
# Contributing to the Pipedream Registry
This document is intended for a technical audience (including those interested in learning how to author and edit components). It defines guidelines and patterns developers should follow when building components for the Pipedream registry.
Developers may create, deploy and share components that do not conform to these guidelines, but they will not be eligible to be listed in the curated registry (e.g., they may be hosted in a Github repo). If you develop a component that does not adhere to these guidelines, but you believe there is value to the broader community, please reach out in our community forum (opens new window).
# Overview
Pipedream (opens new window) is a low code integration platform that makes it easy to connect APIs remarkably fast. Users can select from thousands of customizable, open source components for hundreds of apps and orchestrate their execution in workflows. Developers can contribute (opens new window) to these open source components on Github (opens new window) by:
- Creating new components (sources and actions)
- Updating existing components (e.g., fixing bugs, enhancing functionality)
- Adding or updating metadata (e.g., descriptions, labels)
Once a PR is merged to the master branch of the
pipedreamhq/pipedream (opens new window) repo, the
components are automatically registered and immediately become available to the
150k+ users of the Pipedream platform.
# Components
Components are Node.js modules that run on
Pipedream's serverless infrastructure. They may use Pipedream managed auth for
300+ apps (opens new window) and use most npm
packages with no npm install or package.json
required. Pipedream currently supports two types of components — sources and
actions.
# Sources
- Emit events that can trigger Pipedream workflows (events may also be consumed outside of Pipedream via API)
- Emitted event data can be inspected and referenced by steps in the target workflow
- Can use any of Pipedream's built-in deduping strategies
- Can be triggered on HTTP requests, timers, cron schedules, or manually
- May store and retrieve state using the built-in key-value store
# Actions
- May be used as steps in workflows to perform common functions (e.g., get or modify data in an app)
- Data returned by actions may be inspected and used in future workflow steps
# Pipedream Registry
The Pipedream registry consists of sources and actions that have been curated for the community. Registered components are verified by Pipedream through the Github PR process and:
- Can be trusted by end users
- Follow consistent patterns for usability
- Are supported by Pipedream if issues arise
Registered components also appear in the Pipedream marketplace and are listed in Pipedream's UI when building workflows.
# Getting Started
If you're new to Pipedream, we recommend watching this 5 minute demo (opens new window).
If you're ready to build a component for the Pipedream registry, we recommend starting with our Quickstart Guides for source and actions. Then review the Component API Reference.
# Prerequisites
- A free Pipedream (opens new window) account
- A free Github (opens new window) account
- Basic proficiency with Node.js or Javascript
- Pipedream CLI
Finally, the target app must be integrated with Pipedream. You can explore all apps supported by Pipedream in the marketplace (opens new window). If your app is not listed, please create a Github issue (opens new window) to request it and reach out (opens new window) to our team to let us know that you're blocked on source or action development.
# Local Checks
When submitting pull requests, the new code will run through a series of automated checks like linting the code. If you want to run those checks locally for quicker feedback you must have NPM (opens new window) installed and run the following commands at the root of the project:
To install all the project's dependencies (only needed once):
npm ciTo run the linter checks against your code (assuming that your changes are located at
components/foofor example):npx eslint components/fooOptionally, you can automatically fix any linter issues by running the following command:
npx eslint --fix components/fooKeep in mind that not all issues can be automatically fixed by the linter since they could alter the behaviour of the code.
# Process
Anyone from the community can build sources and actions for integrated apps (we refer to these collectively as "components").
All development happens in this GitHub repo (opens new window). Fork the repo and refer to the contribution docs to get your development environment setup.
To submit new components:
- If you don't see the app listed in our marketplace (opens new window), you can request it here (opens new window).
- Once the Pipedream team integrates the app, we'll create a directory for the app in the
componentsdirectory of the GitHub repo. That directory will contain an "app file" that contains the basic code you'll need to get started developing components. App files should contain props, methods, and other code you're using across different components. See this example for Airtable (opens new window)). - Refer to the quickstarts for sources and actions to learn how to create components.
- When you're ready to develop your own components, you can reference the component API docs and our contribution guidelines.
- Create a PR for the Pipedream team to review and post a message in our community forum (opens new window) or public Slack (opens new window).
- Address any feedback provided by Pipedream.
- Once the review is complete and approved, Pipedream will merge the PR to the
masterbranch! 🎉
Have questions? Reach out in the #contribute channel (opens new window) in Slack or on Discourse (opens new window).
Looking for ideas? Check out sources (opens new window) and actions (opens new window) requested by the community!
# Reference Components
The following components may be used as models for developing sources and actions for Pipedream's registry.
# Reference Sources
| Name | App | Type |
|---|---|---|
| New Card (opens new window) | Trello | Webhook |
| Search Mentions (opens new window) | Polling | |
| New or Modified Files (opens new window) | Google Drive | Webhook + Polling |
| New Submission (opens new window) | Jotform | Webhook (with no unique hook ID) |
| New Stars (opens new window) | Github | Webhook (with extensive use of common files) |
# Reference Actions
| Name | App |
|---|---|
| Create Single Record (opens new window) | Airtable |
| Add Multiple Rows (opens new window) | Google Sheets |
| Send Message (opens new window) | Discord |
| Append Text (opens new window) | Google Docs |
GET request (opens new window) | HTTP |
# Guidelines & Patterns
# General
# Components should be ES modules
The Node.js community has started publishing ESM-only (opens new window) packages that do not work with CommonJS modules (opens new window). This means you must import the package. You can't use require.
You also cannot mix ESM with CJS. This will not work:
// ESM
import axios from "axios";

// CommonJS - this should be `export default`
module.exports = {
  ...
}
Therefore, all components should be written as ES modules:
import axios from "axios";

export default {
  ...
}
You'll need to use the .mjs file extension (opens new window) for any components written as ES modules.
You'll notice that many of the existing components are written as CommonJS modules. Please fix these and submit a pull request as you refactor related code. For example, if you're developing new Spotify actions, and you notice the existing event sources use CommonJS, change them to ESM:
- Rename the file extension from
.jsto.mjsusinggit mv(e.g.git mv source.js source.mjs). - Change all
requirestatements toimports. - Change instances of
module.exportstoexport default.
# Component Scope
Create components to address specific use cases whenever possible. For example, when a user subscribes to a Github webhook to listen for “star” activity, events can be generated when users star or unstar a repository. The “New Star” source filters events for only new star activity so the user doesn’t have to.
There may be cases where it's valuable to create a generic component that provides users with broad latitude (e.g., see the custom webhook (opens new window) event source for GitHub). However, as a general heuristic, we found that tightly scoped components are easier for users to understand and use.
# Required Metadata
Registry components require a unique key and
version, and a friendly name and description. Action components require a
type field to be set to action (sources will require a type to be set in the
future).
export default {
  key: "google_drive-new-shared-drive",
  name: "New Shared Drive",
  description: "Emits a new event any time a shared drive is created.",
  version: "0.0.1",
};
# Component Key Pattern
When publishing components to the Pipedream registry, the key must be unique
across registry components and should follow the pattern:
app_name_slug-slugified-component-name
# Versioning
When you first publish a component to the registry, set its version to 0.0.1.
Pipedream registry components try to follow semantic versioning (opens new window). From their site:
Given a version number MAJOR.MINOR.PATCH, increment the:
MAJORversion when you make incompatible API changes,MINORversion when you add functionality in a backwards compatible manner, andPATCHversion when you make backwards compatible bug fixes.
When you're developing actions locally, and you've incremented the version in your account multiple times, make sure to set it to the version it should be at in the registry prior to submitting your PR. For example, when you add an action to the registry, the version should be 0.0.1. If the action was at version 0.1.0 and you've fixed a bug, change it to 0.1.1 when committing your final code.
# Folder Structure
Registry components are organized by app in the components directory of the
pipedreamhq/pipedream repo.
/components
 /[app-name-slug]
  /[app-name-slug].app.js
  /actions
   /[action-name-slug]
    /[action-name-slug].js
  /sources
   /[source-name-slug]
    /[source-name-slug].js
- The name of each app folder corresponds with the name slug for each app
- The app file should be in the root of the app folder (e.g.,
/components/[app_slug]/[app_slug].app.js) - Components for each app are organized into
/sourcesand/actionssubfolders - Each component should be placed in its own subfolder (with the name of the
folder and the name of the
jsfile equivalent to the slugified component name). For example, the path for the "Search Mentions" source for Twitter is/components/twitter/sources/search-mentions/search-mentions.js.
You can explore examples in the components directory (opens new window).
# Using APIs vs Client Libraries
If the app has a well-supported Node.js client library, that should be preferred to manually constructed API requests to reduce code and improve maintenance.
# Error-handling and input validation
When you use the SDK of a popular API, the SDK might raise clear errors to the user. For example, if the user is asked to pass an email address, and that email address doesn't validate, the library might raise that in the error message.
But other libraries will not raise clear errors. In these cases, you may need to throw your own custom error that wraps the error from the API / lib. See the Airtable components (opens new window) for an example of custom error-handling and input validation.
In general, imagine you are a user troubleshooting an issue. Is the error easy-to-understand? If not, throw a better error.
# Pagination
When making API requests, handle pagination to ensure all data / events are processed.
# Capturing Sensitive Data
If users are required to enter sensitive data, always use secret props.
# Promoting Reusability
# App Files
App files contain components that declare the app and include prop definitions
and methods that may be reused across components. App files should adhere to the
following naming convention: [app_name_slug].app.js. If an app file does not
exist for your app, please reach
out (opens new window).
# Prop Definitions
Whenever possible, reuse existing prop definitions.
If a prop definition does not exist and you are adding an app-specific prop that may be reused in future components, add it as a prop definition to the app file. Prop definitions will also be surfaced for apps the Pipedream marketplace.
# Methods
Whenever possible, reuse methods defined in the app file. If you need to use an API for which a method is not defined and it may be used in future components, define a new method in the app file.
Use the JS Docs (opens new window) pattern for
lightweight documentation of each method in the app file. Provide a description
and define @params and @returns block tags (with default values if applicable —
e.g., [foo=bar]). This data will both help with reusability and will be
surfaced in documentation for apps in the Pipedream marketplace. For example:
export default {
  methods: {
    /**
     * Get the most recently liked Tweets for a user
     *
     * @params {Object} opts - An object representing the configuration options
     * for this method
     * @params {String} opts.screenName - The user's Twitter screen name (e.g.,
     * `pipedream`)
     * @params {String} [opts.count=200] - The maximum number of Tweets to
     * return
     * @params {String} [opts.tweetMode=extended] - Use the default of
     * `extended` to return non-truncated Tweets
     * @returns {Array} Array of most recent Tweets liked by the specified user
     */
    async getLikedTweets(opts = {}) {
      const {
        screenName,
        count = 200,
        tweetMode = "extended",
      } = opts;
      const { data } = await this._makeRequest({
        url: "https://api.twitter.com/1.1/favorites/list.json",
        params: {
          screen_name: screenName,
          count,
          tweet_mode: tweetMode,
        },
      });
      return data;
    },
  },
};
# Testing
Pipedream does not currently support unit tests to validate that changes to app files are backwards compatible with existing components. Therefore, if you make changes to an app file that may impact other sources, you must currently test potentially impacted components to confirm their functionality is not negatively affected. We expect to support a testing framework in the future.
# Common Files (optional)
An optional pattern to improve reusability is to use a common module to
abstract elements that are used across to multiple components. The trade-off
with this approach is that it increases complexity for end-users who have the
option of customizing the code for components within Pipedream. When using this
approach, the general pattern is:
- The
.app.jsmodule contains the logic related to making the actual API calls (e.g. callingaxios.get, encapsulate the API URL and token, etc). - The
common.jsmodule contains logic and structure that is not specific to any single component. Its structure is equivalent to a component, except that it doesn't define attributes such asversion,dedupe,key,name, etc (those are specific to each component). It defines the main logic/flow and relies on calling its methods (which might not be implemented by this component) to get any necessary data that it needs. In OOP terms, it would be the equivalent of a base abstract class. - The component module of each action would inherit/extend the
common.jscomponent by setting additional attributes (e.g.name,description,key, etc) and potentially redefining any inherited methods.
See Google Drive (opens new window) for an example of this pattern. When using this approach, prop definitions should still be maintained in the app file.
# Props
As a general rule of thumb, we should strive to only incorporate the 3-4 most relevant options from a given API as props. This is not a hard limit, but the goal is to optimize for usability. We should aim to solve specific use cases as simply as possible.
# Labels
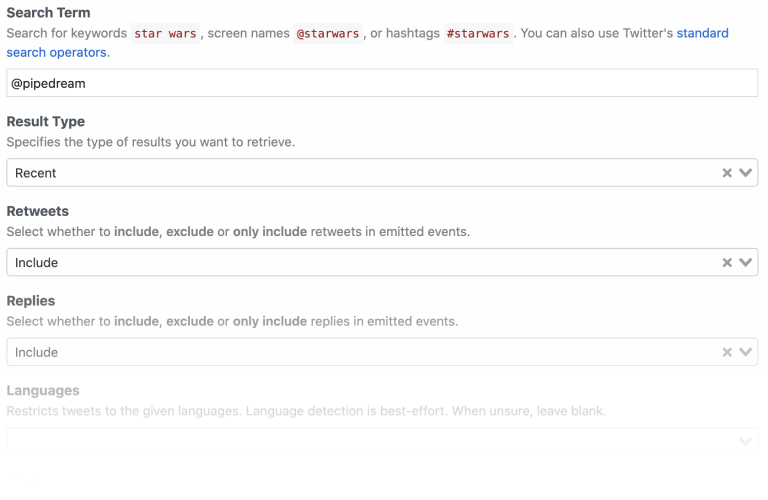
Use prop labels to customize the name of a prop or propDefinition (independent of the variable name in the code). The label should mirror the name users of an app are familiar with; i.e., it should mirror the equivalent label in the app’s UI. This applies to usage in labels, descriptions, etc. E.g., the Twitter API property for search keywords is “q”, but but label is set to “Search Term”.
# Descriptions
Include a description for props if it helps the user understand what they need to do. Use Markdown as appropriate to improve the clarity of the description or instructions. When using Markdown:
- Enclose sample input values in backticks (
`) - Use Markdown links with descriptive text rather than displaying a full URL.
- If the description isn't self-explanatory, link to the API docs of the relevant method to further clarify how the prop works. When the value of the prop is complex (for example, an object with many properties), link to the section of the API docs that include details on this format. Users may pass values from previous steps using expressions, so they'll need to know how to structure that data.
Examples:
The async option to select an Airtable Base is self-explanatory so includes no description:

The “Search Term” prop for Twitter includes a description that helps the user understand what values they can enter, with specific values highlighted using backticks and links to external content.

# Optional vs Required Props
Use optional props whenever possible to minimize the input fields required to use a component.
For example, the Twitter search mentions source only requires that a user connect their account and enter a search term. The remaining fields are optional for users who want to filter the results, but they do not require any action to activate the source:
# Default Values
Provide default values whenever possible. NOTE: the best default for a source doesn’t always map to the default recommended by the app. For example, Twitter defaults search results to an algorithm that balances recency and popularity. However, the best default for the use case on Pipedream is recency.
# Async Options
Avoid asking users to enter ID values. Use async options (with label/value definitions) so users can make selections from a drop down menu. For example, Todoist identifies projects by numeric IDs (e.g., 12345). The async option to select a project displays the name of the project as the label, so that’s the value the user sees when interacting with the source (e.g., “My Project”). The code referencing the selection receives the numeric ID (12345).
Async options should also support pagination (so users can navigate across multiple pages of options for long lists).
# Interface & Service Props
In the interest of consistency, use the following naming patterns when defining interface and service props in source components:
| Prop | Recommended Prop Variable Name |
|---|---|
$.interface.http | http |
$.interface.timer | timer |
$.service.db | db |
# Source Guidelines
These guidelines are specific to source development.
# Webhook vs Polling Sources
Create subscription webhooks sources (vs polling sources) whenever possible. Webhook sources receive/emit events in real-time and typically use less compute time from the user’s account. Note: In some cases, it may be appropriate to support webhook and polling sources for the same event. For example, Calendly supports subscription webhooks for their premium users, but non-premium users are limited to the REST API. A webhook source can be created to emit new Calendly events for premium users, and a polling source can be created to support similar functionality for non-premium users.
# Source Name
Source name should be a singular, title-cased name and should start with "New" (unless emits are not limited to new items). Name should not be slugified and should not include the app name. NOTE: Pipedream does not currently distinguish real-time event sources for end-users automatically. The current pattern to identify a real-time event source is to include “(Instant)” in the source name. E.g., “New Search Mention” or “New Submission (Instant)”.
# Source Description
Enter a short description that provides more detail than the name alone. Typically starts with "Emit new". E.g., “Emit new Tweets that matches your search criteria”.
# Emit a Summary
Always emit a summary for each event. For example, the summary for each new Tweet emitted by the Search Mentions source is the content of the Tweet itself.
If no sensible summary can be identified, submit the event payload in string format as the summary.
# Deduping
Use built-in deduping strategies whenever possible
(unique, greatest, last) vs developing custom deduping code. Develop
custom deduping code if the existing strategies do not support the requirements
for a source.
# Polling Sources
# Default Timer Interval
As a general heuristic, set the default timer interval to 15 minutes. However, you may set a custom interval (greater or less than 15 minutes) if appropriate for the specific source. Users may also override the default value at any time.
# Emit Events on First Run
Polling sources should emit events on the first run. This helps users to know their source works when they activate it. This also provides users with events they can immediately use to support workflow development. Do not emit multiple pages of results or more than 100 events on the first run (as a general heuristic, emit the first page of results returned by the API).
# Rate Limit Optimization
When building a polling source, cache the most recently processed ID or
timestamp using $.service.db whenever the API accepts a since_id or "since
timestamp" (or equivalent). Some apps (e.g., Github) do not count requests that
do not return new results against a user’s API quota.
If the service has a well-supported Node.js client library, it'll often build in retries for issues like rate limits, so using the client lib (when available) should be preferred. In the absence of that, Bottleneck (opens new window) can be useful for managing rate limits. 429s should be handled with exponential backoff (instead of just letting the error bubble up).
# Webhook Sources
# Hooks
Hooks are methods that are automatically invoked by Pipedream
at different stages of the component lifecycle.
Webhook subscriptions are typically created when components are instantiated or
activated via the activate() hook, and deleted when components are deactivated
or deleted via the deactivate() hook.
# Helper Methods
Whenever possible, create methods in the app file to manage creating and deleting webhook subscriptions.
| Description | Method Name |
|---|---|
| Method to create a webhook subscription | createHook() |
| Method to delete a webhook subscription | deleteHook() |
# Storing the 3rd Party Webhook ID
After subscribing to a webhook, save the ID for the hook returned by the 3rd
party service to the $.service.db for a source using the key hookId. This ID
will be referenced when managing or deleting the webhook. Note: some apps may
not return a unique ID for the registered webhook (e.g., Jotform).
# Signature Validation
Subscription webhook components should always validate the incoming event signature if the source app supports it.
# Shared Secrets
If the source app supports shared secrets, implement support transparent to the
end user. Generate and use a GUID for the shared secret value, save it to a
$.service.db key, and use the saved value to validate incoming events.
# Action Guidelines
# Use @pipedream/platform axios for all HTTP requests
By default, the standard axios package doesn't return useful debugging data to the user when it throws errors on HTTP 4XX and 5XX status codes. This makes it hard for the user to troubleshoot the issue.
Instead, use @pipedream/platform axios.
# Return JavaScript objects
When you return data from an action, it's exposed as a step export for users to reference in future steps of their workflow. Return JavaScript objects in all cases, unless there's a specific reason not to.
For example, some APIs return XML responses. If you return XML from the step, it's harder for users to parse and reference in future steps. Convert the XML to a JavaScript object, and return that, instead.
# Use $.summary to summarize what happened
Describe what happened when an action succeeds by following these guidelines:
- Use plain language and provide helpful and contextually relevant information (especially the count of items)
- Whenever possible, use names and titles instead of IDs
- Basic structure: Successfully [action performed (like added, removed, updated)] “[relevant destination]”