
# Quickstart: Source Development
This document is intended for a technical audience (including those interested in learning how to author and edit components). After completing this quickstart, you will understand how to:
- Deploy components to Pipedream using the CLI
- Invoke a component manually, or on a schedule or HTTP request
- Maintain state across component invocations
- Emit deduped events using the
uniqueandgreateststrategies - Use Pipedream managed OAuth for an app
- Use npm packages in components
We recommend that you execute the examples in order — each one builds on the concepts and practices of earlier examples.
# Quickstart Examples
Hello World! (~10 minutes)
- Deploy a
hello world!component using the Pipedream CLI and invoke it manually - Use
$.service.dbto maintain state across invocations - Use
$.interface.timerto invoke a component on a schedule - Use
$.interface.httpto invoke code on HTTP requests
Emit new RSS items on a schedule (~10 mins)
- Use the
rss-parsernpm package to retrieve an RSS feed and emit each item - Display a custom summary for each emitted item in the event list
- Use the
uniquededuping strategy so we only emit new items from the RSS feed - Add a timer interface to run the component on a schedule
Poll for new Github issues (~10 mins)
- Use Pipedream managed OAuth with Github's API to retrieve issues for a repo
- Use the
greatestdeduping strategy to only emit new issues
# Prerequisites
Step 1. Create a free account at https://pipedream.com (opens new window). Just sign in with your Google or Github account.
Step 2. Download and install the Pipedream CLI.
Step 3. Once the CLI is installed, link your Pipedream account to the CLI:
pd login
See the CLI reference for detailed usage and examples beyond those covered below.
# CLI Development Mode
The examples in this guide use the pd dev command. This command will deploy your code in "development mode". What that means is that the CLI will attach to the deployed component and watch your local file for changes — when you save changes to your local file, your component will automatically be updated on Pipedream (the alternative is to pd deploy and run pd update for each change).
If your pd dev session is terminated and you need to re-attach to a deployed component, run the following command.
pd dev [--dc <existing-deployed-component-id>] <file-or-name>
See the CLI reference for detailed usage and examples beyond those covered below.
# Hello World!
Here is a simple component that will emit an event with a payload of { message: "hello world!" } on each invocation.
export default {
  name: "Source Demo",
  description: "This is a demo source",
  async run() {
    this.$emit({ message: "hello world!" });
  },
};
To deploy and run it, save the code to a local .js file (e.g., source.js) and run the following CLI command:
pd dev source.js
The CLI will deploy your code in development mode (the CLI will attach to the deployed component and watch your local file for changes — when you save changes to your local file, your component will automatically be updated on Pipedream).
You should see the following output:
$ pd dev source.js
watch:add     | source.js
Configuring props...
Deploying...
Attached to deployed component: https://pipedream.com/sources/dc_v3uXKz/configuration
Ready for updates!
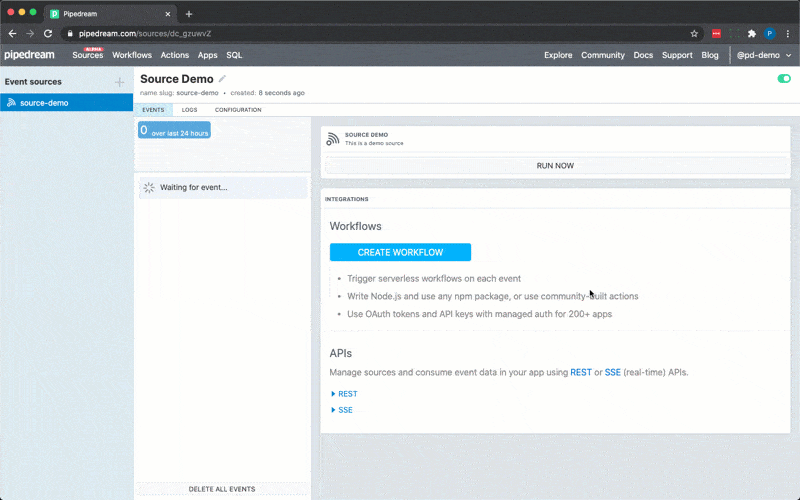
Open the URL returned by the CLI (https://pipedream.com/sources/dc_v3uXKz in the sample output above) to view your source in Pipedream's UI.
Then click RUN NOW to invoke your source. Your event will appear in real-time, and you can select it to inspect the emitted data.
# Maintain state across invocations
Next, we'll use Pipedream's db service to track the number of times the component is invoked.
First, we'll assign $.service.db to a prop so we can reference it in our code via this.
props: {
  db: "$.service.db",
},
Then we'll update the run() method to:
- Retrieve the value for the
countkey (using theget()method of$.service.db) - Display the count in the event summary (event summaries are displayed in the event list next to the event time)
- Increment
countand save the updated value to$.service.dbusing theset()method
let count = this.db.get("count") || 1;

this.$emit(
  { message: "hello world!" },
  {
    summary: `Invocation #${count}`,
  }
);

this.db.set("count", ++count);
Here's the updated code:
export default {
  name: "Source Demo",
  description: "This is a demo source",
  props: {
    db: "$.service.db",
  },
  async run() {
    let count = this.db.get("count") || 1;

    this.$emit(
      { message: "hello world!" },
      {
        summary: `Invocation #${count}`,
      }
    );

    this.db.set("count", ++count);
  },
};
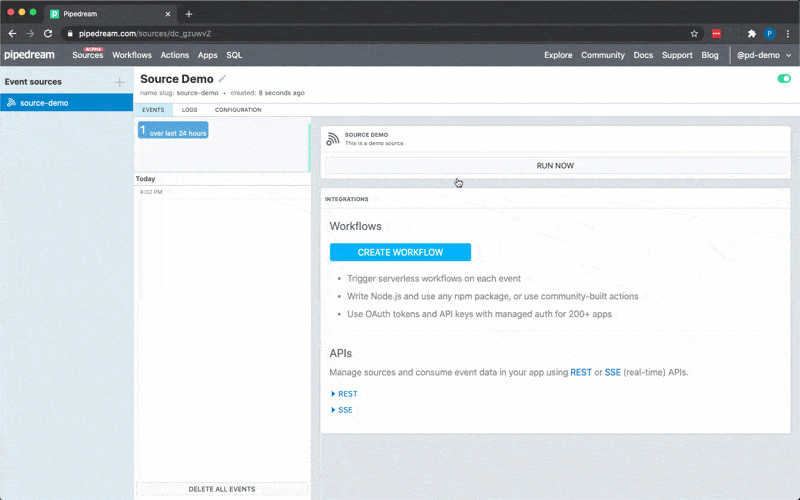
Save the changes to your local file. Your component on Pipedream should automatically update. Return to the Pipedream UI and press RUN NOW — you should see the invocation count appear in the event list.
# Invoke your code on a schedule
Next, we'll update our component so it runs on a schedule. To do that, we'll use Pipedream's timer interface and we'll set the default execution interval to 15 seconds by adding the following code to props:
timer: {
  type: "$.interface.timer",
  default: {
    intervalSeconds: 15,
  },
},
Here's the updated code:
export default {
  name: "Source Demo",
  description: "This is a demo source",
  props: {
    db: "$.service.db",
    timer: {
      type: "$.interface.timer",
      default: {
        intervalSeconds: 15,
      },
    },
  },
  async run() {
    let count = this.db.get("count") || 1;

    this.$emit(
      { message: "hello world!" },
      {
        summary: `Invocation #${count}`,
      }
    );

    this.db.set("count", ++count);
  },
};
Save the changes to your file (your component on Pipedream should automatically update). and then, return to the Pipedream UI and reload the page. You should now see the timer settings in the summary and a countdown to the next execution (you can still run your component manually). Your component will now run every 15 seconds.

Note: if you'd like to change the schedule of your deployed component, visit the Configuration tab in the Pipedream UI and change the schedule accordingly. Changing the value of intervalSeconds within the component's code will not change the schedule of the running instance of the component. You can also set one value as the default intervalSeconds in the component's code, but run
pd dev --prompt-all <your-file.js>
to set a different schedule than the default specified in the code.
# Invoke your code on HTTP requests
Next, we'll update our component to run on HTTP requests instead of a timer. To do that, we'll just replace the timer interface with an http interface.
http: {
        type: "$.interface.http",
        customResponse: true
      },
In addition, we'll update the function signature to pass in the HTTP event so we can reference it in our code:
async run(event) {
Finally, let's update the run() method to use event to both echo back the request body in the HTTP response and emit it as the event payload.
this.http.respond({
  status: 200,
  body: event.body,
  headers: {
    "Content-Type": event.headers["Content-Type"],
  },
});

this.$emit(event.body, {
  summary: `Invocation #${count}`,
});
Here's the updated code:
export default {
  name: "Source Demo",
  description: "This is a demo source",
  props: {
    db: "$.service.db",
    http: {
      type: "$.interface.http",
      customResponse: true
    },
  },
  async run(event) {
    let count = this.db.get("count") || 1;

    this.http.respond({
      status: 200,
      body: event.body,
      headers: {
        "Content-Type": event.headers["Content-Type"],
      },
    });

    this.$emit(event.body, {
      summary: `Invocation #${count}`,
    });

    this.db.set("count", ++count);
  },
};
Save the changes to your file and your component on Pipedream should automatically update.
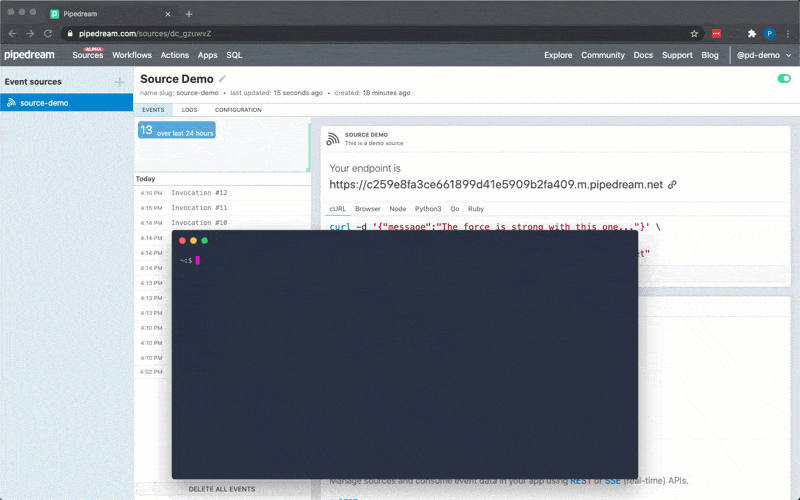
Return to the Pipedream UI and refresh the page. Instead of the countdown timer, you will now see a unique URL generated by Pipedream. Copy the URL and update and execute the CURL command below to invoke your component. This command passes { message: "hello world!" } as the request body. { message: "hello world!" } will be emitted as the event similar to the earlier examples, and it will also be echoed back in the HTTP response.
curl -d '{ "message": "hello world!" }' \
  -H "Content-Type: application/json" \
  "INSERT-YOUR-ENDPOINT-URL-HERE"
# Emit new RSS items on a schedule (~10 mins)
Next, let's cover some real-world examples starting with RSS. Continue editing the same file, but start with the following scaffolding for this example.
export default {
  name: "Source Demo",
  description: "This is a demo source",
  async run() {},
};
# Emit items in an RSS Feed
Note: The code for the examples below was adapted from the samples provided in the readme for the
rss-parserpackage at https://www.npmjs.com/package/rss-parser. To use most npm packages on Pipedream, justimportthem — there is nopackage.jsonornpm installrequired.
To parse the RSS feed, we'll use the rss-parser npm package.
import Parser from "rss-parser";
let parser = new Parser();
Then, update the run() method to:
- Parse the feed at
https://lorem-rss.herokuapp.com/feed(it's important you use this feed -- a new item is added every minute, so it will help us test deduplication) - Loop through the array of returned RSS items and emit each one
let feed = await parser.parseURL("https://lorem-rss.herokuapp.com/feed");
feed.items.forEach((item) => {
  this.$emit(item);
});
Here's the updated code:
import Parser from "rss-parser";
let parser = new Parser();

export default {
  name: "Source Demo",
  description: "This is a demo source",
  async run() {
    let feed = await parser.parseURL("https://lorem-rss.herokuapp.com/feed");
    feed.items.forEach((item) => {
      this.$emit(item);
    });
  },
};
Save the changes to your file, and then refresh your source in the Pipedream UI and click RUN NOW. You should see 10 events emitted. Each event corresponds with an RSS item. You can select each event to inspect it.
# Add an optional summary for each emitted event
Next, we'll add a summary for each event. The summary is displayed in the event list and makes it easy to differentiate events at a glance in the list. For this example, let's emit the title as the summary for each RSS item. To do that, we add a metadata object to this.$emit().
Add summary to emit metadata...
this.$emit(item, {
  summary: item.title,
});
Here's the updated code:
import Parser from "rss-parser";
let parser = new Parser();

export default {
  name: "Source Demo",
  description: "This is a demo source",
  async run() {
    let feed = await parser.parseURL("https://lorem-rss.herokuapp.com/feed");
    feed.items.forEach((item) => {
      this.$emit(item, {
        summary: item.title,
      });
    });
  },
};
Save the changes to your file and then click RUN NOW in the Pipedream UI. You should again see 10 events emitted, but this time each event should have a corresponding summary in the event list.
# Only Emit New Items in the RSS Feed
In the previous examples, we always emit any data that is returned. However, we are emitting duplicate events -- e.g., if you run invoke the component twice, you will see the same events emitted twice.
Pipedream provides built-in deduplication strategies to make it easy to emit new events only. For this example, we'll use the unique strategy. This strategy caches the last 100 event id values, and only emits events with id values that are not contained in that cache.
To dedupe with the unique strategy, we need to first declare it:
dedupe: "unique",
And then we need to pass an id value in the metadata for this.$emit() for Pipedream to use for deduping:
this.$emit(item, {
  summary: item.title,
  id: item.guid,
});
Here's the updated code:
import Parser from "rss-parser";
let parser = new Parser();

export default {
  name: "Source Demo",
  description: "This is a demo source",
  dedupe: "unique",
  async run() {
    let feed = await parser.parseURL("https://lorem-rss.herokuapp.com/feed");
    feed.items.forEach((item) => {
      this.$emit(item, {
        summary: item.title,
        id: item.guid,
      });
    });
  },
};
Save the changes to your file and then click RUN NOW in the Pipedream UI. Similar to previous invocations, you should see 10 events emitted. Now, run the component again. You should see a maximum of one, if any events emitted (the reason one event may be emitted is if a new item was added to the RSS feed). If no new events were emitted, wait for ~1 minute and try again.
# Add a timer interface to invoke the component on a schedule
Now we're ready to add a timer to our component to check for new RSS items automatically. Similar to the hello world! example above, we'll add a timer prop, and we'll set the default interval to 5 minutes:
props: {
  timer: {
    type: "$.interface.timer",
    default: {
      intervalSeconds: 60 * 5,
    },
  },
},
Here's the updated code:
import Parser from "rss-parser";
let parser = new Parser();

export default {
  name: "Source Demo",
  description: "This is a demo source",
  props: {
    timer: {
      type: "$.interface.timer",
      default: {
        intervalSeconds: 60 * 5,
      },
    },
  },
  dedupe: "unique",
  async run() {
    let feed = await parser.parseURL("https://lorem-rss.herokuapp.com/feed");
    feed.items.forEach((item) => {
      this.$emit(item, {
        id: item.guid,
        summary: item.title,
      });
    });
  },
};
Save your component then return to the UI and reload the page. You should see the updated configuration on your summary card and a countdown to the next invocation. You can still click RUN NOW to execute your source manually.
# Use managed auth to pull data from Github (~10 mins)
In the last example, we were able to retrieve data to emit without any authentication. Now we'll use Pipedream managed auth to retrieve and emit data from the Github API (which uses OAuth for authentication). Similar to the last example, continue editing the same file, but start with the following scaffolding:
export default {
  name: "Source Demo",
  description: "This is a demo source",
  async run() {},
};
# Get issues for a repo
First, import axios so we can make a request to the Github REST API:
import axios from "axios";
Next, let's add an app prop, which will enable us to use Pipedream managed auth with this component. For this example, we'll add Github:
props: {
  github: {
    type: "app",
    app: "github",
  },
},
IMPORTANT: The CLI will prompt you to select a connected account (or connect a new one) when you deploy (or update) this component.
Note: The value for the
appproperty is the name slug for the app in Pipedream. This is not currently discoverable, but it will be in the near future. For the time being, if you want to know how to reference an app, please reach out on our public Slack.
Finally, we'll update the run() method to fetch issues from Github using axios and emit them. Notice that we're passing the oauth_access_token in the authorization header by referencing the app prop this.github.$auth.oauth_access_token. Again, it's important that you stick with the pddemo/demo repo shown in the below example so you can test the next dedupe strategy.
async run() {
  const response = await axios({
    method: 'get',
    headers: {
      Authorization: `Bearer ${this.github.$auth.oauth_access_token}`,
    },
    url: `https://api.github.com/repos/pddemo/demo/issues`
  })
  response.data.forEach(issue => {
    this.$emit(issue)
  })
}
Here's the updated code.
import axios from "axios";

export default {
  name: "Source Demo",
  description: "This is a demo source",
  props: {
    github: {
      type: "app",
      app: "github",
    },
  },
  async run() {
    const response = await axios({
      method: "get",
      headers: {
        Authorization: `Bearer ${this.github.$auth.oauth_access_token}`,
      },
      url: `https://api.github.com/repos/pddemo/demo/issues`,
    });
    response.data.forEach((issue) => {
      this.$emit(issue);
    });
  },
};
Next save your changes and go to the terminal where you ran pd dev — follow the CLI prompts to select a connected account for Github (or connect a new one). Then load the Pipedream UI, and click RUN NOW. Your component should emit 30 issues.
# Dedupe the events
In the RSS example, we deduped the emitted events based on the unique strategy. The limitation of the unique strategy is that it will only maintain uniqueness for 100 items. Since Github issues have increasing numeric IDs, we can use the greatest strategy to filter for new issues.
To use this strategy, we first have to declare it.
dedupe: "greatest".
Then, we need to pass the numeric ID for each issue to this.$emit(). We can also add a summary and a timestamp (based on the date/time when the issue was created). Note: when you add a timestamp, Pipedream will automatically emit events from oldest to newest.
response.data.forEach((issue) => {
  this.$emit(issue, {
    id: issue.id,
    summary: `ISSUE ${issue.number}: ${issue.title}`,
    ts: issue.created_at && +new Date(issue.created_at),
  });
});
Here is the updated code.
import axios from "axios";

export default {
  name: "Source Demo",
  description: "This is a demo source",
  props: {
    github: {
      type: "app",
      app: "github",
    },
  },
  dedupe: "greatest",
  async run() {
    const response = await axios({
      method: "get",
      headers: {
        Authorization: `Bearer ${this.github.$auth.oauth_access_token}`,
      },
      url: `https://api.github.com/repos/pddemo/demo/issues`,
    });
    response.data.forEach((issue) => {
      this.$emit(issue, {
        id: issue.id,
        summary: `ISSUE ${issue.number}: ${issue.title}`,
        ts: issue.created_at && +new Date(issue.created_at),
      });
    });
  },
};
Save, load the Pipedream UI, and click RUN NOW. You should see 30 issues emitted, now with summaries. When you click RUN NOW again, only new issues will be emitted (if there are any).
# Add a timer to run on a schedule
As the final step of this walk-through, we'll update our component to check for new issues every 15 minutes. To do that, we'll add a timer prop.
timer: {
  type: "$.interface.timer",
  default: {
    intervalSeconds: 60 * 15,
  },
},
Here's the updated code.
import axios from "axios";

export default {
  name: "Source Demo",
  description: "This is a demo source",
  props: {
    github: {
      type: "app",
      app: "github",
    },
    timer: {
      type: "$.interface.timer",
      default: {
        intervalSeconds: 60 * 15,
      },
    },
  },
  dedupe: "greatest",
  async run() {
    const response = await axios({
      method: "get",
      headers: {
        Authorization: `Bearer ${this.github.$auth.oauth_access_token}`,
      },
      url: `https://api.github.com/repos/pddemo/demo/issues`,
    });
    response.data.forEach((issue) => {
      this.$emit(issue, {
        id: issue.id,
        summary: `ISSUE ${issue.number}: ${issue.title}`,
        ts: issue.created_at && +new Date(issue.created_at),
      });
    });
  },
};
Save and reload your source in the Pipedream UI. You should now see a countdown timer to the next execution.
# What's Next?
You're ready to start authoring and deploying components on Pipedream! You can also check out the detailed component reference at any time!
If you have any questions or feedback, please join our public Slack (opens new window).