App-based Triggers
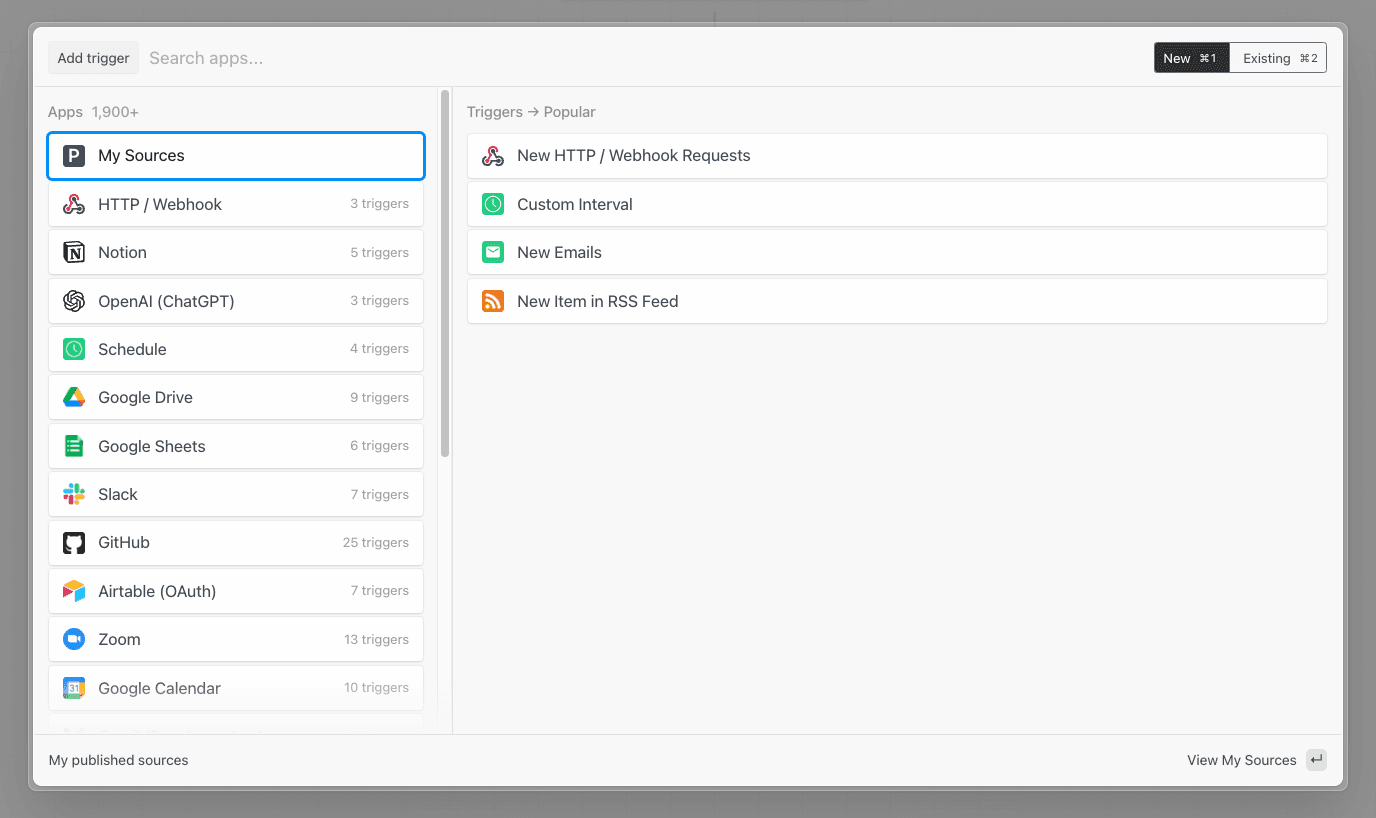
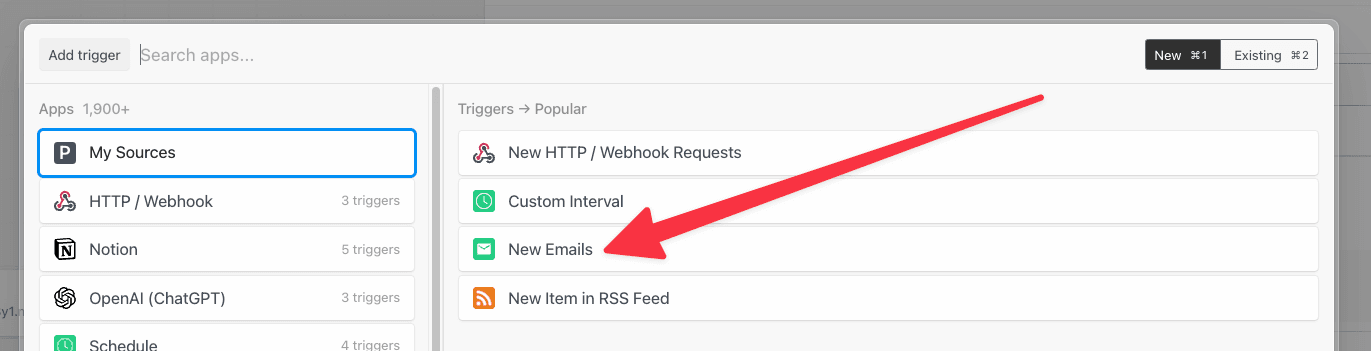
You can trigger a workflow on events from apps like Twitter, Google Calendar, and more using event sources. Event sources run as separate resources from your workflow, which allows you to trigger multiple workflows using the same source. Here, we’ll refer to event sources and workflow triggers interchangeably. When you create a workflow, click Add Trigger to view the available triggers:
What’s the difference between an event source and a trigger?
You’ll notice the docs use the terms event source and trigger interchangeably above. It’s useful to clarify the distinction in the context of workflows. Event sources run code that collects events from some app or service and emits events as the source produces them. An event source can be used to trigger any number of workflows. For example, you might create a single source to listen for new Twitter mentions for a keyword, then trigger multiple workflows each time a new tweet is found: one to send new tweets to Slack, another to save those tweets to an Amazon S3 bucket, etc. This model allows you to separate the data produced by a service (the event source) from the logic to process those events in different contexts (the workflow). Moreover, you can access events emitted by sources using Pipedream’s SSE and REST APIs. This allows you to access these events in your own app, outside Pipedream’s platform.Can I add multiple triggers to a workflow?
Yes, you can add any number of triggers to a workflow. Click the top right menu in the trigger step and select Add trigger.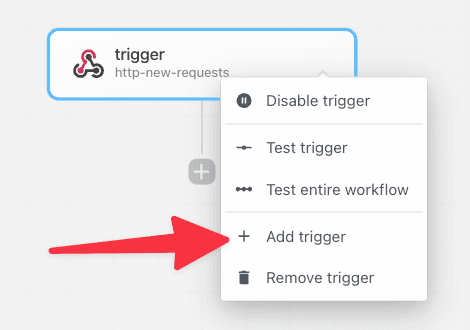
Shape of the steps.trigger.event object
In all workflows, you have access to event data using the variable steps.trigger.event.
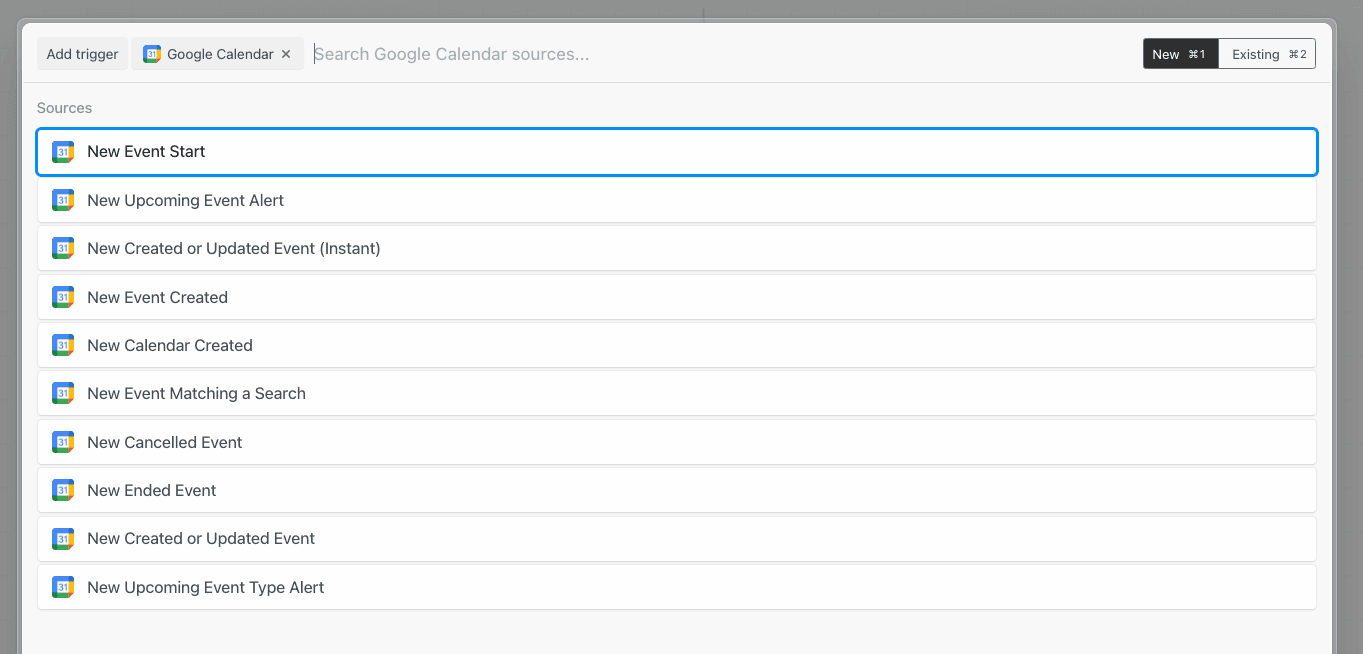
The shape of the event is specific to the source. For example, RSS sources produce events with a url and title property representing the data provided by new items from a feed. Google Calendar sources produce events with a meeting title, start date, etc.
HTTP
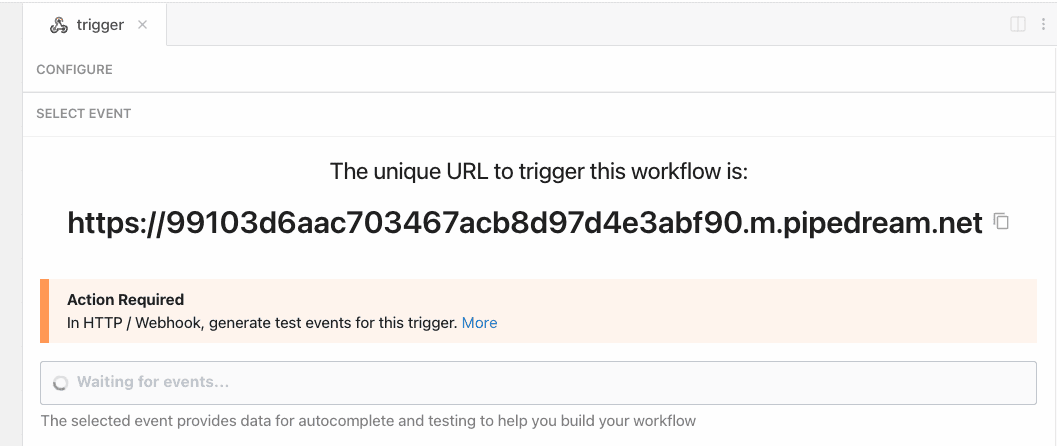
When you select the HTTP trigger: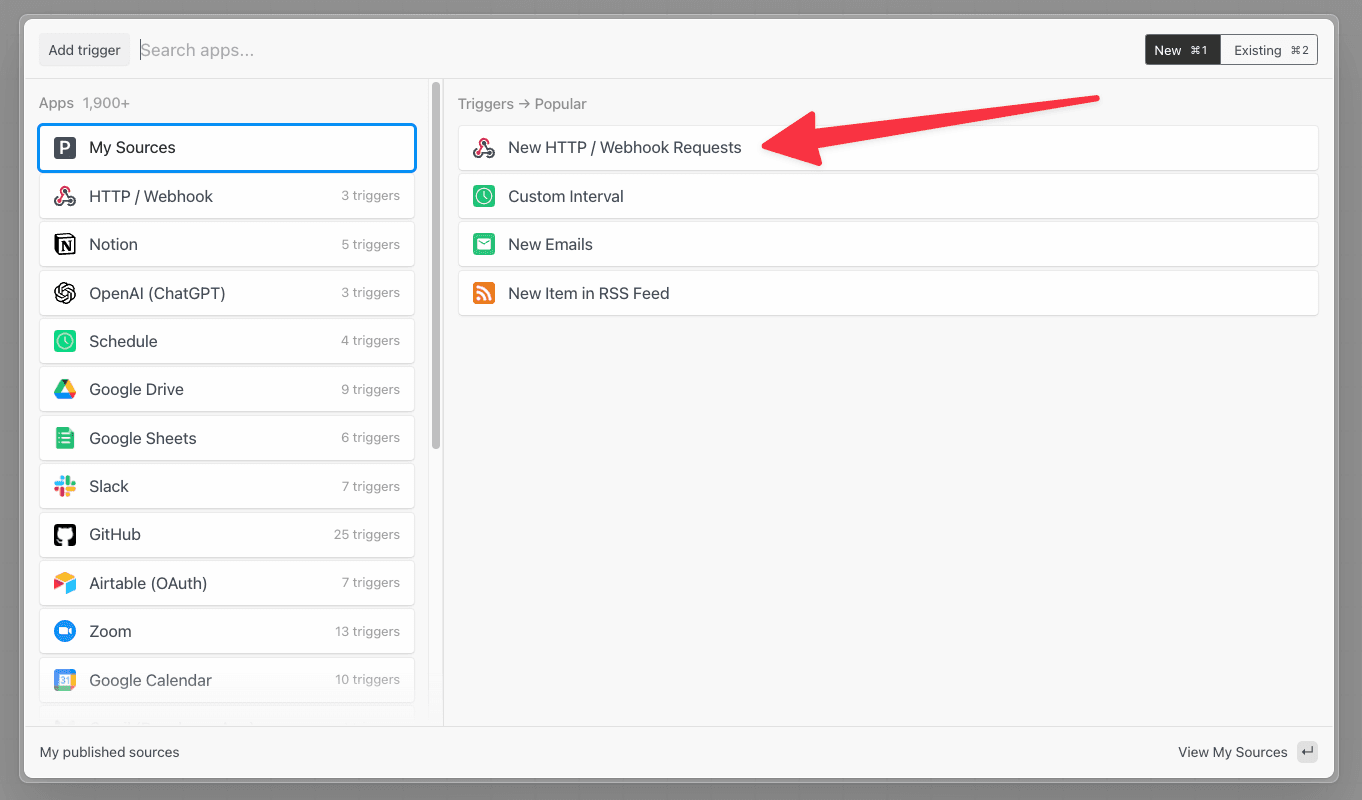
Pipedream also supports custom domains. This lets you host endpoints on
https://endpoint.yourdomain.com instead of the default domain.Accessing HTTP request data
You can access properties of the HTTP request, like the method, payload, headers, and more, in theevent object, accessible in any code or action step.
Valid Requests
You can send a request to your endpoint using any valid HTTP method:GET, POST, HEAD, and more.
We default to generating HTTPS URLs in the UI, but will accept HTTP requests against the same endpoint URL.
You can send data to any path on this host, with any query string parameters. You can access the full URL in the event object if you’d like to write code that interprets requests with different URLs differently.
You can send data of any Media Type in the body of your request.
The primary limit we impose is on the size of the request body: we’ll issue a 413 Payload Too Large status when the body exceeds our specified limit.
Authorizing HTTP requests
By default, HTTP triggers are public and require no authorization to invoke. Anyone with the endpoint URL can trigger your workflow. When possible, we recommend adding authorization. HTTP triggers support two built-in authorization types in the Authorization section of the HTTP trigger configuration: a static, custom token and OAuth.Custom token
To configure a static, custom token for HTTP auth:- Open the Configure section of the HTTP trigger
- Select Custom token.
- Enter whatever secret you’d like and click Save and Continue.
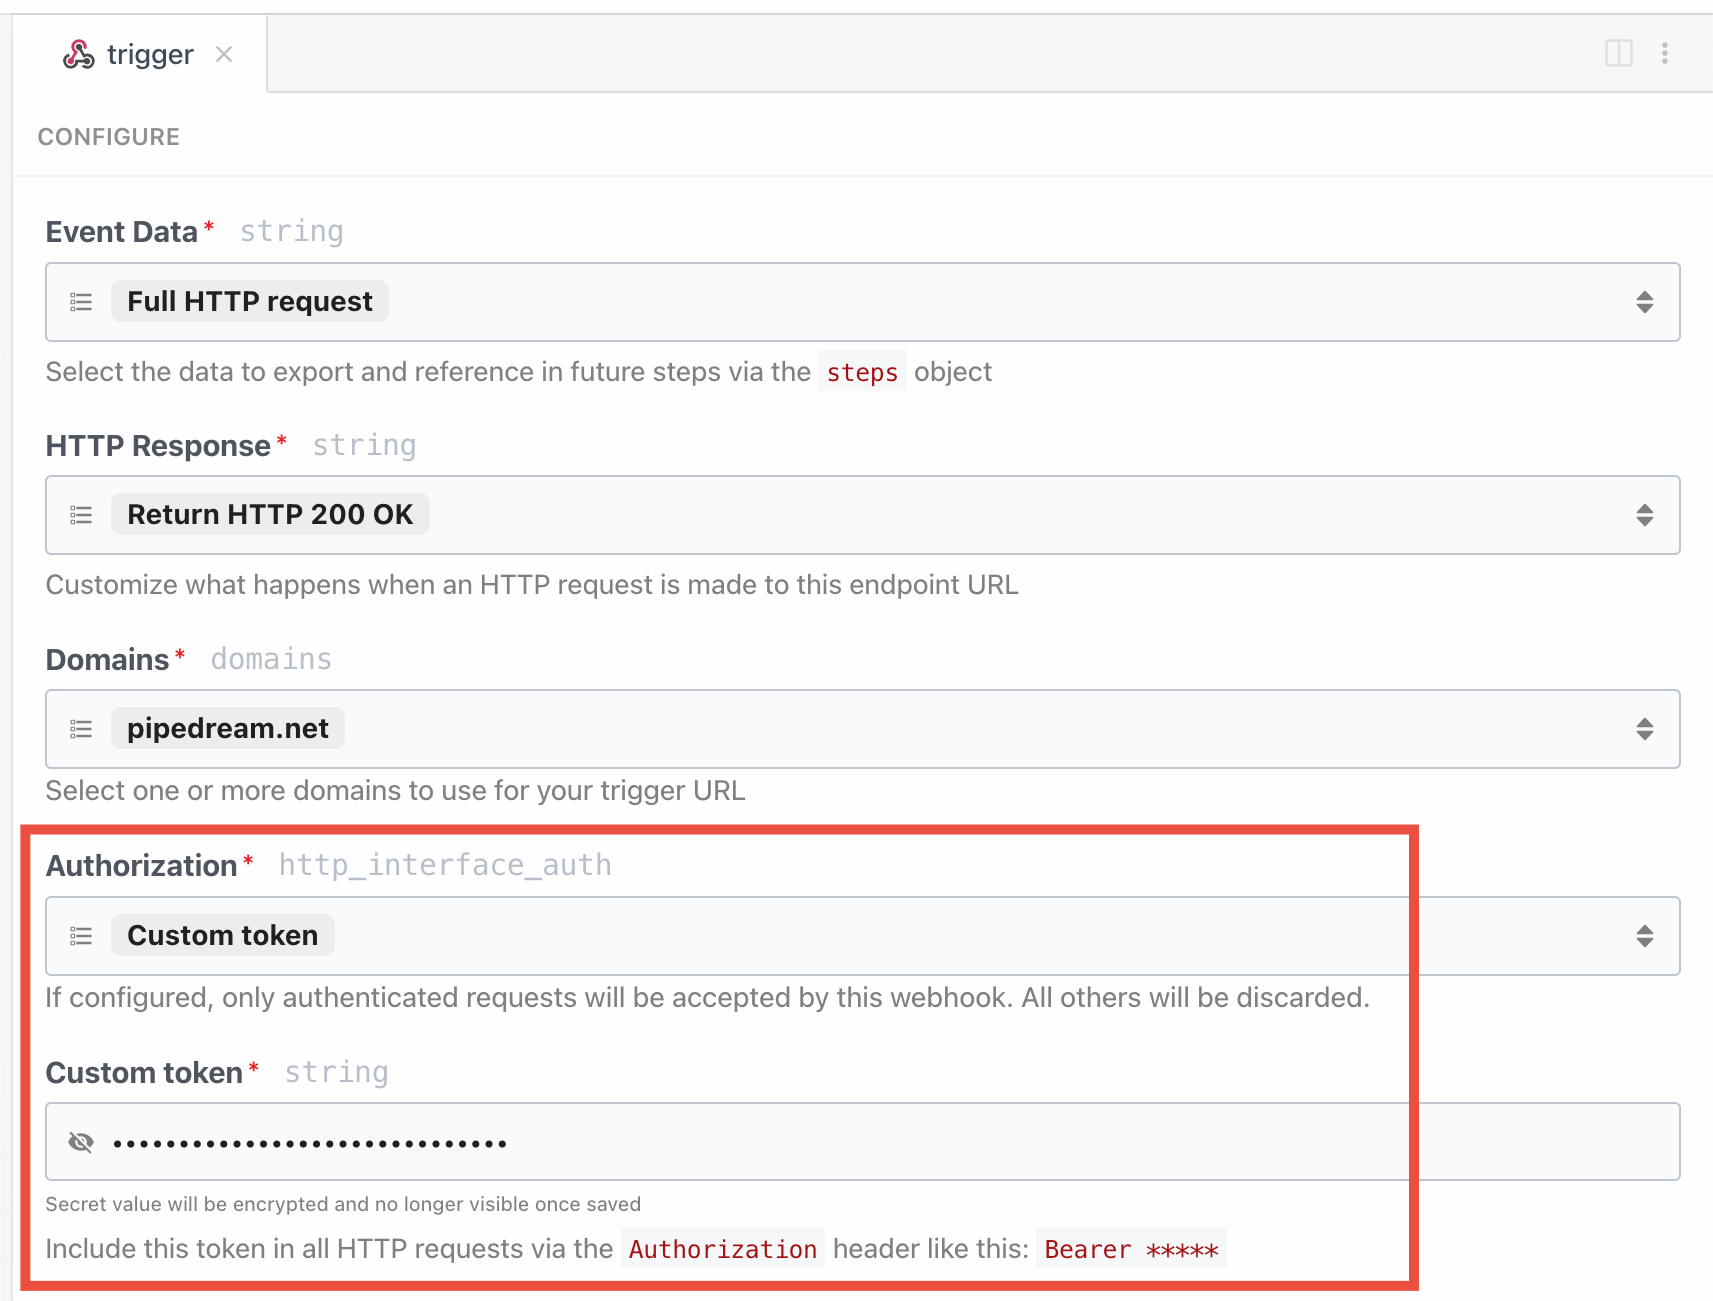
Bearer token in the Authorization header:
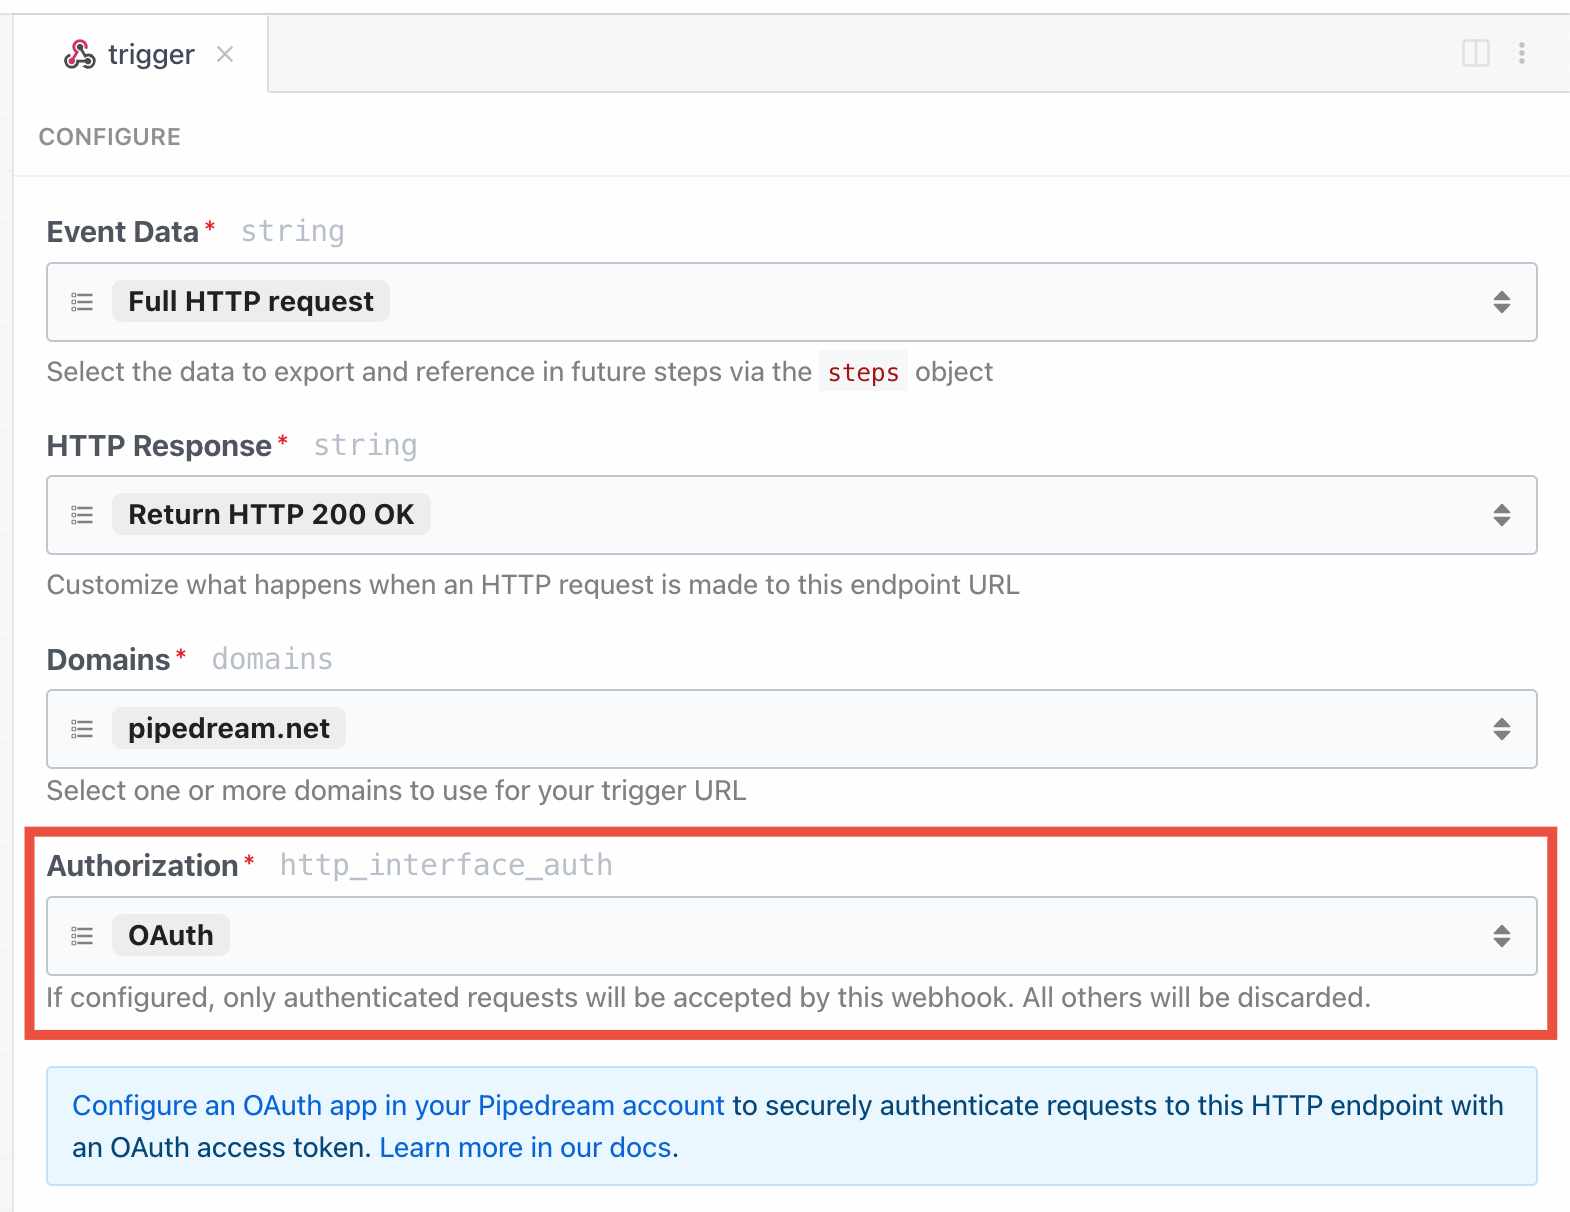
OAuth
You can also authorize requests using Pipedream OAuth clients:- Open the Configure section of the HTTP trigger.
- Select OAuth.
- If you don’t have an existing OAuth client, create one in your workspace’s API settings.
Bearer token in the Authorization header:
Implement your own authorization logic
Since you have access to the entire request object, and can issue any HTTP response from a workflow, you can implement custom logic to validate requests. For example, you could require JWT tokens and validate those tokens using thejsonwebtoken package at the start of your workflow.
Custom domains
To configure endpoints on your own domain, e.g.endpoint.yourdomain.com instead of the default *.m.pipedream.net domain, see the custom domains docs.
How Pipedream handles JSON payloads
When you send JSON in the HTTP payload, or when JSON data is sent in the payload from a webhook provider, Pipedream converts that JSON to its equivalent JavaScript object. The trigger data can be referenced using thesteps object.
In the Inspector, we present steps.trigger.event cleanly, indenting nested properties, to make the payload easy to read. Since steps.trigger.event is a JavaScript object, it’s easy to reference and manipulate properties of the payload using dot-notation.
How Pipedream handles multipart/form-data
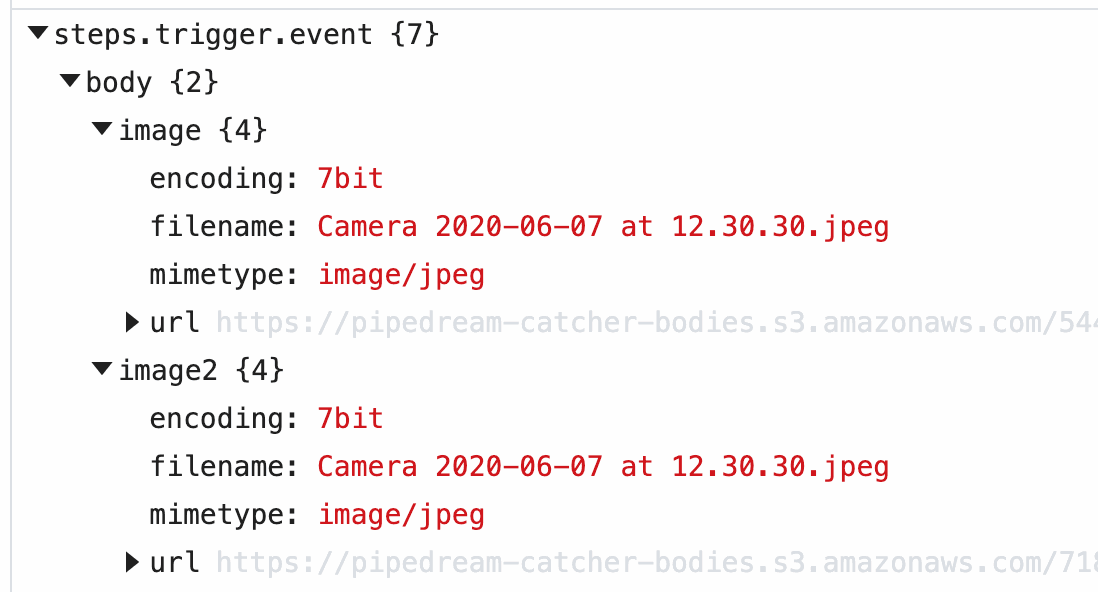
When you send form data to Pipedream using a Content-Type of multipart/form-data, Pipedream parses the payload and converts it to a JavaScript object with a property per form field. For example, if you send a request with two fields:
event.body, with the following shape:
How Pipedream handles HTTP headers
HTTP request headers will be available in thesteps.trigger.event.headers steps export in your downstream steps.
Pipedream will automatically lowercase header keys for consistency.
Pipedream-specific request parameters
These params can be set as headers or query string parameters on any request to a Pipedream HTTP endpoint.x-pd-nostore
Set to 1 to prevent logging any data for this execution. Pipedream will execute all steps of the workflow, but no data will be logged to Pipedream. No event will show up in the inspector or the Event History UI.
If you need to disable logging for all requests, use the workflow’s Data Retention controls, instead.
x-pd-notrigger
Set to 1 to send an event to the workflow for testing. Pipedream will not trigger the production version of the workflow, but will display the event in the list of test events on the HTTP trigger.
Limits
You can send any content, up to the HTTP payload size limit, as a part of the form request. The content of uploaded images or other binary files does not contribute to this limit — the contents of the file will be uploaded at a Pipedream URL you have access to within your source or workflow. See the section on Large File Support for more detail.Sending large payloads
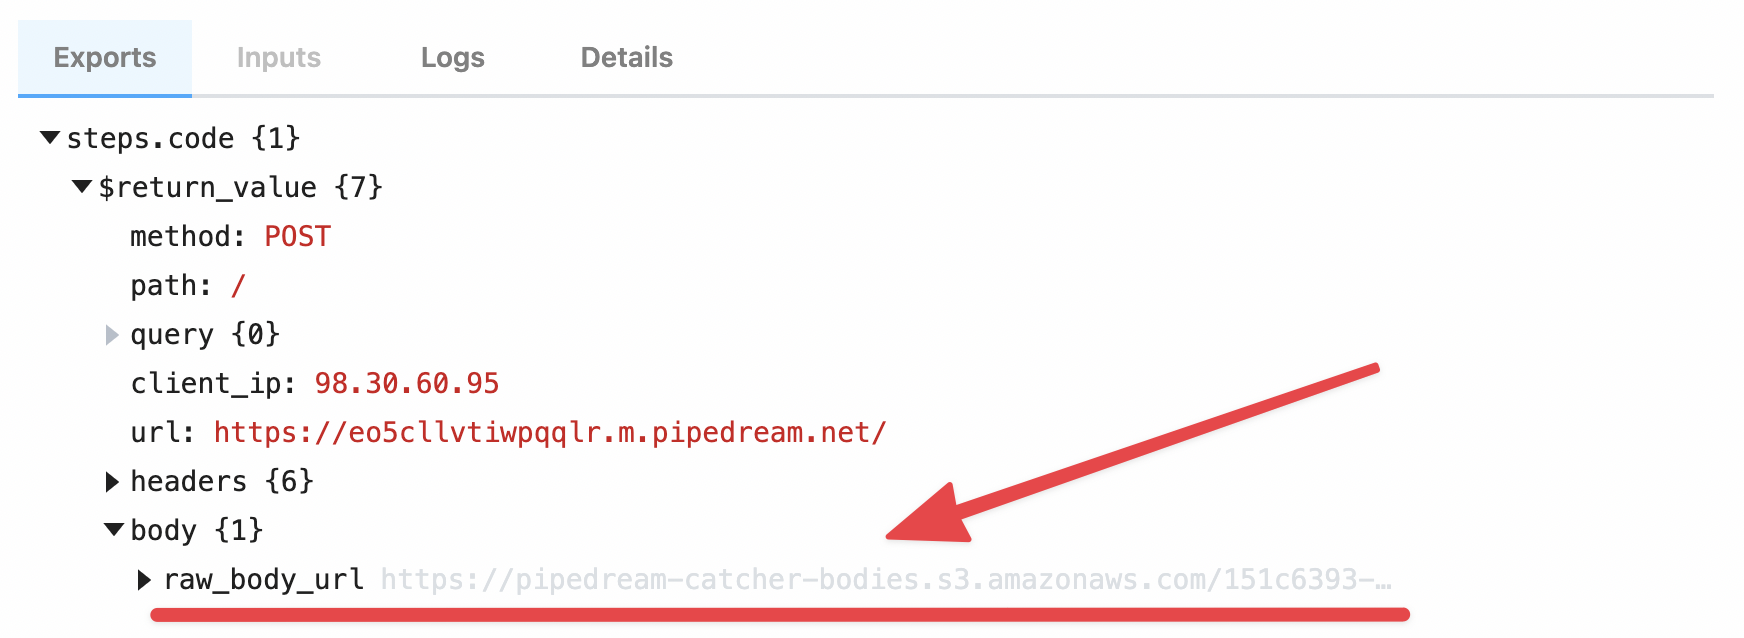
If you’re uploading files, like images or videos, you should use the large file upload interface, instead. By default, the body of HTTP requests sent to a source or workflow is limited to . But you can send an HTTP payload of any size to a workflow or an event source by including thepipedream_upload_body=1 query string or an x-pd-upload-body: 1 HTTP header in your request.
steps.trigger.event.body.raw_body_url.
/tmp directory.
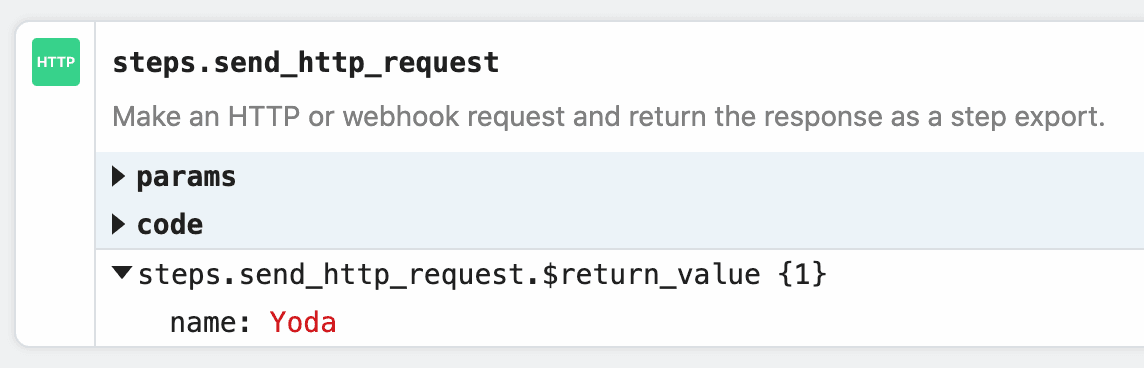
Example: Download the HTTP payload using the Send HTTP Request action
Note: you can only download payloads at most in size using this method. Otherwise, you may encounter a Function Payload Limit Exceeded error. You can download the large HTTP payload using the Send HTTP Request action. Copy this workflow to see how this works. The payload from the trigger of the workflow is exported to the variablesteps.retrieve_large_payload.$return_value:
Example: Download the HTTP payload to the /tmp directory
This workflow downloads the HTTP payload, saving it as a file to the /tmp directory.
How the payload data is saved
Your raw payload is saved to a Pipedream-owned Amazon S3 bucket. Pipedream generates a signed URL that allows you to access to that file for up to 30 minutes. After 30 minutes, the signed URL will be invalidated, and the file will be deleted.Limits
You can upload payloads up to 5TB in size. However, payloads that large may trigger other Pipedream limits. Please reach out with any specific questions or issues.Large File Support
This interface is best used for uploading large files, like images or videos. If you’re sending JSON or other data directly in the HTTP payload, and encountering a Request Entity Too Large error, review the section above for sending large payloads. You can upload any file to a workflow or an event source by making amultipart/form-data HTTP request with the file as one of the form parts. Pipedream saves that file to a Pipedream-owned Amazon S3 bucket, generating a signed URL that allows you to access to that file for up to 30 minutes. After 30 minutes, the signed URL will be invalidated, and the file will be deleted.
In workflows, these file URLs are provided in the steps.trigger.event.body variable, so you can download the file using the URL within your workflow, or pass the URL on to another third-party system for it to process.
/tmp directory.
Example: upload a file using cURL
For example, you can upload an image to a workflow using cURL:
-F tells cURL we’re sending form data, with a single “part”: a field named image, with the content of the image as the value (the @ allows cURL to reference a local file).
When you send this image to a workflow, Pipedream parses the form data and converts it to a JavaScript object, event.body. Select the event from the inspector, and you’ll see the image property under event.body:
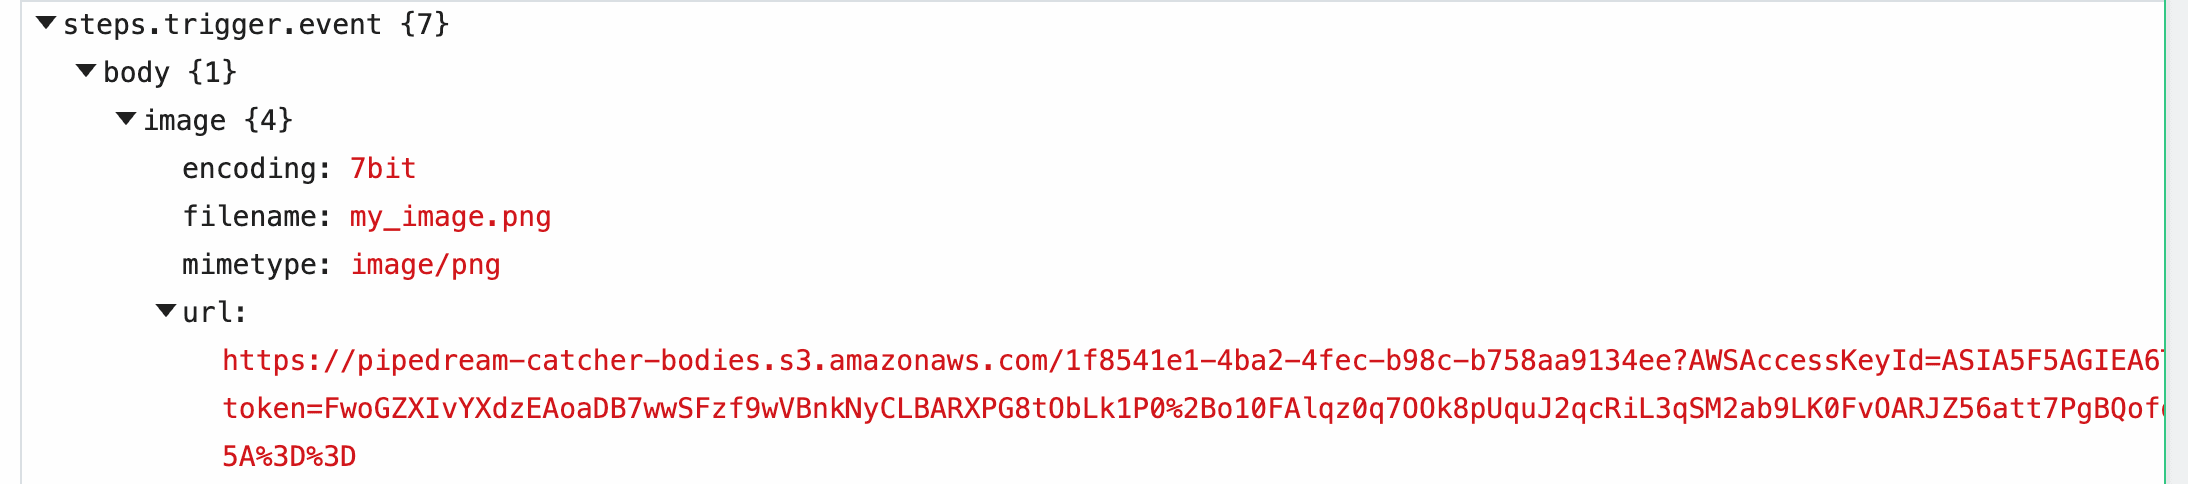
image property of event.body, you’ll see the value of this URL in the url property, along with the filename and mimetype of the file. Within your workflow, you can download the file, or pass the URL to a third party system to handle, and more.
Example: Download this file to the /tmp directory
This workflow downloads an image passed in the image field in the form request, saving it to the /tmp directory.
Example: Upload image to your own Amazon S3 bucket
This workflow streams the uploaded file to an Amazon S3 bucket you specify, allowing you to save the file to long-term storage.Limits
Since large files are uploaded using aContent-Type of multipart/form-data, the limits that apply to form data also apply here.
The content of the file itself does not contribute to the HTTP payload limit imposed for forms. You can upload files up to 5TB in size. However, files that large may trigger other Pipedream limits. Please reach out with any specific questions or issues.
Cross-Origin HTTP Requests
We return the following headers on HTTPOPTIONS requests:
HTTP Responses
Default HTTP response
By default, when you send a valid HTTP request to your endpoint URL, you should expect to receive a200 OK status code with the following payload:
How can my workflow run faster?See our guide on running workflows faster.
Customizing the HTTP response
If you need to issue a custom HTTP response from a workflow, you can either:- Use the Return HTTP response action, available on the HTTP / Webhook app, or
- Use the
$.respond()function in a Code or Action step.
Using the HTTP Response Action
The HTTP Response action lets you return HTTP responses without the need to write code. You can customize the response status code, and optionally specify response headers and body. This action uses$.respond() and will always respond immediately when called in your workflow. A response error will still occur if your workflow throws an Error before this action runs.
Using custom code with $.respond()
You can return HTTP responses in Node.js code with the $.respond() function.
$.respond() takes a single argument: an object with properties that specify the body, headers, and HTTP status code you’d like to respond with:
body property can be either a string, object, a Buffer (binary data), or a Readable stream. Attempting to return any other data may yield an error.
In the case where you return a Readable stream:
- You must
awaitthe$.respondfunction (await $.respond({ ... }) - The stream must close and be finished reading within your workflow execution timeout.
- You cannot return a Readable and use the
immediate: trueproperty of$.respond.
Timing of $.respond() execution
You may notice some response latency calling workflows that use $.respond() from your HTTP client. By default, $.respond() is called at the end of your workflow, after all other code is done executing, so it may take some time to issue the response back.
If you need to issue an HTTP response in the middle of a workflow, see the section on returning a response immediately.
Returning a response immediately
You can issue an HTTP response within a workflow, and continue the rest of the workflow execution, by setting theimmediate property to true:
immediate: true tells $.respond() to issue a response back to the client at this point in the workflow. After the HTTP response has been issued, the remaining code in your workflow runs.
This can be helpful, for example, when you’re building a Slack bot. When you send a message to a bot, Slack requires a 200 OK response be issued immediately, to confirm receipt:
immediate: true and run code after the HTTP response is issued.
Errors with HTTP Responses
If you use$.respond() in a workflow, you must always make sure $.respond() is called in your code. If you make an HTTP request to a workflow, and run code where $.respond() is not called, your endpoint URL will issue a 400 Bad Request error with the following body:
- You call
$.respond()conditionally, where it does not run under certain conditions. - Your workflow throws an Error before you run
$.respond(). - You return data in the
bodyproperty that isn’t a string, object, or Buffer.
400 Bad Request error in the application calling your workflow, you can implement try / finally logic to ensure $.respond() always gets called with some default message. For example:
Errors
Occasionally, you may encounter errors when sending requests to your endpoint:Request Entity Too Large
The endpoint will issue a413 Payload Too Large status code when the body of your request exceeds .
In this case, the request will still appear in the inspector, with information on the error.
API key does not exist
Your API key is the host part of the endpoint, e.g. theeniqtww30717 in eniqtww30717.m.pipedream.net. If you attempt to send a request to an endpoint that does not exist, we’ll return a 404 Not Found error.
We’ll also issue a 404 response on workflows with an HTTP trigger that have been disabled.
Too Many Requests
If you send too many requests to your HTTP source within a small period of time, we may issue a429 Too Many Requests response. Review our limits to understand the conditions where you might be throttled.
You can also reach out to inquire about raising this rate limit.
If you control the application sending requests, you should implement a backoff strategy to temporarily slow the rate of events.
Schedule
Pipedream allows you to run hosted scheduled jobs — commonly-referred to as a “cron job” — for free. You can think of workflows like scripts that run on a schedule. You can write scheduled job to send an HTTP request, send a scheduled email, run any Node.js or Python code, connect to any API, and much more. Pipedream manages the servers where these jobs run, so you don’t have to worry about setting up a server of your own or operating some service just to run code on a schedule. You write the workflow, we take care of the rest.Choosing a Schedule trigger
To create a new scheduled job, create a new workflow and search for the Schedule trigger: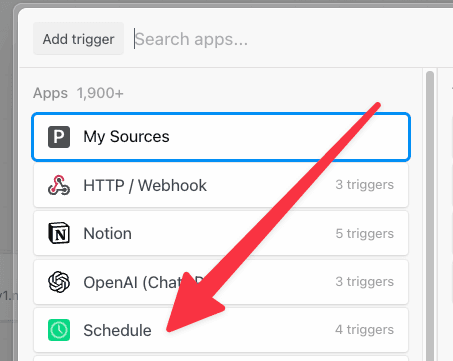
- Every : run the job every N days, hours, minutes (e.g. every 1 day, every 3 hours).
- Cron Expression : schedule your job using a cron expression. For example, the expression
0 0 * * *will run the job every day at midnight. Cron expressions can be tied to any timezone.
Testing a scheduled job
If you’re running a scheduled job once a day, you probably don’t want to wait until the next day’s run to test your new code. You can manually run the workflow associated with a scheduled job at any time by pressing the Run Now button.Job History
You’ll see the history of job executions under the Job History section of the Inspector. Clicking on a specific job shows the execution details for that job — all the logs and observability associated with that run of the workflow.Trigger a notification to an external service (email, Slack, etc.)
You can send yourself a notification — for example, an email or a Slack message — at any point in a workflow by using the relevant Action or Destination. If you’d like to email yourself when a job finishes successfully, you can use the Email Destination. You can send yourself a Slack message using the Slack Action, or trigger an HTTP request to an external service. You can also write code to trigger any complex notification logic you’d like.Troubleshooting your scheduled jobs
When you run a scheduled job, you may need to troubleshoot errors or other execution issues. Pipedream offers built-in, step-level logs that show you detailed execution information that should aid troubleshooting. Any time a scheduled job runs, you’ll see a new execution appear in the Inspector. This shows you when the job ran, how long it took to run, and any errors that might have occurred. Click on any of these lines in the Inspector to view the details for a given run. Code steps show logs below the step itself. Any time you runconsole.log() or other functions that print output, you should see the logs appear directly below the step where the code ran.
Actions and Destinations also show execution details relevant to the specific Action or Destination. For example, when you use the HTTP Destination to make an HTTP request, you’ll see the HTTP request and response details tied to that Destination step:

steps.trigger.event variable that you can access within your workflow. This transformation can take a few seconds to perform. Once done, Pipedream will immediately trigger your workflow with the transformed payload.
Read more about the shape of the email trigger event.
Sending large emails
By default, you can send emails up to in total size (content, headers, attachments). Emails over this size will be rejected, and you will not see them appear in your workflow. You can send emails up to{EMAIL_PAYLOAD_SIZE_LIMIT} in size by sending emails to [YOUR EMAIL ENDPOINT]@upload.pipedream.net. If your workflow-specific email address is endpoint@pipedream.net, your “large email address” is endpoint@upload.pipedream.net.
Emails delivered to this address are uploaded to a private URL you have access to within your workflow, at the variable steps.trigger.event.mail.content_url. You can download and parse the email within your workflow using that URL. This content contains the raw email. Unlike the standard email interface, you must parse this email on your own - see the examples below.
Example: Download the email using the Send HTTP Request action
Note: you can only download emails at most in size using this method. Otherwise, you may encounter a Function Payload Limit Exceeded error. You can download the email using the Send HTTP Request action. Copy this workflow to see how this works. This workflow also parses the contents of the email and exposes it as a JavaScript object using themailparser library:
Example: Download the email to the /tmp directory, read it and parse it
This workflow downloads the email, saving it as a file to the /tmp directory. Then it reads the same file (as an example), and parses it using the mailparser library:
How the email is saved
Your email is saved to a Pipedream-owned Amazon S3 bucket. Pipedream generates a signed URL that allows you to access to that file for up to 30 minutes. After 30 minutes, the signed URL will be invalidated, and the file will be deleted.Email attachments
You can attach any files to your email, up to the total email size limit. Attachments are stored insteps.trigger.event.attachments, which provides an array of attachment objects. Each attachment in that array exposes key properties:
contentUrl: a URL that hosts your attachment. You can download this file to the/tmpdirectory and process it in your workflow.content: If the attachment contains text-based content, Pipedream renders the attachment incontent, up to 10,000 bytes.contentTruncated:trueif the attachment contained text-based content larger than 10,000 bytes. Iftrue, the data incontentwill be truncated, and you should fetch the full attachment fromcontentUrl.
Appending metadata to the incoming email address with +data
Pipedream provides a way to append metadata to incoming emails by adding a + sign to the incoming email key, followed by any arbitrary string:
+ sign. Sending an email to both of these addresses triggers the workflow with the address myemailaddr@pipedream.net:
Troubleshooting
I’m receiving an Expired Token error when trying to read an email attachment
Email attachments are saved to S3, and are accessible in your workflows over pre-signed URLs.
If the presigned URL for the attachment has expired, then you’ll need to send another email to create a brand new pre-signed URL.
If you’re using email attachments in combination with $.flow.delay or $.flow.rerun which introduces a gap of time between steps in your workflow, then there’s a chance the email attachment’s URL will expire.
To overcome this, we suggest uploading your email attachments to your Project’s File Store for persistent storage.
RSS
Choose the RSS trigger to watch an RSS feed for new items:
Events
Events trigger workflow executions. The event that triggers your workflow depends on the trigger you select for your workflow:- HTTP triggers invoke your workflow on HTTP requests.
- Cron triggers invoke your workflow on a time schedule (e.g., on an interval).
- Email triggers invoke your workflow on inbound emails.
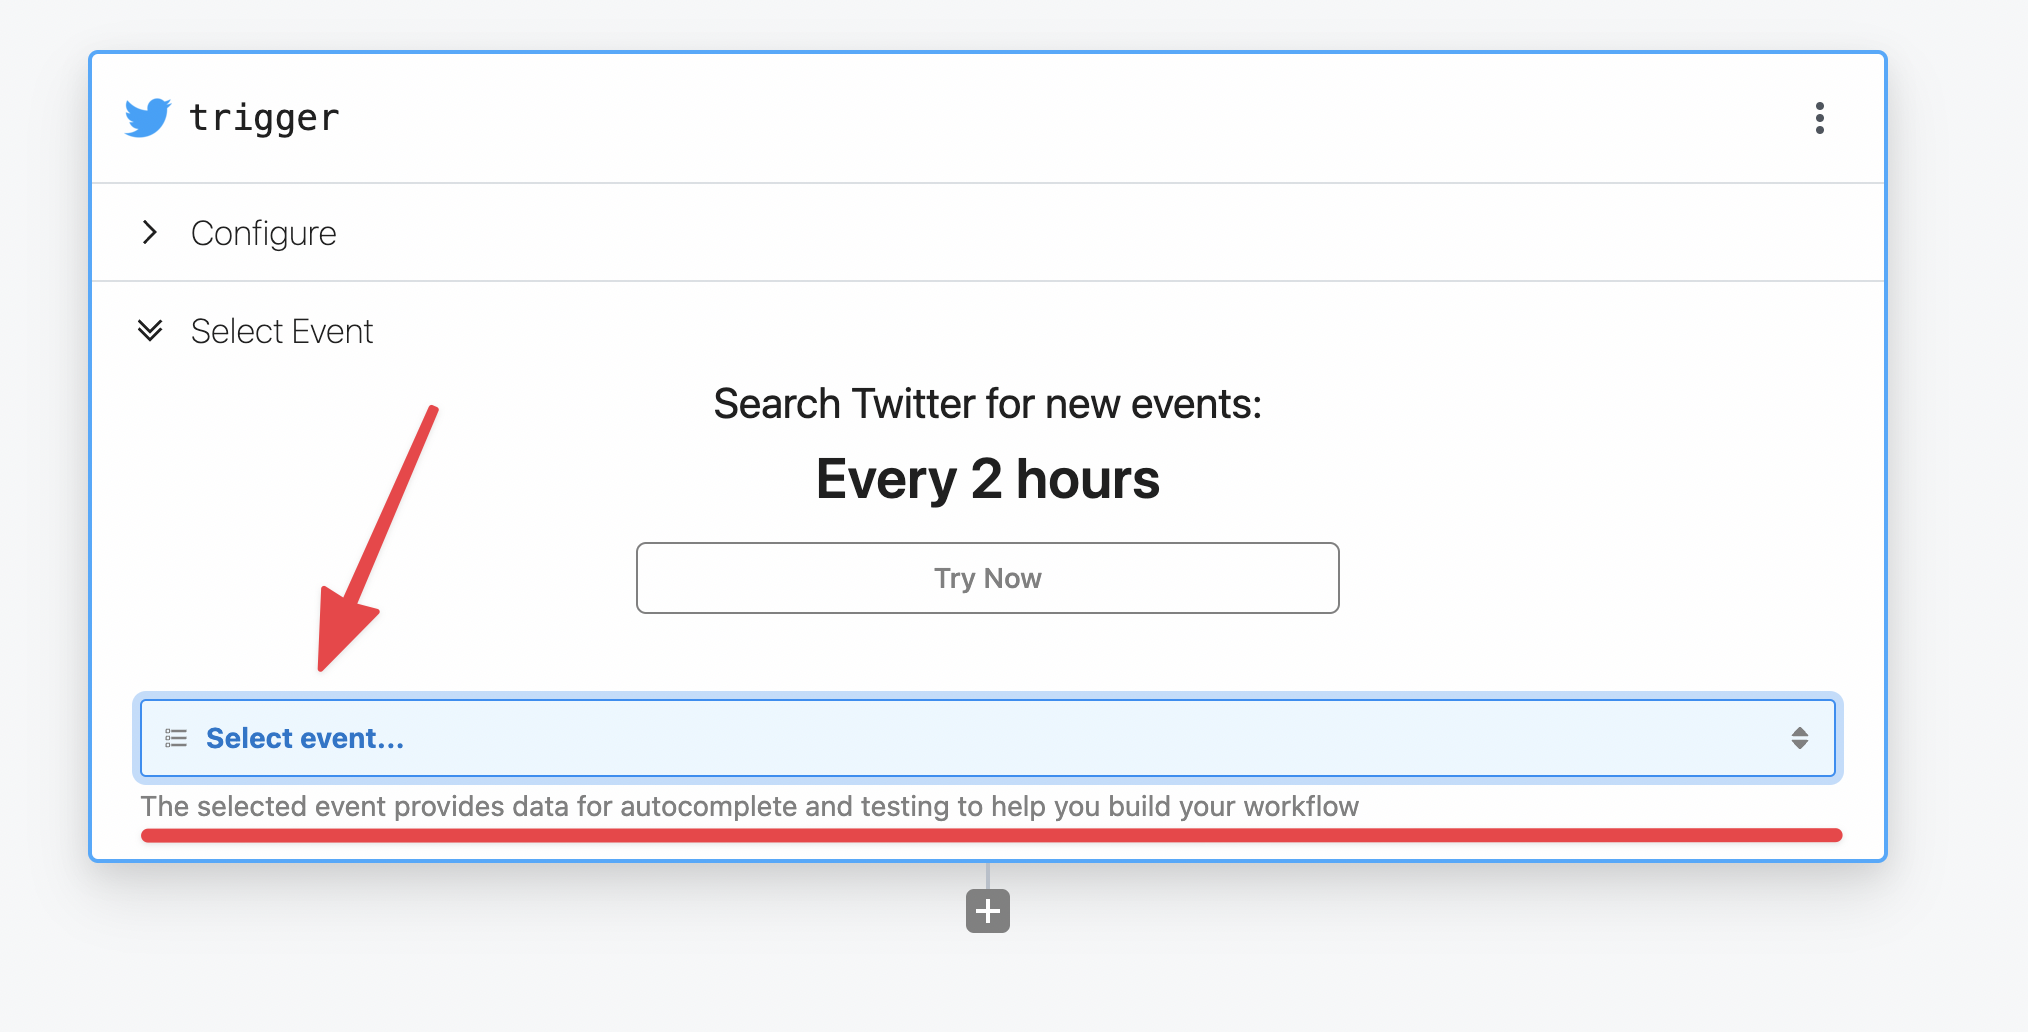
- Event sources invoke your workflow on events from apps like Twitter, Google Calendar, and more.
Selecting a test event
When you test any step in your workflow, Pipedream passes the test event you select in the trigger step:
Examining event data
When you select an event, you’ll see the incoming event data and the event context for that event: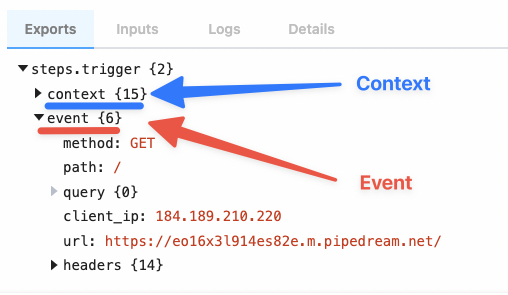
steps.trigger.event, which you can access in any workflow step.
Copying references to event data
When you’re examining event data, you’ll commonly want to copy the name of the variable that points to the data you need to reference in another step. Hover over the property whose data you want to reference, and click the Copy Path button to its right:
Copying the values of event data
You can also copy the value of specific properties of your event data. Hover over the property whose data you want to copy, and click the Copy Value button to its right:
Event format
When you send an event to your workflow, Pipedream takes the trigger data — for example, the HTTP payload, headers, etc. — and adds our own Pipedream metadata to it. This data is exposed in thesteps.trigger.event variable. You can reference this variable in any step of your workflow.
You can reference your event data in any code or action step. See those docs or the general docs on passing data between steps for more information.
The specific shape of steps.trigger.event depends on the trigger type:
HTTP
| Property | Description |
|---|---|
body | A string or object representation of the HTTP payload |
client_ip | IP address of the client that made the request |
headers | HTTP headers, represented as an object |
method | HTTP method |
path | HTTP request path |
query | Query string |
url | Request host + path |
Cron Scheduler
| Property | Description |
|---|---|
interval_seconds | The number of seconds between scheduled executions |
cron | When you’ve configured a custom cron schedule, the cron string |
timestamp | The epoch timestamp when the workflow ran |
timezone_configured | An object with formatted datetime data for the given execution, tied to the schedule’s timezone |
timezone_utc | An object with formatted datetime data for the given execution, tied to the UTC timezone |
steps.trigger.context
steps.trigger.event contain your event’s data. steps.trigger.context contains metadata about the workflow and the execution tied to this event.
You can use the data in steps.trigger.context to uniquely identify the Pipedream event ID, the timestamp at which the event invoked the workflow, and more:
| Property | Description |
|---|---|
deployment_id | A globally-unique string representing the current version of the workflow |
emitter_id | The ID of the workflow trigger that emitted this event, e.g. the event source ID. |
id | A unique, Pipedream-provided identifier for the event that triggered this workflow |
owner_id | The Pipedream-assigned workspace ID that owns the workflow |
platform_version | The version of the Pipedream execution environment this event ran on |
replay | A boolean, whether the event was replayed via the UI |
trace_id | Holds the same value for all executions tied to an original event. See below for more details. |
ts | The ISO 8601 timestamp at which the event invoked the workflow |
workflow_id | The workflow ID |
workflow_name | The workflow name |
How do I retrieve the execution ID for a workflow?
Pipedream exposes two identifies for workflow executions: one for the execution, and one for the “trace”.steps.trigger.context.id should be unique for every execution of a workflow.
steps.trigger.context.trace_id will hold the same value for all executions tied to the same original event, e.g. if you have auto-retry enabled and it retries a workflow three times, the id will change, but the trace_id will remain the same. For example, if you call $.flow.suspend() on a workflow, we run a new execution after the suspend, so you’d see two total executions: id will be unique before and after the suspend, but trace_id will be the same.
You may notice other properties in context. These are used internally by Pipedream, and are subject to change.
Event retention
On the Free and Basic plans, each workflow retains at most 100 events or 7 days of history.- After 100 events have been processed, Pipedream will delete the oldest event data as new events arrive, keeping only the last 100 events.
- Or if an event is older than 7 days, Pipedream will delete the event data.
For an extended history of events across all of your workflows, included processed events, with the ability to filter by status and time range, please see the Event History.