- You need code-level control and you want to use Pipedream’s OAuth instead of your own OAuth client
- There isn’t a pre-built tool (action) for the app, or you need to modify the request
- You want to avoid storing end user credentials in your app
Overview
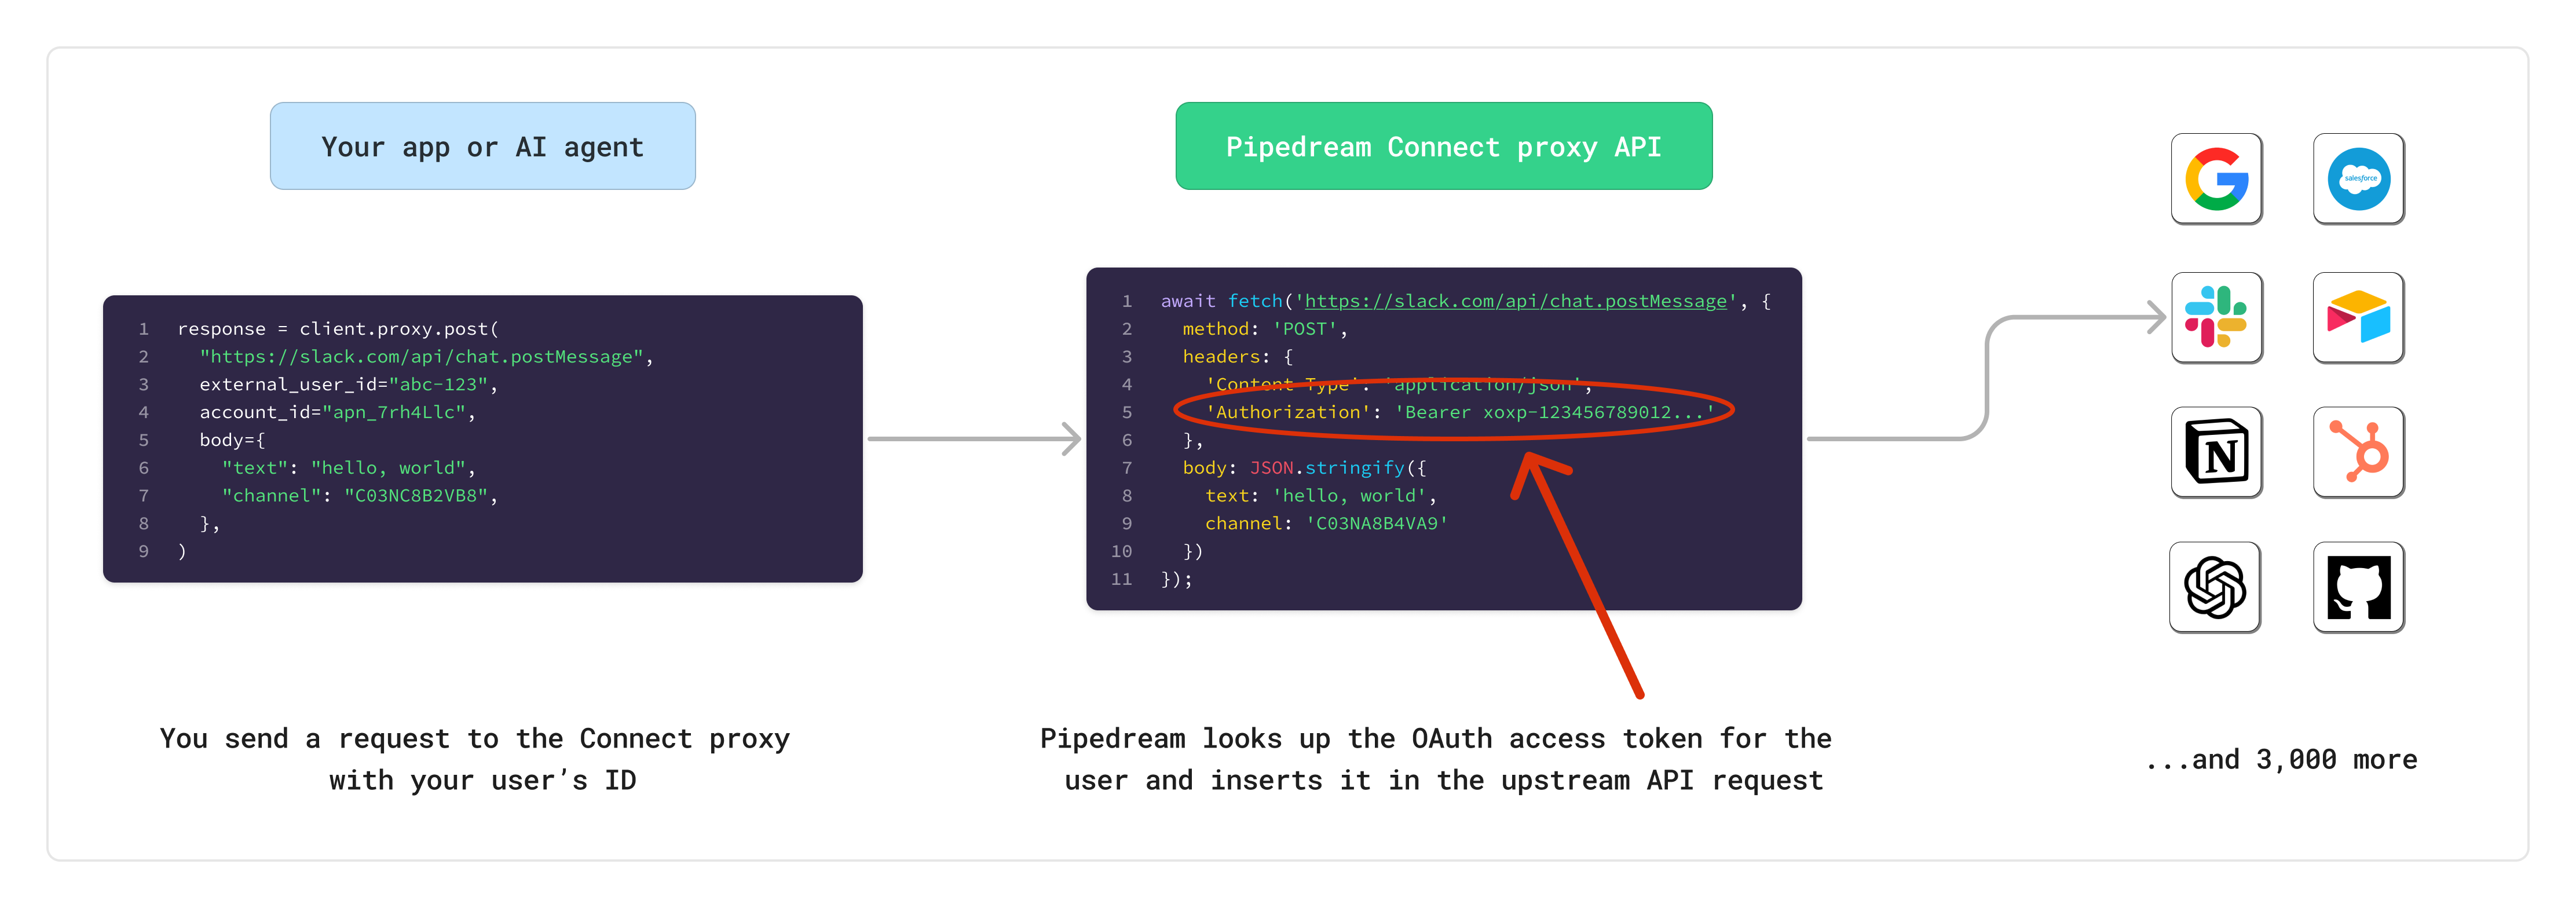
The Connect proxy enables you to interface with any integrated API and make authenticated requests on behalf of your users, without dealing with OAuth or storing end user credentials.- You send a request to the proxy and identify the end user you want to act on behalf of
- The proxy sends the request to the upstream API and dynamically inserts your end user’s auth credentials
- The proxy returns the response from the upstream API back to you
Before getting started with the Connect proxy, make sure you’ve already gone through the managed auth quickstart for Pipedream Connect.
Getting started
You can send requests to the Connect proxy using one of the Pipedream SDKs or directly with the Pipedream REST API.Prerequisites
- A Pipedream OAuth client to make authenticated requests to Pipedream’s API
- Connect environment (ex,
productionordevelopment) - The external user ID for your end user (ex,
abc-123) - The account ID for your end user’s connected account (ex,
apn_1234567)
Authenticating on behalf of your users
One of the core benefits of using the Connect API Proxy is not having to deal with storing or retrieving sensitive credentials for your end users. Since Pipedream has + integrated apps, we know how the upstream APIs are expecting to receive access tokens or API keys. When you send a request to the proxy, Pipedream will look up the corresponding connected account for the relevant user, and automatically insert the authorization credentials in the appropriate header or URL param.Sending requests
When making requests to the Connect Proxy, you must provide the following parameters: URL- The URL of the API you want to call (ex,
https://slack.com/api/chat.postMessage) - If using the REST API directly, this should be a URL-safe Base64 encoded string (ex,
aHR0cHM6Ly9zbGFjay5jb20vYXBpL2NoYXQucG9zdE1lc3NhZ2U)
For apps with dynamic domains (like Zendesk, Zoho, GitLab), you should use relative paths in your proxy requests. Pipedream automatically resolves the correct domain based on the user’s connected account. See When to use relative vs full URLs for details.
- Use the HTTP method required by the upstream API
- Optionally include a body to send to the upstream API
- If using the REST API, include the
Authorizationheader with your Pipedream OAuth access token (Bearer {access_token}) - Headers that contain the prefix
x-pd-proxy-will get forwarded to the upstream API
Examples
Allowed domains
The vast majority of apps in Pipedream work with the Connect Proxy. To check if an app is supported and what domains are allowed, usepd.getApps() or the /apps REST API.
Understanding the Connect object
Each app in the/apps API response includes a connect object:
When to use relative vs full URLs
The format ofbase_proxy_target_url determines whether you should use a relative path or full URL:
Apps with static domains
Ifbase_proxy_target_url is a standard URL (e.g., https://slack.com), you can use either:
- Full URL:
https://slack.com/api/chat.postMessage - Relative path:
/api/chat.postMessage
Apps with dynamic domains
Ifbase_proxy_target_url contains placeholders like {{custom_fields.base_api_url}}, you must use relative paths. This applies to:
- Self-hosted instances (GitLab)
- Apps with account-specific subdomains (Zendesk, Zoho)
Examples
Discovering app support programmatically
Google Ads
Google Ads requires a special request structure because it uses Pipedream’s internal proxy service to protect Pipedream’s developer token. When making requests to Google Ads through the Connect Proxy, you need to nest the Google Ads API request inside the proxy request. Important notes:- The upstream URL is Pipedream’s proxy service for Google Ads:
https://googleads.m.pipedream.net - Define the Google Ads API endpoint path in the
urlfield within the request body - The method to the Connect Proxy should always be
POST, since it targets the Google Ads proxy (you define the actual method for the Google Ads API in the body)
Limits
- The maximum timeout for a request is 30 seconds. Requests that take longer than 30 seconds will be terminated, and Pipedream will return a
504error to the caller.
Restricted headers
The following headers are not allowed when making requests through the Connect API Proxy. Requests that include these headers will be rejected with a400 error:
Accept-EncodingAccess-Control-Request-HeadersAccess-Control-Request-MethodConnectionContent-LengthCookieDateDNTExpectHostKeep-AliveOriginPermissions-PolicyRefererTETrailerTransfer-EncodingUpgradeVia- Headers starting with
Proxy- - Headers starting with
Sec-