

Our TypeScript component API is in beta. If you’re interested in developing TypeScript components and providing feedback, see our TypeScript docs.
Overview
What is a component?
Components are Node.js modules that run on Pipedream’s serverless infrastructure.- Trigger Node.js code on HTTP requests, timers, cron schedules, or manually
- Emit data on each event to inspect it, deliver it to your app by webhook, or access it outside of Pipedream via API
- Accept user input on deploy via CLI, API, or UI
- Connect to 3,000+ apps using Pipedream managed auth
- Use most npm packages with no
npm installorpackage.jsonrequired - Store and retrieve state using the built-in key-value store
Quickstarts
To help you get started, we created a step-by-step walkthrough for developing both sources and actions. We recommend starting with those docs and using the API reference below as you develop.Differences between sources and actions
Sources and actions share the same component API. However, certain features of the API only apply to one or the other:-
Actions are defined with
type: action(see the docs on thetypeproperty). Sources require notypeproperty be set. Components without atypeare considered sources. -
Sources emit events using
this.$emit, which trigger linked workflows. Any features associated with emitting events (e.g., dedupe strategies) can only be used with sources. Actions return data usingreturnor$.export, which is made available to future steps of the associated workflow. - Sources have access to lifecycle hooks, which are often required to configure the source to listen for new events. Actions do not have access to these lifecycle hooks.
-
Actions have access to a special
$variable, passed as a parameter to therunmethod. This variable exposes functions that allow you to send data to destinations, export data from the action, return HTTP responses, and more. -
Sources can be developed iteratively using
pd dev. Actions currently cannot (please follow this issue to be notified of updates). -
You use
pd deployto deploy sources to your account. You usepd publishto publish actions, making them available to run through Connect. - You can attach interfaces (like HTTP endpoints, or timers) to sources. This defines how the source is invoked. Actions do not have interfaces, since they’re run step-by-step as a part of the associated workflow.
Getting Started with the CLI
Several examples below use the Pipedream CLI. To install it, follow the instructions for your OS / architecture. See the CLI reference for detailed usage and examples beyond those covered below.Example Components
You can find hundreds of example components in thecomponents/ directory of the PipedreamHQ/pipedream repo.
Component API
Component Structure
Pipedream components export an object with the following properties:Props
Props are custom attributes you can register on a component. When a value is passed to a prop attribute, it becomes a property on that component instance. You can reference these properties in component code usingthis (e.g., this.propName).
User Input Props
User input props allow components to accept input on deploy. When deploying a component, users will be prompted to enter values for these props, setting the behavior of the component accordingly.General
Definition
Prop Types
Usage
Example
Following is an example source that demonstrates how to capture user input via a prop and emit it on each event:
Advanced Configuration
Async Options (example)
Async options allow users to select prop values that can be programmatically-generated (e.g., based on a real-time API response).
Following is an example source demonstrating the usage of async options:
Prop Definitions (example)
Prop definitions enable you to reuse props that are defined in another object. A common use case is to enable re-use of props that are defined for a specific app.
Following is an example source that demonstrates how to use
propDefinitions.
Referencing values from previous props
When you define a prop in an app file, and that prop depends on the value of another prop, you’ll need to pass the value of the previous props in a special way. Let’s review an example from Trello, a task manager. You create Trello boards for new projects. Boards contain lists. For example, this Active board contains two lists:
Trello board example
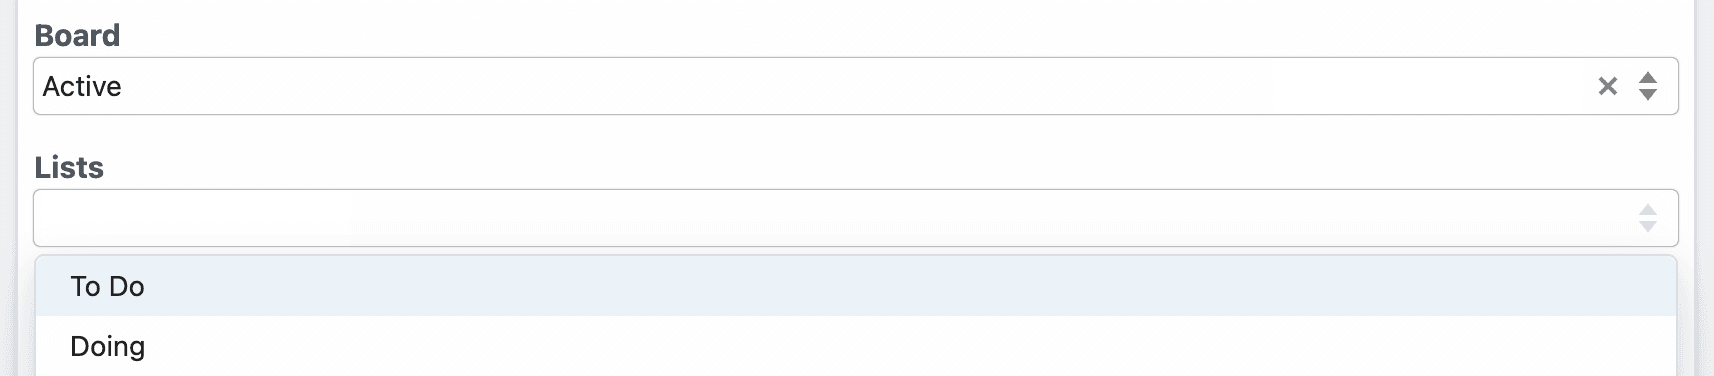
Trello board and lists props
lists prop, notice how opts.board references the board. You can pass opts to the prop’s options method when you reference propDefinitions in specific components:
configuredProps contains the props the user previously configured (the board). This allows the lists prop to use it in the options method.
Dynamic props
Some prop definitions must be computed dynamically, after the user configures another prop. We call these dynamic props, since they are rendered on-the-fly. This technique is used in the Google Sheets Add Single Row action, which we’ll use as an example below. First, determine the prop whose selection should render dynamic props. In the Google Sheets example, we ask the user whether their sheet contains a header row. If it does, we display header fields as individual props: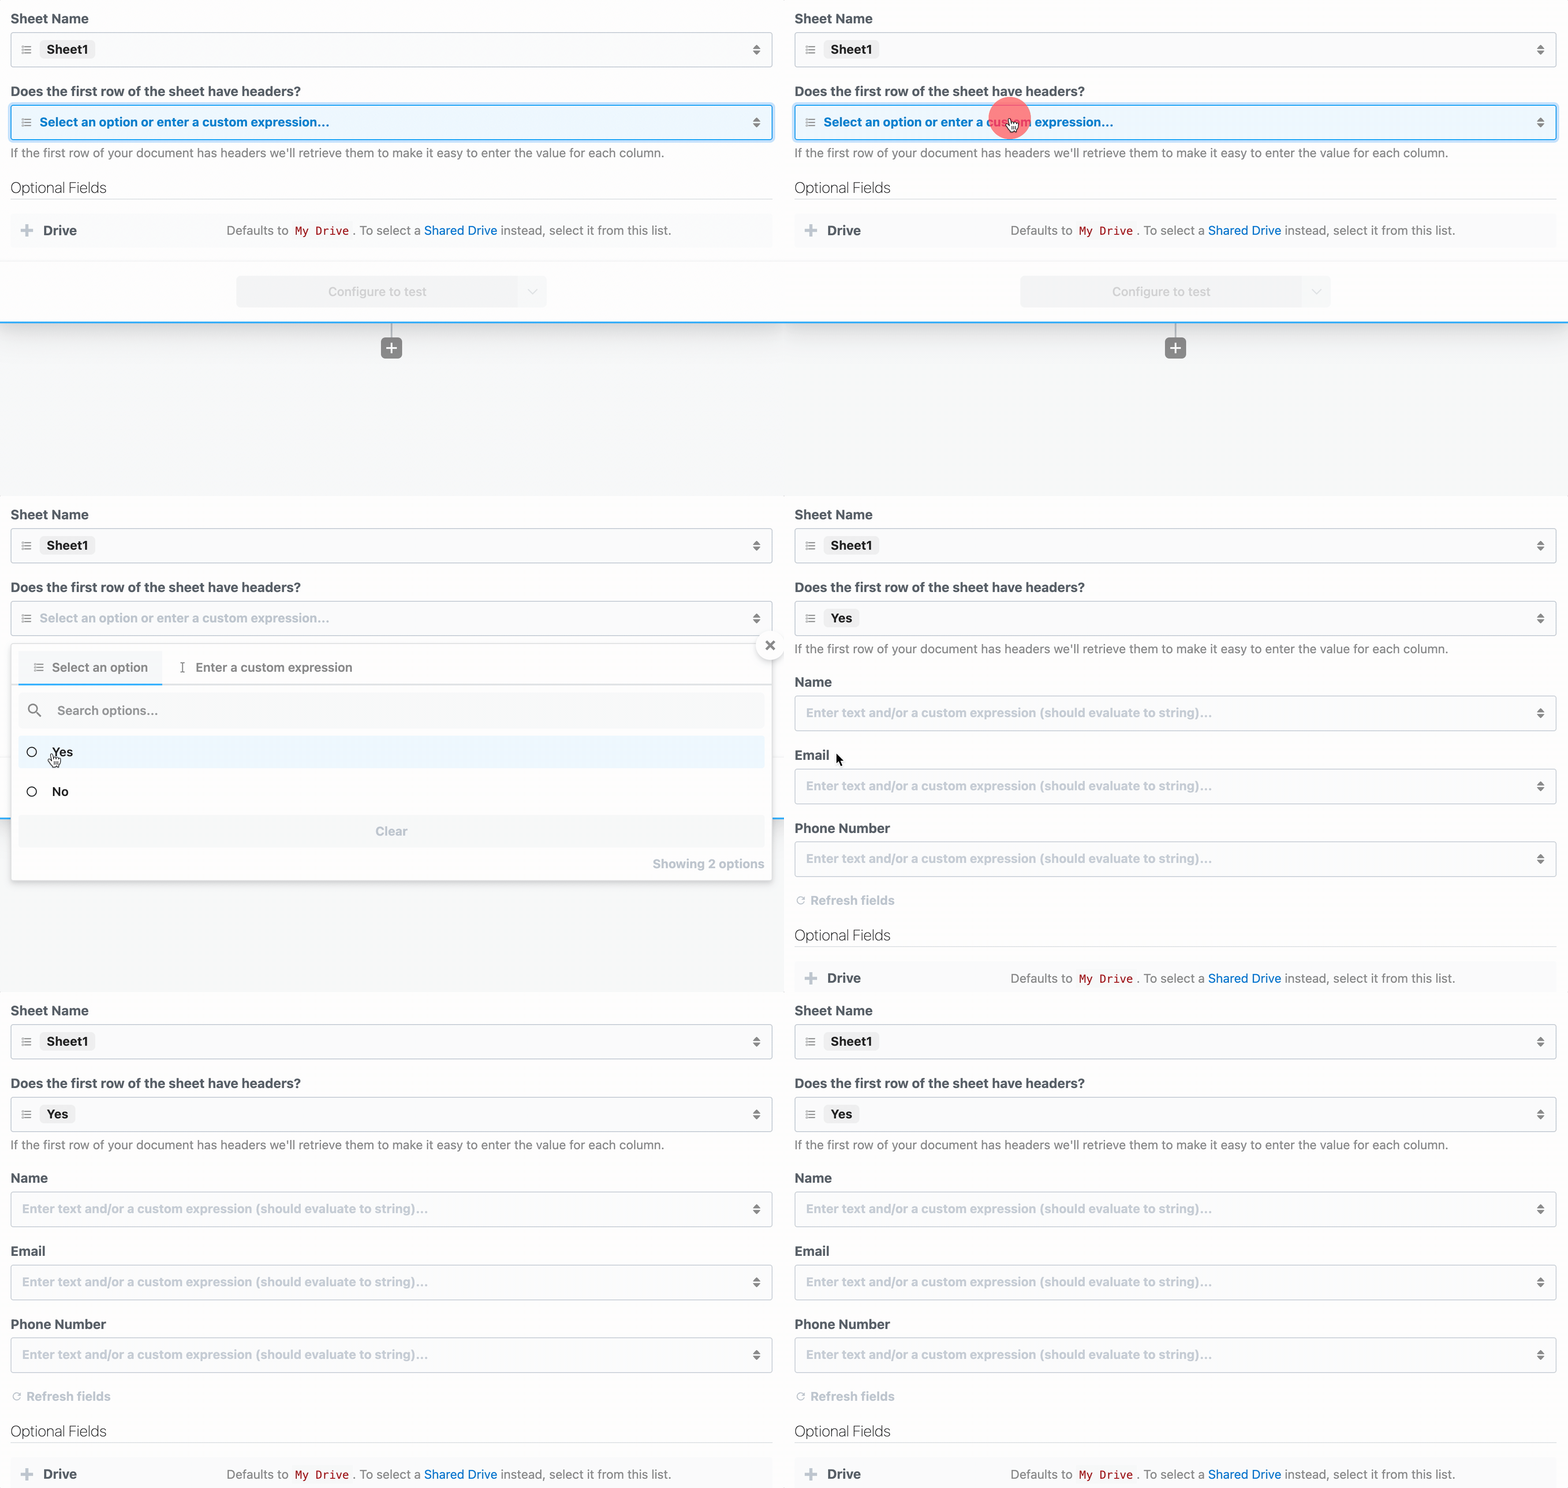
Google Sheets Additional props example - header columns loading as props
reloadProps field set to true:
additionalProps component method to render props:
previousPropDefs are the full set of props (props merged with the previous additionalProps). When the function is executed, this is bound similar to when the run function is called, where you can access the values of the props as currently configured, and call any methods. The return value of additionalProps will replace any previous call, and that return value will be merged with props to define the final set of props.
Following is an example that demonstrates how to use additionalProps to dynamically change a prop’s disabled and hidden properties:
appbooleanintegerstringobjectany$.interface.http$.interface.timerdata_storehttp_request
Interface Props
Interface props are infrastructure abstractions provided by the Pipedream platform. They declare how a source is invoked — via HTTP request, run on a schedule, etc. — and therefore define the shape of the events it processes.Timer
To use the timer interface, declare a prop whose value is the string$.interface.timer:
Definition
Usage
Example
Following is a basic example of a source that is triggered by a
$.interface.timer and has default defined as a cron expression.
$.interface.timer and has a default interval defined.
HTTP
To use the HTTP interface, declare a prop whose value is the string$.interface.http:
Usage
Responding to HTTP requests
The HTTP interface exposes arespond() method that lets your source issue HTTP responses. You may run this.http.respond() to respond to the client from the run() method of a source. In this case you should also pass the customResponse: true parameter to the prop.
HTTP Event Shape
Following is the shape of the event passed to therun() method of your source:
$.interface.http and returns { 'msg': 'hello world!' } in the HTTP response. On deploy, Pipedream will generate a unique URL for this source:
Service Props
DB
DefinitionApp Props
App props are normally defined in an app file, separate from individual components. See thecomponents/ directory of the pipedream GitHub repo for example app files.
Definition
Usage
Note: The specific
$auth keys supported for each app will be published in the near future.HTTP Request Prop
Usage
Example
Following is an example action that demonstrates how to accept an HTTP request configuration as input and execute the request when the component is run:
Alert Prop
Sometimes you may need to surface contextual information to users within the prop form. This might be information that’s not directly related to a specific prop, so it doesn’t make sense to include in a prop description, but rather, it may be related to the overall configuration of the prop form. Usagepipedream repo for an example implementation.
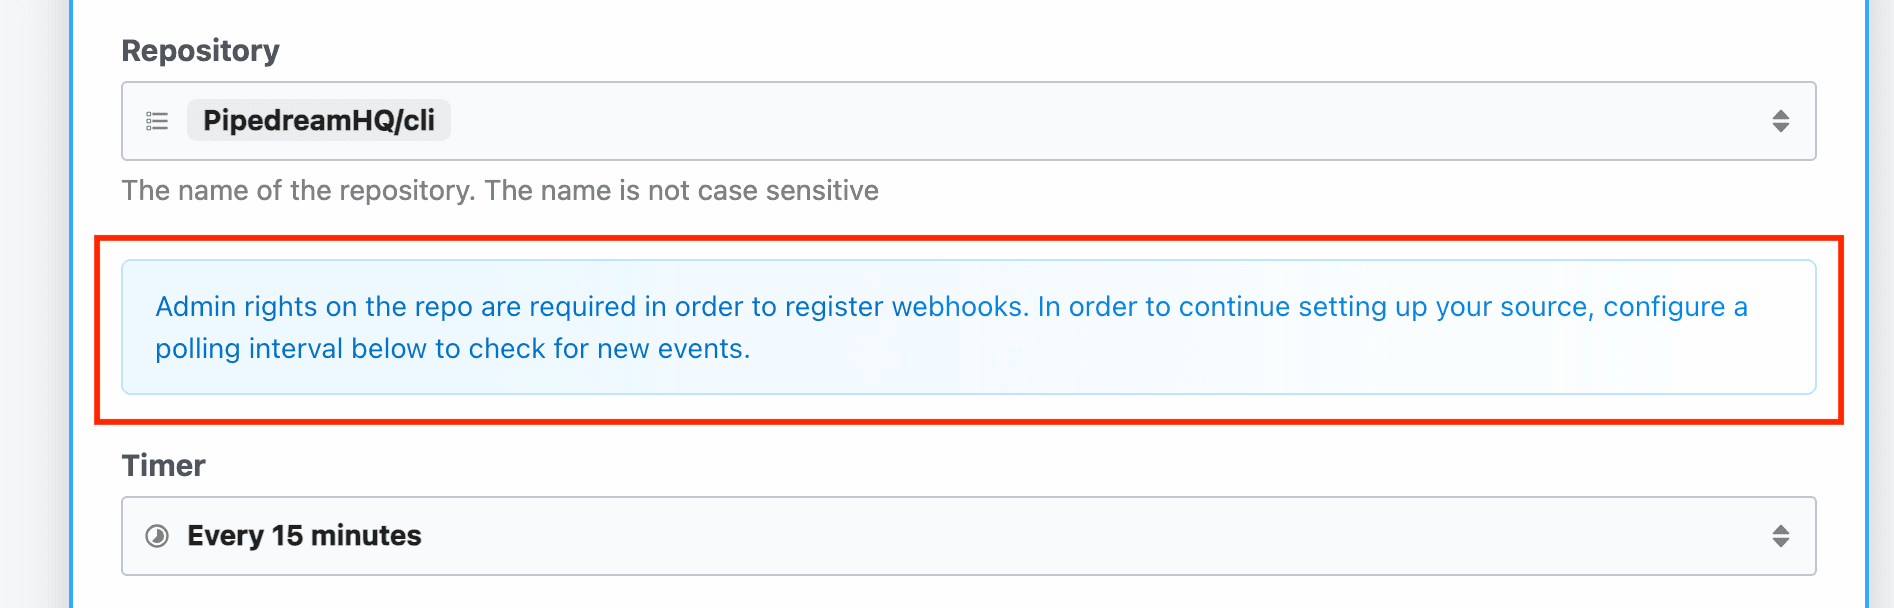
Info alert prop in GitHub source
Limits on props
When a user configures a prop with a value, it can hold at most 64KB data. Consider this when accepting large input in these fields (such as a base64 string). The 64KB limit applies only to static values entered as raw text.Methods
You can define helper functions within themethods property of your component. You have access to these functions within the run method, or within other methods.
Methods can be accessed using this.<method-name>. For example, a random method:
Hooks
Dedupe Strategies
IMPORTANT: To use a dedupe strategy, you must emit anidas part of the event metadata (dedupe strategies are applied to the submittedid)
Run
Each time a component is invoked, itsrun method is called. Sources are invoked by their interface (for example, via HTTP request). Actions are run when Pipedream invokes them.
You can reference this within the run method. this refers to the component, and provides access to props, methods, and more.
Sources
When a source is invoked, the event that triggered the source is passed torun, so that you can access it within the method:
$emit
this.$emit() is a method in scope for the run method of a source
Following is a basic example that emits an event on each component execution.
Logs
You can view logs produced by a source’srun method in the Logs section of the Pipedream source UI, or using the pd logs CLI command:
Events
If therun method emits events using this.$emit, you can access the events in the EVENTS section of the Pipedream UI for the component, or using the pd events CLI command:
Actions
When Pipedream runs an action, it passes an object with a$ variable that gives you access to special functions, outlined below:
Returning data from steps
By default, variables declared within an action are scoped to that action. To return data from a step, you have two options: 1) use thereturn keyword, or 2) use $.export to return a named export from a step.
return
Use return to return data from an action:
steps.[STEP NAME].$return_value. For example, if you ran the code above in a step named nodejs, you’d reference the returned data using steps.nodejs.$return_value.
$.export
You can also use $.export to return named exports from an action. $.export takes the name of the export as the first argument, and the value to export as the second argument:
steps.[STEP NAME].[EXPORT NAME].
Returning HTTP responses with $.respond
$.respond lets you issue an HTTP response to the request that triggered the component.
Ending steps early with return $.flow.exit
return $.flow.exit terminates the entire workflow. It accepts a single argument: a string that tells the workflow why the workflow terminated, which is displayed in the Pipedream UI.
$.summary
$.summary is used to surface brief, user-friendly summaries about what happened when an action step succeeds. For example, when adding items to a Spotify playlist:
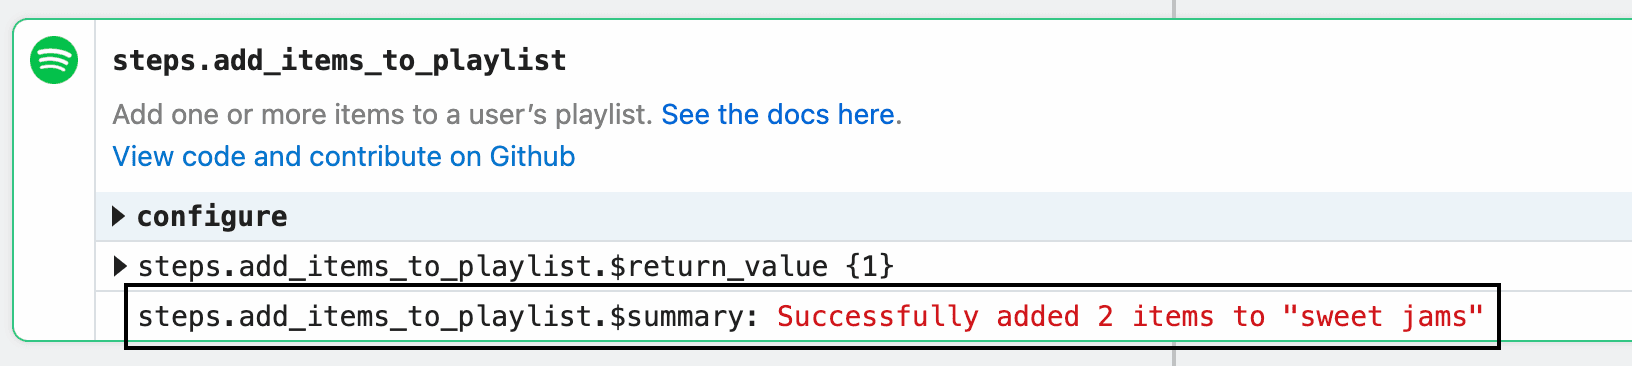
Spotify example with $summary
$.send
$.send allows you to send data to Pipedream destinations. Destinations are delivered asynchronously, after the component finishes running.
$.send.http
Sends data to an HTTP endpoint outside of Pipedream.
$.send.email
Sends an email to the address tied to your Pipedream account.
$.send.s3
Sends data to an Amazon S3 bucket.
$.send.emit
Emits an event that can be consumed using Pipedream’s REST API.
$.send.sse
Sends data to a client subscribed to a server-sent events (SSE) stream.
$.context
$.context exposes properties that describe the execution. Action authors can use it to get context about the caller and the current run.
All properties from the trigger context are exposed, as well as:
Environment variables
Environment variables are not accessible within sources or actions directly. Since components can be used by anyone, you cannot guarantee that a user will have a specific variable set in their environment. Usesecret props to reference sensitive data instead.
Using npm packages
To use an npm package in a component, just require it. There is nopackage.json or npm install required.
Referencing a specific version of a package
This currently applies only to sources. If you’d like to use a specific version of a package in a source, you can add that version in therequire string, for example: require("axios@0.19.2"). Moreover, you can pass the same version specifiers that npm and other tools allow to specify allowed semantic version upgrades. For example:
- To allow for future patch version upgrades, use
require("axios@~0.20.0") - To allow for patch and minor version upgrades, use
require("axios@^0.20.0")
Managing Components
Sources and actions are developed and deployed in different ways, given the different functions they serve in the product.Managing Sources
CLI - Development Mode
The easiest way to develop and test sources is with the
pd dev command. pd dev deploys a local file, attaches it to a component, and automatically updates the component on each local save. To deploy a new component with pd dev, run:
CLI - Deploy
From Local Code
To deploy a source via CLI, use thepd deploy command.
From Pipedream GitHub Repo
You can explore the components available to deploy in Pipedream’s GitHub repo.From Any URL
CLI - Update
View the CLI command reference.CLI - Delete
View the CLI command reference.UI - Deploy
You can find and deploy curated components at https://pipedream.com/sources/new, or you can deploy code via the UI using following URL patterns.From Pipedream GitHub Repo
From Any URL
UI - Update
You can update the code and props for a component from the Configuration tab for a source in the Pipedream UI.UI - Delete
You can delete a component via the UI at https://pipedream.com/sources.API
See the REST API docs.Managing Actions
CLI - Publish
To publish an action, use thepd publish command.
Source Lifecycle
Lifecycle hooks
Pipedream sources support the following hooks. The code for these hooks are defined within the component. Learn more about the component structure and hook usage.deploy
The deploy() hook is automatically invoked by Pipedream when a source is deployed. A common use case for the deploy hook is to create webhook subscriptions when the source is deployed, but you can run any Node.js code within the deploy hook. To learn more about the deploy() hook, refer to the API documentation.
activate
The activate() hook is automatically invoked by Pipedream when a source is deployed or updated. For example, this hook will be run when users update component props, so you can run code here that handles those changes. To learn more about defining a custom activate() hook, refer to the API documentation.
deactivate
The deactivate() hook is automatically invoked by Pipedream when a source is updated or deleted. A common use case for the deactivate hook is to automatically delete a webhook subscription when a component is deleted, but you can run any Node.js code within the deactivate hook. To learn more about the deactivate() hook, refer to the API documentation.
States
Saved Component
A saved component is non-instantiated component code that has previously been deployed to Pipedream. Each saved component has a unique saved component ID. Saved components cannot be invoked directly —they must first be deployed.Deployed Component
A deployed component is an instance of a saved component that can be invoked. Deployed components can be active or inactive. On deploy, Pipedream instantiates a saved component and invokes theactivate() hook.
Deleted Component
On delete, Pipedream invokes thedeactivate() hook and then deletes the deployed component instance.
Operations
Deploy
On deploy, Pipedream creates an instance of a saved component and invokes the optionaldeploy() and activate() hooks. A unique deployed component ID is generated for the component.
You can deploy a component via the CLI, UI or API.
Update
On update, Pipedream, invokes the optionaldeactivate() hook, updates the code and props for a deployed component, and then invokes the optional activate() hook. The deployed component ID is not changed by an update operation.
Delete
On delete, Pipedream invokes the optionaldeactivate() hook and deletes the component instance.
Source Event Lifecycle
The event lifecycle applies to deployed sources. Learn about the source lifecycle.Diagram
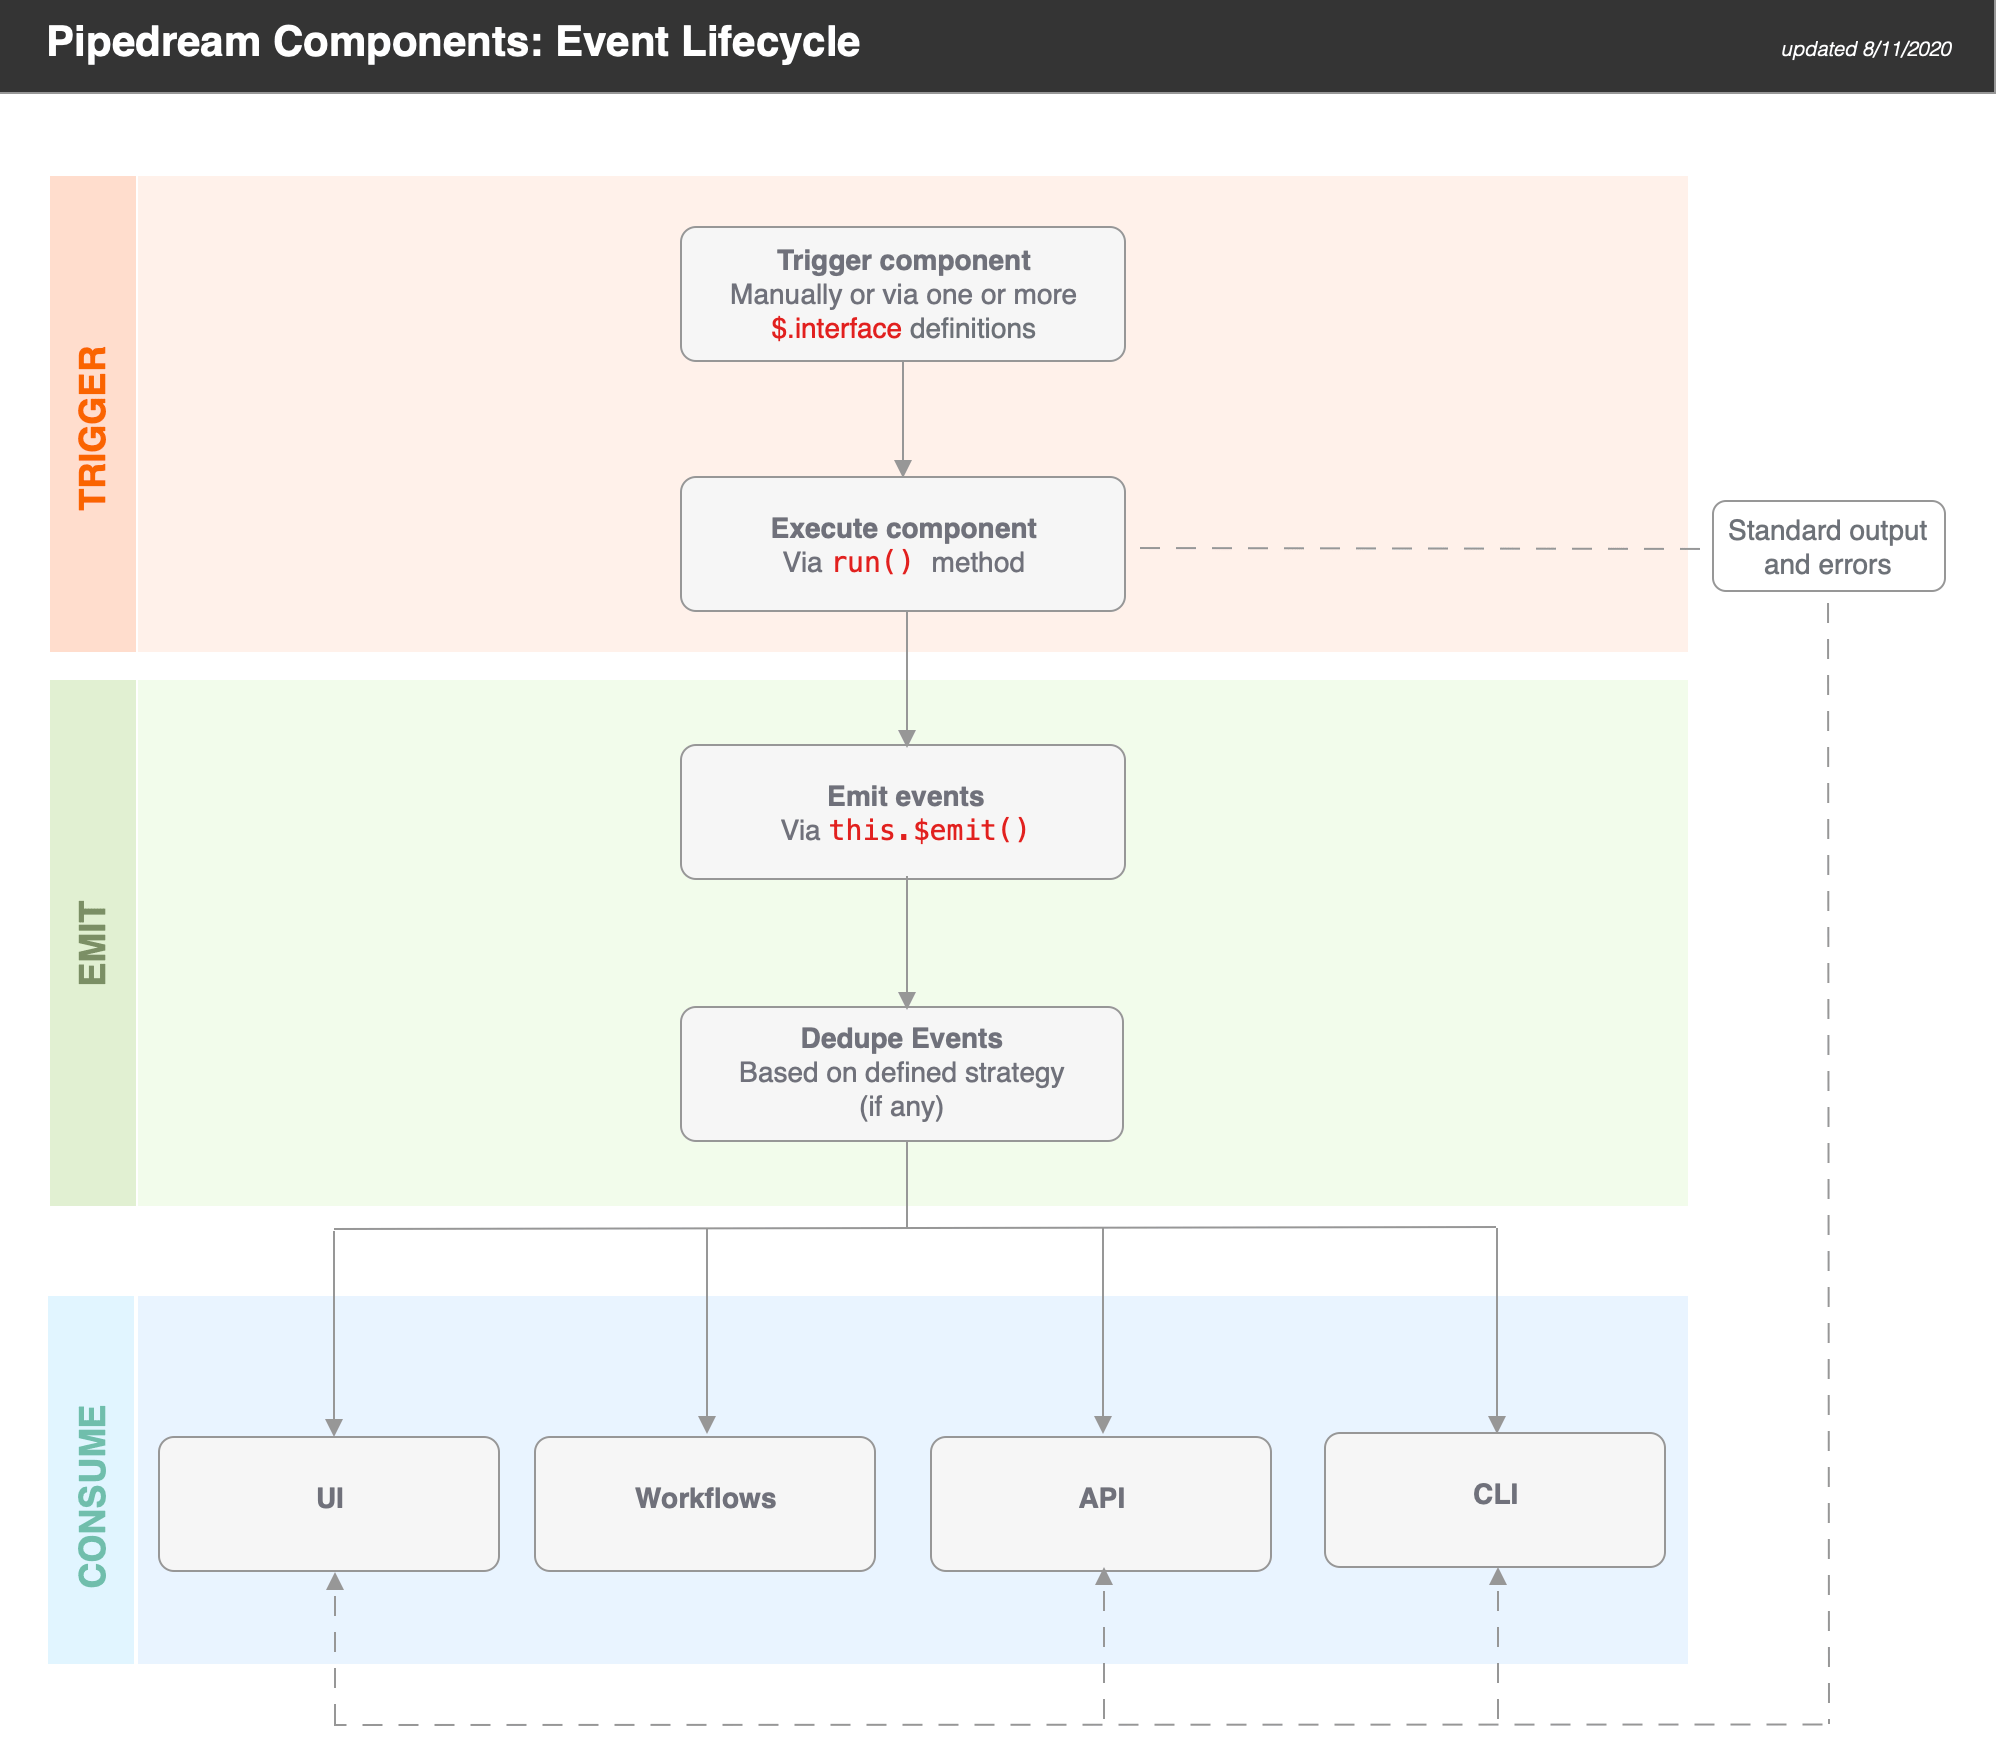
Pipedream Components Event Lifecycle Diagram
Triggering Sources
Sources are triggered when you manually run them (e.g., via the RUN NOW button in the UI) or when one of their interfaces is triggered. Pipedream sources currently support HTTP and Timer interfaces. When a source is triggered, therun() method of the component is executed. Standard output and errors are surfaced in the Logs tab.
Emitting Events from Sources
Sources can emit events viathis.$emit(). If you define a dedupe strategy for a source, Pipedream automatically dedupes the events you emit.
TIP: if you want to use a dedupe strategy, be sure to pass an id for each event. Pipedream uses this value for deduping purposes.
Consuming Events from Sources
Pipedream makes it easy to consume events via:- The UI
- Connect
- APIs
- CLI
UI
When you navigate to your source in the UI, you’ll be able to select and inspect the most recent 100 events (i.e., an event bin). For example, if you send requests to a simple HTTP source, you will be able to inspect the events (i.e., a request bin).Connect
Deploy the source as a trigger for one of your users and receive each event by webhook. Integrate with 3,000+ apps including Google Sheets, Discord, Slack, AWS, and more!API
Events can be retrieved using the REST API or the SSE stream tied to your component. This makes it easy to retrieve data processed by your component from another app. Typically, you’ll want to use the REST API to retrieve events in batch, and connect to the SSE stream to process them in real time.CLI
Use thepd events command to retrieve the last 10 events via the CLI: