You can share your workflows as templates with other Pipedream accounts with a unique shareable link.
Creating a share link for your workflow will allow anyone with the link to create a template version of your workflow in their own Pipedream account. This will allow others to use your workflow with their own Pipedream account and also their own connected accounts.
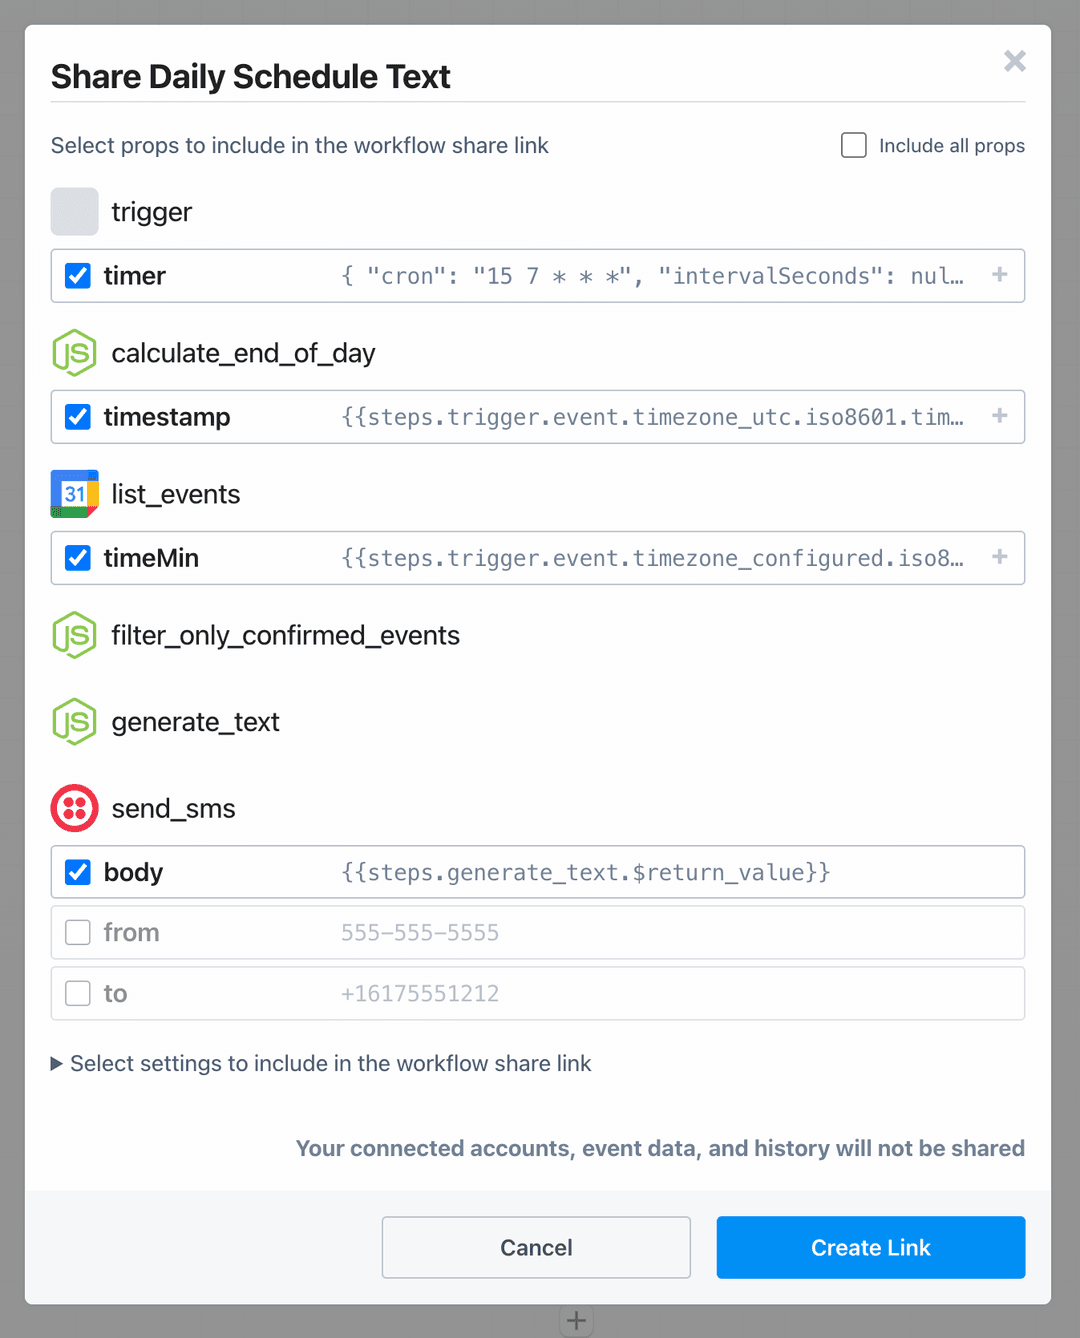
Here’s an example of a workflow that sends you a daily SMS message with today’s schedule:
Click Deploy to Pipedream below to create a copy of this workflow in your own Pipedream account.
The copied workflow includes the same trigger, steps, and connected account configuration, but it has a separate event history and versioning from the original.
Steps that are paused within your workflow will be omitted from the generated share link.
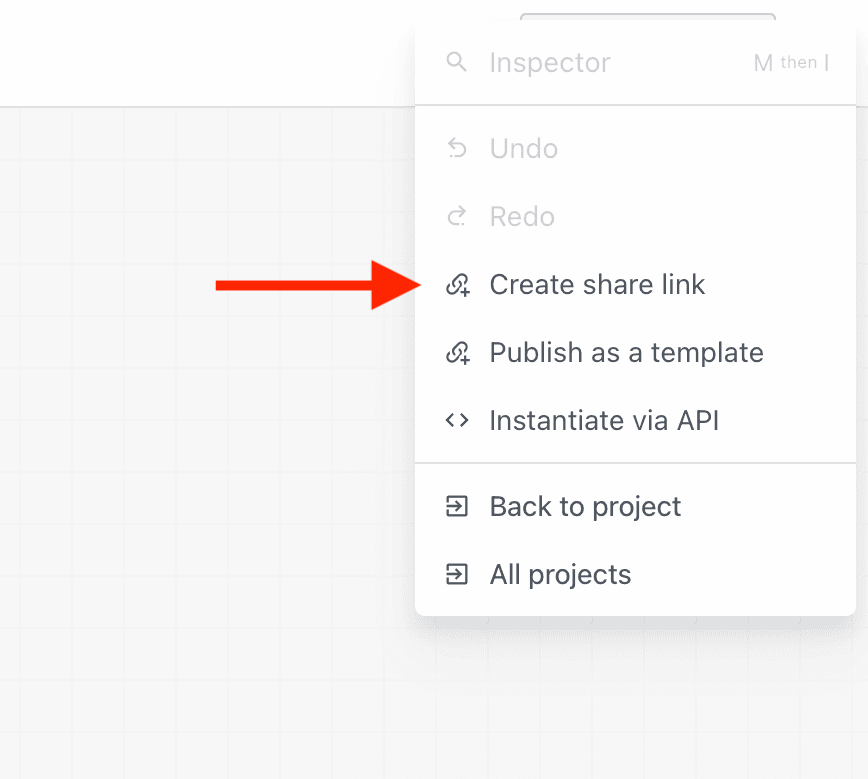
Creating a share link for a workflow
To share a workflow, open the workflow in your browser. Then in the top right menu, select Create Share Link.
Now you can define which prop values should be included in this shareable link.
Including props
Optionally, you can include the actual individual prop configurations as well. This helps speed up workflow development if the workflow relies on specific prop values to function properly.
You can choose to Include all prop values if you’d like, or only select specific props.
For the daily schedule reminder workflow, we included the props for filtering Google Calendar events, but we did not include the SMS number to send the message to. This is because the end user of this workflow will use their own phone number instead:
Your connected accounts are not shared. When other users configure your workflow from the shared link they’ll be prompted to connect their own accounts.
Versioning
- When you create a shared link for your workflow, that link is frozen to the version of your workflow at the time the link was created
- If you make changes to the original workflow, those changes will not be included in the shared workflow link, nor in any workflows copied from the original shared link
- To push out new changes to a workflow, you’ll need to generate a new share link
Share links persist. You can create multiple share links for the same workflow with different prop configurations, or even different steps. Share links do not expire, nor do newly created link overwrite existing ones.
FAQ
If changes are made to the original workflow, will copied versions of the workflow from the shared link also change?
No, workflows copied from a shared link will have separate version histories from the original workflow. You can modify your original workflow and it will not affect copied workflows.
The only exception is if you use a share link within your own workspace, which is not recommended (you should copy the workflow directly instead). There is a known issue in this case where changes in the new workflow’s trigger can impact the existing workflow’s trigger.
Will my connected accounts be shared with the workflow?
No, your connected accounts are not shared. Instead, copied workflows display a slot in actions that require a connected account, so the user of the copied workflow can provide their own accounts instead.
For example, if one of your steps relies on a Slack connected account to send a message, then the copied workflow will display the need to connect a Slack account.
I haven’t made any changes to my workflow, but if I generate another shared link will it override my original link?
No, if the steps and prop configuration of the workflow is exactly the same, then the shared link URL will also be exactly the same.
The shared workflow link is determined by the configuration of your workflow, it’s not a randomly generated ID.
Will generating new shared links disable or delete old links?
No, each link you generate will be available even if you create new versions based on changes or included props from the original workflow.
What plan is this feature available on?
Sharing workflows via link is available on all plans, including the Free plan.
Do users of my workflow need to have a subscription?
To copy a workflow, a subscription is not required. However, the copied workflow is subject to the current workspace’s plan limits.
For example, if a workflow requires more connected accounts than what’s available on the Free plan, then users of your workflow will require a plan to run the workflow properly.
Will copies of my workflow use my credits?
No. Copied workflows have entirely separate versioning, connected accounts, and billing. Sharing workflow copies is free, and the user of the copy usage is responsible for credit usage. Your original workflow is entirely separate from the copy.
How can I transfer all of my workflows from one account to another?
It’s only possible to share a single workflow at time with a link at this time.
Are step notes included when I share a workflow?
Yes any step notes you’ve added to your workflow are included in the copied version.