← HTTP / Webhook + Clerk integrations

Create User with Clerk API on New Requests (Payload Only) from HTTP / Webhook API

Pipedream makes it easy to connect APIs for Clerk, HTTP / Webhook and 2,100+ other apps remarkably fast.

Trigger workflow on
New Requests (Payload Only) from the HTTP / Webhook API
Next, do this
Create User with the Clerk API
No credit card required
Intro to Pipedream
Watch us build a workflow
8 min
Watch now ➜

Trusted by 800,000+ developers from startups to Fortune 500 companies

Adyen logo
Appcues logo
Bandwidth logo
Checkr logo
ChartMogul logo
Dataminr logo
Gopuff logo
Gorgias logo
LinkedIn logo
Logitech logo
Replicated logo
Rudderstack logo
SAS logo
Scale AI logo
Webflow logo
Warner Bros. logo
Adyen logo
Appcues logo
Bandwidth logo
Checkr logo
ChartMogul logo
Dataminr logo
Gopuff logo
Gorgias logo
LinkedIn logo
Logitech logo
Replicated logo
Rudderstack logo
SAS logo
Scale AI logo
Webflow logo
Warner Bros. logo

Developers Pipedream

Getting Started

This integration creates a workflow with a HTTP / Webhook trigger and Clerk action. When you configure and deploy the workflow, it will run on Pipedream's servers 24x7 for free.

  1. Select this integration
  2. Configure the New Requests (Payload Only) trigger
    1. Connect your HTTP / Webhook account
  3. Configure the Create User action
    1. Connect your Clerk account
    2. Optional- Configure External Id
    3. Optional- Configure First Name
    4. Optional- Configure Last Name
    5. Configure Email Addresses
    6. Optional- Configure Phone Numbers
    7. Optional- Configure Web3 Wallets
    8. Optional- Configure Username
    9. Configure Password
    10. Optional- Configure Password Digest
    11. Optional- Configure Password Hasher
    12. Optional- Configure Skip Password Checks
    13. Optional- Configure Skip Password Requirement
    14. Optional- Configure TOTP Secret
    15. Optional- Configure Backup Codes
    16. Optional- Configure Public Metadata
    17. Optional- Configure Private Metadata
    18. Optional- Configure Unsafe Metadata
    19. Optional- Configure Created At
  4. Deploy the workflow
  5. Send a test event to validate your setup
  6. Turn on the trigger

Details

This integration uses pre-built, source-available components from Pipedream's GitHub repo. These components are developed by Pipedream and the community, and verified and maintained by Pipedream.

To contribute an update to an existing component or create a new component, create a PR on GitHub. If you're new to Pipedream component development, you can start with quickstarts for trigger span and action development, and then review the component API reference.

Trigger

Description:Get a URL and emit the HTTP body as an event on every request
Version:0.1.1
Key:http-new-requests-payload-only

HTTP / Webhook Overview

Build, test, and send HTTP requests without code using your Pipedream workflows. The HTTP / Webhook action is a tool to build HTTP requests with a Postman-like graphical interface.

An interface for configuring an HTTP request within Pipedream's workflow system. The current selection is a GET request with fields for the request URL, authorization type (set to 'None' with a note explaining "This request does not use authorization"), parameters, headers (with a count of 1, though the detail is not visible), and body. Below the main configuration area is an option to "Include Response Headers," and a button labeled "Configure to test." The overall layout suggests a user-friendly, no-code approach to setting up custom HTTP requests.

Point and click HTTP requests

Define the target URL, HTTP verb, headers, query parameters, and payload body without writing custom code.

A screenshot of Pipedream's HTTP Request Configuration interface with a GET request type selected. The request URL is set to 'https://api.openai.com/v1/models'. The 'Auth' tab is highlighted, indicating that authentication is required for this request. In the headers section, there are two headers configured: 'User-Agent' is set to 'pipedream/1', and 'Authorization' is set to 'Bearer {{openai_api_key}}', showing how the OpenAI account's API key is dynamically inserted into the headers to handle authentication automatically.

Here's an example workflow that uses the HTTP / Webhook action to send an authenticated API request to OpenAI.

Focus on integrating, not authenticating

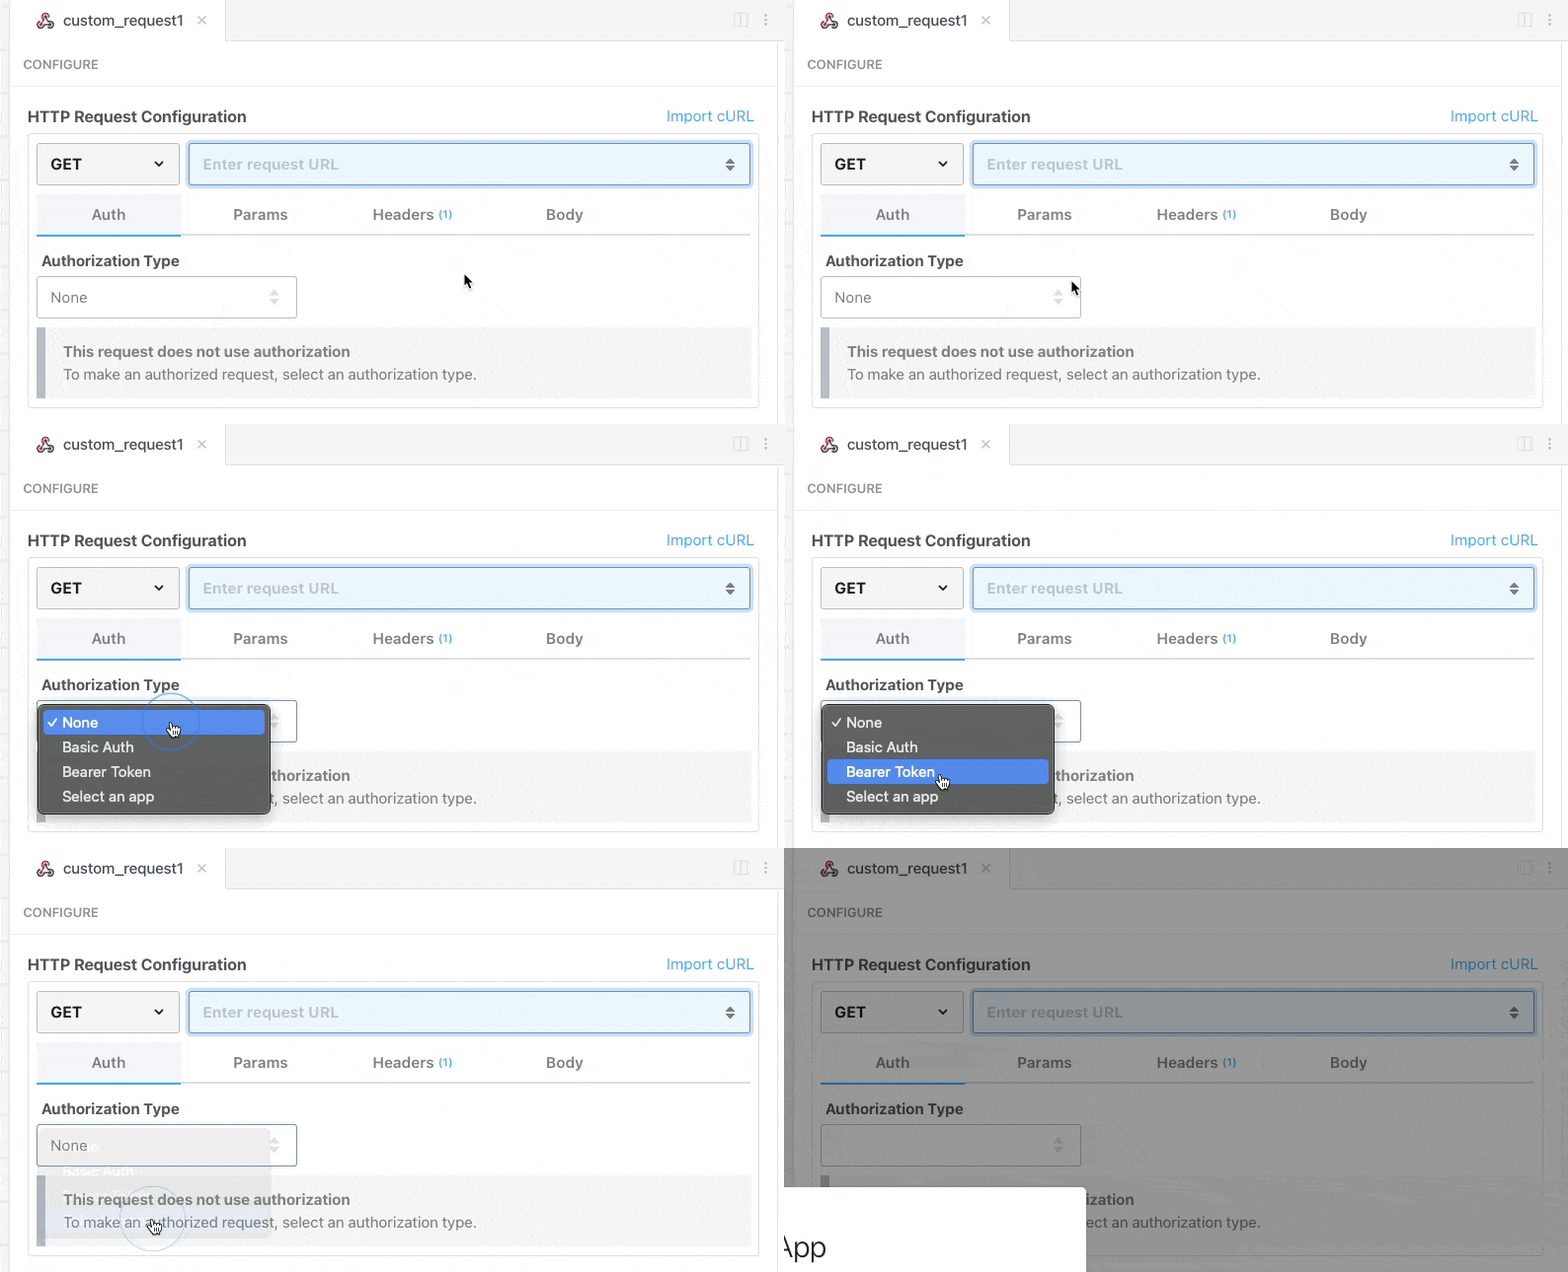
This action can also use your connected accounts with third-party APIs. Selecting an integrated app will automatically update the request’s headers to authenticate with the app properly, and even inject your token dynamically.

This GIF depicts the process of selecting an application within Pipedream's HTTP Request Builder. A user hovers the cursor over the 'Auth' tab and clicks on a dropdown menu labeled 'Authorization Type', then scrolls through a list of applications to choose from for authorization purposes. The interface provides a streamlined and intuitive method for users to authenticate their HTTP requests by selecting the relevant app in the configuration settings.

Pipedream integrates with thousands of APIs, but if you can’t find a Pipedream integration simply use Environment Variables in your request headers to authenticate with.

Compatible with no code actions or Node.js and Python

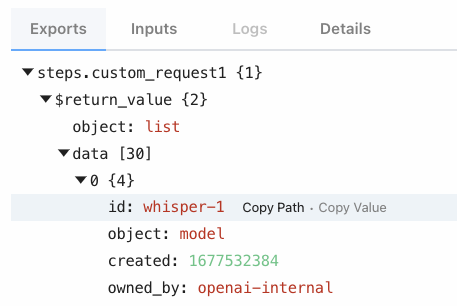
The HTTP/Webhook action exports HTTP response data for use in subsequent workflow steps, enabling easy data transformation, further API calls, database storage, and more.

Response data is available for both coded (Node.js, Python) and no-code steps within your workflow.

An image showing the Pipedream interface where the HTTP Webhook action has returned response data as a step export. The interface highlights a structured view of the returned data with collapsible sections. We can see 'steps.custom_request1' expanded to show 'return_value' which is an object containing a 'list'. Inside the list, an item 'data' is expanded to reveal an element with an 'id' of 'whisper-1', indicating a model created by and owned by 'openai-internal'. Options to 'Copy Path' and 'Copy Value' are available for easy access to the data points.

Trigger Code

import http from "../../http.app.mjs";

// Core HTTP component
// Returns a 200 OK response, emits the HTTP payload as an event
export default {
  key: "http-new-requests-payload-only",
  name: "New Requests (Payload Only)",
  // eslint-disable-next-line
  description: "Get a URL and emit the HTTP body as an event on every request",
  version: "0.1.1",
  type: "source",
  props: {
    // eslint-disable-next-line
    httpInterface: {
      type: "$.interface.http",
      customResponse: true,
    },
    http,
  },
  async run(event) {
    const { body } = event;
    this.httpInterface.respond({
      status: 200,
      body,
    });
    // Emit the HTTP payload
    this.$emit({
      body,
    });
  },
};

Trigger Configuration

This component may be configured based on the props defined in the component code. Pipedream automatically prompts for input values in the UI and CLI.
LabelPropTypeDescription
N/AhttpInterface$.interface.httpThis component uses $.interface.http to generate a unique URL when the component is first instantiated. Each request to the URL will trigger the run() method of the component.
HTTP / WebhookhttpappThis component uses the HTTP / Webhook app.

Trigger Authentication

The HTTP / Webhook API does not require authentication.

About HTTP / Webhook

Get a unique URL where you can send HTTP or webhook requests

Action

Description:Creates a new user. Your user management settings determine how you should setup your user model. [See the documentation](https://clerk.com/docs/reference/backend-api/tag/Users#operation/CreateUser)
Version:0.0.1
Key:clerk-create-user

Clerk Overview

The Clerk API lets you manage user authentication and create secure, delightful user experiences in your apps. Within Pipedream's serverless platform, you can harness this API to automate workflows that trigger on user events, sync user data across apps, and maintain robust user management without the heavy lifting of building authentication infrastructure from scratch.

Action Code

import clerk from "../../clerk.app.mjs";
import {
  parseError, parseObject,
} from "../../common/utils.mjs";

export default {
  key: "clerk-create-user",
  name: "Create User",
  version: "0.0.1",
  description: "Creates a new user. Your user management settings determine how you should setup your user model. [See the documentation](https://clerk.com/docs/reference/backend-api/tag/Users#operation/CreateUser)",
  type: "action",
  props: {
    clerk,
    externalId: {
      propDefinition: [
        clerk,
        "externalId",
      ],
      optional: true,
    },
    firstName: {
      propDefinition: [
        clerk,
        "firstName",
      ],
      optional: true,
    },
    lastName: {
      propDefinition: [
        clerk,
        "lastName",
      ],
      optional: true,
    },
    emailAddress: {
      type: "string[]",
      label: "Email Addresses",
      description: "Email addresses to add to the user. Must be unique across your instance. The first email address will be set as the user's primary email address.",
    },
    phoneNumber: {
      type: "string[]",
      label: "Phone Numbers",
      description: "Phone numbers to add to the user. Must be unique across your instance. The first phone number will be set as user's primary phone number.",
      optional: true,
    },
    web3Wallet: {
      type: "string[]",
      label: "Web3 Wallets",
      description: "Web3 wallets to add to the user. Must be unique across your instance. The first wallet will be set as the user's primary wallet.",
      optional: true,
    },
    username: {
      propDefinition: [
        clerk,
        "username",
      ],
      optional: true,
    },
    password: {
      propDefinition: [
        clerk,
        "password",
      ],
    },
    passwordDigest: {
      type: "string",
      label: "Password Digest",
      description: "In case you already have the password digests and not the passswords, you can use them for the newly created user via this property. The digests should be generated with one of the supported algorithms. The hashing algorithm can be specified using the `Password Hasher` property.",
      optional: true,
    },
    passwordHasher: {
      type: "string",
      label: "Password Hasher",
      description: "The hashing algorithm that was used to generate the password digest. The algorithms that Clerk supports at the moment are `bcrypt`, `bcrypt_sha256_django`, `md5`, `pbkdf2_sha256`, `pbkdf2_sha256_django`, `phpass`, `scrypt_firebase` and 2 `argon2` variants, `argon2i` and `argon2id`. Each of the above expects the incoming digest to be of a particular format. [See the documentarion](https://clerk.com/docs/reference/backend-api/tag/Users#operation/CreateUser!path=password_hasher&t=request) for further information.",
      optional: true,
    },
    skipPasswordChecks: {
      propDefinition: [
        clerk,
        "skipPasswordChecks",
      ],
      optional: true,
    },
    skipPasswordRequirement: {
      type: "boolean",
      label: "Skip Password Requirement",
      description: "When set to `true`, `password` is not required anymore when creating the user and can be omitted. This is useful when you are trying to create a user that doesn't have a password, in an instance that is using passwords. Please note that you cannot use this flag if password is the only way for a user to sign into your instance.",
      optional: true,
    },
    totpSecret: {
      propDefinition: [
        clerk,
        "totpSecret",
      ],
      optional: true,
    },
    backupCodes: {
      propDefinition: [
        clerk,
        "backupCodes",
      ],
      optional: true,
    },
    publicMetadata: {
      propDefinition: [
        clerk,
        "publicMetadata",
      ],
      optional: true,
    },
    privateMetadata: {
      propDefinition: [
        clerk,
        "privateMetadata",
      ],
      optional: true,
    },
    unsafeMetadata: {
      propDefinition: [
        clerk,
        "unsafeMetadata",
      ],
      optional: true,
    },
    createdAt: {
      propDefinition: [
        clerk,
        "createdAt",
      ],
      optional: true,
    },
  },
  async run({ $ }) {
    if (this.passwordDigest) {
      this.password = null;
    }
    try {
      const response = await this.clerk.createUser({
        $,
        data: {
          external_id: this.externalId,
          first_name: this.firstName,
          last_name: this.lastName,
          email_address: parseObject(this.emailAddress),
          phone_number: parseObject(this.phoneNumber),
          web3_wallet: parseObject(this.web3Wallet),
          username: this.username,
          password: this.password,
          password_digest: this.passwordDigest,
          password_hasher: this.passwordHasher,
          skip_password_checks: this.skipPasswordChecks,
          skip_password_requirement: this.skipPasswordRequirement,
          totp_secret: this.totpSecret,
          backup_codes: parseObject(this.backupCodes),
          public_metadata: parseObject(this.publicMetadata),
          private_metadata: parseObject(this.privateMetadata),
          unsafe_metadata: parseObject(this.unsafeMetadata),
          created_at: this.createdAt,
        },
      });

      $.export("$summary", `A new user with Id: ${response.id} was successfully created!`);
      return response;
    } catch (err) {
      return parseError(err);
    }
  },
};

Action Configuration

This component may be configured based on the props defined in the component code. Pipedream automatically prompts for input values in the UI.

LabelPropTypeDescription
ClerkclerkappThis component uses the Clerk app.
External IdexternalIdstring

The ID of the user as used in your external systems or your previous authentication solution. Must be unique across your instance.

First NamefirstNamestring

The first name to assign to the user.

Last NamelastNamestring

The last name to assign to the user.

Email AddressesemailAddressstring[]

Email addresses to add to the user. Must be unique across your instance. The first email address will be set as the user's primary email address.

Phone NumbersphoneNumberstring[]

Phone numbers to add to the user. Must be unique across your instance. The first phone number will be set as user's primary phone number.

Web3 Walletsweb3Walletstring[]

Web3 wallets to add to the user. Must be unique across your instance. The first wallet will be set as the user's primary wallet.

Usernameusernamestring

The username to give to the user. It must be unique across your instance.

Passwordpasswordstring

The plaintext password to give to the user. Must be at least 8 characters long, and can not be in any list of hacked passwords.

Password DigestpasswordDigeststring

In case you already have the password digests and not the passswords, you can use them for the newly created user via this property. The digests should be generated with one of the supported algorithms. The hashing algorithm can be specified using the Password Hasher property.

Password HasherpasswordHasherstring

The hashing algorithm that was used to generate the password digest. The algorithms that Clerk supports at the moment are bcrypt, bcrypt_sha256_django, md5, pbkdf2_sha256, pbkdf2_sha256_django, phpass, scrypt_firebase and 2 argon2 variants, argon2i and argon2id. Each of the above expects the incoming digest to be of a particular format. See the documentarion for further information.

Skip Password ChecksskipPasswordChecksboolean

When set to true all password checks are skipped. It is recommended to use this method only when migrating plaintext passwords to Clerk. Upon migration the user base should be prompted to pick stronger password.

Skip Password RequirementskipPasswordRequirementboolean

When set to true, password is not required anymore when creating the user and can be omitted. This is useful when you are trying to create a user that doesn't have a password, in an instance that is using passwords. Please note that you cannot use this flag if password is the only way for a user to sign into your instance.

TOTP SecrettotpSecretstring

In case TOTP is configured on the instance, you can provide the secret to enable it on the newly created user without the need to reset it.

Backup CodesbackupCodesstring[]

If Backup Codes are configured on the instance, you can provide them to enable it on the newly created user without the need to reset them. You must provide the backup codes in plain format or the corresponding bcrypt digest.

Public MetadatapublicMetadataobject

Metadata saved on the user, that is visible to both your Frontend and Backend APIs.

Private MetadataprivateMetadataobject

Metadata saved on the user, that is only visible to your Backend API.

Unsafe MetadataunsafeMetadataobject

Metadata saved on the user, that can be updated from both the Frontend and Backend APIs. Note: Since this data can be modified from the frontend, it is not guaranteed to be safe.

Created AtcreatedAtstring

A custom date/time denoting when the user signed up to the application, specified in RFC3339 format (e.g. 2012-10-20T07:15:20.902Z).

Action Authentication

Clerk uses API keys for authentication. When you connect your Clerk account, Pipedream securely stores the keys so you can easily authenticate to Clerk APIs in both code and no-code steps.

About Clerk

Drop-in authentication for React and React Native.

More Ways to Connect Clerk + HTTP / Webhook

Create User Invitation with Clerk API on New Requests (Payload Only) from HTTP / Webhook API
HTTP / Webhook + Clerk
 
Try it
Create User Invitation with Clerk API on New Requests from HTTP / Webhook API
HTTP / Webhook + Clerk
 
Try it
Create User with Clerk API on New Requests from HTTP / Webhook API
HTTP / Webhook + Clerk
 
Try it
Delete User with Clerk API on New Requests (Payload Only) from HTTP / Webhook API
HTTP / Webhook + Clerk
 
Try it
Delete User with Clerk API on New Requests from HTTP / Webhook API
HTTP / Webhook + Clerk
 
Try it
New Requests from the HTTP / Webhook API

Get a URL and emit the full HTTP event on every request (including headers and query parameters). You can also configure the HTTP response code, body, and more.

 
Try it
New Requests (Payload Only) from the HTTP / Webhook API

Get a URL and emit the HTTP body as an event on every request

 
Try it
New event when the content of the URL changes. from the HTTP / Webhook API

Emit new event when the content of the URL changes.

 
Try it
Send any HTTP Request with the HTTP / Webhook API

Send an HTTP request using any method and URL. Optionally configure query string parameters, headers, and basic auth.

 
Try it
Send GET Request with the HTTP / Webhook API

Send an HTTP GET request to any URL. Optionally configure query string parameters, headers and basic auth.

 
Try it
Send POST Request with the HTTP / Webhook API

Send an HTTP POST request to any URL. Optionally configure query string parameters, headers and basic auth.

 
Try it
Send PUT Request with the HTTP / Webhook API

Send an HTTP PUT request to any URL. Optionally configure query string parameters, headers and basic auth.

 
Try it
Return HTTP Response with the HTTP / Webhook API

Use with an HTTP trigger that uses "Return a custom response from your workflow" as its HTTP Response

 
Try it

Explore Other Apps

1
-
24
of
2,100+
apps by most popular

HTTP / Webhook
HTTP / Webhook
Get a unique URL where you can send HTTP or webhook requests
Node
Node
Anything you can do with Node.js, you can do in a Pipedream workflow. This includes using most of npm's 400,000+ packages.
Python
Python
Anything you can do in Python can be done in a Pipedream Workflow. This includes using any of the 350,000+ PyPi packages available in your Python powered workflows.
OpenAI (ChatGPT)
OpenAI (ChatGPT)
OpenAI is an AI research and deployment company with the mission to ensure that artificial general intelligence benefits all of humanity. They are the makers of popular models like ChatGPT, DALL-E, and Whisper.
Premium
Salesforce
Salesforce
Web services API for interacting with Salesforce
Premium
HubSpot
HubSpot
HubSpot's CRM platform contains the marketing, sales, service, operations, and website-building software you need to grow your business.
Premium
Zoho CRM
Zoho CRM
Zoho CRM is an online Sales CRM software that manages your sales, marketing, and support in one CRM platform.
Premium
Stripe
Stripe
Stripe powers online and in-person payment processing and financial solutions for businesses of all sizes.
Shopify Developer App
Shopify is a user-friendly e-commerce platform that helps small businesses build an online store and sell online through one streamlined dashboard.
Premium
WooCommerce
WooCommerce
WooCommerce is the open-source ecommerce platform for WordPress.
Premium
Snowflake
Snowflake
A data warehouse built for the cloud
Premium
MongoDB
MongoDB
MongoDB is an open source NoSQL database management program.
Supabase
Supabase
Supabase is an open source Firebase alternative.
MySQL
MySQL
MySQL is an open-source relational database management system.
PostgreSQL
PostgreSQL
PostgreSQL is a free and open-source relational database management system emphasizing extensibility and SQL compliance.
Premium
AWS
AWS
Amazon Web Services (AWS) offers reliable, scalable, and inexpensive cloud computing services.
Premium
Twilio SendGrid
Twilio SendGrid
Send marketing and transactional email through the Twilio SendGrid platform with the Email API, proprietary mail transfer agent, and infrastructure for scalable delivery.
Amazon SES
Amazon SES
Amazon SES is a cloud-based email service provider that can integrate into any application for high volume email automation
Premium
Klaviyo
Klaviyo
Email Marketing and SMS Marketing Platform
Premium
Zendesk
Zendesk
Zendesk is award-winning customer service software trusted by 200K+ customers. Make customers happy via text, mobile, phone, email, live chat, social media.
Premium
ServiceNow
ServiceNow
The smarter way to workflow
Notion
Notion
Notion is a new tool that blends your everyday work apps into one. It's the all-in-one workspace for you and your team.
Slack
Slack
Slack is a channel-based messaging platform. With Slack, people can work together more effectively, connect all their software tools and services, and find the information they need to do their best work — all within a secure, enterprise-grade environment.
Microsoft Teams
Microsoft Teams
Microsoft Teams has communities, events, chats, channels, meetings, storage, tasks, and calendars in one place.