- Bi-directional GitHub sync (push and pull changes)
- Edit in development branches
- Track commit and merge history
- Link users to commits
- Merge from Pipedream or create PRs and merge from GitHub
- Edit in Pipedream or use a local editor and synchronize via GitHub (e.g., edit code, find and replace across multiple steps or workflows)
- Organize workflows into projects with support for nested folders
Getting Started
Create a new project and enable GitHub Sync
A project may contain one or more workflows and may be further organized using nested folders. Each project may be synchronized to a single GitHub repo.- Go to https://pipedream.com/projects
- Create a new project
-
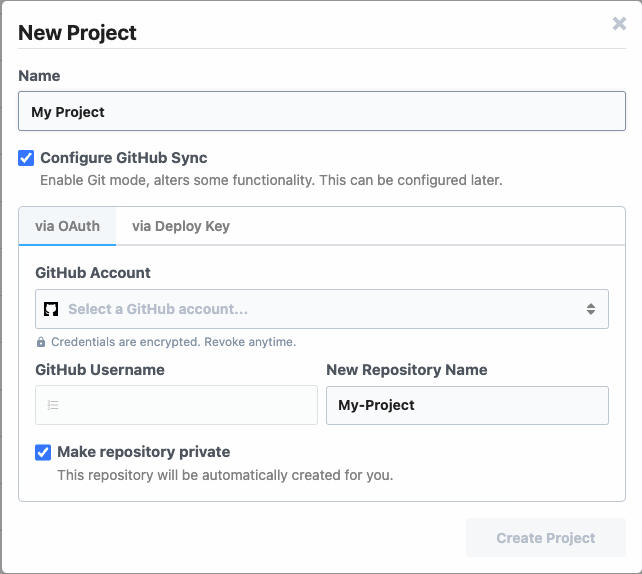
Enter a project name and check the box to Configure GitHub Sync
-
To use OAuth
- Select a connected account, GitHub scope and repo name
- Pipedream will automatically create a new, empty repo in GitHub
-
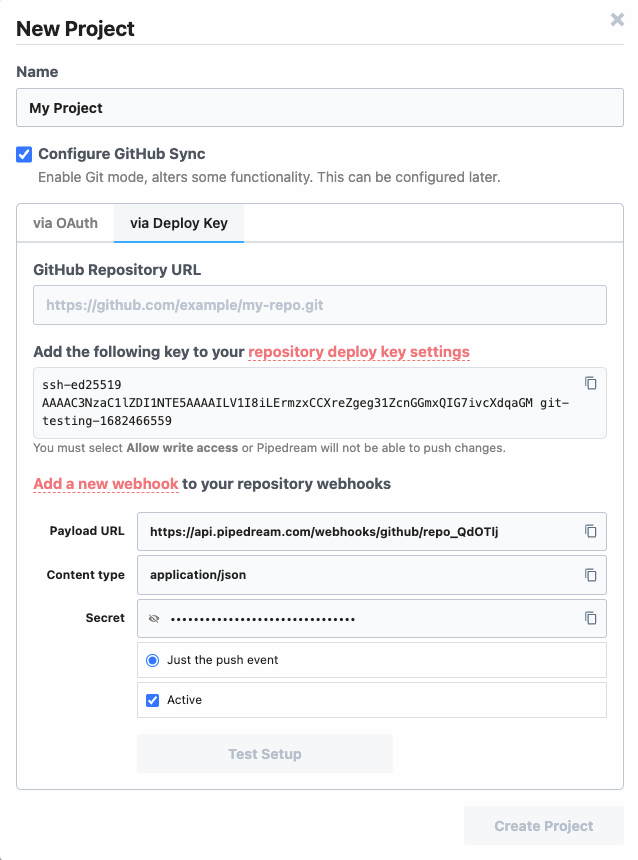
To use Deploy Keys
- Create a new repo in GitHub
- Copy and paste the URL of your new repo
- Follow the instructions to configure the deploy key
- Test your setup and create a new project
-
To use OAuth
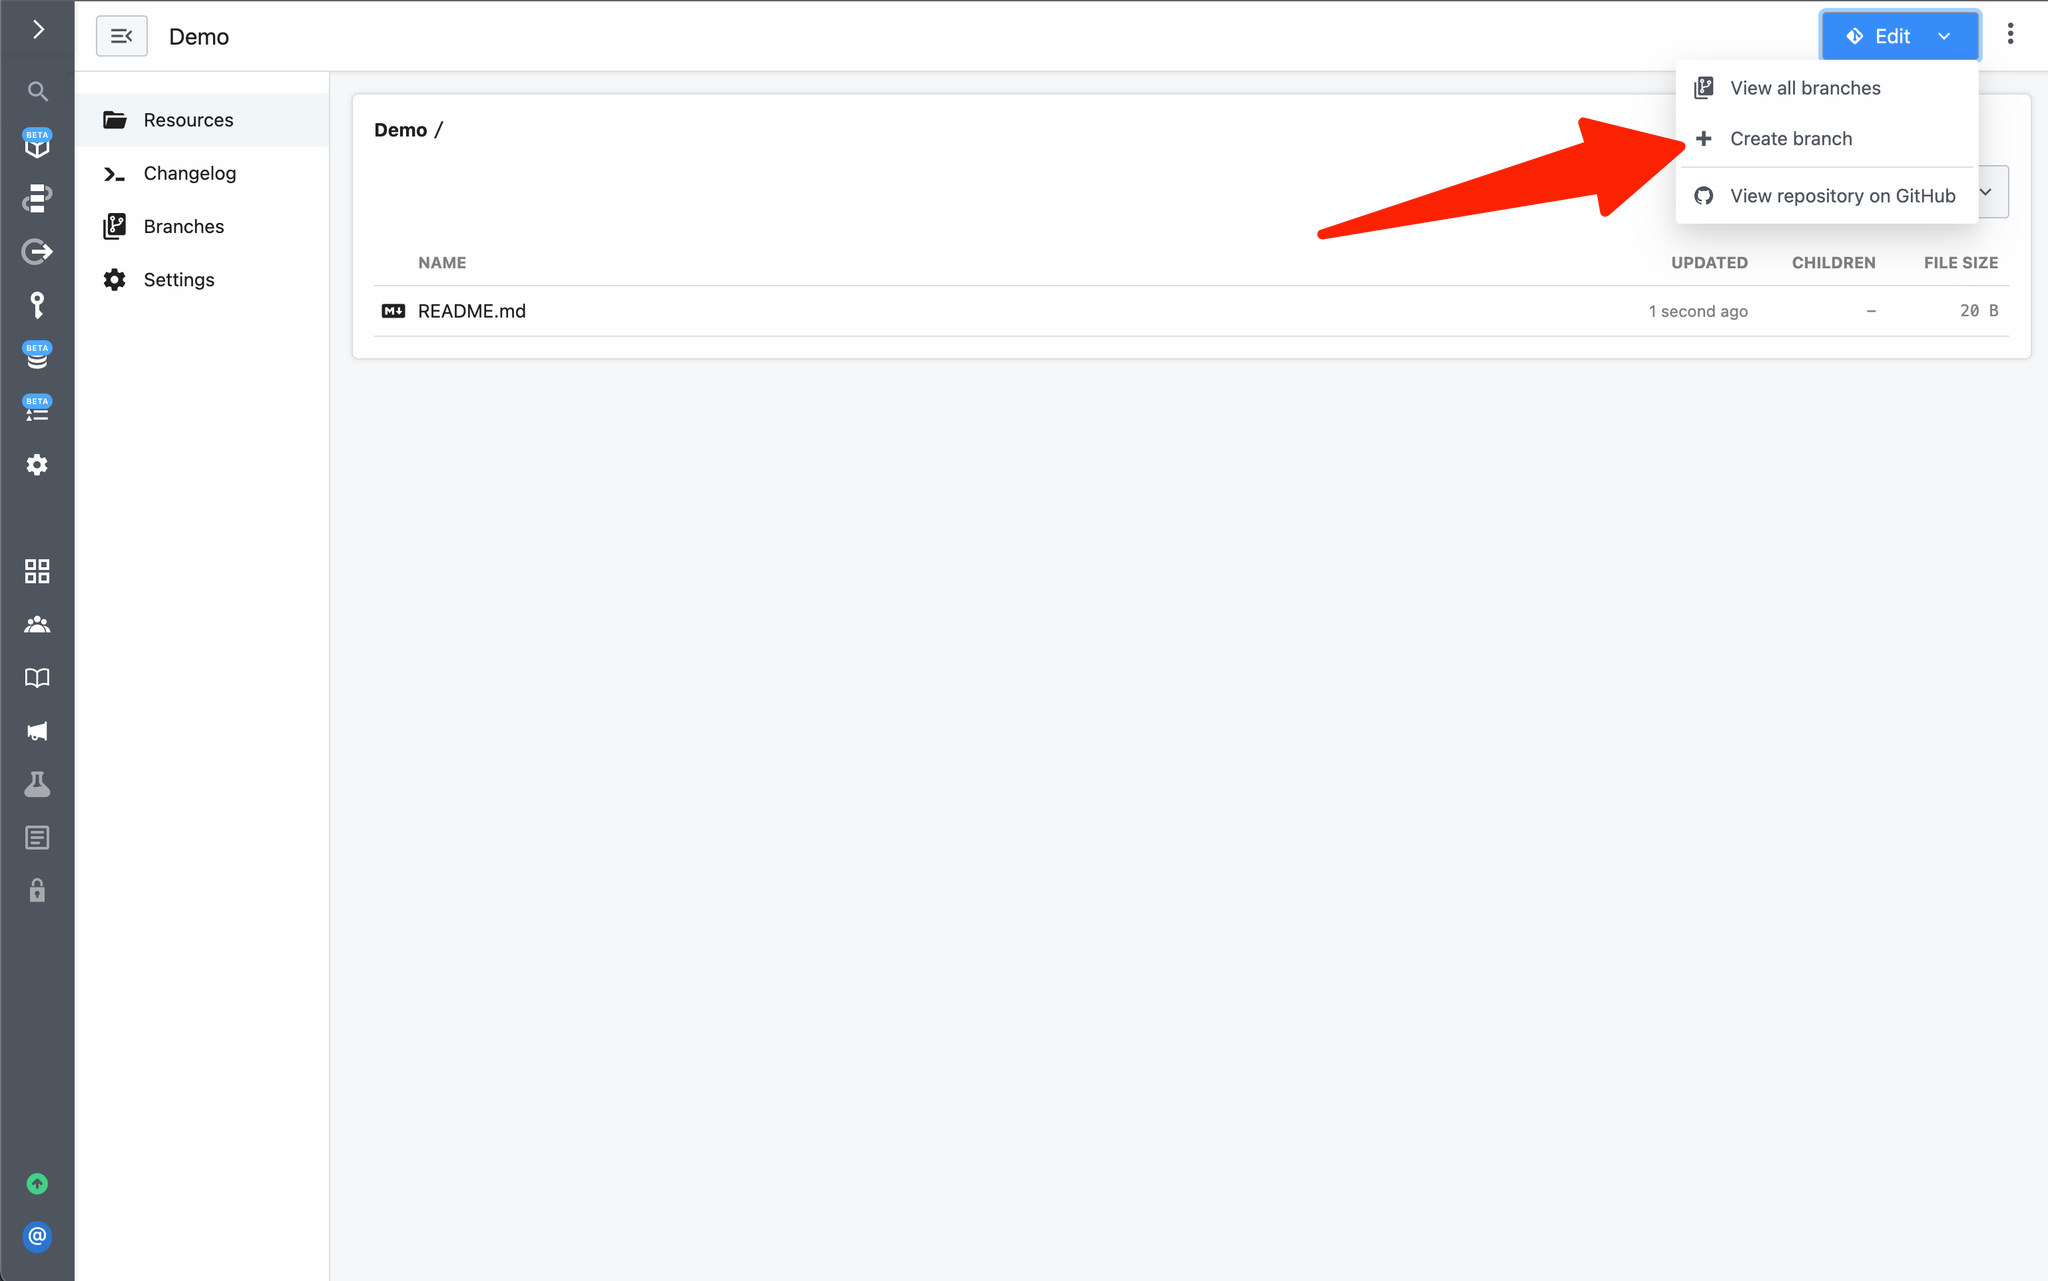
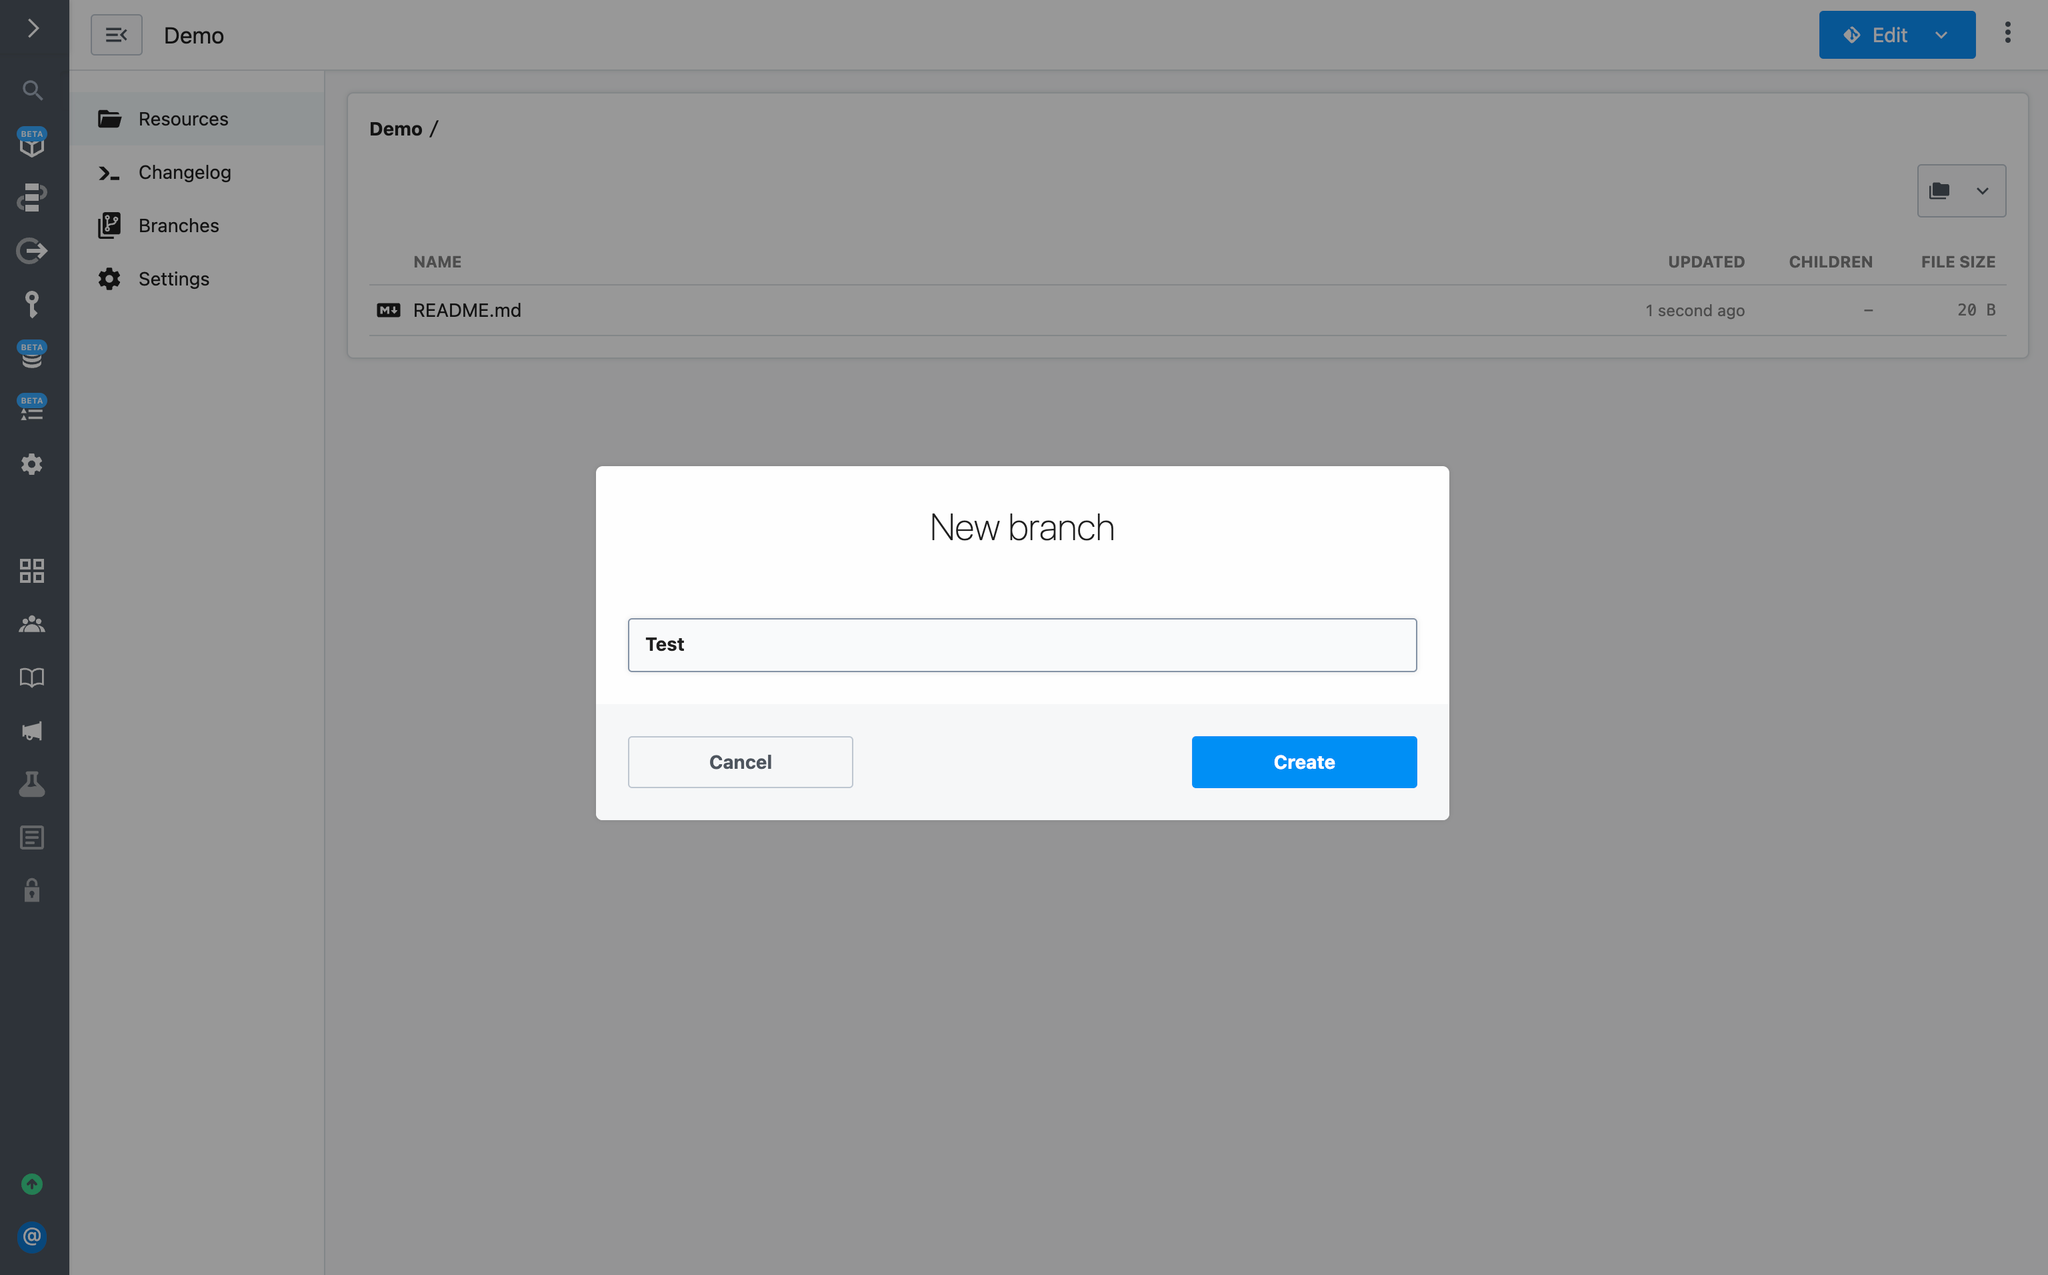
Create a branch to edit a project
Branches are required to make changesAll changes to resources in a project must be made in a development branch.Examples of changes include creating, editing, deleting, enabling, disabling and renaming workflows. This also includes changing workflow settings like concurrency, VPC assignment and auto-retries.
Merge changes to production
Once you’ve committed your changes, you can deploy your changes by merging them into theproduction branch through the Pipedream UI or GitHub.
When you merge a Git-backed project to production, all modified resources in the project will be deployed. Multiple workflows may be deployed, modified, or deleted in production through a single merge action.
Merge via the Pipedream UI
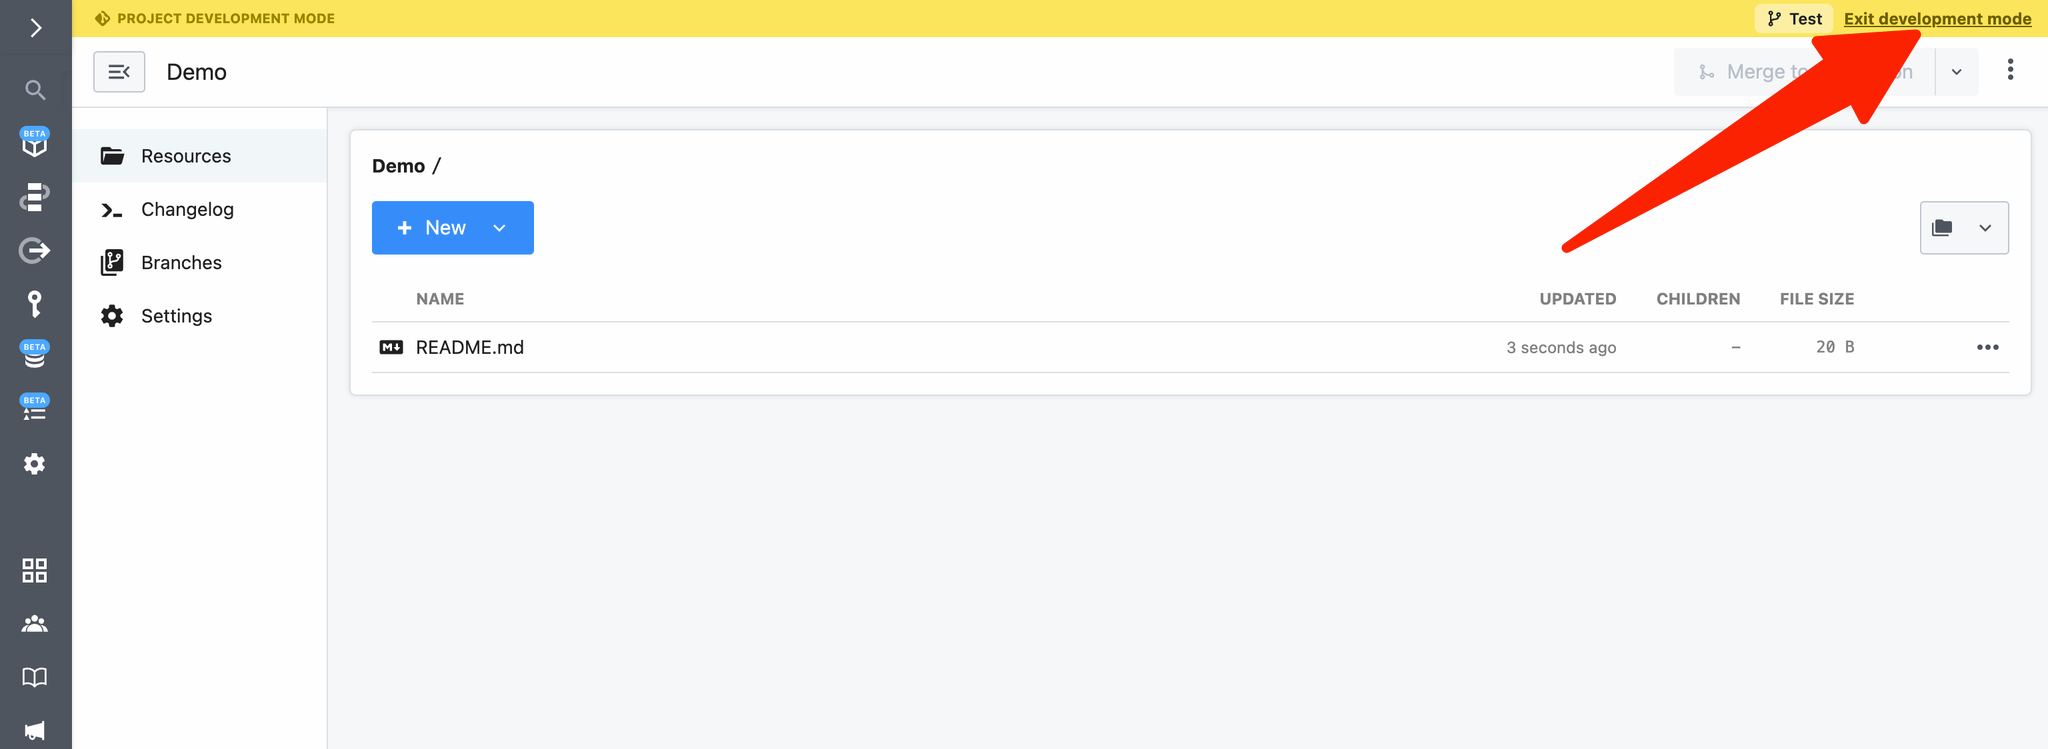
To merge changes to production, click on Merge to production: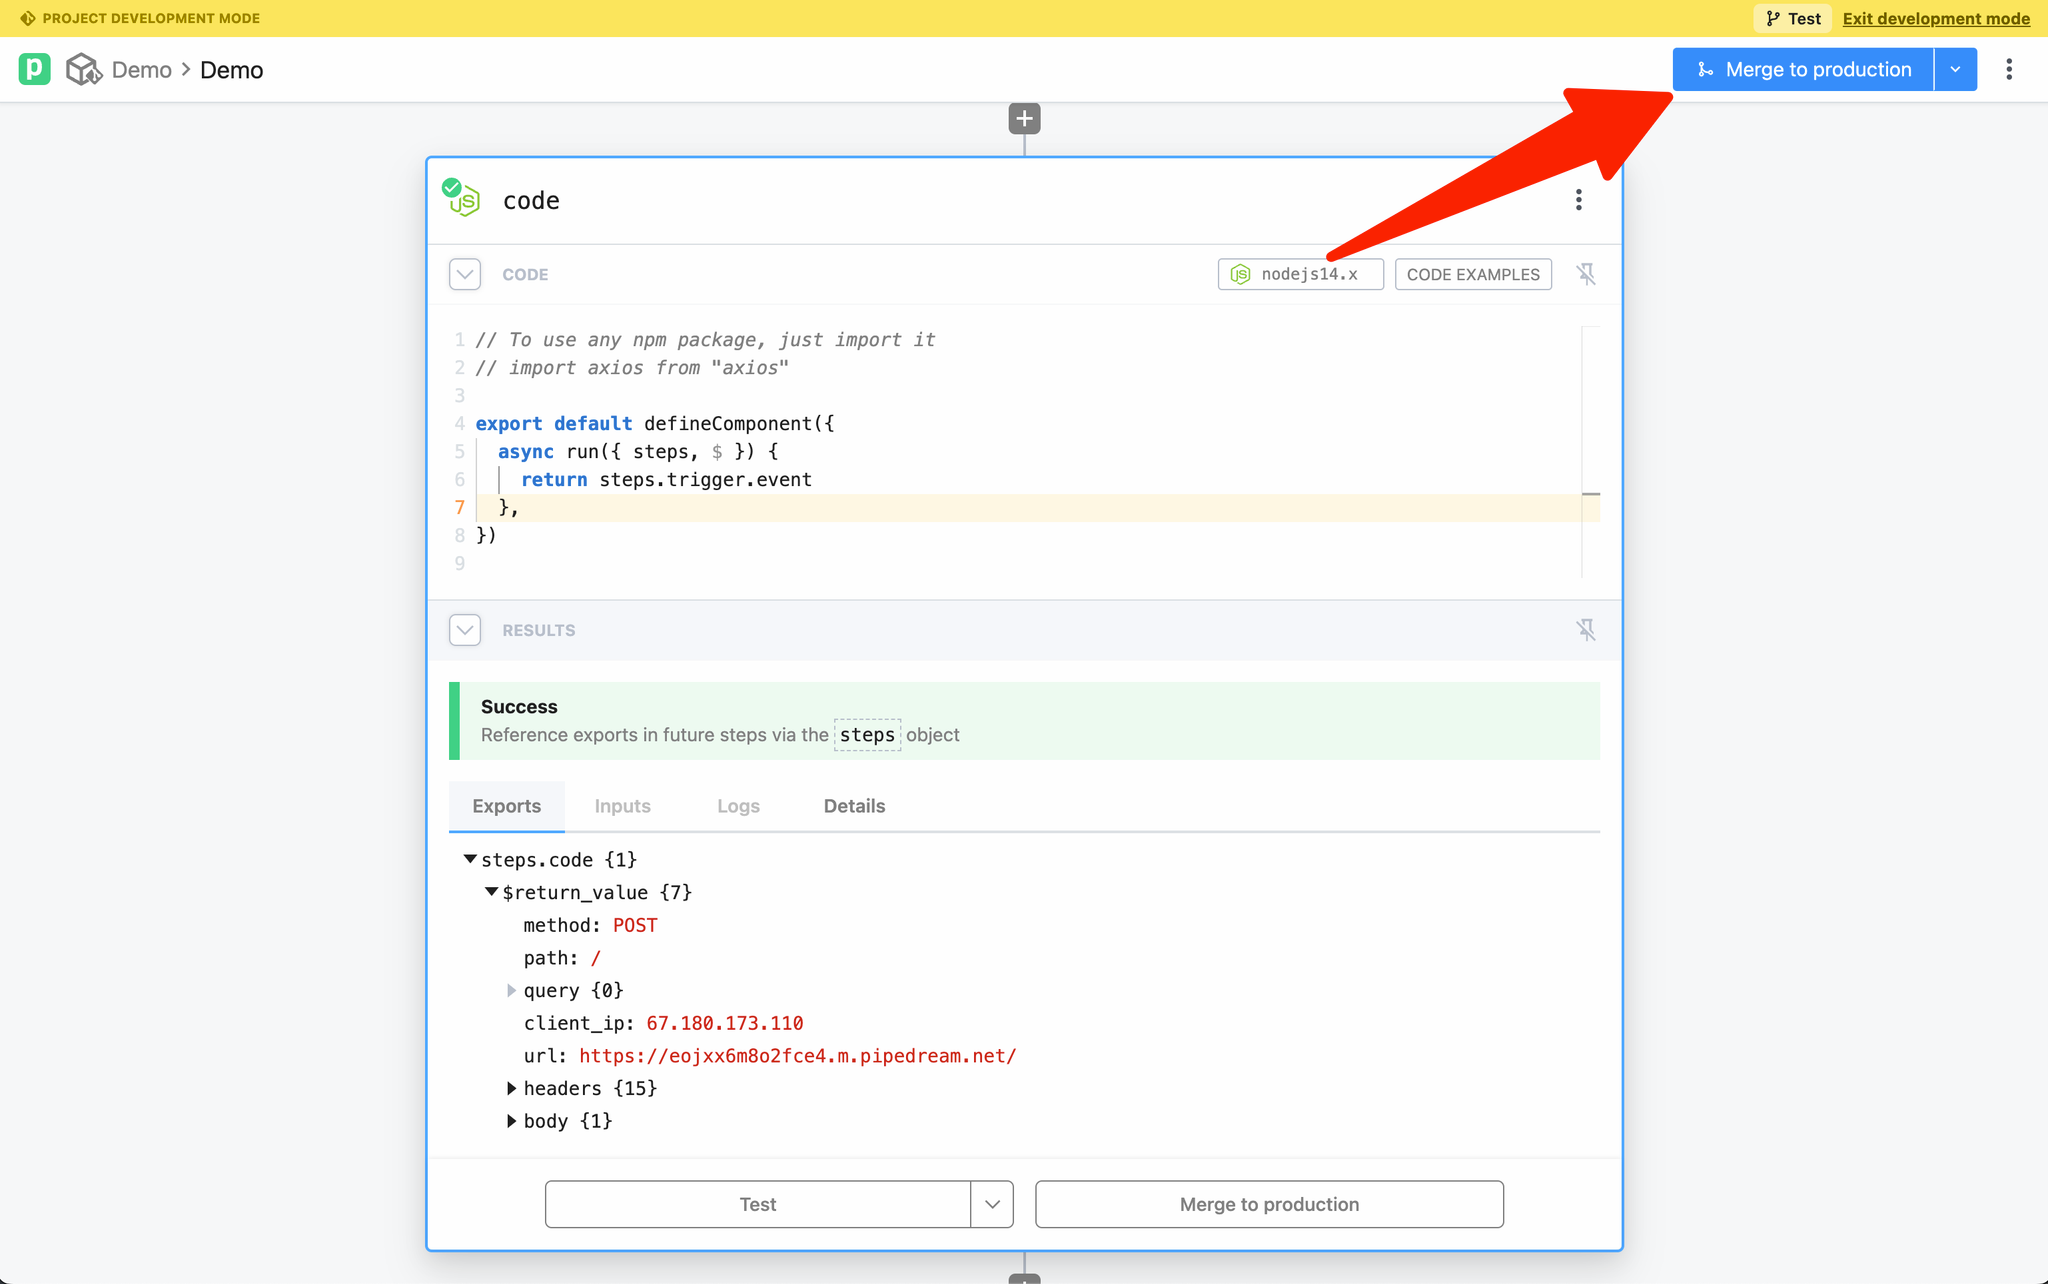
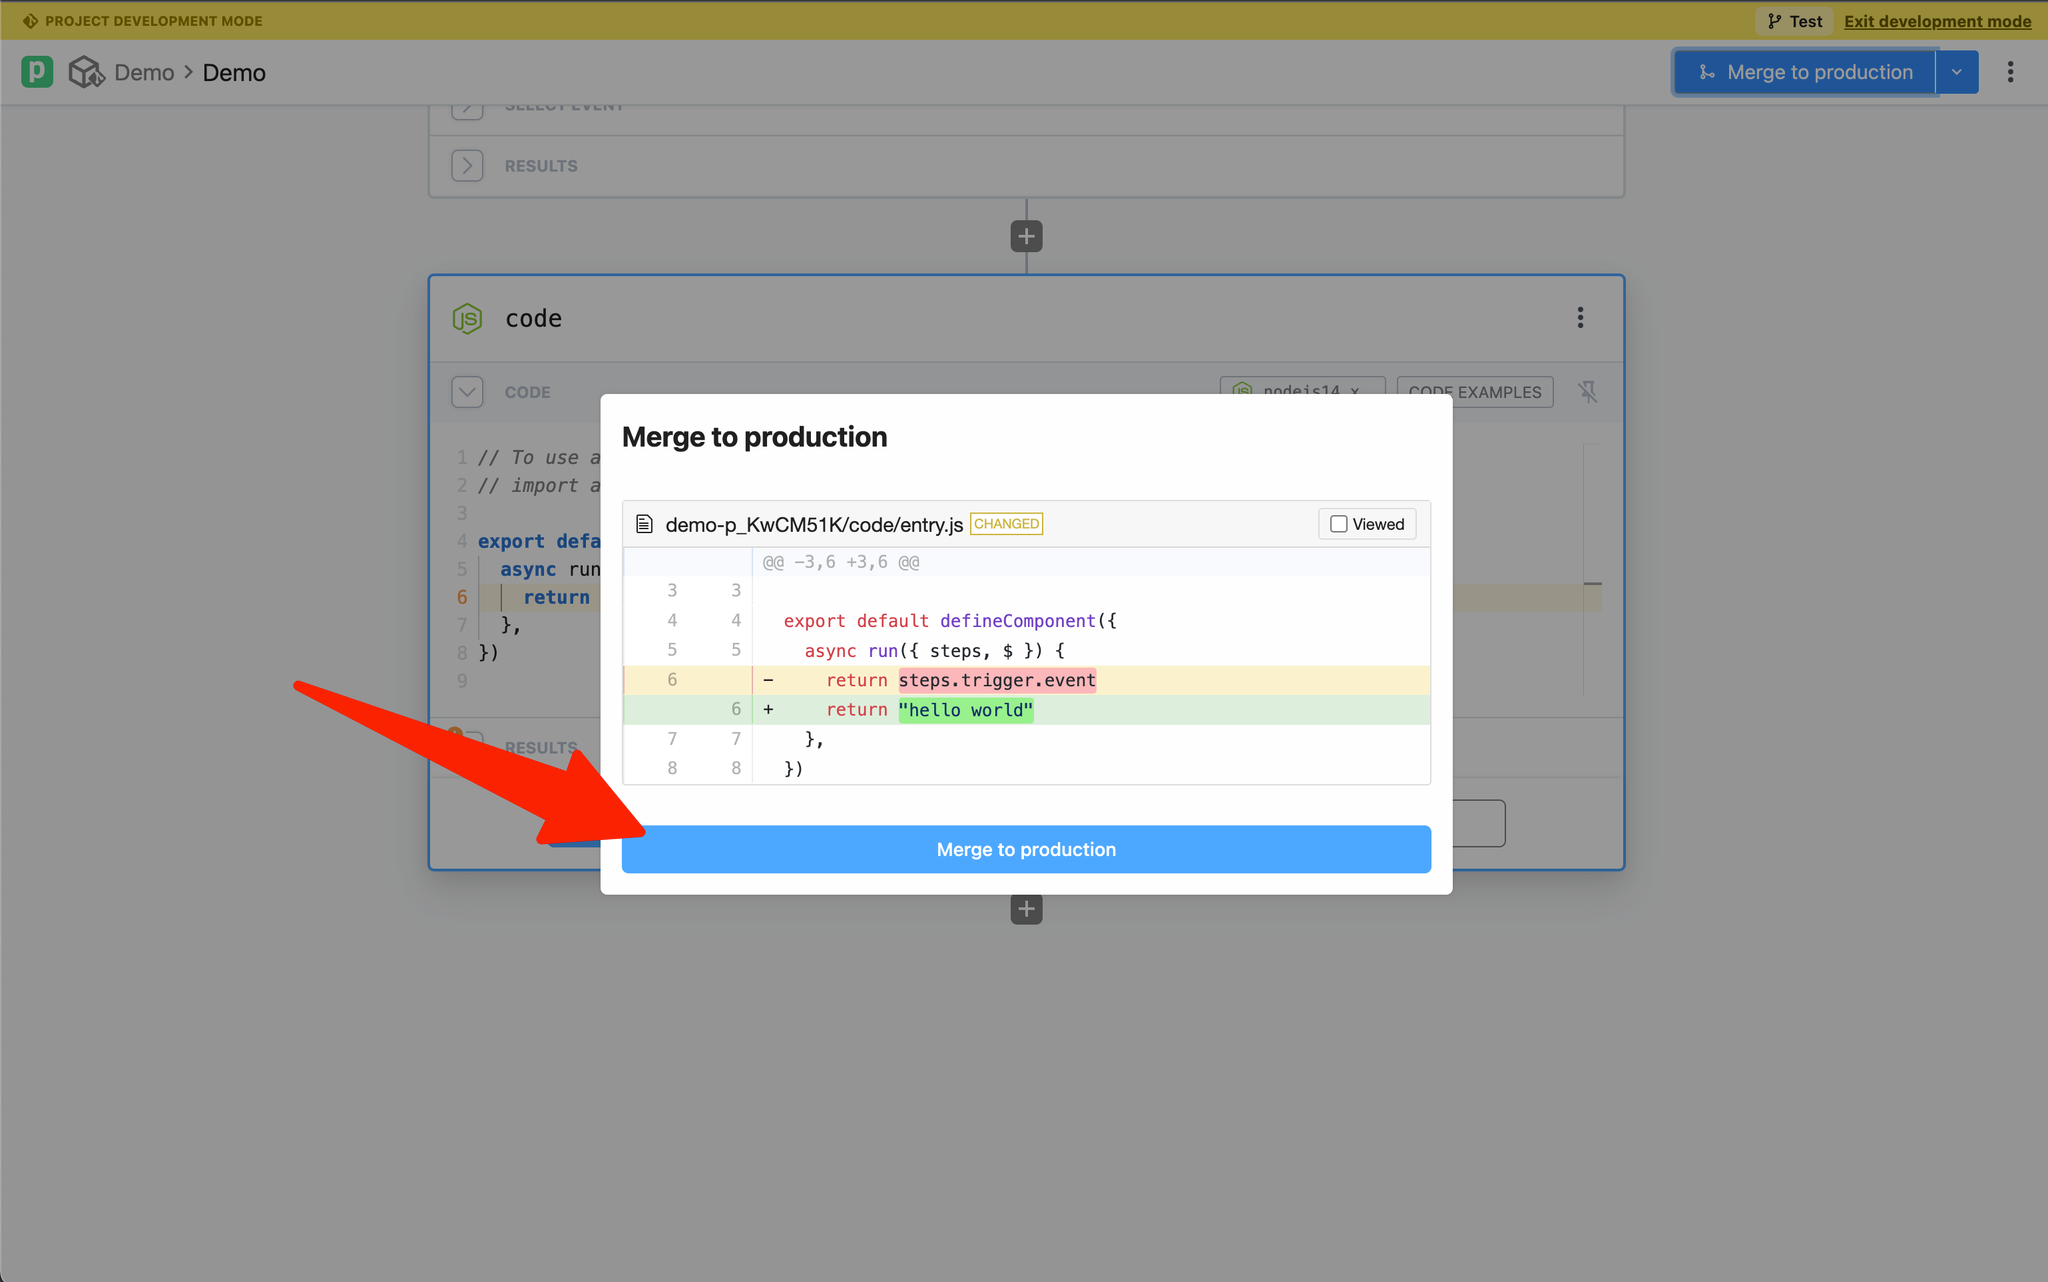
production branch. Validate your changes and click Merge to production to complete the merge:
Create a Pull Request in GitHub
To create a pull request in GitHub, either choose Open GitHub pull request from the git-actions menu in Pipedream or in GitHub: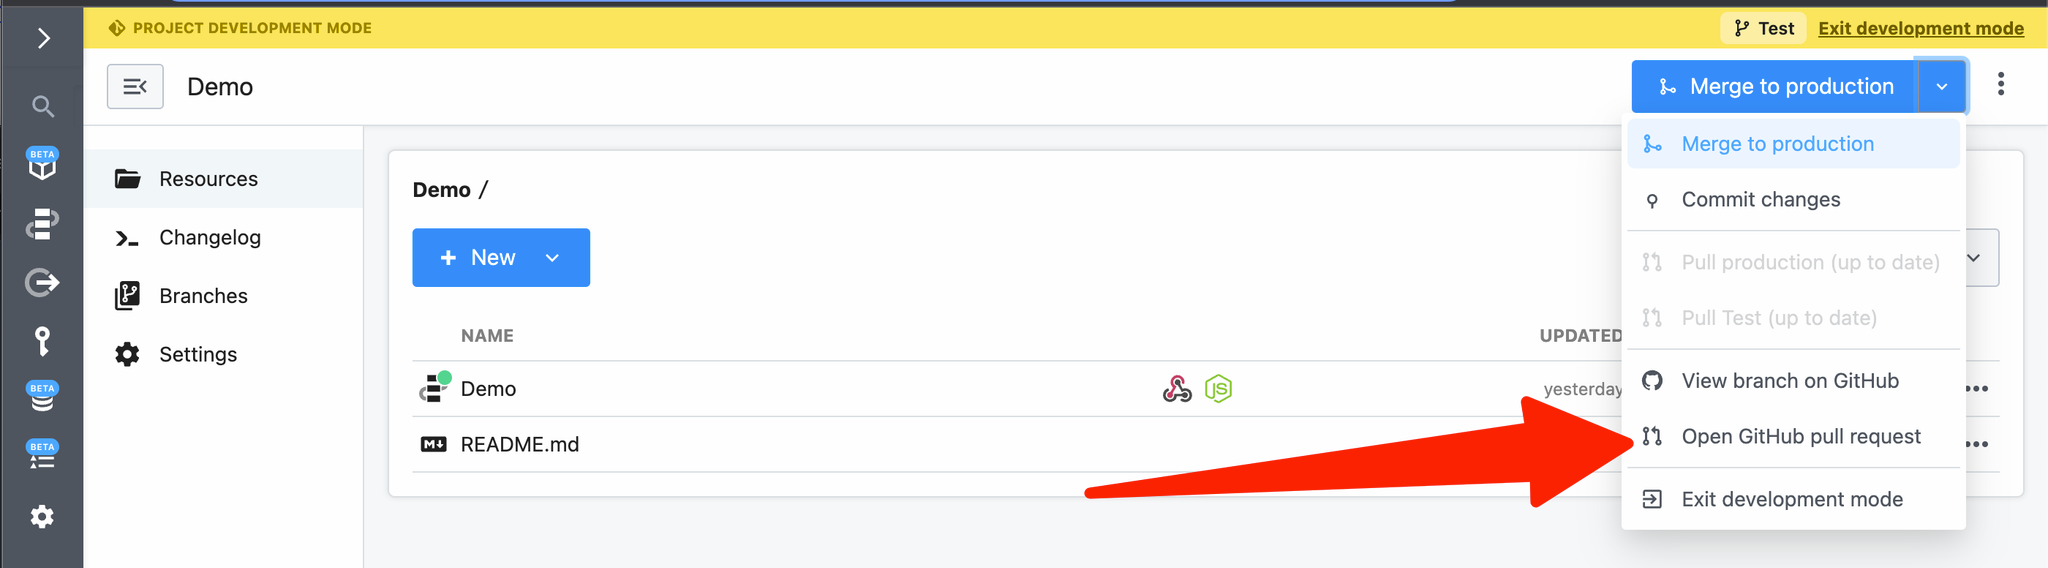
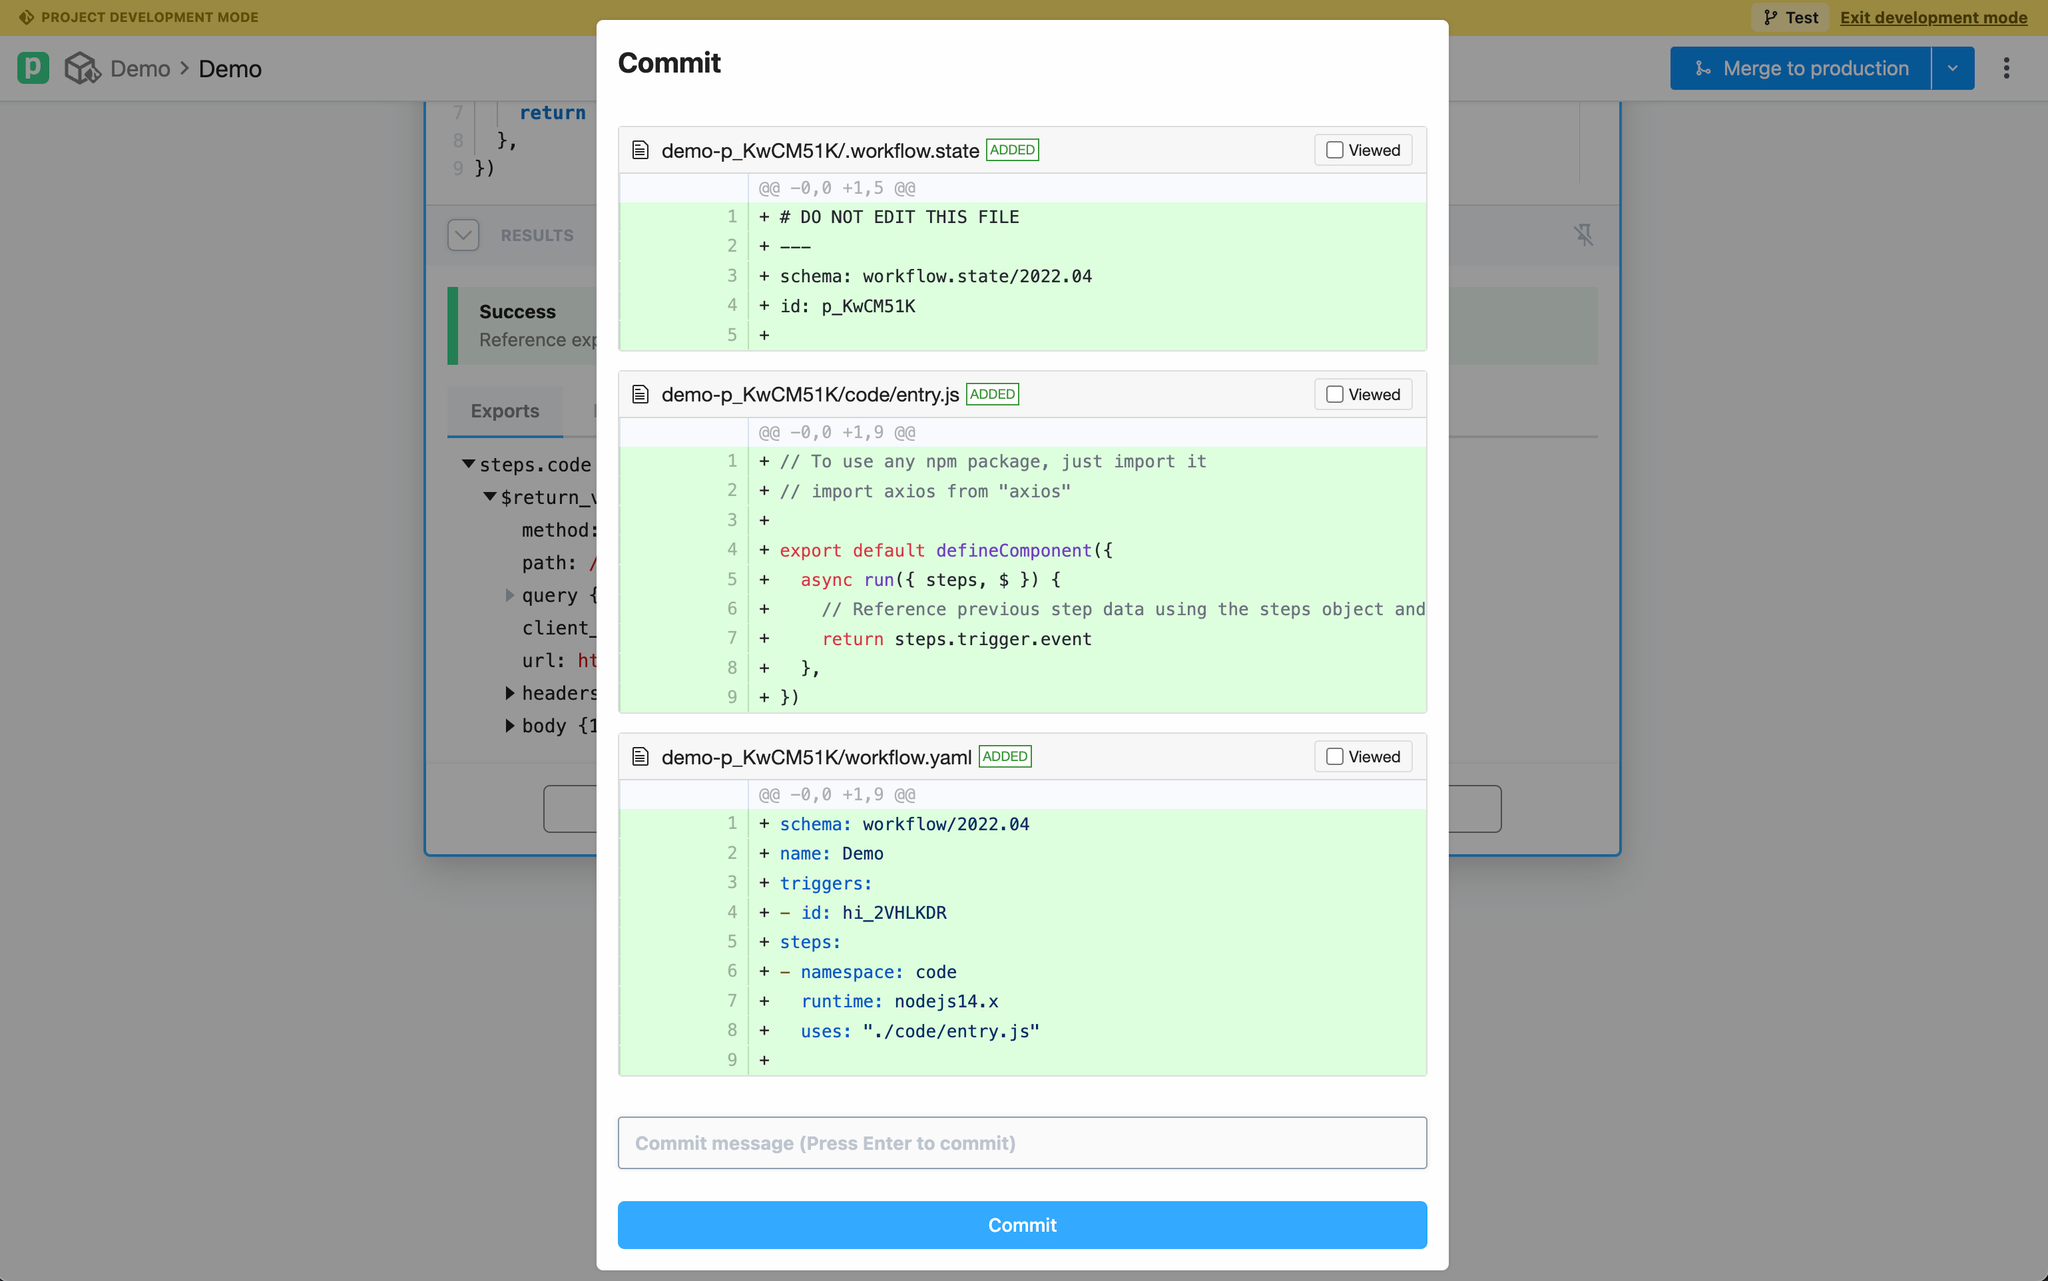
Commit changes
To commit changes without merging to production, select Commit Changes from the Git Actions menu: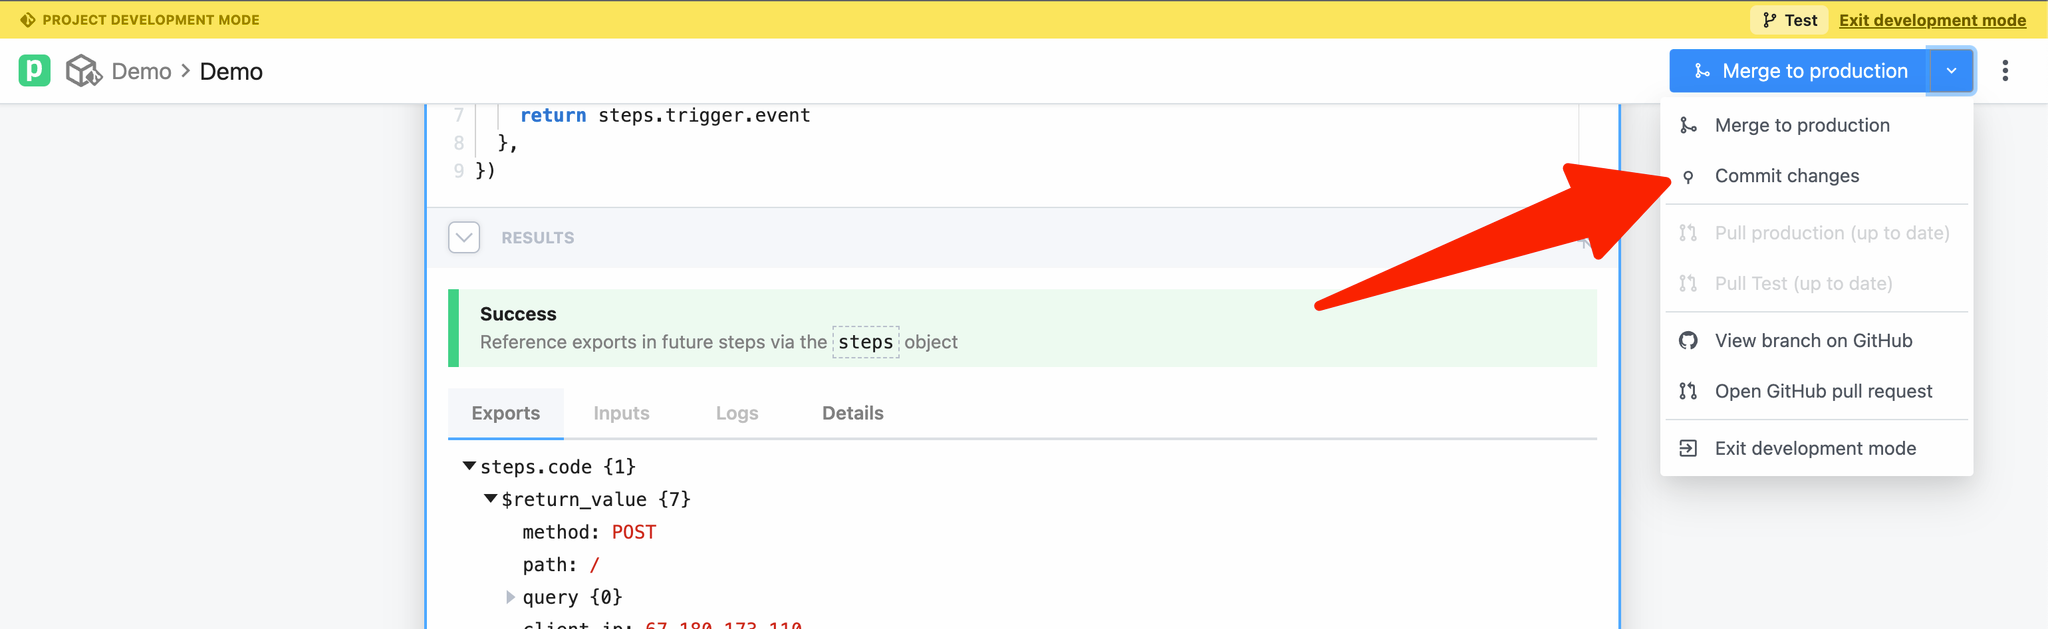
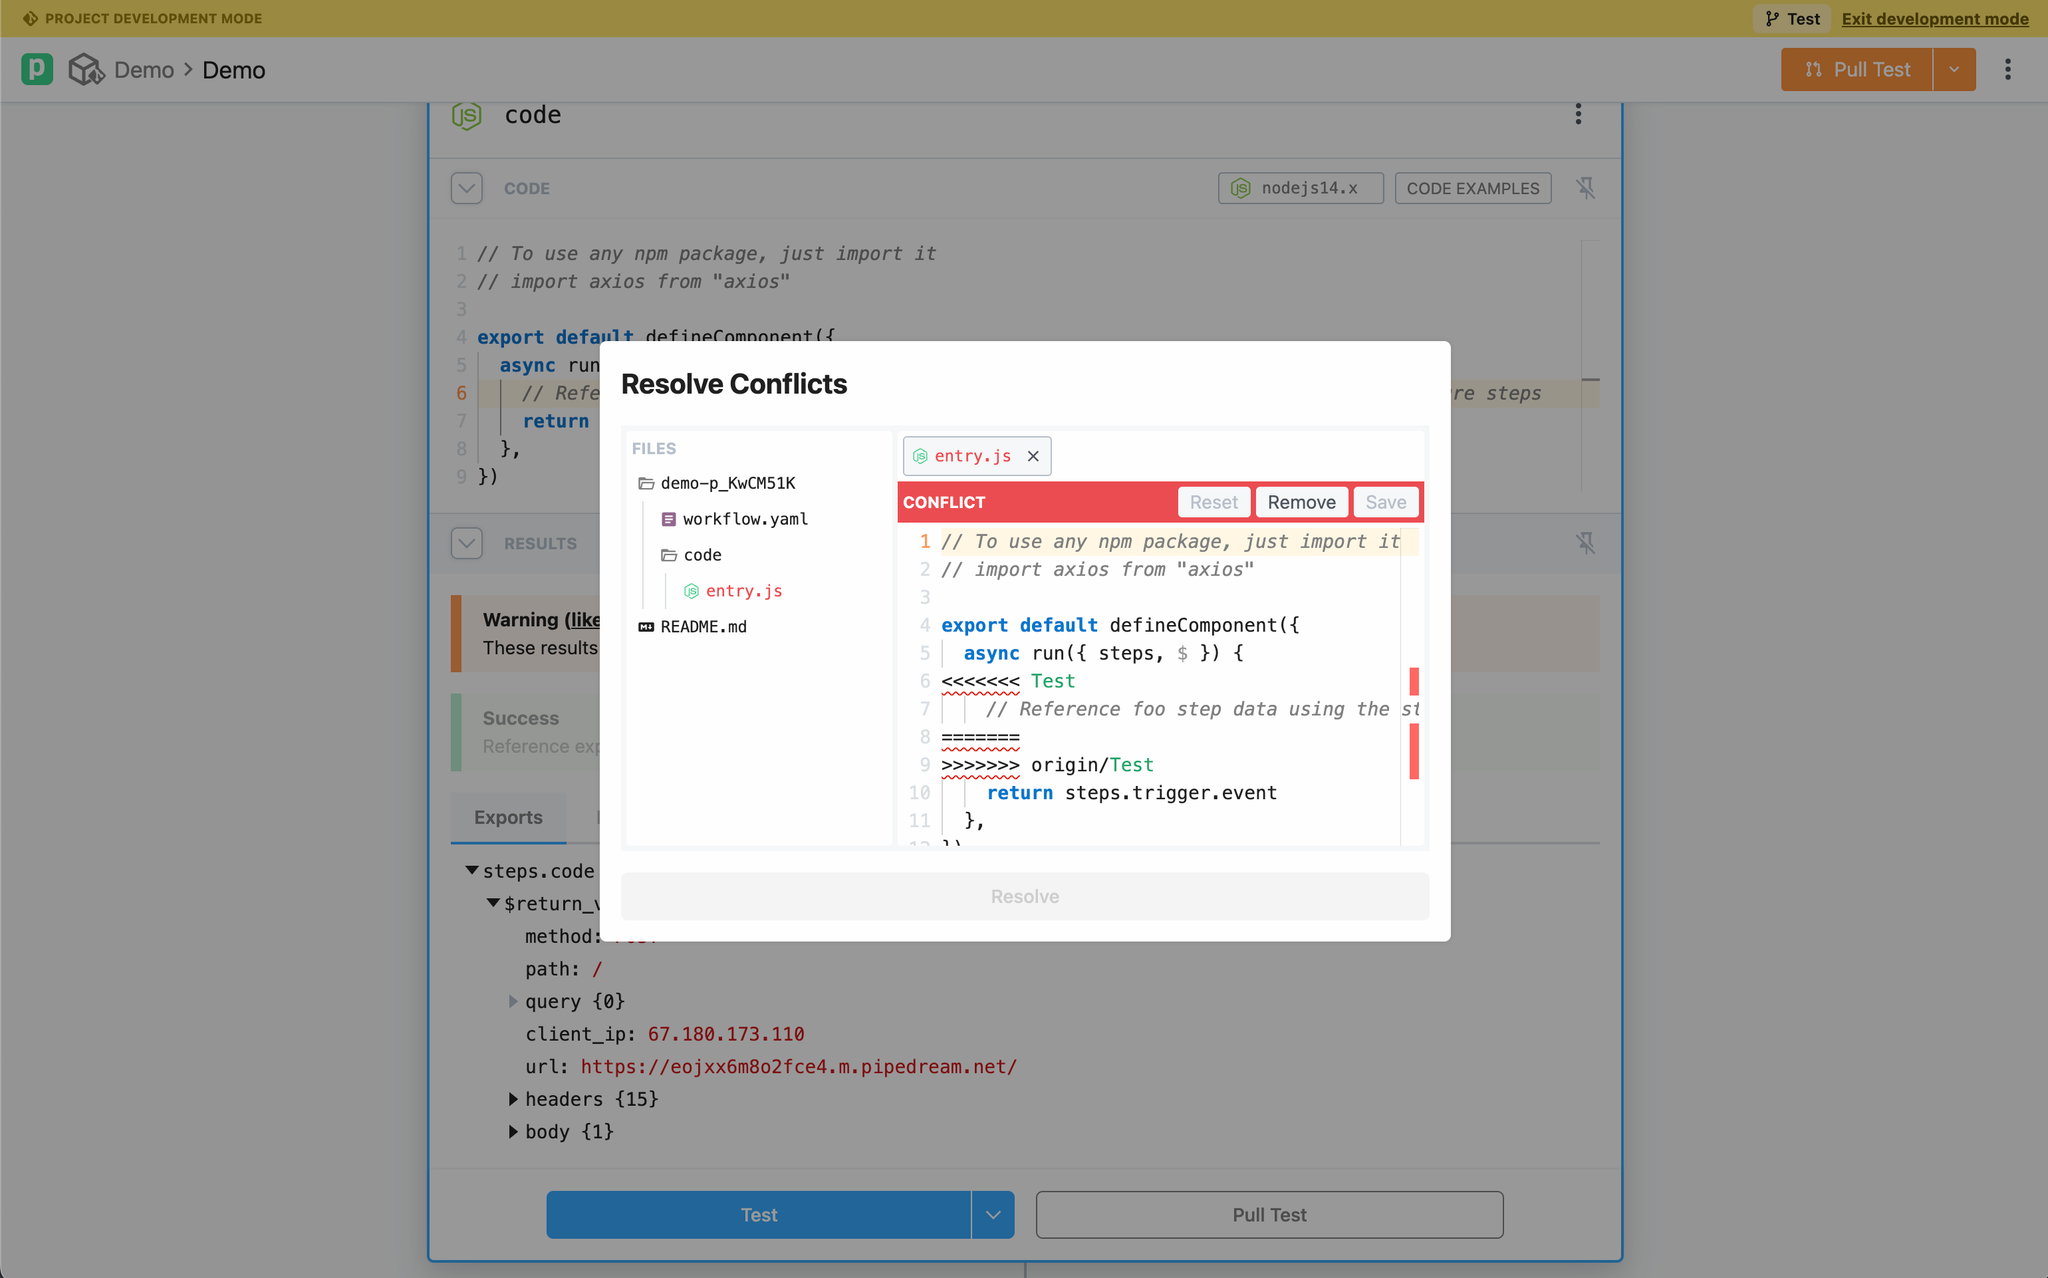
Pull changes and resolve conflicts
If remote changes are detected, you’ll be prompted to pull the changes:
Move existing workflows to projects
First, select the workflow(s) you want to move from the workflows listing page and click Move in the top action menu:

Undeployed changes are automatically assigned a development branchIf any moved workflows have undeployed changes, those changes will staged in a branch prefixed with
undeployed-changes (e.g., undeployed-changes-27361).Use the changelog
The changelog tracks all git activity (for projects with GitHub sync enabled). If you encounter an error merging your project, go to the changelog and explore the log details to help you troubleshoot issues in your workflows: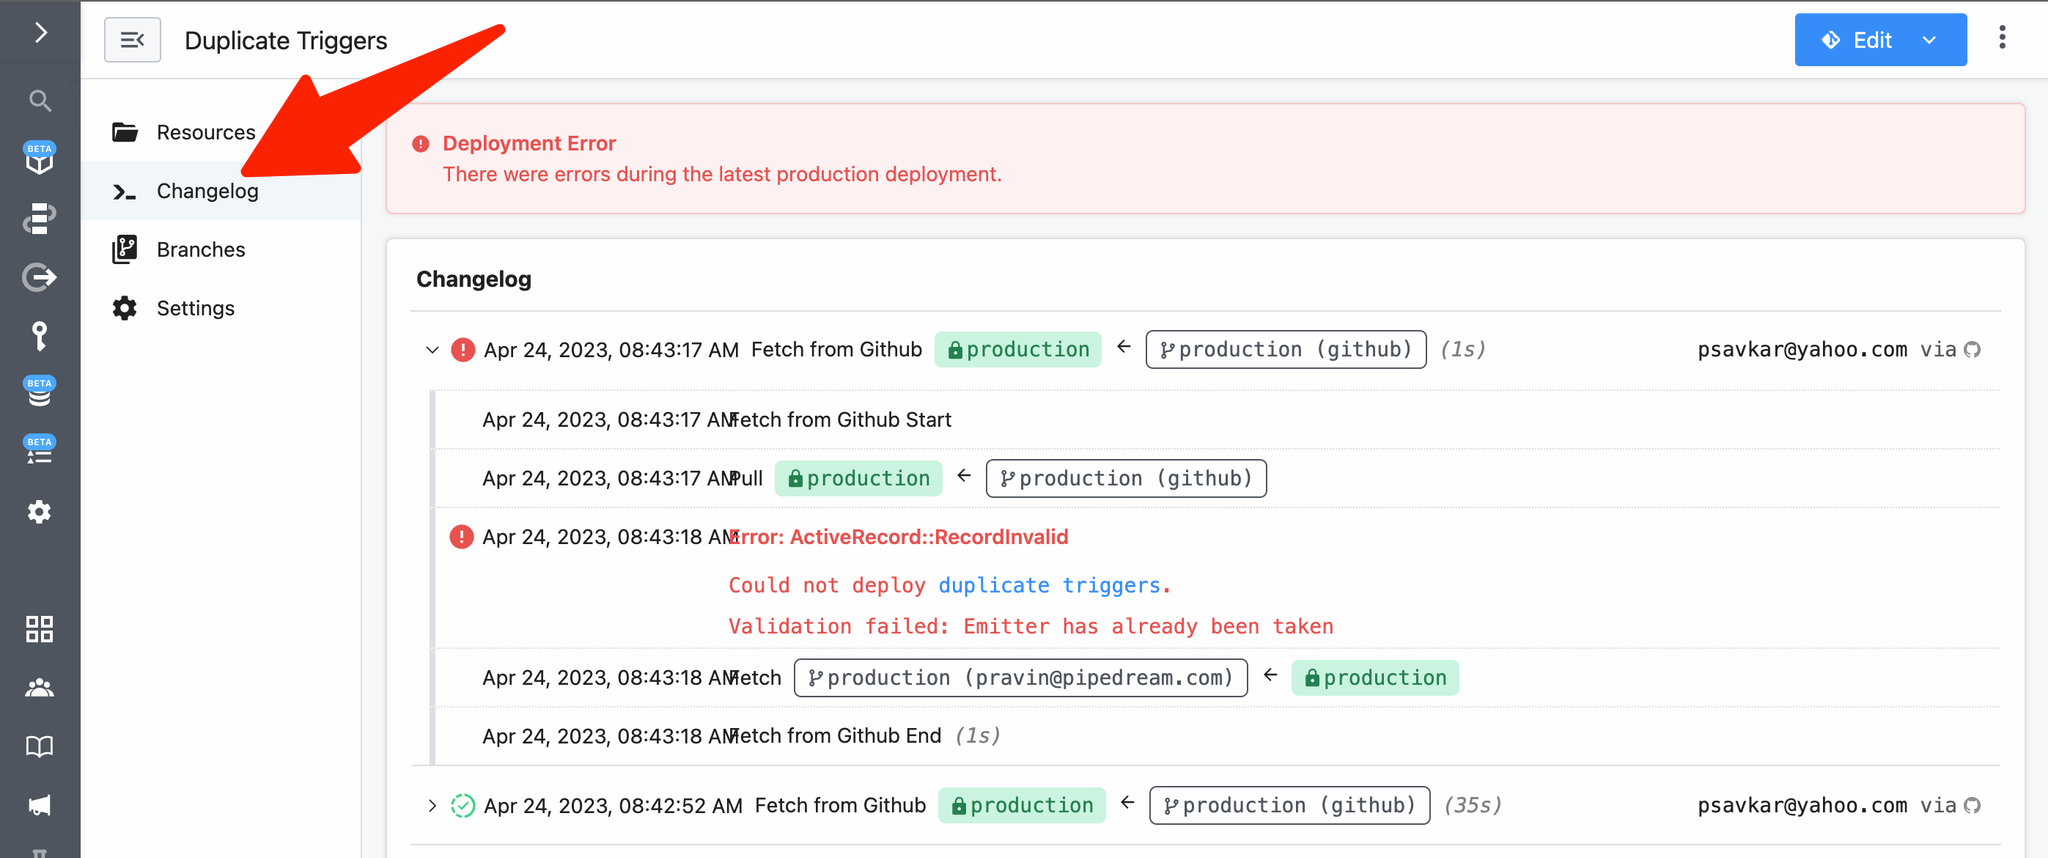
Local development
Projects that use GitHub sync may be edited outside of Pipedream. You can edit and commit directly via GitHub’s UI or clone the repo locally and use your preferred editor (e.g., VSCode). To test external edits in Pipedream:- Commit and push local changes to your development branch in GitHub
- Open the project in Pipedream’s UI and load your development branch
- Use the Git Actions menu to pull changes from GitHub
Known Issues
Below are a list of known issues that do not currently have solutions, but are in progress:- Project branches on Pipedream cannot be deleted.
- If a workflow uses an action that has been deprecated, merging to production will fail.
- Legacy (v1) workflows are not supported in projects.
- Self-hosted GitHub Server instances are not yet supported. Please contact us for help.
- Workflow attachments are not supported
GitHub Enterprise Cloud
If your repository is hosted on a GitHub Enterprise account, you can allow Pipedream’s address range to sync your project changes. Follow the directions here and add the following IP range:FAQ
How are Pipedream workflows synchronized to GitHub?
Pipedream will serialize your project’s workflows and their configuration into a standard YAML format for storage in GitHub. Then Pipedream will commit your changes to your connected GitHub repository.Do you have a definition of this YAML?
Not yet, please stay tuned!Can I sync multiple workflows to a single GitHub repository?
Yes, projects are synced to a single GitHub repository which allows you to store multiple workflows into a single GitHub repository for easier organization and management.Can I use this feature to develop workflows locally?
Yes, you can use the GitHub Syncing feature to develop your workflows from YAML files checked into your Pipedream connected GitHub repository. Then pushing changes to theproduction branch will trigger a deploy for your Pipedream workflows.
Why am I seeing the error “could not resolve step[index].uses: component-key@version” when merging to production?
This error occurs when a workflow references a private component without properly prefixing the component key with your workspace name in theworkflow.yaml configuration file. Pipedream requires this prefix to correctly identify and resolve components specific to your workspace.
For example, if you modified a registry action and published it privately, the correct component key should be formatted as @workspacename/component-key@version (e.g., @pipedream/github-update-issue@0.1.0).
To resolve this error:
- Clone your repository locally and create a development branch.
- Locate the error in your
workflow.yamlfile where the component key is specified. - Add your workspace name prefix to the component key, ensuring it follows the format
@workspacename/component-key@version. - Commit your changes and push them to your repository.
- Open your project in the Pipedream UI and select your development branch.
- Click on Merge to Production and verify the deployment success in the Changelog.
- If the issue persists, reach out to Pipedream Support for further assistance.
Why am I seeing an error about “private auth mismatch” when trying to merge a branch to production?
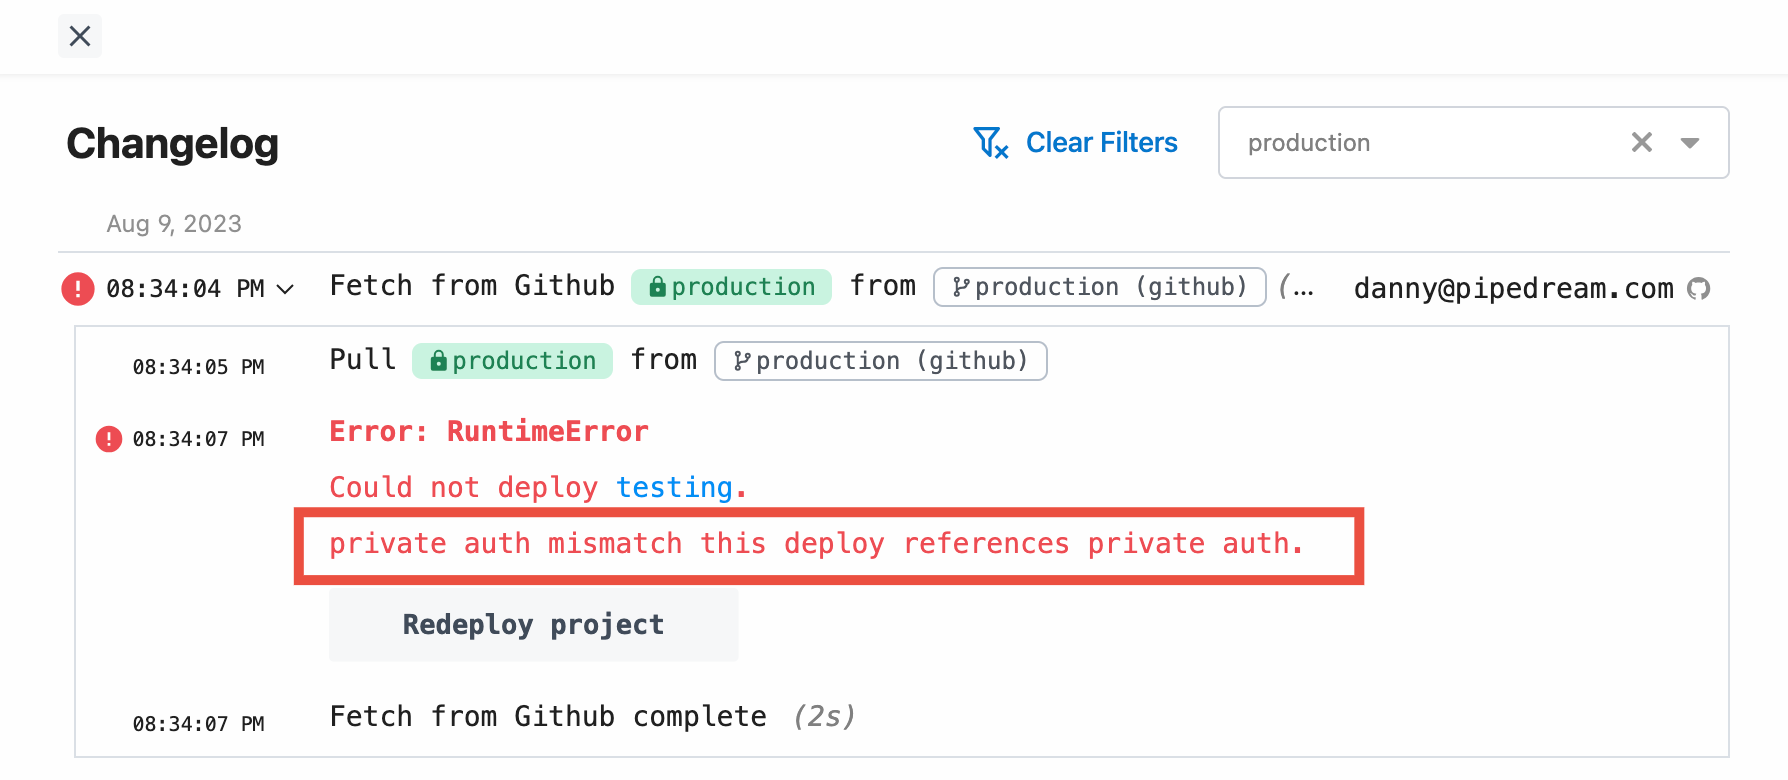
- The referenced workflow is using a connected account that’s not shared with the entire workspace
- The change was merged from outside the Pipedream UI (via github.com or locally)
- Make sure all the connected accounts in the project’s workflows are accessible to the entire workspace
- Re-trigger a sync with Pipedream by making a nominal change to the workflow from outside the Pipedream UI (via github.com or locally), then merge that change to production
Can I sync an existing GitHub repository with workflows to a new Pipedream Project?
No, at this time it’s not possible because of how resources are connected during the bootstrapping process from the workflow YAML specification. However, this is on our roadmap, please subscribe to this issue for the latest details.Migrating GitHub Repositories
You can migrate Pipedream project’s GitHub repository to a new repository, while preserving history. You may want to do this when migrating a repository from a personal GitHub account to an organization account, without affecting the workflows within the Pipedream project.Assumptions
- Current GitHub repository:
previous_github_repo - New GitHub repository:
new_github_repo - Basic familiarity with git and GitHub
- Access to a local terminal (e.g., Bash, Zsh, PowerShell)
- Necessary permissions to modify both the Pipedream project and associated GitHub repositories
Steps
-
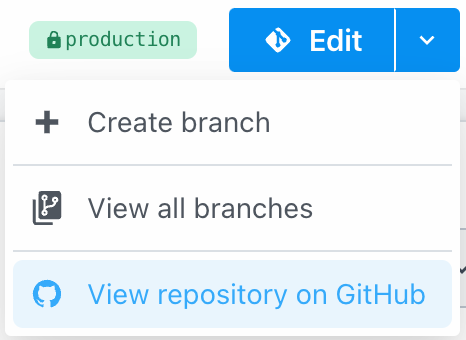
Access Project Settings in Pipedream:
- Navigate to your Pipedream project.
- Use the dropdown menu on the “Edit” button in the top right corner to access
previous_github_repoin GitHub.
-
Clone the Current Repository Locally:
-
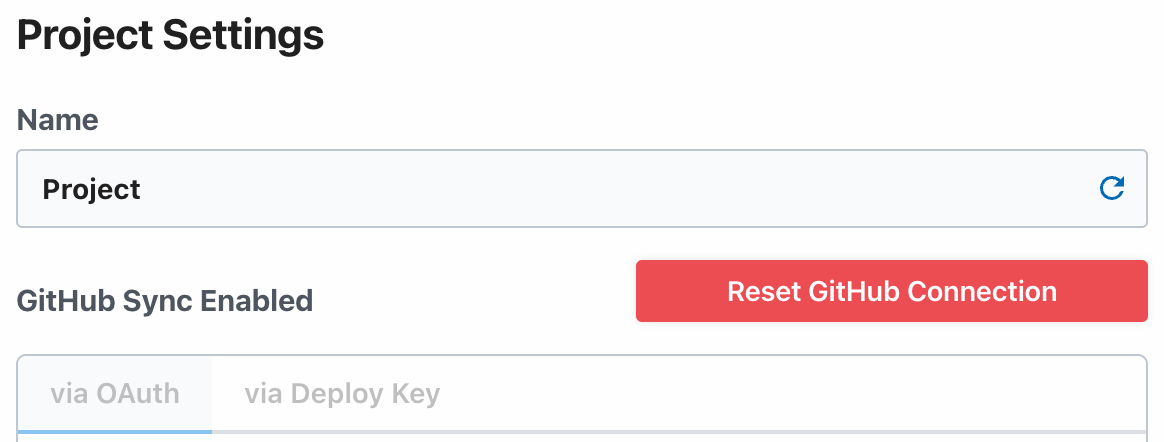
Reset GitHub Sync in Pipedream:
- In Pipedream, go to your project settings.
- Click on “Reset GitHub Connection”.
-
Set Up New repository connection:
- Configure the project’s GitHub repository to use
new_github_repo.
- Configure the project’s GitHub repository to use
-
Clone the new repository locally:
-
Link to the old repository:
-
Prepare for migration:
-
Create and switch to a new branch for migration:
-
Merge the main branch of
old_github_repointo migration, allowing for unrelated histories:
-
Create and switch to a new branch for migration:
-
Finalize the migration:
-
Optionally push the
migrationbranch to the remote: -
Switch to the
productionbranch and merge:
-
Optionally push the
-
Cleanup:
-
Remove the connection to the old repository:
-
Optionally, you may now safely delete
previous_github_repofrom GitHub.
-
Remove the connection to the old repository:
How does the production branch work?
Anything merged to the production branch will be deployed to your production workflows on Pipedream.
From a design perspective, we want to let you manage any branching strategy on your end, since you may be making commits to the repo outside of Pipedream. Once we support managing Pipedream workflows in a monorepo, where you may have other changes, we wanted to use a branch that didn’t conflict with a conventional main branch (like main or master).
In the future, we also plan to support you changing the default branch name.