Real time notifications on X keywords


One of our super powers here at Pipedream is that we're the ultimate dogfooders. We're hands on with building Pipedream workflows every single day, shipping automations that power even Pipedream itself.
These workflows perform various tasks, like preserving the searchability and history of our Slack community conversations by copying threads from Slack to our Discourse forum. Or reducing our time-to-answers for support tickets by decorating them with contextual information.
Always present
All Pipedream staff can quickly react to @pipedream or even simply "pipedream.com" mentions on X (formerly known as Twitter) because we're all notified on a specific #social-mentions Slack channel:
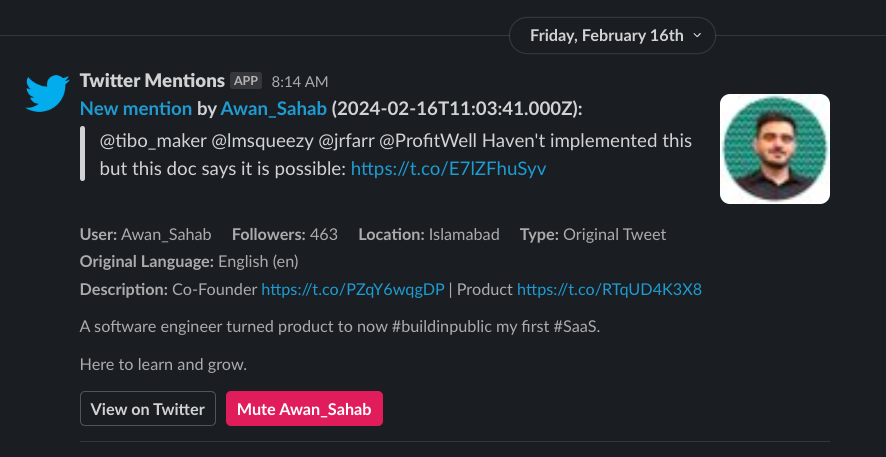
As a result, our whole team has a greater understanding of questions being asked on X and we can easily jump in and engage directly:
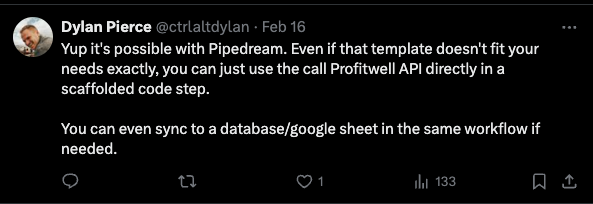
Being the first to reply on a new conversation or question about Pipedream gives us an engagement edge.
We'll show you how to build this workflow for your own use, so you can also enjoy this edge for participating in conversations on X where you can provide insights and have more visibility at the top of the thread.
You can either follow the step by step instructions below, or simply copy this workflow to your Pipedream account to get started.
If you'd rather learn from scratch, open a new workflow and follow the instructions below.
Connecting X to Pipedream
Pipedream offers a native integration with X's API. This allows you to set up triggers based X events like tweets, mentions, direct messages and more.
Choosing the trigger
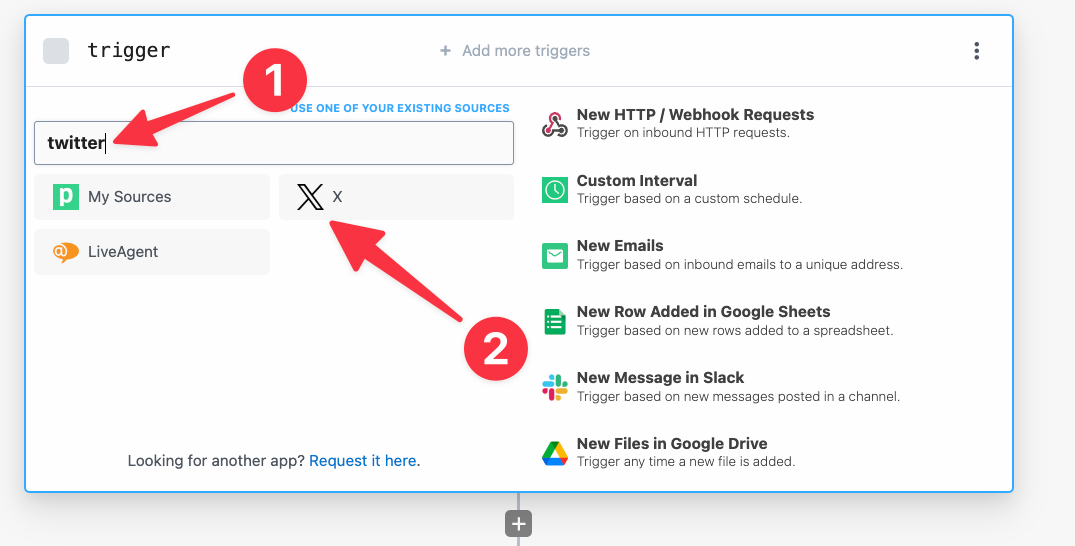
First we'll set up a new trigger for the workflow. Search for the Twitter app in the trigger selector, and select it.
Then choose the New Tweet Posted Matching Query trigger:
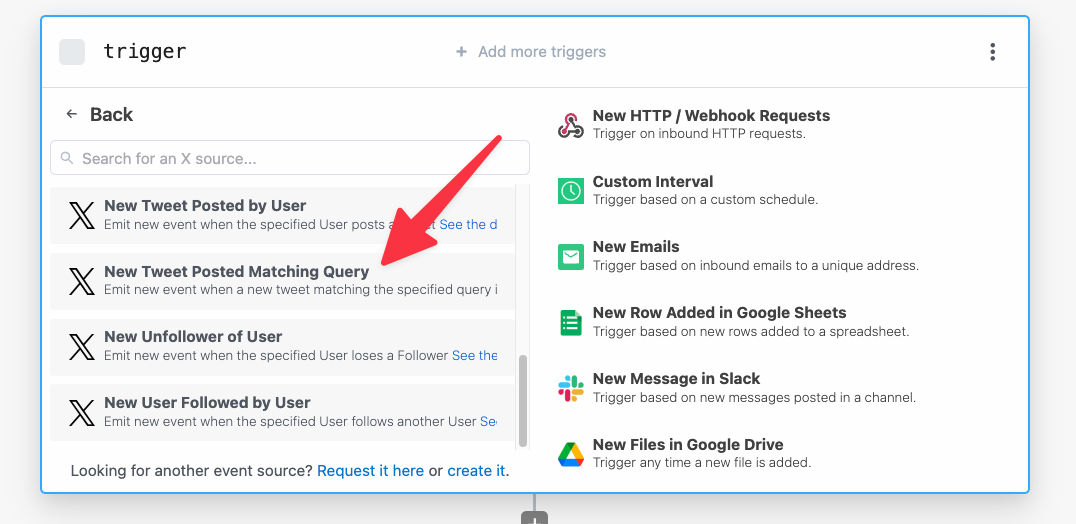
You can also use the New Mention Received by User trigger, but that trigger only emits tweets only on new mentions, whereas the New Tweet Posted Matching Query trigger cast a wider net with a query.
Don't worry, we'll show you how use X queries further down.
Now that you have a trigger selected, let's set it up. First, you'll need to connect your X developer account by clicking on the Connect X account button.

You'll be prompted to provide your X developer account's Consumer Key and Secret. Follow our detailed guide here to learn how to create an X project and generate these keys.
Please note: you must have a paid X developer account in order to leverage this trigger.
Configuring the trigger
By default, the trigger will query X for new tweets that match your query every 15 minutes. You can adjust this if you'd like to reduce or increase that frequency, but be careful to stay within the X API rate limits.
But the Query is where the real power lies. X offers a rich query language to allow you to add multiple terms, which will give you the most value per execution.
For example, we used a query that listens to both @Pipedream mentions and pipedream.com mentions using the OR operator:
@pipedream OR pipedream.com
Here's the configuration of our Twitter trigger:
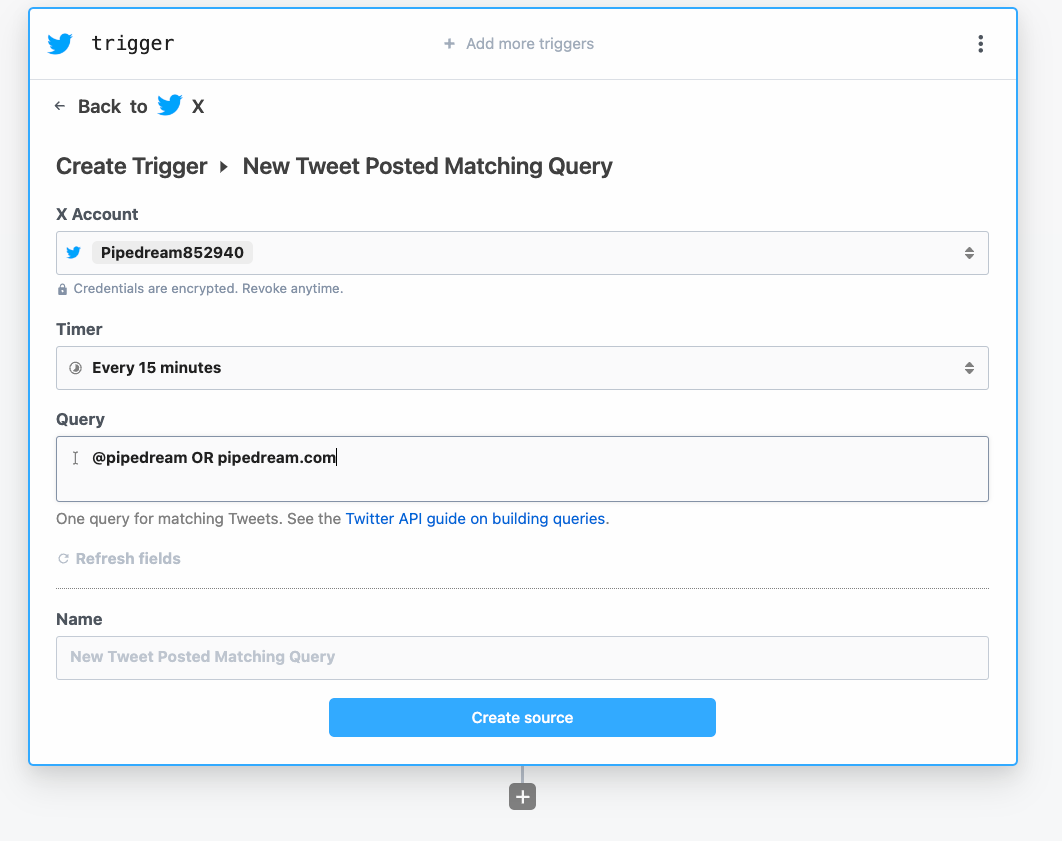
Finally, click Create Source to create this trigger, which will periodically poll the X API for new tweets that match your query's criteria.
You can use up to 512 characters in a Query (depending on your plan), so you can track a substantial number of keywords with a single workflow.
(Optional) Translate the Tweet
This step is optional, but you can add a step to translate the Tweet into your preferred language.
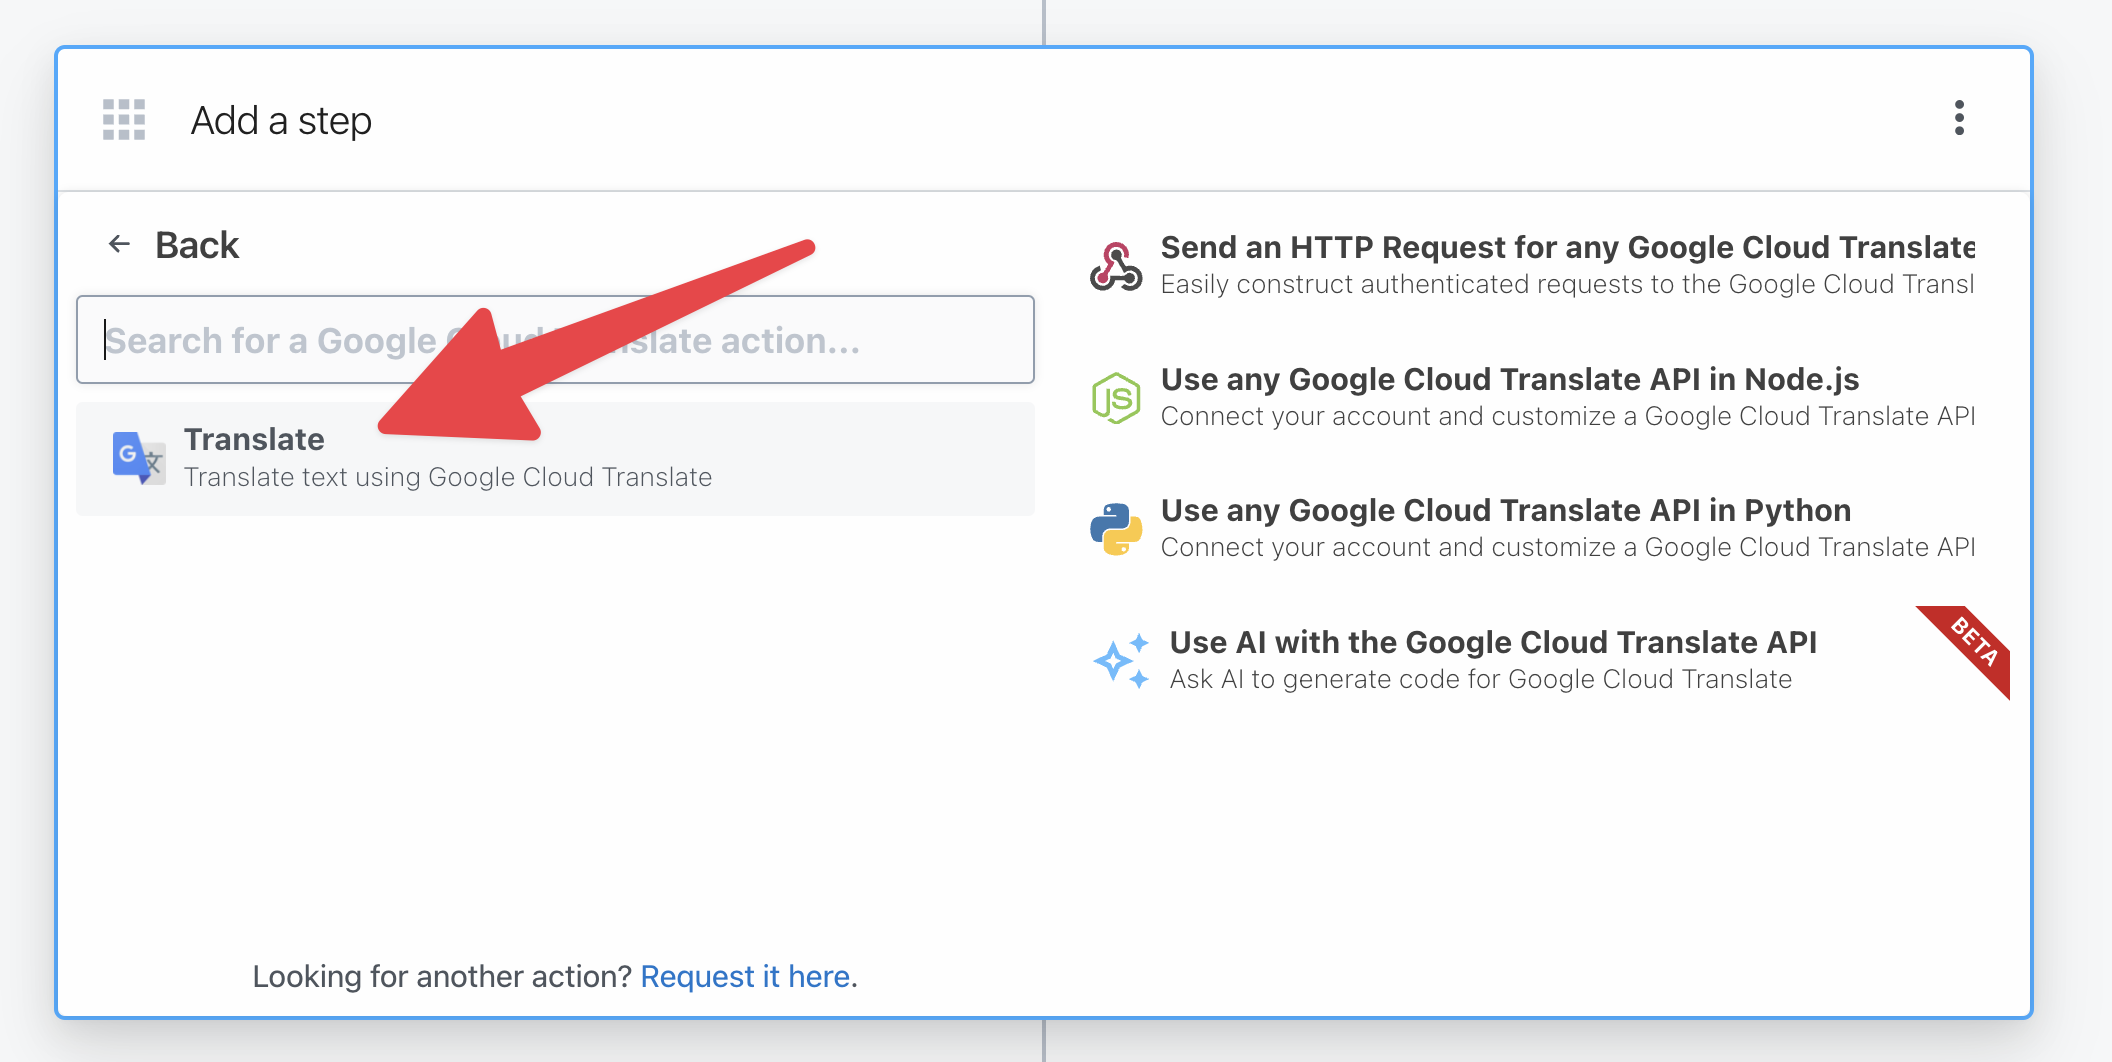
Simply add another step, and search for the Google Cloud Translate app in the new step.
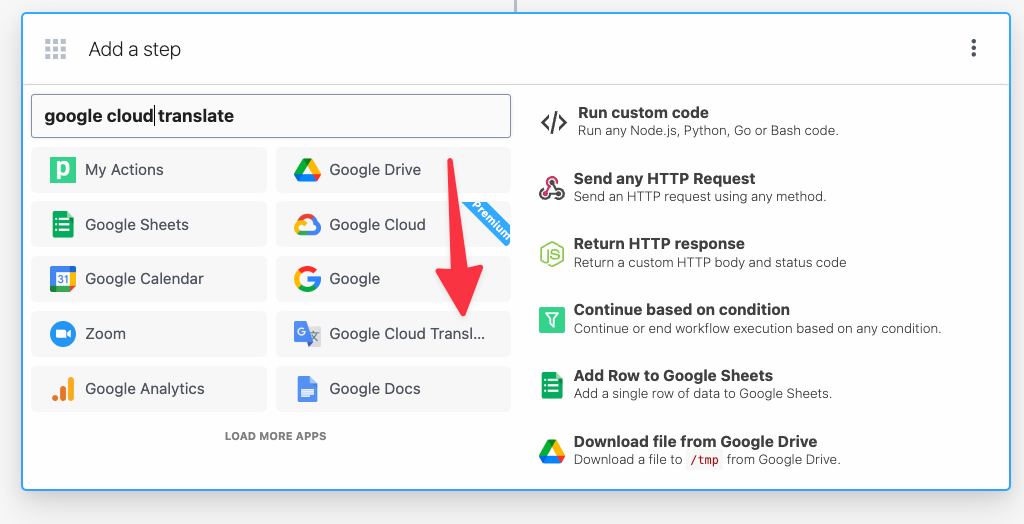
Then choose the Translate action:
First connect your Google Cloud account by pasting your Google Cloud API key into Pipedream.
Then in the Text field, associate the text from the tweet with {{ steps.trigger.event.text }}, and you can leave the Language as en, unless you'd like another language.
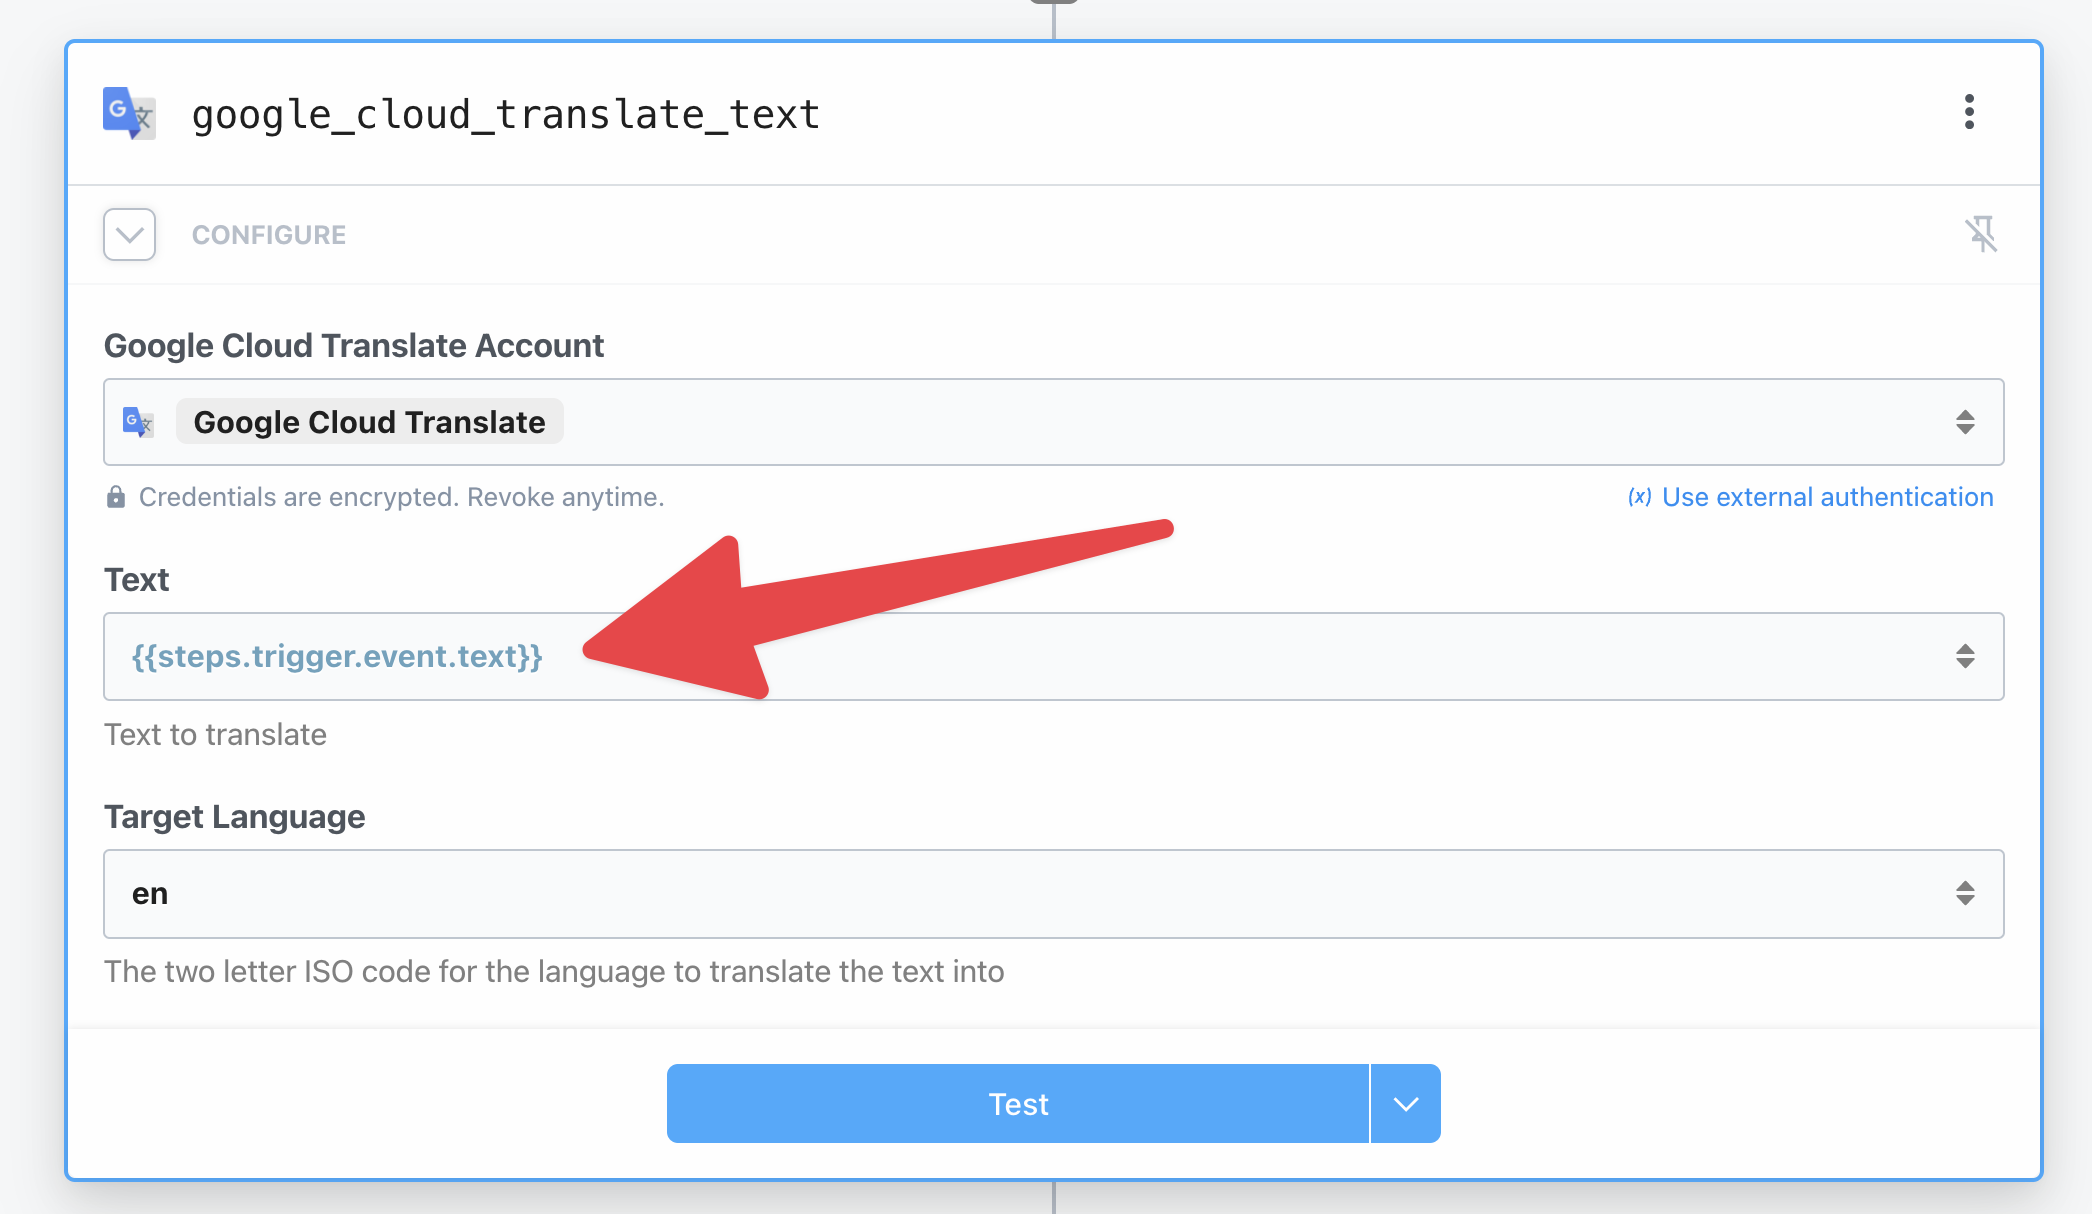
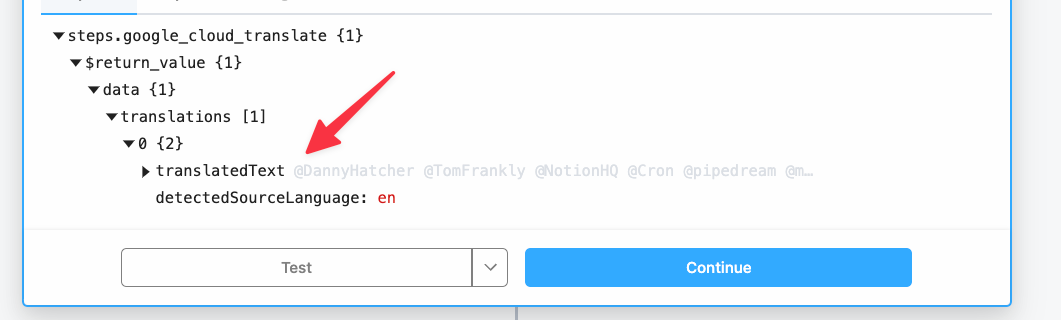
Then click Test to translate the Tweet. The result should include a translations array with the translated text. We'll use this in the next step.
Sending rich notifications with Slack Bot Kit in Node.js
Now let's craft our message to Slack that contains the data from the Tweet. You could use the Slack - Send Message to Public Channel action for a quick simple message.
But for this tutorial, we're going to use the Slack Block Kit instead.
You can think of Slack Block Kit as a JSON spec for a Slack message. The JSON you provide dictates the visual representation of the message. Without it, we're stuck with simple text or markdown within our Slack notifications.
With Slack Block Kit, we can build complex messages that include sections, images, interactive form elements, and more:
Slack also offers a Block Kit Prototype builder which is a great tool to build your message with a UI. Simply drag and drop the blocks you'd like to include in your message, and the Prototype builder will show the JSON representation on the right hand side.
Here's the Slack Block Kit template we made for our workflow.
:*%5Cn%3E%20Tomorrow%20(05/14)%20at%207PM%20PT,%20we%20have%20a%20serverless%20filled%20night%20at%20the%20Tracy%20Developer%20Meetup.%20RSVP%20to%20participate%20and%20learn%20from%20the%20one%20and%20only%20Raymond%20Camden!%20https://t.co/FFXBRemv5s%20cc%20@raymondcamden%20@pipedream%20@workvine209%20https://t.co/gYLut18lqC%5Cn%22%7D,%22accessory%22:%7B%22type%22:%22image%22,%22image_url%22:%22https://pbs.twimg.com/profile_images/1035554704988594178/stN0QpgC_normal.jpg%22,%22alt_text%22:%22Profile%20picture%22%7D%7D,%7B%22type%22:%22image%22,%22image_url%22:%22https://pbs.twimg.com/media/E1Tg9mAXMAEwFQF.jpg%22,%22alt_text%22:%22Tweet%20Image%22%7D,%7B%22type%22:%22context%22,%22elements%22:%5B%7B%22type%22:%22mrkdwn%22,%22text%22:%22*User:*%20nraboy%22%7D,%7B%22type%22:%22mrkdwn%22,%22text%22:%22*Followers:*%204.6k%22%7D,%7B%22type%22:%22mrkdwn%22,%22text%22:%22*Location:*%20Tracy,%20CA%22%7D,%7B%22type%22:%22mrkdwn%22,%22text%22:%22*Language:*%20English%20(en)%22%7D,%7B%22type%22:%22mrkdwn%22,%22text%22:%22*Description:*%20Pok%C3%A9mon%20Trainer%20%7C%20Developer%20Relations%20at%20@MongoDB%20%7C%20Author%20on%20The%20Polyglot%20Developer%20%7C%20Organizer%20of%20the%20Tracy%20Developer%20Meetup%20%7C%20@Mail_gun%20Maverick%22%7D%5D%7D,%7B%22type%22:%22actions%22,%22elements%22:%5B%7B%22type%22:%22button%22,%22text%22:%7B%22type%22:%22plain_text%22,%22text%22:%22View%20on%20Twitter%22,%22emoji%22:true%7D,%22url%22:%22https://twitter.com/nraboy/statuses/1392985537083019267%22%7D%5D%7D,%7B%22type%22:%22context%22,%22elements%22:%5B%7B%22type%22:%22mrkdwn%22,%22text%22:%22Sent%20via%20%3Chttps://pipedream.com/@/p_OKCYGM3%7CPipedream%3E%22%7D%5D%7D,%7B%22type%22:%22divider%22%7D%5D%7D)
Great, now that we have a static template designed, we'll need to populate it with actual data from our incoming tweets. As much as we love Raymond, we don't want to see his same tweet as a Slack message on every new tweet about Pipedream. Sorry Raymond.
We'll use Node.js to replace the static strings with variables from our X trigger. You can copy and paste the code below into your code step:
import ISO6391 from "iso-639-1"
import _ from "lodash"
function getLanguageName(isocode) {
try {
return ISO6391.getName(isocode)
} catch (err) {
console.error(err)
return "Unknown"
}
}
function kFormatter(num) {
return Math.abs(num) > 999 ? Math.sign(num)*((Math.abs(num)/1000).toFixed(1)) + 'k' : Math.sign(num)*Math.abs(num)
}
export default defineComponent({
async run({ steps, $ }) {
const event = steps.trigger.event
const user = steps.get_user.$return_value.data
let type = "Original Tweet"
let intro = "New mention"
if (event.in_reply_to_status_id) {
type = "Reply"
intro = "New reply"
}
if (event.retweeted_status) {
type = "Retweet"
intro = "Retweet"
}
let language = ""
let message
if (steps.google_cloud_translate_text) {
console.log('using translated output')
message = steps.google_cloud_translate_text.$return_value.data.translations[0].translatedText
language = `${getLanguageName(steps.google_cloud_translate_text.$return_value.data.translations[0].detectedSourceLanguage)} (${steps.google_cloud_translate_text.$return_value.data.translations[0].detectedSourceLanguage})`
} else {
console.log('using event data')
message = event.text
language = `${getLanguageName(event.lang)} (${event.lang})`
}
let quotedMessage = ''
const lines = message.split('\n')
lines.forEach(line=>{
quotedMessage = quotedMessage + '> ' + line + '\n'
})
const tweetUrl = `https://twitter.com/${user.username}/statuses/${event.id}`
const userUrl = `https://twitter.com/${user.username}/`
const blocks = []
blocks.push({
"type": "section",
"text": {
"type": "mrkdwn",
"text": `*<${tweetUrl}|${intro}> by <${userUrl}|${user.username}> (${event.created_at}):*\n${quotedMessage}`
},
"accessory": {
"type": "image",
"image_url": user.profile_image_url,
"alt_text": "Profile picture"
}
})
blocks.push({
"type": "context",
"elements": [
{
"type": "mrkdwn",
"text": `*User:* ${user.username}`
},
{
"type": "mrkdwn",
"text": `*Followers:* ${kFormatter(user.public_metrics.followers_count)}`
},
{
"type": "mrkdwn",
"text": `*Location:* ${user.location}`
},
{
"type": "mrkdwn",
"text": `*Type:* ${type}`
},
{
"type": "mrkdwn",
"text": `*Original Language:* ${language}`
},
{
"type": "mrkdwn",
"text": `*Description:* ${user.description}`
}
]
},
{
"type": "actions",
"elements": [
{
"type": "button",
"text": {
"type": "plain_text",
"text": "View on Twitter",
"emoji": true
},
"url": tweetUrl
}
]
},
{
"type": "divider"
})
return blocks
},
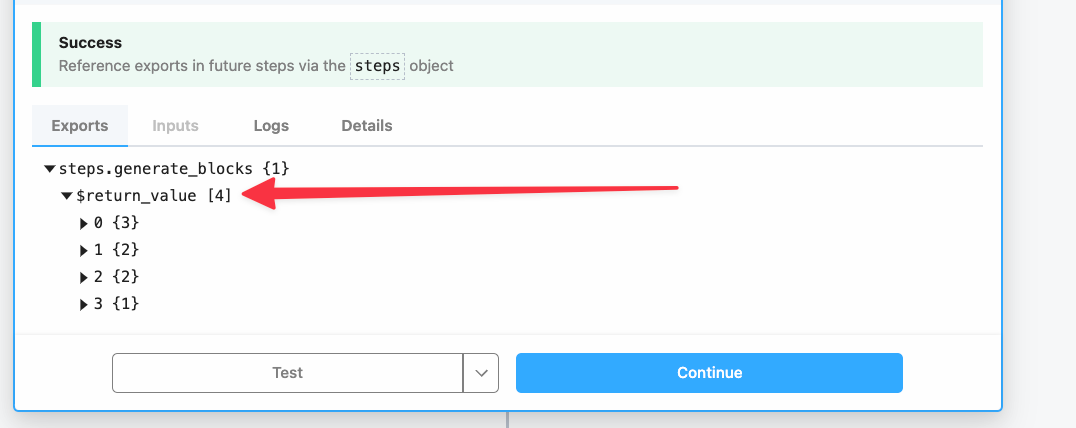
})After pasting this into the code step, rename the step to generate_blocks and click Test to test this Node.js code, which should produce a blocks array that we can use in our final step.
You should have a result that looks something like this:
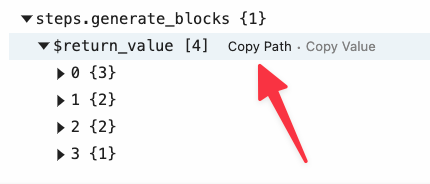
Click Copy Path to copy the path to the return value of this step:
Then add a new step to the workflow, but this time search for Slack and choose the Build and Send a Block Kit Message (Beta).
Then simply connect your Slack account to authenticate it with Pipedream, and choose a particular channel where you'd like these notifications to appear. We chose to create a dedicated #social-mentions channel, but it's up to you.
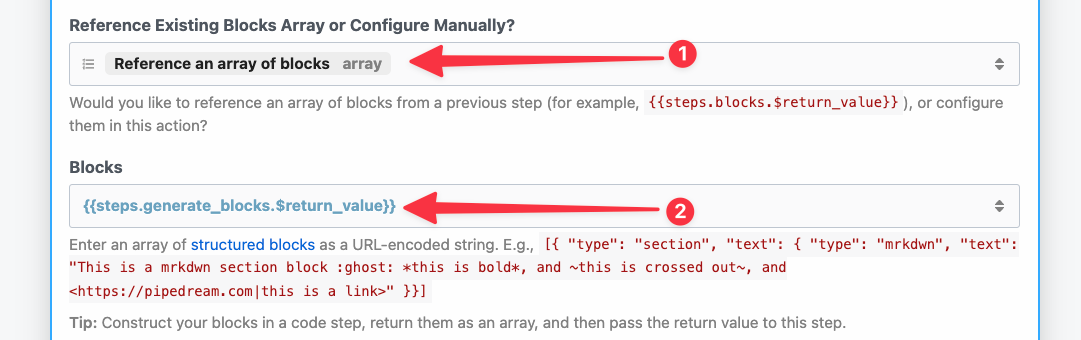
Choose the Reference an array of blocks option for the next field, this will configure the step to accept a JSON array of blocks. Now we simply paste in the reference from our generate_blocks code step to complete the connection:
Finally, click Test at the bottom of the step to send the Slack notification.
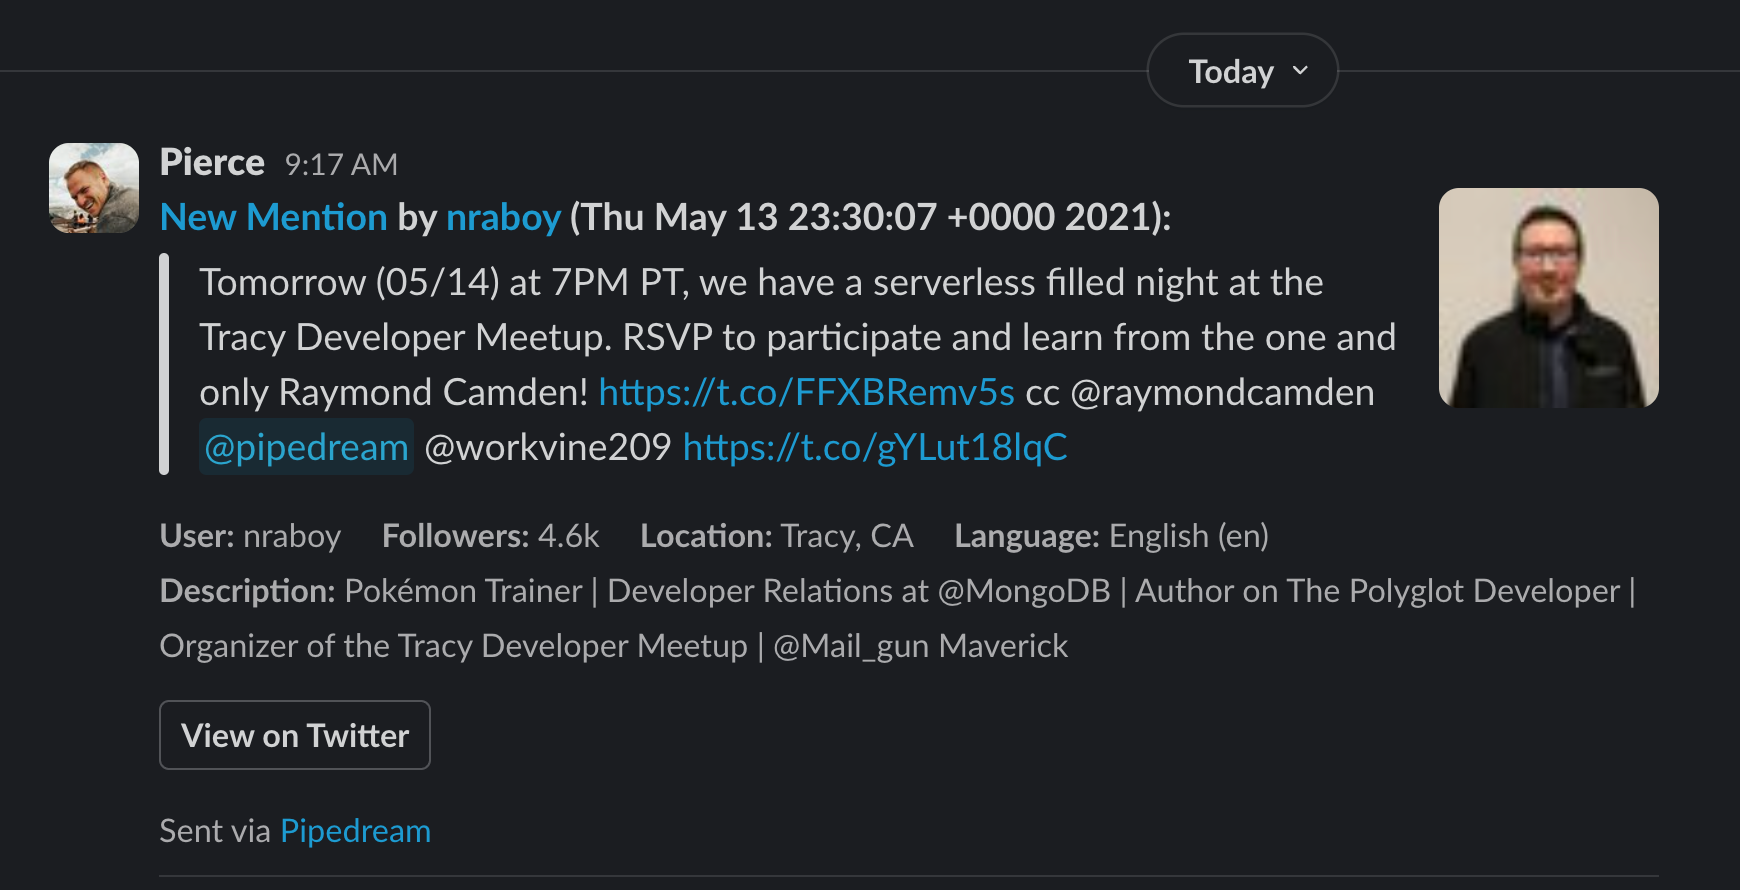
You should see a beautifully formatted Slack message appear in your Slack channel with the details from the tweet filled out.
Deploying
Feel free to tweak the block kit message, or deploy (or Merge to production if you're using a Github sync'd workflow) from the top right hand corner of the screen.
Once this workflow is deployed, it'll notify you and your team with the latest tweets.
Some potential ideas to take this automation a step further:
- Use the X - Get User action to enrich the Slack message with additional details about the author of the tweet.
- Add an interactive form to the Slack message to send replies over X using your teams official X account.
- Add a workflow to track replies on the tweet to the same Slack thread to follow the entire conversation.
- Log these mentions to a database, Airtable or Google Sheets for analysis.
What's next?
At the end of this tutorial, you should have a Pipedream account set up. So try your hand at build workflows, or even building custom actions & triggers.
If you'd like to dig a bit deeper, check out these additional resources:
🐦 Trigger this workflow by mentioning us on Twitter
📚 Read our comprehensive docs
📺 Watch our Pipedream University videos
🤝 Join our Slack Community