Classifying bug reports with ChatGPT

There is nothing dreaded more by programmers than bugs. Well, actually it's probably either naming things or cache invalidation, but you see my point. Bugs show up at unwelcome times, perhaps when you are deep on a totally different problem.
If not properly handled, bugs can slow down an engineering team considerably. Context switching is expensive for any cognitive task. If you code, you know what I'm talking about. And if you haven't, then listen to Elon Musk.
Context switching is the mindkiller
— Elon Musk (@elonmusk) November 25, 2023
So there are two problems to reconcile: 1) context switching kills developer productivity, but 2) bugs happen. How can we deal with this reality?
One way to tackle this is by enforcing proper prioritization. This is certainly easier said than done, but modern tooling and Pipedream can help.
In this post, we'll create an automated workflow that will:
- Trigger on new bug reports
- Use ChatGPT to classify the report based on the user description
- Update the priority accordingly
- Send a Slack notification if and only if the bug is deemed as Urgent.
That's a lot of unpack, so let's get started!
Configuring Airtable
For this example we'll use Airtable as our database. Airtable lets us create public forms, shareable with anyone on the Internet. It also provides its own automation framework, which we'll use to trigger the Pipedream workflow.
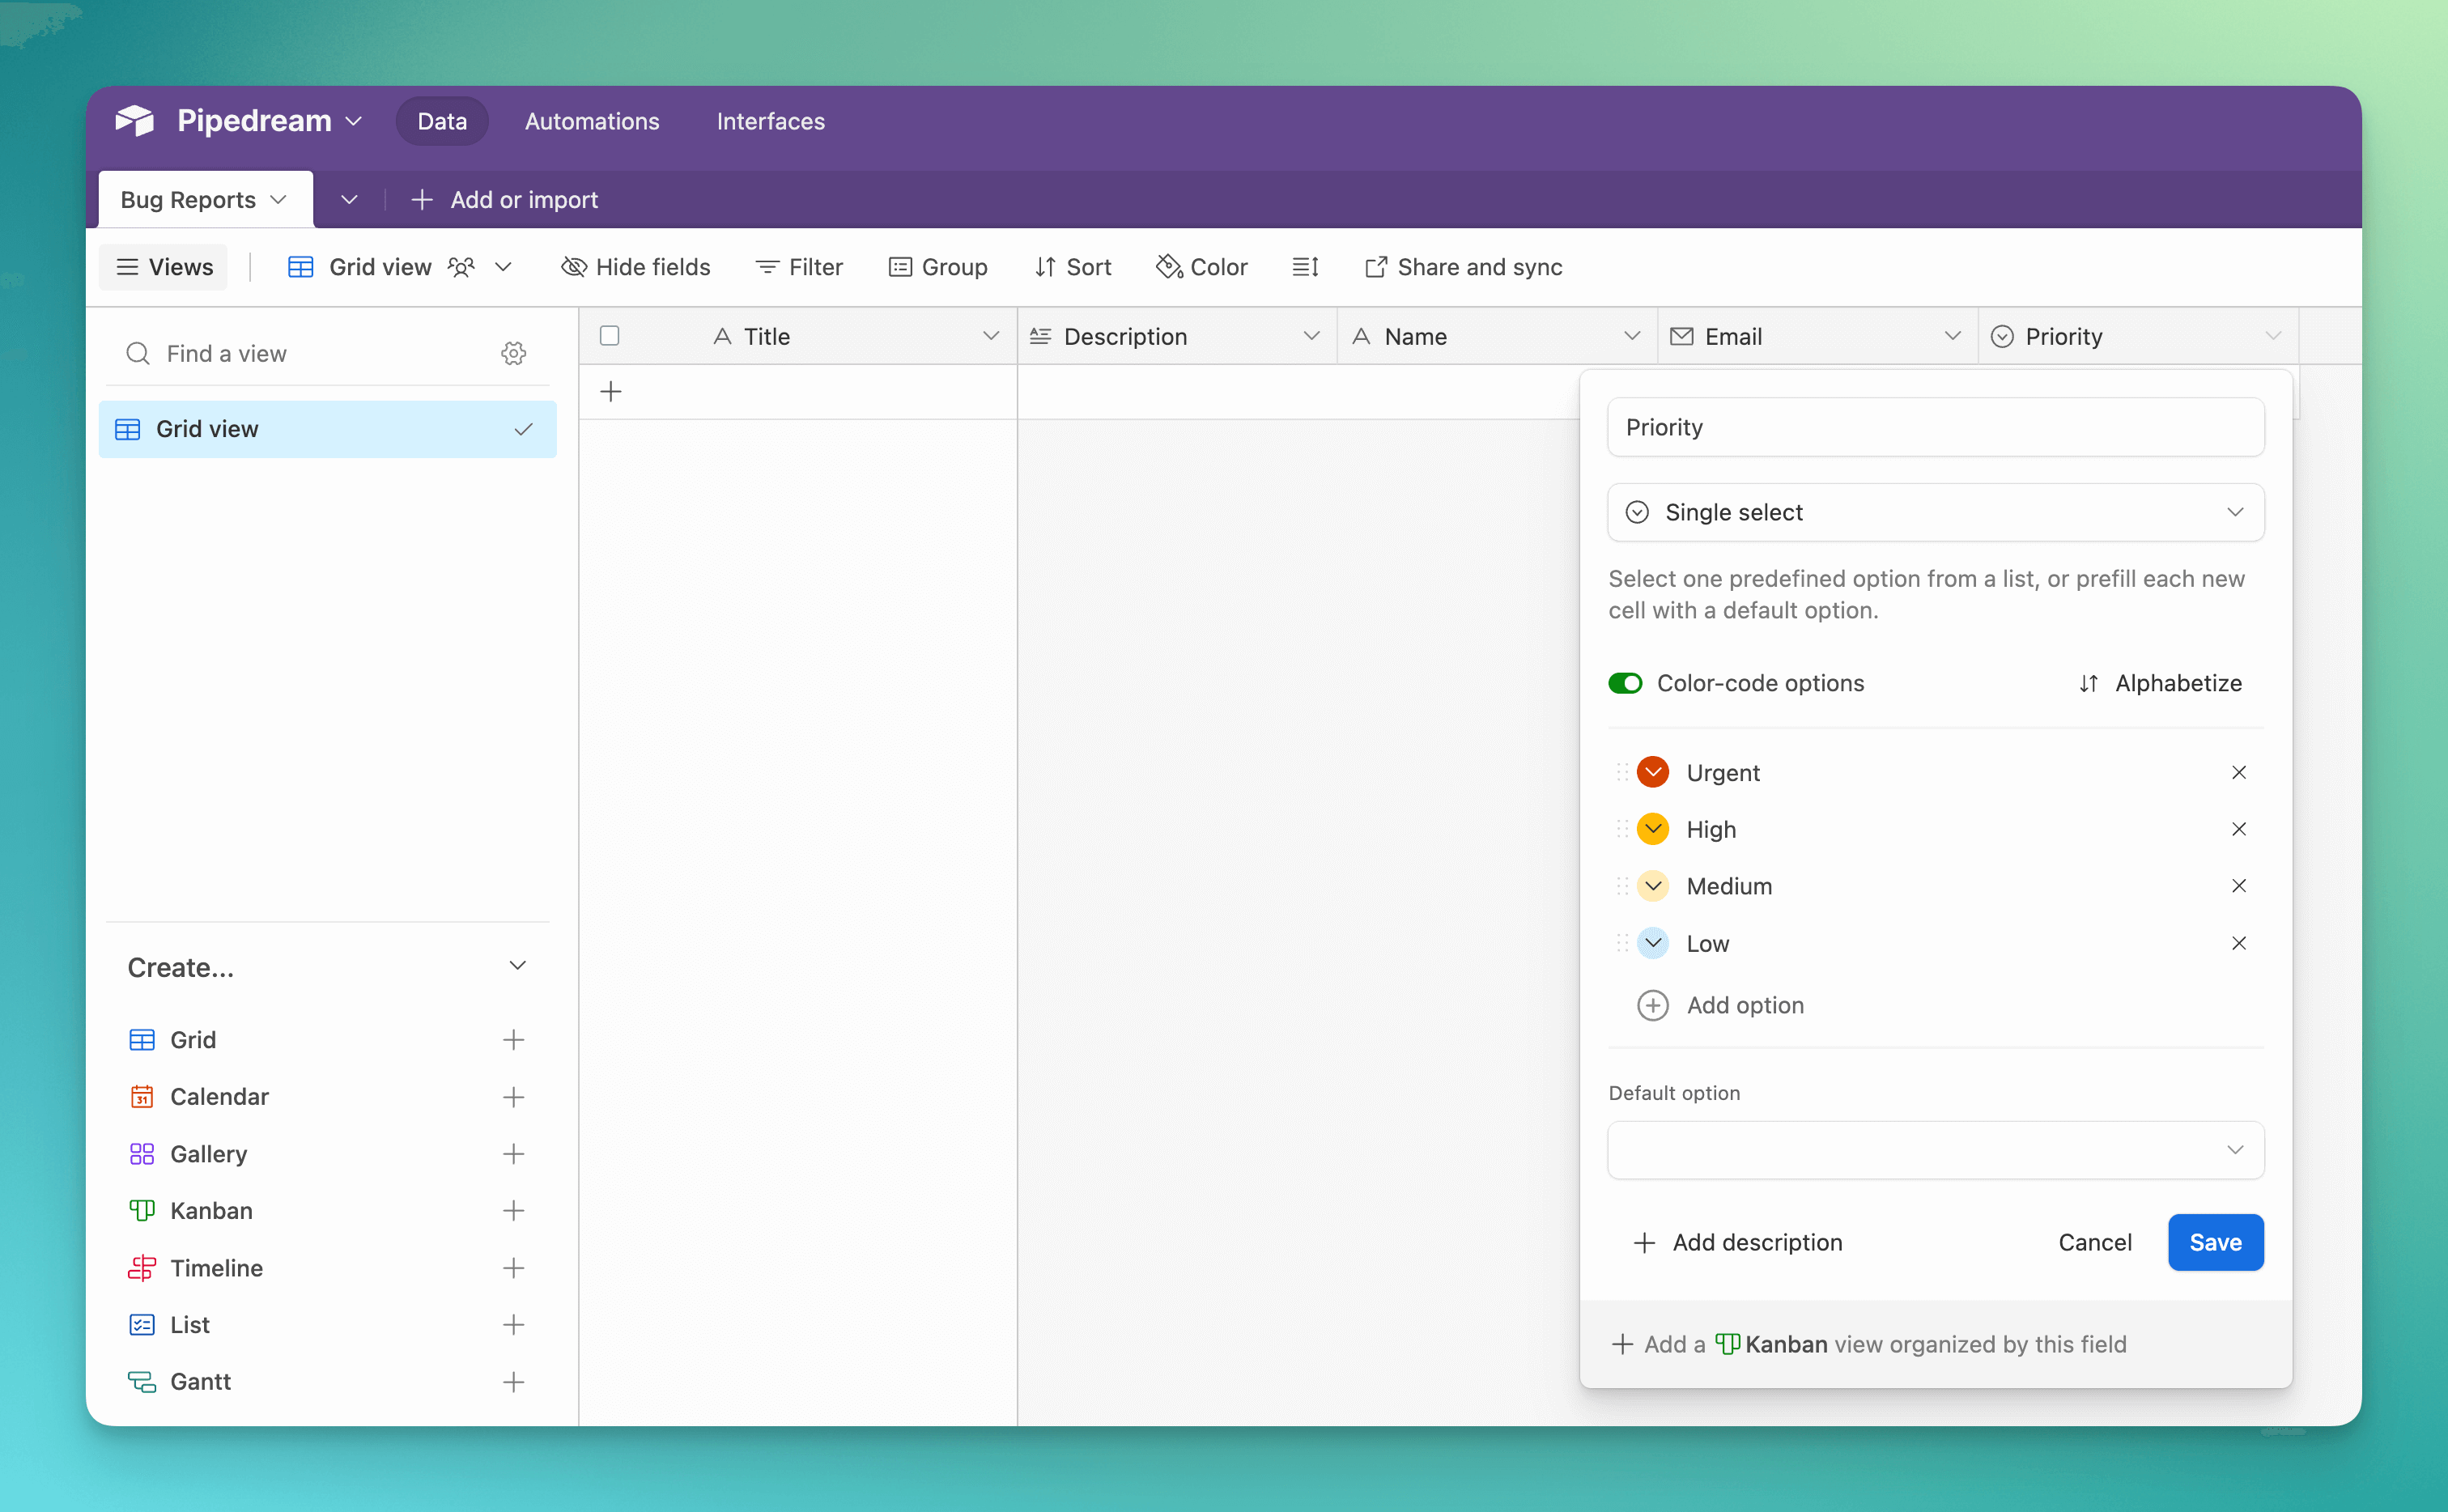
Start by creating a new base and a table inside it. I chose the fields Title, Description, Name, Email and Priority. Priority will be a Single Select field, holding a set of values that we'll pass to ChatGPT as the options for the classification.
Now, there are two possible approaches for adding new records.
First, you can add a custom Button to the table (see our post on how to Slice and dice images with Sharp.js). Here, Airtable sends an HTTP GET request to a Pipedream-generated URL, passing the record ID as query parameter. While it works beautifully, this means the workflow can be triggered only from within Airtable. In this post, we want to allow anyone to submit a report, e.g. a user affected by the bug.
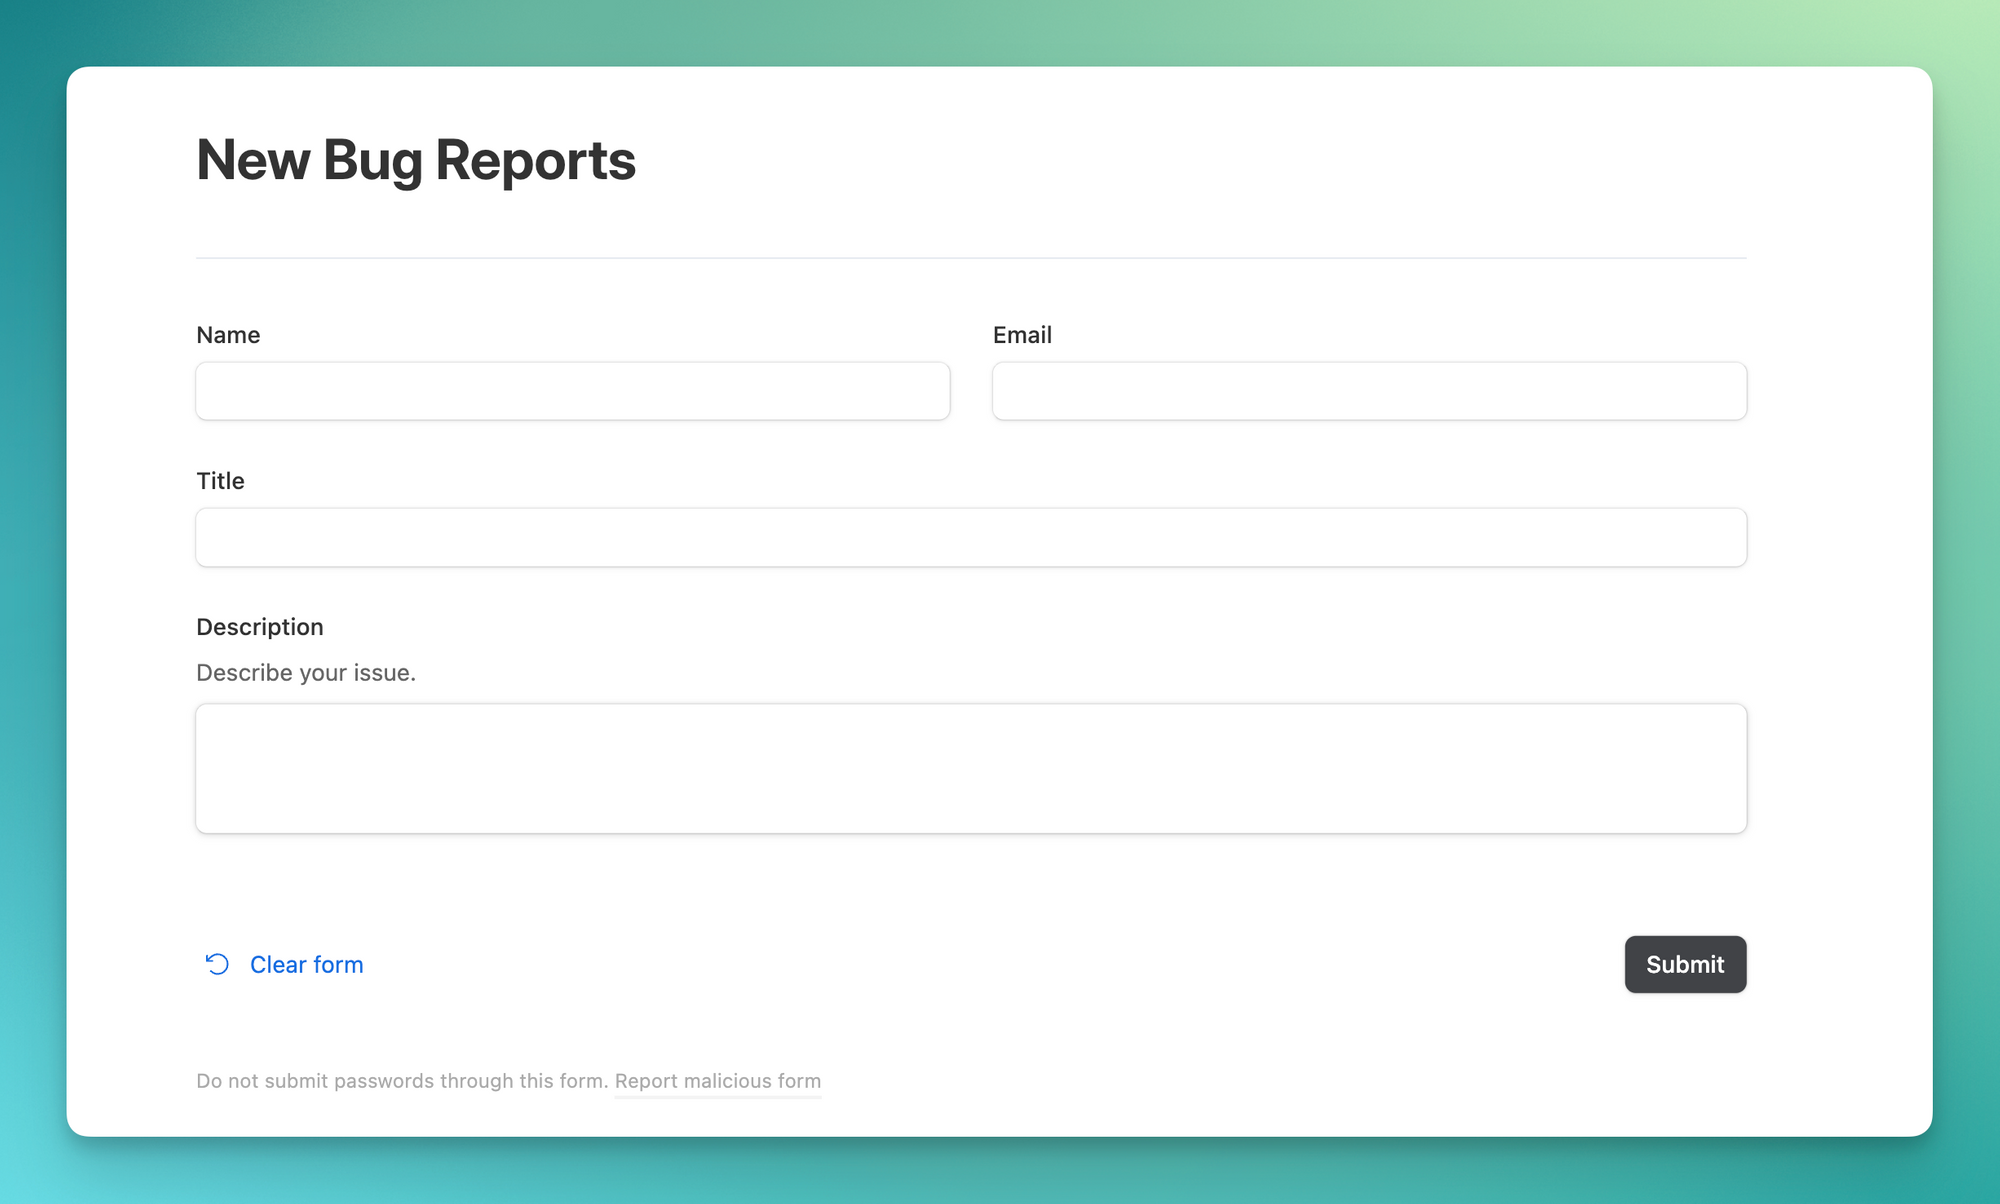
You can also create a Form. This can be shared publicly, sending an event when any user submits a bug.
Create a form in Airtable and adjust it to your use case. Don't forget to hide the Priority field, as it will be filled by the AI. You should end up with something like this:
Great, now we have a working form storing bug reports. Now, let's configure our trigger.
Triggering the workflow
We want form submissions to trigger our workflow. To do that, we need to configure a webhook.
In Pipedream, create a new workflow and select HTTP / Webhook > HTTP Requests with a Body. Data from the form sent by Airtable will be available in the body of the HTTP request in Pipedream. You don't need to change anything in the configuration — clicking Save and continue and you'll receive a URL like https://eoabc123def456.m.pipedream.net.
Head back to Airtable and create a new automation. Similar to Pipedream, Airtable also requires a trigger, which here will be When a form is submitted. Next, select the table and the recently-created form.
The next step is the only coding necessary in this tutorial. Click on Add advanced logic or action > Run script. On the panel on the left, click on Add input variable and name and select all fields submitted via the form. Don't forget to also add the Airtable record ID, once it will be needed later.
Add the following in the code editor, replacing the content of WEBHOOK_URL with the URL provided before:
const WEBHOOK_URL = 'https://your-endpoint.m.pipedream.net'

fetch(WEBHOOK_URL, {
  method: 'POST',
  headers: {
    'Content-Type': 'application/json',
  },
  body: JSON.stringify(input.config()),
})
Great! You can click on Test action, and, if a record has been previously selected, you'll receive its content in Pipedream.

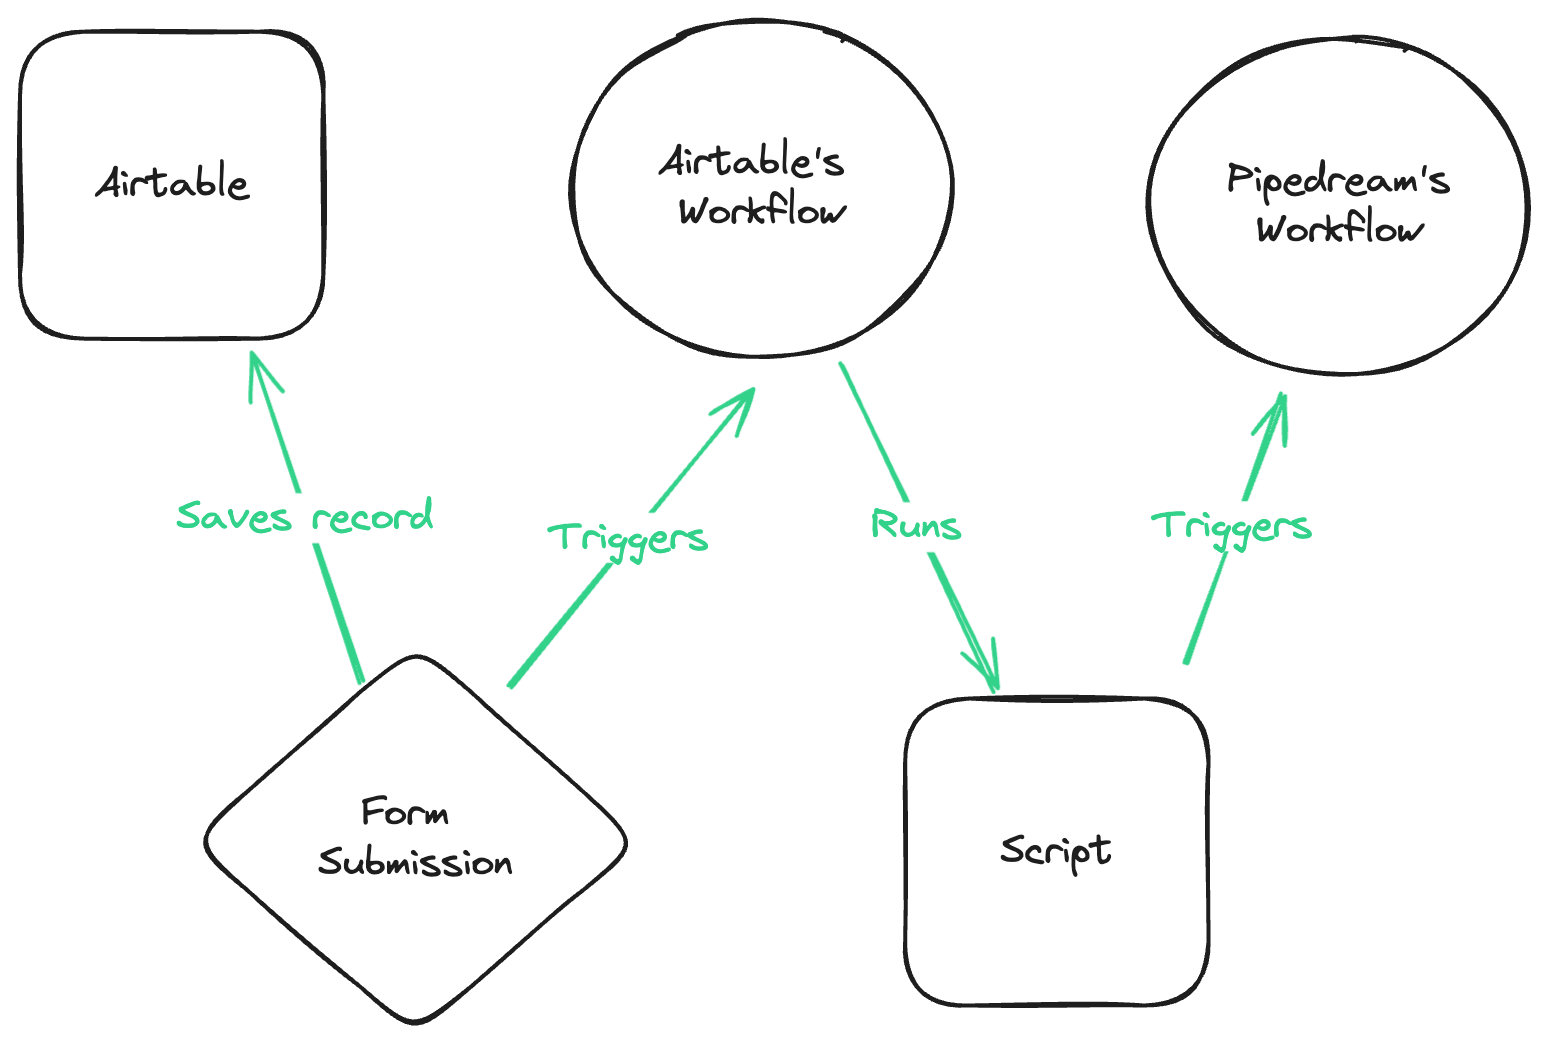
Let's recap what we did so far.
- We created a Pipedream workflow whose trigger is a webhook which provides a unique URL;
- We created a form in Airtable that inserts records into a table called Bug Reports;
- We added an Airtable automation triggered on form submissions;
- This automation runs a script that sends a
POSTrequest along with the submitted data to the webhook URL generated in step 1.
Classifying the priority of the bug
Now we're ready to classify the priority of the bug. Let's remember the goal: we want to classify the content of the bug report and notify the developers only when OpenAI detects urgency.
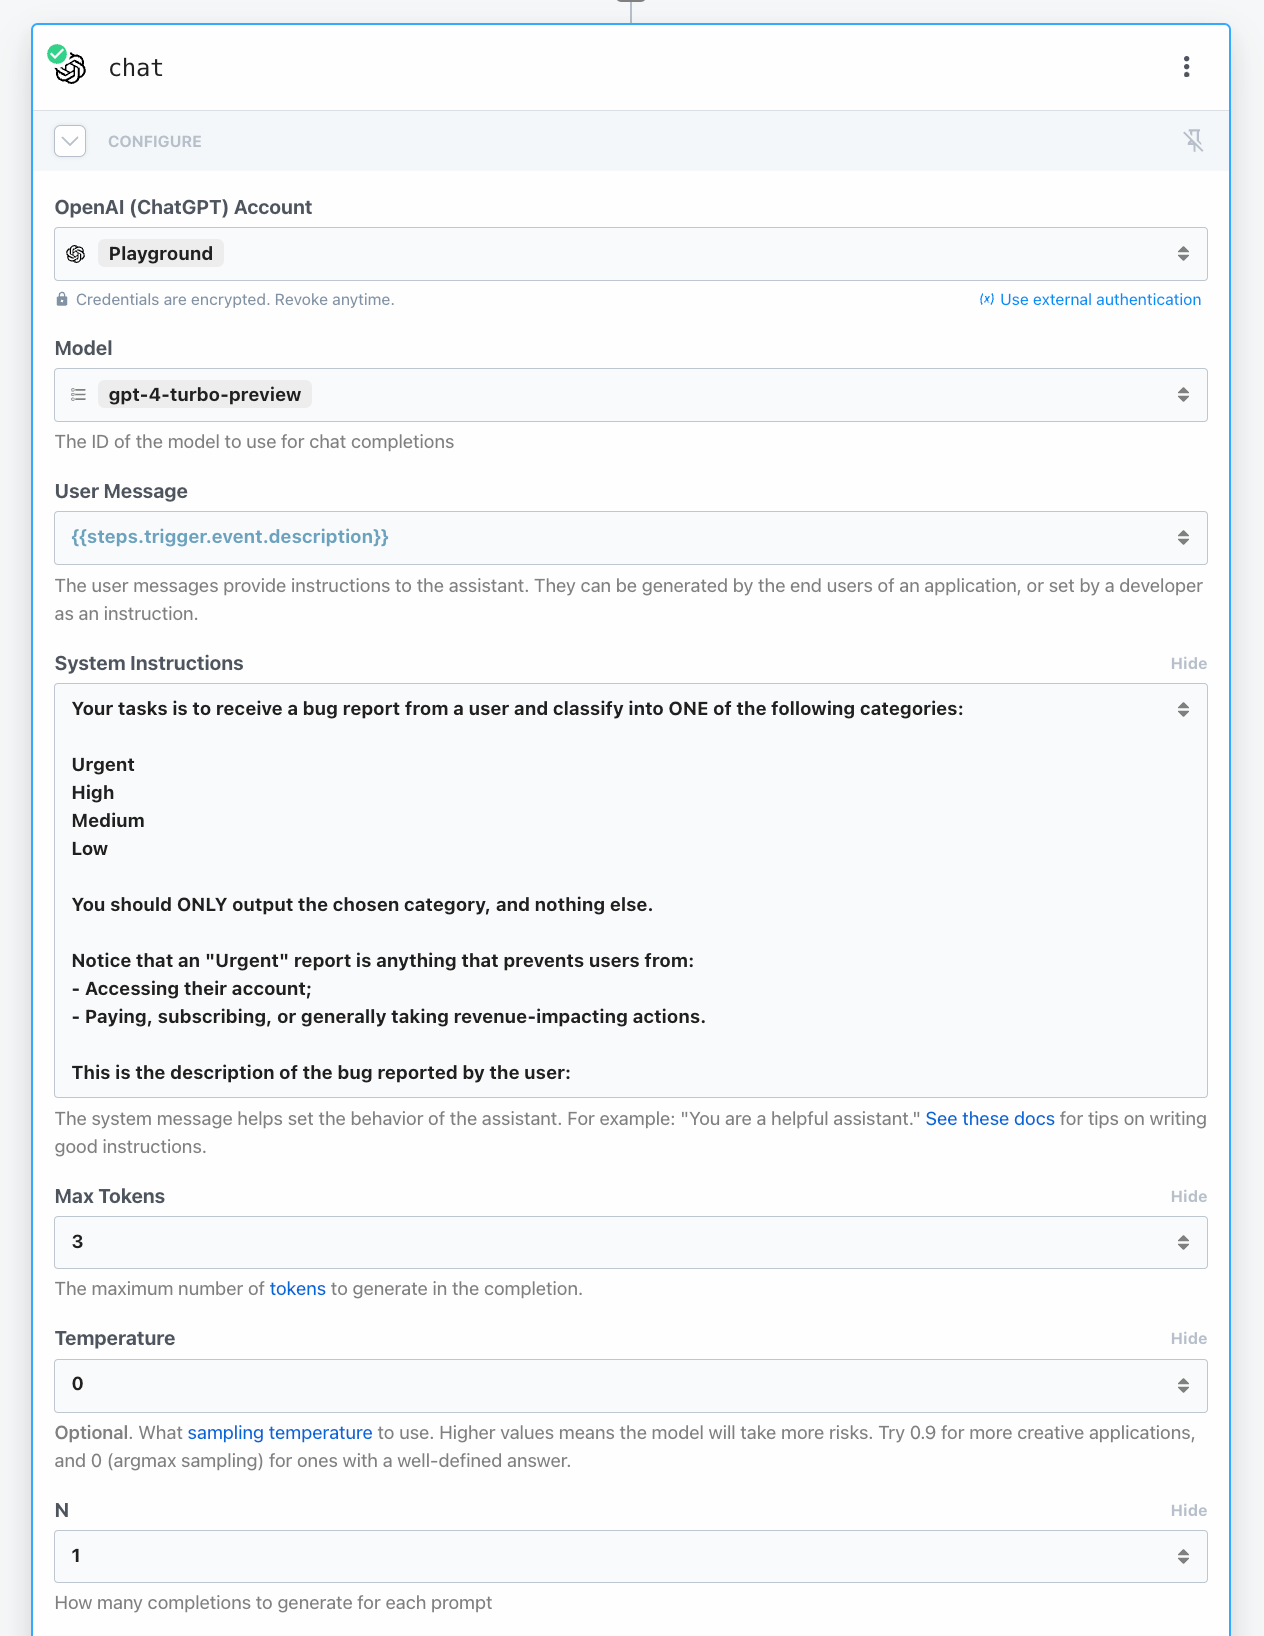
Back in Pipedream, create a new step in your workflow and select the OpenAI (ChatGPT) app. Conveniently, Pipedream has an action to Classify Items into Categories, which will work for simple classification use cases. Here, we'll use the Chat action instead; this gives us more control over the API request, which is key here.
If you don't have one, you'll need an OpenAI API key. In Pipedream, click the button to add a new OpenAI (ChatGPT) account and add the API key there.
Next, select the Model you want to use for classifications. If bug reports are not so frequent in your application, then we recommend choosing gpt-4-turbo-preview, the most-accurate model for classifications as of this post.
In the User Message field, pick the description sent in the body of the request.
Finally, we'll set the System Instructions. System instructions guide how the AI answers prompts. Add the following:
Your tasks is to receive a bug report from a user and classify into ONE of the following categories:

Urgent
High
Medium
Low

You should ONLY output the chosen category, and nothing else.

Notice that an "Urgent" report is anything that prevents users from:
- Accessing their account;
- Paying, subscribing, or generally taking revenue-impacting actions.

This is the description of the bug reported by the user:
Notice that the categories provided match the priorities expected in Airtable. The instruction explicitly asks the model to return the category and only the category. We also give examples of urgent requests in order to nudge the AI to our specific use-case. Feel free to adjust the instructions with examples pertinent to your application.
Note: the pre-made Classify Items into Categories will instruct the LLM to output a JSON, which is very convenient when parsing the output in a code context, but not necessary here.
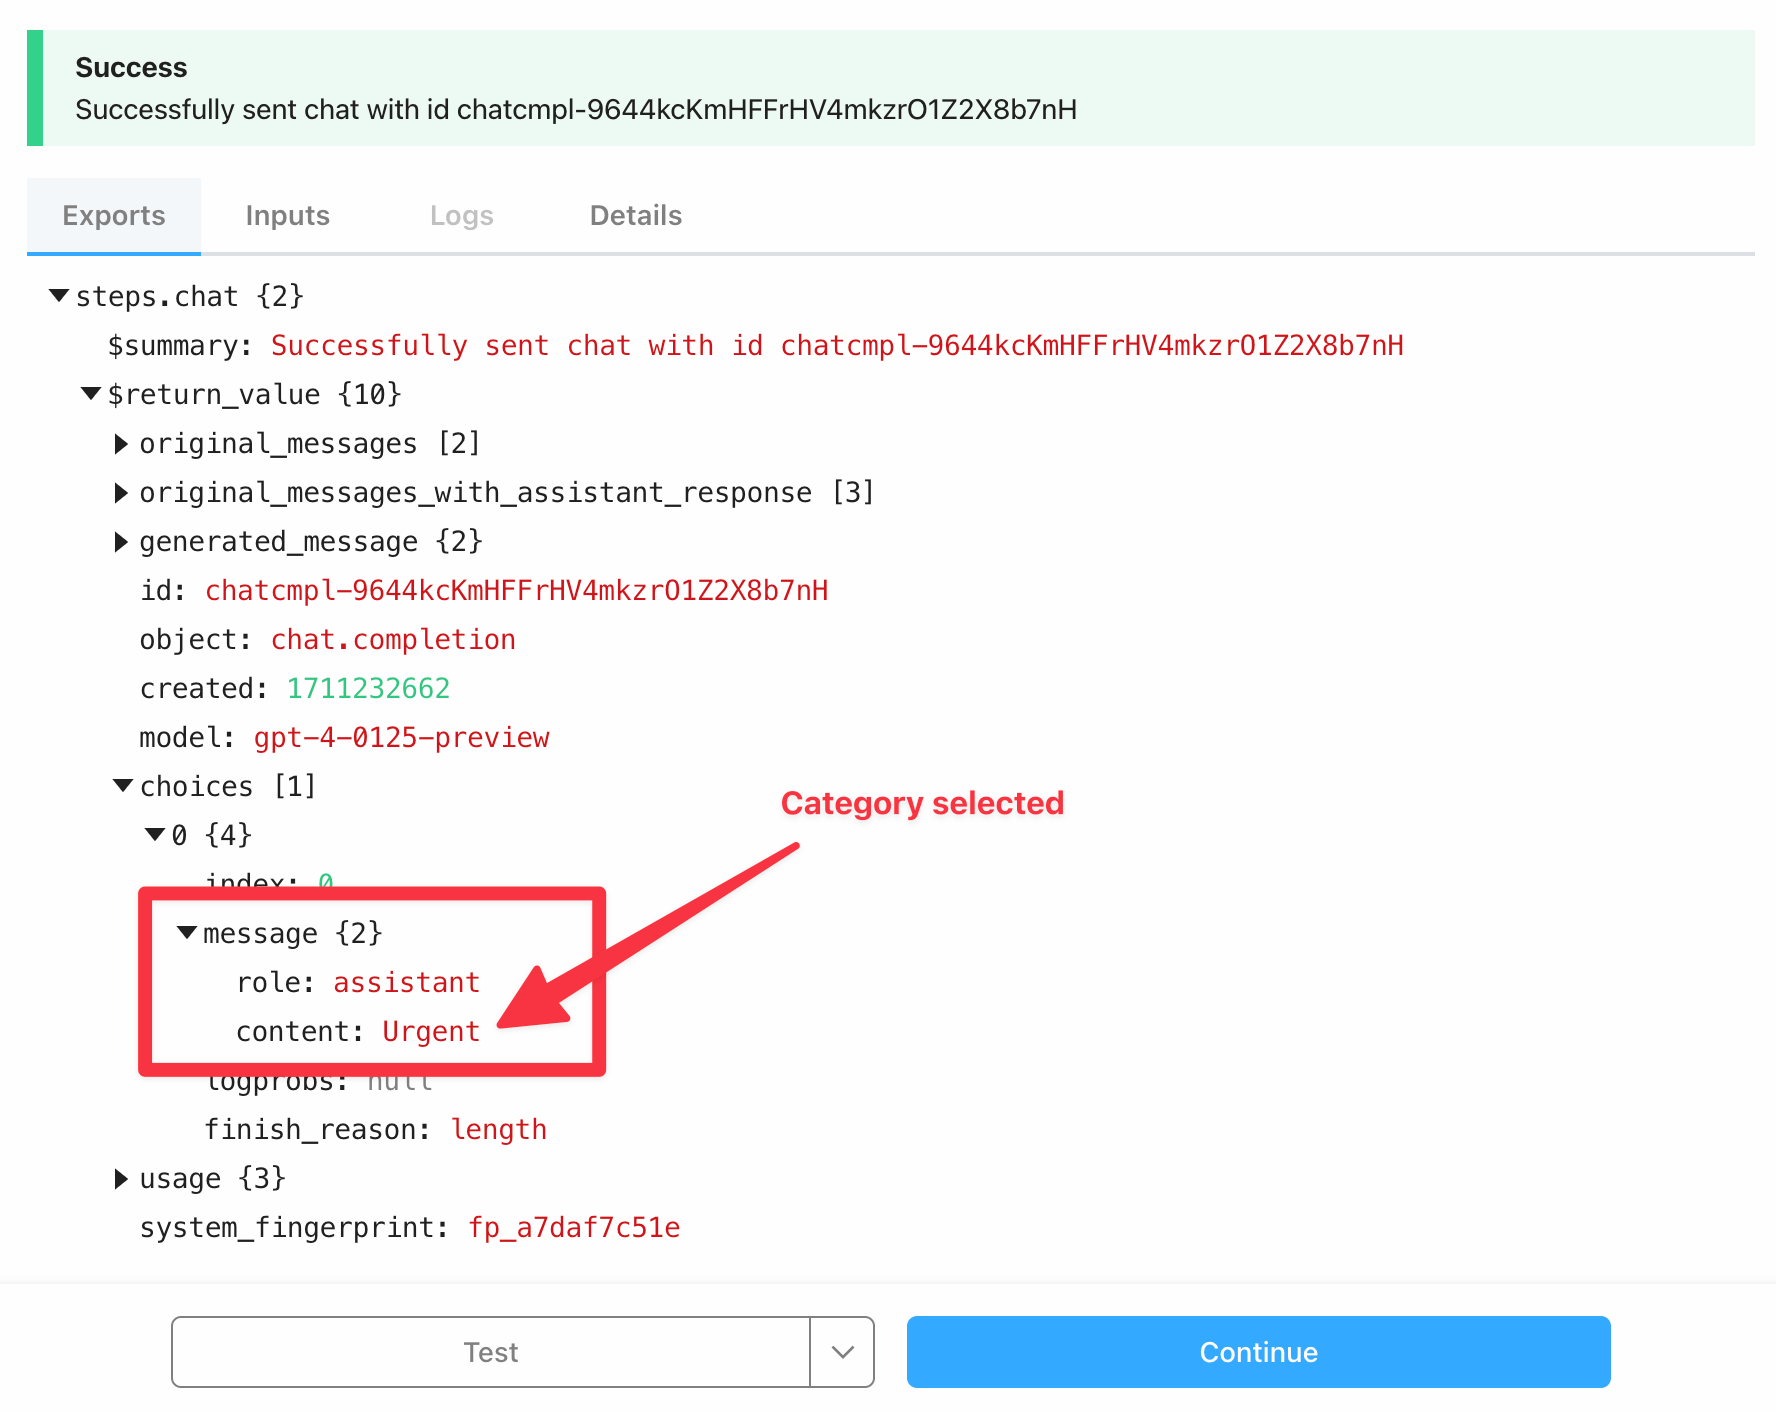
Because of the stochastic character of any AI, we cannot guarantee it will always return one of the 4 categories, though more powerful models are significantly better at adhering to the prompt. There's an extra trick we can do, too. The Tokenizer app allows us to simulate how many tokens a given text is expected to yield. It happens that Urgent takes 3 tokens, while all other categories are successfully encoded with a single one. Hence, we can limit the maximum number of tokens allowed in the completion.
Finally, adjust Temperature to 0 (we want as little randomness as possible in the outcome) and N to 1, and the step is complete.
Click on Test to run the step, and if all is well, you should see the category selected by the LLM.
Updating the Airtable record
Now that the classifier works, let's update the record in Airtable.
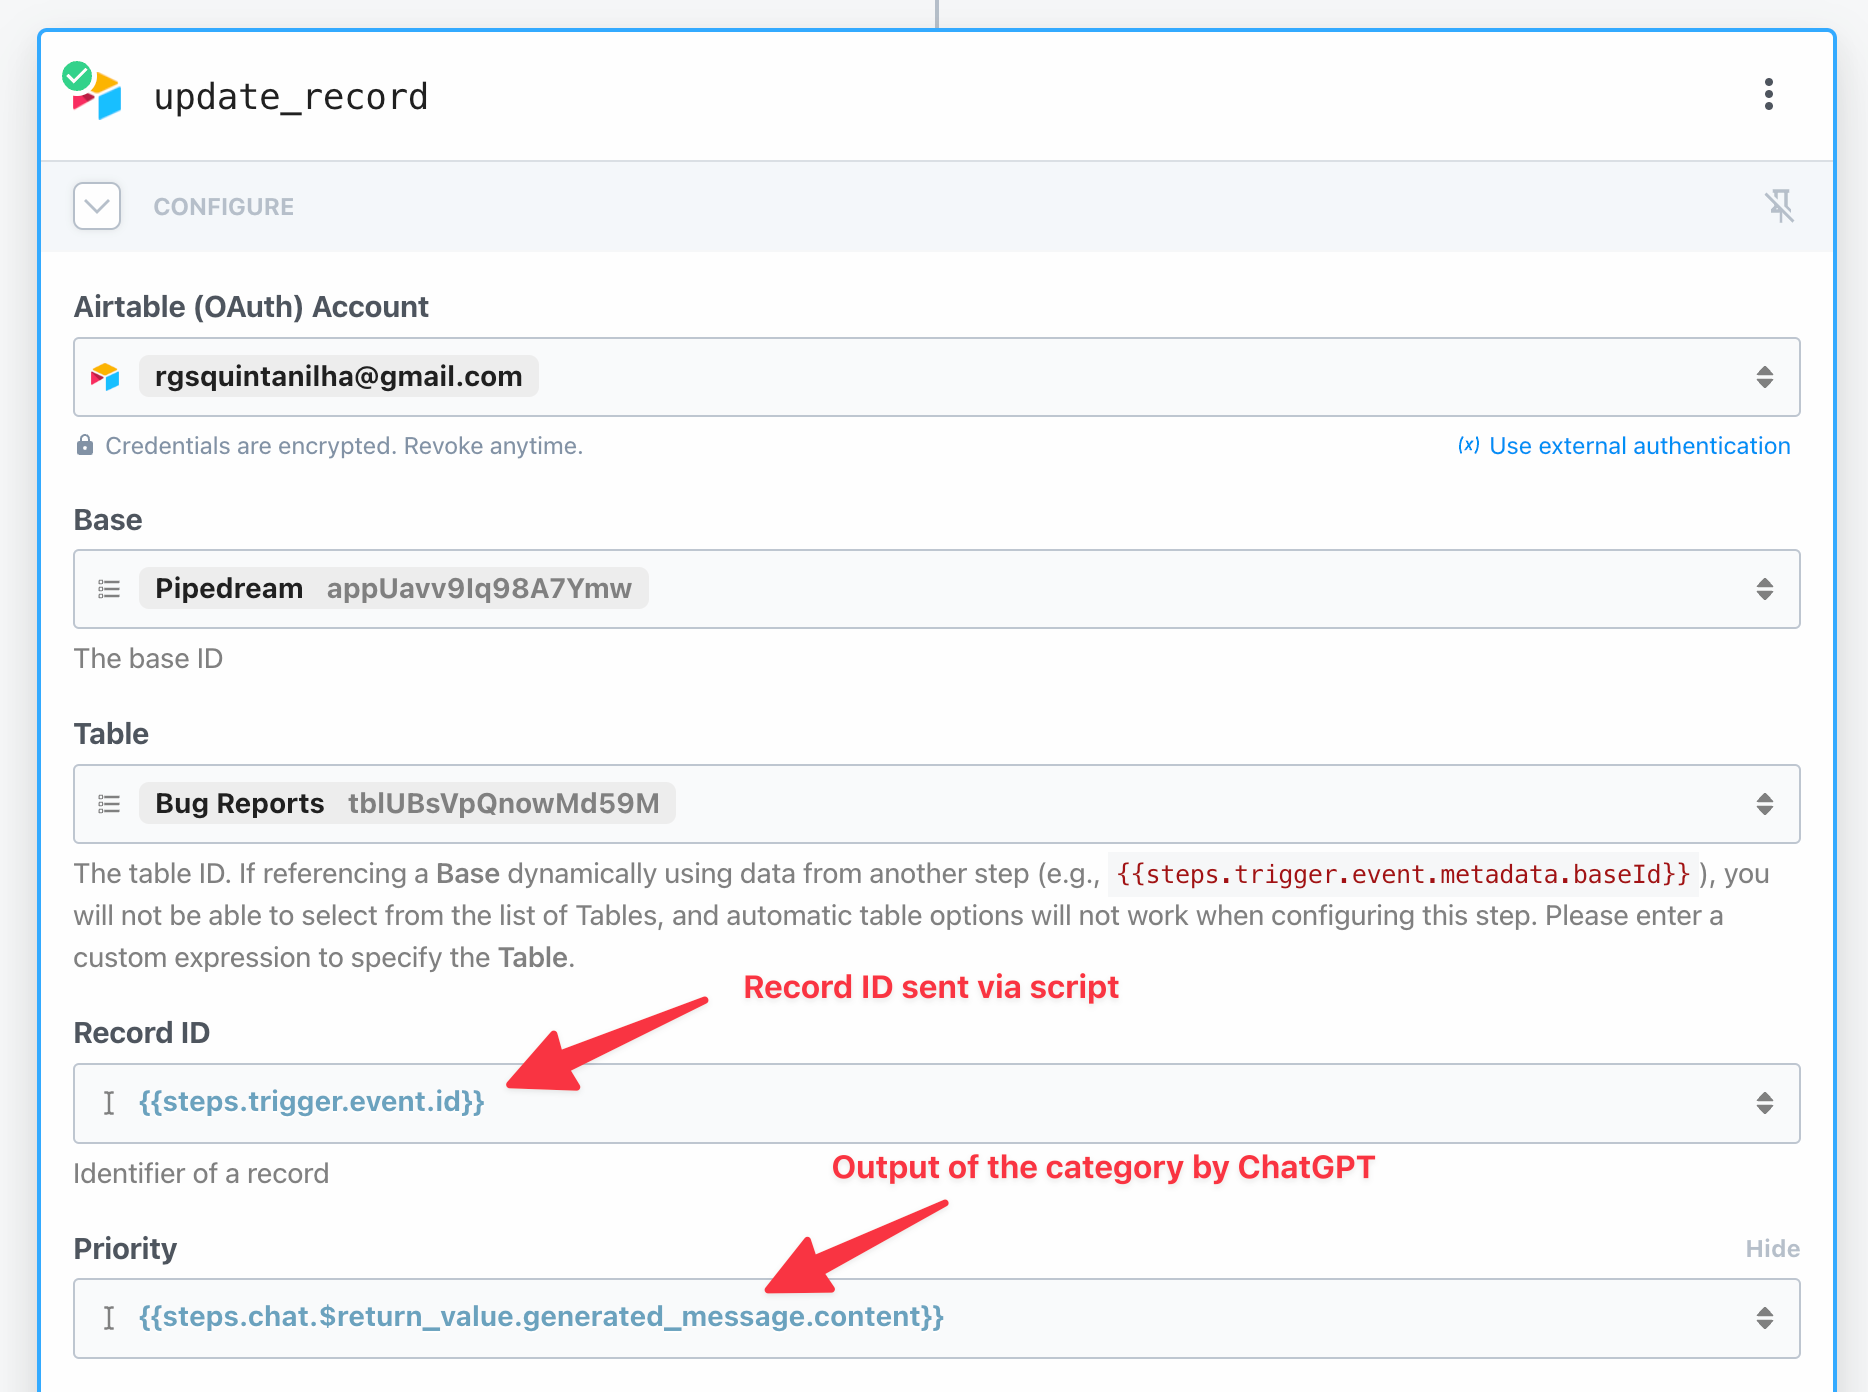
Add a new step to the workflow, search for "airtable", and select the Airtable (OAuth) app. Click the Update Record action. The configuration is straightforward – connect your account and select your Base and Table.
For Record ID, we will need the id from the trigger step. The field we want to update is Priority, and the content is the generated message from the previous step.
The update_record step should look like this:
Conditionally send Slack message
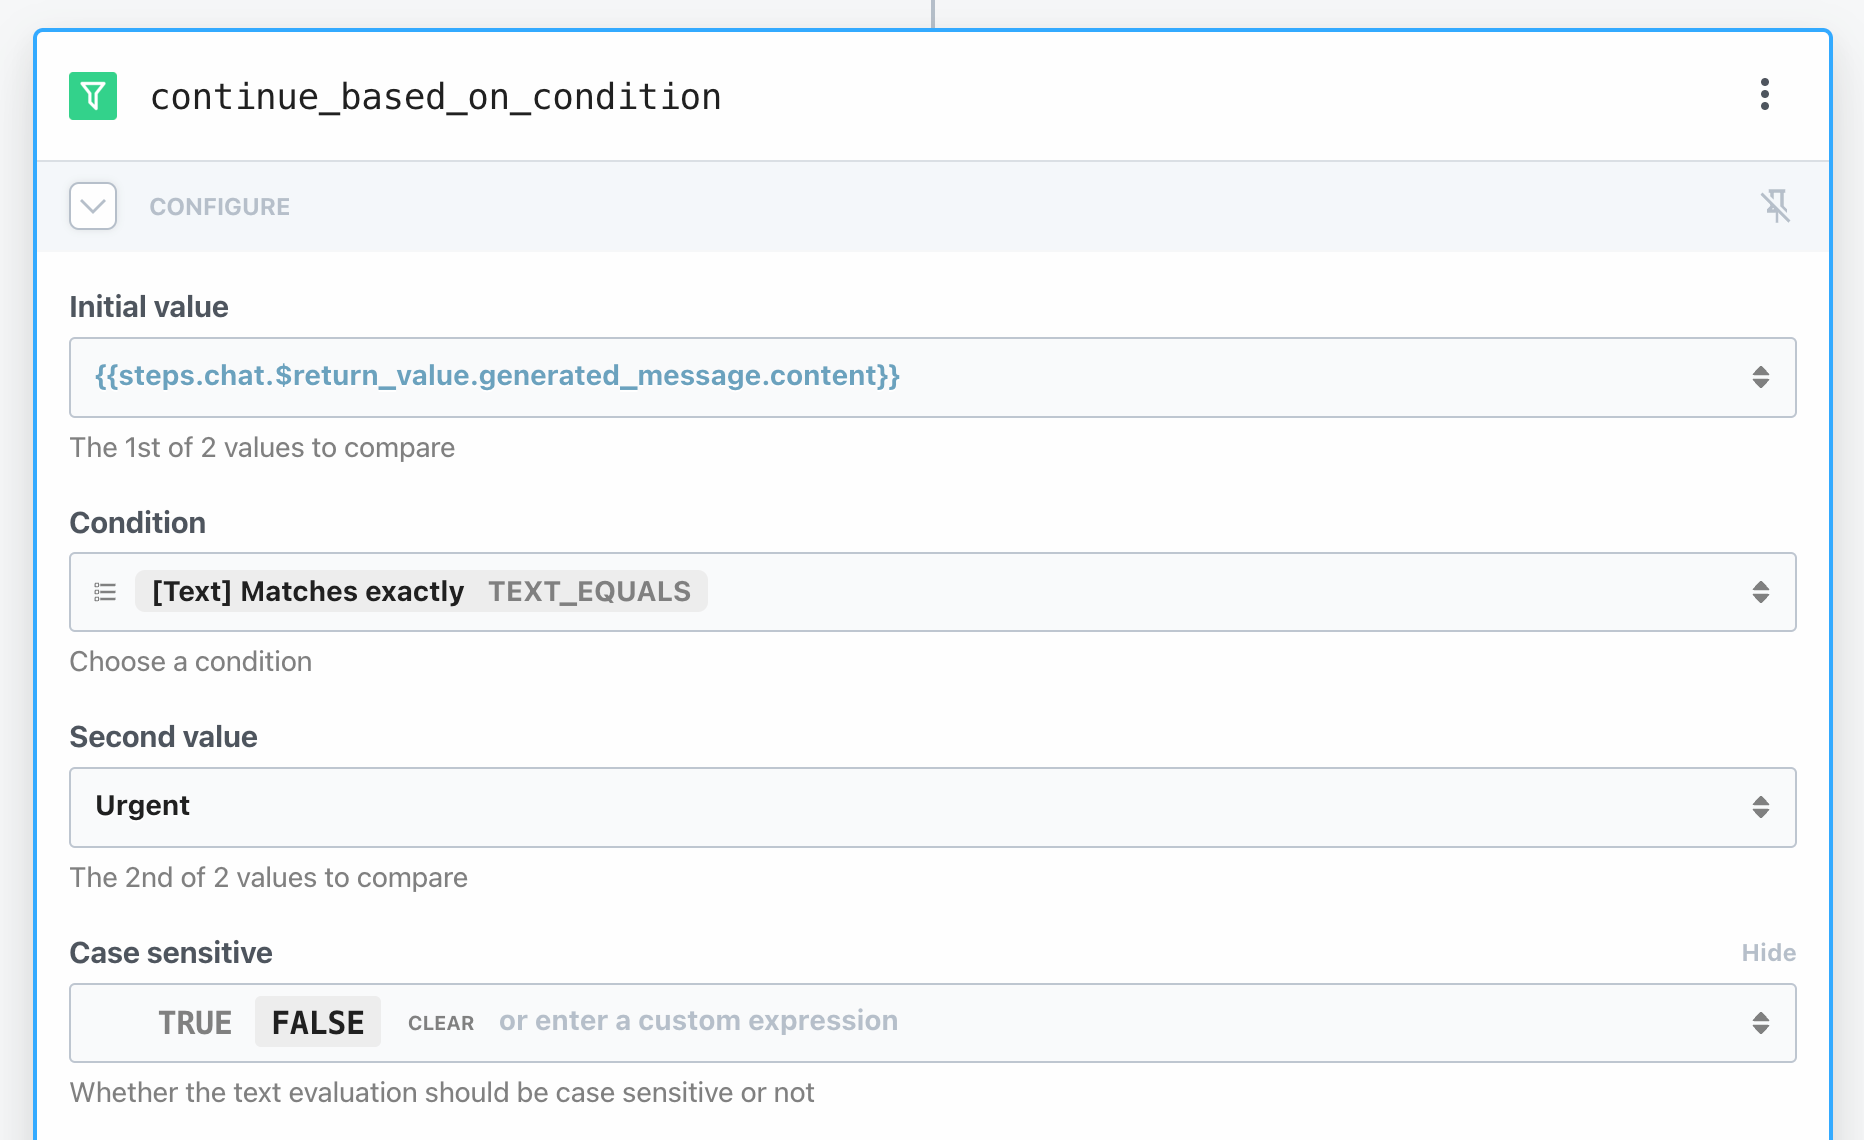
Finally, we'll send a message to Slack. Recall that we want to send notifications only if on Urgent issues. Luckily, Pipedream makes this process a breeze by providing a Continue based on condition step: the workflow will only continue if the configured condition is met, else it ends.
You'll need to configure three fields: Initial value, Condition, and Second value.
For Initial value, select the same output used when updating Airtable – this will be the category. The Second value is the target priority, i.e., Urgent. Finally, select TEXT_EQUALS as the condition. In order to prevent unnecessary misclassifications, make sure Case sensitive is False as well.
Now the workflow will only continue if the AI classifies the report exactly as Urgent (case insensitive). Let's wrap this tutorial up by creating the final step: Slack > Send Message to a Public Channel. Connect your account, select the Channel ID from the list, and use the data sent from Airtable to craft a message to your beloved developers.
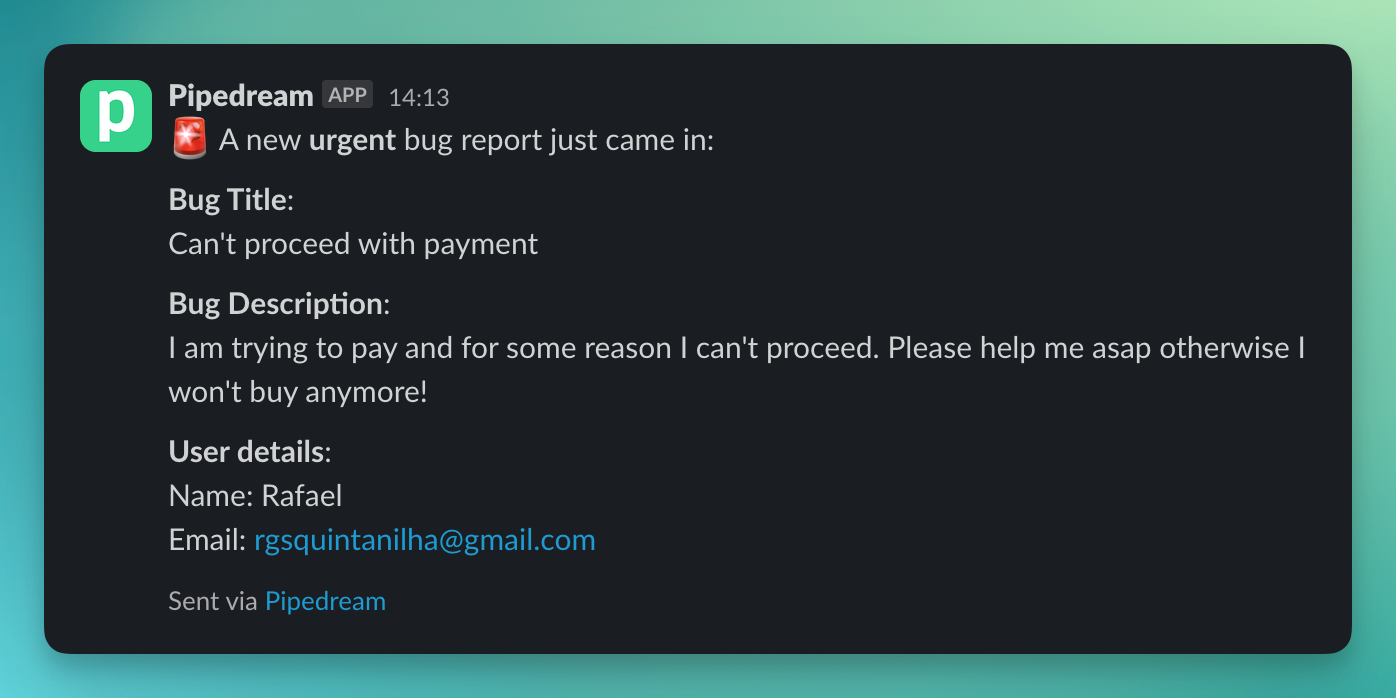
And that's it! Deploy the Pipedream workflow and don't forget to turn on the Airtable automation. Open the publicly-shareable Airtable form and submit a desperate request in order to receive the notification.
Next steps
A great enhancement to this workflow is to send an automatic email to the user, letting them know that the report has been received.
Pipedream has a convenient Gmail integration that can be used for this purpose. For a more custom experience, you can leverage the Postmark integration (my go-to platform for sending templated emails).