Slice and dice images with Sharp.js


The NPM package ecosystem is absolutely massive. The NPM registry is one of, if not the largest open source repository in the world (just please refrain from installing everything).
Jokes aside, NPM and package managers are crucial for modern software development. Without it and the open ecosystems they provide, wheel reinvention would be the standard. Instead with a few commands, you can consume and contribute reusable software packages.

That's why Pipedream integrates with NPM tightly for your Node.js Code Steps, actions and source components. You can leverage packages for facilitating connections to APIs like the AWS SDK, manipulating dates with date-fns, and now manipulating images with sharp.
What is sharp?
sharp is popular and performant NPM package for manipulating images. sharp can resize, convert, and even make alterations including rotating, blurring or sharpening (pun intended) images.
Using sharp you can automate common tasks like:
- Resizing images to different sizes for social media assets (Blog post header, YouTube thumbnail, etc.)
- Blurring photos for paywalls or coming soon teasers.
- Converting images across different formats such as
.png,.jpeg, or.giffor storage optimization or compatibility. - Changing image color to grayscale for machine learning tasks.
Pipedream offers integrations into 2,000+ apps, including sources for image storage like AWS S3, Google Photos, and more. Making Pipedream an ideal tool to automate your image manipulation tasks - no matter where your images are hosted.
But perhaps the more interesting are apps that you can upload to from Pipedream after manipulating them.
For example, we can add a single image to Airtable, then a workflow could automate updating a corresponding blog post header.
In fact, the image you see on this blog post was resized and uploaded to our CMS using this workflow:
Resizing images hosted on Airtable and uploading to Ghost CMS
Read on to learn how it works by leveraging sharp, Airtable, Pipedream File Stores and the Ghost Admin API.
Paired perfectly with Project File Stores
Leveraging sharp within Pipedream pairs perfectly with Project File Stores. In Node.js code steps, perform your image manipulations and then easily upload them to your file store using the $.files helper.
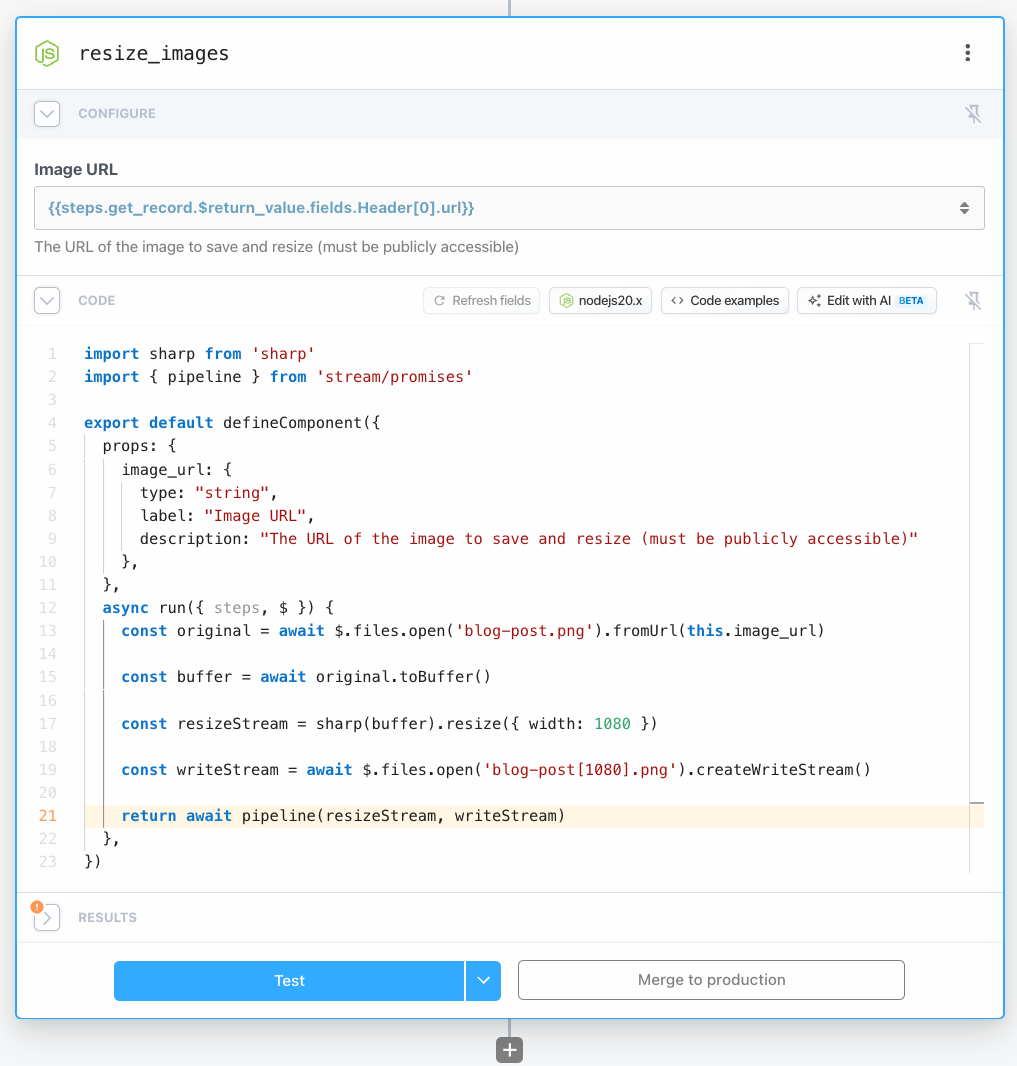
This example below resizes an image using sharp, then uploads it to the file store using $.files :
import sharp from 'sharp'
import { pipeline } from 'stream/promises'
export default defineComponent({
props: {
image_url: {
type: "string",
label: "Image URL",
description: "The URL of the image to save and resize (must be publicly accessible)"
},
},
async run({ steps, $ }) {
// Upload the image to the File Store
const original = await $.files.open('blog-post.png').fromUrl(this.image_url)
// Convert the image to a buffer for processing with sharp
const buffer = await original.toBuffer()
// Resize the image (stream)
const resizeStream = sharp(buffer).resize({ width: 950 })
// Open a new file on the File Store where this resized image will live
const resized = $.files.open('blog-post[1080].png')
// Create a writable stream for our resized image
const writeStream = await resized.createWriteStream()
// resize and upload at the same time
await pipeline(resizeStream, writeStream)
return {
original: await original.toUrl(),
resized: await resized.toUrl(),
}
},
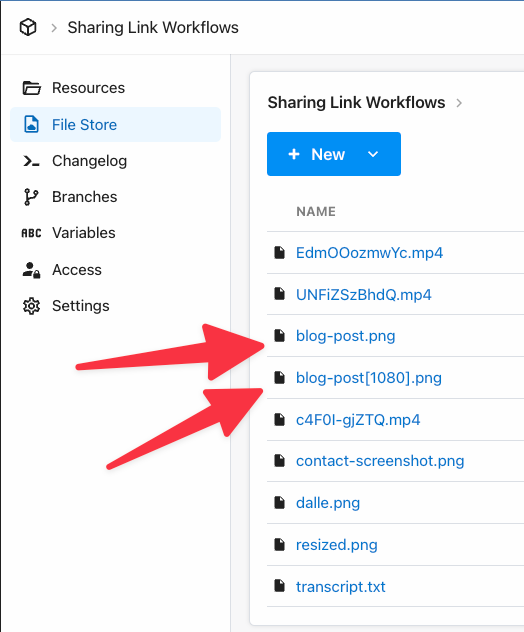
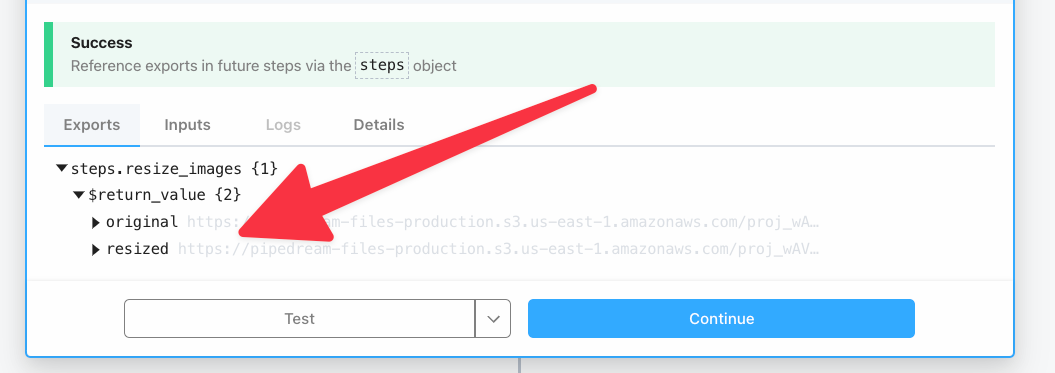
})This step will store both the original image and the resized image to the Pipedream File Store for your project:
Once images are uploaded to the File Store, you can use the $.files helper to download them into memory or /tmp on other workflows. You can even share them with short lived public URLs.
We'll show you how we use this same resize and upload technique to standardize our images across social media channels.
Cutting images to size
We'll show you how we use it to standardize images across our blog post and YouTube channel using Airtable as a quick and easy database, sharp for resizing images.
You can copy this workflow to your account using the link below, or read on to see how to build this workflow from scratch.
Designing the Airtable table
We chose Airtable for this task because it has file attachment support as well as the ability to define Buttons that make HTTP requests, which is perfect for triggering a Pipedream workflow.
We've added a Header column that accepts attachments, so we can upload the original image to the new row for this particular blog post:

The Blog Hero Image will be populated by the workflow, with a resized version that fits the constraints for our blog's header.
Last but not least, we set up a Pipedream HTTP triggered workflow, and configured the Update images column with a button that simply passes the current row's ID as a query parameter:
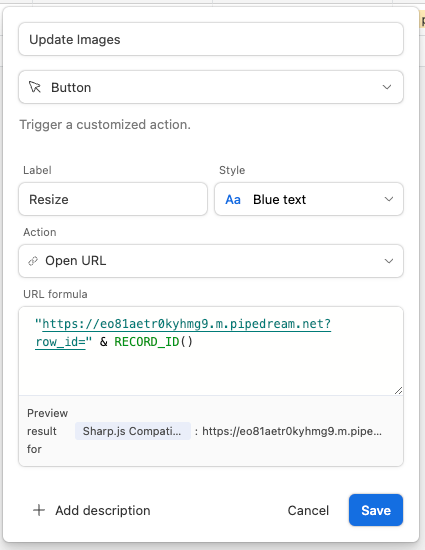
The RECORD_ID() function provides the current record ID, which we can use in our Pipedream Workflow to retrieve the current row's data using the Airtable - Get Record action:
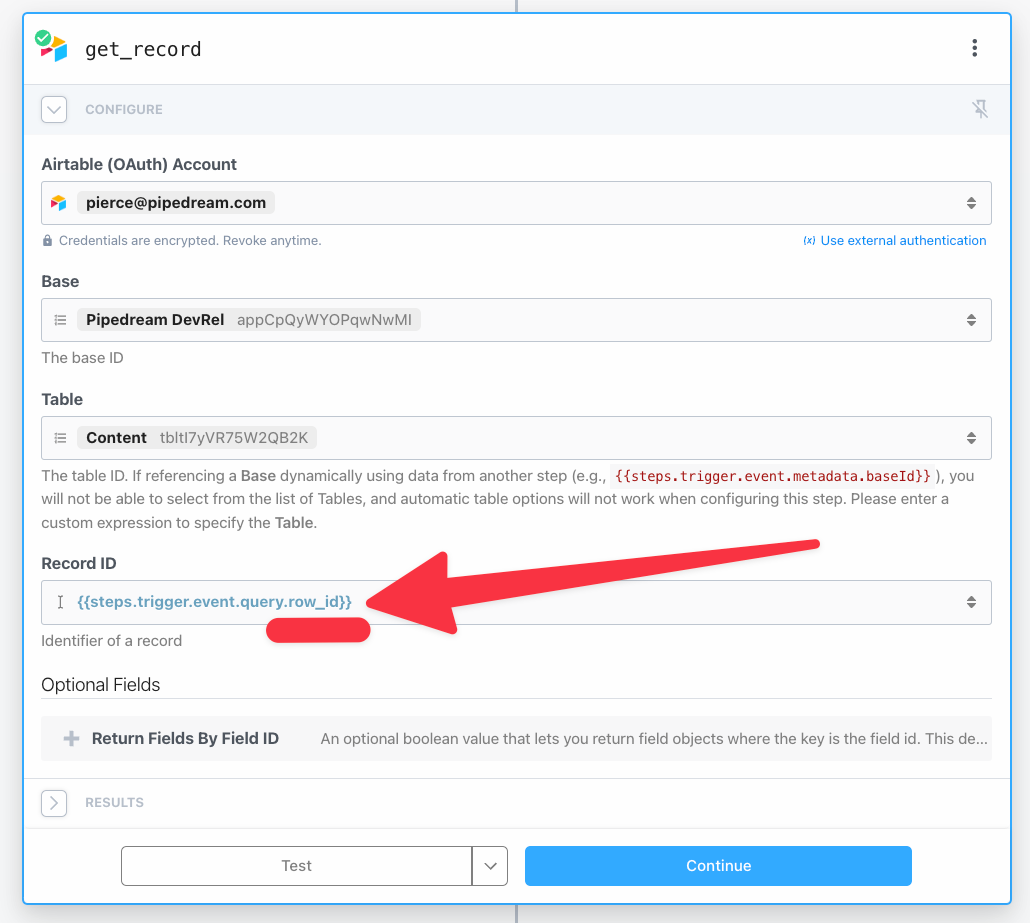
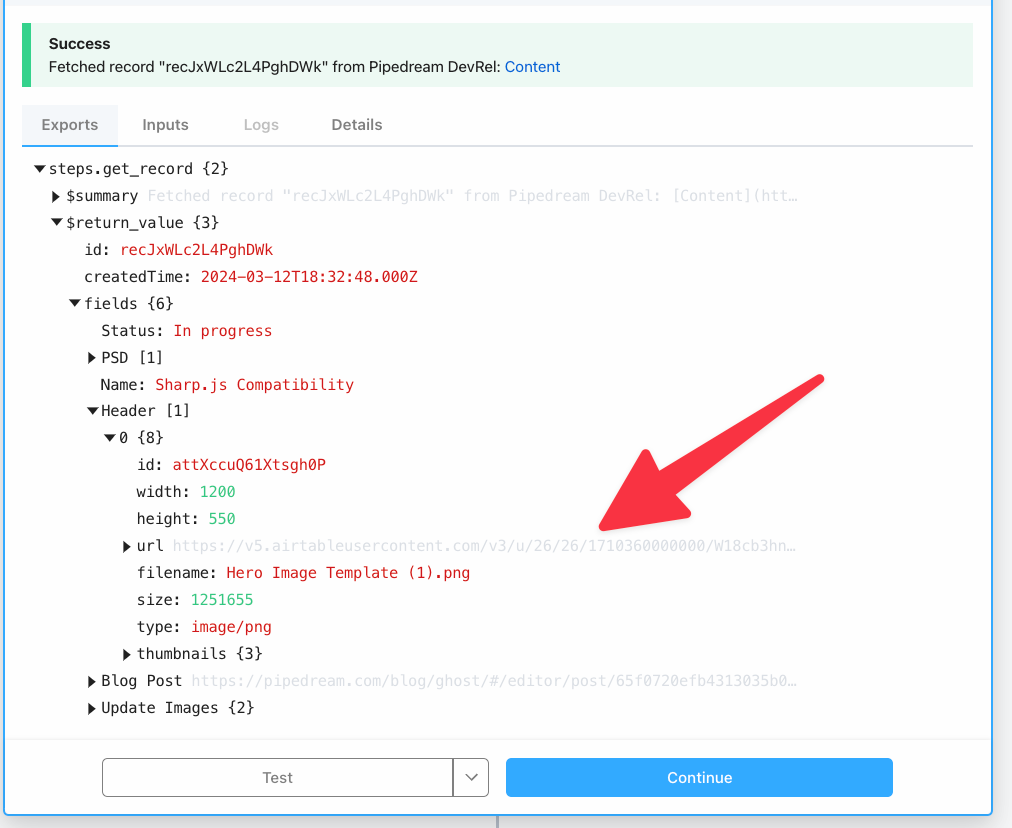
Testing this action will retrieve our records from Airtable including a URL to the Header image.
Don't fear the streamer
Now we can use this code snippet to download this image to the file store, resize it and upload the resized version - using streams!
The File Stores API supports bi-directional streaming, which helps reduce the memory footprint, which is essential for large media files.
import sharp from 'sharp'
import { pipeline } from 'stream/promises'

export default defineComponent({
  props: {
    image_url: {
      type: "string",
      label: "Image URL",
      description: "The URL of the image to save and resize (must be publicly accessible)"
    },
  },
  async run({ steps, $ }) {
    // Upload the image to the File Store
    const original = await $.files.open('blog-post.png').fromUrl(this.image_url)

    // Convert the image to a buffer for processing with sharp
    const buffer = await original.toBuffer()

    // Resize the image (stream)
    const resizeStream = sharp(buffer).resize({ width: 950 })

    // Open a new file on the File Store where this resized image will live
    const resized = $.files.open('blog-post[1080].png')

    // Create a writable stream for our resized image
    const writeStream = await resized.createWriteStream()

    // resize and upload at the same time
    await pipeline(resizeStream, writeStream)

    return {
      original: await original.toUrl(),
      resized: await resized.toUrl(),
    }
  },
})
We'll provide the image_url prop the URL from the Header in the Airtable - Get Row action we set up previously:
The result includes the URL to the newly resized file that's uploaded to our File Store!
Uploading the resized image to Airtable
Airtable is acting as our source of truth for our images, so it makes sense to reach for the Airtable - Update Record action to upload our resized version.
Please note, you'll need to include the image's URL within an object that matches the Attachment Object shape described in the Airtable API docs.
It'll look something like this: {{ [ { url: steps.resize_images.$return_value.resized } ] }}
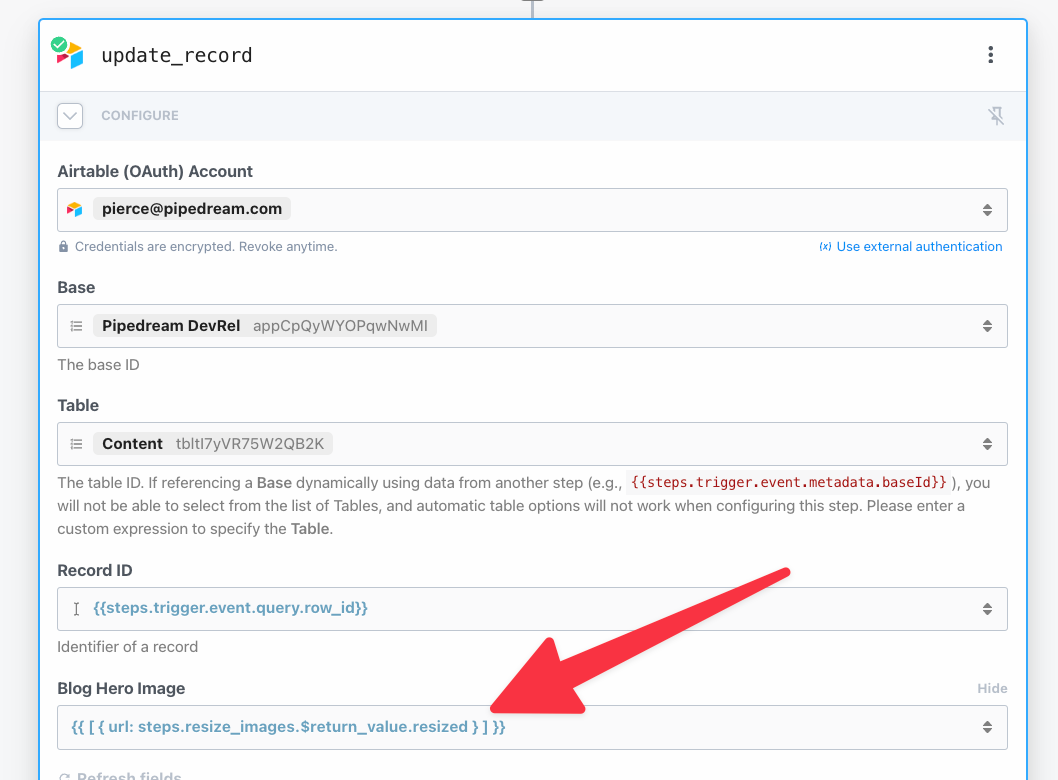
Then after testing this new step, you should see the newly resized image uploaded to your Airtable table:

Extra Credit - uploading the resized image to the blog post
Let's go the extra mile and actually upload the resized image as a header to this blog post.
This blog post is running on Ghost, which is a Node.js powered CMS. And of course, Pipedream integrates into the Ghost Admin API which allows you to automate editing and even publishing your posts.
Uploading images to Ghost posts
First, we'll need to upload the resized image to the Ghost blog.
You can paste this code into a Node.js code step and click Refresh Fields to connect your Ghost CMS instance to Pipedream:
import GhostAdminAPI from '@tryghost/admin-api';
import FormData from 'form-data'

export default defineComponent({
  props: {
    ghost_org_admin_api: {
      type: "app",
      app: "ghost_org_admin_api",
    }
  },
  async run({steps, $}) {
    const api = new GhostAdminAPI({
        url: this.ghost_org_admin_api.$auth.admin_api_url,
        key: this.ghost_org_admin_api.$auth.admin_api_key,
        version: 'v3'
    });

    // open the resized image from the File Store and convert it into a Buffer
    const buffer = await $.files.open('blog-post[1080].png').toBuffer();

    // Create a FormData object
    const formData = new FormData();

    // Append our resized image to it, and don't forget to provide a name
    formData.append('file', buffer, { filename : 'blog-post[1080].png' });
    formData.append('purpose', 'image');

    // Upload our image to the Ghost instance, will return a URL hosted on Ghost
    return await api.images.upload(formData)
  },
})
Clicking Test will show our uploaded image's Ghost URL:

Now we're ready to assign this URL as the post's feature_image (aka the featured image on the post).
Copy and paste this code into another Node.js code step, and again click Refresh Fields:
import GhostAdminAPI from '@tryghost/admin-api';

export default defineComponent({
  props: {
    ghost_org_admin_api: {
      type: "app",
      app: "ghost_org_admin_api",
    },
    post_url: {
      type: "string",
      label: "Post URL",
      description: "The URL to the specific post in the editor (example format `https://your-site.com/blog/ghost/#/editor/post/65f0720efb4313035b01d240`)"
    }
  },
  async run({steps, $}) {
    const api = new GhostAdminAPI({
        url: this.ghost_org_admin_api.$auth.admin_api_url,
        key: this.ghost_org_admin_api.$auth.admin_api_key,
        version: 'v3'
    });

    // extract the post_id from the post_url
    let post_id = this.post_url.match(/\/(\w+)$/);

    // Checking if any digits were found and printing them
    if (post_id && Array.isArray(post_id)) {
      post_id = post_id[1];
    } else {
      throw new Exception('Invalid post_url given, make sure it is copied from the Blog Editor correctly')
    }

    $.export('post_id', post_id);

    // we need to retrieve the current post's updated_at field
    // otherwise you might run into the dreaded "Someone else is editing this post" error
    const current_post = await api.posts.read({id: post_id})

    $.export('current_post', current_post);

    // update the post's featured_image
    const updated_post = await api.posts.edit({
      id: post_id,
      feature_image: steps.upload_blog_header.$return_value.url,
      "updated_at": current_post.updated_at,
    })

    $.export('updated_post', updated_post);
  },
})
You'll need to provide a Blog Post URL which is the link to the post when you have it opened in Ghost. Conveniently this value is part of our Airtable table:

Since we have that data stored within the Blog Post column, we just have to reference it in our step as {{ steps.get_record.return_value.fields["Blog Post"] }}:
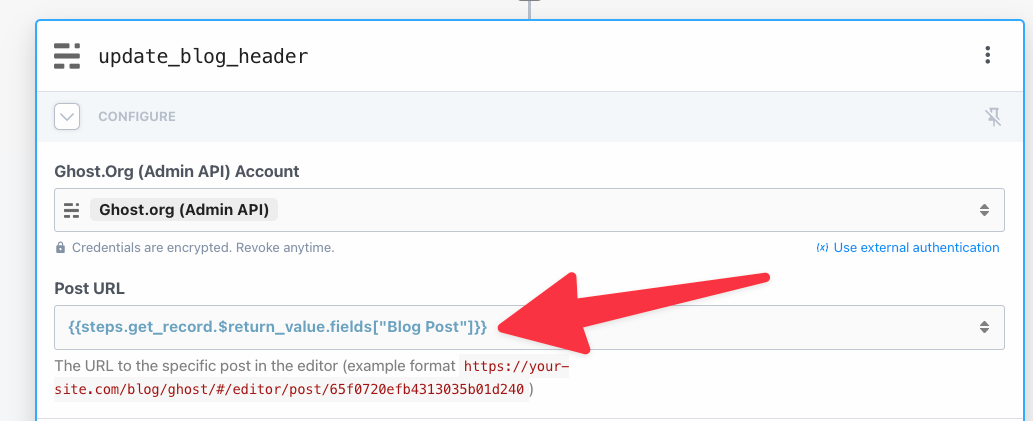
Then clicking Test will upload the resized image to Ghost, and use the new locally hosted URL as the post.featured_image.
Refreshing the page in the Ghost Editor will show the newly resized image:
Try this next
- Using
sharpto resize to YouTube thumbnail size, and play with the various cropping settings - Use OpenAI or another LLM to generate the
alttag for thefeatured_postbased on the post's content - Use OpenAI or another LLM to generate the excerpt for the post using the content from the post
- Add a Publish button to the Airtable table to publish the blog post after uploading the image
Learn more
At the end of this tutorial, you should have a Pipedream account set up. So try your hand at build workflows, or even building custom actions & triggers.
If you'd like to dig a bit deeper, check out these additional resources:
🔪 Read the sharp docs
📚 Read our comprehensive docs
📺 Watch our Pipedream University videos
🤝 Join our Slack Community