Questions about best practices?Join the discussion with fellow Pipedream component developers at the #contribute channel in Slack or on Discourse.
Local Checks
When submitting pull requests, the new code will run through a series of automated checks like linting the code. If you want to run those checks locally for quicker feedback you must have pnpm installed and run the following commands at the root of the project:-
To install all the project’s dependencies (only needed once):
-
To install all required dependencies:
-
To run the linter checks against your code (assuming that your changes are located at
components/foofor example): -
Optionally, you can automatically fix any linter issues by running the following command:
General
Components Should Be ES Modules
The Node.js community has started publishing ESM-only packages that do not work with CommonJS modules. This means you mustimport the package. You can’t use require.
You also cannot mix ESM with CJS. This will not work:
.mjs file extension for any components written as ES modules.
You’ll notice that many of the existing components are written as CommonJS modules. Please fix these and submit a pull request as you refactor related code. For example, if you’re developing new Spotify actions, and you notice the existing event sources use CommonJS, change them to ESM:
- Rename the file extension from
.jsto.mjsusinggit mv(e.g.git mv source.js source.mjs). - Change all
requirestatements toimports. - Change instances of
module.exportstoexport default.
Component Scope
Create components to address specific use cases whenever possible. For example, when a user subscribes to a GitHub webhook to listen for “star” activity, events can be generated when users star or unstar a repository. The “New Star” source filters events for only new star activity so the user doesn’t have to. There may be cases where it’s valuable to create a generic component that provides users with broad latitude (e.g., see the custom webhook event source for GitHub). However, as a general heuristic, we found that tightly scoped components are easier for users to understand and use.Required Metadata
Registry components require a uniquekey and version, and a friendly name and description. Action components require a type field to be set to action (sources will require a type to be set in the future). Action components require the description to include a link to the relevant documentation in the following format:
Annotations
All registry components should include anannotations object that describes the component’s capabilities. These annotations follow the Model Context Protocol specification for tool annotations and help AI systems understand how to use components safely and effectively.
The annotations object should include three boolean fields:
destructiveHint: Set totrueif the action permanently deletes data or performs other irreversible operations. Examples: deleting files, removing users, canceling orders.openWorldHint: Set totrueif the action sends data to external parties or makes information publicly accessible. Examples: sending emails, posting to social media, publishing content.readOnlyHint: Set totrueif the action only reads data without making any modifications. Examples: fetching records, listing items, searching content.
Component Key Pattern
When publishing components to the Pipedream registry, thekey must be unique across registry components and should follow the pattern:
app_name_slug-slugified-component-name
Source keys should use past tense verbs that describe the event that occurred (e.g., linear_app-issue-created-instant). For action keys, use active verbs to describe the action that will occur, (e.g., linear_app-create-issue).
Versioning
When you first publish a component to the registry, set its version to0.0.1.
Pipedream registry components try to follow semantic versioning. From their site:
Given a version number MAJOR.MINOR.PATCH, increment the:
MAJORversion when you make incompatible API changes,MINORversion when you add functionality in a backwards compatible manner, andPATCHversion when you make backwards compatible bug fixes.
0.0.1. If the action was at version 0.1.0 and you’ve fixed a bug, change it to 0.1.1 when committing your final code.
If you update a file, you must increment the versions of all components that import or are affected by the updated file.
Folder Structure
Registry components are organized by app in thecomponents directory of the pipedreamhq/pipedream repo.
- The name of each app folder corresponds with the name slug for each app
- The app file should be in the root of the app folder (e.g.,
/components/[app_slug]/[app_slug].app.mjs) - Components for each app are organized into
/sourcesand/actionssubfolders - Each component should be placed in its own subfolder (with the name of the folder and the name of the
jsfile equivalent to the slugified component name). For example, the path for the “Search Mentions” source for Twitter is/components/twitter/sources/search-mentions/search-mentions.mjs. - Aside from
app_slug, words in folder and file names are separated by dashes (-) (i.e., in kebab case) - Common files (e.g.,
common.mjs,utils.mjs) must be placed within a common folder:/common/common.mjs.
Using APIs vs Client Libraries
If the app has a well-supported Node.js client library, feel free to use that instead of manually constructing API requests.package.json
Each app should have a package.json in its root folder. If one doesn’t exist, run npm init in the app’s root folder and customize the file using this package.json as a template.
Each time you change the code for an app file, or change the dependencies for any app component, modify the package version.
Save any dependencies in the component app directory:
Error-Handling and Input Validation
When you use the SDK of a popular API, the SDK might raise clear errors to the user. For example, if the user is asked to pass an email address, and that email address doesn’t validate, the library might raise that in the error message. But other libraries will not raise clear errors. In these cases, you may need tothrow your own custom error that wraps the error from the API / lib. See the Airtable components for an example of custom error-handling and input validation.
In general, imagine you are a user troubleshooting an issue. Is the error easy-to-understand? If not, throw a better error.
README files
New actions and sources should include README.md files within the same directory to describe how to use the action or source to users.
Here’s an example README.md structure:
README.md within the discord component on the Pipedream registry. That same content is rendered within the Pipedream integration page for the Discord app.
You can add additional subheadings to each of the top level Overview, Example Use Cases, Getting Started and Troubleshooting headings:
Only these three top level headings
Overview, Getting Starting and Troubleshooting will appear within the corresponding App Marketplace page. All other headings will be ignored.Pagination
When making API requests, handle pagination to ensure all data/events are processed. Moreover, if the underlying account experiences and/or generates too much data paginating through the entire collection of records, it might cause out-of-memory or timeout issues (or both!), so as a rule of thumb the pagination logic should:- Be encapsulated as a generator so that the component can start processing records after the very first API call. As an example, you can check the Microsoft OneDrive methods to list files.
- Accept a “next token/page/ID” whenever possible, so that API calls do not retrieve the entire collection of records during every execution but rather from a recent point in time. The
scanDeltaItemsgenerator method in the example above follows this pattern. - Persist the last page number, token or record ID right after processing, so that following executions of the component process new records to minimize the amount of duplicate events, execution time and delayed events. Following the same Microsoft OneDrive example, check the
processEventmethod in this component for an example.
Capturing Sensitive Data
If users are required to enter sensitive data, always use secret props.Promoting Reusability
App Files
App files contain components that declare the app and include prop definitions and methods that may be reused across components. App files should adhere to the following naming convention:[app_name_slug].app.mjs. If an app file does not exist for your app, please reach out.
Prop Definitions
Whenever possible, reuse existing prop definitions. If a prop definition does not exist and you are adding an app-specific prop that may be reused in future components, add it as a prop definition to the app file. Prop definitions will also be surfaced for apps the Pipedream marketplace.Methods
Whenever possible, reuse methods defined in the app file. If you need to use an API for which a method is not defined and it may be used in future components, define a new method in the app file. Use the JS Docs pattern for lightweight documentation of each method in the app file. Provide a description and define @params and @returns block tags (with default values if applicable — e.g.,[foo=bar]). This data will both help with reusability and will be surfaced in documentation for apps in the Pipedream marketplace. For example:
Testing
Pipedream does not currently support unit tests to validate that changes to app files are backwards compatible with existing components. Therefore, if you make changes to an app file that may impact other sources, you must currently test potentially impacted components to confirm their functionality is not negatively affected. We expect to support a testing framework in the future.Common Files (Optional)
An optional pattern to improve reusability is to use acommon module to abstract elements that are used across to multiple components. The trade-off with this approach is that it increases complexity for end-users who have the option of customizing the code for components within Pipedream. When using this approach, the general pattern is:
- The
.app.mjsmodule contains the logic related to making the actual API calls (e.g. callingaxios.get, encapsulate the API URL and token, etc). - The
common.mjsmodule contains logic and structure that is not specific to any single component. Its structure is equivalent to a component, except that it doesn’t define attributes such asversion,dedupe,key,name, etc (those are specific to each component). It defines the main logic/flow and relies on calling its methods (which might not be implemented by this component) to get any necessary data that it needs. In OOP terms, it would be the equivalent of a base abstract class. - The component module of each action would inherit/extend the
common.mjscomponent by setting additional attributes (e.g.name,description,key, etc) and potentially redefining any inherited methods. - Common files (e.g.,
common.mjs,utils.mjs) must be placed within a common folder:/common/common.mjs.
common is just a convention and depending on each case it might make sense to name any common module differently. For example, the AWS sources contains a common directory instead of a common.mjs file, and the directory contains several modules that are shared between different event sources.
Props
As a general rule of thumb, we should strive to incorporate all relevant options from a given API as props.Labels
Use prop labels to customize the name of a prop or propDefinition (independent of the variable name in the code). The label should mirror the name users of an app are familiar with; i.e., it should mirror the equivalent label in the app’s UI. This applies to usage in labels, descriptions, etc. E.g., the Twitter API property for search keywords is “q”, but its label is set to “Search Term”.Descriptions
Include a description for props to help the user understand what they need to do. Use Markdown as appropriate to improve the clarity of the description or instructions. When using Markdown:- Enclose sample input values in backticks (
`) - Refer to other props using bold by surrounding with double asterisks (*)
- Use Markdown links with descriptive text rather than displaying a full URL.
- If the description isn’t self-explanatory, link to the API docs of the relevant method to further clarify how the prop works. When the value of the prop is complex (for example, an object with many properties), link to the section of the API docs that include details on this format. Users may pass values from previous steps using expressions, so they’ll need to know how to structure the input data.
-
The async option to select an Airtable Base is self-explanatory so includes no description:

-
The “Search Term” prop for Twitter includes a description that helps the user understand what values they can enter, with specific values highlighted using backticks and links to external content.

Optional vs Required Props
Use optional props whenever possible to minimize the input fields required to use a component. For example, the Twitter search mentions source only requires that a user connect their account and enter a search term. The remaining fields are optional for users who want to filter the results, but they do not require any action to activate the source: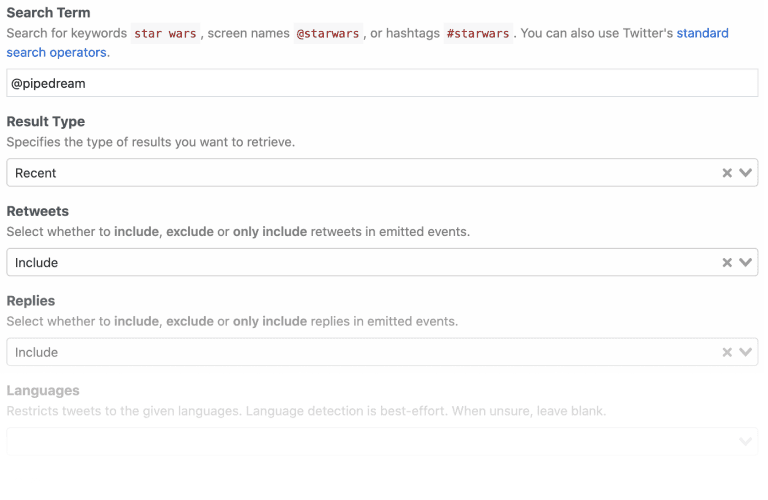
Default Values
Provide default values whenever possible. NOTE: the best default for a source doesn’t always map to the default recommended by the app. For example, Twitter defaults search results to an algorithm that balances recency and popularity. However, the best default for the use case on Pipedream is recency.Async Options
Avoid asking users to enter ID values. Use async options (with label/value definitions) so users can make selections from a drop down menu. For example, Todoist identifies projects by numeric IDs (e.g., 12345). The async option to select a project displays the name of the project as the label, so that’s the value the user sees when interacting with the source (e.g., “My Project”). The code referencing the selection receives the numeric ID (12345). Async options should also support pagination (so users can navigate across multiple pages of options for long lists). See HubSpot for an example of offset-based pagination. See Twitter for an example of cursor-based pagination.Dynamic Props
Dynamic props can improve the user experience for components. They let you render props in Pipedream dynamically, based on the value of other props, and can be used to collect more specific information that can make it easier to use the component. See the Google Sheets example in the linked component API docs.Interface & Service Props
In the interest of consistency, use the following naming patterns when defining interface and service props in source components:
Use getters and setters when dealing with
$.service.db to avoid potential typos and leverage encapsulation (e.g., see the Search Mentions event source for Twitter).
Source Guidelines
These guidelines are specific to source development.Webhook vs Polling Sources
Create subscription webhooks sources (vs polling sources) whenever possible. Webhook sources receive/emit events in real-time and typically use less compute time from the user’s account. Note: In some cases, it may be appropriate to support webhook and polling sources for the same event. For example, Calendly supports subscription webhooks for their premium users, but non-premium users are limited to the REST API. A webhook source can be created to emit new Calendly events for premium users, and a polling source can be created to support similar functionality for non-premium users.Source Name
Source name should be a singular, title-cased name and should start with “New” (unless emits are not limited to new items). Name should not be slugified and should not include the app name. NOTE: Pipedream does not currently distinguish real-time event sources for end-users automatically. The current pattern to identify a real-time event source is to include “(Instant)” in the source name. E.g., “New Search Mention” or “New Submission (Instant)”.Source Description
Enter a short description that provides more detail than the name alone. Typically starts with “Emit new”. E.g., “Emit new Tweets that matches your search criteria”.Emit a Summary
Always emit a summary for each event. For example, the summary for each new Tweet emitted by the Search Mentions source is the content of the Tweet itself. If no sensible summary can be identified, submit the event payload in string format as the summary.Deduping
Use built-in deduping strategies whenever possible (unique, greatest, last) vs developing custom deduping code. Develop custom deduping code if the existing strategies do not support the requirements for a source.
Surfacing Test Events
In order to provide users with source events that they can immediately reference when building their workflow, we should implement 2 strategies whenever possible:Emit Events on First Run
- Polling sources should always emit events on the first run (see the Spotify: New Playlist source as an example)
- Webhook-based sources should attempt to fetch existing events in the
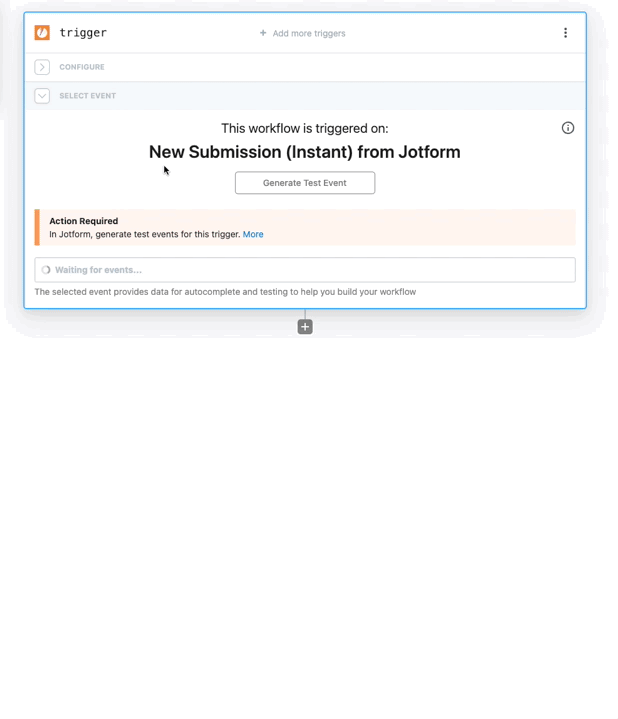
deploy()hook during source creation (see the Jotform: New Submission source)
Include a Static Sample Event
There are times where there may not be any historical events available (think about sources that emit less frequently, like “New Customer” or “New Order”, etc). In these cases, we should include a static sample event so users can see the event shape and reference it while building their workflow, even if it’s using fake data. To achieve this, follow these steps:- Copy the JSON output from the source’s emit (what you get from
steps.trigger.event) and make sure to remove or scrub any sensitive or personal data (you can also copy this from the app’s API docs) - Add a new file called
test-event.mjsin the same directory as the component source and export the JSON event viaexport default(example) - In the source component code, make sure to import that file as
sampleEmit(example) - And finally, export the
sampleEmitobject (example)
Polling Sources
Default Timer Interval
As a general heuristic, set the default timer interval to 15 minutes. However, you may set a custom interval (greater or less than 15 minutes) if appropriate for the specific source. Users may also override the default value at any time. For polling sources in the Pipedream registry, the default polling interval is set as a global config. Individual sources can access that default within the props definition:Rate Limit Optimization
When building a polling source, cache the most recently processed ID or timestamp using$.service.db whenever the API accepts a since_id or “since timestamp” (or equivalent). Some apps (e.g., GitHub) do not count requests that do not return new results against a user’s API quota.
If the service has a well-supported Node.js client library, it’ll often build in retries for issues like rate limits, so using the client lib (when available) should be preferred. In the absence of that, Bottleneck can be useful for managing rate limits. 429s should be handled with exponential backoff (instead of just letting the error bubble up).
Webhook Sources
Hooks
Hooks are methods that are automatically invoked by Pipedream at different stages of the component lifecycle. Webhook subscriptions are typically created when components are instantiated or activated via theactivate() hook, and deleted when components are deactivated or deleted via the deactivate() hook.
Helper Methods
Whenever possible, create methods in the app file to manage creating and deleting webhook subscriptions.Storing the 3rd Party Webhook ID
After subscribing to a webhook, save the ID for the hook returned by the 3rd party service to the$.service.db for a source using the key hookId. This ID will be referenced when managing or deleting the webhook. Note: some apps may not return a unique ID for the registered webhook (e.g., Jotform).
Signature Validation
Subscription webhook components should always validate the incoming event signature if the source app supports it.Shared Secrets
If the source app supports shared secrets, implement support transparent to the end user. Generate and use a GUID for the shared secret value, save it to a$.service.db key, and use the saved value to validate incoming events.
File-related Sources
Sources that emit events for new or updated files should include a temporary file download link in the emitted event payload whenever possible. This improves the user experience by allowing downstream workflows to access the file contents without needing to make an additional authenticated request to the 3rd party service. If the 3rd party API does not provide temporary file download links, use adir prop to upload files to File Stash and generate presigned GET URLs:
- Add a
dirprop withaccessModeset towrite. Thedirprop’s interface mirrors the File Stores API, but files are uploaded to a File Stash folder scoped to the source. - Stream files directly to File Stash using
dir.open(filepath).fromReadableStream(stream, ?contentType, ?contentLength)to avoid exhausting/tmpwhen processing multiple or large files. - Add a boolean prop to control whether to include file upload details and pre-signed GET URL in emitted events. This should default to
false. - When polling sources are updated or re-enabled, continue polling from the current time instead of catching up on all missed history.
Action Guidelines
Action Name
Like source name, action name should be a singular, title-cased name, should not be slugified, and should not include the app name. As a general pattern, articles are not included in the action name. For example, instead of “Create a Post”, use “Create Post”.Use @pipedream/platform axios for all HTTP Requests
By default, the standard axios package doesn’t return useful debugging data to the user when it throws errors on HTTP 4XX and 5XX status codes. This makes it hard for the user to troubleshoot the issue.
Instead, use @pipedream/platform axios.
Return JavaScript Objects
When youreturn data from an action, it’s exposed as a step export for users to reference in future steps of their workflow. Return JavaScript objects in all cases, unless there’s a specific reason not to.
For example, some APIs return XML responses. If you return XML from the step, it’s harder for users to parse and reference in future steps. Convert the XML to a JavaScript object, and return that, instead.
”List” Actions
Return an Array of Objects
To simplify using results from “list”/“search” actions in future steps of a workflow, return an array of the items being listed rather than an object with a nested array. See this example for Airtable.Handle Pagination
For actions that return a list of items, the common use case is to retrieve all items. Handle pagination within the action to remove the complexity of needing to paginate from users. We may revisit this in the future and expose the pagination / offset params directly to the user. In some cases, it may be appropriate to limit the number of API requests made or records returned in an action. For example, some Twitter actions optionally limit the number of API requests that are made per execution (using amaxRequests prop) to avoid exceeding Twitter’s rate limits. See the Airtable components for an example of using a maxRecords prop to optionally limit the maximum number of records to return.
Use $.summary to Summarize What Happened
Describe what happened when an action succeeds by following these guidelines:
- Use plain language and provide helpful and contextually relevant information (especially the count of items)
- Whenever possible, use names and titles instead of IDs
- Basic structure: Successfully [action performed (like added, removed, updated)] “[relevant destination]”
Don’t Export Data You Know Will Be Large
Browsers can crash when users load large exports (many MBs of data). When you know the content being returned is likely to be large –e.g. files —don’t export the full content. Consider writing the data to the/tmp directory and exporting a reference to the file.
File-related Actions
Actions that accept a file as input should have a singlestring prop (e.g. called file) that accepts both a URL of a file and a path to a file in /tmp. This prop should include format: "file-ref" so that clients can identify it as a file input. Only props that accept both a URL and a /tmp path should have format: "file-ref". Props that accept only one or the other should not include this property.
dir prop to indicate that the /tmp directory should be synced with File Stash when executed via Connect:
accessMode to one of the following values to enable automatic syncing before and/or after execution based on how the action interacts with files in /tmp:
read- if the action accepts/tmpfile paths as input, to sync files before executionwrite- if the action writes files to/tmpas output, to sync files after executionread-write- if the action both reads and writes files, to sync files before and after execution
Only files whose paths are explicitly returned by the action (e.g., via
return { filePath: "/tmp/filename.ext" } or return "/tmp/filename.ext") or files written to process.env.STASH_DIR are synced with File Stash. This prevents syncing unnecessary temporary files created during execution.Miscellaneous
- Use camelCase for all props, method names, and variables.
Database Components
Pipedream supports a special category of apps called “databases”, such as MySQL, PostgreSQL, Snowflake, etc. Components tied to these apps offer unique features as long as they comply with some requirements. The most important features are:- A built-in SQL editor that allows users to input a SQL query to be run against their DB
- Proxied execution of commands against a DB, which guarantees that such requests are always being made from the same range of static IPs (see the shared static IPs docs)
@pipedream/platform package.
SQL Editor
This code editor is rendered specifically for props of typesql, and it uses (whenever possible) the underlying’s database schema information to provide auto-complete suggestions. Each database engine not only has its own SQL dialect, but also its own way of inspecting the schemas and table information it stores. For this reason, each app file must implement the logic that’s applicable to the target engine.
To support the schema retrieval, the app file must implement a method called getSchema that takes no parameters, and returns a data structure with a format like this:
lib/sql-prop.ts file in the @pipedream/platform package define the schema format and the signature of the getSchema method. You can also check out existing examples in the MySQL, PostgreSQL and Snowflake components.
Shared Static IPs
When a user runs a SQL query against a database, the request is proxied through a separate internal service that’s guaranteed to always use the same range of static IPs when making outbound requests. This is important for users that have their databases protected behind a firewall, as they can whitelist these IPs to allow Pipedream components to access their databases. To make this work, the app file must implement the interface defined in thelib/sql-proxy.ts file in the @pipedream/platform package. This interface defines the following methods:
-
getClientConfiguration: This method takes no parameters and returns an object that can be fed directly to the database’s client library to initialize/establish a connection to the database. This guarantees that both the component and the proxy service use the same connection settings, so make sure the component uses this method when initializing the client. -
executeQuery: This method takes a query object and returns the result of executing the query against the database. The Pipedream runtime will replace this method with a call to the proxy service, so every component must make use of this method in order to support this feature. -
proxyAdapter: This method allows the proxy service to take the arguments passed to theexecuteQuerymethod and transform them into a “generic” query object that the service can then use. The expected format looks something like this: