File Stores Live Demo Recap and Workflows


Thank you to all who could attend our live demonstration of File Stores, the newest Pipedream service addition for simple and native cloud storage for your workflows & projects.
Here's the live demo in it's entirety if you'd like to watch in cased you missed this or would like to rewatch for catching details:
In our demo, we showcased several workflows the show how you can leverage this new service. You can jump to each workflow to learn how to build it out step by step, or simply click the respective link to copy it to your Pipedream account instantly.
SlackJourney - the Midjourney clone
Last week, we started SlackJourney, a DALL-E 3 powered Midjourney clone that interfaces with Slack using a Slash Command.
It would accept prompts over the /imagine Slack command we created with a workflow, and then return the A.I. generated image's URL to the Slack channel.
However, DALL-E 3's API generates images that are 1024x1024 pixels by default. These images are too high quality for Slack to show in the preview of a message, which was not ideal for quickly viewing them:
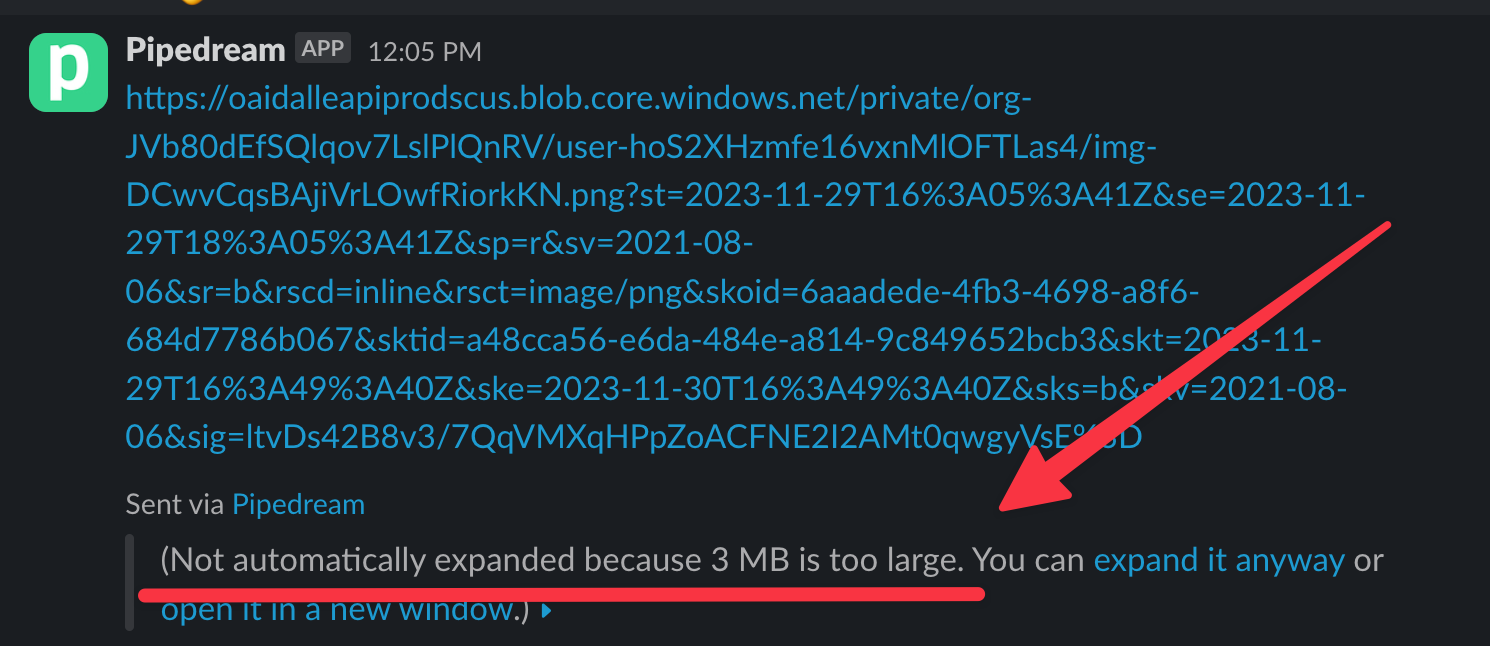
So let's improve this workflow by adding a resizing step to our workflow to resize the original image to under 3mb and display it in the Slack.
🔗 Copy the SlackJourney workflow to your Pipedream account
And follow along with how we built this step by step below.
Backing up the DALL-E 3 Image to the File Store
The OpenAI - Create Image action in Pipedream leverages DALL-E 3 to create an image, and this image is only available for a short period of time.
Let's back it up to our File Store by using a Node.js code step:
export default defineComponent({
  async run({ steps, $ }) {
	// create a new file in the File Store by opening it a path:
    const file = $.files.open('dalle.png')

    // Upload a file to the File Store by a URL
    await file.fromUrl(steps.create_image.$return_value.data[0].url)

    // download the file to local /tmp for further processing
    await file.toFile('/tmp/dalle.png')
  },
})
This code will upload the DALL-E 3 generated image to the File Store under the path dalle.png. Now it's permanently stored in our File Store.
Then last but not least, let's use the file.toFile() method to save the file itself to the /tmp directory in the workflow's execution environment.
Resizing the Image with Python & Pillow
Now that we have the file available at /tmp/dalle.png, we can use Python to resize it. You can install Python PyPI packages like Pillow for image manipulation.
Let's resize the image to 500x500 pixels so it's well beneath the 3 megabyte limit in Slack for image previews:
# pipedream add-package Pillow
from PIL import Image

def handler(pd: "pipedream"):
    image = Image.open("/tmp/dalle.png")
    resized = image.resize((500, 500))
    resized.save("/tmp/resized.png", "PNG")
In this step, we download the image, then resize it and saved the resized image as a new file at /tmp/resized.png.
Uploading the new /tmp/resized.png to the File Store
Let's upload this newly resized file using Node.js code:
export default defineComponent({
  async run({ steps, $ }) {
    // Open the File Store file to be populated
    const file = await $.files.open('resized.png')

    // Upload from the local /tmp/ directory to this new File Store file
    await file.fromFile('/tmp/resized.png')

    return file
  },
})
Sending the resized image as a Slack Message
Last but not least, let's send this newly resized image over Slack so we can view it.
First we'll create a Node.js code step that generates Slack Block Kit blocks. Specifically we need an image block to render the image well:
// create_slack_blocks
export default defineComponent({
  async run({ steps, $ }) {
    const file = await $.files.open('resized.png')
    const imageUrl = await file.toUrl();

    // Return data to use it in future steps
    return {
      "blocks": [
        {
          "type": "image",
          "title": {
            "type": "plain_text",
            "text": steps.trigger.event.body.text
          },
          "block_id": "image4",
          "image_url": imageUrl,
          "alt_text": steps.trigger.event.body.text
        }
      ]
    }
  },
})
This Node.js code step just simply creates an object that we'll pass to the response_url given to use by Slack in the /imagine Slash Command's HTTP request body in the very beginning.
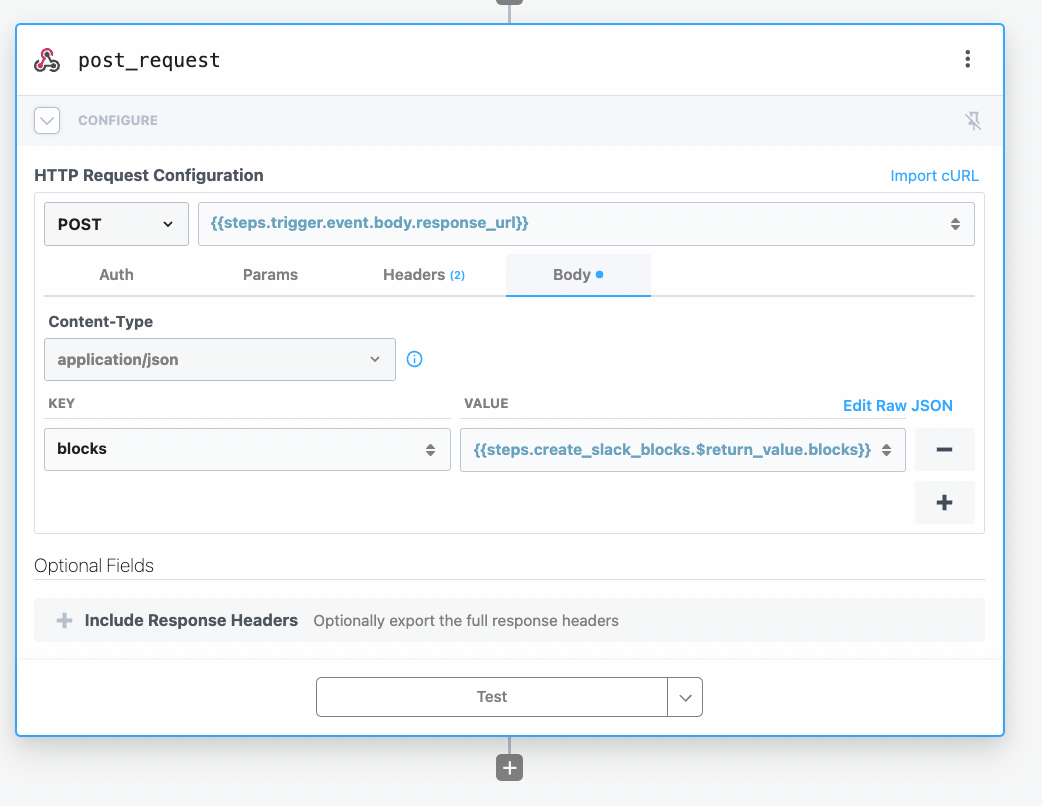
Create a new HTTP Request action as the next step in your workflow, then pass the {{steps.trigger.event.body.response_url}} as the URL and the {{steps.create_slack_blocks.$return_value.blocks}} as the blocks in the Body of the request.
The configured HTTP Request action will look like this below:
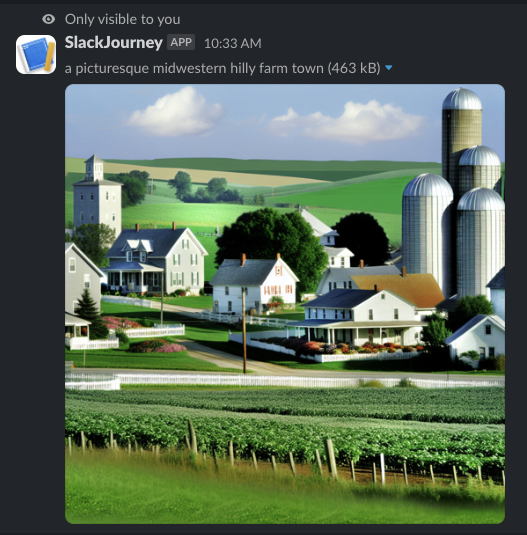
And that's it! Click Test Workflow to show these results:
If you receive an error about a "Expired Slack URL", that just means the response_url in the trigger has expired. Simply deploy the workflow and test again.
Transcribe YouTube Videos Workflow
Copy this workflow here: https://pipedream.com/new?h=tch_wlXfxe
File Stores can handle large files including YouTube videos. In just a few minutes, we'll show you how to build a workflow that leverages Deepgram to transcribe our channel's YouTube videos.
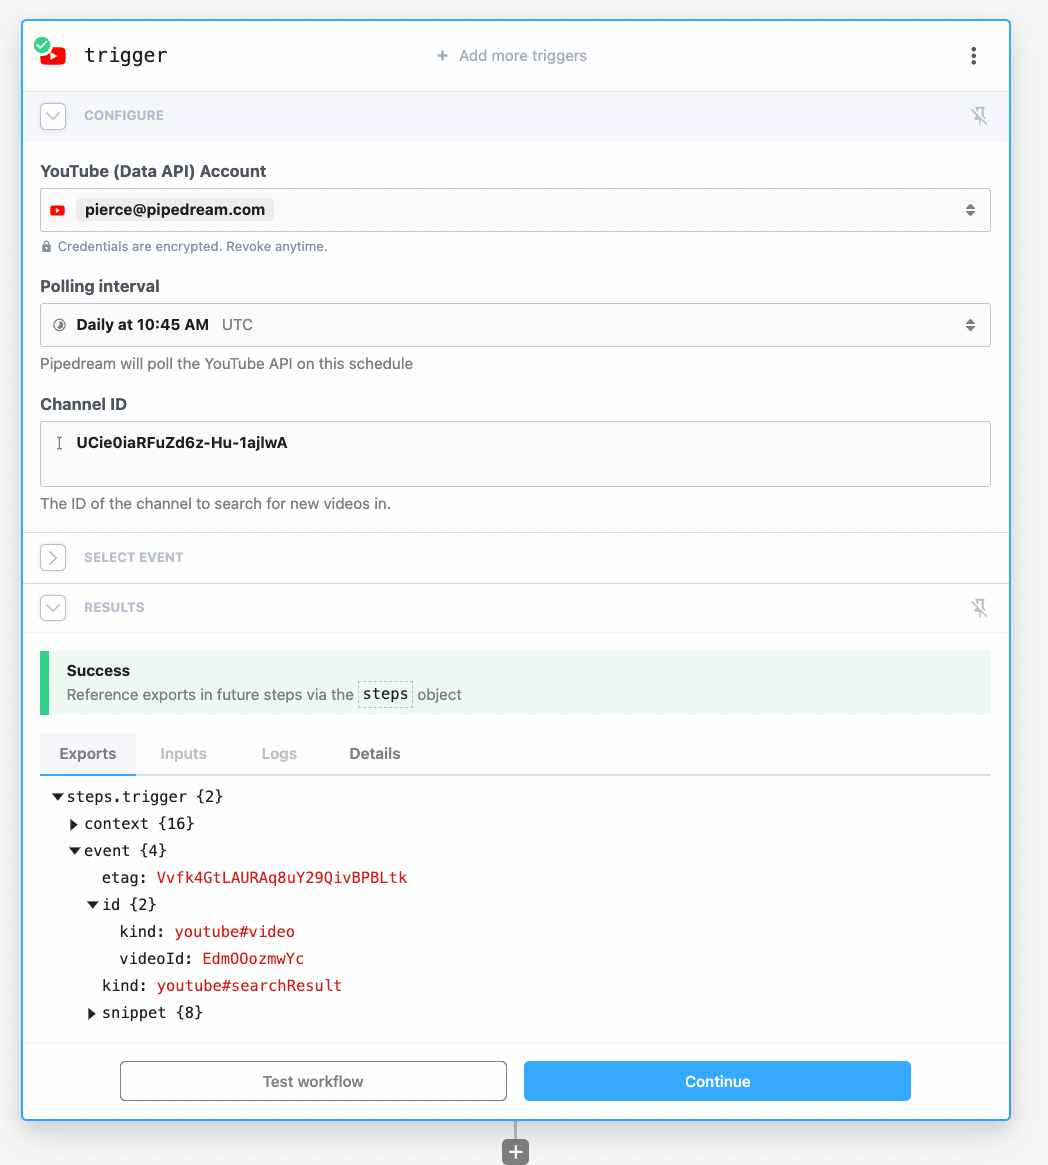
In a new Pipedream workflow, let's use the YouTube Data API - New Videos in Channel trigger. This will trigger the workflow to run whenever we upload a new YouTube video to our channel.
If you you're having trouble finding your YouTube channel ID, open your channel's YouTube Studio in a new browser and copy the ID from the URL:

Then paste this channel ID into the trigger:
Finally, click Create Source and you should be able to pick one of the recent published videos on your account to test the rest of the workflow with.
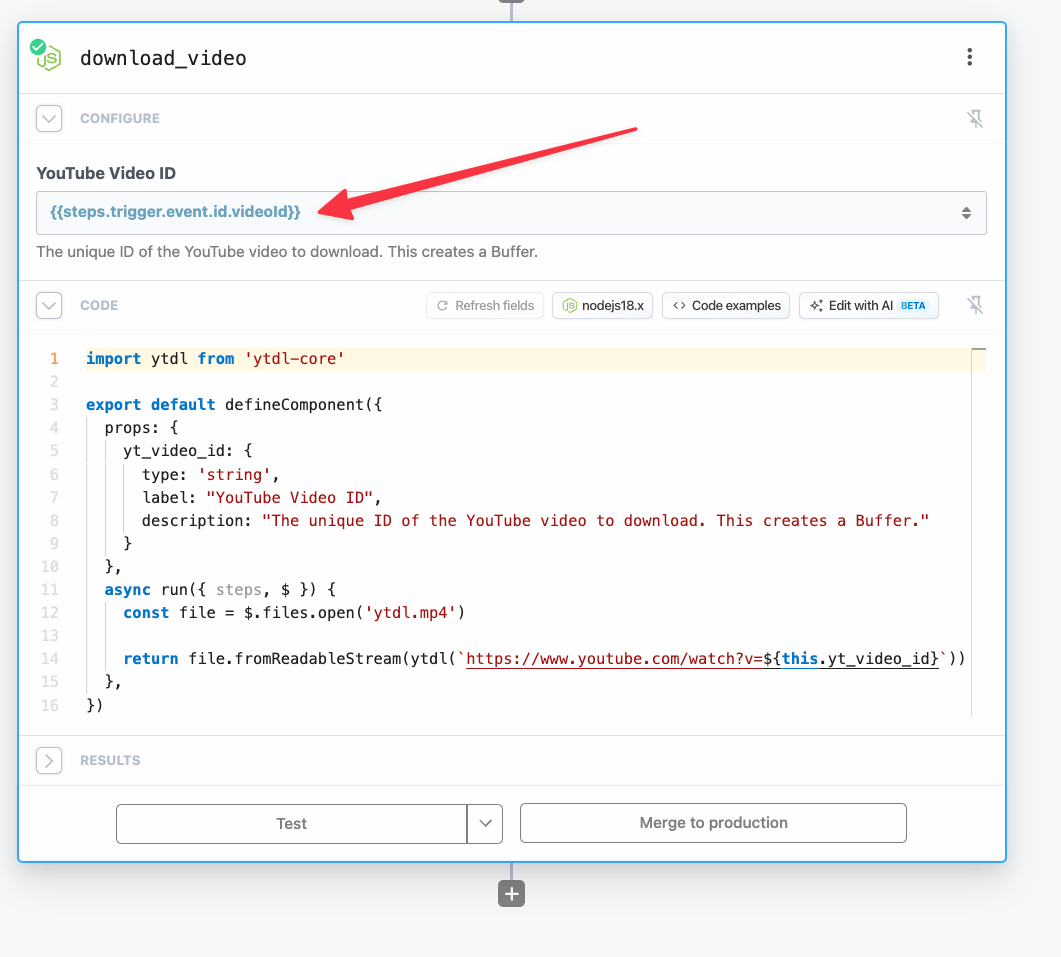
Downloading the YouTube Video with Node.js
The next step is to download the YouTube video to the workflow.
We can use this wonderful ytdl-core NPM package within a Node.js code step for this task:
import ytdl from 'ytdl-core'

export default defineComponent({
  props: {
    yt_video_id: {
      type: 'string',
      label: "YouTube Video ID",
      description: "The unique ID of the YouTube video to download. It will be uploaded to this project's File Store."
    }
  },
  async run({ steps, $ }) {
    const file = $.files.open(`${this.yt_video_id}.mp4`)

    return file.fromReadableStream(ytdl(`https://www.youtube.com/watch?v=${this.yt_video_id}`))
  },
})
If you're copying this code directly, don't forget to click Refresh fields so the YouTube Video ID field appears in the step.
Then in the YouTube Video ID field, copy our video's ID from the trigger: {{steps.trigger.event.id.videoId}}.
At the end, our step should look something like this:
Clicking Test for this step will download the YouTube video as an MP4 file, then upload it to our File Store.
You can even open up the File Store of the project and see it has been uploaded:

Now that our YouTube video has been downloaded as MP4 to our File Store, then we can upload it to Deepgram for transcription
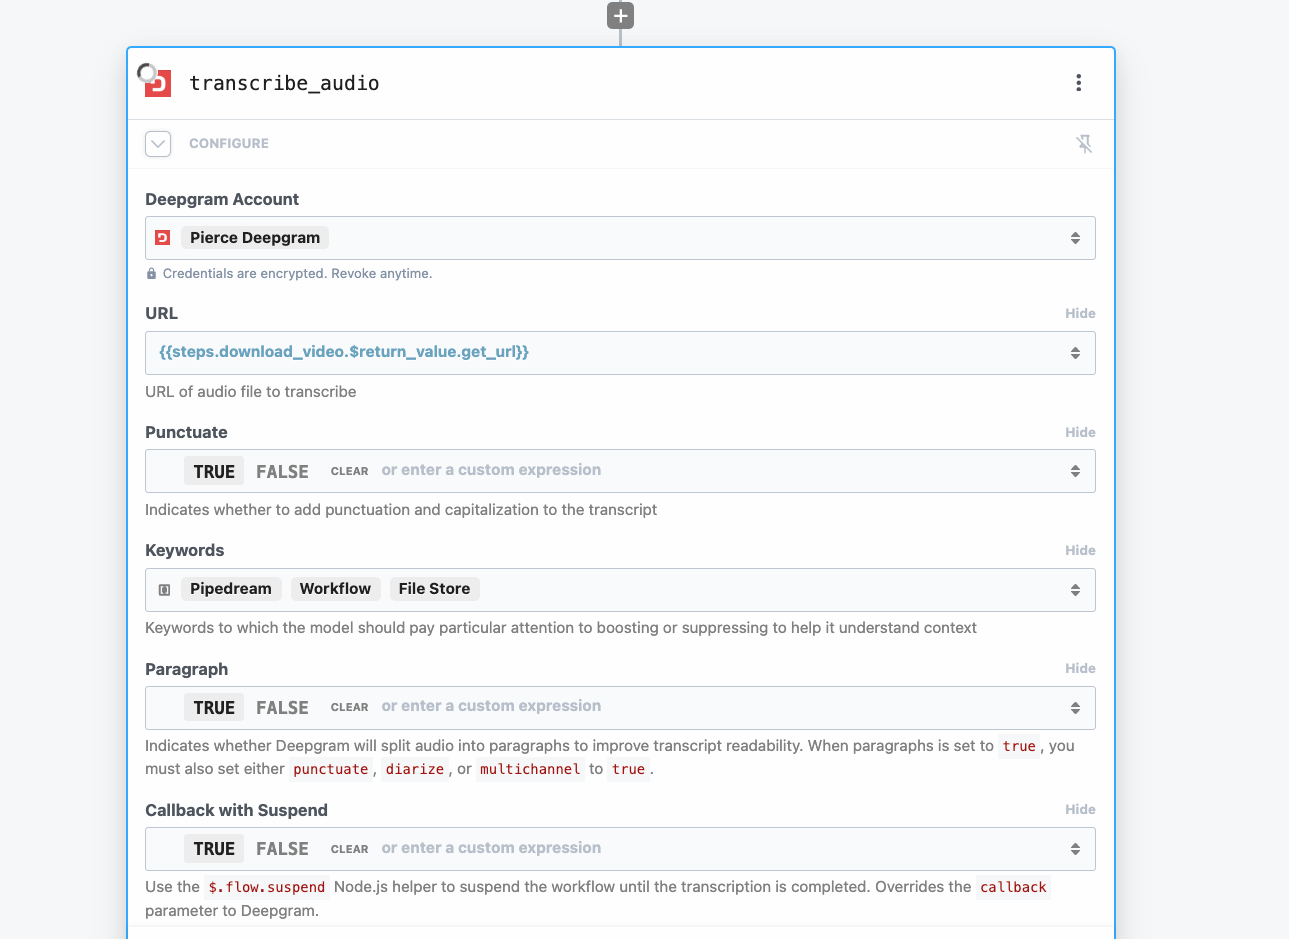
Transcribing the video with Deepgram
Deepgram offers transcriptions through it's robust audio transcription API. Deepgram's transcription API endpoint accepts files directly, or via URL. Because our YouTube video is now hosted within our File Store, it's simple to create a short lived URL to pass to Deepgram.
Pipedream offers pre-built actions to integrate with the Deepgram API, no coding required.
To add the transcription action, just search for Deepgram and select the Transcribe Audio action. Then we'll just need to configure just a few options.
- URL - Deepgram will need a URL to our video. So select the
get_urlfrom thedownload_videocode step we just created: - Callback with Suspend - Transcriptions can take some time to complete. Enabling this option leverage's Pipedream's ability to suspend the workflow until an asynchronous long running operation is finished.
I also added Paragraph and Keywords options to the action, just to increase the accuracy of the transcription. These are optional.
Your step should look something like below:
Please note: when testing steps that use $.flow.suspend you'll see a warning about cancelations. Currently testing with $.flow.suspend isn't supported. So you'll need to deploy to see the results.

To continue with building this workflow, click Deploy and then rerun the latest YouTube event.
What next?
Since Deepgram doesn't offer storage for transcriptions, you can use Pipedream to store transcriptions as files in your File Store or the raw JSON within a Data Store.
Interested in presenting at our next meetup?
We're looking for speakers for our next meet up. If you have a neat workflow you'd like to share, or would like to promote your API to Pipedream developers, sign up here: