Scraping market data with Python
Web scraping with the BeautifulSoup Python library

For many investors, timing is extremely important. We've seen the market be irrational (despite some arguing that it is efficient) countless times, which often translates into great investment opportunities.
The combination of quantitative analysis and software engineering can be extremely useful for exploiting such moments. Having access to real-time data, executing some computation, and plugging it into a decision-making algorithm is a workflow that you can start benefitting today. And the good news – it's never been easier to start.
There is a problem, though. While there are plenty of data sources available, they are usually restricted to specific markets, rate-limited, throttled, or flat out expensive. Outside of the American market and crypto assets, chances are you won't have access to good, reliable APIs.
Thankfully, Pipedream allows you to run JavaScript or Python code as part of your workflows. This unlocks every website as a data source for your project — that's what we'll explore today.
We'll build a workflow that:
- Runs at fixed intervals
- Launches a Python code to scrape data from a website containing market data of unusual assets.
- Sends the OHLC values to Slack
You can copy the final workflow at any time and use it in your own Pipedream account.
With that all said, let's get started!
Create the workflow
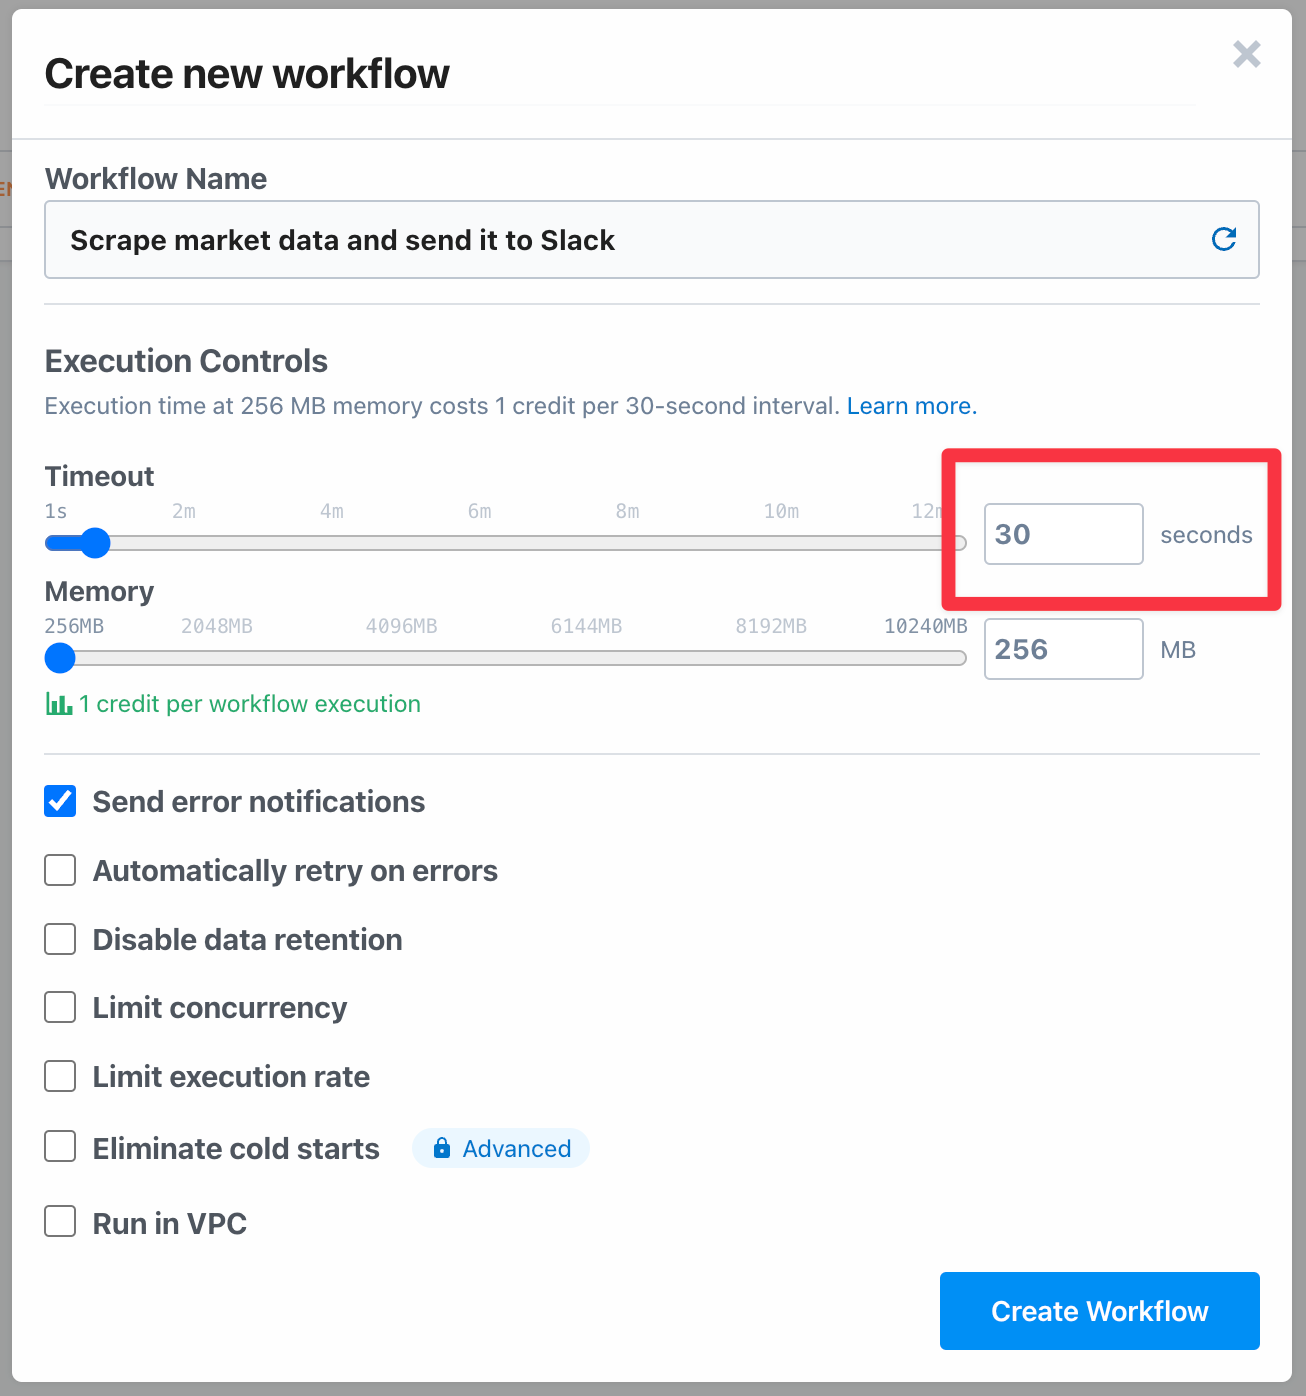
When you create a workflow, you'll be presented with a list of settings. Depending on what you're scraping, it's important to pay attention to the workflow's Timeout.
By default, Pipedream will set a 30-second timeout on workflow executions, which should be enough for our example. You may need to raise it or take advantage of other settings for more complex workflows.
Add a Custom Interval trigger
We need a trigger to launch our web scraper. As we want to constantly monitor the security we're interested on, a Custom Interval is the best choice. Select it from the list of triggers.
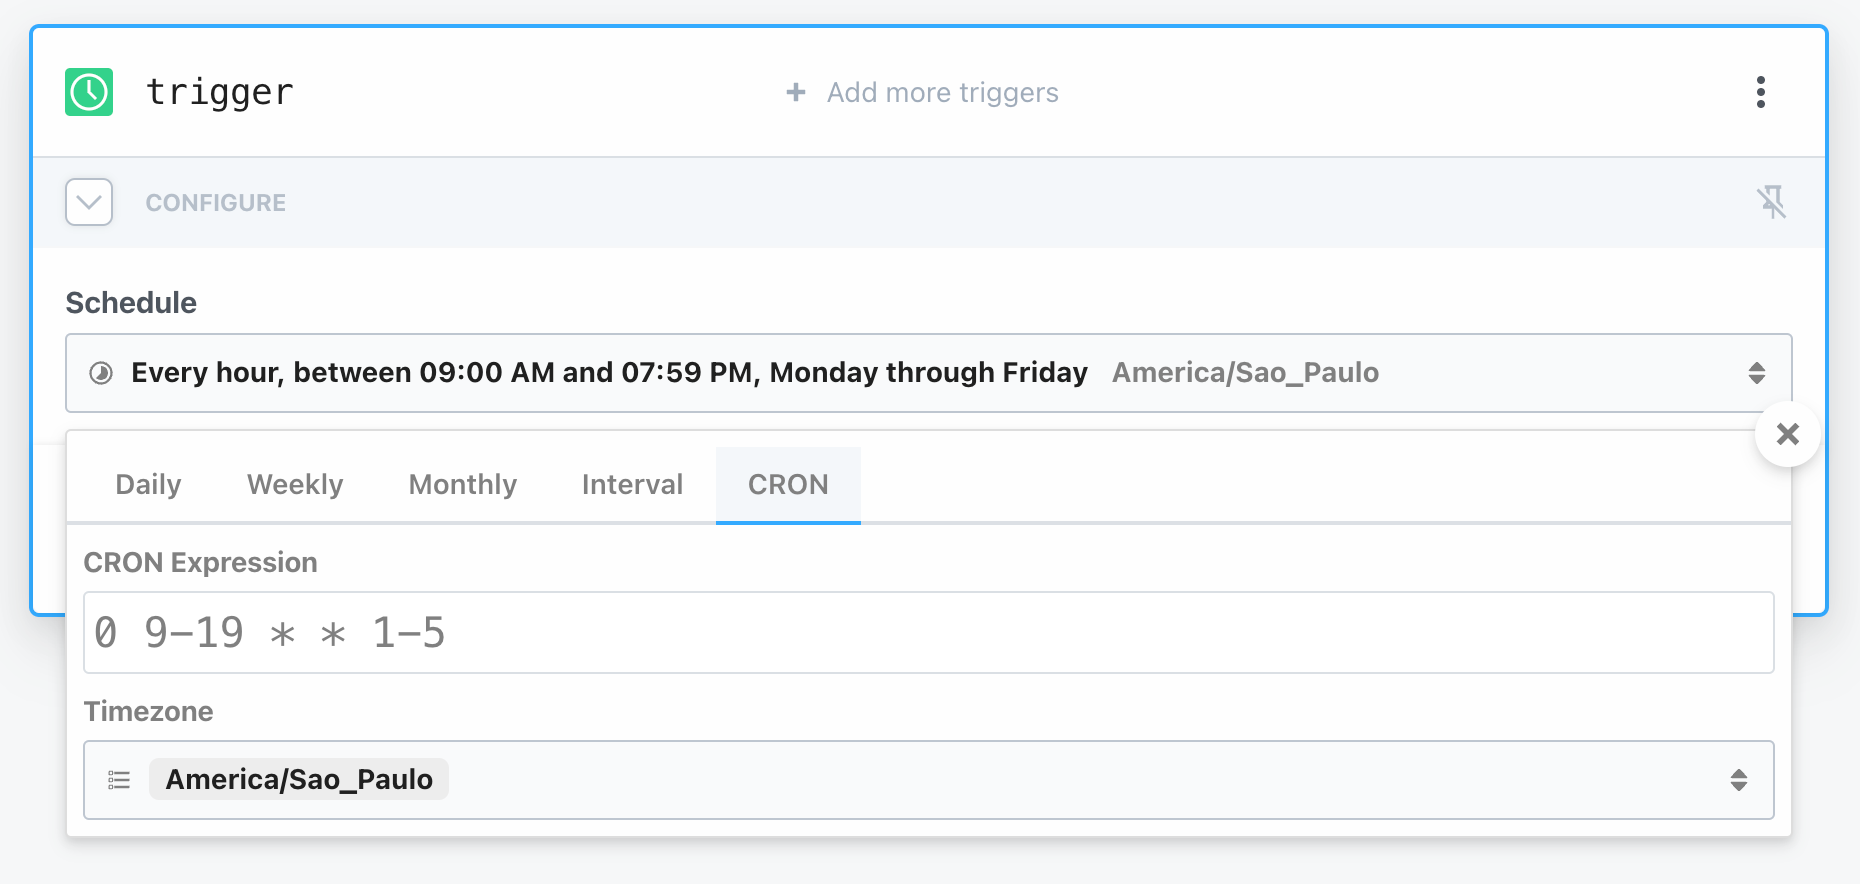
You'll be asked to set a Schedule, i.e., when the action will be triggered. Typically, a fixed interval like "once every hour" is enough. But for this example I'll be scraping IBOV data, the Brazilian benchmark index. The Brazilian market opens from Monday to Friday, during working hours. Fortunately, Pipedream supports custom cron expressions, which we can leverage in order to avoid triggering the action unnecessarily.
I never remember the cron syntax, so that's a great use-case for your LLM of choice to help you (I'm using Raycast's built-in Ask AI feature to get quick answers like that).
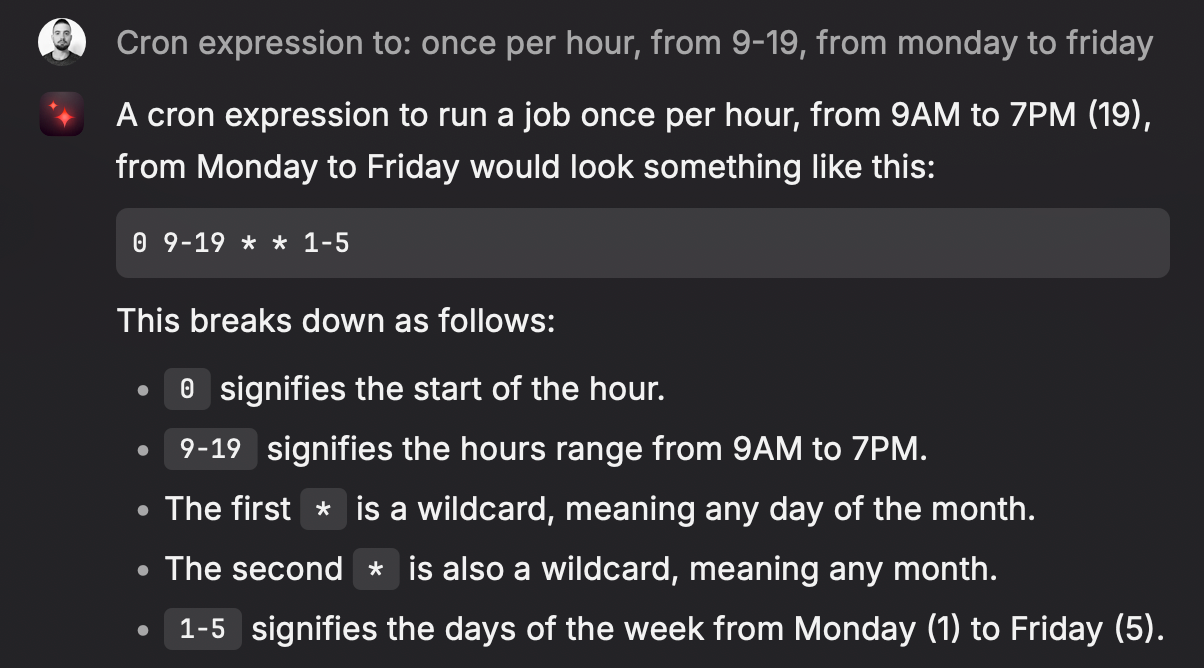
Great! We can then set that schedule and get a human-friendly description that confirms it's what we wanted:
Configure the scraper
Now that the trigger is configured, we're ready to build the scraper. Pipedream will prompt you to connect a step, i.e., an action to be performed after the workflow triggers.
Select Python > Run Python code to open the editor.
You'll be greeted with a functional editor where you can start running Python code or add third-party dependencies without the fuss of dealing with package managers like pip or poetry. Pretty neat.
We'll scrape the Polish website Stooq.com, passing the Brazilian index ticker as the query parameter (try adjusting it to use your ticker of choice).
Replace the content of the editor with the following:
import requests
from bs4 import BeautifulSoup
from datetime import datetime

def handler(pd: "pipedream"):
  try:
    # The base URL
    url = "https://stooq.com/q/g/?s=^bvp"

    # Sending a GET request
    response = requests.get(url)

    # If the GET request is successful, the status code will be 200
    if response.status_code == 200:
      # Get the content of the response
      page_content = response.content

      # Create a BeautifulSoup object and specify the parser
      soup = BeautifulSoup(page_content, "html.parser")

      # Find the tables
      tables = soup.find_all("table", {"id": "t1"})

      # Initialize a dictionary to hold the data
      data = {}

      # Iterate through the rows in the first table
      for row in tables[0].find_all("tr"):
          cells = row.find_all("td")
          if cells[0].text == "Otwarcie":
              data["open"] = float(cells[1].text.replace(",", ""))
          elif cells[0].text == "Kurs":
              data["close"] = float(cells[1].text.replace(",", ""))

      # Iterate through the rows in the second table
      for row in tables[1].find_all("tr"):
          cells = row.find_all("td")
          if cells[0].text == "Max/min":
              high, low = cells[1].text.split(" / ")
              data["high"] = float(high.replace(",", ""))
              data["low"] = float(low.replace(",", ""))

      dt = datetime.now().strftime("%Y-%m-%d")

      data = [
          (
              dt,
              data["open"],
              data["high"],
              data["low"],
              data["close"],
          )
      ]

      return data
    else:
      print("Error fetching data!")

      # Raise a network error so we can retry the task again
      raise requests.exceptions.RequestException
  except Exception as e:
    print(f"Error scraping data: {repr(e)}")
The code should be pretty straightforward (though admittedly easier if you happen to know Polish), and the only thing you need to change in order to scrape other assets is the URL:
url = "https://stooq.com/q/g/?s=^bvp"Go ahead and test the code. If successful, you'll see something like this:

Note: If you run into timeout issues, consider increasing the Timeout value in Settings (shortcut: press M then S).
Great! The Exports tab exposes all data that will be available in future steps. Let's take advantage of it next.
Connect to Slack
The last step of this proof-of-concept is to send the results of the scraper to Slack.
Click on the plus button to add a new step and select Slack > Send Message to a Public Channel.
The wizard is also straightforward. Click on Slack Account and allow Pipedream to connect to your workspace. Next select the Channel ID you want the messages to be sent. Finally, format the Text as you like, using the floating dropdown menu to help you integrate variables returned from prior steps.
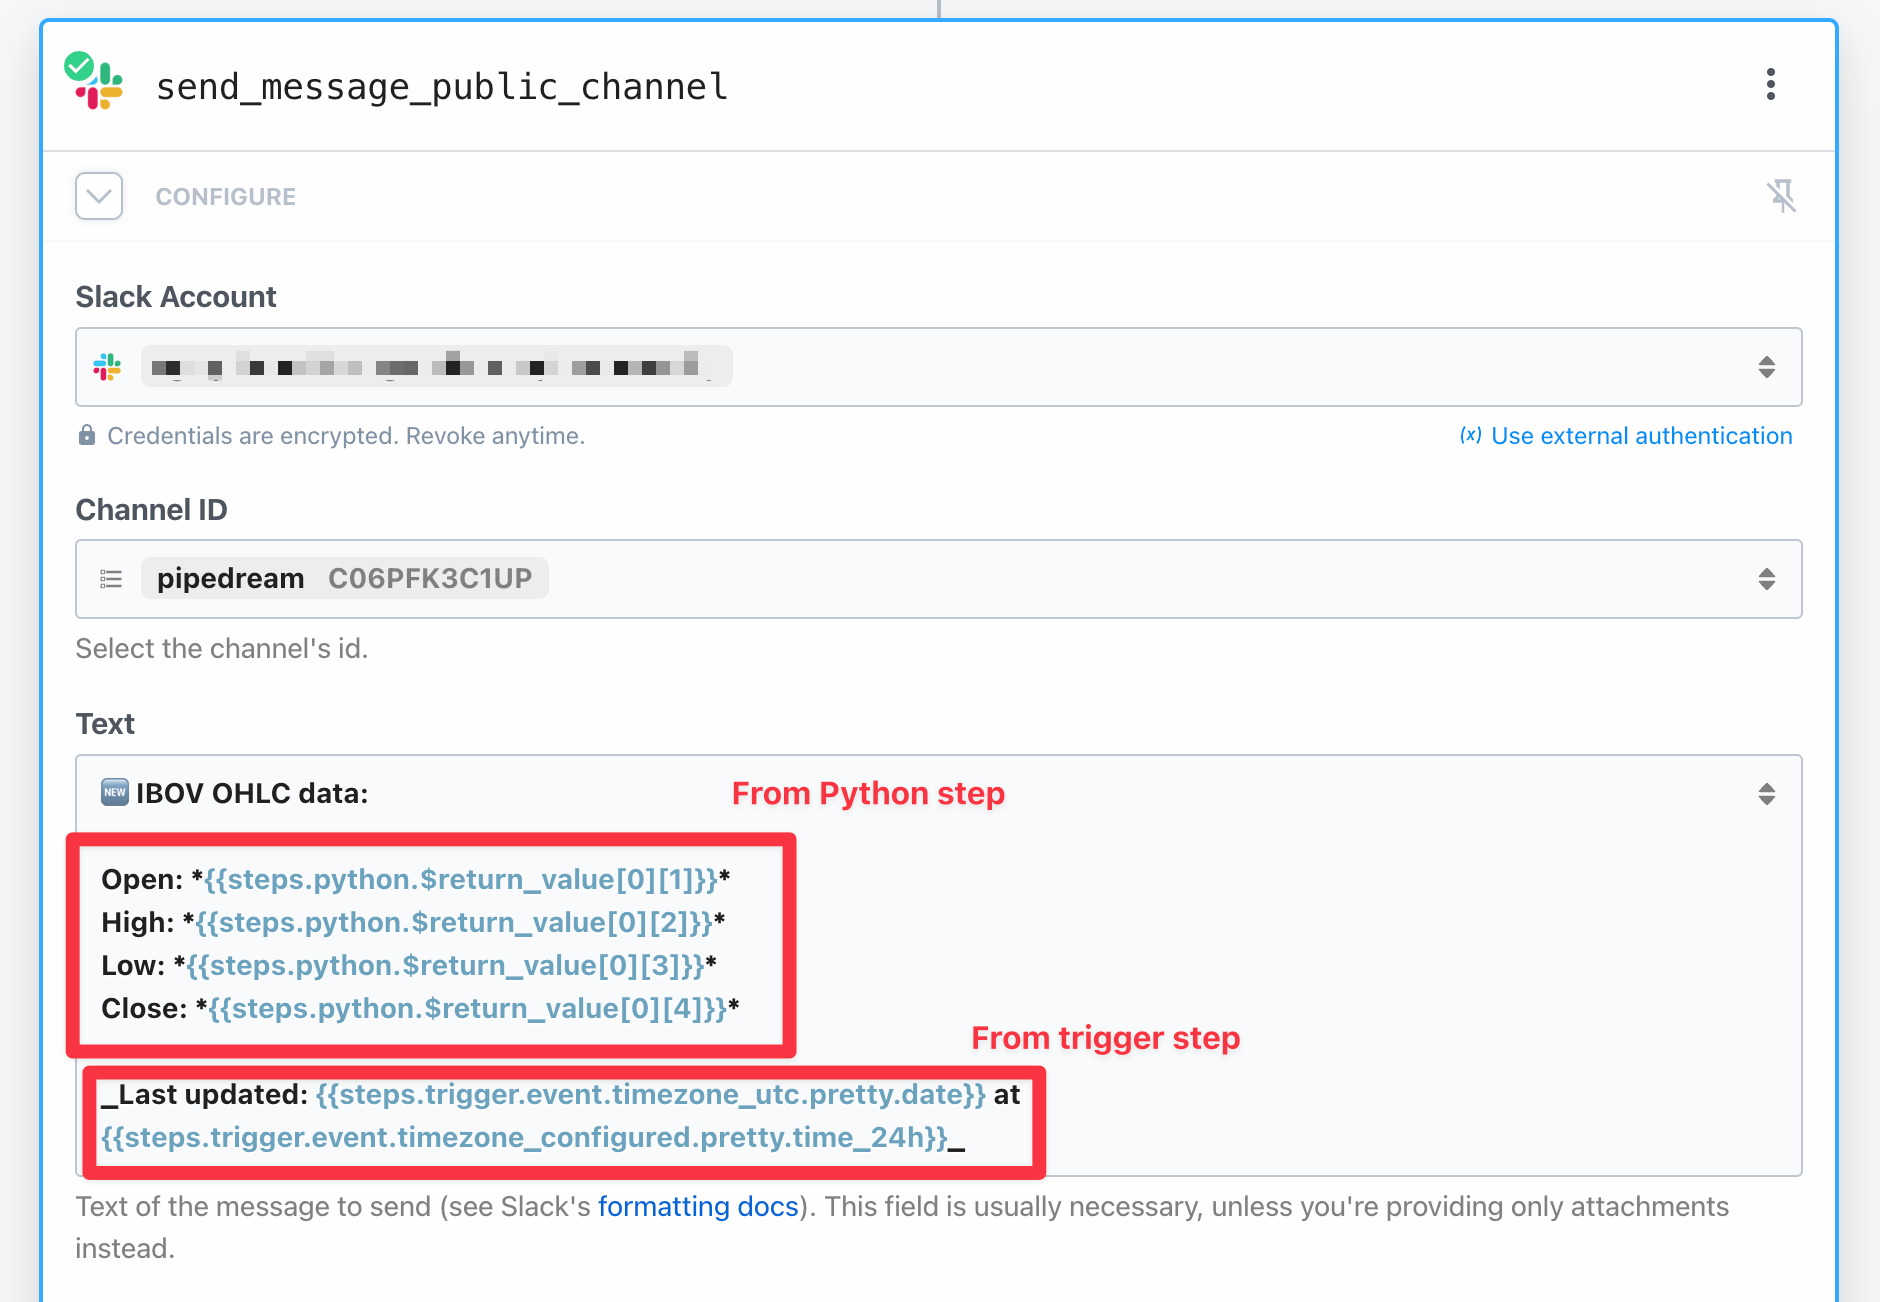
Notice how I plugged data from the previous two steps:
- A nicely-formatted timestamp pulled from the trigger step
- The actual return of the Python function pulled from the scraping step.
Now, we are able to test our integration! Click on Test and within a moment you shall receive a message in the selected channel:

That's it! You successfully hooked an end-to-end automation capable to power your quantitative analysis!
Next steps
Hopefully this article serves as a base for further exploration. Here are some follow-up suggestions:
- Notify how much the asset price has changed. It's usually useful to know the variation in percentage points. Sharpen your Python (and Polish) skills to scrape this information from Stooq.com, or store previously scraped data elsewhere (can be as simple as a Google Sheet).
- Go to the next level by storing the data in a database (e.g. Supabase). This will unlock a world of automated possibilities, including running your own data analysis, allowing you to generate real-time notifications based on historical data.