> ## Documentation Index
> Fetch the complete documentation index at: https://pipedream.com/docs/llms.txt
> Use this file to discover all available pages before exploring further.
# HTTP
Integrate and automate any API using Pipedream workflows. Use app specific pre-built actions, or an HTTP request action for a no code interface. If you need more control over error handling, then use your same connected accounts with code in Node.js or Python.
## Pre-built actions
Pre-built actions are the most convenient option for integrating your workflow with an API. Pre-built actions can use your connected accounts to perform API requests, and are configured through props.
Pre-built actions are the fastest way to get started building workflows, but they may not fit your use case if a prop is missing or is handling data in a way that doesn’t fit your needs.
For example, to send a message using Slack just search for Slack and use the **Send Message to a Public Channel** action:
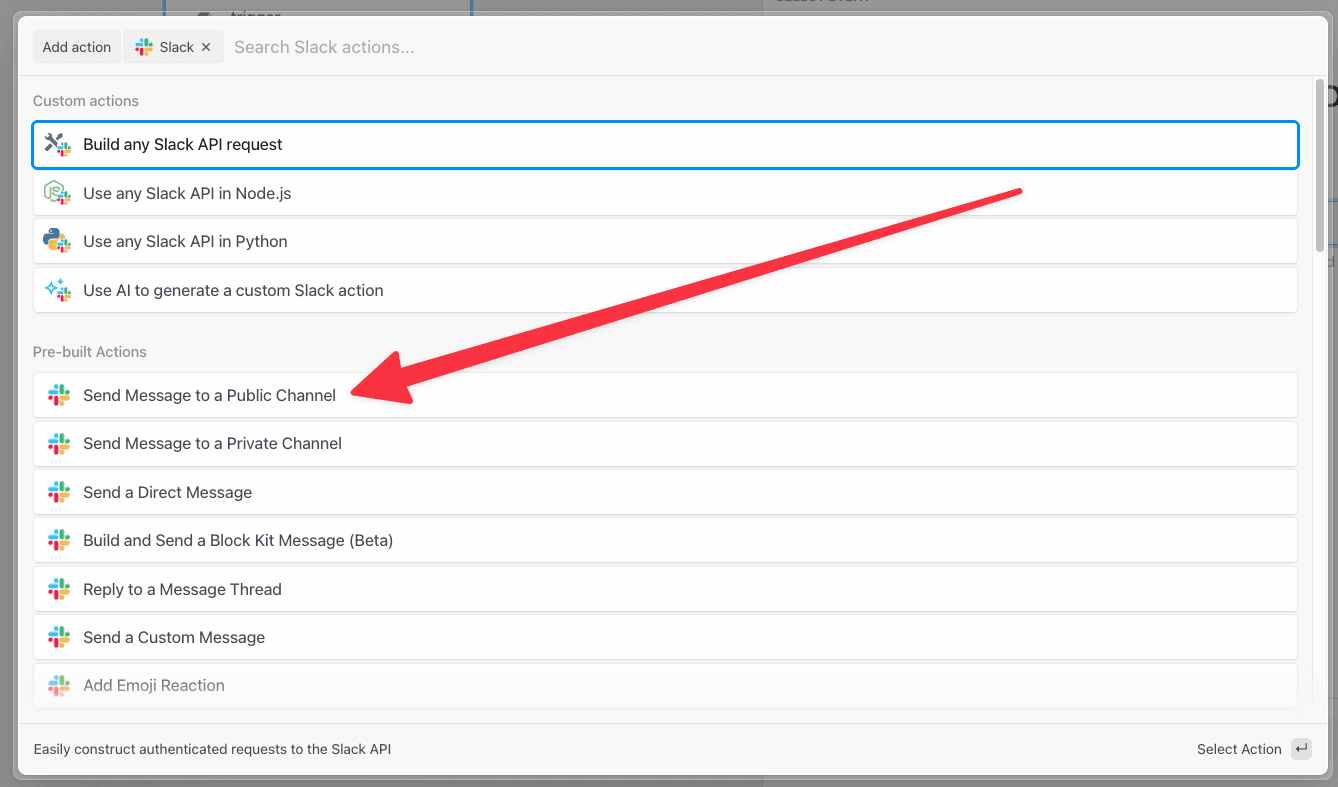 Then connect your Slack account, select a channel and write your message:
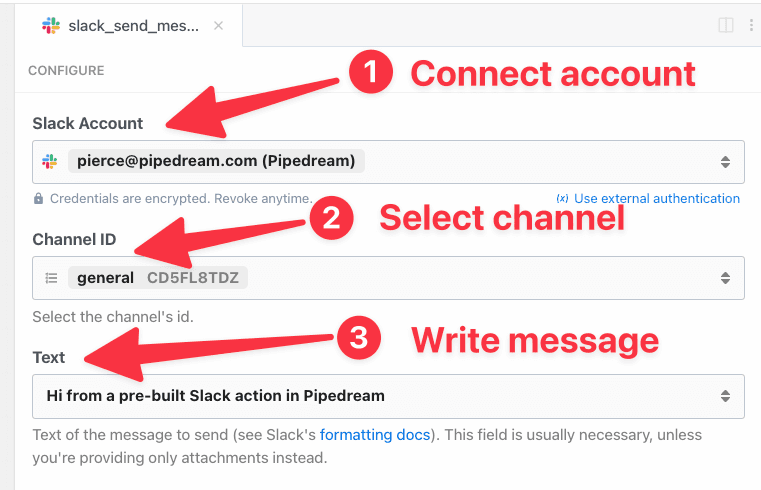 Now with a few clicks and some text you’ve integrated Slack into a Pipedream workflow.
Pre-built actions are open source
All pre-built actions are published from the [Pipedream Component Registry](/components/contributing/), so you can read and modify their source code. You can even publish your own from [Node.js code steps privately to your own workspace](/workflows/building-workflows/code/nodejs/sharing-code/).
## HTTP Request Action
The HTTP request action is the next most convenient option. Use a Postman-like interface to configure an HTTP request - including the headers, body, and even connecting an account.
Now with a few clicks and some text you’ve integrated Slack into a Pipedream workflow.
Pre-built actions are open source
All pre-built actions are published from the [Pipedream Component Registry](/components/contributing/), so you can read and modify their source code. You can even publish your own from [Node.js code steps privately to your own workspace](/workflows/building-workflows/code/nodejs/sharing-code/).
## HTTP Request Action
The HTTP request action is the next most convenient option. Use a Postman-like interface to configure an HTTP request - including the headers, body, and even connecting an account.
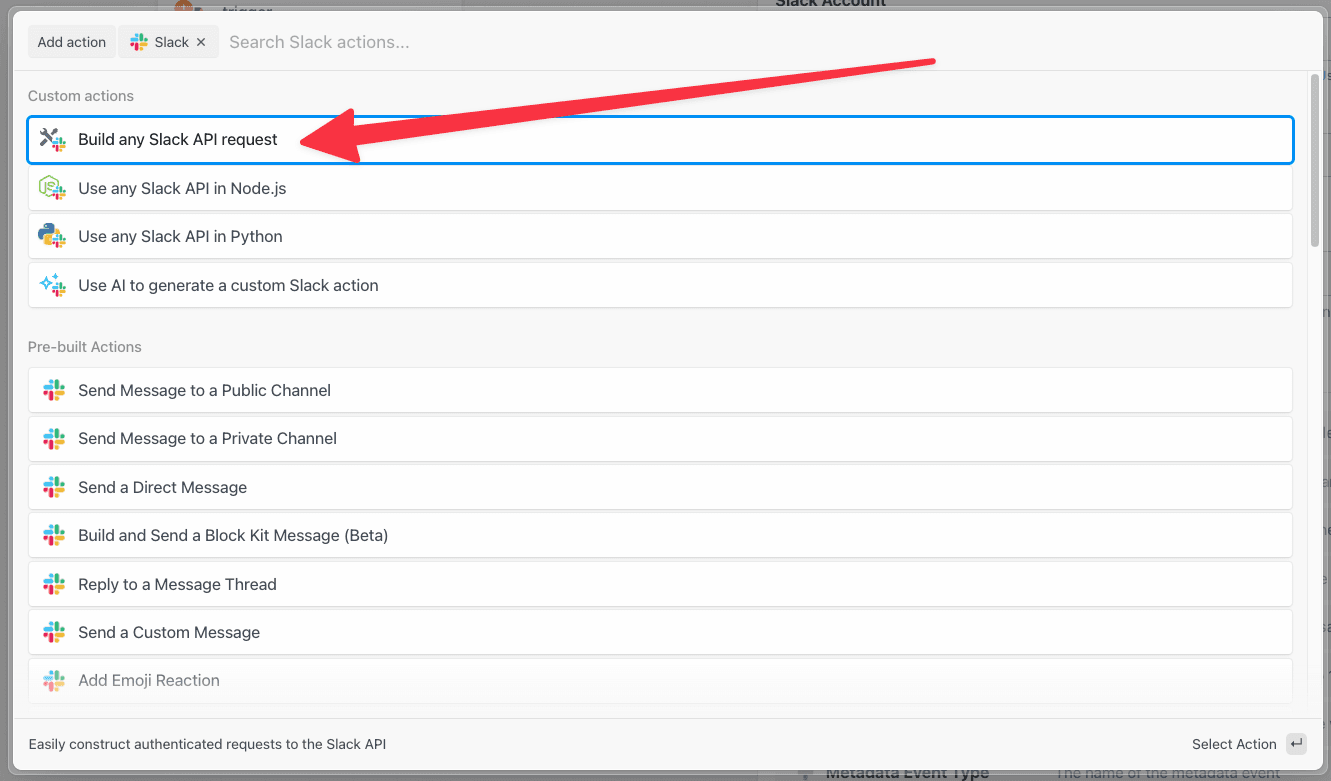 Selecting this action will display an HTTP request builder, with the Slack app slot to connect your account with.
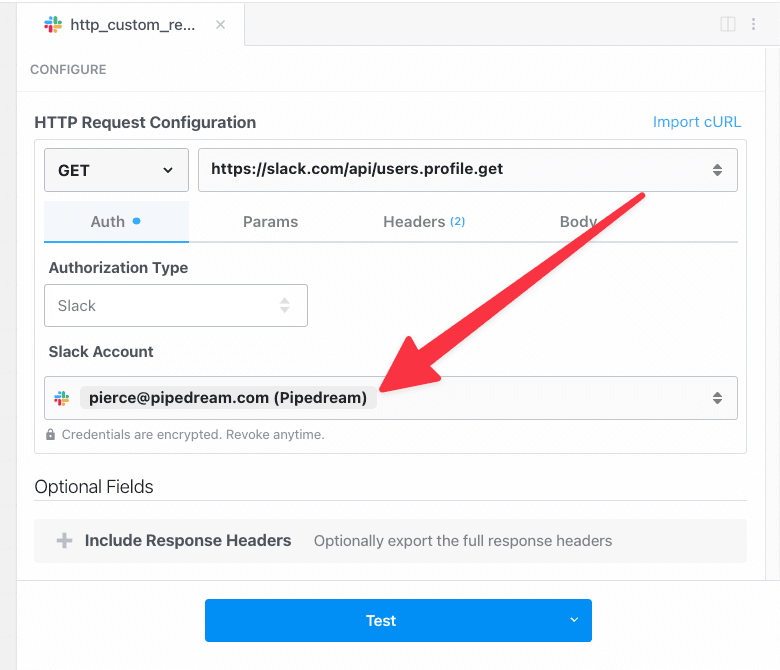 Once you connect your account to the step, it will automatically configure the authorization headers to match.
For example, the Slack API expects a Bearer token with the `Authorization` header. So Pipedream automatically configures this HTTP request to pass your token to that specific header:
Once you connect your account to the step, it will automatically configure the authorization headers to match.
For example, the Slack API expects a Bearer token with the `Authorization` header. So Pipedream automatically configures this HTTP request to pass your token to that specific header:
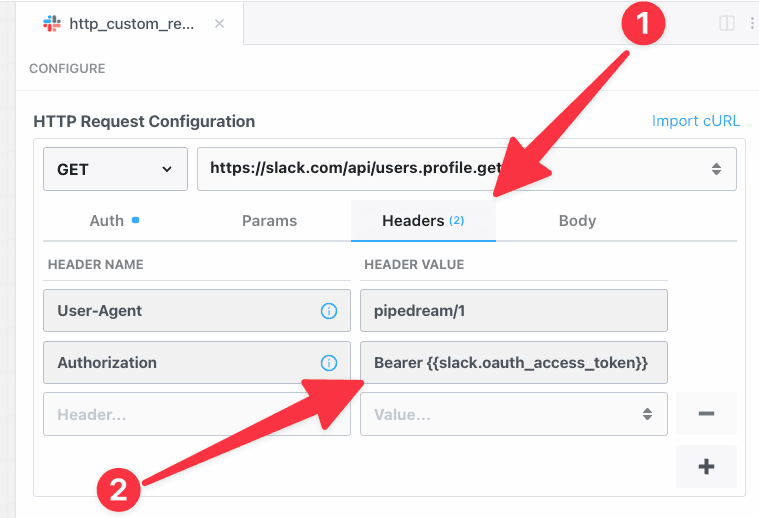 The configuration of the request and management of your token is automatically handled for you. So you can simply modify the request to match the API endpoint you’re seeking to interact with.
### Adding apps to an HTTP request builder action
You can also attach apps to the *Send any HTTP Request* action from the action selection menu. After adding a new step to your workflow, select the *Send any HTTP Request* action:
The configuration of the request and management of your token is automatically handled for you. So you can simply modify the request to match the API endpoint you’re seeking to interact with.
### Adding apps to an HTTP request builder action
You can also attach apps to the *Send any HTTP Request* action from the action selection menu. After adding a new step to your workflow, select the *Send any HTTP Request* action:
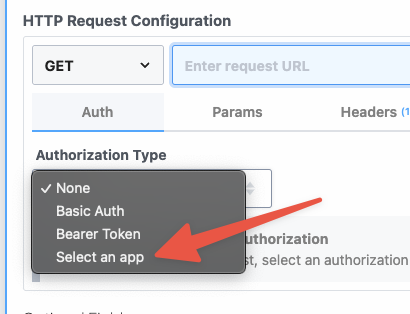
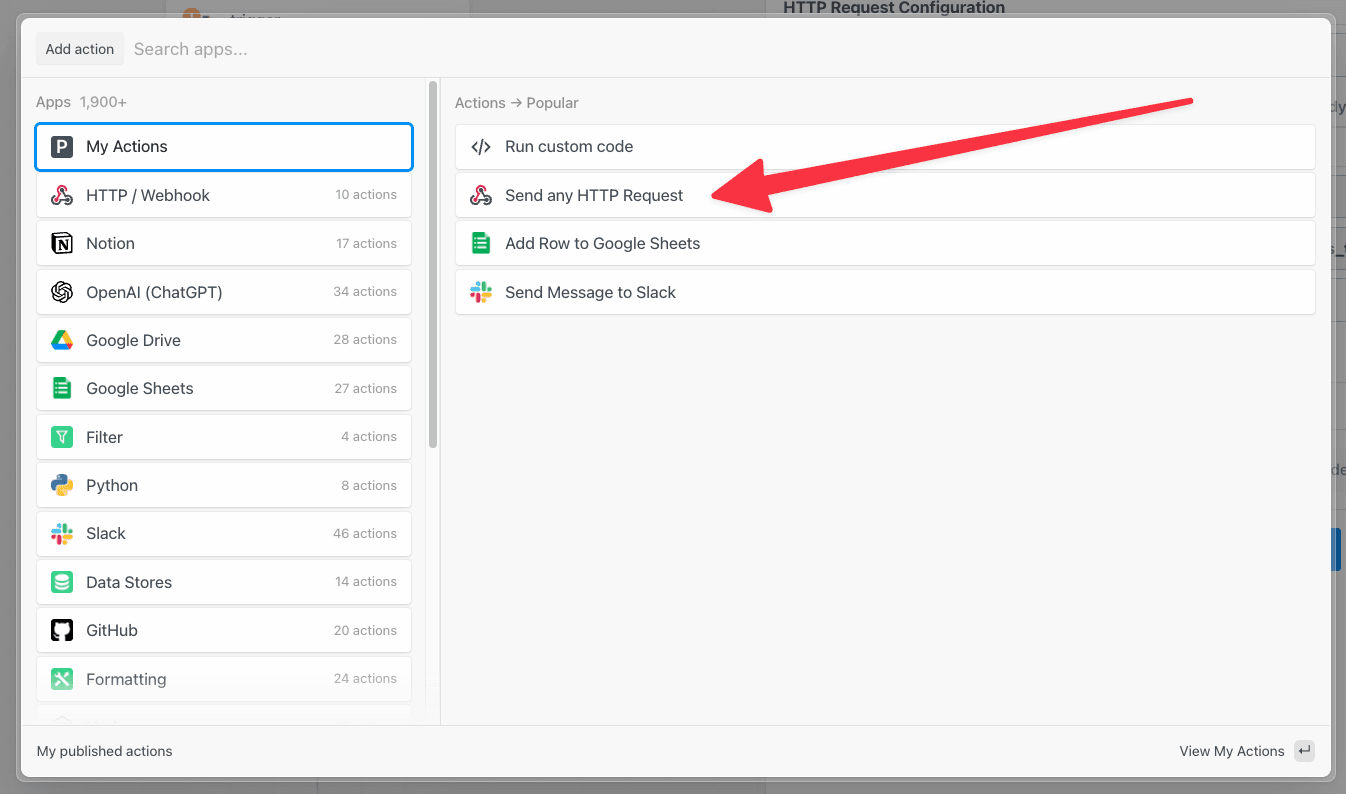 Then within the HTTP request builder, click the *Authorization Type* dropdown to select a method, and click **Select an app**:
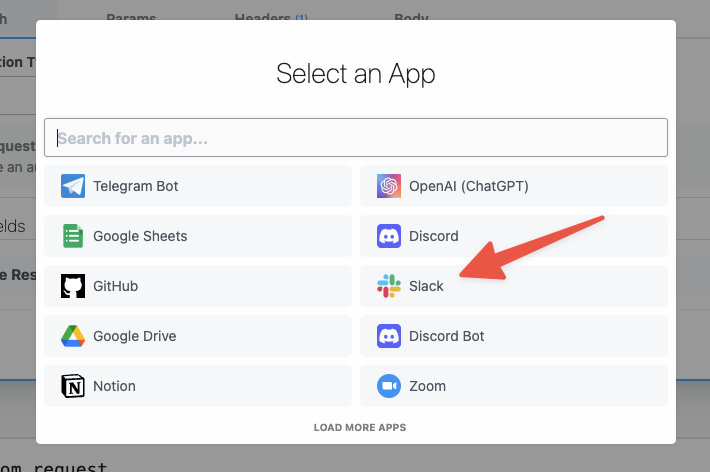
 Then you can choose **Slack** as the service to connect the HTTP request with:
 The HTTP request action will automatically be configured with the Slack connection, you’ll just need to select your account to finish the authentication.
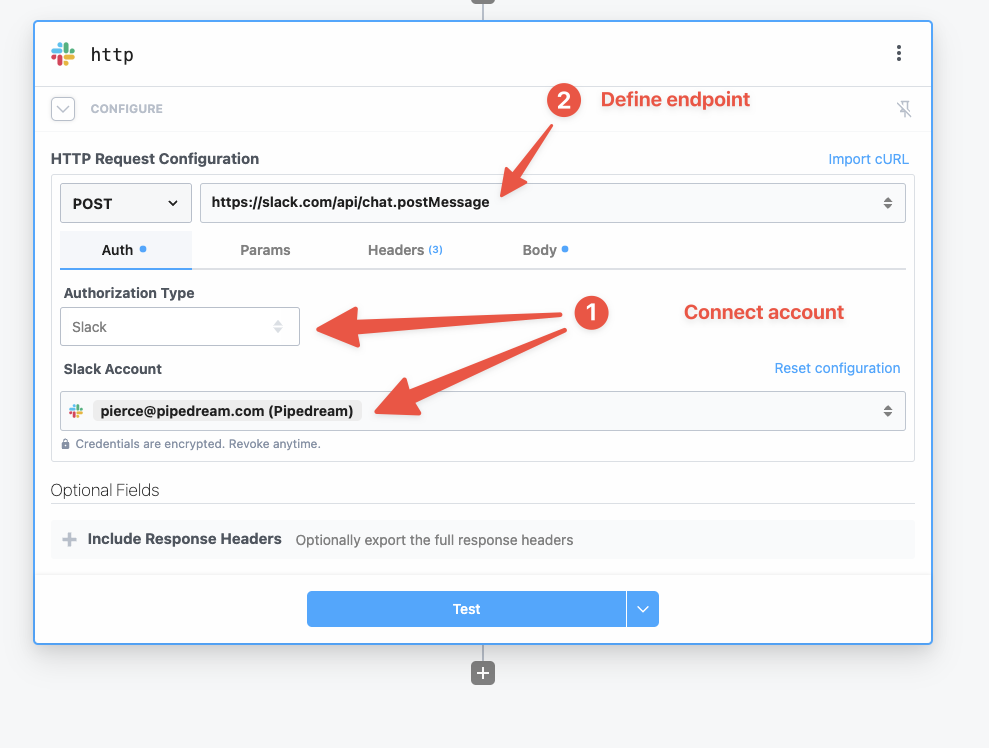
Then it’s simply updating the URL to send a message which is [`https://slack.com/api/chat.postMessage`](https://api.slack.com/methods/chat.postMessage):
The HTTP request action will automatically be configured with the Slack connection, you’ll just need to select your account to finish the authentication.
Then it’s simply updating the URL to send a message which is [`https://slack.com/api/chat.postMessage`](https://api.slack.com/methods/chat.postMessage):
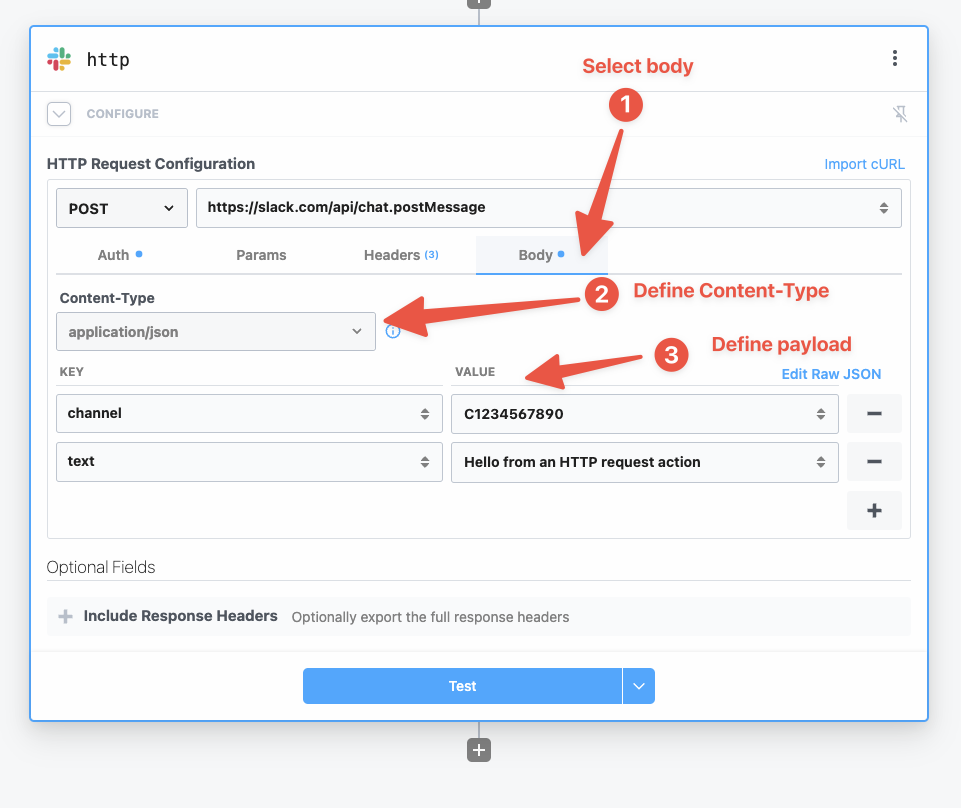
 Finally modify the body of the request to specify the `channel` and `message` for the request:
 HTTP Request actions can be used to quickly scaffold API requests, but are not as flexible as code for a few reasons:
* Conditionally sending requests - The HTTP request action will always request, to send requests conditionally you’ll need to use code.
* Workflow execution halts - if an HTTP request fails, the entire workflow cancels
* Automatically retrying - `$.flow.retry` isn’t available in the HTTP Request action to retry automatically if the request fails
* Error handling - It’s not possible to set up a secondary action if an HTTP request fails.
## HTTP Requests in code
When you need more control, use code. You can use your connected accounts with Node.js or Python code steps.
This gives you the flexibility to catch errors, use retries, or send multiple API requests in a single step.
First, connect your account to the code step:
* [Connecting any account to a Node.js step](/workflows/building-workflows/code/nodejs/auth/#accessing-connected-account-data-with-thisappnameauth)
* [Connecting any account to a Python step](/workflows/building-workflows/code/python/auth/)
### Conditionally sending an API Request
You may only want to send a Slack message on a certain condition, in this example we’ll only send a Slack message if the HTTP request triggering the workflow passes a special variable: `steps.trigger.event.body.send_message`
```javascript theme={null}
import { axios } from "@pipedream/platform"
export default defineComponent({
props: {
slack: {
type: "app",
app: "slack",
}
},
async run({steps, $}) {
// only send the Slack message if the HTTP request has a `send_message` property in the body
if(steps.trigger.body.send_message) {
return await axios($, {
headers: {
Authorization: `Bearer ${this.slack.$auth.oauth_access_token}`,
},
url: `https://slack.com/api/chat.postMessage`,
method: 'post',
data: {
channel: 'C123456',
text: 'Hi from a Pipedream Node.js code step'
}
})
}
},
})
```
### Error Handling
The other advantage of using code is handling error messages using `try...catch` blocks. In this example, we’ll only send a Slack message if another API request fails:
```javascript theme={null}
import { axios } from "@pipedream/platform"
export default defineComponent({
props: {
openai: {
type: "app",
app: "openai"
},
slack: {
type: "app",
app: "slack",
}
},
async run({steps, $}) {
try {
return await axios($, {
url: `https://api.openai.com/v1/completions`,
method: 'post',
headers: {
Authorization: `Bearer ${this.openai.$auth.api_key}`,
},
data: {
"model": "text-davinci-003",
"prompt": "Say this is a test",
"max_tokens": 7,
"temperature": 0
}
})
} catch(error) {
return await axios($, {
url: `https://slack.com/api/chat.postMessage`,
method: 'post',
headers: {
Authorization: `Bearer ${this.slack.$auth.oauth_access_token}`,
},
data: {
channel: 'C123456',
text: `OpenAI returned an error: ${error}`
}
})
}
},
})
```
Subscribing to all errors
[You can use a subscription](/rest-api/#subscriptions) to subscribe a workflow to all errors through the `$errors` channel, instead of handling each error individually.
### Automatically retrying an HTTP request
You can leverage `$.flow.rerun` within a `try...catch` block in order to retry a failed API request.
[See the example in the `$.flow.rerun` docs](/workflows/building-workflows/code/nodejs/rerun/#pause-resume-and-rerun-a-workflow) for Node.js.
## Platform axios
### Why `@pipedream/platform` axios?
`axios` is an HTTP client for Node.js ([see these docs](/workflows/building-workflows/code/nodejs/http-requests/) for usage examples).
`axios` has a simple programming API and works well for most use cases. But its default error handling behavior isn’t easy to use. When you make an HTTP request and the server responds with an error code in the 4XX or 5XX range of status codes, `axios` returns this stack trace:
HTTP Request actions can be used to quickly scaffold API requests, but are not as flexible as code for a few reasons:
* Conditionally sending requests - The HTTP request action will always request, to send requests conditionally you’ll need to use code.
* Workflow execution halts - if an HTTP request fails, the entire workflow cancels
* Automatically retrying - `$.flow.retry` isn’t available in the HTTP Request action to retry automatically if the request fails
* Error handling - It’s not possible to set up a secondary action if an HTTP request fails.
## HTTP Requests in code
When you need more control, use code. You can use your connected accounts with Node.js or Python code steps.
This gives you the flexibility to catch errors, use retries, or send multiple API requests in a single step.
First, connect your account to the code step:
* [Connecting any account to a Node.js step](/workflows/building-workflows/code/nodejs/auth/#accessing-connected-account-data-with-thisappnameauth)
* [Connecting any account to a Python step](/workflows/building-workflows/code/python/auth/)
### Conditionally sending an API Request
You may only want to send a Slack message on a certain condition, in this example we’ll only send a Slack message if the HTTP request triggering the workflow passes a special variable: `steps.trigger.event.body.send_message`
```javascript theme={null}
import { axios } from "@pipedream/platform"
export default defineComponent({
props: {
slack: {
type: "app",
app: "slack",
}
},
async run({steps, $}) {
// only send the Slack message if the HTTP request has a `send_message` property in the body
if(steps.trigger.body.send_message) {
return await axios($, {
headers: {
Authorization: `Bearer ${this.slack.$auth.oauth_access_token}`,
},
url: `https://slack.com/api/chat.postMessage`,
method: 'post',
data: {
channel: 'C123456',
text: 'Hi from a Pipedream Node.js code step'
}
})
}
},
})
```
### Error Handling
The other advantage of using code is handling error messages using `try...catch` blocks. In this example, we’ll only send a Slack message if another API request fails:
```javascript theme={null}
import { axios } from "@pipedream/platform"
export default defineComponent({
props: {
openai: {
type: "app",
app: "openai"
},
slack: {
type: "app",
app: "slack",
}
},
async run({steps, $}) {
try {
return await axios($, {
url: `https://api.openai.com/v1/completions`,
method: 'post',
headers: {
Authorization: `Bearer ${this.openai.$auth.api_key}`,
},
data: {
"model": "text-davinci-003",
"prompt": "Say this is a test",
"max_tokens": 7,
"temperature": 0
}
})
} catch(error) {
return await axios($, {
url: `https://slack.com/api/chat.postMessage`,
method: 'post',
headers: {
Authorization: `Bearer ${this.slack.$auth.oauth_access_token}`,
},
data: {
channel: 'C123456',
text: `OpenAI returned an error: ${error}`
}
})
}
},
})
```
Subscribing to all errors
[You can use a subscription](/rest-api/#subscriptions) to subscribe a workflow to all errors through the `$errors` channel, instead of handling each error individually.
### Automatically retrying an HTTP request
You can leverage `$.flow.rerun` within a `try...catch` block in order to retry a failed API request.
[See the example in the `$.flow.rerun` docs](/workflows/building-workflows/code/nodejs/rerun/#pause-resume-and-rerun-a-workflow) for Node.js.
## Platform axios
### Why `@pipedream/platform` axios?
`axios` is an HTTP client for Node.js ([see these docs](/workflows/building-workflows/code/nodejs/http-requests/) for usage examples).
`axios` has a simple programming API and works well for most use cases. But its default error handling behavior isn’t easy to use. When you make an HTTP request and the server responds with an error code in the 4XX or 5XX range of status codes, `axios` returns this stack trace:
 This only communicates the error code, and not any other information (like the body or headers) returned from the server.
Pipedream publishes an `axios` wrapper as a part of [the `@pipedream/platform` package](https://github.com/PipedreamHQ/pipedream/tree/master/platform). This presents the same programming API as `axios`, but implements two helpful features:
1. When the HTTP request succeeds (response code \< `400`), it returns only the `data` property of the response object — the HTTP response body. This is typically what users want to see when they make an HTTP request:
This only communicates the error code, and not any other information (like the body or headers) returned from the server.
Pipedream publishes an `axios` wrapper as a part of [the `@pipedream/platform` package](https://github.com/PipedreamHQ/pipedream/tree/master/platform). This presents the same programming API as `axios`, but implements two helpful features:
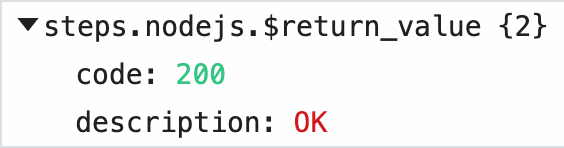
1. When the HTTP request succeeds (response code \< `400`), it returns only the `data` property of the response object — the HTTP response body. This is typically what users want to see when they make an HTTP request:
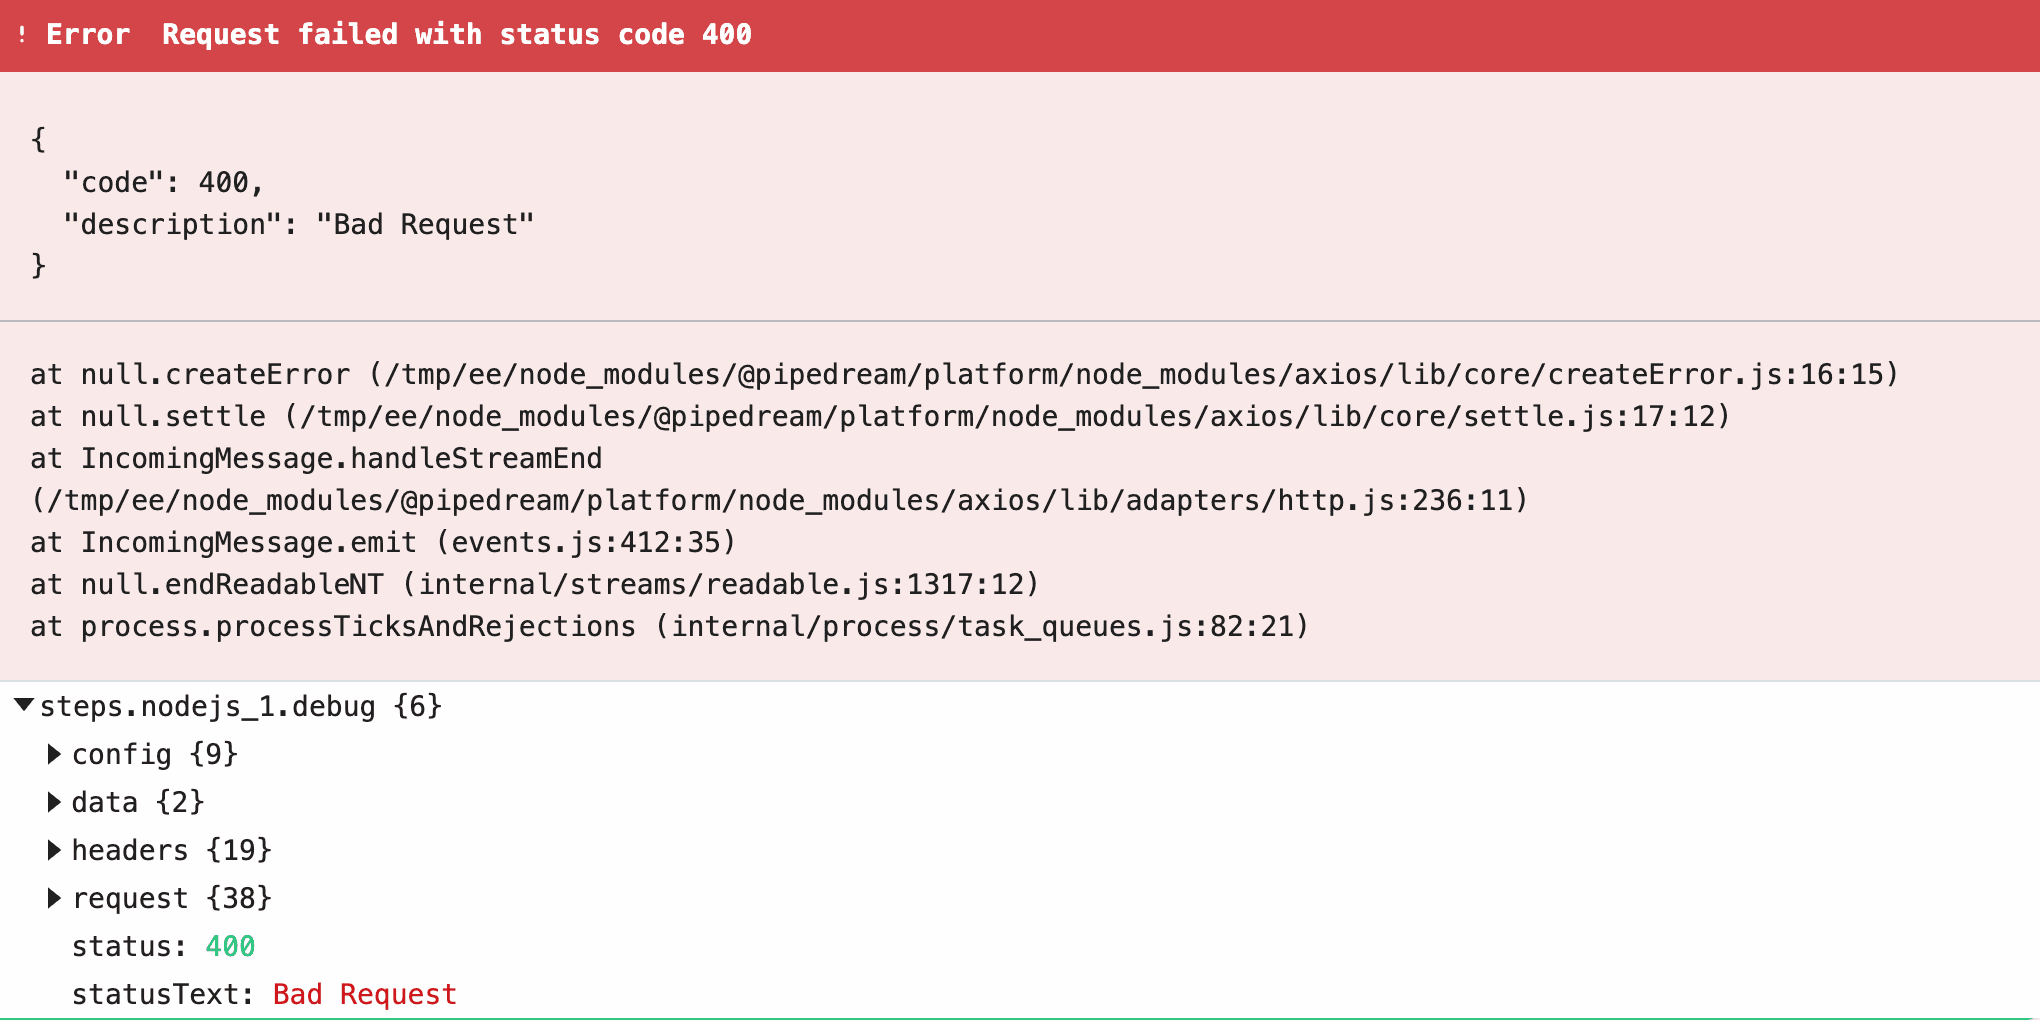
 2. When the HTTP request *fails* (response code >= `400`), it displays a detailed error message in the Pipedream UI (the HTTP response body), and returns the whole `axios` response object so users can review details on the HTTP request and response:
 ### Using `@pipedream/platform` axios in component actions
To use `@pipedream/platform` axios in component actions, import it:
```javascript theme={null}
import { axios } from "@pipedream/platform"
```
`@pipedream/platform` axios uses methods [provided by the `$` object](/components/contributing/api/#actions), so you’ll need to pass that as the first argument to `axios` when making HTTP requests, and pass the [standard `axios` request config](https://github.com/axios/axios#request-config) as the second argument.
Here’s an example action:
```javascript theme={null}
import { axios } from "@pipedream/platform"
export default {
key: "my-test-component",
name: "My Test component",
version: "0.0.1",
type: "action",
async run({ $ }) {
return await axios($, {
url: "https://httpstat.us/200",
})
}
}
```
### Using `@pipedream/platform` axios in component actions
To use `@pipedream/platform` axios in component actions, import it:
```javascript theme={null}
import { axios } from "@pipedream/platform"
```
`@pipedream/platform` axios uses methods [provided by the `$` object](/components/contributing/api/#actions), so you’ll need to pass that as the first argument to `axios` when making HTTP requests, and pass the [standard `axios` request config](https://github.com/axios/axios#request-config) as the second argument.
Here’s an example action:
```javascript theme={null}
import { axios } from "@pipedream/platform"
export default {
key: "my-test-component",
name: "My Test component",
version: "0.0.1",
type: "action",
async run({ $ }) {
return await axios($, {
url: "https://httpstat.us/200",
})
}
}
```