 The platform processes billions of events and is built and [priced](https://pipedream.com/pricing/) for use at scale. [Our team](https://pipedream.com/about) has built internet scale applications and managed data pipelines in excess of 10 million events per second (EPS) at startups and high-growth environments like BrightRoll, Yahoo!, Affirm, and Dropbox.
Our [community](https://pipedream.com/support) uses Pipedream for a wide variety of use cases including:
* AI agents and chatbots
* Workflow builders and SaaS automation
* API orchestration and automation
* Database automations
* Custom notifications and alerting
* Event queueing and concurrency management
* Webhook inspection and routing
* Prototyping and demos
## Source-available
Pipedream maintains a [source-available component registry](https://github.com/PipedreamHQ/pipedream) on GitHub so you can avoid writing boilerplate code for common API integrations. Use components as no code building blocks in workflows, or use them to scaffold code that you can customize. You can also [create a PR to contribute new components](/docs/components/contributing/#contribution-process) via GitHub.
## Contributing
We hope that by providing a generous free tier, you will not only get value from Pipedream, but you will give back to help us improve the product for the entire community and grow the platform by:
* [Contributing components](/docs/components/contributing/) to the [Pipedream registry](https://github.com/PipedreamHQ/pipedream) or sharing via your own GitHub repo
* Asking and answering questions in our [public community](https://pipedream.com/community/)
* [Reporting bugs](https://pipedream.com/community/c/bugs/9) and [requesting features](https://github.com/PipedreamHQ/pipedream/issues/new?assignees=\&labels=enhancement\&template=feature_request.md\&title=%5BFEATURE%5D+) that help us build a better product
* Following us on [Twitter](https://twitter.com/pipedream), starring our [GitHub repo](https://github.com/PipedreamHQ/pipedream) and subscribing to our [YouTube channel](https://www.youtube.com/c/pipedreamhq)
* Recommending us to your friends and colleagues
Learn about [all the ways you can contribute](https://pipedream.com/contributing).
## Support & Community
If you have any questions or feedback, please [reach out in our community forum](https://pipedream.com/community) or [to our support team](https://pipedream.com/support).
## Service Status
Pipedream operates a status page at [https://status.pipedream.com](https://status.pipedream.com/). That page displays the uptime history and current status of every Pipedream service.
When incidents occur, updates are published to the **#incidents** channel of [Pipedream’s Slack Community](https://pipedream.com/support) and to the [@PipedreamStatus](https://twitter.com/PipedreamStatus) account on Twitter. On the status page itself, you can also subscribe to updates directly.
# Billing Settings
Source: https://pipedream.com/docs/account/billing-settings
You’ll find information on your usage data (for specific [Pipedream limits](/docs/workflows/limits/)) in your [Billing Settings](https://pipedream.com/settings/billing). You can also upgrade to [paid plans](https://pipedream.com/pricing) from this page.
## Subscription
If you’ve already upgraded, you’ll see an option to **Manage Subscription** here, which directs you to your personal Stripe portal. Here, you can change your payment method, review the details of previous invoices, and more.
## Usage
[Credits](/docs/pricing/#credits-and-billing) are Pipedream’s billable unit, and users on the [free plan](/docs/pricing/#free-plan) are limited on the number of daily free credits allocated. The **Usage** section displays a chart of the daily credits across a historical range of time to provide insight into your usage patterns.
The platform processes billions of events and is built and [priced](https://pipedream.com/pricing/) for use at scale. [Our team](https://pipedream.com/about) has built internet scale applications and managed data pipelines in excess of 10 million events per second (EPS) at startups and high-growth environments like BrightRoll, Yahoo!, Affirm, and Dropbox.
Our [community](https://pipedream.com/support) uses Pipedream for a wide variety of use cases including:
* AI agents and chatbots
* Workflow builders and SaaS automation
* API orchestration and automation
* Database automations
* Custom notifications and alerting
* Event queueing and concurrency management
* Webhook inspection and routing
* Prototyping and demos
## Source-available
Pipedream maintains a [source-available component registry](https://github.com/PipedreamHQ/pipedream) on GitHub so you can avoid writing boilerplate code for common API integrations. Use components as no code building blocks in workflows, or use them to scaffold code that you can customize. You can also [create a PR to contribute new components](/docs/components/contributing/#contribution-process) via GitHub.
## Contributing
We hope that by providing a generous free tier, you will not only get value from Pipedream, but you will give back to help us improve the product for the entire community and grow the platform by:
* [Contributing components](/docs/components/contributing/) to the [Pipedream registry](https://github.com/PipedreamHQ/pipedream) or sharing via your own GitHub repo
* Asking and answering questions in our [public community](https://pipedream.com/community/)
* [Reporting bugs](https://pipedream.com/community/c/bugs/9) and [requesting features](https://github.com/PipedreamHQ/pipedream/issues/new?assignees=\&labels=enhancement\&template=feature_request.md\&title=%5BFEATURE%5D+) that help us build a better product
* Following us on [Twitter](https://twitter.com/pipedream), starring our [GitHub repo](https://github.com/PipedreamHQ/pipedream) and subscribing to our [YouTube channel](https://www.youtube.com/c/pipedreamhq)
* Recommending us to your friends and colleagues
Learn about [all the ways you can contribute](https://pipedream.com/contributing).
## Support & Community
If you have any questions or feedback, please [reach out in our community forum](https://pipedream.com/community) or [to our support team](https://pipedream.com/support).
## Service Status
Pipedream operates a status page at [https://status.pipedream.com](https://status.pipedream.com/). That page displays the uptime history and current status of every Pipedream service.
When incidents occur, updates are published to the **#incidents** channel of [Pipedream’s Slack Community](https://pipedream.com/support) and to the [@PipedreamStatus](https://twitter.com/PipedreamStatus) account on Twitter. On the status page itself, you can also subscribe to updates directly.
# Billing Settings
Source: https://pipedream.com/docs/account/billing-settings
You’ll find information on your usage data (for specific [Pipedream limits](/docs/workflows/limits/)) in your [Billing Settings](https://pipedream.com/settings/billing). You can also upgrade to [paid plans](https://pipedream.com/pricing) from this page.
## Subscription
If you’ve already upgraded, you’ll see an option to **Manage Subscription** here, which directs you to your personal Stripe portal. Here, you can change your payment method, review the details of previous invoices, and more.
## Usage
[Credits](/docs/pricing/#credits-and-billing) are Pipedream’s billable unit, and users on the [free plan](/docs/pricing/#free-plan) are limited on the number of daily free credits allocated. The **Usage** section displays a chart of the daily credits across a historical range of time to provide insight into your usage patterns.
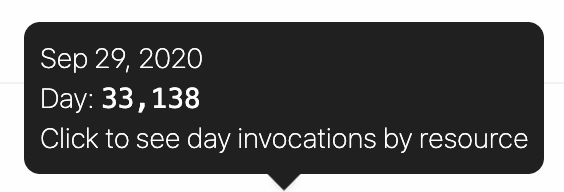 Click on a specific column to see credits for that day, broken out by workflow / source:
 Users on the free tier will see the last 30 days of usage in this chart. Users on [paid plans](https://pipedream.com/pricing) will see the cumulative usage tied to their current billing period.
## Compute Budget
Control the maximum number of credits permitted on your account with a **Credit Budget**.
This will restrict your workspace-wide usage to the specified number of [credits](/docs/pricing/#credits-and-billing) on a monthly or daily basis. The compute budget does not apply to credits incurred by [dedicated workers](/docs/workflows/building-workflows/settings/#eliminate-cold-starts) or Pipedream Connect.
To enable this feature, click on the toggle and define your maximum number of credits in the period.
Users on the free tier will see the last 30 days of usage in this chart. Users on [paid plans](https://pipedream.com/pricing) will see the cumulative usage tied to their current billing period.
## Compute Budget
Control the maximum number of credits permitted on your account with a **Credit Budget**.
This will restrict your workspace-wide usage to the specified number of [credits](/docs/pricing/#credits-and-billing) on a monthly or daily basis. The compute budget does not apply to credits incurred by [dedicated workers](/docs/workflows/building-workflows/settings/#eliminate-cold-starts) or Pipedream Connect.
To enable this feature, click on the toggle and define your maximum number of credits in the period.
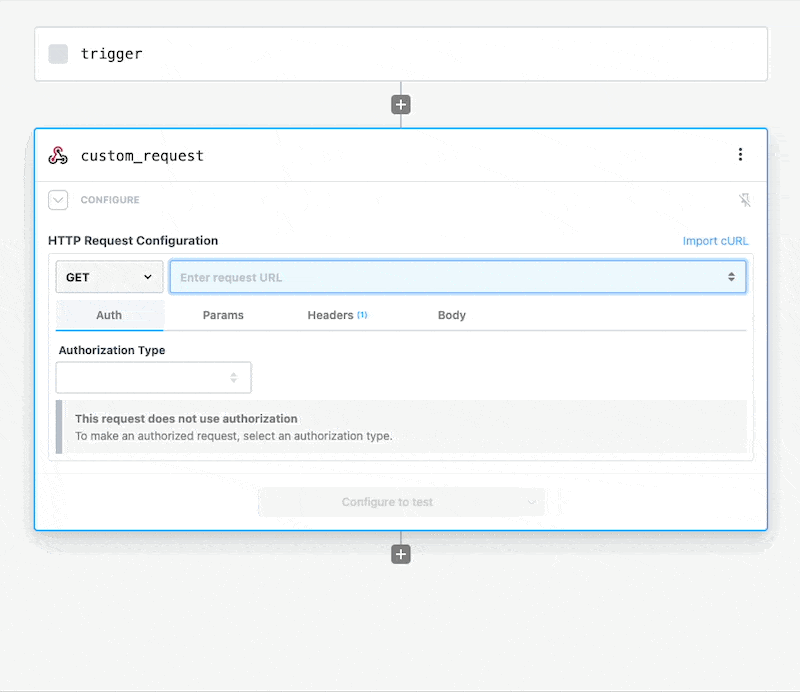
 Then, within the new HTTP request, open the **Authorization Type** dropdown to select a **Select an app**:
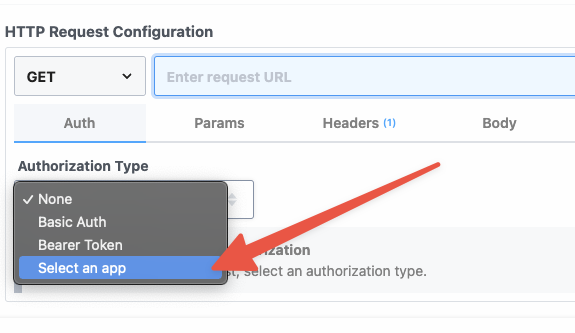 This will open a new prompt to select an app to connect with. Once you select an app, the HTTP request will be updated with the correct headers to authenticate with that app’s API.
 Once you connect the selected app account Pipedream will autmatically include your account’s authentication keys in the request in the headers, as well as update the URL to match the selected service.
Now you can modify the request path, method, body or query params to perform an action on the endpoint with your authenticated account.
### From a code step
You can connect accounts to code steps by using an `app` prop. Refer to the [connecting apps in Node.js documentation](/docs/workflows/building-workflows/code/nodejs/auth/).
For example, you can connect to Slack from Pipedream (via their OAuth integration), and use the access token Pipedream generates to authorize requests:
```javascript
import { WebClient } from '@slack/web-api';
// Sends a message to a Slack Channel
export default defineComponent({
props: {
slack: {
type: 'app',
app: 'slack'
}
},
async run({ steps, $ }) {
const web = new WebClient(this.slack.$auth.oauth_access_token)
return await web.chat.postMessage({
text: "Hello, world!",
channel: "#general",
})
}
});
```
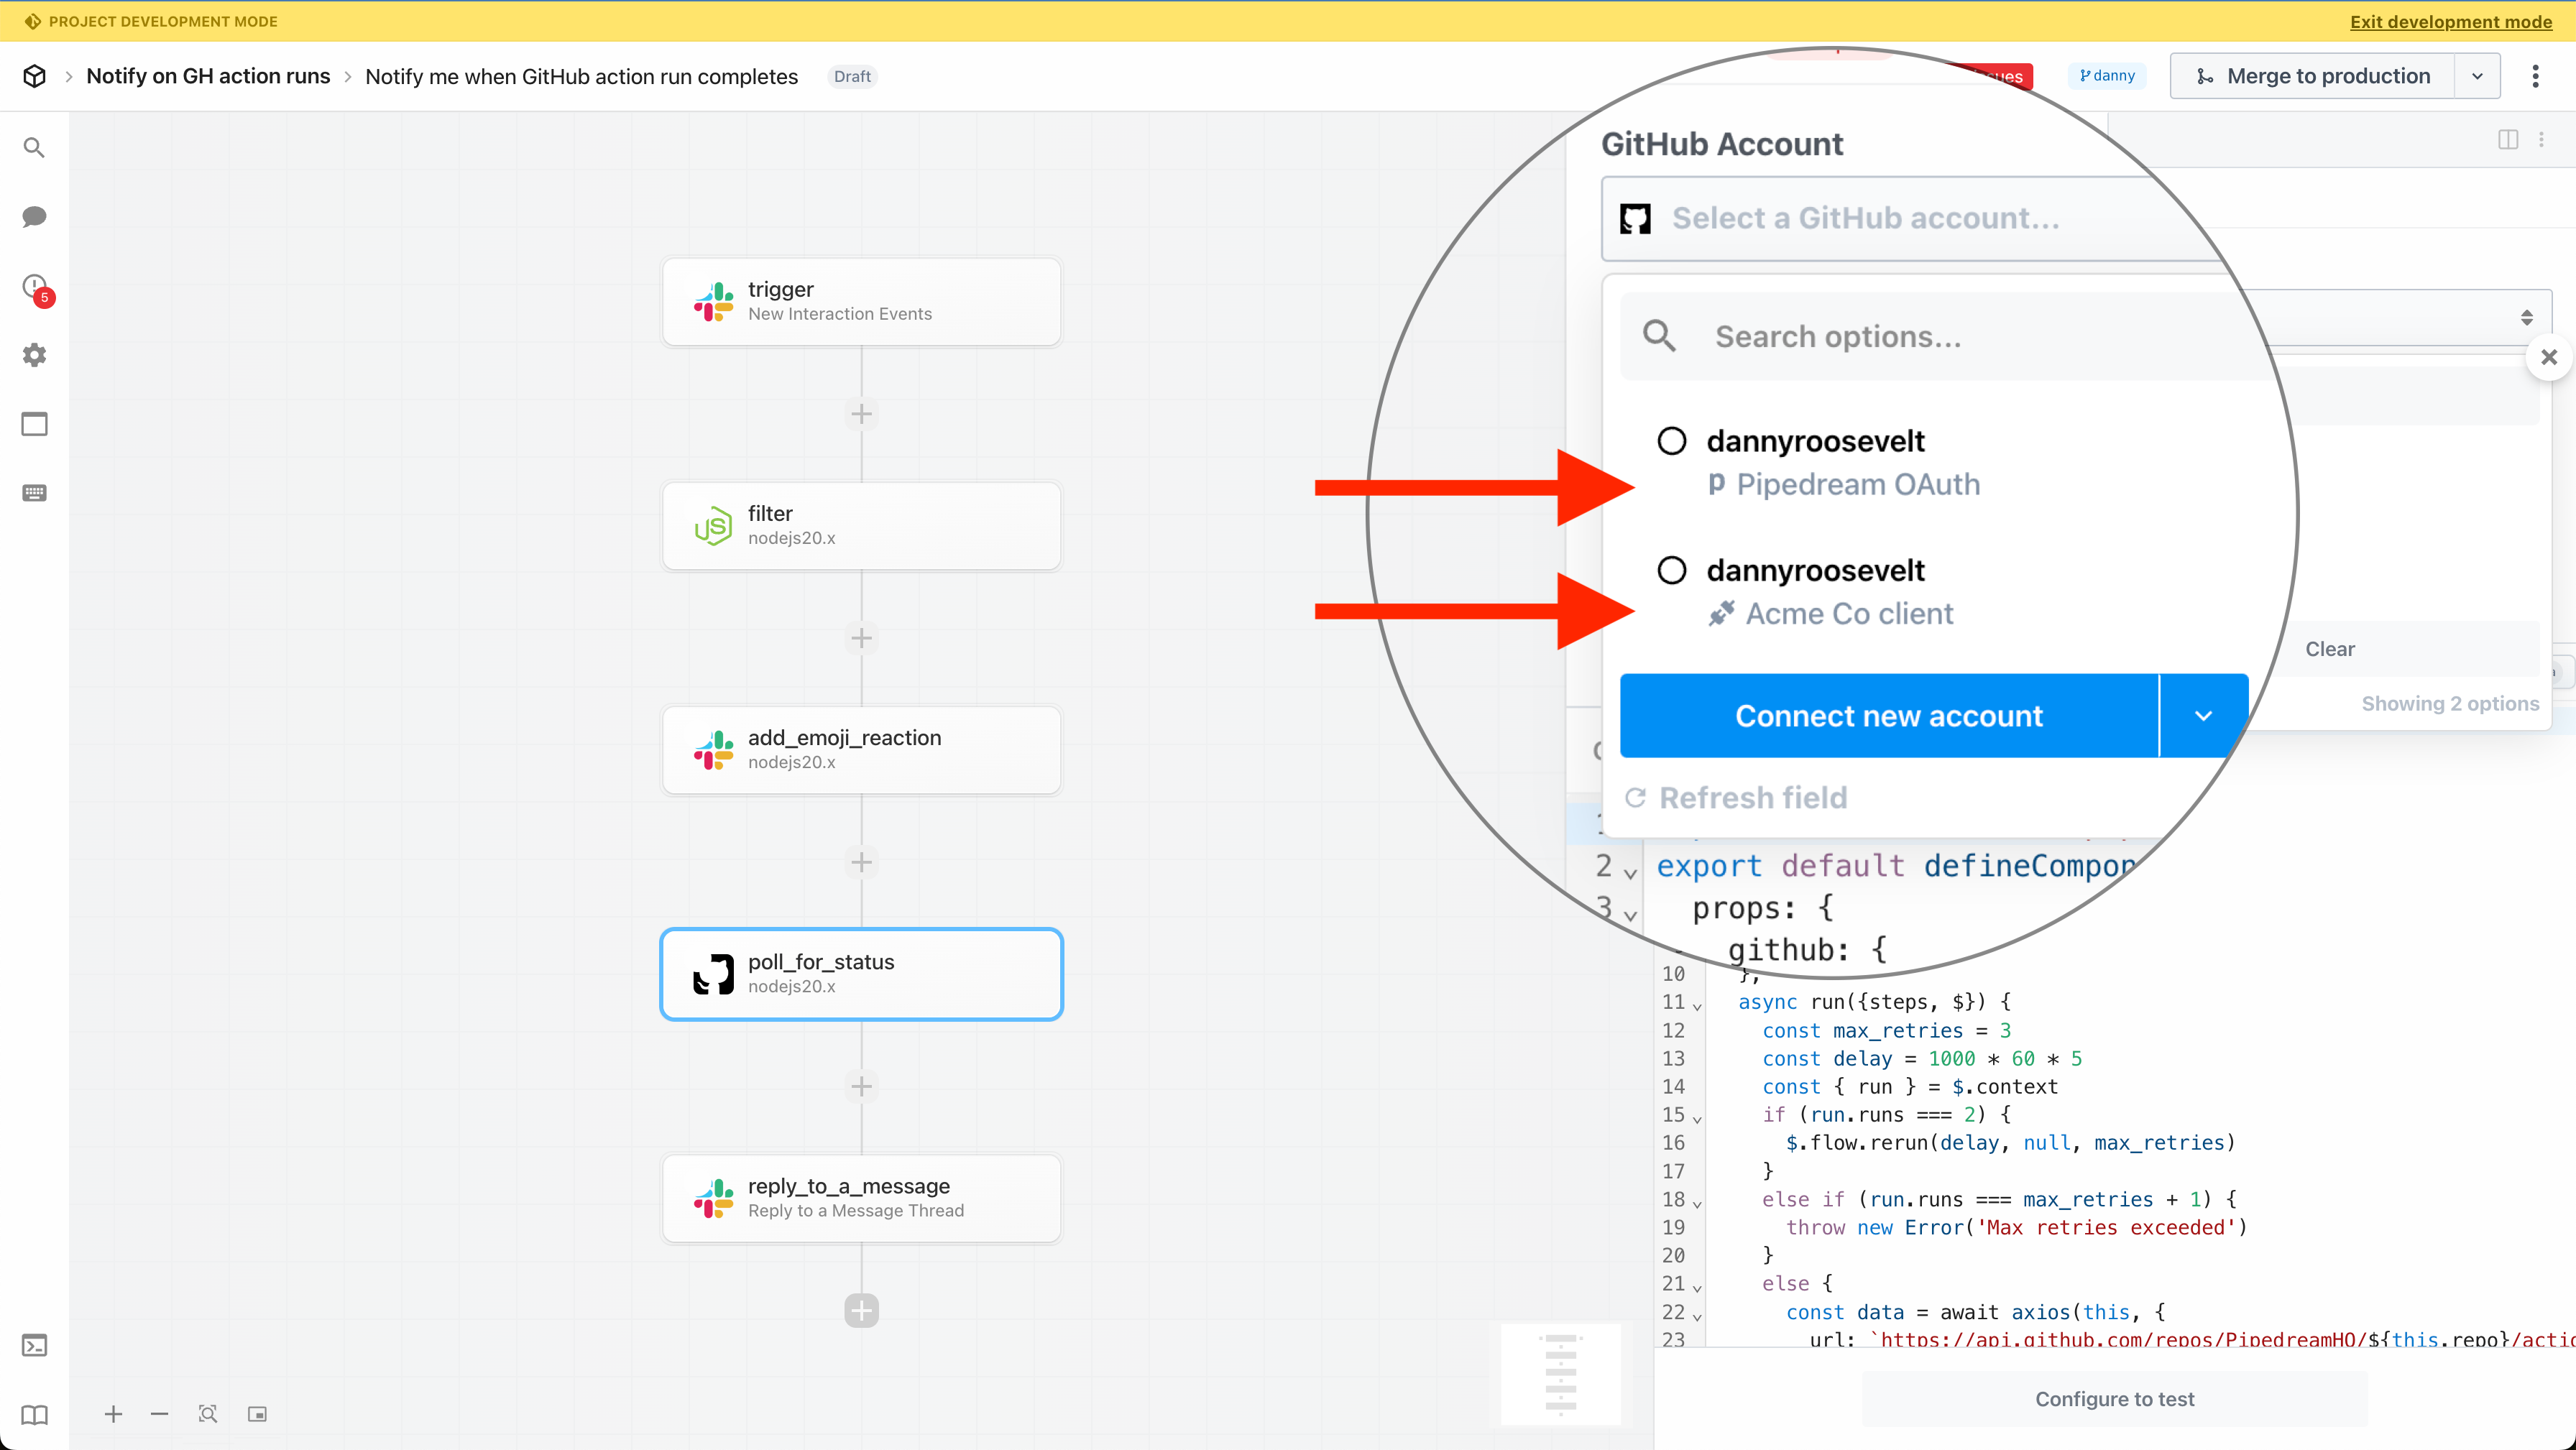
## Managing Connected Accounts
Visit your [Accounts Page](https://pipedream.com/accounts) to see a list of all your connected accounts.
On this page you can:
* Connect your account for any integrated app
* [View and manage access](/docs/apps/connected-accounts/#access-control) for your connected accounts
* Delete a connected account
* Reconnect an account
* Change the nickname associated with an account
You’ll also see some data associated with these accounts:
* For many OAuth apps, we’ll list the scopes for which you’ve granted Pipedream access
* The workflows that are using the account
### Connecting a new account
1. Visit [https://pipedream.com/accounts](https://pipedream.com/accounts)
2. Click the **Connect an app** button at the top-right.
3. Select the app you’d like to connect.
### Reconnecting an account
If you encounter errors in a step that appear to be related to credentials or authorization, you can reconnect your account:
1. Visit [https://pipedream.com/accounts](https://pipedream.com/accounts)
2. Search for your account
3. Click on the *…* next to your account, on the right side of the page
4. Select the option to **Reconnect** your account
## Access Control
**New connected accounts are private by default** and can only be used by the person who added it.
Connected accounts created prior to August 2023 were accessible to all workspace members by default. You can [restrict access](/docs/apps/connected-accounts/#managing-access) at any time.
### Managing access
* Find the account on the Accounts page and click the 3 dots on the far right of the row
* Select **Manage Access**
Once you connect the selected app account Pipedream will autmatically include your account’s authentication keys in the request in the headers, as well as update the URL to match the selected service.
Now you can modify the request path, method, body or query params to perform an action on the endpoint with your authenticated account.
### From a code step
You can connect accounts to code steps by using an `app` prop. Refer to the [connecting apps in Node.js documentation](/docs/workflows/building-workflows/code/nodejs/auth/).
For example, you can connect to Slack from Pipedream (via their OAuth integration), and use the access token Pipedream generates to authorize requests:
```javascript
import { WebClient } from '@slack/web-api';
// Sends a message to a Slack Channel
export default defineComponent({
props: {
slack: {
type: 'app',
app: 'slack'
}
},
async run({ steps, $ }) {
const web = new WebClient(this.slack.$auth.oauth_access_token)
return await web.chat.postMessage({
text: "Hello, world!",
channel: "#general",
})
}
});
```
## Managing Connected Accounts
Visit your [Accounts Page](https://pipedream.com/accounts) to see a list of all your connected accounts.
On this page you can:
* Connect your account for any integrated app
* [View and manage access](/docs/apps/connected-accounts/#access-control) for your connected accounts
* Delete a connected account
* Reconnect an account
* Change the nickname associated with an account
You’ll also see some data associated with these accounts:
* For many OAuth apps, we’ll list the scopes for which you’ve granted Pipedream access
* The workflows that are using the account
### Connecting a new account
1. Visit [https://pipedream.com/accounts](https://pipedream.com/accounts)
2. Click the **Connect an app** button at the top-right.
3. Select the app you’d like to connect.
### Reconnecting an account
If you encounter errors in a step that appear to be related to credentials or authorization, you can reconnect your account:
1. Visit [https://pipedream.com/accounts](https://pipedream.com/accounts)
2. Search for your account
3. Click on the *…* next to your account, on the right side of the page
4. Select the option to **Reconnect** your account
## Access Control
**New connected accounts are private by default** and can only be used by the person who added it.
Connected accounts created prior to August 2023 were accessible to all workspace members by default. You can [restrict access](/docs/apps/connected-accounts/#managing-access) at any time.
### Managing access
* Find the account on the Accounts page and click the 3 dots on the far right of the row
* Select **Manage Access**
 * You may be prompted to reconnect your account first to verify ownership of the account
* You can enable access to the entire workspace or individual members
* You may be prompted to reconnect your account first to verify ownership of the account
* You can enable access to the entire workspace or individual members
 ### Collaborating with others
Even if a workspace member doesn’t have access to a private connected account, you can still collaborate together on the same workflows.
Workspace members who don’t have access to a connected account **can perform the following actions** on workflows:
* Reference step exports
* Inspect prop inputs, step logs, and errors
* Test any step, so they can effectively develop and debug workflows end to end
Workspace members who do **not** have access to a given connected account **cannot modify prop inputs or edit any code** with that account.
### Collaborating with others
Even if a workspace member doesn’t have access to a private connected account, you can still collaborate together on the same workflows.
Workspace members who don’t have access to a connected account **can perform the following actions** on workflows:
* Reference step exports
* Inspect prop inputs, step logs, and errors
* Test any step, so they can effectively develop and debug workflows end to end
Workspace members who do **not** have access to a given connected account **cannot modify prop inputs or edit any code** with that account.
 To make changes to steps that are locked in read-only mode, you can:
* Ask the account owner to [grant access](/docs/apps/connected-accounts/#managing-access)
* Click **More Actions** and change the connected account to one that you have access to (note that this may remove some prop configurations)
### Access
Access to connected accounts is enforced at the step-level within workflows and is designed with security and control in mind.
When you connect an account in Pipedream, you are the owner of that connected account, and you always have full access. You can:
* Manage access
* Delete
* Reconnect
* Add to any step or trigger
For connected accounts that are **not** shared with other workspace members:
| Operation | Workspace Owner & Admin | Other Members |
| -------------------------------------------------- | ----------------------- | ------------- |
| View on [Accounts](https://pipedream.com/accounts) | ✅ | ❌ |
| Add to a new trigger or step | ❌ | ❌ |
| Modify existing steps | ❌ | ❌ |
| Test exising steps | ✅ | ✅ |
| Manage access | ✅ | ❌ |
| Reconnect | ✅ | ❌ |
| Delete | ✅ | ❌ |
For connected accounts that **are** shared with other workspace members:
| Operations | Workspace Owner & Admin | Other Members |
| -------------------------------------------------- | ----------------------- | ------------- |
| View on [Accounts](https://pipedream.com/accounts) | ✅ | ✅ |
| Add to a new trigger or step | ✅ | ✅ |
| Modify existing steps | ✅ | ✅ |
| Test exising steps | ✅ | ✅ |
| Manage access | ✅ | ❌ |
| Reconnect | ✅ | ❌ |
| Delete | ✅ | ❌ |
### FAQ
#### Why isn’t my connected account showing up in the legacy workflow builder?
In order to use a connected account in the legacy (v1) workflow builder, the account must be shared with the entire workspace. Private accounts are accessible in the latest version of the workflow builder.
#### What is the “Owner” column?
The owner column on the Accounts page indicates who in the workspace originally connected the account (that is the only person who has permissions to manage access).
#### Why is there no “Owner” for certain connected accounts?
Accounts that were connected before August 2023 don’t have an owner associated with them, and are shared with the entire workspace. In order to manage access for any of those accounts, we’ll first prompt you to reconnect.
#### How can I restrict access to a connected account shared with the workspace?
See above for info on [managing access](/docs/apps/connected-accounts/#managing-access).
#### Can I still work with other people on a single workflow, even if I don’t want them to have access to my connected account?
Yes, see the section on [collaborating with others](/docs/apps/connected-accounts/#collaborating-with-others).
## Accessing credentials via API
You can access credentials for any connected account via API, letting you build services anywhere and use Pipedream to handle auth. See [the guide for accessing credentials via API](/docs/connect/api-reference/list-accounts) for more details.
## Passing external credentials at runtime
If you use a secrets store like [HashiCorp Vault](https://www.vaultproject.io/) or something else, or if you store credentials in a database, you can retrieve these secrets at runtime and pass them to any step. [See the full guide here](/docs/apps/external-auth/).
## Connecting to apps with IP restrictions
These IP addresses are tied to **app connections only**, not workflows or other Pipedream services. To whitelist requests from Pipedream workflows, [use VPCs](/docs/workflows/vpc/).
If you’re connecting to an app that enforces IP restrictions, you may need to whitelist the Pipedream API’s IP addresses:
{PD_EGRESS_IP_RANGE}
## Account security
[See our security docs](/docs/privacy-and-security/#third-party-oauth-grants-api-keys-and-environment-variables) for details on how Pipedream secures your connected accounts.
## Requesting a new app or service
1. Visit [https://pipedream.com/support](https://pipedream.com/support)
2. Scroll to the bottom, where you’ll see a Support form.
3. Select **App / Integration questions** and submit the request.
# OAuth Clients
Source: https://pipedream.com/docs/apps/oauth-clients
By default, OAuth apps in Pipedream use our official OAuth client. When you connect an account for these apps, you grant Pipedream the requested permissions (scopes) on OAuth authorization.
Pipedream apps solve for a broad range of use cases, which means the scopes our OAuth client requests may include a different set than your specific use case. To define the exact scope of access you’d like to grant, you can configure a custom OAuth client.
## Configuring custom OAuth clients
To make changes to steps that are locked in read-only mode, you can:
* Ask the account owner to [grant access](/docs/apps/connected-accounts/#managing-access)
* Click **More Actions** and change the connected account to one that you have access to (note that this may remove some prop configurations)
### Access
Access to connected accounts is enforced at the step-level within workflows and is designed with security and control in mind.
When you connect an account in Pipedream, you are the owner of that connected account, and you always have full access. You can:
* Manage access
* Delete
* Reconnect
* Add to any step or trigger
For connected accounts that are **not** shared with other workspace members:
| Operation | Workspace Owner & Admin | Other Members |
| -------------------------------------------------- | ----------------------- | ------------- |
| View on [Accounts](https://pipedream.com/accounts) | ✅ | ❌ |
| Add to a new trigger or step | ❌ | ❌ |
| Modify existing steps | ❌ | ❌ |
| Test exising steps | ✅ | ✅ |
| Manage access | ✅ | ❌ |
| Reconnect | ✅ | ❌ |
| Delete | ✅ | ❌ |
For connected accounts that **are** shared with other workspace members:
| Operations | Workspace Owner & Admin | Other Members |
| -------------------------------------------------- | ----------------------- | ------------- |
| View on [Accounts](https://pipedream.com/accounts) | ✅ | ✅ |
| Add to a new trigger or step | ✅ | ✅ |
| Modify existing steps | ✅ | ✅ |
| Test exising steps | ✅ | ✅ |
| Manage access | ✅ | ❌ |
| Reconnect | ✅ | ❌ |
| Delete | ✅ | ❌ |
### FAQ
#### Why isn’t my connected account showing up in the legacy workflow builder?
In order to use a connected account in the legacy (v1) workflow builder, the account must be shared with the entire workspace. Private accounts are accessible in the latest version of the workflow builder.
#### What is the “Owner” column?
The owner column on the Accounts page indicates who in the workspace originally connected the account (that is the only person who has permissions to manage access).
#### Why is there no “Owner” for certain connected accounts?
Accounts that were connected before August 2023 don’t have an owner associated with them, and are shared with the entire workspace. In order to manage access for any of those accounts, we’ll first prompt you to reconnect.
#### How can I restrict access to a connected account shared with the workspace?
See above for info on [managing access](/docs/apps/connected-accounts/#managing-access).
#### Can I still work with other people on a single workflow, even if I don’t want them to have access to my connected account?
Yes, see the section on [collaborating with others](/docs/apps/connected-accounts/#collaborating-with-others).
## Accessing credentials via API
You can access credentials for any connected account via API, letting you build services anywhere and use Pipedream to handle auth. See [the guide for accessing credentials via API](/docs/connect/api-reference/list-accounts) for more details.
## Passing external credentials at runtime
If you use a secrets store like [HashiCorp Vault](https://www.vaultproject.io/) or something else, or if you store credentials in a database, you can retrieve these secrets at runtime and pass them to any step. [See the full guide here](/docs/apps/external-auth/).
## Connecting to apps with IP restrictions
These IP addresses are tied to **app connections only**, not workflows or other Pipedream services. To whitelist requests from Pipedream workflows, [use VPCs](/docs/workflows/vpc/).
If you’re connecting to an app that enforces IP restrictions, you may need to whitelist the Pipedream API’s IP addresses:
{PD_EGRESS_IP_RANGE}
## Account security
[See our security docs](/docs/privacy-and-security/#third-party-oauth-grants-api-keys-and-environment-variables) for details on how Pipedream secures your connected accounts.
## Requesting a new app or service
1. Visit [https://pipedream.com/support](https://pipedream.com/support)
2. Scroll to the bottom, where you’ll see a Support form.
3. Select **App / Integration questions** and submit the request.
# OAuth Clients
Source: https://pipedream.com/docs/apps/oauth-clients
By default, OAuth apps in Pipedream use our official OAuth client. When you connect an account for these apps, you grant Pipedream the requested permissions (scopes) on OAuth authorization.
Pipedream apps solve for a broad range of use cases, which means the scopes our OAuth client requests may include a different set than your specific use case. To define the exact scope of access you’d like to grant, you can configure a custom OAuth client.
## Configuring custom OAuth clients
 ### Limitations
* The vast majority of OAuth apps in Pipedream support custom OAuth clients. However, due to the unique integration requirements for certain apps, custom OAuth clients are not supported in **triggers** for these apps (custom OAuth clients work in actions and code steps): [Discord](https://pipedream.com/apps/discord/), [Dropbox](https://pipedream.com/apps/dropbox/), [Slack](https://pipedream.com/apps/slack/), and [Zoom](https://pipedream.com/apps/zoom/).
# Installing The CLI
Source: https://pipedream.com/docs/cli/install
## macOS
### Homebrew
```bash
brew tap pipedreamhq/pd-cli
brew install pipedreamhq/pd-cli/pipedream
```
### From source
Run the following command:
```bash
curl https://cli.pipedream.com/install | sh
```
This will automatically download and install the `pd` CLI to your Mac. You can also [download the macOS build](https://cli.pipedream.com/darwin/amd64/latest/pd.zip), unzip that archive, and place the `pd` binary somewhere in [your `PATH`](https://opensource.com/article/17/6/set-path-linux).
If this returns a permissions error, you may need to run:
```bash
curl https://cli.pipedream.com/install | sudo sh
```
### Limitations
* The vast majority of OAuth apps in Pipedream support custom OAuth clients. However, due to the unique integration requirements for certain apps, custom OAuth clients are not supported in **triggers** for these apps (custom OAuth clients work in actions and code steps): [Discord](https://pipedream.com/apps/discord/), [Dropbox](https://pipedream.com/apps/dropbox/), [Slack](https://pipedream.com/apps/slack/), and [Zoom](https://pipedream.com/apps/zoom/).
# Installing The CLI
Source: https://pipedream.com/docs/cli/install
## macOS
### Homebrew
```bash
brew tap pipedreamhq/pd-cli
brew install pipedreamhq/pd-cli/pipedream
```
### From source
Run the following command:
```bash
curl https://cli.pipedream.com/install | sh
```
This will automatically download and install the `pd` CLI to your Mac. You can also [download the macOS build](https://cli.pipedream.com/darwin/amd64/latest/pd.zip), unzip that archive, and place the `pd` binary somewhere in [your `PATH`](https://opensource.com/article/17/6/set-path-linux).
If this returns a permissions error, you may need to run:
```bash
curl https://cli.pipedream.com/install | sudo sh
```
🗎 README.md
🗎 airtable.app.mjs
🗎 package.json
🗁 actions
🗁 get-record
🗎 get-record.mjs
🗁 node\_modules
🗎 ...here be dragons
🗁 sources
🗁 new-records
🗎 new-records.mjs
In the example above, the `components/airtable/actions/get-record/get-record.mjs` component is published as the **Get Record** action under the **Airtable** app within the workflow builder in Pipedream.
 5. Deploy your workflow
6. Click **RUN NOW** to execute your workflow and action
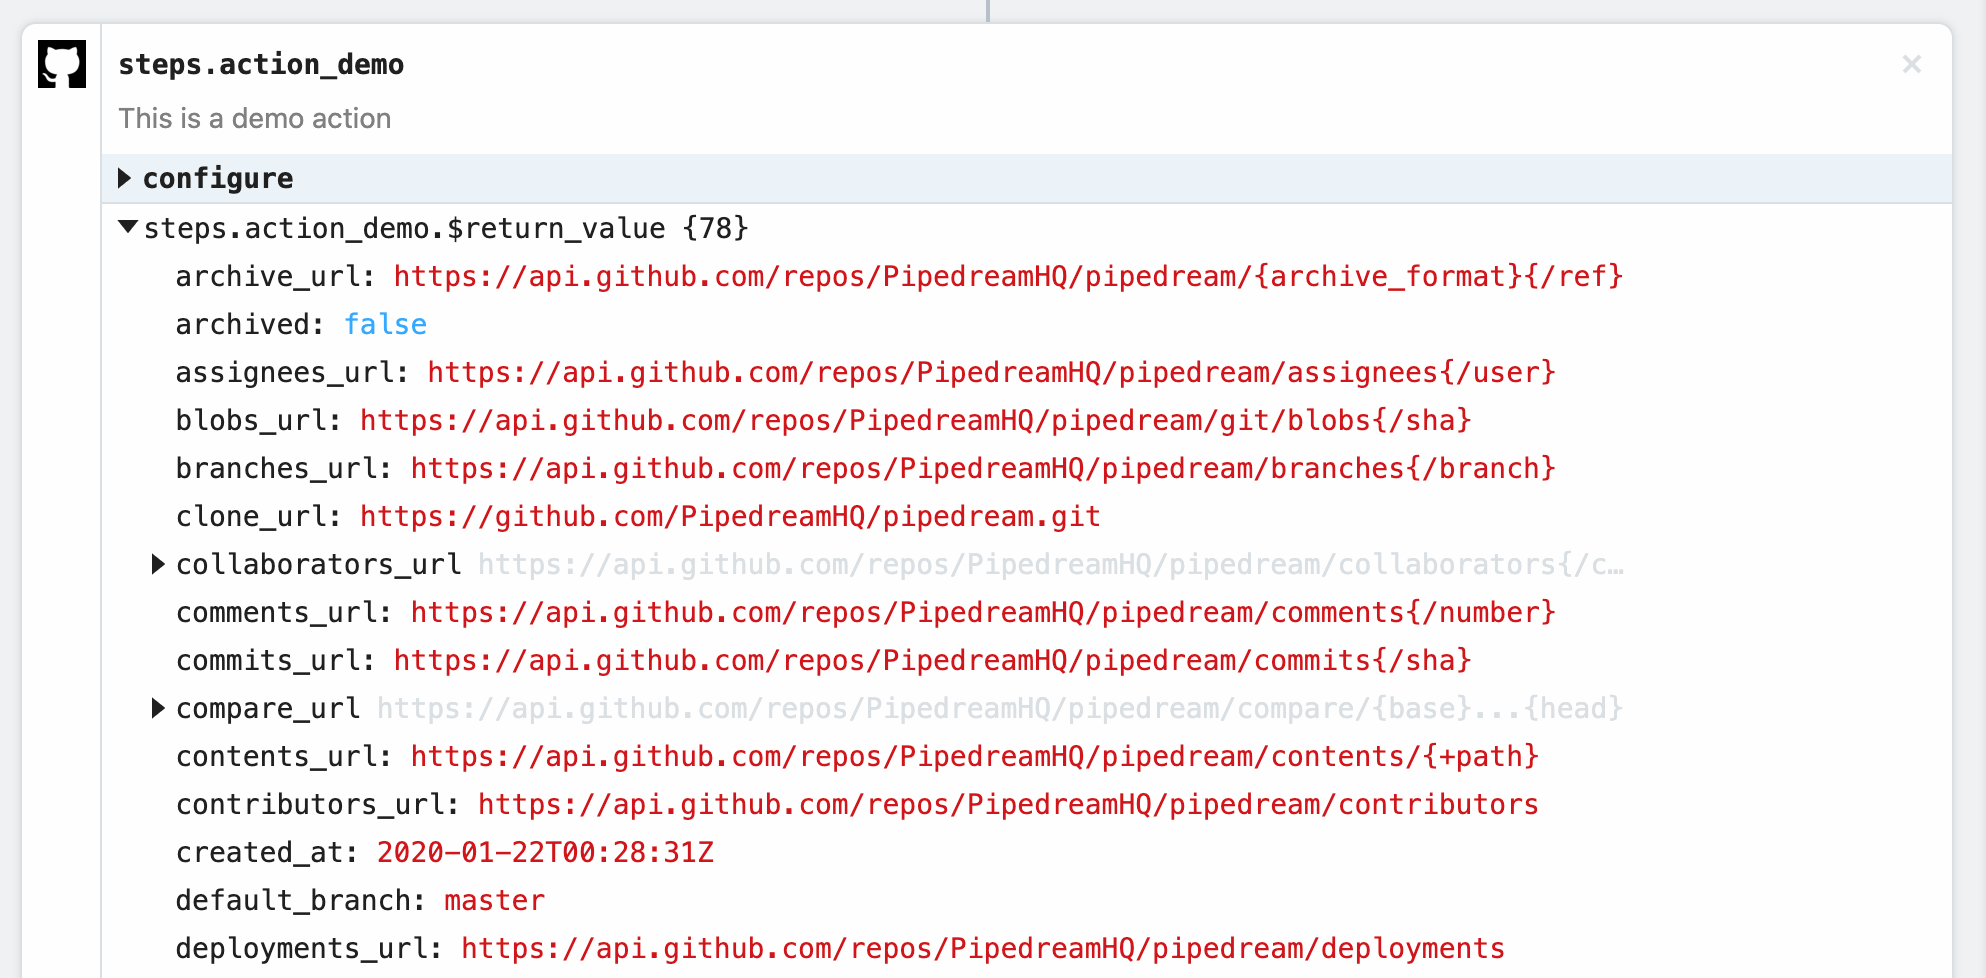
You should see `hello world!` returned as the value for `steps.action_demo.$return_value`.
5. Deploy your workflow
6. Click **RUN NOW** to execute your workflow and action
You should see `hello world!` returned as the value for `steps.action_demo.$return_value`.
 Keep the browser tab open. We’ll return to this workflow in the rest of the examples as we update the action.
### hello \[name]!
Next, let’s update the component to capture some user input. First, add a `string` [prop](/docs/components/contributing/api/#props) called `name` to the component.
```javascript
export default {
name: "Action Demo",
description: "This is a demo action",
key: "action_demo",
version: "0.0.1",
type: "action",
props: {
name: {
type: "string",
label: "Name",
}
},
async run() {
return `hello world!`
},
}
```
Next, update the `run()` function to reference `this.name` in the return value.
```javascript
export default {
name: "Action Demo",
description: "This is a demo action",
key: "action_demo",
version: "0.0.1",
type: "action",
props: {
name: {
type: "string",
label: "Name",
},
},
async run() {
return `hello ${this.name}!`;
},
};
```
Finally, update the component version to `0.0.2`. If you fail to update the version, the CLI will throw an error.
```javascript
export default {
name: "Action Demo",
description: "This is a demo action",
key: "action_demo",
version: "0.0.2",
type: "action",
props: {
name: {
type: "string",
label: "Name",
},
},
async run() {
return `hello ${this.name}!`;
},
};
```
Save the file and run the `pd publish` command again to update the action in your account.
```
pd publish action.js
```
The CLI will update the component in your account with the key `action_demo`. You should see something like this:
```
sc_Egip04 Action Demo 0.0.2 just now action_demo
```
Next, let’s update the action in the workflow from the previous example and run it.
1. Hover over the action in your workflow —you should see an update icon at the top right. Click the icon to update the action to the latest version and then save the workflow. If you don’t see the icon, verify that the CLI successfully published the update or try refreshing the page.
Keep the browser tab open. We’ll return to this workflow in the rest of the examples as we update the action.
### hello \[name]!
Next, let’s update the component to capture some user input. First, add a `string` [prop](/docs/components/contributing/api/#props) called `name` to the component.
```javascript
export default {
name: "Action Demo",
description: "This is a demo action",
key: "action_demo",
version: "0.0.1",
type: "action",
props: {
name: {
type: "string",
label: "Name",
}
},
async run() {
return `hello world!`
},
}
```
Next, update the `run()` function to reference `this.name` in the return value.
```javascript
export default {
name: "Action Demo",
description: "This is a demo action",
key: "action_demo",
version: "0.0.1",
type: "action",
props: {
name: {
type: "string",
label: "Name",
},
},
async run() {
return `hello ${this.name}!`;
},
};
```
Finally, update the component version to `0.0.2`. If you fail to update the version, the CLI will throw an error.
```javascript
export default {
name: "Action Demo",
description: "This is a demo action",
key: "action_demo",
version: "0.0.2",
type: "action",
props: {
name: {
type: "string",
label: "Name",
},
},
async run() {
return `hello ${this.name}!`;
},
};
```
Save the file and run the `pd publish` command again to update the action in your account.
```
pd publish action.js
```
The CLI will update the component in your account with the key `action_demo`. You should see something like this:
```
sc_Egip04 Action Demo 0.0.2 just now action_demo
```
Next, let’s update the action in the workflow from the previous example and run it.
1. Hover over the action in your workflow —you should see an update icon at the top right. Click the icon to update the action to the latest version and then save the workflow. If you don’t see the icon, verify that the CLI successfully published the update or try refreshing the page.
 2. After saving the workflow, you should see an input field appear. Enter a value for the `Name` input (e.g., `foo`).
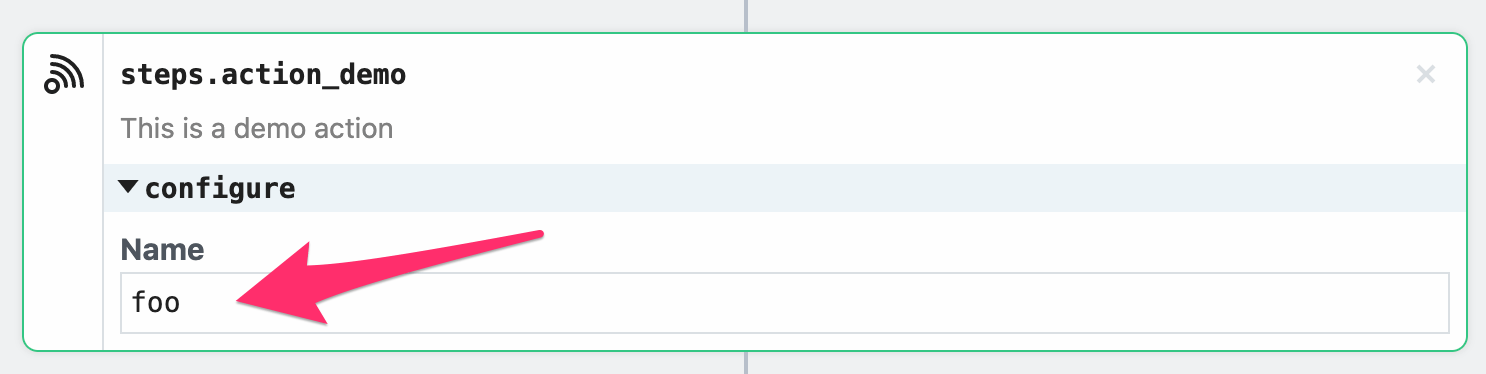 3. Deploy the workflow and click **RUN NOW**
You should see `hello foo!` (or the value you entered for `Name`) as the value returned by the step.
### Use an npm Package
Next, we’ll update the component to get data from the Star Wars API using the `axios` npm package. To use the `axios` package, just `import` it.
```javascript
import { axios } from "@pipedream/platform";
export default {
name: "Action Demo",
description: "This is a demo action",
key: "action_demo",
version: "0.0.2",
type: "action",
props: {
name: {
type: "string",
label: "Name",
},
},
async run() {
return `hello ${this.name}!`;
},
};
```
3. Deploy the workflow and click **RUN NOW**
You should see `hello foo!` (or the value you entered for `Name`) as the value returned by the step.
### Use an npm Package
Next, we’ll update the component to get data from the Star Wars API using the `axios` npm package. To use the `axios` package, just `import` it.
```javascript
import { axios } from "@pipedream/platform";
export default {
name: "Action Demo",
description: "This is a demo action",
key: "action_demo",
version: "0.0.2",
type: "action",
props: {
name: {
type: "string",
label: "Name",
},
},
async run() {
return `hello ${this.name}!`;
},
};
```
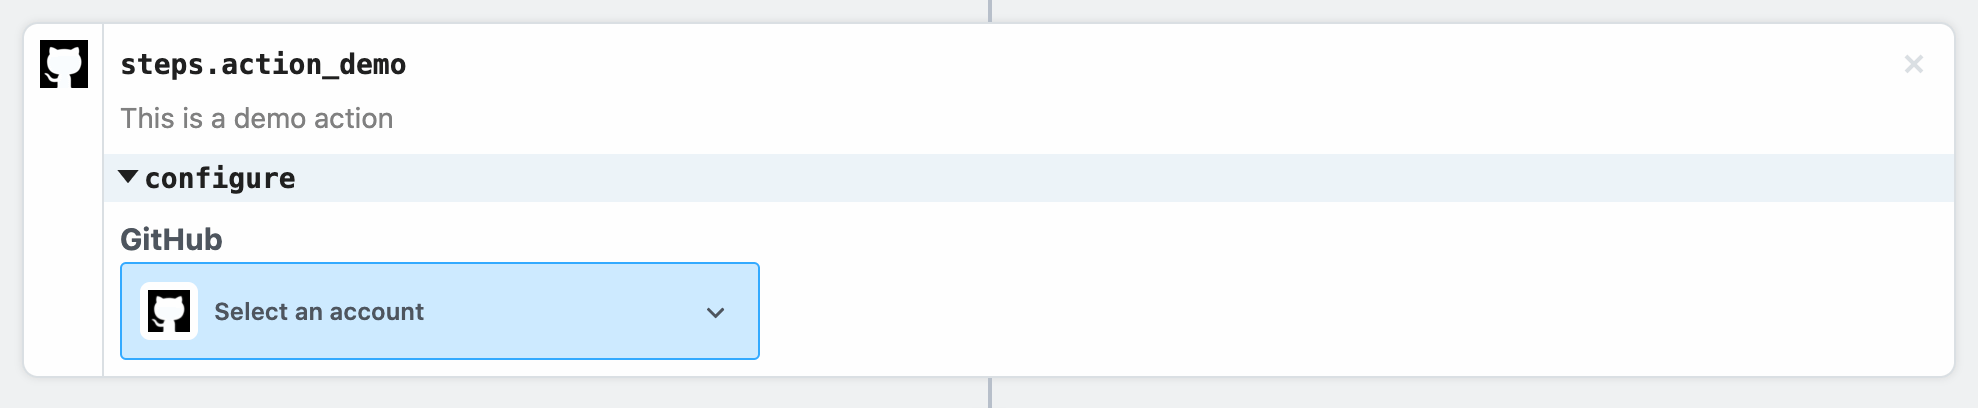 Select an existing account or connect a new one, and then deploy your workflow and click **RUN NOW**. You should see the results returned by the action:
 ## What’s Next?
You’re ready to start authoring and publishing actions on Pipedream! You can also check out the [detailed component reference](/docs/components/contributing/api/#component-api) at any time!
If you have any questions or feedback, please [reach out](https://pipedream.com/community)!
# Component API Reference
Source: https://pipedream.com/docs/components/contributing/api
export const CONFIGURED_PROPS_SIZE_LIMIT = '64KB';
## What’s Next?
You’re ready to start authoring and publishing actions on Pipedream! You can also check out the [detailed component reference](/docs/components/contributing/api/#component-api) at any time!
If you have any questions or feedback, please [reach out](https://pipedream.com/community)!
# Component API Reference
Source: https://pipedream.com/docs/components/contributing/api
export const CONFIGURED_PROPS_SIZE_LIMIT = '64KB';
 In Pipedream, users can choose from lists on a specific board:
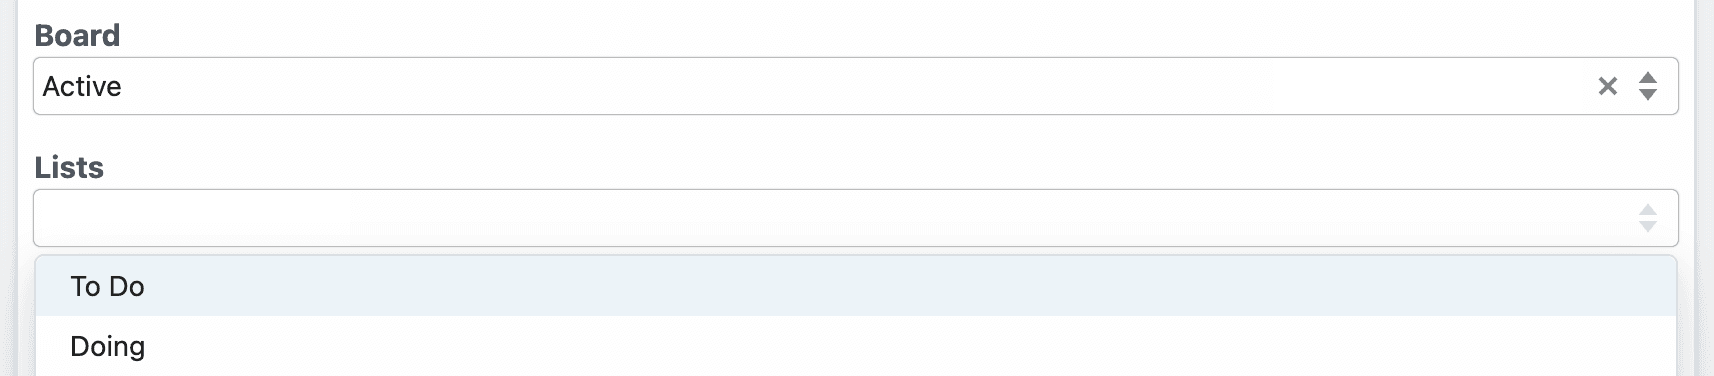 Both **Board** and **Lists** are defined in the Trello app file:
```javascript
board: {
type: "string",
label: "Board",
async options(opts) {
const boards = await this.getBoards(this.$auth.oauth_uid);
const activeBoards = boards.filter((board) => board.closed === false);
return activeBoards.map((board) => {
return { label: board.name, value: board.id };
});
},
},
lists: {
type: "string[]",
label: "Lists",
optional: true,
async options(opts) {
const lists = await this.getLists(opts.board);
return lists.map((list) => {
return { label: list.name, value: list.id };
});
},
}
```
In the `lists` prop, notice how `opts.board` references the board. You can pass `opts` to the prop’s `options` method when you reference `propDefinitions` in specific components:
```javascript
board: { propDefinition: [trello, "board"] },
lists: {
propDefinition: [
trello,
"lists",
(configuredProps) => ({ board: configuredProps.board }),
],
},
```
`configuredProps` contains the props the user previously configured (the board). This allows the `lists` prop to use it in the `options` method.
##### Dynamic props
Some prop definitions must be computed dynamically, after the user configures another prop. We call these **dynamic props**, since they are rendered on-the-fly. This technique is used in [the Google Sheets **Add Single Row** action](https://github.com/PipedreamHQ/pipedream/blob/master/components/google_sheets/actions/add-single-row/add-single-row.mjs), which we’ll use as an example below.
First, determine the prop whose selection should render dynamic props. In the Google Sheets example, we ask the user whether their sheet contains a header row. If it does, we display header fields as individual props:
Both **Board** and **Lists** are defined in the Trello app file:
```javascript
board: {
type: "string",
label: "Board",
async options(opts) {
const boards = await this.getBoards(this.$auth.oauth_uid);
const activeBoards = boards.filter((board) => board.closed === false);
return activeBoards.map((board) => {
return { label: board.name, value: board.id };
});
},
},
lists: {
type: "string[]",
label: "Lists",
optional: true,
async options(opts) {
const lists = await this.getLists(opts.board);
return lists.map((list) => {
return { label: list.name, value: list.id };
});
},
}
```
In the `lists` prop, notice how `opts.board` references the board. You can pass `opts` to the prop’s `options` method when you reference `propDefinitions` in specific components:
```javascript
board: { propDefinition: [trello, "board"] },
lists: {
propDefinition: [
trello,
"lists",
(configuredProps) => ({ board: configuredProps.board }),
],
},
```
`configuredProps` contains the props the user previously configured (the board). This allows the `lists` prop to use it in the `options` method.
##### Dynamic props
Some prop definitions must be computed dynamically, after the user configures another prop. We call these **dynamic props**, since they are rendered on-the-fly. This technique is used in [the Google Sheets **Add Single Row** action](https://github.com/PipedreamHQ/pipedream/blob/master/components/google_sheets/actions/add-single-row/add-single-row.mjs), which we’ll use as an example below.
First, determine the prop whose selection should render dynamic props. In the Google Sheets example, we ask the user whether their sheet contains a header row. If it does, we display header fields as individual props:
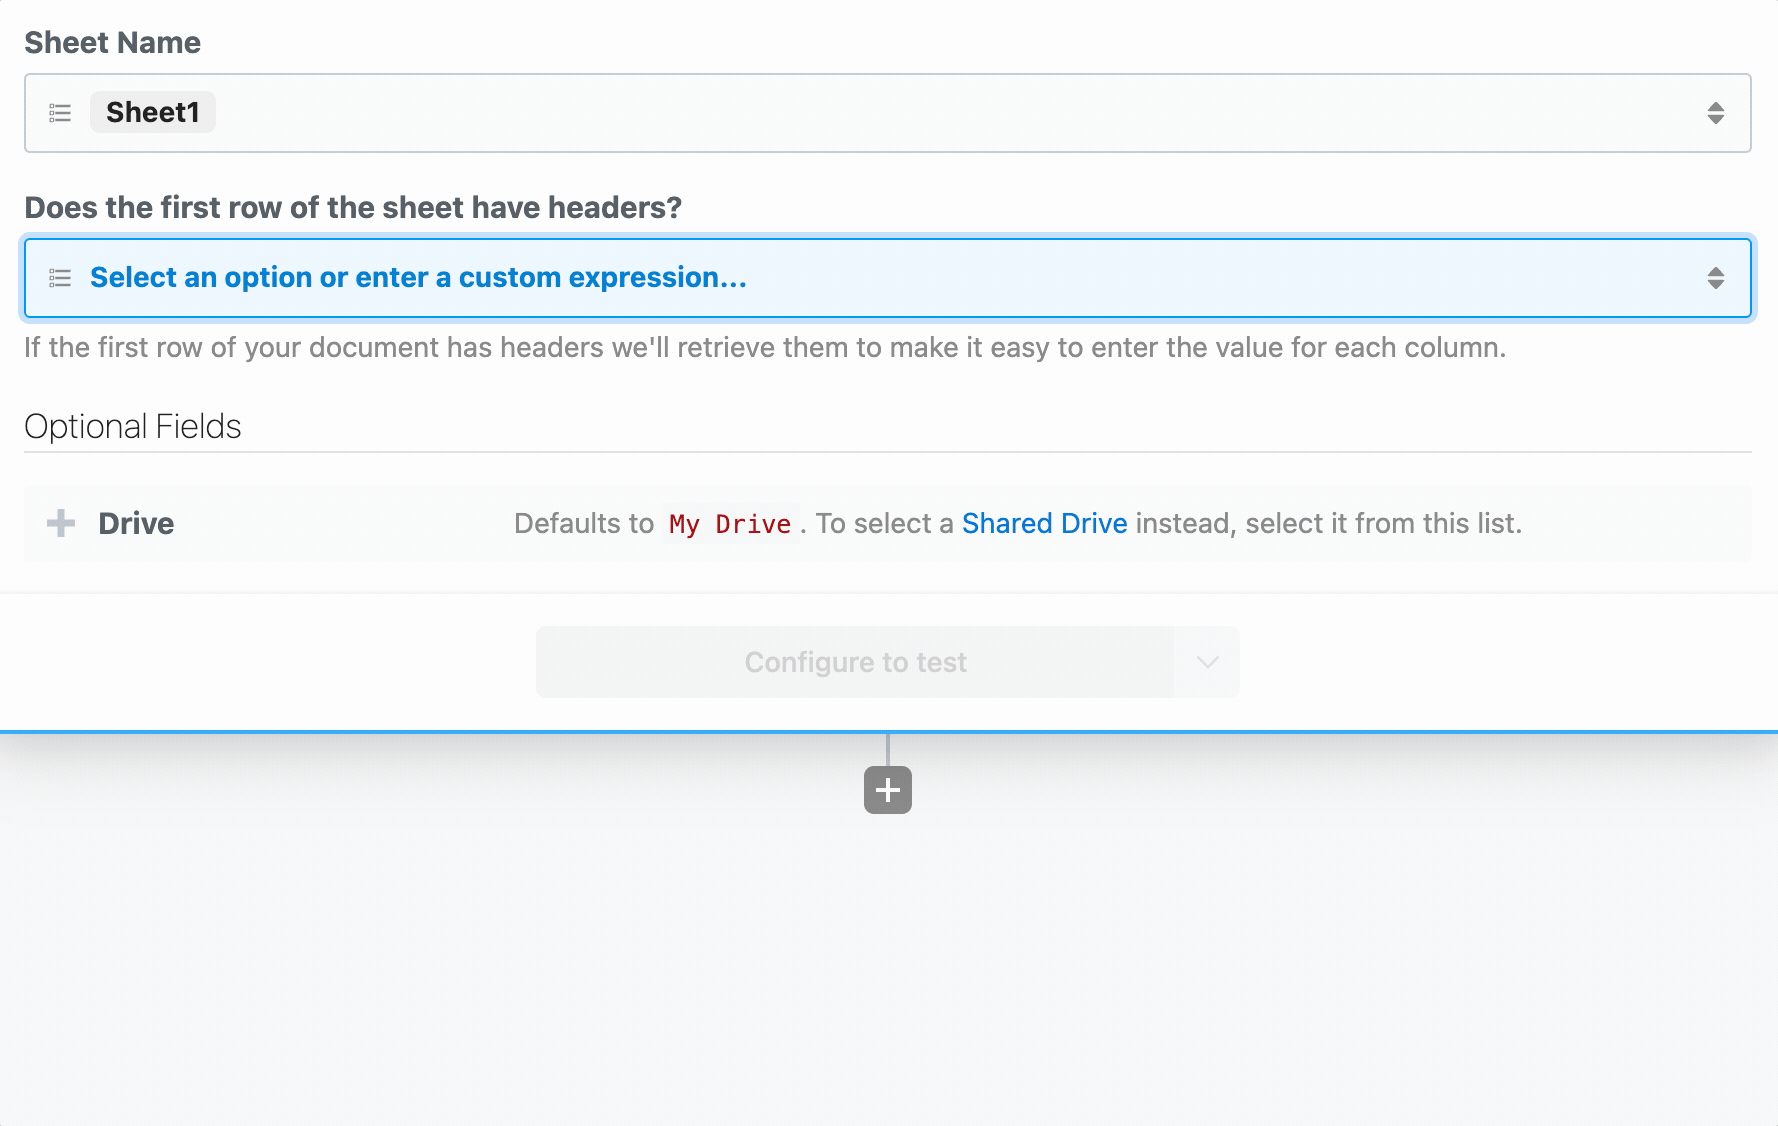 To load dynamic props, the header prop must have the `reloadProps` field set to `true`:
```javascript
hasHeaders: {
type: "string",
label: "Does the first row of the sheet have headers?",
description: "If the first row of your document has headers we'll retrieve them to make it easy to enter the value for each column.",
options: [
"Yes",
"No",
],
reloadProps: true,
},
```
When a user chooses a value for this prop, Pipedream runs the `additionalProps` component method to render props:
```javascript
async additionalProps() {
const sheetId = this.sheetId?.value || this.sheetId;
const props = {};
if (this.hasHeaders === "Yes") {
const { values } = await this.googleSheets.getSpreadsheetValues(sheetId, `${this.sheetName}!1:1`);
if (!values[0]?.length) {
throw new ConfigurationError("Cound not find a header row. Please either add headers and click \"Refresh fields\" or adjust the action configuration to continue.");
}
for (let i = 0; i < values[0]?.length; i++) {
props[`col_${i.toString().padStart(4, "0")}`] = {
type: "string",
label: values[0][i],
optional: true,
};
}
} else if (this.hasHeaders === "No") {
props.myColumnData = {
type: "string[]",
label: "Values",
description: "Provide a value for each cell of the row. Google Sheets accepts strings, numbers and boolean values for each cell. To set a cell to an empty value, pass an empty string.",
};
}
return props;
},
```
The signature of this function is:
```javascript
async additionalProps(previousPropDefs)
```
where `previousPropDefs` are the full set of props (props merged with the previous `additionalProps`). When the function is executed, `this` is bound similar to when the `run` function is called, where you can access the values of the props as currently configured, and call any `methods`. The return value of `additionalProps` will replace any previous call, and that return value will be merged with props to define the final set of props.
Following is an example that demonstrates how to use `additionalProps` to dynamically change a prop’s `disabled` and `hidden` properties:
```javascript
async additionalProps(previousPropDefs) {
if (this.myCondition === "Yes") {
previousPropDefs.myPropName.disabled = true;
previousPropDefs.myPropName.hidden = true;
} else {
previousPropDefs.myPropName.disabled = false;
previousPropDefs.myPropName.hidden = false;
}
return previousPropDefs;
},
```
Dynamic props can have any one of the following prop types:
* `app`
* `boolean`
* `integer`
* `string`
* `object`
* `any`
* `$.interface.http`
* `$.interface.timer`
* `data_store`
* `http_request`
#### Interface Props
Interface props are infrastructure abstractions provided by the Pipedream platform. They declare how a source is invoked — via HTTP request, run on a schedule, etc. — and therefore define the shape of the events it processes.
| Interface Type | Description |
| ------------------------------------------------- | --------------------------------------------------------------- |
| [Timer](/docs/components/contributing/api/#timer) | Invoke your source on an interval or based on a cron expression |
| [HTTP](/docs/components/contributing/api/#http) | Invoke your source on HTTP requests |
#### Timer
To use the timer interface, declare a prop whose value is the string `$.interface.timer`:
**Definition**
```javascript
props: {
myPropName: {
type: "$.interface.timer",
default: {},
},
}
```
| Property | Type | Required? | Description |
| --------- | -------- | --------- | ------------------------------------------------------------------------------------------------------------------------- |
| `type` | `string` | required | Must be set to `$.interface.timer` |
| `default` | `object` | optional | **Define a default interval** `{ intervalSeconds: 60, },` **Define a default cron expression** `{ cron: "0 0 * * *", },` |
**Usage**
| Code | Description | Read Scope | Write Scope |
| ----------------- | ------------------------------------------------------------------------------------------------------------------------------------------ | ------------------------- | ------------------------------------------------------------------------------------------- |
| `this.myPropName` | Returns the type of interface configured (e.g., `{ type: '$.interface.timer' }`) | `run()` `hooks` `methods` | n/a (interface props may only be modified on component deploy or update via UI, CLI or API) |
| `event` | Returns an object with the execution timestamp and interface configuration (e.g., `{ "timestamp": 1593937896, "interval_seconds": 3600 }`) | `run(event)` | n/a (interface props may only be modified on source deploy or update via UI, CLI or API) |
**Example**
Following is a basic example of a source that is triggered by a `$.interface.timer` and has default defined as a cron expression.
```javascript
export default {
name: "Cron Example",
version: "0.1",
props: {
timer: {
type: "$.interface.timer",
default: {
cron: "0 0 * * *", // Run job once a day
},
},
},
async run() {
console.log("hello world!");
},
};
```
Following is an example source that’s triggered by a `$.interface.timer` and has a `default` interval defined.
```javascript
export default {
name: "Interval Example",
version: "0.1",
props: {
timer: {
type: "$.interface.timer",
default: {
intervalSeconds: 60 * 60 * 24, // Run job once a day
},
},
},
async run() {
console.log("hello world!");
},
};
```
##### HTTP
To use the HTTP interface, declare a prop whose value is the string `$.interface.http`:
```javascript
props: {
myPropName: {
type: "$.interface.http",
customResponse: true, // optional: defaults to false
},
}
```
**Definition**
| Property | Type | Required? | Description |
| --------- | -------- | --------- | ------------------------------------------------------------------------------------------------------------ |
| `type` | `string` | required | Must be set to `$.interface.http` |
| `respond` | `method` | required | The HTTP interface exposes a `respond()` method that lets your component issue HTTP responses to the client. |
**Usage**
| Code | Description | Read Scope | Write Scope |
| --------------------------- | --------------------------------------------------------------------------------------------------------------------------------------- | ------------------------- | ----------------------------------------------------------------------------------------------------------------------------- |
| `this.myPropName` | Returns an object with the unique endpoint URL generated by Pipedream (e.g., `{ endpoint: 'https://abcde.m.pipedream.net' }`) | `run()` `hooks` `methods` | n/a (interface props may only be modified on source deploy or update via UI, CLI or API) |
| `event` | Returns an object representing the HTTP request (e.g., `{ method: 'POST', path: '/', query: {}, headers: {}, bodyRaw: '', body: {}, }`) | `run(event)` | The shape of `event` corresponds with the the HTTP request you make to the endpoint generated by Pipedream for this interface |
| `this.myPropName.respond()` | Returns an HTTP response to the client (e.g., `this.http.respond({status: 200})`). | n/a | `run()` |
###### Responding to HTTP requests
The HTTP interface exposes a `respond()` method that lets your source issue HTTP responses. You may run `this.http.respond()` to respond to the client from the `run()` method of a source. In this case you should also pass the `customResponse: true` parameter to the prop.
| Property | Type | Required? | Description |
| --------- | -------------------------- | --------- | ------------------------------------------------------------------------------------------------------------------------------ |
| `status` | `integer` | required | An integer representing the HTTP status code. Return `200` to indicate success. Standard status codes range from `100` - `599` |
| `headers` | `object` | optional | Return custom key-value pairs in the HTTP response |
| `body` | `string` `object` `buffer` | optional | Return a custom body in the HTTP response. This can be any string, object, or Buffer. |
###### HTTP Event Shape
Following is the shape of the event passed to the `run()` method of your source:
```javascript
{
method: 'POST',
path: '/',
query: {},
headers: {},
bodyRaw: '',
body:
}
```
**Example**
Following is an example source that’s triggered by `$.interface.http` and returns `{ 'msg': 'hello world!' }` in the HTTP response. On deploy, Pipedream will generate a unique URL for this source:
```javascript
export default {
name: "HTTP Example",
version: "0.0.1",
props: {
http: {
type: "$.interface.http",
customResponse: true,
},
},
async run(event) {
this.http.respond({
status: 200,
body: {
msg: "hello world!",
},
headers: {
"content-type": "application/json",
},
});
console.log(event);
},
};
```
#### Service Props
| Service | Description |
| ------- | ---------------------------------------------------------------------------------------------------- |
| *DB* | Provides access to a simple, component-specific key-value store to maintain state across executions. |
##### DB
**Definition**
```javascript
props: {
myPropName: "$.service.db",
}
```
**Usage**
| Code | Description | Read Scope | Write Scope |
| ----------------------------------- | -------------------------------------------------------------------------------------------- | ------------------------------------- | -------------------------------------- |
| `this.myPropName.get('key')` | Method to get a previously set value for a key. Returns `undefined` if a key does not exist. | `run()` `hooks` `methods` | Use the `set()` method to write values |
| `this.myPropName.set('key', value)` | Method to set a value for a key. Values must be JSON-serializable data. | Use the `get()` method to read values | `run()` `hooks` `methods` |
#### App Props
App props are normally defined in an [app file](/docs/components/contributing/guidelines/#app-files), separate from individual components. See [the `components/` directory of the pipedream GitHub repo](https://github.com/PipedreamHQ/pipedream/tree/master/components) for example app files.
**Definition**
```javascript
props: {
myPropName: {
type: "app",
app: "",
propDefinitions: {}
methods: {},
},
},
```
| Property | Type | Required? | Description |
| ----------------- | -------- | --------- | ------------------------------------------------------------------------------------------------------------------------------------------------------------------------------------------------------------------------------------------------------------------------------------------------------------------------------------------------------------------------------------------------------------------------------------------------------------------------------------------------------------------------------------------------------------------------------------------------------------------------------------------------------------------------------------------------------- |
| `type` | `string` | required | Value must be `app` |
| `app` | `string` | required | Value must be set to the name slug for an app registered on Pipedream. [App files](/docs/components/contributing/guidelines/#app-files) are programmatically generated for all integrated apps on Pipedream. To find your app’s slug, visit the `components` directory of [the Pipedream GitHub repo](https://github.com/PipedreamHQ/pipedream/tree/master/components), find the app file (the file that ends with `.app.mjs`), and find the `app` property at the root of that module. If you don’t see an app listed, please [open an issue here](https://github.com/PipedreamHQ/pipedream/issues/new?assignees=\&labels=app%2C+enhancement\&template=app---service-integration.md\&title=%5BAPP%5D). |
| `propDefinitions` | `object` | optional | An object that contains objects with predefined user input props. See the section on User Input Props above to learn about the shapes that can be defined and how to reference in components using the `propDefinition` property |
| `methods` | `object` | optional | Define app-specific methods. Methods can be referenced within the app object context via `this` (e.g., `this.methodName()`) and within a component via `this.myAppPropName` (e.g., `this.myAppPropName.methodName()`). |
**Usage**
| Code | Description | Read Scope | Write Scope |
| --------------------------------- | ------------------------------------------------------------------------------------------------ | ----------------------------------------------- | ----------- |
| `this.$auth` | Provides access to OAuth tokens and API keys for Pipedream managed auth | **App Object:** `methods` | n/a |
| `this.myAppPropName.$auth` | Provides access to OAuth tokens and API keys for Pipedream managed auth | **Parent Component:** `run()` `hooks` `methods` | n/a |
| `this.methodName()` | Execute a common method defined for an app within the app definition (e.g., from another method) | **App Object:** `methods` | n/a |
| `this.myAppPropName.methodName()` | Execute a common method defined for an app from a component that includes the app as a prop | **Parent Component:** `run()` `hooks` `methods` | n/a |
To load dynamic props, the header prop must have the `reloadProps` field set to `true`:
```javascript
hasHeaders: {
type: "string",
label: "Does the first row of the sheet have headers?",
description: "If the first row of your document has headers we'll retrieve them to make it easy to enter the value for each column.",
options: [
"Yes",
"No",
],
reloadProps: true,
},
```
When a user chooses a value for this prop, Pipedream runs the `additionalProps` component method to render props:
```javascript
async additionalProps() {
const sheetId = this.sheetId?.value || this.sheetId;
const props = {};
if (this.hasHeaders === "Yes") {
const { values } = await this.googleSheets.getSpreadsheetValues(sheetId, `${this.sheetName}!1:1`);
if (!values[0]?.length) {
throw new ConfigurationError("Cound not find a header row. Please either add headers and click \"Refresh fields\" or adjust the action configuration to continue.");
}
for (let i = 0; i < values[0]?.length; i++) {
props[`col_${i.toString().padStart(4, "0")}`] = {
type: "string",
label: values[0][i],
optional: true,
};
}
} else if (this.hasHeaders === "No") {
props.myColumnData = {
type: "string[]",
label: "Values",
description: "Provide a value for each cell of the row. Google Sheets accepts strings, numbers and boolean values for each cell. To set a cell to an empty value, pass an empty string.",
};
}
return props;
},
```
The signature of this function is:
```javascript
async additionalProps(previousPropDefs)
```
where `previousPropDefs` are the full set of props (props merged with the previous `additionalProps`). When the function is executed, `this` is bound similar to when the `run` function is called, where you can access the values of the props as currently configured, and call any `methods`. The return value of `additionalProps` will replace any previous call, and that return value will be merged with props to define the final set of props.
Following is an example that demonstrates how to use `additionalProps` to dynamically change a prop’s `disabled` and `hidden` properties:
```javascript
async additionalProps(previousPropDefs) {
if (this.myCondition === "Yes") {
previousPropDefs.myPropName.disabled = true;
previousPropDefs.myPropName.hidden = true;
} else {
previousPropDefs.myPropName.disabled = false;
previousPropDefs.myPropName.hidden = false;
}
return previousPropDefs;
},
```
Dynamic props can have any one of the following prop types:
* `app`
* `boolean`
* `integer`
* `string`
* `object`
* `any`
* `$.interface.http`
* `$.interface.timer`
* `data_store`
* `http_request`
#### Interface Props
Interface props are infrastructure abstractions provided by the Pipedream platform. They declare how a source is invoked — via HTTP request, run on a schedule, etc. — and therefore define the shape of the events it processes.
| Interface Type | Description |
| ------------------------------------------------- | --------------------------------------------------------------- |
| [Timer](/docs/components/contributing/api/#timer) | Invoke your source on an interval or based on a cron expression |
| [HTTP](/docs/components/contributing/api/#http) | Invoke your source on HTTP requests |
#### Timer
To use the timer interface, declare a prop whose value is the string `$.interface.timer`:
**Definition**
```javascript
props: {
myPropName: {
type: "$.interface.timer",
default: {},
},
}
```
| Property | Type | Required? | Description |
| --------- | -------- | --------- | ------------------------------------------------------------------------------------------------------------------------- |
| `type` | `string` | required | Must be set to `$.interface.timer` |
| `default` | `object` | optional | **Define a default interval** `{ intervalSeconds: 60, },` **Define a default cron expression** `{ cron: "0 0 * * *", },` |
**Usage**
| Code | Description | Read Scope | Write Scope |
| ----------------- | ------------------------------------------------------------------------------------------------------------------------------------------ | ------------------------- | ------------------------------------------------------------------------------------------- |
| `this.myPropName` | Returns the type of interface configured (e.g., `{ type: '$.interface.timer' }`) | `run()` `hooks` `methods` | n/a (interface props may only be modified on component deploy or update via UI, CLI or API) |
| `event` | Returns an object with the execution timestamp and interface configuration (e.g., `{ "timestamp": 1593937896, "interval_seconds": 3600 }`) | `run(event)` | n/a (interface props may only be modified on source deploy or update via UI, CLI or API) |
**Example**
Following is a basic example of a source that is triggered by a `$.interface.timer` and has default defined as a cron expression.
```javascript
export default {
name: "Cron Example",
version: "0.1",
props: {
timer: {
type: "$.interface.timer",
default: {
cron: "0 0 * * *", // Run job once a day
},
},
},
async run() {
console.log("hello world!");
},
};
```
Following is an example source that’s triggered by a `$.interface.timer` and has a `default` interval defined.
```javascript
export default {
name: "Interval Example",
version: "0.1",
props: {
timer: {
type: "$.interface.timer",
default: {
intervalSeconds: 60 * 60 * 24, // Run job once a day
},
},
},
async run() {
console.log("hello world!");
},
};
```
##### HTTP
To use the HTTP interface, declare a prop whose value is the string `$.interface.http`:
```javascript
props: {
myPropName: {
type: "$.interface.http",
customResponse: true, // optional: defaults to false
},
}
```
**Definition**
| Property | Type | Required? | Description |
| --------- | -------- | --------- | ------------------------------------------------------------------------------------------------------------ |
| `type` | `string` | required | Must be set to `$.interface.http` |
| `respond` | `method` | required | The HTTP interface exposes a `respond()` method that lets your component issue HTTP responses to the client. |
**Usage**
| Code | Description | Read Scope | Write Scope |
| --------------------------- | --------------------------------------------------------------------------------------------------------------------------------------- | ------------------------- | ----------------------------------------------------------------------------------------------------------------------------- |
| `this.myPropName` | Returns an object with the unique endpoint URL generated by Pipedream (e.g., `{ endpoint: 'https://abcde.m.pipedream.net' }`) | `run()` `hooks` `methods` | n/a (interface props may only be modified on source deploy or update via UI, CLI or API) |
| `event` | Returns an object representing the HTTP request (e.g., `{ method: 'POST', path: '/', query: {}, headers: {}, bodyRaw: '', body: {}, }`) | `run(event)` | The shape of `event` corresponds with the the HTTP request you make to the endpoint generated by Pipedream for this interface |
| `this.myPropName.respond()` | Returns an HTTP response to the client (e.g., `this.http.respond({status: 200})`). | n/a | `run()` |
###### Responding to HTTP requests
The HTTP interface exposes a `respond()` method that lets your source issue HTTP responses. You may run `this.http.respond()` to respond to the client from the `run()` method of a source. In this case you should also pass the `customResponse: true` parameter to the prop.
| Property | Type | Required? | Description |
| --------- | -------------------------- | --------- | ------------------------------------------------------------------------------------------------------------------------------ |
| `status` | `integer` | required | An integer representing the HTTP status code. Return `200` to indicate success. Standard status codes range from `100` - `599` |
| `headers` | `object` | optional | Return custom key-value pairs in the HTTP response |
| `body` | `string` `object` `buffer` | optional | Return a custom body in the HTTP response. This can be any string, object, or Buffer. |
###### HTTP Event Shape
Following is the shape of the event passed to the `run()` method of your source:
```javascript
{
method: 'POST',
path: '/',
query: {},
headers: {},
bodyRaw: '',
body:
}
```
**Example**
Following is an example source that’s triggered by `$.interface.http` and returns `{ 'msg': 'hello world!' }` in the HTTP response. On deploy, Pipedream will generate a unique URL for this source:
```javascript
export default {
name: "HTTP Example",
version: "0.0.1",
props: {
http: {
type: "$.interface.http",
customResponse: true,
},
},
async run(event) {
this.http.respond({
status: 200,
body: {
msg: "hello world!",
},
headers: {
"content-type": "application/json",
},
});
console.log(event);
},
};
```
#### Service Props
| Service | Description |
| ------- | ---------------------------------------------------------------------------------------------------- |
| *DB* | Provides access to a simple, component-specific key-value store to maintain state across executions. |
##### DB
**Definition**
```javascript
props: {
myPropName: "$.service.db",
}
```
**Usage**
| Code | Description | Read Scope | Write Scope |
| ----------------------------------- | -------------------------------------------------------------------------------------------- | ------------------------------------- | -------------------------------------- |
| `this.myPropName.get('key')` | Method to get a previously set value for a key. Returns `undefined` if a key does not exist. | `run()` `hooks` `methods` | Use the `set()` method to write values |
| `this.myPropName.set('key', value)` | Method to set a value for a key. Values must be JSON-serializable data. | Use the `get()` method to read values | `run()` `hooks` `methods` |
#### App Props
App props are normally defined in an [app file](/docs/components/contributing/guidelines/#app-files), separate from individual components. See [the `components/` directory of the pipedream GitHub repo](https://github.com/PipedreamHQ/pipedream/tree/master/components) for example app files.
**Definition**
```javascript
props: {
myPropName: {
type: "app",
app: "",
propDefinitions: {}
methods: {},
},
},
```
| Property | Type | Required? | Description |
| ----------------- | -------- | --------- | ------------------------------------------------------------------------------------------------------------------------------------------------------------------------------------------------------------------------------------------------------------------------------------------------------------------------------------------------------------------------------------------------------------------------------------------------------------------------------------------------------------------------------------------------------------------------------------------------------------------------------------------------------------------------------------------------------- |
| `type` | `string` | required | Value must be `app` |
| `app` | `string` | required | Value must be set to the name slug for an app registered on Pipedream. [App files](/docs/components/contributing/guidelines/#app-files) are programmatically generated for all integrated apps on Pipedream. To find your app’s slug, visit the `components` directory of [the Pipedream GitHub repo](https://github.com/PipedreamHQ/pipedream/tree/master/components), find the app file (the file that ends with `.app.mjs`), and find the `app` property at the root of that module. If you don’t see an app listed, please [open an issue here](https://github.com/PipedreamHQ/pipedream/issues/new?assignees=\&labels=app%2C+enhancement\&template=app---service-integration.md\&title=%5BAPP%5D). |
| `propDefinitions` | `object` | optional | An object that contains objects with predefined user input props. See the section on User Input Props above to learn about the shapes that can be defined and how to reference in components using the `propDefinition` property |
| `methods` | `object` | optional | Define app-specific methods. Methods can be referenced within the app object context via `this` (e.g., `this.methodName()`) and within a component via `this.myAppPropName` (e.g., `this.myAppPropName.methodName()`). |
**Usage**
| Code | Description | Read Scope | Write Scope |
| --------------------------------- | ------------------------------------------------------------------------------------------------ | ----------------------------------------------- | ----------- |
| `this.$auth` | Provides access to OAuth tokens and API keys for Pipedream managed auth | **App Object:** `methods` | n/a |
| `this.myAppPropName.$auth` | Provides access to OAuth tokens and API keys for Pipedream managed auth | **Parent Component:** `run()` `hooks` `methods` | n/a |
| `this.methodName()` | Execute a common method defined for an app within the app definition (e.g., from another method) | **App Object:** `methods` | n/a |
| `this.myAppPropName.methodName()` | Execute a common method defined for an app from a component that includes the app as a prop | **Parent Component:** `run()` `hooks` `methods` | n/a |
 #### Limits on props
When a user configures a prop with a value, it can hold at most {CONFIGURED_PROPS_SIZE_LIMIT} data. Consider this when accepting large input in these fields (such as a base64 string).
The {CONFIGURED_PROPS_SIZE_LIMIT} limit applies only to static values entered as raw text. In workflows, users can pass expressions (referencing data in a prior step). In that case the prop value is simply the text of the expression, for example `{{steps.nodejs.$return_value}}`, well below the limit. The value of these expressions is evaluated at runtime, and are subject to [different limits](/docs/workflows/limits/).
### Methods
You can define helper functions within the `methods` property of your component. You have access to these functions within the [`run` method](/docs/components/contributing/api/#run), or within other methods.
Methods can be accessed using `this.
#### Limits on props
When a user configures a prop with a value, it can hold at most {CONFIGURED_PROPS_SIZE_LIMIT} data. Consider this when accepting large input in these fields (such as a base64 string).
The {CONFIGURED_PROPS_SIZE_LIMIT} limit applies only to static values entered as raw text. In workflows, users can pass expressions (referencing data in a prior step). In that case the prop value is simply the text of the expression, for example `{{steps.nodejs.$return_value}}`, well below the limit. The value of these expressions is evaluated at runtime, and are subject to [different limits](/docs/workflows/limits/).
### Methods
You can define helper functions within the `methods` property of your component. You have access to these functions within the [`run` method](/docs/components/contributing/api/#run), or within other methods.
Methods can be accessed using `this.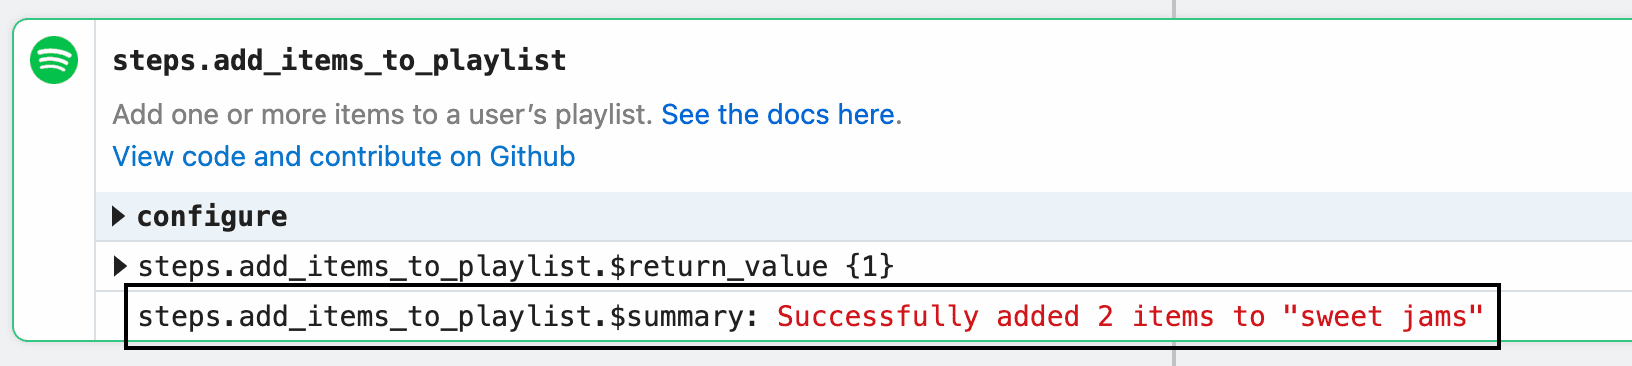 Example implementation:
```javascript
const data = [1, 2];
const playlistName = "Cool jams";
$.export(
"$summary",
`Successfully added ${data.length} ${
data.length == 1 ? "item" : "items"
} to "${playlistName}"`
);
```
##### `$.send`
`$.send` allows you to send data to [Pipedream destinations](/docs/workflows/data-management/destinations/).
**`$.send.http`**
[See the HTTP destination docs](/docs/workflows/data-management/destinations/http/#using-sendhttp-in-component-actions).
**`$.send.email`**
[See the Email destination docs](/docs/workflows/data-management/destinations/email/#using-sendemail-in-component-actions).
**`$.send.s3`**
[See the S3 destination docs](/docs/workflows/data-management/destinations/s3/#using-sends3-in-component-actions).
**`$.send.emit`**
[See the Emit destination docs](/docs/workflows/data-management/destinations/emit/#using-sendemit-in-component-actions).
**`$.send.sse`**
[See the SSE destination docs](/docs/workflows/data-management/destinations/sse/#using-sendsse-in-component-actions).
##### `$.context`
`$.context` exposes [the same properties as `steps.trigger.context`](/docs/workflows/building-workflows/triggers/#stepstriggercontext), and more. Action authors can use it to get context about the calling workflow and the execution.
All properties from [`steps.trigger.context`](/docs/workflows/building-workflows/triggers/#stepstriggercontext) are exposed, as well as:
| Property | Description |
| ---------- | ------------------------------------------------------------------------------------------------------------------------------------------------------------------------------- |
| `deadline` | An epoch millisecond timestamp marking the point when the workflow is configured to [timeout](/docs/workflows/limits/#time-per-execution). |
| `JIT` | Stands for “just in time” (environment). `true` if the user is testing the step, `false` if the step is running in production. |
| `run` | An object containing metadata about the current run number. See [the docs on `$.flow.rerun`](/docs/workflows/building-workflows/triggers/#stepstriggercontext) for more detail. |
### Environment variables
[Environment variables](/docs/workflows/environment-variables/) are not accessible within sources or actions directly. Since components can be used by anyone, you cannot guarantee that a user will have a specific variable set in their environment.
In sources, you can use [`secret` props](/docs/components/contributing/api/#props) to reference sensitive data.
In actions, you’ll see a list of your environment variables in the object explorer when selecting a variable to pass to a step:
### Using npm packages
To use an npm package in a component, just require it. There is no `package.json` or `npm install` required.
```javascript
import axios from "axios";
```
When you deploy a component, Pipedream downloads the latest versions of these packages and bundles them with your deployment.
Some packages that rely on large dependencies or on unbundled binaries — may not work on Pipedream. Please [reach out](https://pipedream.com/support) if you encounter a specific issue.
#### Referencing a specific version of a package
*This currently applies only to sources*.
If you’d like to use a *specific* version of a package in a source, you can add that version in the `require` string, for example: `require("axios@0.19.2")`. Moreover, you can pass the same version specifiers that npm and other tools allow to specify allowed [semantic version](https://semver.org/) upgrades. For example:
* To allow for future patch version upgrades, use `require("axios@~0.20.0")`
* To allow for patch and minor version upgrades, use `require("axios@^0.20.0")`
## Managing Components
Sources and actions are developed and deployed in different ways, given the different functions they serve in the product.
* [Managing Sources](/docs/components/contributing/api/#managing-sources)
* [Managing Actions](/docs/components/contributing/api/#managing-actions)
### Managing Sources
#### CLI - Development Mode
***
The easiest way to develop and test sources is with the `pd dev` command. `pd dev` deploys a local file, attaches it to a component, and automatically updates the component on each local save. To deploy a new component with `pd dev`, run:
```
pd dev
Example implementation:
```javascript
const data = [1, 2];
const playlistName = "Cool jams";
$.export(
"$summary",
`Successfully added ${data.length} ${
data.length == 1 ? "item" : "items"
} to "${playlistName}"`
);
```
##### `$.send`
`$.send` allows you to send data to [Pipedream destinations](/docs/workflows/data-management/destinations/).
**`$.send.http`**
[See the HTTP destination docs](/docs/workflows/data-management/destinations/http/#using-sendhttp-in-component-actions).
**`$.send.email`**
[See the Email destination docs](/docs/workflows/data-management/destinations/email/#using-sendemail-in-component-actions).
**`$.send.s3`**
[See the S3 destination docs](/docs/workflows/data-management/destinations/s3/#using-sends3-in-component-actions).
**`$.send.emit`**
[See the Emit destination docs](/docs/workflows/data-management/destinations/emit/#using-sendemit-in-component-actions).
**`$.send.sse`**
[See the SSE destination docs](/docs/workflows/data-management/destinations/sse/#using-sendsse-in-component-actions).
##### `$.context`
`$.context` exposes [the same properties as `steps.trigger.context`](/docs/workflows/building-workflows/triggers/#stepstriggercontext), and more. Action authors can use it to get context about the calling workflow and the execution.
All properties from [`steps.trigger.context`](/docs/workflows/building-workflows/triggers/#stepstriggercontext) are exposed, as well as:
| Property | Description |
| ---------- | ------------------------------------------------------------------------------------------------------------------------------------------------------------------------------- |
| `deadline` | An epoch millisecond timestamp marking the point when the workflow is configured to [timeout](/docs/workflows/limits/#time-per-execution). |
| `JIT` | Stands for “just in time” (environment). `true` if the user is testing the step, `false` if the step is running in production. |
| `run` | An object containing metadata about the current run number. See [the docs on `$.flow.rerun`](/docs/workflows/building-workflows/triggers/#stepstriggercontext) for more detail. |
### Environment variables
[Environment variables](/docs/workflows/environment-variables/) are not accessible within sources or actions directly. Since components can be used by anyone, you cannot guarantee that a user will have a specific variable set in their environment.
In sources, you can use [`secret` props](/docs/components/contributing/api/#props) to reference sensitive data.
In actions, you’ll see a list of your environment variables in the object explorer when selecting a variable to pass to a step:
### Using npm packages
To use an npm package in a component, just require it. There is no `package.json` or `npm install` required.
```javascript
import axios from "axios";
```
When you deploy a component, Pipedream downloads the latest versions of these packages and bundles them with your deployment.
Some packages that rely on large dependencies or on unbundled binaries — may not work on Pipedream. Please [reach out](https://pipedream.com/support) if you encounter a specific issue.
#### Referencing a specific version of a package
*This currently applies only to sources*.
If you’d like to use a *specific* version of a package in a source, you can add that version in the `require` string, for example: `require("axios@0.19.2")`. Moreover, you can pass the same version specifiers that npm and other tools allow to specify allowed [semantic version](https://semver.org/) upgrades. For example:
* To allow for future patch version upgrades, use `require("axios@~0.20.0")`
* To allow for patch and minor version upgrades, use `require("axios@^0.20.0")`
## Managing Components
Sources and actions are developed and deployed in different ways, given the different functions they serve in the product.
* [Managing Sources](/docs/components/contributing/api/#managing-sources)
* [Managing Actions](/docs/components/contributing/api/#managing-actions)
### Managing Sources
#### CLI - Development Mode
***
The easiest way to develop and test sources is with the `pd dev` command. `pd dev` deploys a local file, attaches it to a component, and automatically updates the component on each local save. To deploy a new component with `pd dev`, run:
```
pd dev 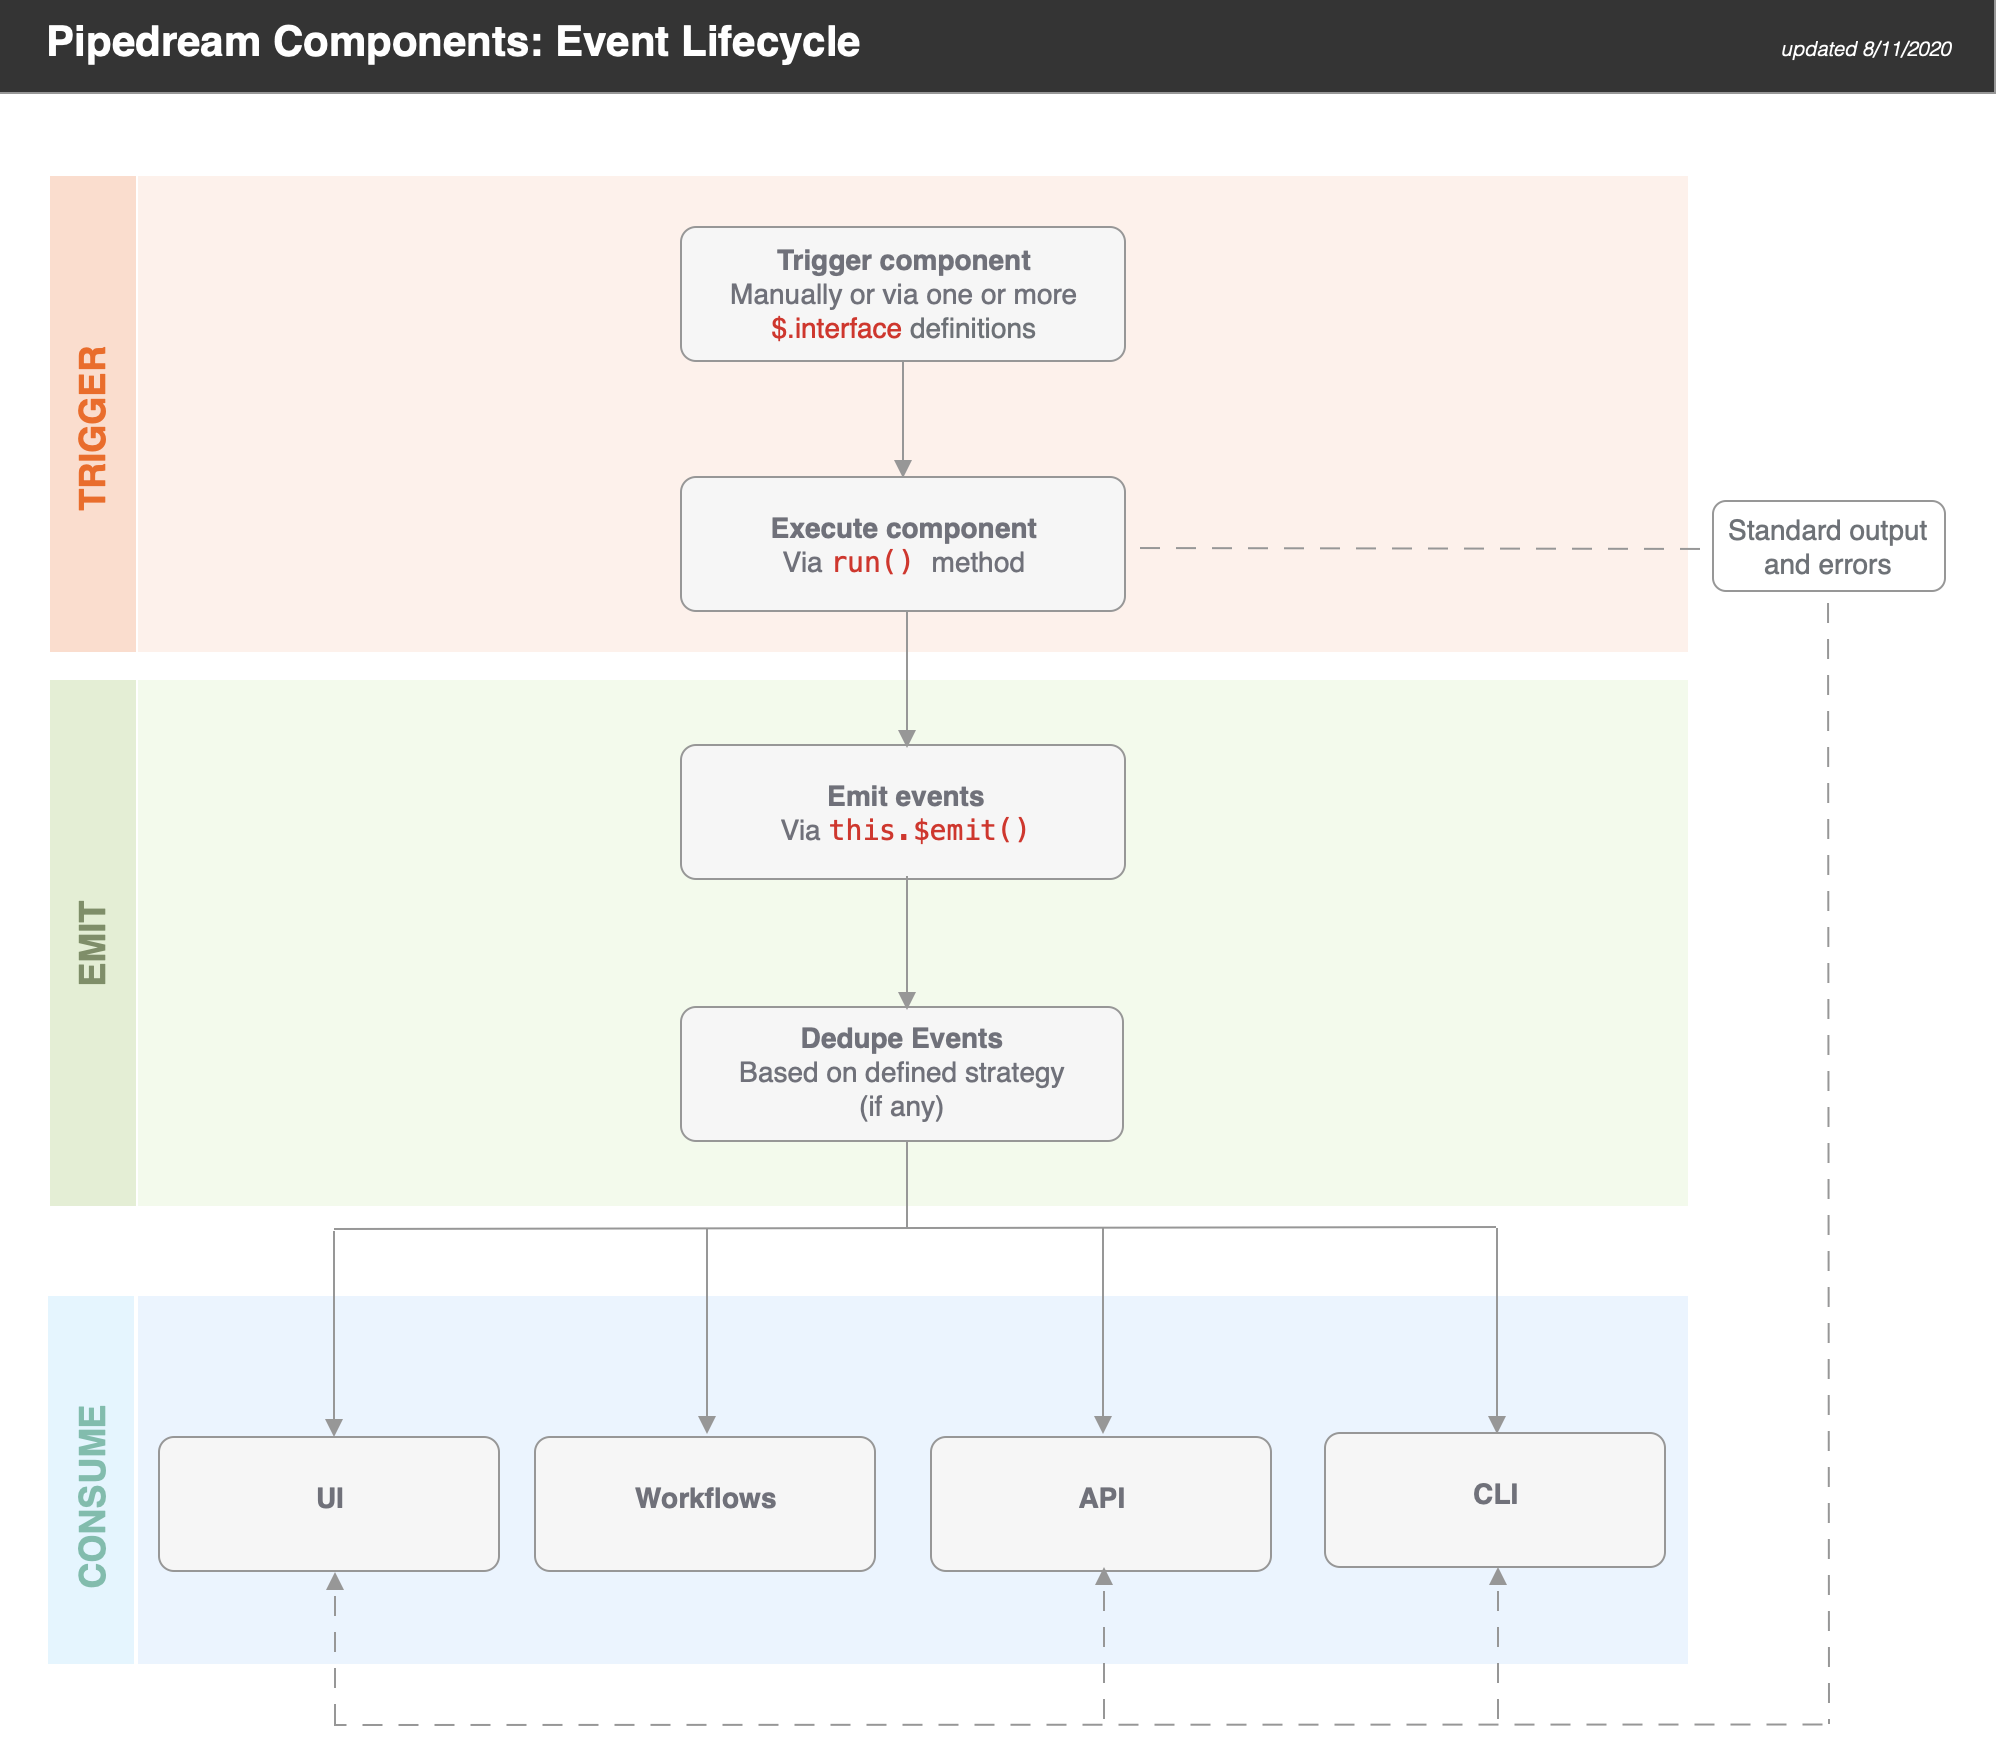 ### Triggering Sources
Sources are triggered when you manually run them (e.g., via the **RUN NOW** button in the UI) or when one of their [interfaces](/docs/components/contributing/api/#interface-props) is triggered. Pipedream sources currently support **HTTP** and **Timer** interfaces.
When a source is triggered, the `run()` method of the component is executed. Standard output and errors are surfaced in the **Logs** tab.
### Emitting Events from Sources
Sources can emit events via `this.$emit()`. If you define a [dedupe strategy](/docs/components/contributing/api/#dedupe-strategies) for a source, Pipedream automatically dedupes the events you emit.
> **TIP:** if you want to use a dedupe strategy, be sure to pass an `id` for each event. Pipedream uses this value for deduping purposes.
### Consuming Events from Sources
Pipedream makes it easy to consume events via:
* The UI
* Workflows
* APIs
* CLI
#### UI
When you navigate to your source [in the UI](https://pipedream.com/sources), you’ll be able to select and inspect the most recent 100 events (i.e., an event bin). For example, if you send requests to a simple HTTP source, you will be able to inspect the events (i.e., a request bin).
#### Workflows
[Trigger hosted Node.js workflows](/docs/workflows/building-workflows/) on each event. Integrate with 2,700+ apps including Google Sheets, Discord, Slack, AWS, and more!
#### API
Events can be retrieved using the [REST API](/docs/rest-api/) or [SSE stream tied to your component](/docs/workflows/data-management/destinations/sse/). This makes it easy to retrieve data processed by your component from another app. Typically, you’ll want to use the [REST API](/docs/rest-api/) to retrieve events in batch, and connect to the [SSE stream](/docs/workflows/data-management/destinations/sse/) to process them in real time.
#### CLI
Use the `pd events` command to retrieve the last 10 events via the CLI:
```
pd events -n 10
### Triggering Sources
Sources are triggered when you manually run them (e.g., via the **RUN NOW** button in the UI) or when one of their [interfaces](/docs/components/contributing/api/#interface-props) is triggered. Pipedream sources currently support **HTTP** and **Timer** interfaces.
When a source is triggered, the `run()` method of the component is executed. Standard output and errors are surfaced in the **Logs** tab.
### Emitting Events from Sources
Sources can emit events via `this.$emit()`. If you define a [dedupe strategy](/docs/components/contributing/api/#dedupe-strategies) for a source, Pipedream automatically dedupes the events you emit.
> **TIP:** if you want to use a dedupe strategy, be sure to pass an `id` for each event. Pipedream uses this value for deduping purposes.
### Consuming Events from Sources
Pipedream makes it easy to consume events via:
* The UI
* Workflows
* APIs
* CLI
#### UI
When you navigate to your source [in the UI](https://pipedream.com/sources), you’ll be able to select and inspect the most recent 100 events (i.e., an event bin). For example, if you send requests to a simple HTTP source, you will be able to inspect the events (i.e., a request bin).
#### Workflows
[Trigger hosted Node.js workflows](/docs/workflows/building-workflows/) on each event. Integrate with 2,700+ apps including Google Sheets, Discord, Slack, AWS, and more!
#### API
Events can be retrieved using the [REST API](/docs/rest-api/) or [SSE stream tied to your component](/docs/workflows/data-management/destinations/sse/). This makes it easy to retrieve data processed by your component from another app. Typically, you’ll want to use the [REST API](/docs/rest-api/) to retrieve events in batch, and connect to the [SSE stream](/docs/workflows/data-management/destinations/sse/) to process them in real time.
#### CLI
Use the `pd events` command to retrieve the last 10 events via the CLI:
```
pd events -n 10  * The “Search Term” prop for Twitter includes a description that helps the user understand what values they can enter, with specific values highlighted using backticks and links to external content.
 ### Optional vs Required Props
Use optional [props](/docs/components/contributing/api/#user-input-props) whenever possible to minimize the input fields required to use a component.
For example, the Twitter search mentions source only requires that a user connect their account and enter a search term. The remaining fields are optional for users who want to filter the results, but they do not require any action to activate the source:
### Optional vs Required Props
Use optional [props](/docs/components/contributing/api/#user-input-props) whenever possible to minimize the input fields required to use a component.
For example, the Twitter search mentions source only requires that a user connect their account and enter a search term. The remaining fields are optional for users who want to filter the results, but they do not require any action to activate the source:
 ### Default Values
Provide [default values](/docs/components/contributing/api/#user-input-props) whenever possible. NOTE: the best default for a source doesn’t always map to the default recommended by the app. For example, Twitter defaults search results to an algorithm that balances recency and popularity. However, the best default for the use case on Pipedream is recency.
### Async Options
Avoid asking users to enter ID values. Use [async options](/docs/components/contributing/api/#async-options-example) (with label/value definitions) so users can make selections from a drop down menu. For example, Todoist identifies projects by numeric IDs (e.g., 12345). The async option to select a project displays the name of the project as the label, so that’s the value the user sees when interacting with the source (e.g., “My Project”). The code referencing the selection receives the numeric ID (12345).
Async options should also support [pagination](/docs/components/contributing/api/#async-options-example) (so users can navigate across multiple pages of options for long lists). See [Hubspot](https://github.com/PipedreamHQ/pipedream/blob/a9b45d8be3b84504dc22bb2748d925f0d5c1541f/components/hubspot/hubspot.app.mjs#L136) for an example of offset-based pagination. See [Twitter](https://github.com/PipedreamHQ/pipedream/blob/d240752028e2a17f7cca1a512b40725566ea97bd/components/twitter/twitter.app.mjs#L200) for an example of cursor-based pagination.
### Dynamic Props
[Dynamic props](/docs/components/contributing/api/#dynamic-props) can improve the user experience for components. They let you render props in Pipedream dynamically, based on the value of other props, and can be used to collect more specific information that can make it easier to use the component. See the Google Sheets example in the linked component API docs.
### Interface & Service Props
In the interest of consistency, use the following naming patterns when defining [interface](/docs/components/contributing/api/#interface-props) and [service](/docs/components/contributing/api/#service-props) props in source components:
| Prop | **Recommended Prop Variable Name** |
| ------------------- | ---------------------------------- |
| `$.interface.http` | `http` |
| `$.interface.timer` | `timer` |
| `$.service.db` | `db` |
Use getters and setters when dealing with `$.service.db` to avoid potential typos and leverage encapsulation (e.g., see the [Search Mentions](https://github.com/PipedreamHQ/pipedream/blob/master/components/twitter/sources/search-mentions/search-mentions.mjs#L83-L88) event source for Twitter).
## Source Guidelines
These guidelines are specific to [source](/docs/workflows/building-workflows/triggers/) development.
### Webhook vs Polling Sources
Create subscription webhooks sources (vs polling sources) whenever possible. Webhook sources receive/emit events in real-time and typically use less compute time from the user’s account. Note: In some cases, it may be appropriate to support webhook and polling sources for the same event. For example, Calendly supports subscription webhooks for their premium users, but non-premium users are limited to the REST API. A webhook source can be created to emit new Calendly events for premium users, and a polling source can be created to support similar functionality for non-premium users.
### Source Name
Source name should be a singular, title-cased name and should start with “New” (unless emits are not limited to new items). Name should not be slugified and should not include the app name. NOTE: Pipedream does not currently distinguish real-time event sources for end-users automatically. The current pattern to identify a real-time event source is to include “(Instant)” in the source name. E.g., “New Search Mention” or “New Submission (Instant)”.
### Source Description
Enter a short description that provides more detail than the name alone. Typically starts with “Emit new”. E.g., “Emit new Tweets that matches your search criteria”.
### Emit a Summary
Always [emit a summary](/docs/components/contributing/api/#emit) for each event. For example, the summary for each new Tweet emitted by the Search Mentions source is the content of the Tweet itself.
If no sensible summary can be identified, submit the event payload in string format as the summary.
### Deduping
Use built-in [deduping strategies](/docs/components/contributing/api/#dedupe-strategies) whenever possible (`unique`, `greatest`, `last`) vs developing custom deduping code. Develop custom deduping code if the existing strategies do not support the requirements for a source.
### Surfacing Test Events
In order to provide users with source events that they can immediately reference when building their workflow, we should implement 2 strategies whenever possible:
#### Emit Events on First Run
* Polling sources should always emit events on the first run (see the [Spotify: New Playlist](https://github.com/PipedreamHQ/pipedream/blob/master/components/spotify/sources/new-playlist/new-playlist.mjs) source as an example)
* Webhook-based sources should attempt to fetch existing events in the `deploy()` hook during source creation (see the [Jotform: New Submission](https://github.com/PipedreamHQ/pipedream/blob/master/components/jotform/sources/new-submission/new-submission.mjs) source)
*Note – make sure to emit the most recent events (considering pagination), and limit the count to no more than 50 events.*
#### Include a Static Sample Event
There are times where there may not be any historical events available (think about sources that emit less frequently, like “New Customer” or “New Order”, etc). In these cases, we should include a static sample event so users can see the event shape and reference it while building their workflow, even if it’s using fake data.
To achieve this, follow these steps:
1. Copy the JSON output from the source’s emit (what you get from `steps.trigger.event`) and **make sure to remove or scrub any sensitive or personal data** (you can also copy this from the app’s API docs)
2. Add a new file called `test-event.mjs` in the same directory as the component source and export the JSON event via `export default` ([example](https://github.com/PipedreamHQ/pipedream/blob/master/components/jotform/sources/new-submission/test-event.mjs))
3. In the source component code, make sure to import that file as `sampleEmit` ([example](https://github.com/PipedreamHQ/pipedream/blob/master/components/jotform/sources/new-submission/new-submission.mjs#L2))
4. And finally, export the `sampleEmit` object ([example](https://github.com/PipedreamHQ/pipedream/blob/master/components/jotform/sources/new-submission/new-submission.mjs#L96))
This will render a “Generate Test Event” button in the UI for users to emit that sample event:
### Default Values
Provide [default values](/docs/components/contributing/api/#user-input-props) whenever possible. NOTE: the best default for a source doesn’t always map to the default recommended by the app. For example, Twitter defaults search results to an algorithm that balances recency and popularity. However, the best default for the use case on Pipedream is recency.
### Async Options
Avoid asking users to enter ID values. Use [async options](/docs/components/contributing/api/#async-options-example) (with label/value definitions) so users can make selections from a drop down menu. For example, Todoist identifies projects by numeric IDs (e.g., 12345). The async option to select a project displays the name of the project as the label, so that’s the value the user sees when interacting with the source (e.g., “My Project”). The code referencing the selection receives the numeric ID (12345).
Async options should also support [pagination](/docs/components/contributing/api/#async-options-example) (so users can navigate across multiple pages of options for long lists). See [Hubspot](https://github.com/PipedreamHQ/pipedream/blob/a9b45d8be3b84504dc22bb2748d925f0d5c1541f/components/hubspot/hubspot.app.mjs#L136) for an example of offset-based pagination. See [Twitter](https://github.com/PipedreamHQ/pipedream/blob/d240752028e2a17f7cca1a512b40725566ea97bd/components/twitter/twitter.app.mjs#L200) for an example of cursor-based pagination.
### Dynamic Props
[Dynamic props](/docs/components/contributing/api/#dynamic-props) can improve the user experience for components. They let you render props in Pipedream dynamically, based on the value of other props, and can be used to collect more specific information that can make it easier to use the component. See the Google Sheets example in the linked component API docs.
### Interface & Service Props
In the interest of consistency, use the following naming patterns when defining [interface](/docs/components/contributing/api/#interface-props) and [service](/docs/components/contributing/api/#service-props) props in source components:
| Prop | **Recommended Prop Variable Name** |
| ------------------- | ---------------------------------- |
| `$.interface.http` | `http` |
| `$.interface.timer` | `timer` |
| `$.service.db` | `db` |
Use getters and setters when dealing with `$.service.db` to avoid potential typos and leverage encapsulation (e.g., see the [Search Mentions](https://github.com/PipedreamHQ/pipedream/blob/master/components/twitter/sources/search-mentions/search-mentions.mjs#L83-L88) event source for Twitter).
## Source Guidelines
These guidelines are specific to [source](/docs/workflows/building-workflows/triggers/) development.
### Webhook vs Polling Sources
Create subscription webhooks sources (vs polling sources) whenever possible. Webhook sources receive/emit events in real-time and typically use less compute time from the user’s account. Note: In some cases, it may be appropriate to support webhook and polling sources for the same event. For example, Calendly supports subscription webhooks for their premium users, but non-premium users are limited to the REST API. A webhook source can be created to emit new Calendly events for premium users, and a polling source can be created to support similar functionality for non-premium users.
### Source Name
Source name should be a singular, title-cased name and should start with “New” (unless emits are not limited to new items). Name should not be slugified and should not include the app name. NOTE: Pipedream does not currently distinguish real-time event sources for end-users automatically. The current pattern to identify a real-time event source is to include “(Instant)” in the source name. E.g., “New Search Mention” or “New Submission (Instant)”.
### Source Description
Enter a short description that provides more detail than the name alone. Typically starts with “Emit new”. E.g., “Emit new Tweets that matches your search criteria”.
### Emit a Summary
Always [emit a summary](/docs/components/contributing/api/#emit) for each event. For example, the summary for each new Tweet emitted by the Search Mentions source is the content of the Tweet itself.
If no sensible summary can be identified, submit the event payload in string format as the summary.
### Deduping
Use built-in [deduping strategies](/docs/components/contributing/api/#dedupe-strategies) whenever possible (`unique`, `greatest`, `last`) vs developing custom deduping code. Develop custom deduping code if the existing strategies do not support the requirements for a source.
### Surfacing Test Events
In order to provide users with source events that they can immediately reference when building their workflow, we should implement 2 strategies whenever possible:
#### Emit Events on First Run
* Polling sources should always emit events on the first run (see the [Spotify: New Playlist](https://github.com/PipedreamHQ/pipedream/blob/master/components/spotify/sources/new-playlist/new-playlist.mjs) source as an example)
* Webhook-based sources should attempt to fetch existing events in the `deploy()` hook during source creation (see the [Jotform: New Submission](https://github.com/PipedreamHQ/pipedream/blob/master/components/jotform/sources/new-submission/new-submission.mjs) source)
*Note – make sure to emit the most recent events (considering pagination), and limit the count to no more than 50 events.*
#### Include a Static Sample Event
There are times where there may not be any historical events available (think about sources that emit less frequently, like “New Customer” or “New Order”, etc). In these cases, we should include a static sample event so users can see the event shape and reference it while building their workflow, even if it’s using fake data.
To achieve this, follow these steps:
1. Copy the JSON output from the source’s emit (what you get from `steps.trigger.event`) and **make sure to remove or scrub any sensitive or personal data** (you can also copy this from the app’s API docs)
2. Add a new file called `test-event.mjs` in the same directory as the component source and export the JSON event via `export default` ([example](https://github.com/PipedreamHQ/pipedream/blob/master/components/jotform/sources/new-submission/test-event.mjs))
3. In the source component code, make sure to import that file as `sampleEmit` ([example](https://github.com/PipedreamHQ/pipedream/blob/master/components/jotform/sources/new-submission/new-submission.mjs#L2))
4. And finally, export the `sampleEmit` object ([example](https://github.com/PipedreamHQ/pipedream/blob/master/components/jotform/sources/new-submission/new-submission.mjs#L96))
This will render a “Generate Test Event” button in the UI for users to emit that sample event:
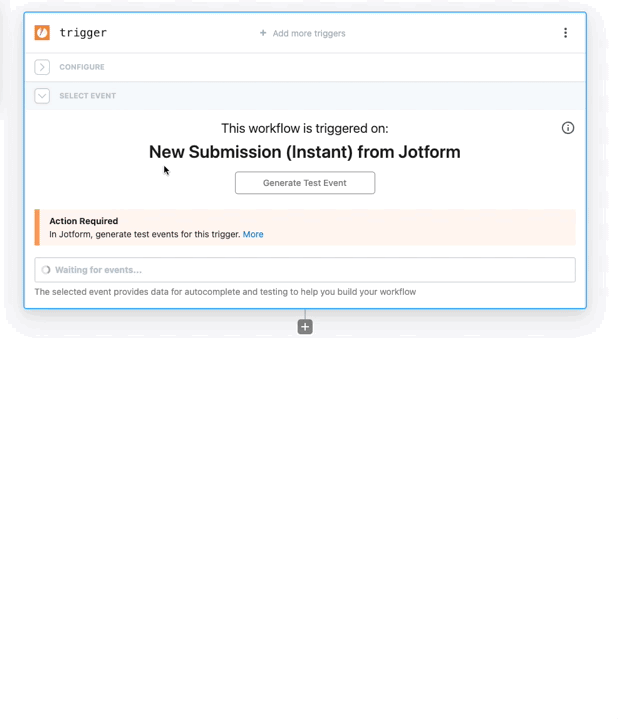 ### Polling Sources
#### Default Timer Interval
As a general heuristic, set the default timer interval to 15 minutes. However, you may set a custom interval (greater or less than 15 minutes) if appropriate for the specific source. Users may also override the default value at any time.
For polling sources in the Pipedream registry, the default polling interval is set as a global config. Individual sources can access that default within the props definition:
```javascript
import { DEFAULT_POLLING_SOURCE_TIMER_INTERVAL } from "@pipedream/platform";
export default {
props: {
timer: {
type: "$.interface.timer",
default: {
intervalSeconds: DEFAULT_POLLING_SOURCE_TIMER_INTERVAL,
},
},
},
// rest of component...
}
```
#### Rate Limit Optimization
When building a polling source, cache the most recently processed ID or timestamp using `$.service.db` whenever the API accepts a `since_id` or “since timestamp” (or equivalent). Some apps (e.g., Github) do not count requests that do not return new results against a user’s API quota.
If the service has a well-supported Node.js client library, it’ll often build in retries for issues like rate limits, so using the client lib (when available) should be preferred. In the absence of that, [Bottleneck](https://www.npmjs.com/package/bottleneck) can be useful for managing rate limits. 429s should be handled with exponential backoff (instead of just letting the error bubble up).
### Webhook Sources
#### Hooks
[Hooks](/docs/components/contributing/api/#hooks) are methods that are automatically invoked by Pipedream at different stages of the [component lifecycle](/docs/components/contributing/api/#source-lifecycle). Webhook subscriptions are typically created when components are instantiated or activated via the `activate()` hook, and deleted when components are deactivated or deleted via the `deactivate()` hook.
#### Helper Methods
Whenever possible, create methods in the app file to manage [creating and deleting webhook subscriptions](/docs/components/contributing/api/#hooks).
| **Description** | **Method Name** |
| --------------------------------------- | --------------- |
| Method to create a webhook subscription | `createHook()` |
| Method to delete a webhook subscription | `deleteHook()` |
#### Storing the 3rd Party Webhook ID
After subscribing to a webhook, save the ID for the hook returned by the 3rd party service to the `$.service.db` for a source using the key `hookId`. This ID will be referenced when managing or deleting the webhook. Note: some apps may not return a unique ID for the registered webhook (e.g., Jotform).
#### Signature Validation
Subscription webhook components should always validate the incoming event signature if the source app supports it.
#### Shared Secrets
If the source app supports shared secrets, implement support transparent to the end user. Generate and use a GUID for the shared secret value, save it to a `$.service.db` key, and use the saved value to validate incoming events.
## Action Guidelines
### Action Name
Like [source name](/docs/components/contributing/guidelines/#source-name), action name should be a singular, title-cased name, should not be slugified, and should not include the app name.
As a general pattern, articles are not included in the action name. For example, instead of “Create a Post”, use “Create Post”.
#### Use `@pipedream/platform` axios for all HTTP Requests
By default, the standard `axios` package doesn’t return useful debugging data to the user when it `throw`s errors on HTTP 4XX and 5XX status codes. This makes it hard for the user to troubleshoot the issue.
Instead, [use `@pipedream/platform` axios](/docs/workflows/building-workflows/http/#platform-axios).
#### Return JavaScript Objects
When you `return` data from an action, it’s exposed as a [step export](/docs/workflows/#step-exports) for users to reference in future steps of their workflow. Return JavaScript objects in all cases, unless there’s a specific reason not to.
For example, some APIs return XML responses. If you return XML from the step, it’s harder for users to parse and reference in future steps. Convert the XML to a JavaScript object, and return that, instead.
### ”List” Actions
#### Return an Array of Objects
To simplify using results from “list”/“search” actions in future steps of a workflow, return an array of the items being listed rather than an object with a nested array. [See this example for Airtable](https://github.com/PipedreamHQ/pipedream/blob/cb4b830d93e1495d8622b0c7dbd80cd3664e4eb3/components/airtable/actions/common-list.js#L48-L63).
#### Handle Pagination
For actions that return a list of items, the common use case is to retrieve all items. Handle pagination within the action to remove the complexity of needing to paginate from users. We may revisit this in the future and expose the pagination / offset params directly to the user.
In some cases, it may be appropriate to limit the number of API requests made or records returned in an action. For example, some Twitter actions optionally limit the number of API requests that are made per execution (using a [`maxRequests` prop](https://github.com/PipedreamHQ/pipedream/blob/cb4b830d93e1495d8622b0c7dbd80cd3664e4eb3/components/twitter/twitter.app.mjs#L52)) to avoid exceeding Twitter’s rate limits. [See the Airtable components](https://github.com/PipedreamHQ/pipedream/blob/e2bb7b7bea2fdf5869f18e84644f5dc61d9c22f0/components/airtable/airtable.app.js#L14) for an example of using a `maxRecords` prop to optionally limit the maximum number of records to return.
### Use `$.summary` to Summarize What Happened
[Describe what happened](/docs/components/contributing/api/#returning-data-from-steps) when an action succeeds by following these guidelines:
* Use plain language and provide helpful and contextually relevant information (especially the count of items)
* Whenever possible, use names and titles instead of IDs
* Basic structure: *Successfully \[action performed (like added, removed, updated)] “\[relevant destination]”*
### Don’t Export Data You Know Will Be Large
Browsers can crash when users load large exports (many MBs of data). When you know the content being returned is likely to be large –e.g. files —don’t export the full content. Consider writing the data to the `/tmp` directory and exporting a reference to the file.
## Miscellaneous
* Use camelCase for all props, method names, and variables.
## Database Components
Pipedream supports a special category of apps called [“databases”](/docs/workflows/data-management/databases/), such as [MySQL](https://github.com/PipedreamHQ/pipedream/tree/master/components/mysql), [PostgreSQL](https://github.com/PipedreamHQ/pipedream/tree/master/components/postgresql), [Snowflake](https://github.com/PipedreamHQ/pipedream/tree/master/components/snowflake), etc. Components tied to these apps offer unique features *as long as* they comply with some requirements. The most important features are:
1. A built-in SQL editor that allows users to input a SQL query to be run against their DB
2. Proxied execution of commands against a DB, which guarantees that such requests are always being made from the same range of static IPs (see the [shared static IPs docs](/docs/workflows/data-management/databases/#send-requests-from-a-shared-static-ip))
When dealing with database components, the Pipedream runtime performs certain actions internally to make these features work. For this reason, these components must implement specific interfaces that allows the runtime to properly interact with their code. These interfaces are usually defined in the [`@pipedream/platform`](https://github.com/PipedreamHQ/pipedream/tree/master/platform) package.
### SQL Editor
This code editor is rendered specifically for props of type `sql`, and it uses (whenever possible) the underlying’s database schema information to provide auto-complete suggestions. Each database engine not only has its own SQL dialect, but also its own way of inspecting the schemas and table information it stores. For this reason, each app file must implement the logic that’s applicable to the target engine.
To support the schema retrieval, the app file must implement a method called `getSchema` that takes no parameters, and returns a data structure with a format like this:
```javascript
{
users: { // The entries at the root correspond to table names
metadata: {
rowCount: 100,
},
schema: {
id: { // The entries under `schema` correspond to column names
columnDefault: null,
dataType: "number",
isNullable: false,
tableSchema: "public",
},
email: {
columnDefault: null,
dataType: "varchar",
isNullable: false,
tableSchema: "public",
},
dateOfBirth: {
columnDefault: null,
dataType: "varchar",
isNullable: true,
tableSchema: "public",
},
},
},
}
```
The [`lib/sql-prop.ts`](https://github.com/PipedreamHQ/pipedream/blob/master/platform/lib/sql-prop.ts) file in the `@pipedream/platform` package define the schema format and the signature of the `getSchema` method. You can also check out existing examples in the [MySQL](https://github.com/PipedreamHQ/pipedream/blob/master/components/mysql/mysql.app.mjs), [PostgreSQL](https://github.com/PipedreamHQ/pipedream/blob/master/components/postgresql/postgresql.app.mjs) and [Snowflake](https://github.com/PipedreamHQ/pipedream/blob/master/components/snowflake/snowflake.app.mjs) components.
### Shared Static IPs
When a user runs a SQL query against a database, the request is proxied through a separate internal service that’s guaranteed to always use the same range of static IPs when making outbound requests. This is important for users that have their databases protected behind a firewall, as they can whitelist these IPs to allow Pipedream components to access their databases.
To make this work, the app file must implement the interface defined in the [`lib/sql-proxy.ts`](https://github.com/PipedreamHQ/pipedream/blob/master/platform/lib/sql-proxy.ts) file in the `@pipedream/platform` package. This interface defines the following methods:
1. **`getClientConfiguration`**: This method takes no parameters and returns an object that can be fed directly to the database’s client library to initialize/establish a connection to the database. This guarantees that both the component and the proxy service use the same connection settings, **so make sure the component uses this method when initializing the client**.
2. **`executeQuery`**: This method takes a query object and returns the result of executing the query against the database. The Pipedream runtime will replace this method with a call to the proxy service, so **every component must make use of this method in order to support this feature**.
3. **`proxyAdapter`**: This method allows the proxy service to take the arguments passed to the `executeQuery` method and transform them into a “generic” query object that the service can then use. The expected format looks something like this:
```javascript
{
query: "SELECT * FROM users WHERE id = ?",
params: [42],
}
```
You can check out these example pull requests that allowed components to support this proxy feature:
* [#11201 (MySQL)](https://github.com/PipedreamHQ/pipedream/pull/11201)
* [#11202 (PostgreSQL)](https://github.com/PipedreamHQ/pipedream/pull/11202)
* [#12511 (Snowflake)](https://github.com/PipedreamHQ/pipedream/pull/12511)
# Quickstart: Source Development
Source: https://pipedream.com/docs/components/contributing/sources-quickstart
This document is intended for a technical audience (including those interested in learning how to author and edit components). After completing this quickstart, you will understand how to:
* Deploy components to Pipedream using the CLI
* Invoke a component manually, or on a schedule or HTTP request
* Maintain state across component executions
* Emit deduped events using the `unique` and `greatest` strategies
* Use Pipedream managed OAuth for an app
* Use npm packages in components
We recommend that you execute the examples in order — each one builds on the concepts and practices of earlier examples.
## Quickstart Examples
**Hello World! (\~10 minutes)**
* Deploy a `hello world!` component using the Pipedream CLI and invoke it manually
* Use `$.service.db` to maintain state across executions
* Use `$.interface.timer` to invoke a component on a schedule
* Use `$.interface.http` to invoke code on HTTP requests
**Emit new RSS items on a schedule (\~10 mins)**
* Use the `rss-parser` npm package to retrieve an RSS feed and emit each item
* Display a custom summary for each emitted item in the event list
* Use the `unique` deduping strategy so we only emit new items from the RSS feed
* Add a timer interface to run the component on a schedule
**Poll for new Github issues (\~10 mins)**
* Use Pipedream managed OAuth with Github’s API to retrieve issues for a repo
* Use the `greatest` deduping strategy to only emit new issues
## Prerequisites
**Step 1.** Create a free account at [https://pipedream.com](https://pipedream.com). Just sign in with your Google or Github account.
**Step 2.** [Download and install the Pipedream CLI](/docs/cli/install/).
**Step 3.** Once the CLI is installed, [link your Pipedream account to the CLI](/docs/cli/login/#existing-pipedream-account):
```
pd login
```
See the [CLI reference](/docs/cli/reference/) for detailed usage and examples beyond those covered below.
## CLI Development Mode
The examples in this guide use the `pd dev` command. This command will deploy your code in “development mode”. What that means is that the CLI will attach to the deployed component and watch your local file for changes —when you save changes to your local file, your component will automatically be updated on Pipedream (the alternative is to `pd deploy` and run `pd update` for each change).
If your `pd dev` session is terminated and you need to re-attach to a deployed component, run the following command.
```
pd dev [--dc
### Polling Sources
#### Default Timer Interval
As a general heuristic, set the default timer interval to 15 minutes. However, you may set a custom interval (greater or less than 15 minutes) if appropriate for the specific source. Users may also override the default value at any time.
For polling sources in the Pipedream registry, the default polling interval is set as a global config. Individual sources can access that default within the props definition:
```javascript
import { DEFAULT_POLLING_SOURCE_TIMER_INTERVAL } from "@pipedream/platform";
export default {
props: {
timer: {
type: "$.interface.timer",
default: {
intervalSeconds: DEFAULT_POLLING_SOURCE_TIMER_INTERVAL,
},
},
},
// rest of component...
}
```
#### Rate Limit Optimization
When building a polling source, cache the most recently processed ID or timestamp using `$.service.db` whenever the API accepts a `since_id` or “since timestamp” (or equivalent). Some apps (e.g., Github) do not count requests that do not return new results against a user’s API quota.
If the service has a well-supported Node.js client library, it’ll often build in retries for issues like rate limits, so using the client lib (when available) should be preferred. In the absence of that, [Bottleneck](https://www.npmjs.com/package/bottleneck) can be useful for managing rate limits. 429s should be handled with exponential backoff (instead of just letting the error bubble up).
### Webhook Sources
#### Hooks
[Hooks](/docs/components/contributing/api/#hooks) are methods that are automatically invoked by Pipedream at different stages of the [component lifecycle](/docs/components/contributing/api/#source-lifecycle). Webhook subscriptions are typically created when components are instantiated or activated via the `activate()` hook, and deleted when components are deactivated or deleted via the `deactivate()` hook.
#### Helper Methods
Whenever possible, create methods in the app file to manage [creating and deleting webhook subscriptions](/docs/components/contributing/api/#hooks).
| **Description** | **Method Name** |
| --------------------------------------- | --------------- |
| Method to create a webhook subscription | `createHook()` |
| Method to delete a webhook subscription | `deleteHook()` |
#### Storing the 3rd Party Webhook ID
After subscribing to a webhook, save the ID for the hook returned by the 3rd party service to the `$.service.db` for a source using the key `hookId`. This ID will be referenced when managing or deleting the webhook. Note: some apps may not return a unique ID for the registered webhook (e.g., Jotform).
#### Signature Validation
Subscription webhook components should always validate the incoming event signature if the source app supports it.
#### Shared Secrets
If the source app supports shared secrets, implement support transparent to the end user. Generate and use a GUID for the shared secret value, save it to a `$.service.db` key, and use the saved value to validate incoming events.
## Action Guidelines
### Action Name
Like [source name](/docs/components/contributing/guidelines/#source-name), action name should be a singular, title-cased name, should not be slugified, and should not include the app name.
As a general pattern, articles are not included in the action name. For example, instead of “Create a Post”, use “Create Post”.
#### Use `@pipedream/platform` axios for all HTTP Requests
By default, the standard `axios` package doesn’t return useful debugging data to the user when it `throw`s errors on HTTP 4XX and 5XX status codes. This makes it hard for the user to troubleshoot the issue.
Instead, [use `@pipedream/platform` axios](/docs/workflows/building-workflows/http/#platform-axios).
#### Return JavaScript Objects
When you `return` data from an action, it’s exposed as a [step export](/docs/workflows/#step-exports) for users to reference in future steps of their workflow. Return JavaScript objects in all cases, unless there’s a specific reason not to.
For example, some APIs return XML responses. If you return XML from the step, it’s harder for users to parse and reference in future steps. Convert the XML to a JavaScript object, and return that, instead.
### ”List” Actions
#### Return an Array of Objects
To simplify using results from “list”/“search” actions in future steps of a workflow, return an array of the items being listed rather than an object with a nested array. [See this example for Airtable](https://github.com/PipedreamHQ/pipedream/blob/cb4b830d93e1495d8622b0c7dbd80cd3664e4eb3/components/airtable/actions/common-list.js#L48-L63).
#### Handle Pagination
For actions that return a list of items, the common use case is to retrieve all items. Handle pagination within the action to remove the complexity of needing to paginate from users. We may revisit this in the future and expose the pagination / offset params directly to the user.
In some cases, it may be appropriate to limit the number of API requests made or records returned in an action. For example, some Twitter actions optionally limit the number of API requests that are made per execution (using a [`maxRequests` prop](https://github.com/PipedreamHQ/pipedream/blob/cb4b830d93e1495d8622b0c7dbd80cd3664e4eb3/components/twitter/twitter.app.mjs#L52)) to avoid exceeding Twitter’s rate limits. [See the Airtable components](https://github.com/PipedreamHQ/pipedream/blob/e2bb7b7bea2fdf5869f18e84644f5dc61d9c22f0/components/airtable/airtable.app.js#L14) for an example of using a `maxRecords` prop to optionally limit the maximum number of records to return.
### Use `$.summary` to Summarize What Happened
[Describe what happened](/docs/components/contributing/api/#returning-data-from-steps) when an action succeeds by following these guidelines:
* Use plain language and provide helpful and contextually relevant information (especially the count of items)
* Whenever possible, use names and titles instead of IDs
* Basic structure: *Successfully \[action performed (like added, removed, updated)] “\[relevant destination]”*
### Don’t Export Data You Know Will Be Large
Browsers can crash when users load large exports (many MBs of data). When you know the content being returned is likely to be large –e.g. files —don’t export the full content. Consider writing the data to the `/tmp` directory and exporting a reference to the file.
## Miscellaneous
* Use camelCase for all props, method names, and variables.
## Database Components
Pipedream supports a special category of apps called [“databases”](/docs/workflows/data-management/databases/), such as [MySQL](https://github.com/PipedreamHQ/pipedream/tree/master/components/mysql), [PostgreSQL](https://github.com/PipedreamHQ/pipedream/tree/master/components/postgresql), [Snowflake](https://github.com/PipedreamHQ/pipedream/tree/master/components/snowflake), etc. Components tied to these apps offer unique features *as long as* they comply with some requirements. The most important features are:
1. A built-in SQL editor that allows users to input a SQL query to be run against their DB
2. Proxied execution of commands against a DB, which guarantees that such requests are always being made from the same range of static IPs (see the [shared static IPs docs](/docs/workflows/data-management/databases/#send-requests-from-a-shared-static-ip))
When dealing with database components, the Pipedream runtime performs certain actions internally to make these features work. For this reason, these components must implement specific interfaces that allows the runtime to properly interact with their code. These interfaces are usually defined in the [`@pipedream/platform`](https://github.com/PipedreamHQ/pipedream/tree/master/platform) package.
### SQL Editor
This code editor is rendered specifically for props of type `sql`, and it uses (whenever possible) the underlying’s database schema information to provide auto-complete suggestions. Each database engine not only has its own SQL dialect, but also its own way of inspecting the schemas and table information it stores. For this reason, each app file must implement the logic that’s applicable to the target engine.
To support the schema retrieval, the app file must implement a method called `getSchema` that takes no parameters, and returns a data structure with a format like this:
```javascript
{
users: { // The entries at the root correspond to table names
metadata: {
rowCount: 100,
},
schema: {
id: { // The entries under `schema` correspond to column names
columnDefault: null,
dataType: "number",
isNullable: false,
tableSchema: "public",
},
email: {
columnDefault: null,
dataType: "varchar",
isNullable: false,
tableSchema: "public",
},
dateOfBirth: {
columnDefault: null,
dataType: "varchar",
isNullable: true,
tableSchema: "public",
},
},
},
}
```
The [`lib/sql-prop.ts`](https://github.com/PipedreamHQ/pipedream/blob/master/platform/lib/sql-prop.ts) file in the `@pipedream/platform` package define the schema format and the signature of the `getSchema` method. You can also check out existing examples in the [MySQL](https://github.com/PipedreamHQ/pipedream/blob/master/components/mysql/mysql.app.mjs), [PostgreSQL](https://github.com/PipedreamHQ/pipedream/blob/master/components/postgresql/postgresql.app.mjs) and [Snowflake](https://github.com/PipedreamHQ/pipedream/blob/master/components/snowflake/snowflake.app.mjs) components.
### Shared Static IPs
When a user runs a SQL query against a database, the request is proxied through a separate internal service that’s guaranteed to always use the same range of static IPs when making outbound requests. This is important for users that have their databases protected behind a firewall, as they can whitelist these IPs to allow Pipedream components to access their databases.
To make this work, the app file must implement the interface defined in the [`lib/sql-proxy.ts`](https://github.com/PipedreamHQ/pipedream/blob/master/platform/lib/sql-proxy.ts) file in the `@pipedream/platform` package. This interface defines the following methods:
1. **`getClientConfiguration`**: This method takes no parameters and returns an object that can be fed directly to the database’s client library to initialize/establish a connection to the database. This guarantees that both the component and the proxy service use the same connection settings, **so make sure the component uses this method when initializing the client**.
2. **`executeQuery`**: This method takes a query object and returns the result of executing the query against the database. The Pipedream runtime will replace this method with a call to the proxy service, so **every component must make use of this method in order to support this feature**.
3. **`proxyAdapter`**: This method allows the proxy service to take the arguments passed to the `executeQuery` method and transform them into a “generic” query object that the service can then use. The expected format looks something like this:
```javascript
{
query: "SELECT * FROM users WHERE id = ?",
params: [42],
}
```
You can check out these example pull requests that allowed components to support this proxy feature:
* [#11201 (MySQL)](https://github.com/PipedreamHQ/pipedream/pull/11201)
* [#11202 (PostgreSQL)](https://github.com/PipedreamHQ/pipedream/pull/11202)
* [#12511 (Snowflake)](https://github.com/PipedreamHQ/pipedream/pull/12511)
# Quickstart: Source Development
Source: https://pipedream.com/docs/components/contributing/sources-quickstart
This document is intended for a technical audience (including those interested in learning how to author and edit components). After completing this quickstart, you will understand how to:
* Deploy components to Pipedream using the CLI
* Invoke a component manually, or on a schedule or HTTP request
* Maintain state across component executions
* Emit deduped events using the `unique` and `greatest` strategies
* Use Pipedream managed OAuth for an app
* Use npm packages in components
We recommend that you execute the examples in order — each one builds on the concepts and practices of earlier examples.
## Quickstart Examples
**Hello World! (\~10 minutes)**
* Deploy a `hello world!` component using the Pipedream CLI and invoke it manually
* Use `$.service.db` to maintain state across executions
* Use `$.interface.timer` to invoke a component on a schedule
* Use `$.interface.http` to invoke code on HTTP requests
**Emit new RSS items on a schedule (\~10 mins)**
* Use the `rss-parser` npm package to retrieve an RSS feed and emit each item
* Display a custom summary for each emitted item in the event list
* Use the `unique` deduping strategy so we only emit new items from the RSS feed
* Add a timer interface to run the component on a schedule
**Poll for new Github issues (\~10 mins)**
* Use Pipedream managed OAuth with Github’s API to retrieve issues for a repo
* Use the `greatest` deduping strategy to only emit new issues
## Prerequisites
**Step 1.** Create a free account at [https://pipedream.com](https://pipedream.com). Just sign in with your Google or Github account.
**Step 2.** [Download and install the Pipedream CLI](/docs/cli/install/).
**Step 3.** Once the CLI is installed, [link your Pipedream account to the CLI](/docs/cli/login/#existing-pipedream-account):
```
pd login
```
See the [CLI reference](/docs/cli/reference/) for detailed usage and examples beyond those covered below.
## CLI Development Mode
The examples in this guide use the `pd dev` command. This command will deploy your code in “development mode”. What that means is that the CLI will attach to the deployed component and watch your local file for changes —when you save changes to your local file, your component will automatically be updated on Pipedream (the alternative is to `pd deploy` and run `pd update` for each change).
If your `pd dev` session is terminated and you need to re-attach to a deployed component, run the following command.
```
pd dev [--dc 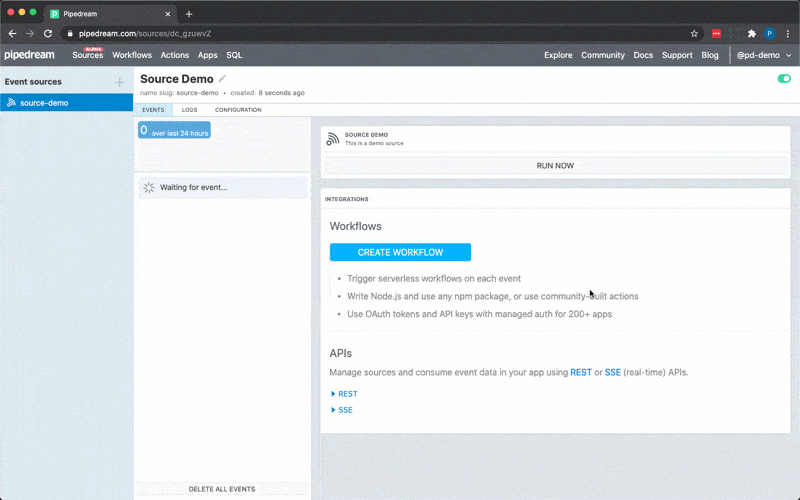 ### Maintain state across executions
Next, we’ll use Pipedream’s `db` service to track the number of times the component is invoked.
First, we’ll assign `$.service.db` to a prop so we can reference it in our code via `this`.
```javascript
props: {
db: "$.service.db",
},
```
Then we’ll update the `run()` method to:
* Retrieve the value for the `count` key (using the `get()` method of `$.service.db`)
* Display the count in the event summary (event summaries are displayed in the event list next to the event time)
* Increment `count` and save the updated value to `$.service.db` using the `set()` method
```javascript
let count = this.db.get("count") || 1;
this.$emit(
{ message: "hello world!" },
{
summary: `Execution #${count}`,
}
);
this.db.set("count", ++count);
```
Here’s the updated code:
```javascript
export default {
name: "Source Demo",
description: "This is a demo source",
props: {
db: "$.service.db",
},
async run() {
let count = this.db.get("count") || 1;
this.$emit(
{ message: "hello world!" },
{
summary: `Execution #${count}`,
}
);
this.db.set("count", ++count);
},
};
```
Save the changes to your local file. Your component on Pipedream should automatically update. Return to the Pipedream UI and press **RUN NOW** —you should see the execution count appear in the event list.
### Maintain state across executions
Next, we’ll use Pipedream’s `db` service to track the number of times the component is invoked.
First, we’ll assign `$.service.db` to a prop so we can reference it in our code via `this`.
```javascript
props: {
db: "$.service.db",
},
```
Then we’ll update the `run()` method to:
* Retrieve the value for the `count` key (using the `get()` method of `$.service.db`)
* Display the count in the event summary (event summaries are displayed in the event list next to the event time)
* Increment `count` and save the updated value to `$.service.db` using the `set()` method
```javascript
let count = this.db.get("count") || 1;
this.$emit(
{ message: "hello world!" },
{
summary: `Execution #${count}`,
}
);
this.db.set("count", ++count);
```
Here’s the updated code:
```javascript
export default {
name: "Source Demo",
description: "This is a demo source",
props: {
db: "$.service.db",
},
async run() {
let count = this.db.get("count") || 1;
this.$emit(
{ message: "hello world!" },
{
summary: `Execution #${count}`,
}
);
this.db.set("count", ++count);
},
};
```
Save the changes to your local file. Your component on Pipedream should automatically update. Return to the Pipedream UI and press **RUN NOW** —you should see the execution count appear in the event list.
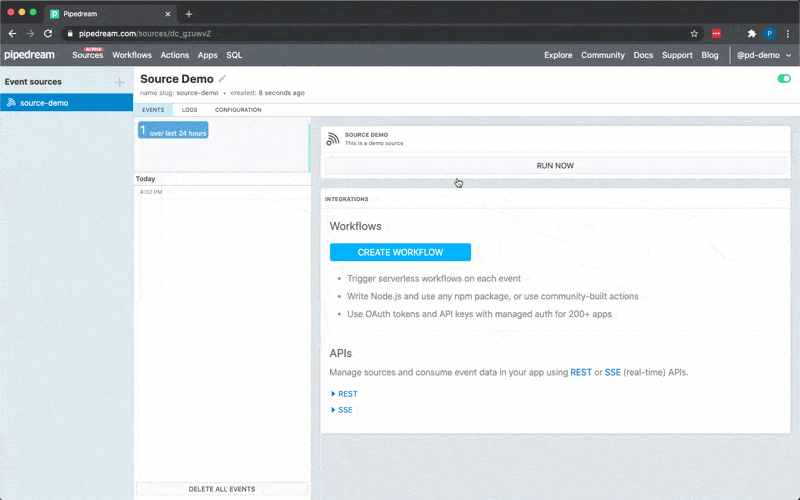 ### Invoke your code on a schedule
Next, we’ll update our component so it runs on a schedule. To do that, we’ll use Pipedream’s `timer` interface and we’ll set the default execution interval to 15 minutes by adding the following code to props:
```javascript
timer: {
type: "$.interface.timer",
default: {
intervalSeconds: 15 * 60,
},
},
```
Here’s the updated code:
```javascript
export default {
name: "Source Demo",
description: "This is a demo source",
props: {
db: "$.service.db",
timer: {
type: "$.interface.timer",
default: {
intervalSeconds: 15 * 60,
},
},
},
async run() {
let count = this.db.get("count") || 1;
this.$emit(
{ message: "hello world!" },
{
summary: `Execution #${count}`,
}
);
this.db.set("count", ++count);
},
};
```
Save the changes to your file (your component on Pipedream should automatically update). and then, return to the Pipedream UI and **reload the page**. You should now see the timer settings in the summary and a countdown to the next execution (you can still run your component manually). Your component will now run every 15 minutes.
### Invoke your code on a schedule
Next, we’ll update our component so it runs on a schedule. To do that, we’ll use Pipedream’s `timer` interface and we’ll set the default execution interval to 15 minutes by adding the following code to props:
```javascript
timer: {
type: "$.interface.timer",
default: {
intervalSeconds: 15 * 60,
},
},
```
Here’s the updated code:
```javascript
export default {
name: "Source Demo",
description: "This is a demo source",
props: {
db: "$.service.db",
timer: {
type: "$.interface.timer",
default: {
intervalSeconds: 15 * 60,
},
},
},
async run() {
let count = this.db.get("count") || 1;
this.$emit(
{ message: "hello world!" },
{
summary: `Execution #${count}`,
}
);
this.db.set("count", ++count);
},
};
```
Save the changes to your file (your component on Pipedream should automatically update). and then, return to the Pipedream UI and **reload the page**. You should now see the timer settings in the summary and a countdown to the next execution (you can still run your component manually). Your component will now run every 15 minutes.
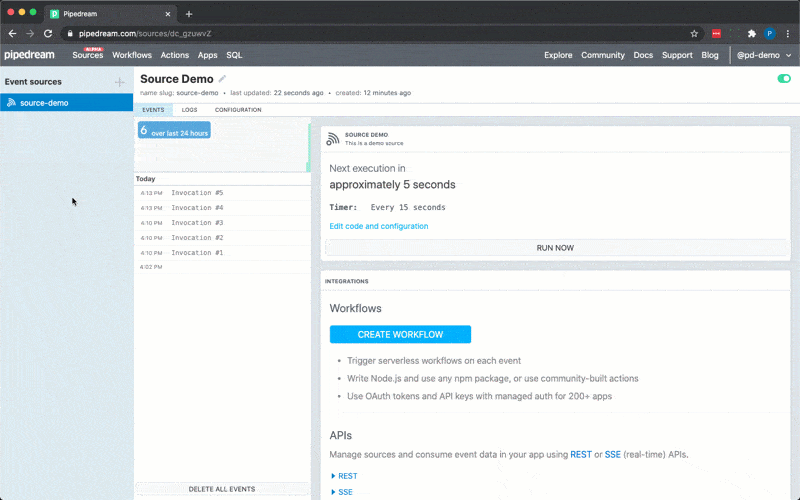 **Note**: if you’d like to change the schedule of your deployed component, visit the **Configuration** tab in the Pipedream UI and change the schedule accordingly. Changing the value of `intervalSeconds` within the component’s code will not change the schedule of the running instance of the component. You can also set one value as the default `intervalSeconds` in the component’s code, but run
```
pd dev --prompt-all
**Note**: if you’d like to change the schedule of your deployed component, visit the **Configuration** tab in the Pipedream UI and change the schedule accordingly. Changing the value of `intervalSeconds` within the component’s code will not change the schedule of the running instance of the component. You can also set one value as the default `intervalSeconds` in the component’s code, but run
```
pd dev --prompt-all 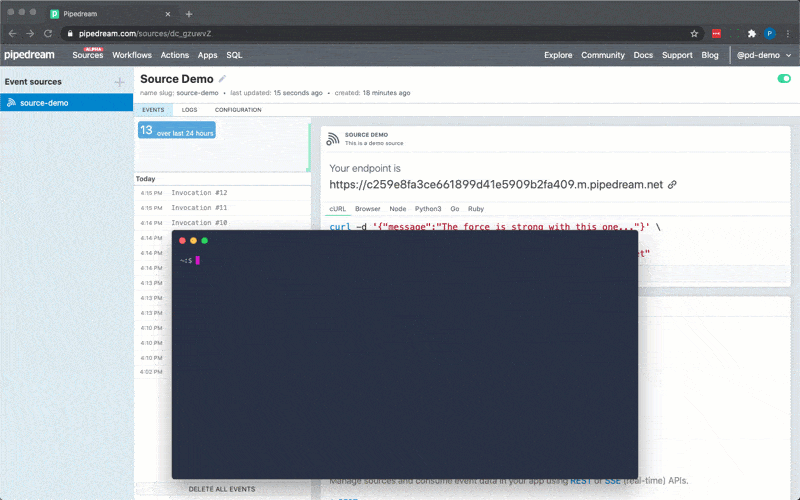 ## Emit new RSS items on a schedule (\~10 mins)
Next, let’s cover some real-world examples starting with RSS. Continue editing the same file, but start with the following scaffolding for this example.
```javascript
export default {
name: "Source Demo",
description: "This is a demo source",
async run() {},
};
```
### Emit items in an RSS Feed
## Emit new RSS items on a schedule (\~10 mins)
Next, let’s cover some real-world examples starting with RSS. Continue editing the same file, but start with the following scaffolding for this example.
```javascript
export default {
name: "Source Demo",
description: "This is a demo source",
async run() {},
};
```
### Emit items in an RSS Feed
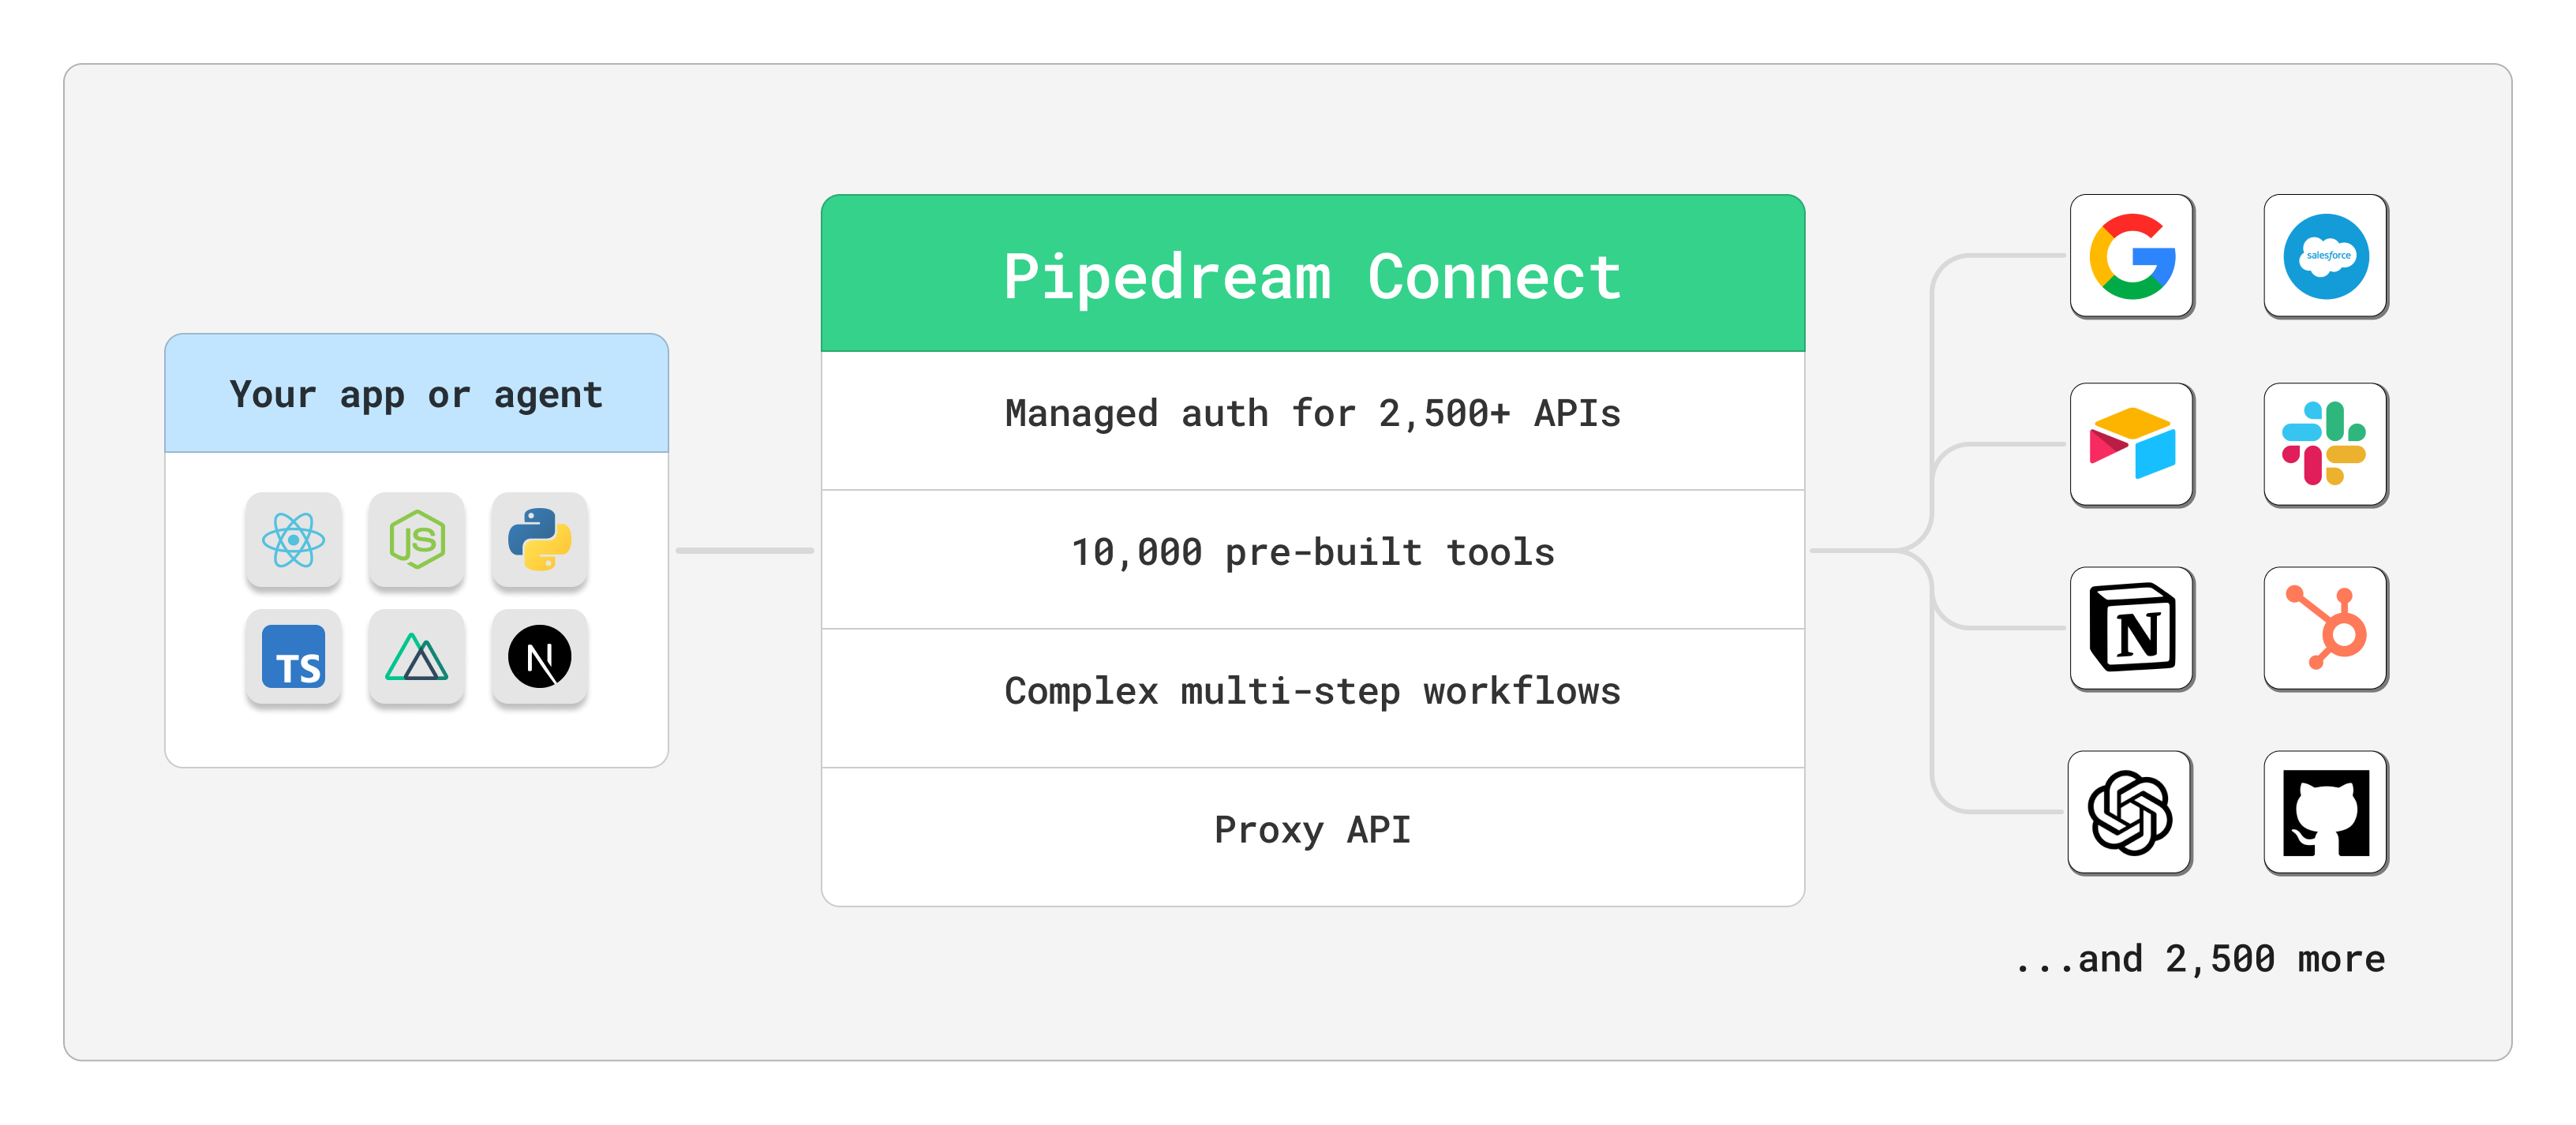 ## Demos

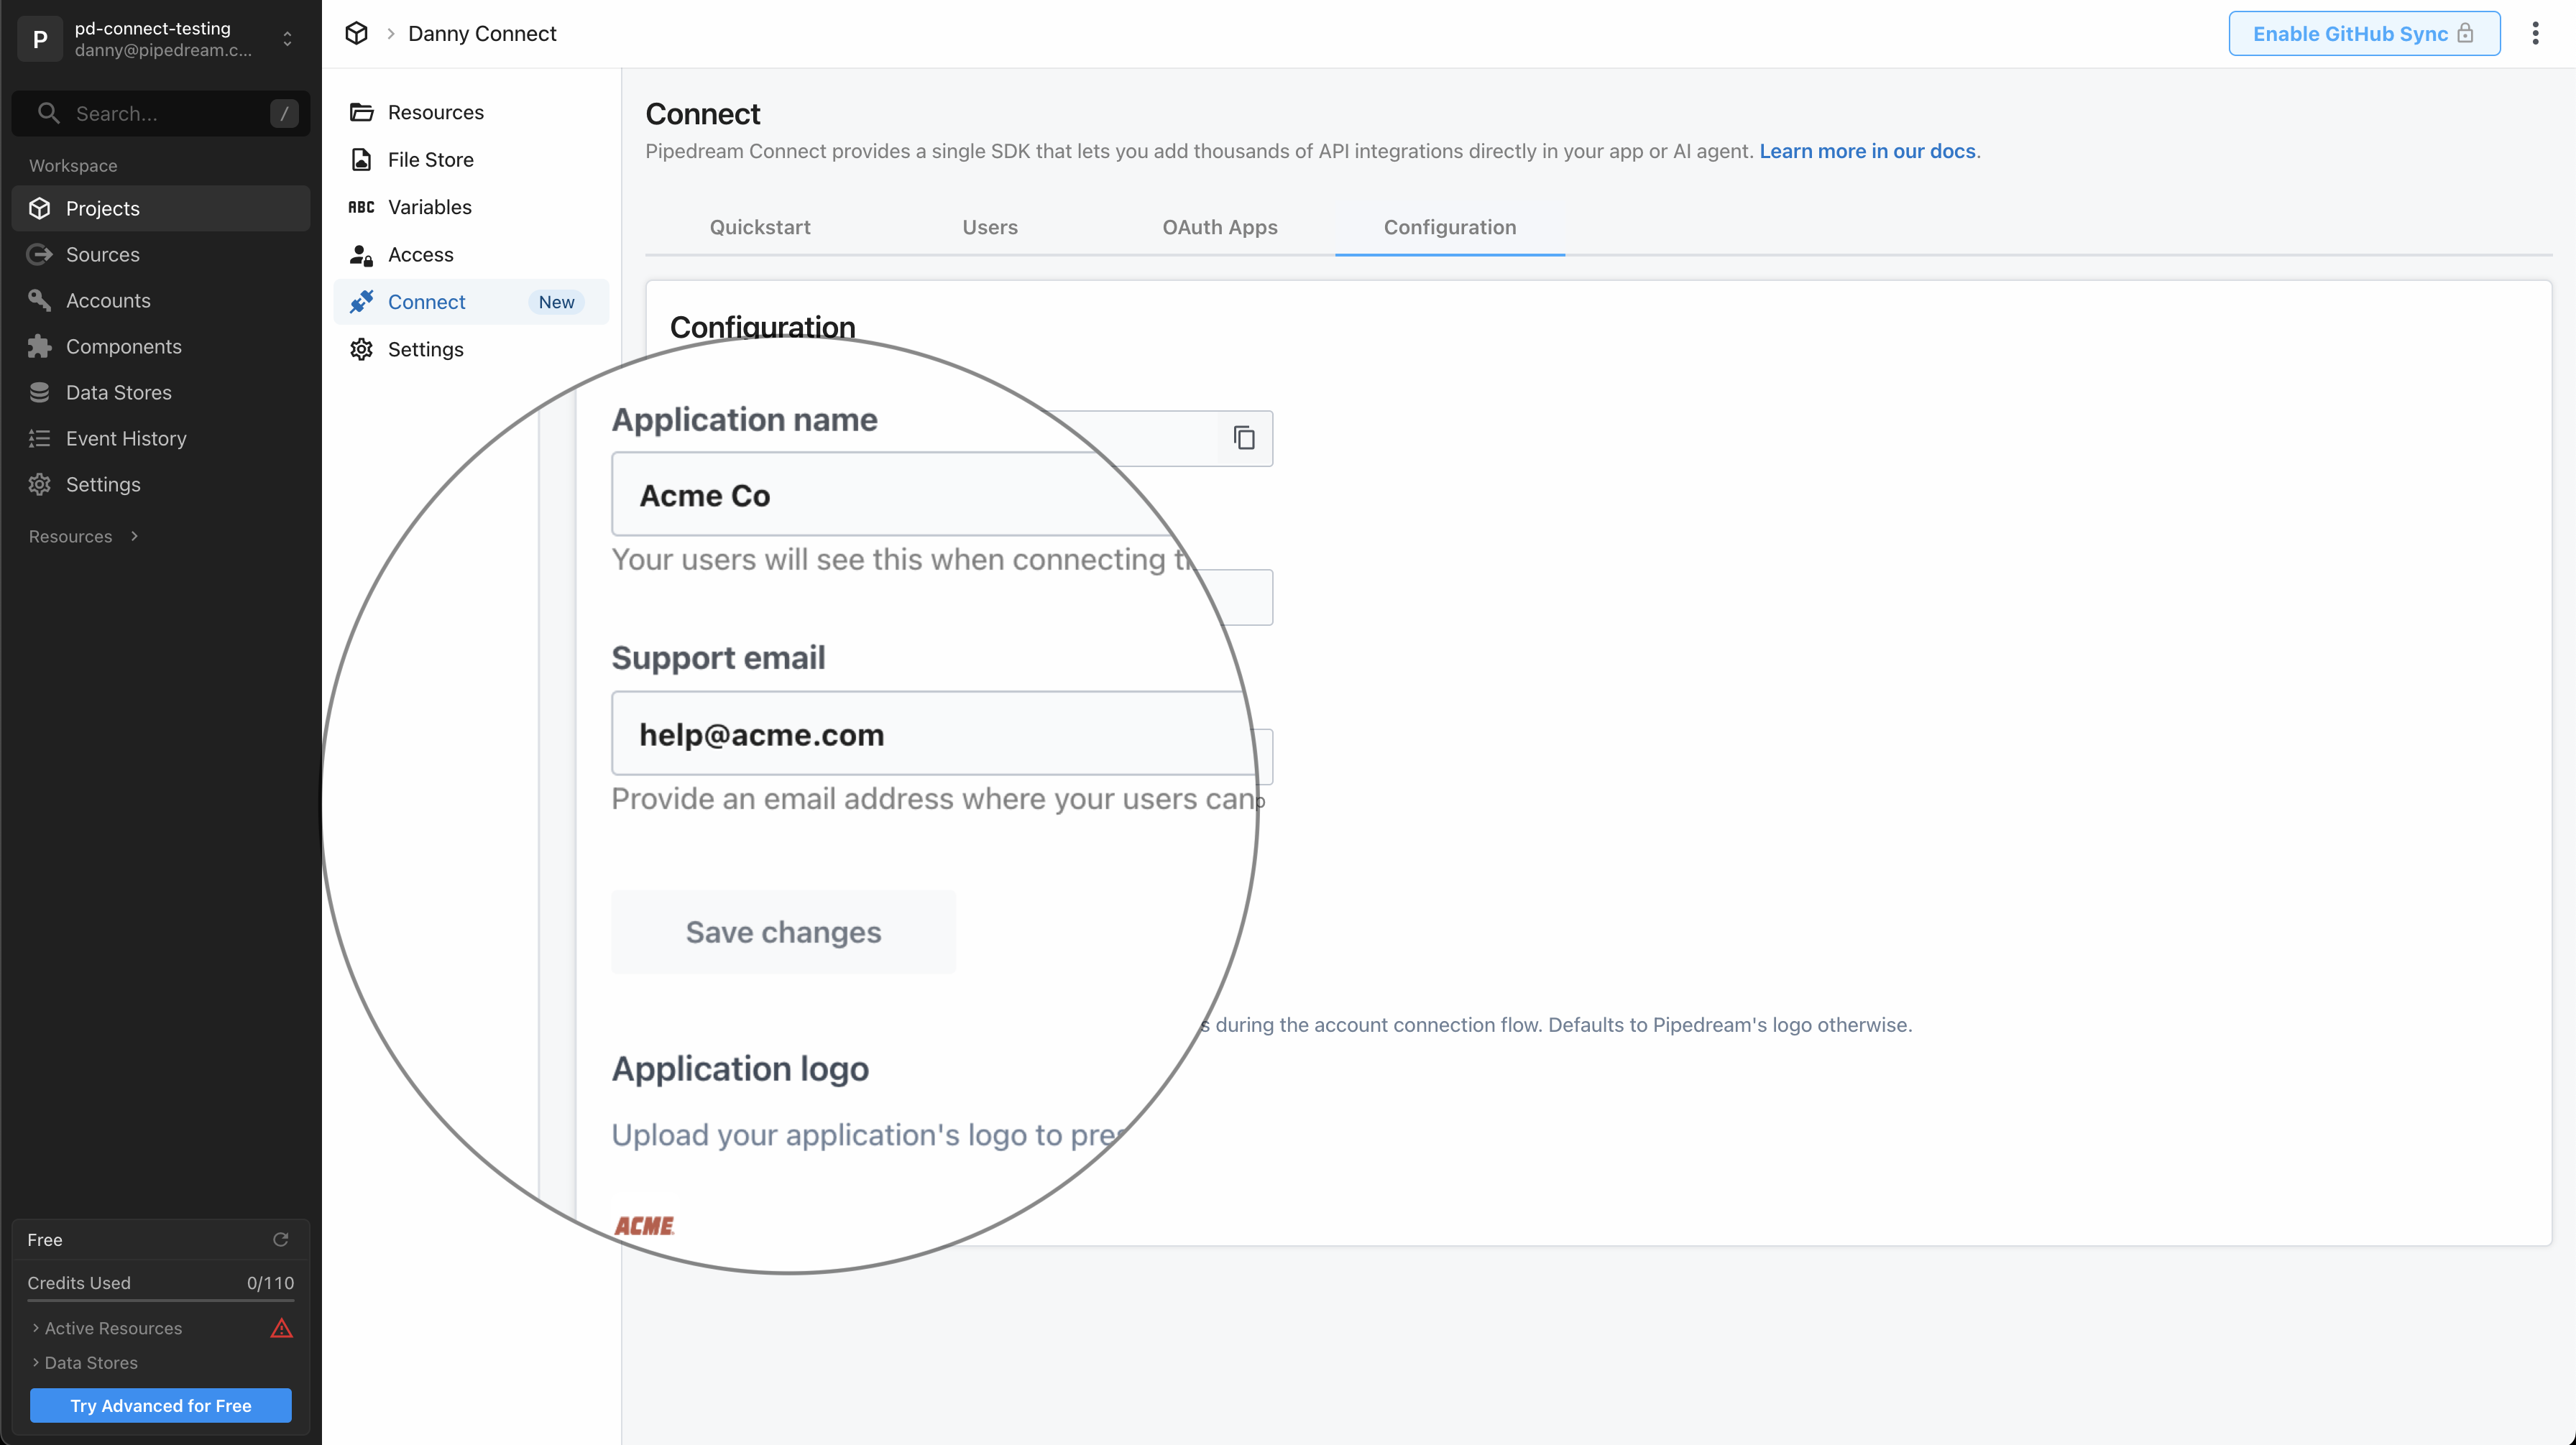 ### Application name
By default, your end users will see:
> We use Pipedream to connect your account
Enter the name of your application that you’d like to show instead, so it reads:
> \{Application Name} uses Pipedream to connect your account
### Support email
In the case of any errors during the account connection flow, by default your users will see:
> Connection failed. Please retry or contact support.
To give your end users an email address to seek support, enter your support email. We’ll display it:
> Connection failed. Please retry or contact support [help@example.com](mailto:help@example.com).
### Logo
By default we’ll show Pipedream’s logo alongside the app your user is connecting to. If you’d like to show your own logo instead, upload it here.
# Environments
Source: https://pipedream.com/docs/connect/managed-auth/environments
Pipedream Connect projects support two environments: `development` and `production`. Connected accounts and credentials stored in one environment remain separate from the other.
### Application name
By default, your end users will see:
> We use Pipedream to connect your account
Enter the name of your application that you’d like to show instead, so it reads:
> \{Application Name} uses Pipedream to connect your account
### Support email
In the case of any errors during the account connection flow, by default your users will see:
> Connection failed. Please retry or contact support.
To give your end users an email address to seek support, enter your support email. We’ll display it:
> Connection failed. Please retry or contact support [help@example.com](mailto:help@example.com).
### Logo
By default we’ll show Pipedream’s logo alongside the app your user is connecting to. If you’d like to show your own logo instead, upload it here.
# Environments
Source: https://pipedream.com/docs/connect/managed-auth/environments
Pipedream Connect projects support two environments: `development` and `production`. Connected accounts and credentials stored in one environment remain separate from the other.
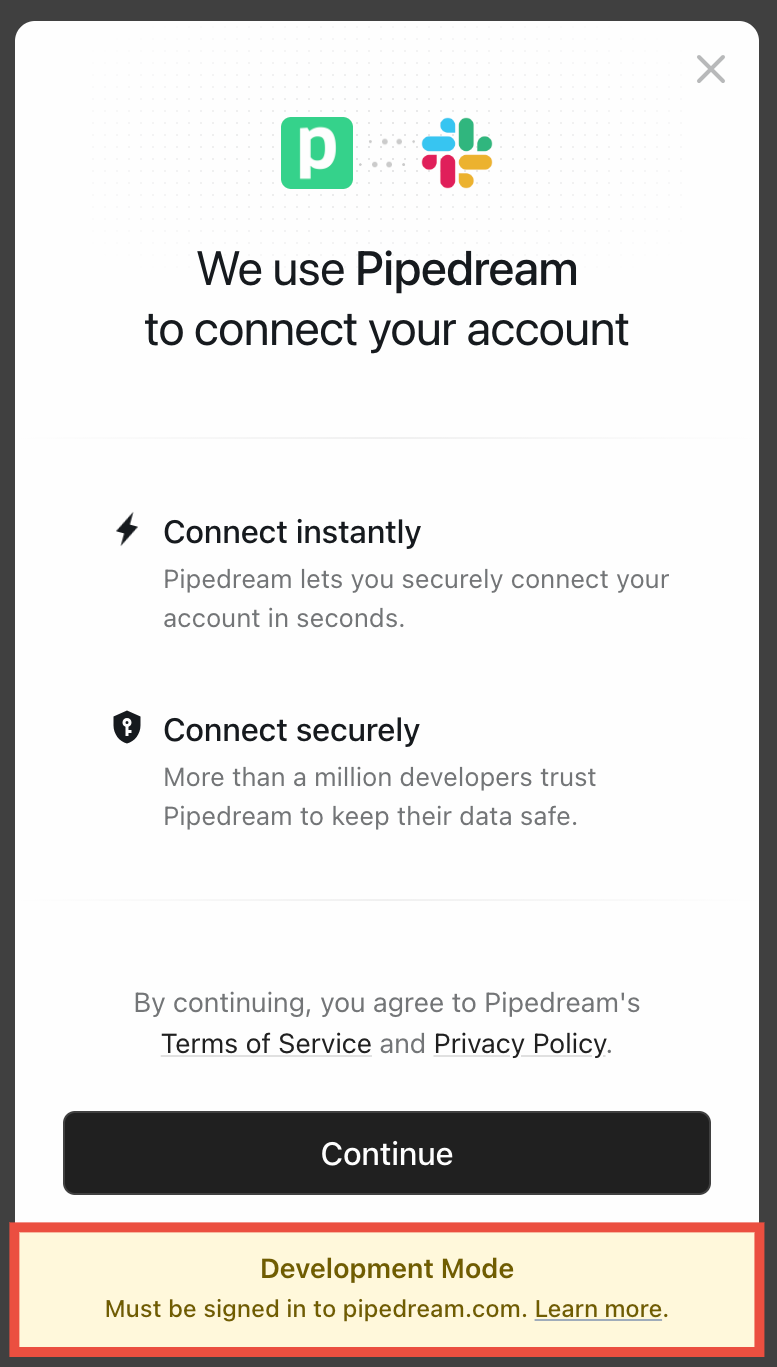 ## How to specify the environment
You specify the environment when [creating a new Connect token](/docs/connect/api-reference/create-connect-token) with the Pipedream SDK or API. When users successfully connect their account, Pipedream saves the account credentials (API key, access token, etc.) for that `external_user_id` in the specified environment.
Always set the environment when you create the SDK client:
```js
import { PipedreamClient } from "@pipedream/sdk";
const client = new PipedreamClient({
projectEnvironment: "development", // change to production if running for a test production account, or in production
clientId: "your-oauth-client-id",
clientSecret: "your-oauth-client-secret",
projectId: "proj_xxxxxxx"
});
```
or pass the `x-pd-environment` header in HTTP requests:
```sh
curl -X POST https://api.pipedream.com/v1/connect/{project_id}/tokens \
-H "Content-Type: application/json" \
-H "x-pd-environment: development" \
-H "Authorization: Bearer {access_token}" \
-d '{
"external_user_id": "your-external-user-id"
}'
```
## Shipping Connect to production
When you’re ready to ship to production:
1. Visit the [pricing page](https://pipedream.com/pricing?plan=Connect) to enable production access
2. Update your environment to `production` in your SDK client configuration and / or API calls
## How to specify the environment
You specify the environment when [creating a new Connect token](/docs/connect/api-reference/create-connect-token) with the Pipedream SDK or API. When users successfully connect their account, Pipedream saves the account credentials (API key, access token, etc.) for that `external_user_id` in the specified environment.
Always set the environment when you create the SDK client:
```js
import { PipedreamClient } from "@pipedream/sdk";
const client = new PipedreamClient({
projectEnvironment: "development", // change to production if running for a test production account, or in production
clientId: "your-oauth-client-id",
clientSecret: "your-oauth-client-secret",
projectId: "proj_xxxxxxx"
});
```
or pass the `x-pd-environment` header in HTTP requests:
```sh
curl -X POST https://api.pipedream.com/v1/connect/{project_id}/tokens \
-H "Content-Type: application/json" \
-H "x-pd-environment: development" \
-H "Authorization: Bearer {access_token}" \
-d '{
"external_user_id": "your-external-user-id"
}'
```
## Shipping Connect to production
When you’re ready to ship to production:
1. Visit the [pricing page](https://pipedream.com/pricing?plan=Connect) to enable production access
2. Update your environment to `production` in your SDK client configuration and / or API calls
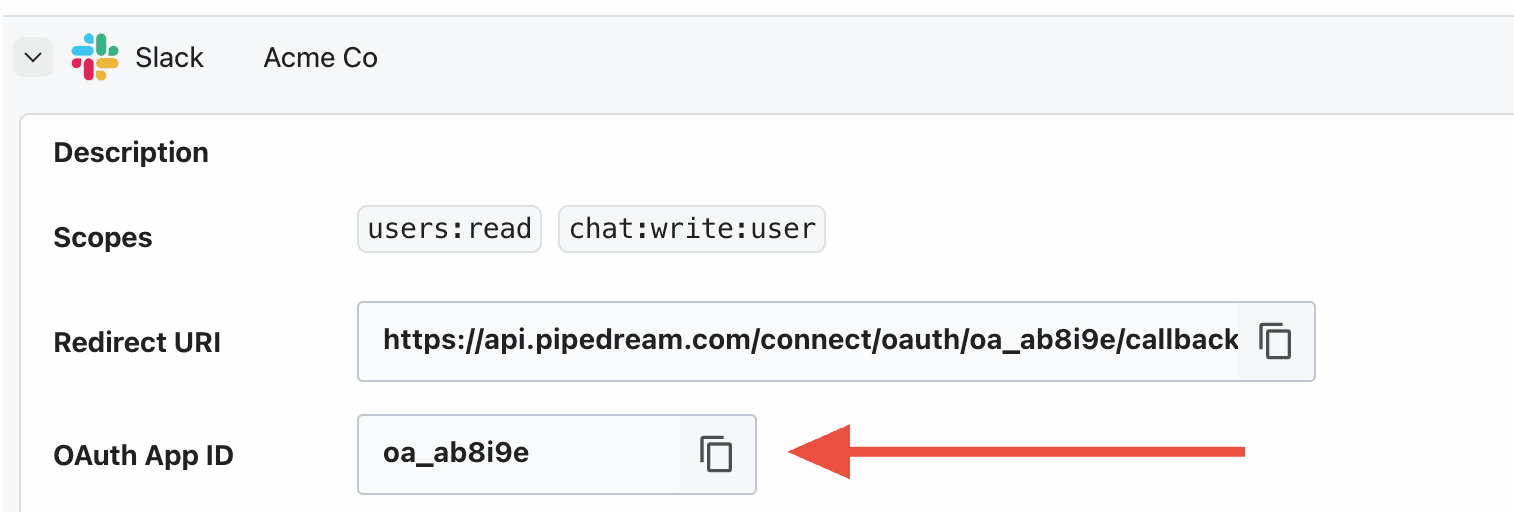 # Managed Auth Quickstart
Source: https://pipedream.com/docs/connect/managed-auth/quickstart
export const ConnectLinkDemo = ({supabaseUrl, supabaseAnonKey}) => {
const [appSlug, setAppSlug] = useState("google_sheets");
const [tokenData, setTokenData] = useState(null);
const [connectLinkUrl, setConnectLinkUrl] = useState("");
const [error, setError] = useState(null);
const [copied, setCopied] = useState(false);
const [externalUserId, setExternalUserId] = useState("");
useEffect(() => {
setExternalUserId(crypto.randomUUID());
}, []);
const generateRequestToken = () => {
if (typeof window === "undefined") return "";
const baseString = `${navigator.userAgent}:${window.location.host}:connect-demo`;
return btoa(baseString);
};
const getConnectToken = async () => {
try {
const requestToken = generateRequestToken();
const response = await fetch(`${supabaseUrl}/functions/v1/demo-connect-token`, {
method: "POST",
headers: {
"Content-Type": "application/json",
"Authorization": `Bearer ${supabaseAnonKey}`,
"X-Request-Token": requestToken
},
body: JSON.stringify({
external_user_id: externalUserId
})
});
if (!response.ok) {
throw new Error("Failed to get Connect token");
}
const data = await response.json();
setTokenData(data);
} catch (err) {
setError(err.message || "Failed to get Connect token");
}
};
useEffect(() => {
if (externalUserId) {
getConnectToken();
}
}, [externalUserId]);
useEffect(() => {
if (tokenData?.connect_link_url) {
const url = new URL(tokenData.connect_link_url);
url.searchParams.set("app", appSlug);
setConnectLinkUrl(url.toString());
} else {
setConnectLinkUrl("");
}
}, [tokenData, appSlug]);
const copyToClipboard = () => {
navigator.clipboard.writeText(connectLinkUrl);
setCopied(true);
setTimeout(() => setCopied(false), 2000);
};
if (!tokenData?.connect_link_url) {
return
# Managed Auth Quickstart
Source: https://pipedream.com/docs/connect/managed-auth/quickstart
export const ConnectLinkDemo = ({supabaseUrl, supabaseAnonKey}) => {
const [appSlug, setAppSlug] = useState("google_sheets");
const [tokenData, setTokenData] = useState(null);
const [connectLinkUrl, setConnectLinkUrl] = useState("");
const [error, setError] = useState(null);
const [copied, setCopied] = useState(false);
const [externalUserId, setExternalUserId] = useState("");
useEffect(() => {
setExternalUserId(crypto.randomUUID());
}, []);
const generateRequestToken = () => {
if (typeof window === "undefined") return "";
const baseString = `${navigator.userAgent}:${window.location.host}:connect-demo`;
return btoa(baseString);
};
const getConnectToken = async () => {
try {
const requestToken = generateRequestToken();
const response = await fetch(`${supabaseUrl}/functions/v1/demo-connect-token`, {
method: "POST",
headers: {
"Content-Type": "application/json",
"Authorization": `Bearer ${supabaseAnonKey}`,
"X-Request-Token": requestToken
},
body: JSON.stringify({
external_user_id: externalUserId
})
});
if (!response.ok) {
throw new Error("Failed to get Connect token");
}
const data = await response.json();
setTokenData(data);
} catch (err) {
setError(err.message || "Failed to get Connect token");
}
};
useEffect(() => {
if (externalUserId) {
getConnectToken();
}
}, [externalUserId]);
useEffect(() => {
if (tokenData?.connect_link_url) {
const url = new URL(tokenData.connect_link_url);
url.searchParams.set("app", appSlug);
setConnectLinkUrl(url.toString());
} else {
setConnectLinkUrl("");
}
}, [tokenData, appSlug]);
const copyToClipboard = () => {
navigator.clipboard.writeText(connectLinkUrl);
setCopied(true);
setTimeout(() => setCopied(false), 2000);
};
if (!tokenData?.connect_link_url) {
return Generating Connect token...
{error &&
{connectLinkUrl}
This URL contains a Connect Token that expires in 4 hours or after it's used once. You can send this link to your users via email, SMS, or chat.
Note: {" "}Connect tokens are single-use. After a successful connection, you'll need to generate a new token.
{externalUserId}
{error}
{JSON.stringify(tokenData, null, 2)}
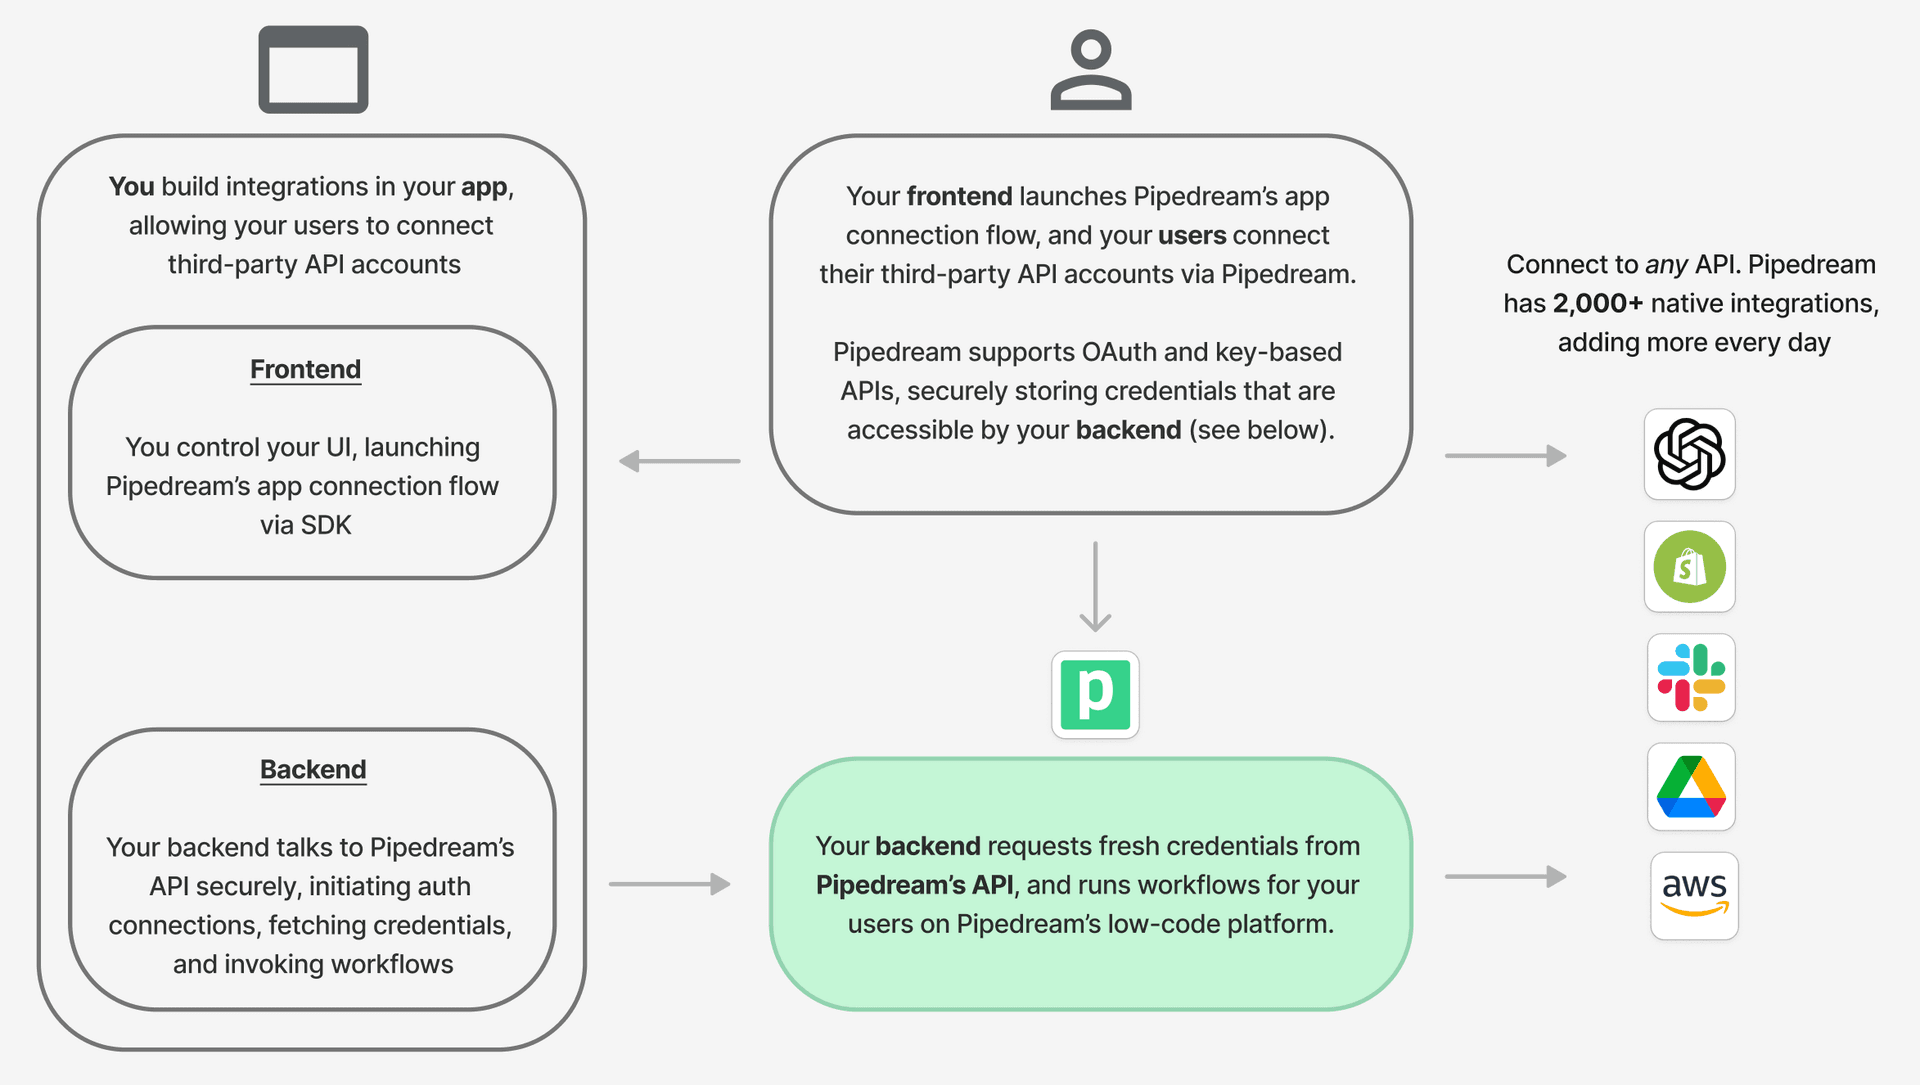 Here’s how Connect sits in your frontend and backend, and communicates with Pipedream’s API:
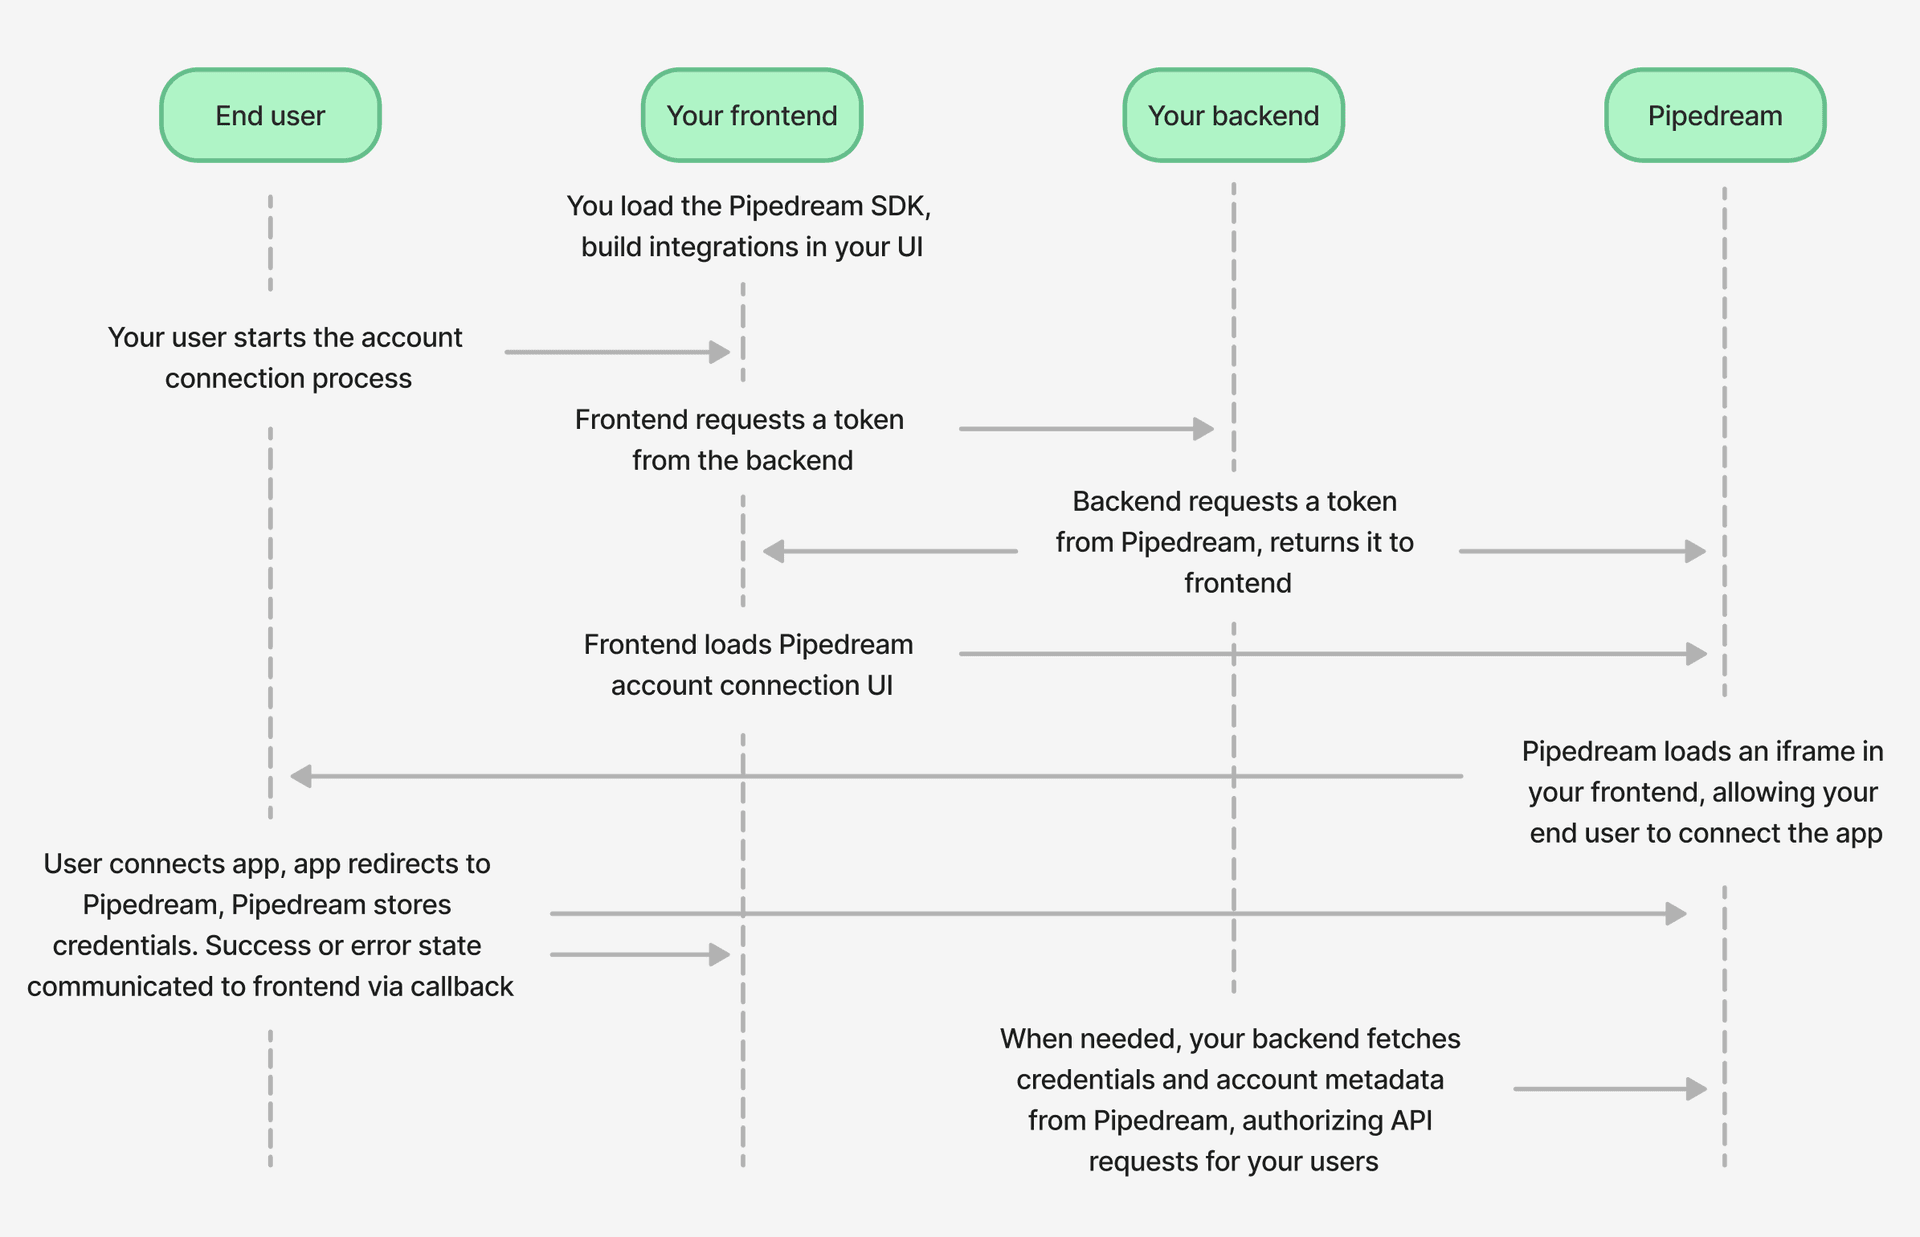 ## Getting started
We’ll walk through these steps below with an interactive demo that lets you see an execute the code directly in the docs.
## Getting started
We’ll walk through these steps below with an interactive demo that lets you see an execute the code directly in the docs.
Type at least 2 characters to search
} {isLoading &&Searching...
{error}
{app.name}
{app.description}
{app.categories.length > 0 &&Scroll to see more
}No apps found for "{debouncedSearchQuery}"
Browse all available apps at{" "} mcp.pipedream.com
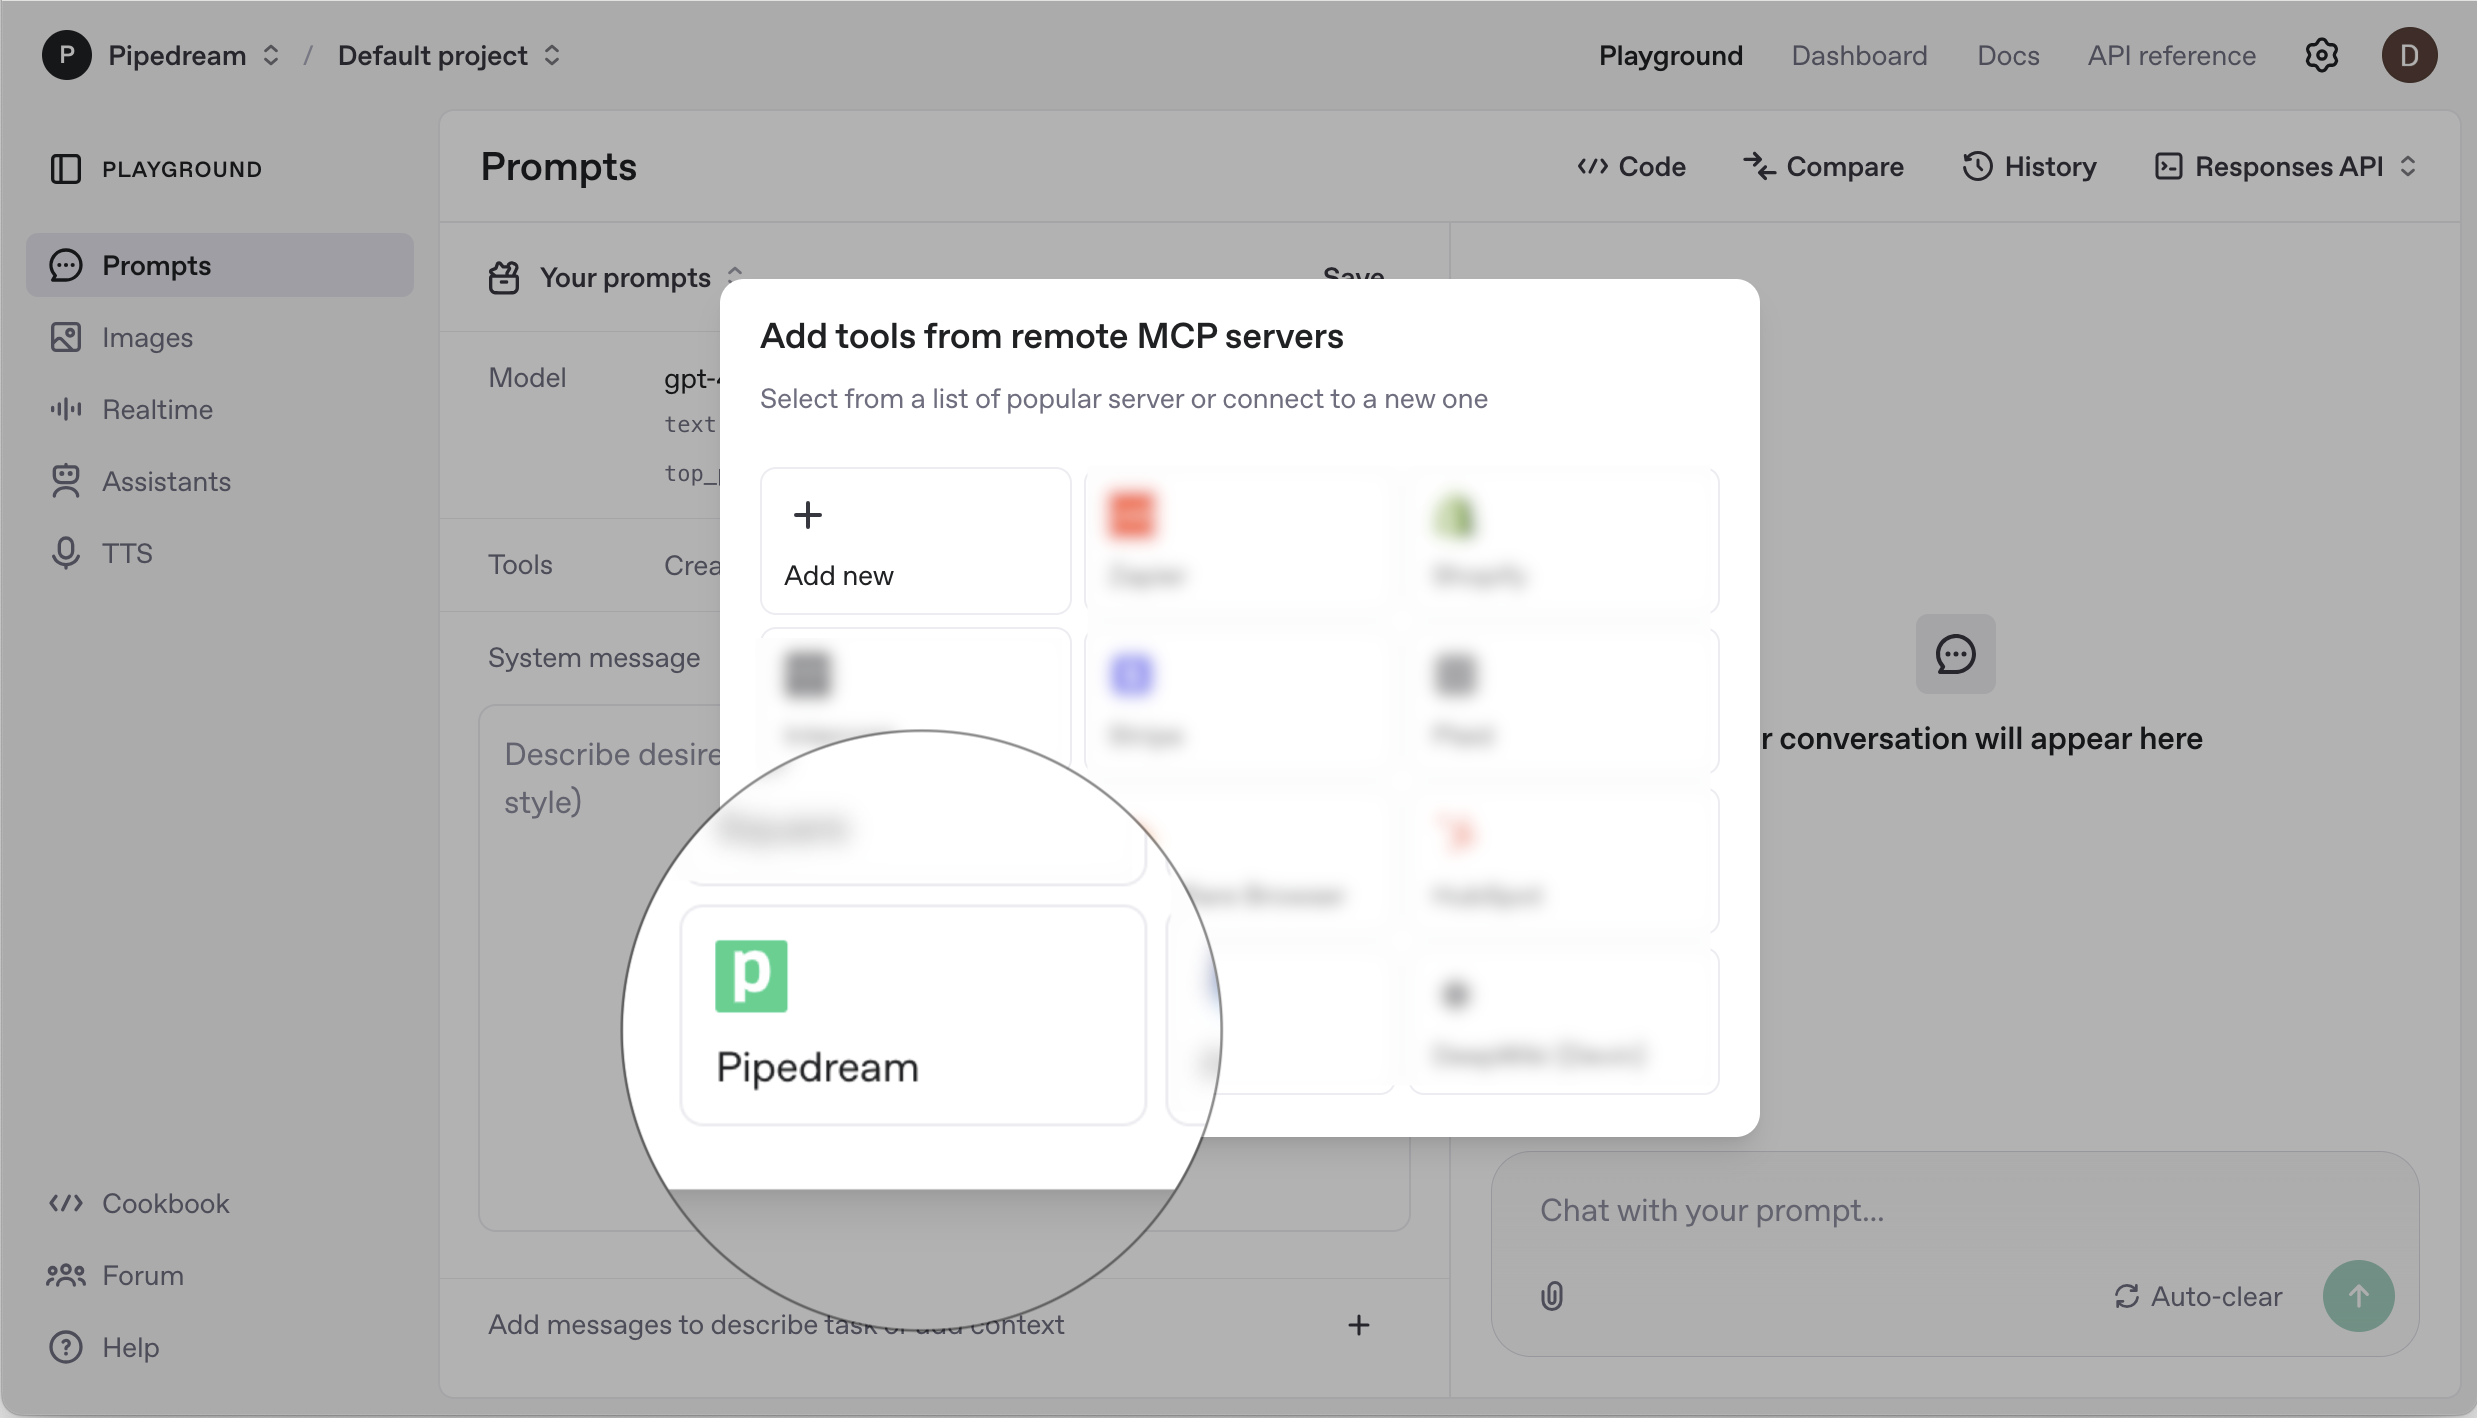
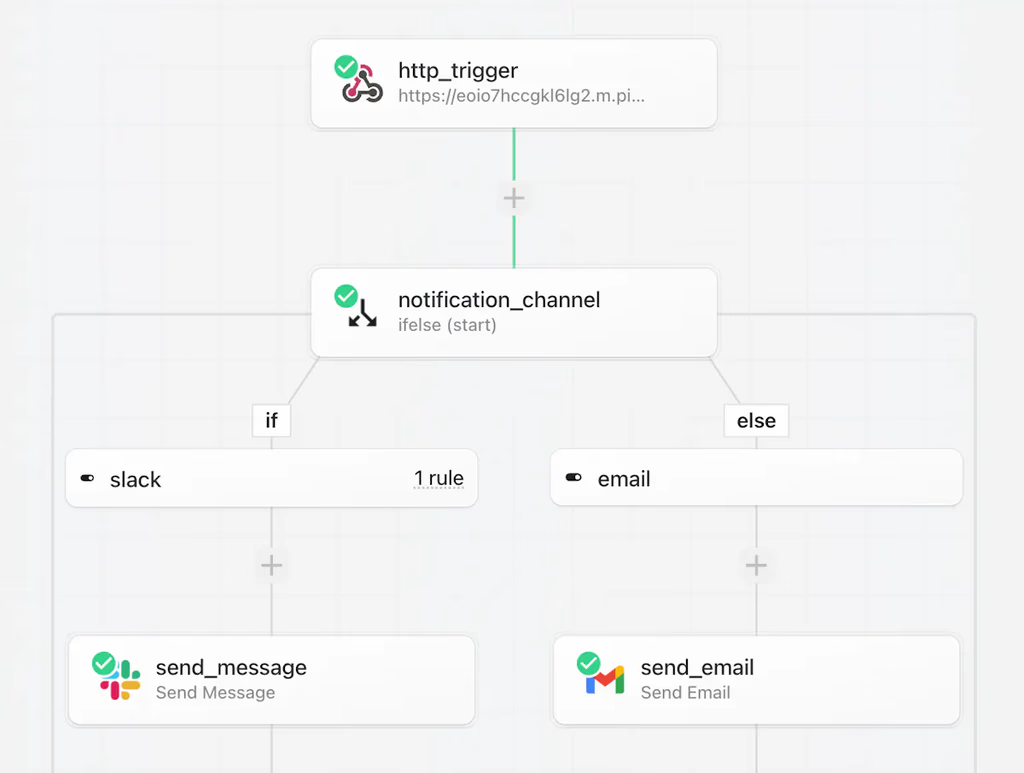 Workflows are sequences of [steps](/docs/workflows/#steps) [triggered by an event](/docs/workflows/building-workflows/triggers/), like an HTTP request, or new rows in a Google sheet.
You can use [pre-built actions](/docs/workflows/building-workflows/actions/) or custom [Node.js](/docs/workflows/building-workflows/code/nodejs/), [Python](/docs/workflows/building-workflows/code/python/), [Golang](/docs/workflows/building-workflows/code/go/), or [Bash](/docs/workflows/building-workflows/code/bash/) code in workflows and connect to any of our {PUBLIC_APPS} integrated apps.
Workflows also have built-in:
* [Flow control](/docs/workflows/building-workflows/control-flow/)
* [Concurrency and throttling](/docs/workflows/building-workflows/settings/concurrency-and-throttling/)
* [Key-value stores](/docs/workflows/data-management/data-stores/)
* [Error handling](/docs/workflows/building-workflows/errors/)
* [VPCs](/docs/workflows/vpc/)
* [And more](https://pipedream.com/pricing)
Read [the quickstart](/docs/workflows/quickstart/) to learn more.
## Getting started
Workflows are sequences of [steps](/docs/workflows/#steps) [triggered by an event](/docs/workflows/building-workflows/triggers/), like an HTTP request, or new rows in a Google sheet.
You can use [pre-built actions](/docs/workflows/building-workflows/actions/) or custom [Node.js](/docs/workflows/building-workflows/code/nodejs/), [Python](/docs/workflows/building-workflows/code/python/), [Golang](/docs/workflows/building-workflows/code/go/), or [Bash](/docs/workflows/building-workflows/code/bash/) code in workflows and connect to any of our {PUBLIC_APPS} integrated apps.
Workflows also have built-in:
* [Flow control](/docs/workflows/building-workflows/control-flow/)
* [Concurrency and throttling](/docs/workflows/building-workflows/settings/concurrency-and-throttling/)
* [Key-value stores](/docs/workflows/data-management/data-stores/)
* [Error handling](/docs/workflows/building-workflows/errors/)
* [VPCs](/docs/workflows/vpc/)
* [And more](https://pipedream.com/pricing)
Read [the quickstart](/docs/workflows/quickstart/) to learn more.
## Getting started
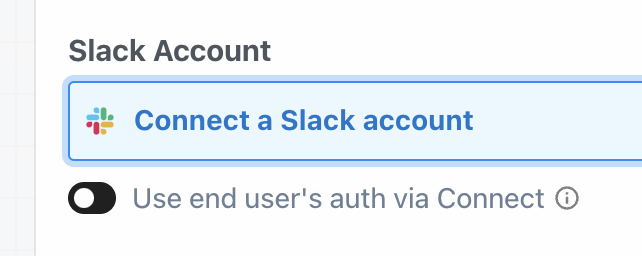 2. **Use your end users’ auth**: If you’re building a workflow that connects to your end users’ accounts — for example, a workflow that sends a message with your user’s Slack account — you can select the option to **Use end user’s auth via Connect**:
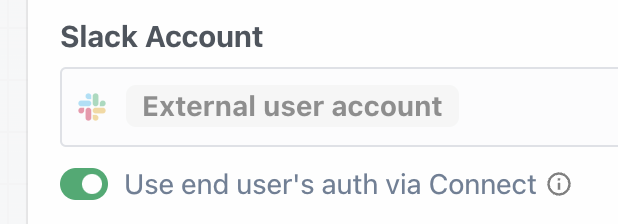 When you trigger the workflow, Pipedream will look up the corresponding account for the end user whose user ID you provide [when invoking the workflow](/docs/connect/workflows/#invoke-the-workflow).
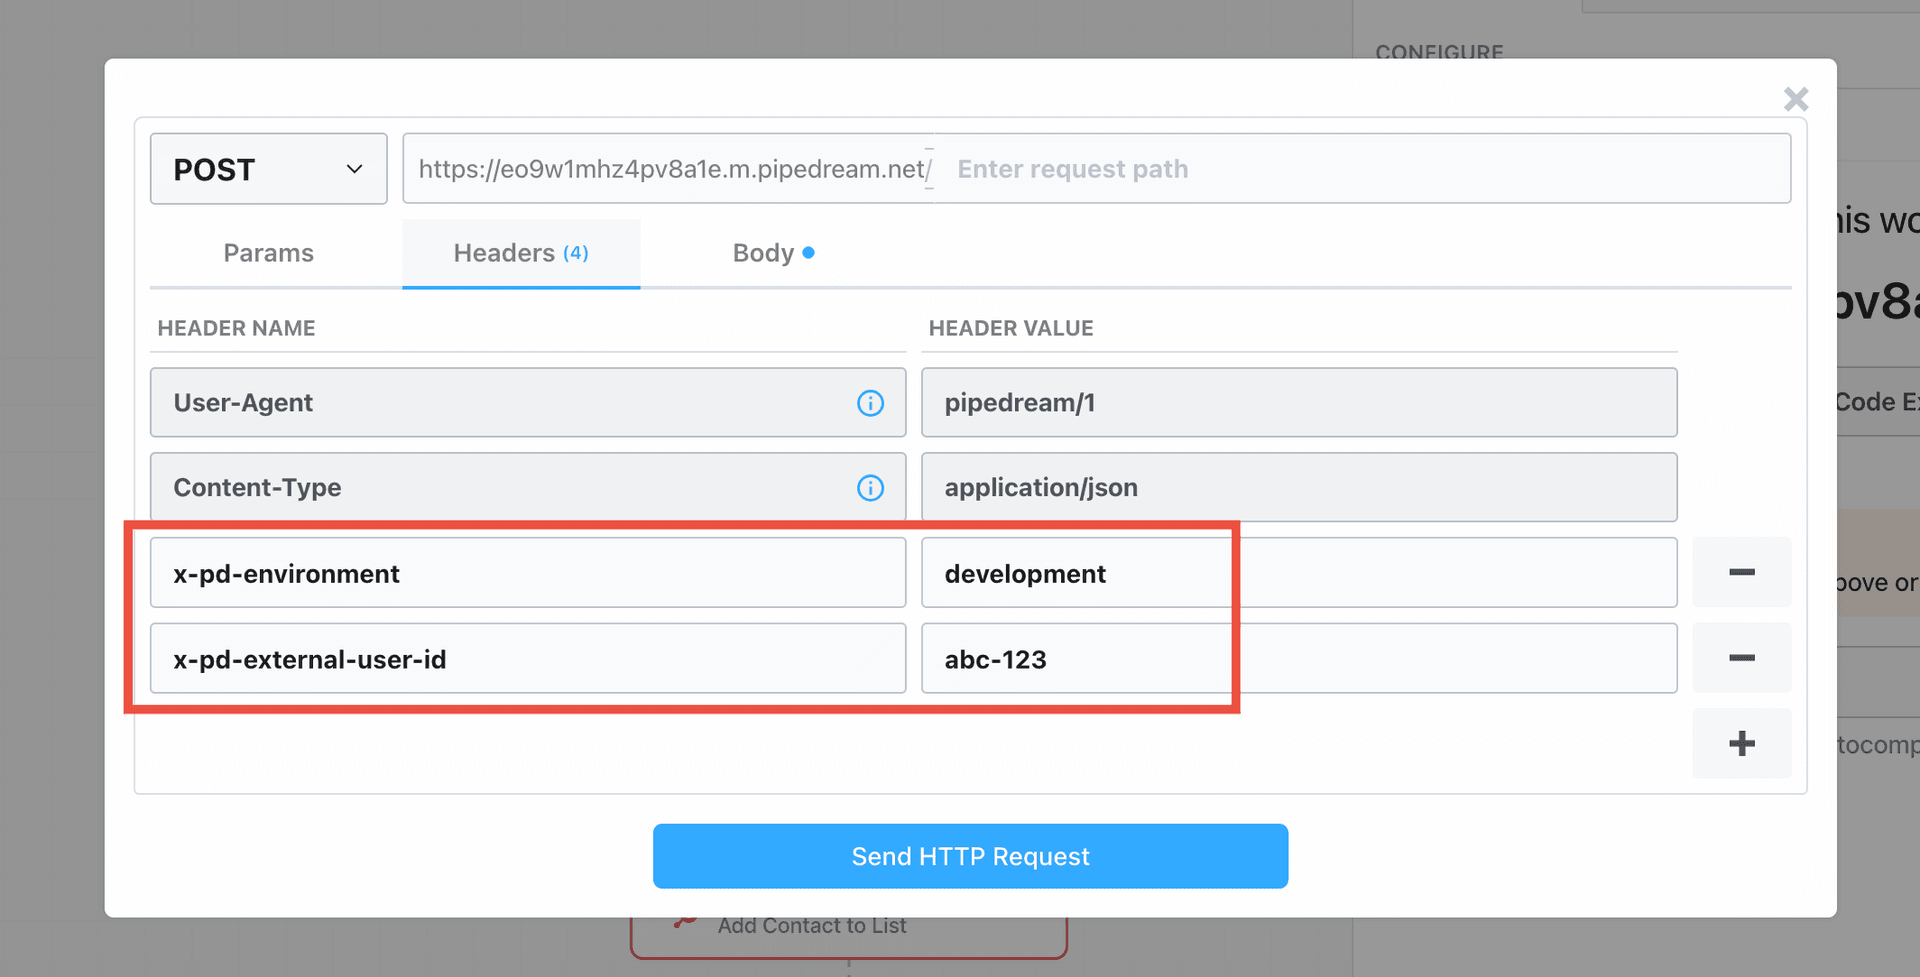
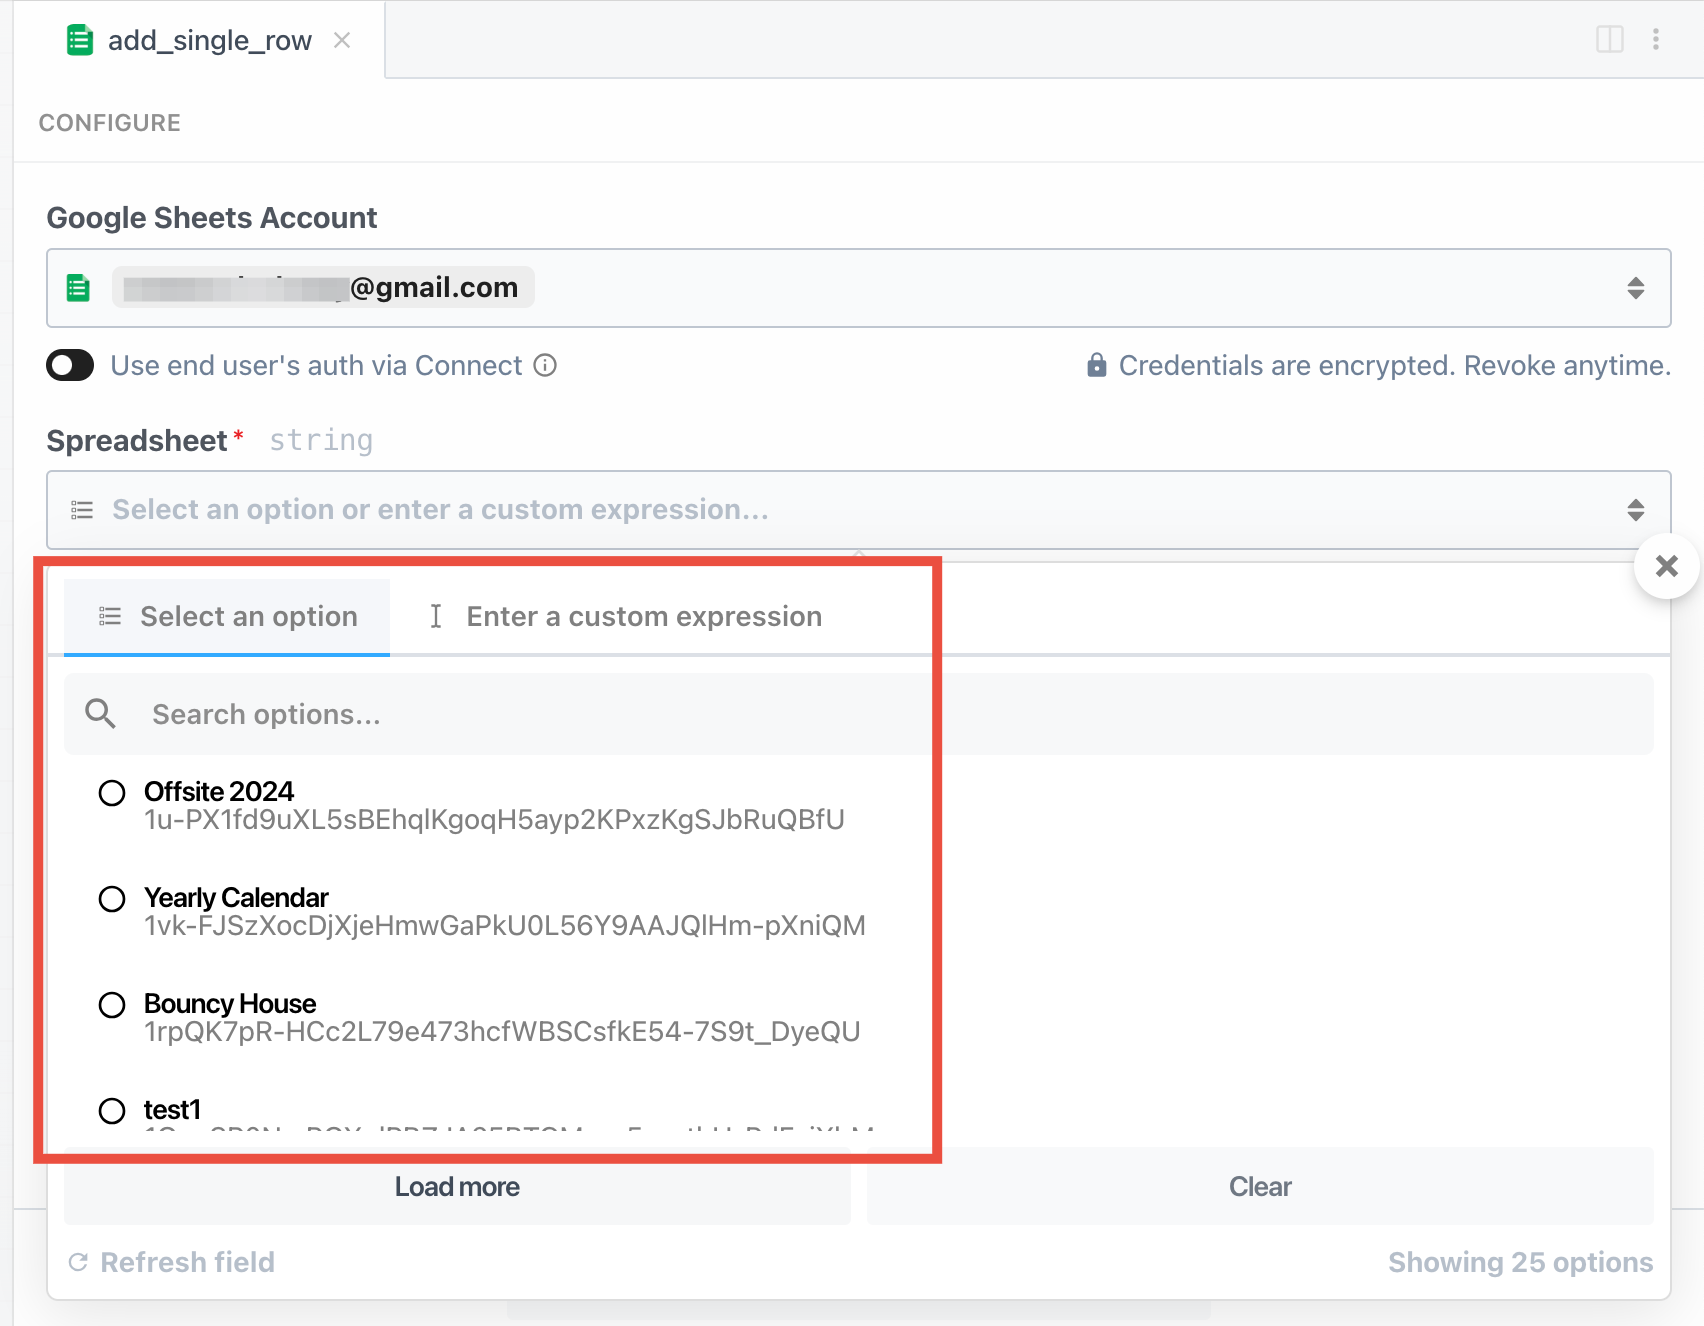 However, when running workflows on behalf of your end users, that UI configuration doesn’t work, since the Google Sheets account to use is determined at the time of workflow execution. So instead, you’ll need to configure these fields manually.
* Either make sure to pass all required configuration data when invoking the workflow, or add a step to your workflow that retrieve it from your database, etc. For example:
```sh
curl -X POST https://{your-endpoint-url} \
-H "Content-Type: application/json" \
-H "Authorization: Bearer {access_token}" \
-H 'X-PD-External-User-ID: {your_external_user_id}' \
-H 'X-PD-Environment: development' \ # 'development' or 'production'
-d '{
"slackChannel": "#general",
"messageText": "Hello, world!",
"gitRepo": "AcmeOrg/acme-repo",
"issueTitle": "Test Issue"
}' \
```
* Then in the Slack and GitHub steps, you’d reference those fields directly:
However, when running workflows on behalf of your end users, that UI configuration doesn’t work, since the Google Sheets account to use is determined at the time of workflow execution. So instead, you’ll need to configure these fields manually.
* Either make sure to pass all required configuration data when invoking the workflow, or add a step to your workflow that retrieve it from your database, etc. For example:
```sh
curl -X POST https://{your-endpoint-url} \
-H "Content-Type: application/json" \
-H "Authorization: Bearer {access_token}" \
-H 'X-PD-External-User-ID: {your_external_user_id}' \
-H 'X-PD-Environment: development' \ # 'development' or 'production'
-d '{
"slackChannel": "#general",
"messageText": "Hello, world!",
"gitRepo": "AcmeOrg/acme-repo",
"issueTitle": "Test Issue"
}' \
```
* Then in the Slack and GitHub steps, you’d reference those fields directly:
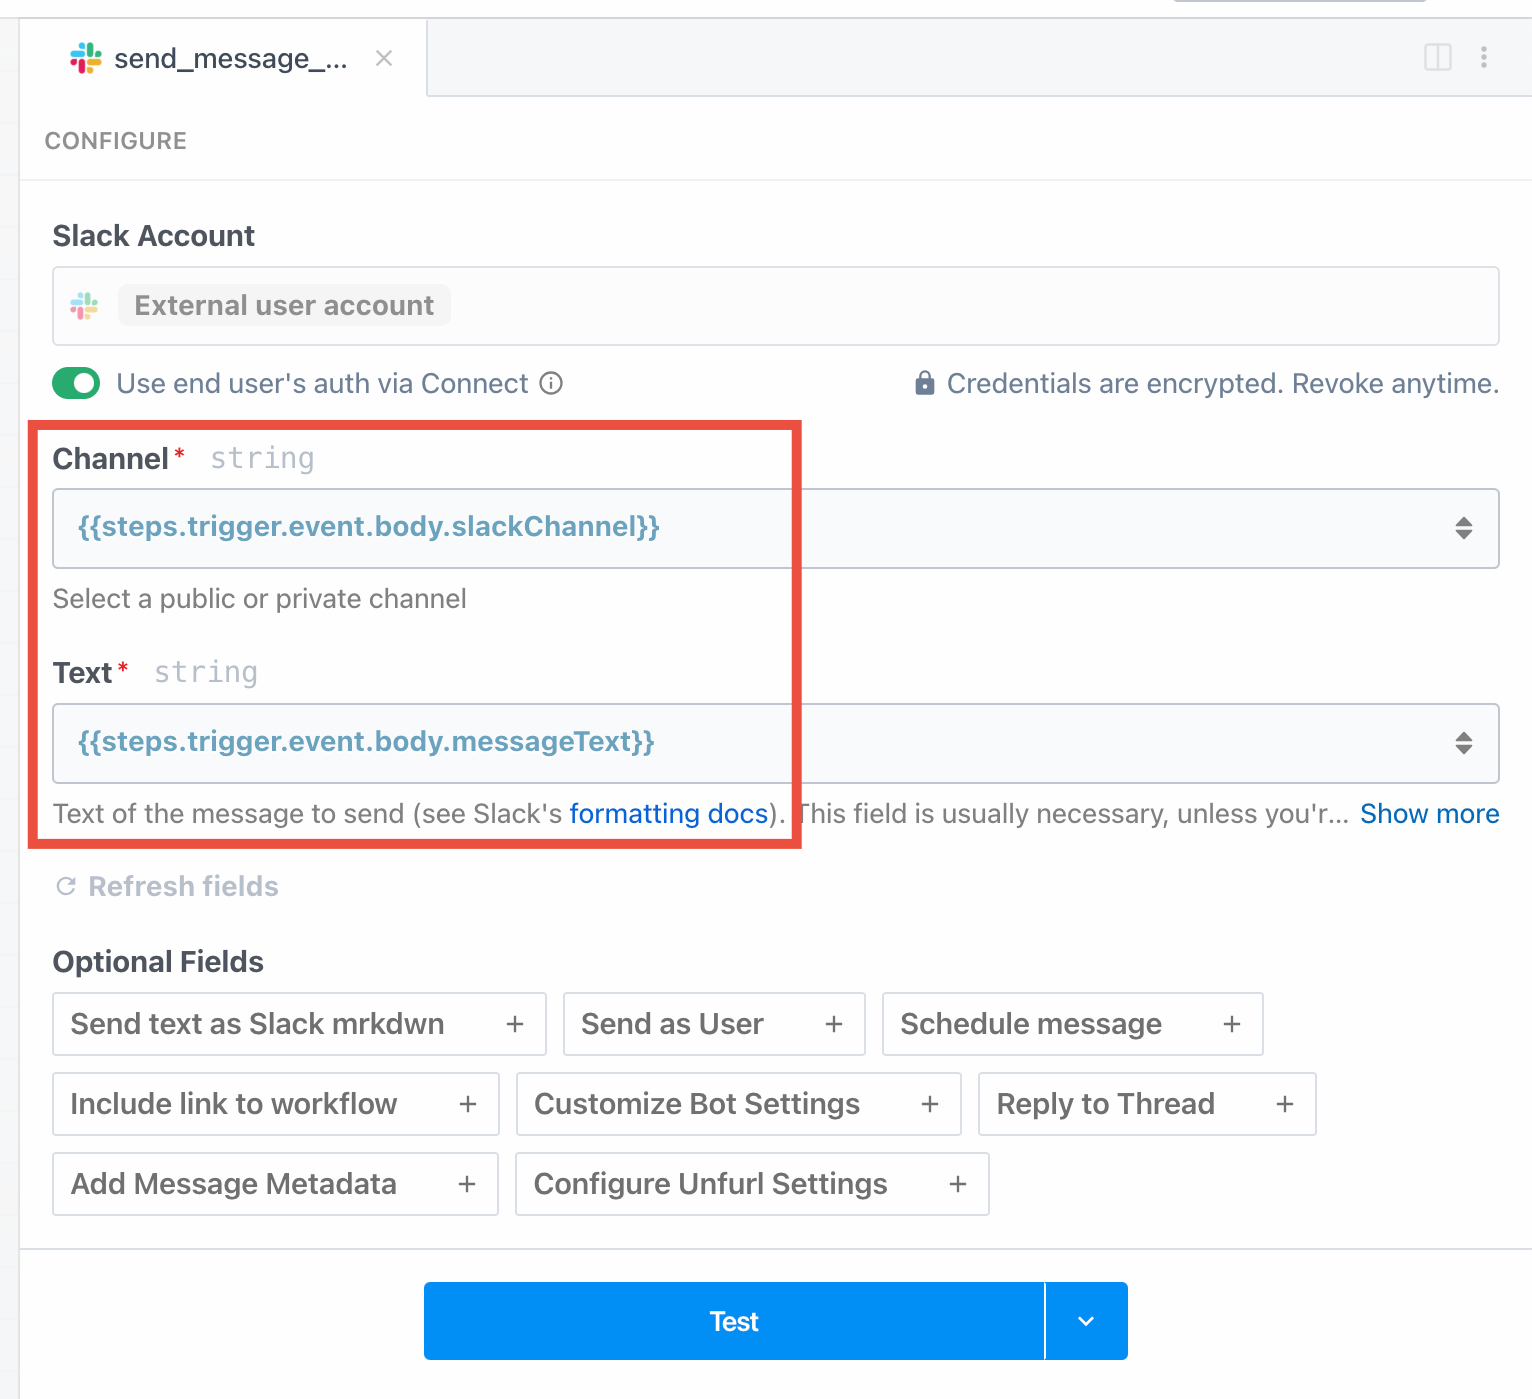
 2. Click on the **Headers** tab
3. Make sure `x-pd-environment` is set (you’ll likely want to `development`)
4. Make sure to also pass `x-pd-external-user-id` with the external user ID of the user you’d like to test with
2. Click on the **Headers** tab
3. Make sure `x-pd-environment` is set (you’ll likely want to `development`)
4. Make sure to also pass `x-pd-external-user-id` with the external user ID of the user you’d like to test with
 ## Triggering your workflow
You have two options for triggering workflows that run on behalf of your end users:
1. [Invoke via HTTP webhook](/docs/connect/workflows/#http-webhook)
2. [Deploy an event source](/docs/connect/workflows/#deploy-an-event-source) (Slack, Gmail, etc.)
### HTTP Webhook
The most common way to trigger workflows is via HTTP webhook. We strongly recommend [creating a Pipedream OAuth client](/docs/connect/api-reference/authentication#creating-an-oauth-client) and authenticating inbound requests to your workflows.
## Triggering your workflow
You have two options for triggering workflows that run on behalf of your end users:
1. [Invoke via HTTP webhook](/docs/connect/workflows/#http-webhook)
2. [Deploy an event source](/docs/connect/workflows/#deploy-an-event-source) (Slack, Gmail, etc.)
### HTTP Webhook
The most common way to trigger workflows is via HTTP webhook. We strongly recommend [creating a Pipedream OAuth client](/docs/connect/api-reference/authentication#creating-an-oauth-client) and authenticating inbound requests to your workflows.
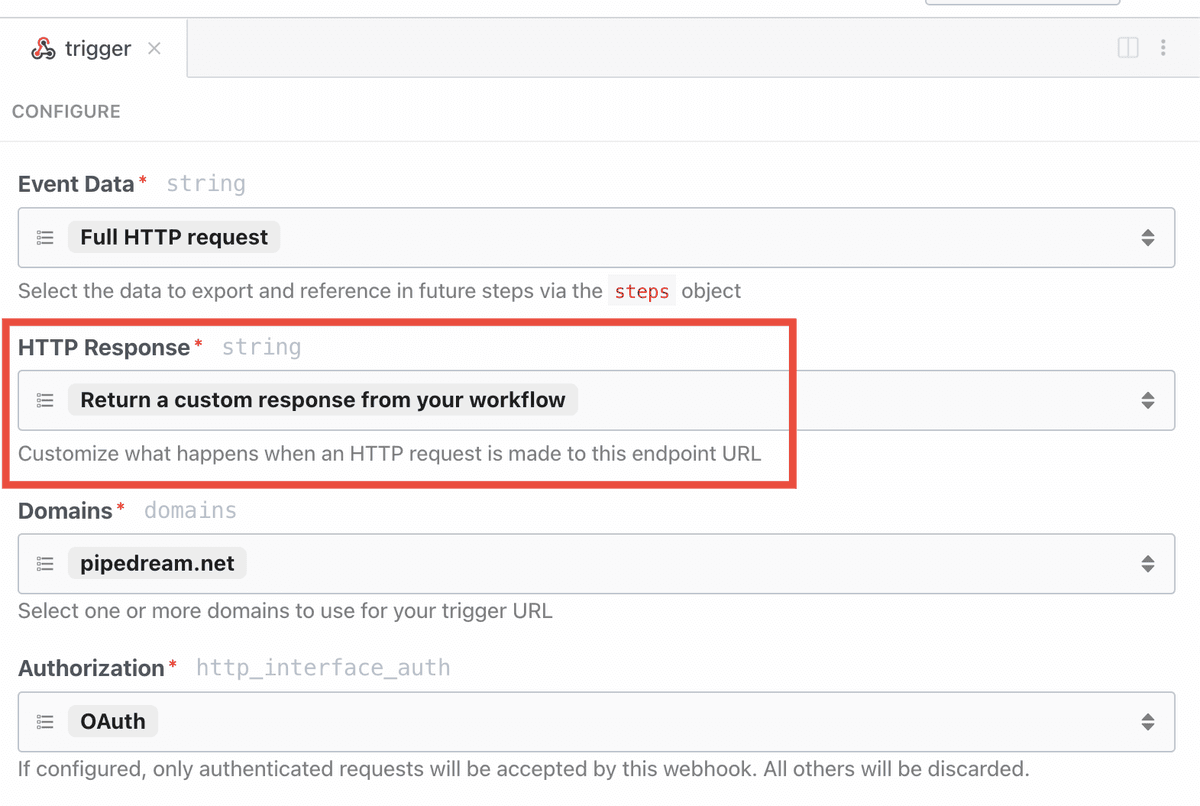 With that setting enabled on the trigger, below is an example of [this](/docs/connect/workflows/#required-account-not-found-for-external-user-id) error:
```sh
curl -X POST https://{your-endpoint-url} \
-H 'Content-Type: application/json' \
-H 'Authorization: Bearer {access_token}' \
-H "x-pd-environment: development" \
-H "x-pd-external-user-id: abc-123" \
-d '{
"slackChannel": "#general",
"messageText": "Hello, world! (sent via curl)",
"hubSpotList": "prospects",
"contactEmail": "foo@example.com"
}' \
Pipedream Connect Error: Required account for hubspot not found for external user ID abc-123 in development
```
### Common errors
#### No external user ID passed, but one or more steps require it
* One or more steps in the workflow are configured to **Use end user’s auth via Connect**, but no external user ID was passed when invoking the workflow.
* [Refer to the docs](/docs/connect/workflows/#invoke-the-workflow) to make sure you’re passing external user ID correctly when invoking the workflow.
#### No matching external user ID
* There was an external user ID passed, but it didn’t match any users in the project.
* Double-check that the external user ID that you passed when invoking the workflow matches one either [in the UI](/docs/connect/managed-auth/users/) or [via the API](/docs/connect/api-reference/list-accounts).
#### Required account not found for external user ID
* The external user ID was passed when invoking the workflow, but the user doesn’t have a connected account for one or more of the apps that are configured to use it in this workflow execution.
* You can check which connected accounts are available for that user [in the UI](/docs/connect/managed-auth/users/) or [via the API](/docs/connect/api-reference/list-accounts).
#### Running workflows for your users in production requires a higher tier plan
* Anyone is able to run workflows for your end users in `development`.
* Visit the [pricing page](https://pipedream.com/pricing?plan=Connect) for the latest info on using Connect in production.
## Known limitations
#### Workflows can only use a single external user’s auth per execution
* Right now you cannot invoke a workflow to loop through many external user IDs within a single execution.
* You can only run a workflow for a single external user ID at a time (for now).
#### The external user ID to use during execution must be passed in the triggering event
* You can’t run a workflow on a timer for example, and look up the external user ID to use at runtime.
* The external user ID must be passed in the triggering event, typically via [HTTP trigger](/docs/connect/workflows/#invoke-the-workflow).
#### Cannot use multiple accounts for the same app during a single execution
* If a user has multiple accounts for the same app (tied to a single external user), **Pipedream will use the most recently created account**.
* Learn about [managing connected accounts](/docs/connect/managed-auth/users/) for your end users.
# Migrate from v1
Source: https://pipedream.com/docs/deprecated/migrate-from-v1
With that setting enabled on the trigger, below is an example of [this](/docs/connect/workflows/#required-account-not-found-for-external-user-id) error:
```sh
curl -X POST https://{your-endpoint-url} \
-H 'Content-Type: application/json' \
-H 'Authorization: Bearer {access_token}' \
-H "x-pd-environment: development" \
-H "x-pd-external-user-id: abc-123" \
-d '{
"slackChannel": "#general",
"messageText": "Hello, world! (sent via curl)",
"hubSpotList": "prospects",
"contactEmail": "foo@example.com"
}' \
Pipedream Connect Error: Required account for hubspot not found for external user ID abc-123 in development
```
### Common errors
#### No external user ID passed, but one or more steps require it
* One or more steps in the workflow are configured to **Use end user’s auth via Connect**, but no external user ID was passed when invoking the workflow.
* [Refer to the docs](/docs/connect/workflows/#invoke-the-workflow) to make sure you’re passing external user ID correctly when invoking the workflow.
#### No matching external user ID
* There was an external user ID passed, but it didn’t match any users in the project.
* Double-check that the external user ID that you passed when invoking the workflow matches one either [in the UI](/docs/connect/managed-auth/users/) or [via the API](/docs/connect/api-reference/list-accounts).
#### Required account not found for external user ID
* The external user ID was passed when invoking the workflow, but the user doesn’t have a connected account for one or more of the apps that are configured to use it in this workflow execution.
* You can check which connected accounts are available for that user [in the UI](/docs/connect/managed-auth/users/) or [via the API](/docs/connect/api-reference/list-accounts).
#### Running workflows for your users in production requires a higher tier plan
* Anyone is able to run workflows for your end users in `development`.
* Visit the [pricing page](https://pipedream.com/pricing?plan=Connect) for the latest info on using Connect in production.
## Known limitations
#### Workflows can only use a single external user’s auth per execution
* Right now you cannot invoke a workflow to loop through many external user IDs within a single execution.
* You can only run a workflow for a single external user ID at a time (for now).
#### The external user ID to use during execution must be passed in the triggering event
* You can’t run a workflow on a timer for example, and look up the external user ID to use at runtime.
* The external user ID must be passed in the triggering event, typically via [HTTP trigger](/docs/connect/workflows/#invoke-the-workflow).
#### Cannot use multiple accounts for the same app during a single execution
* If a user has multiple accounts for the same app (tied to a single external user), **Pipedream will use the most recently created account**.
* Learn about [managing connected accounts](/docs/connect/managed-auth/users/) for your end users.
# Migrate from v1
Source: https://pipedream.com/docs/deprecated/migrate-from-v1
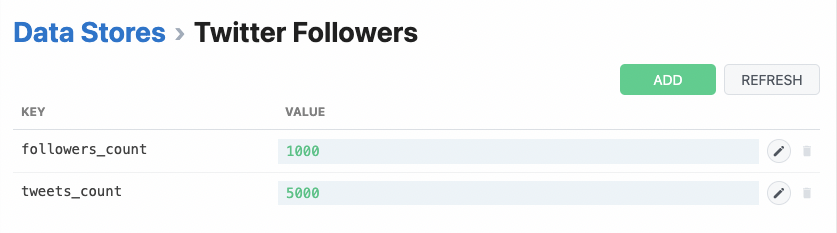 ## Managing your plan
To cancel, upgrade or downgrade your plan, open the [pricing page](https://pipedream.com/pricing).
To update your billing details, such as your VAT number, email address, etc. use the **Manage Billing Information** button in your [workspace billing settings](https://pipedream.com/settings/billing) to change your plan. Within this portal you can cancel, upgrade or downgrade your plan at any time.
### Billing period
Many of the usage statistics for paid users are tied to a **billing period**. Your billing period starts when you sign up for a paid plan, and recurs roughly once a month for the duration of your subscription.
For example, if you sign up on Jan 1st, your first billing period will last one month, ending around Feb 1st, at which point you’ll start a new billing period.
Your invoices are tied to your billing period. [Read more about invoicing / billing here](/docs/pricing/faq/#when-am-i-billed-for-paid-plans).
### Upgrading
Upgrading your subscription instantly activates the features available to your workspace. For example, if you upgrade your workspace from Free to Basic, that workspace will immediately be able to activate more workflows and connected accounts.
### Downgrading
Downgrades will apply at the end of your billing cycle, and any workflows or integrations that use features outside the new billing plan will be automatically disabled.
For example, if your workspace downgrades from Advanced to Basic and a workflow uses an Advanced feature such as [auto-retries](/docs/workflows/building-workflows/settings/#auto-retry-errors), then this workflow will be disabled because the workspace plan no longer qualifies for that feature.
Additionally, resource limits such as the number of active workflows and connected accounts will also be enforced at this same time.
### Cancelling your plan
To cancel your plan, open the [pricing page](https://pipedream.com/pricing) and click **Cancel** beneath your current plan.
Cancelling your subscription will apply at the end of your current billing period. Workflows, connected accounts and sources will be deactivated from newest to oldest until the Free limits have been reached.
## Detailed pricing information
Refer to our [pricing page](https://pipedream.com/pricing) for detailed pricing information.
# FAQ
Source: https://pipedream.com/docs/pricing/faq
export const MEMORY_LIMIT = '256MB';
## How does workflow memory affect credits?
Pipedream charges credits proportional to the memory configuration. If you run your workflow at the default memory of {MEMORY_LIMIT}, you are charged one credit each time your workflow executes for 30 seconds. But if you configure your workflow with `1024MB` of memory, for example, you’re charged **four** credits, since you’re using `4x` the default memory.
## Are there any limits on paid tiers?
**You can run any number of credits for any amount of compute time** on any paid tier. [Other platform limits](/docs/workflows/limits/) apply.
## When am I billed for paid plans?
When you upgrade to a paid tier, Stripe will immediately charge your payment method on file for the platform fee tied to your plan (see [https://pipedream.com/pricing](https://pipedream.com/pricing))
If you accrue any [additional credits](/docs/pricing/#additional-credits), that usage is reported to Stripe throughout the [billing period](/docs/pricing/#billing-period). That overage, as well as the next platform fee, is charged at the start of the *next* billing period.
## Do any plans support payment by invoice, instead of credit / debit card?
Yes, Pipedream can issue invoices on the Business Plan. [Please reach out to support](https://pipedream.com/support)
## How does Pipedream secure my credit card data?
Pipedream stores no information on your payment method and uses Stripe as our payment processor. [See our security docs](/docs/privacy-and-security/#payment-processor) for more information.
## Are unused credits rolled over from one period to the next?
**No**. On the Free tier, unused included daily credits under the daily limit are **not** rolled over to the next day.
On paid tiers, unused included credits are also **not** rolled over to the next month.
## How do I change my billing payment method?
Please visit your [Stripe customer portal](https://pipedream.com/settings/billing?rtsbp=1) to change your payment method.
## How can I view my past invoices?
Invoices are emailed to your billing email address. You can also visit your [Stripe customer portal](https://pipedream.com/settings/billing?rtsbp=1) to view past invoices.
## Can I retrieve my billing information via API?
Yes. You can retrieve your usage and billing metadata from the [/users/me](/docs/rest-api/#get-current-user-info) endpoint in the Pipedream REST API.
## How do I cancel my paid plan?
You can cancel your plan in your [Billing and Usage Settings](https://pipedream.com/settings/billing). You will have access to your paid plan through the end of your current billing period. Pipedream does not prorate plans cancelled within a billing period.
If you’d like to process your cancellation immediately, and downgrade to the free tier, please [reach out](https://pipedream.com/support).
## How do I change the billing email, VAT, or other company details tied to my invoice?
You can update your billing information in your [Stripe customer portal](https://pipedream.com/settings/billing?rtsbp=1).
## How do I contact the Pipedream team with other questions?
You can start a support ticket [on our support page](https://pipedream.com/support). Select the **Billing Issues** category to start a billing related ticket.
# Privacy And Security At Pipedream
Source: https://pipedream.com/docs/privacy-and-security
export const PUBLIC_APPS = '2,700';
Pipedream is committed to the privacy and security of your data. Below, we outline how we handle specific data and what we do to secure it. This is not an exhaustive list of practices, but an overview of key policies and procedures.
It is also your responsibility as a customer to ensure you’re securing your workflows’ code and data. See our [security best practices](/docs/privacy-and-security/best-practices/) for more information.
Pipedream has demonstrated SOC 2 compliance and can provide a SOC 2 Type 2 report upon request (please reach out to [support@pipedream.com](mailto:support@pipedream.com)).
If you have any questions related to data privacy, please email [privacy@pipedream.com](mailto:privacy@pipedream.com). If you have any security-related questions, or if you’d like to report a suspected vulnerability, please email [security@pipedream.com](mailto:security@pipedream.com).
## Reporting a Vulnerability
If you’d like to report a suspected vulnerability, please contact [security@pipedream.com](mailto:security@pipedream.com).
If you need to encrypt sensitive data as part of your report, you can use our security team’s [PGP key](/docs/privacy-and-security/pgp-key/).
## Reporting abuse
If you suspect Pipedream resources are being used for illegal purposes, or otherwise violate [the Pipedream Terms](https://pipedream.com/terms), [report abuse here](/docs/abuse/).
## Compliance
### SOC 2
Pipedream undergoes annual third-party audits. We have demonstrated SOC 2 compliance and can provide a SOC 2 Type 2 report upon request. Please reach out to [support@pipedream.com](mailto:support@pipedream.com) to request the latest report.
We use [Drata](https://drata.com) to continuosly monitor our infrastructure’s compliance with standards like SOC 2, and you can visit our [Security Report](https://app.drata.com/security-report/b45c2f79-1968-496b-8a10-321115b55845/27f61ebf-57e1-4917-9536-780faed1f236) to see a list of policies and processes we implement and track within Drata.
### Annual penetration test
Pipedream performs annual pen tests with a third-party security firm. Please reach out to [support@pipedream.com](mailto:support@pipedream.com) to request the latest report.
### GDPR
#### Data Protection Addendum
Pipedream is considered both a Controller and a Processor as defined by the GDPR. As a Processor, Pipedream implements policies and practices that secure the personal data you send to the platform, and includes a [Data Protection Addendum](https://pipedream.com/dpa) as part of our standard [Terms of Service](https://pipedream.com/terms).
The Pipedream Data Protection Addendum includes the [Standard Contractual Clauses (SCCs)](https://ec.europa.eu/info/law/law-topic/data-protection/international-dimension-data-protection/standard-contractual-clauses-scc_en). These clarify how Pipedream handles your data, and they update our GDPR policies to cover the latest standards set by the European Commission.
You can find a list of Pipedream subprocessors [here](/docs/subprocessors/).
#### Submitting a GDPR deletion request
When you [delete your account](/docs/account/user-settings/#delete-account), Pipedream deletes all personal data we hold on you in our system and our vendors.
If you need to delete data on behalf of one of your users, you can delete the event data yourself in your workflow or event source (for example, by deleting the events, or by removing the data from data stores). Your customer event data is automatically deleted from Pipedream subprocessors.
### HIPAA
Pipedream can sign Business Associate Addendum (BAAs) for customers intending to pass PHI to Pipedream. We can also provide a third-party SOC 2 report detailing our HIPAA-related controls. See our [dedicated HIPAA docs](/docs/privacy-and-security/hipaa/) for more details.
## Hosting Details
Pipedream is hosted on the [Amazon Web Services](https://aws.amazon.com/) (AWS) platform in the `us-east-1` region. The physical hardware powering Pipedream, and the data stored by our platform, is hosted in data centers controlled and secured by AWS. You can read more about AWS’s security practices and compliance certifications [here](https://aws.amazon.com/security/).
Pipedream further secures access to AWS resources through a series of controls, including but not limited to: using multi-factor authentication to access AWS, hosting services within a private network inaccessible to the public internet, and more.
## Intrustion Detection and Prevention
Pipedream uses AWS WAF, GuardDuty, CloudTrail, CloudWatch, Datadog, and other custom alerts to monitor and block suspected attacks against Pipedream infrastructure, including DDoS attacks.
Pipedream reacts to potential threats quickly based on [our incident response policy](/docs/privacy-and-security/#incident-response).
## User Accounts, Authentication and Authorization
When you sign up for a Pipedream account, you can choose to link your Pipedream login to either an existing [Google](https://google.com) or [Github](https://github.com) account, or create an account directly with Pipedream. Pipedream also supports [single-sign on](/docs/workspaces/#configuring-single-sign-on-sso).
When you link your Pipedream login to an existing identity provider, Pipedream does not store any passwords tied to your user account —that information is secured with the identity provider. We recommend you configure two-factor authentication in the provider to further protect access to your Pipedream account.
When you create an account on Pipedream directly, with a username and password, Pipedream implements account security best practices (for example: Pipedream hashes your password, and the hashed password is encrypted in our database, which resides in a private network accessible only to select Pipedream employees).
## Third party OAuth grants, API keys, and environment variables
When you link an account from a third party application, you may be asked to either authorize a Pipedream OAuth application access to your account, or provide an API key or other credentials. This section describes how we handle these grants and keys.
When a third party application supports an [OAuth integration](https://oauth.net/2/), Pipedream prefers that interface. The OAuth protocol allows Pipedream to request scoped access to specific resources in your third party account without you having to provide long-term credentials directly. Pipedream must request short-term access tokens at regular intervals, and most applications provide a way to revoke Pipedream’s access to your account at any time.
Some third party applications do not provide an OAuth interface. To access these services, you must provide the required authorization mechanism (often an API key). As a best practice, if your application provides such functionality, Pipedream recommends you limit that API key’s access to only the resources you need access to within Pipedream.
Pipedream encrypts all OAuth grants, key-based credentials, and environment variables at rest in our production database. That database resides in a private network. Backups of that database are encrypted. The key used to encrypt this database is managed by [AWS KMS](https://aws.amazon.com/kms/) and controlled by Pipedream. KMS keys are 256 bit in length and use the Advanced Encryption Standard (AES) in Galois/Counter Mode (GCM). Access to administer these keys is limited to specific members of our team. Keys are automatically rotated once a year. KMS has achieved SOC 1, 2, 3, and ISO 9001, 27001, 27017, 27018 compliance. Copies of these certifications are available from Amazon on request.
When you link credentials to a specific source or workflow, the credentials are loaded into that program’s [execution environment](/docs/privacy-and-security/#execution-environment), which runs in its own virtual machine, with access to RAM and disk isolated from other users’ code.
No credentials are logged in your source or workflow by default. If you log their values or [export data from a step](/docs/workflows/#step-exports), you can always delete the data for that execution from your source or workflow. These logs will also be deleted automatically based on the [event retention](/docs/workflows/limits/#event-history) for your account.
You can delete your OAuth grants or key-based credentials at any time by visiting [https://pipedream.com/accounts](https://pipedream.com/accounts). Deleting OAuth grants within Pipedream **do not** revoke Pipedream’s access to your account. You must revoke that access wherever you manage OAuth grants in your third party application.
## Pipedream REST API security, OAuth clients
The Pipedream API supports two methods of authentication: [OAuth](/docs/rest-api/auth/#oauth) and [User API keys](/docs/rest-api/auth/#user-api-keys). **We recommend using OAuth clients** for a few reasons:
✅ OAuth clients are tied to the workspace, administered by workspace admins\
✅ Tokens are short-lived\
✅ OAuth clients support scopes, limiting access to specific operations
When testing the API or using the CLI, you can use your user API key. This key is tied to your user account and provides full access to any resources your user has access to, across workspaces.
### OAuth clients
Pipedream supports client credentials OAuth clients, which exchange a client ID and client secret for a short-lived access token. These clients are not tied to individual end users, and are meant to be used server-side. You must store these credentials securely on your server, never allowing them to be exposed in client-side code.
Client secrets are salted and hashed before being saved to the database. The hashed secret is encrypted at rest. Pipedream does not store the client secret in plaintext.
You can revoke a specific client secret at any time by visiting [https://pipedream.com/settings/api](https://pipedream.com/settings/api).
### OAuth tokens
Since Pipedream uses client credentials grants, access tokens must not be shared with end users or stored anywhere outside of your server environment.
Access tokens are issued as JWTs, signed with an ED25519 private key. The public key used to verify these tokens is available at [https://api.pipedream.com/.well-known/jwks.json](https://api.pipedream.com/.well-known/jwks.json). See [this workflow template](https://pipedream.com/new?h=tch_rBf76M) for example code you can use to validate these tokens.
Access tokens are hashed before being saved in the Pipedream database, and are encrypted at rest.
Access tokens expire after 1 hour. Tokens can be revoked at any time.
## Pipedream Connect
[Pipedream Connect](/docs/connect/) is the easiest way for your users to connect to [over {PUBLIC_APPS}+ APIs](https://pipedream.com/apps), **right in your product**.
### Client-side SDK
Pipedream provides a [client-side SDK](/docs/connect/api-reference/introduction) to initiate authorization or accept API keys on behalf of your users in environments that can run JavaScript. You can see the code for that SDK [here](https://github.com/PipedreamHQ/pipedream/tree/master/packages/sdk).
When you initiate authorization, you must:
1. [Create a server-side token for a specific end user](/docs/connect/api-reference/create-connect-token)
2. Initiate auth with that token, connecting an account for a specific user
These tokens can only initiate the auth connection flow. They have no permissions to access credentials or perform other operations against the REST API. They are meant to be scoped to a specific user, for use in clients that need to initiate auth flows.
Tokens expire after 4 hours, at which point you must create a new token for that specific user.
### Connect Link
You can also use [Connect Link](/docs/connect/managed-auth/connect-link/) to generate a URL that initiates the authorization flow for a specific user. This is useful when you want to initiate the auth flow from a client-side environment that can’t run JavaScript, or include the link in an email, chat message, etc.
Like tokens, Connect Links are coupled to specific users, and expire after 4 hours.
### REST API
The Pipedream Connect API is a subset of the [Pipedream REST API](/docs/rest-api/). See the [REST API Security](/docs/privacy-and-security/#pipedream-rest-api-security-oauth-clients) section for more information on how we secure the API.
## Execution environment
The **execution environment** refers to the environment in which your sources, workflows, and other Pipedream code is executed.
Each version of a source or workflow is deployed to its own virtual machine in AWS. This means your execution environment has its own RAM and disk, isolated from other users’ environments. You can read more about the details of the virtualization and isolation mechanisms used to secure your execution environment [here](https://firecracker-microvm.github.io/).
Instances of running VMs are called **workers**. If Pipedream spins up three VMs to handle multiple, concurrent requests for a single workflow, we’re running three **workers**. Each worker runs the same Pipedream execution environment. Workers are ephemeral —AWS will shut them down within \~5 minutes of inactivity —but you can configure [dedicated workers](/docs/workflows/building-workflows/settings/#eliminate-cold-starts) to ensure workers are always available to handle incoming requests.
## Controlling egress traffic from Pipedream
By default, outbound traffic shares the same network as other AWS services deployed in the `us-east-1` region. That means network requests from your workflows (e.g. an HTTP request or a connection to a database) originate from the standard range of AWS IP addresses.
[Pipedream VPCs](/docs/workflows/vpc/) enable you to run workflows in dedicated and isolated networks with static outbound egress IP addresses that are unique to your workspace (unlike other platforms that provide static IPs common to all customers on the platform). Outbound network requests from workflows that run in a VPC will originate from these IP addresses, and only workflows in your workspace will run there.
## Encryption of data in transit, TLS (SSL) Certificates
When you use the Pipedream web application at [https://pipedream.com](https://pipedream.com), traffic between your client and Pipedream services is encrypted in transit. When you create an HTTP interface in Pipedream, the Pipedream UI defaults to displaying the HTTPS endpoint, which we recommend you use when sending HTTP traffic to Pipedream so that your data is encrypted in transit.
All Pipedream-managed certificates, including those we create for [custom domains](/docs/workflows/domains/), are created using [AWS Certificate Manager](https://aws.amazon.com/certificate-manager/). This eliminates the need for our employees to manage certificate private keys: these keys are managed and secured by Amazon. Certificate renewal is also handled by Amazon.
## Encryption of data at rest
Pipedream encrypts customer data at rest in our databases and data stores. We use [AWS KMS](https://aws.amazon.com/kms/) to manage encryption keys, and all keys are controlled by Pipedream. KMS keys are 256 bit in length and use the Advanced Encryption Standard (AES) in Galois/Counter Mode (GCM). Access to administer these keys is limited to specific members of our team. Keys are automatically rotated once a year. KMS has achieved SOC 1, 2, 3, and ISO 9001, 27001, 27017, 27018 compliance. Copies of these certifications are available from Amazon on request.
## Email Security
Pipedream delivers emails to users for the purpose of email verification, error notifications, and more. Pipedream implements [SPF](https://en.wikipedia.org/wiki/Sender_Policy_Framework) and [DMARC](https://en.wikipedia.org/wiki/DMARC) DNS records to guard against email spoofing / forgery. You can review these records by using a DNS lookup tool like `dig`:
```
# SPF
dig pipedream.com TXT +short
# DMARC
dig _dmarc.pipedream.com TXT +short
```
## Incident Response
Pipedream implements incident response best practices for identifying, documenting, resolving and communicating incidents. Pipedream publishes incident notifications to a status page at [status.pipedream.com](https://status.pipedream.com/) and to the [@PipedreamStatus Twitter account](https://twitter.com/pipedreamstatus).
Pipedream notifies customers of any data breaches according to our [Data Protection Addendum](https://pipedream.com/dpa).
## Software Development
Pipedream uses GitHub to store and version all production code. Employee access to Pipedream’s GitHub organization is protected by multi-factor authentication.
Only authorized employees are able to deploy code to production. Deploys are tested and monitored before and after release.
## Vulnerability Management
Pipedream monitors our code, infrastructure and core application for known vulnerabilities and addresses critical vulnerabilities in a timely manner.
## Corporate Security
### Background Checks
Pipedream performs background checks on all new hires.
### Workstation Security
Pipedream provides hardware to all new hires. These machines run a local agent that sets configuration of the operating system to hardened standards, including:
* Automatic OS updates
* Hard disk encryption
* Anti-malware software
* Screen lock
and more.
### System Access
Employee access to systems is granted on a least-privilege basis. This means that employees only have access to the data they need to perform their job. System access is reviewed quarterly, on any change in role, or upon termination.
### Security Training
Pipedream provides annual security training to all employees. Developers go through a separate, annual training on secure software development practices.
## Data Retention
Pipedream retains data only for as long as necessary to provide the core service. Pipedream stores your workflow code, data in data stores, and other data indefinitely, until you choose to delete it.
Event data and the logs associated with workflow executions are stored according to [the retention rules on your account](/docs/workflows/limits/#event-history).
Pipedream deletes most internal application logs and logs tied to subprocessors within 30 days. We retain a subset of logs for longer periods where required for security investigations.
## Data Deletion
If you choose to delete your Pipedream account, Pipedream deletes all customer data and event data associated with your account. We also make a request to all subprocessors to delete any data those vendors store on our behalf.
Pipedream deletes customer data in backups within 30 days.
## Payment Processor
Pipedream uses [Stripe](https://stripe.com) as our payment processor. When you sign up for a paid plan, the details of your payment method are transmitted to and stored by Stripe [according to their security policy](https://stripe.com/docs/security/stripe). Pipedream stores no information about your payment method.
# Security Best Practices
Source: https://pipedream.com/docs/privacy-and-security/best-practices
Pipedream implements a range of [privacy and security measures](/docs/privacy-and-security/) meant to protect your data from unauthorized access. Since Pipedream [workflows](/docs/workflows/building-workflows/), [event sources](/docs/workflows/building-workflows/triggers/), and other resources can run any code and process any event data, you also have a responsibility to ensure you handle that code and data securely. We’ve outlined a handful of best practices for that below.
## Store secrets as Pipedream connected accounts or environment variables
Never store secrets like API keys directly in code. These secrets should be stored in one of two ways:
* [If Pipedream integrates with the app](https://pipedream.com/apps), use [connected accounts](/docs/apps/connected-accounts/) to link your apps / APIs.
* If you need to store credentials for an app Pipedream doesn’t support, or you need to store arbitrary configuration data, use [environment variables](/docs/workflows/environment-variables/).
Read more about how Pipedream secures connected accounts / environment variables [here](/docs/privacy-and-security/#third-party-oauth-grants-api-keys-and-environment-variables).
## Deliver data to Pipedream securely
Always send data over HTTPS to Pipedream endpoints.
## Send data out of Pipedream securely
When you connect to APIs in a workflow, or deliver data to third-party destinations, encrypt that data in transit. For example, use HTTPS endpoints when sending HTTP traffic to third parties.
## Require authorization for HTTP triggers
HTTP triggers are public by default, and require no authorization or token to invoke.
For many workflows, you should [configure authorization](/docs/workflows/building-workflows/triggers/#authorizing-http-requests) to ensure that only authorized parties can invoke your HTTP trigger.
For third-party services like webhooks, that authorize requests using their own mechanism, use the [Validate Webhook Auth action](https://pipedream.com/apps/http/actions/validate-webhook-auth). This supports common auth options, and you don’t have to write any code to configure it.
## Validate signatures for incoming events, where available
Many apps pass a **signature** with event data delivered via webhooks (or other push delivery systems). The signature is an opaque value computed from the incoming event data and a secret that only you and the app know. When you receive the event, you can validate the signature by computing it yourself and comparing it to the signature sent by the app. If the two values match, it verifies that the app sent the data, and not some third party.
Signatures are specific to the app sending the data, and the app should provide instructions for signature validation. **Not all apps compute signatures, but when they do, you should always verify them**.
When you use a Pipedream [event source](/docs/workflows/building-workflows/triggers/) as your workflow trigger, Pipedream should verify the signature for you. You can always [audit the code behind the event source](/docs/privacy-and-security/best-practices/#audit-code-or-packages-you-use-within-a-workflow) to confirm this, and suggest further security improvements that you find.
See [Stripe’s signature docs](https://stripe.com/docs/webhooks/signatures) for a real-world example. Pipedream’s Stripe event source [verifies this signature for you](https://github.com/PipedreamHQ/pipedream/blob/bb1ebedf8cbcc6f1f755a8878c759522b8cc145b/components/stripe/sources/custom-webhook-events/custom-webhook-events.js#L49).
## Audit code or packages you use within a workflow
Pipedream workflows are just code. Pipedream provides prebuilt triggers and actions that facilitate common use cases, but these are written and run as code within your workflow. You can examine and modify this code in any way you’d like.
This also means that you can audit the code for any triggers or actions you use in your workflow. We encourage this as a best practice. Even code authored by Pipedream can be improved, and if you notice a vulnerability or other issue, you can submit a patch or raise an issue [in our GitHub repo](https://github.com/PipedreamHQ/pipedream/tree/master/components).
The same follows for [npm](https://www.npmjs.com/) packages. Before you use a new npm package in your workflow, review its page on npm and its repo, if available. Good packages should have recent updates. The package should have a healthy number of downloads and related activity (like GitHub stars), and the package author should be responsive to issues raised by the community. If you don’t observe these signals, be wary of using the package in your workflow.
## Limit what you log and return from steps
[Pipedream retains a limited history of event data](/docs/workflows/limits/#event-history) and associated logs for event sources and workflows. But if you cannot log specific data in Pipedream for privacy / security reasons, or if you want to limit risk, remember that **Pipedream only stores data returned from or logged in steps**. Specifically, Pipedream will only store:
* The event data emitted from event sources, and any `console` logs / errors
* The event data that triggers your workflow, any `console` logs / errors, [step exports](/docs/workflows/#step-exports), and any data included in error stack traces.
Variables stored in memory that aren’t logged or returned from steps are not included in Pipedream logs. Since you can modify any code in your Pipedream workflow, if you want to limit what gets logged from a Pipedream action or other step, you can adjust the code accordingly, removing any logs or step exports.
# HIPAA Compliance
Source: https://pipedream.com/docs/privacy-and-security/hipaa
Pipedream can [sign Business Associate Addendums (BAAs)](/docs/privacy-and-security/hipaa/#signing-a-business-associate-addendum) for Business customers intending to pass PHI to Pipedream. We can also provide a third-party SOC 2 report detailing our HIPAA-related controls.
## HIPAA-eligible services
* [Workflows](/docs/workflows/building-workflows/)
* [Event sources](/docs/workflows/building-workflows/triggers/)
* [Data stores](/docs/workflows/data-management/data-stores/)
* [Destinations](/docs/workflows/data-management/destinations/)
* [Pipedream Connect](/docs/connect/)
### Ineligible services
Any service not listed in the [HIPAA-eligible services](/docs/privacy-and-security/hipaa/#hipaa-eligible-services) section is not eligible for use with PHI under HIPAA. Please reach out to [Pipedream support](https://pipedream.com/support) if you have questions about a specific service.
The following services are explicitly not eligible for use with PHI under HIPAA.
* [v1 workflows](/docs/deprecated/migrate-from-v1/)
* [File stores](/docs/workflows/data-management/file-stores/)
## Your obligations as a customer
If you are a covered entity or business associate under HIPAA, you must ensure that [you have a BAA in place with Pipedream](/docs/privacy-and-security/hipaa/#signing-a-business-associate-addendum) before passing PHI to Pipedream.
You must also ensure that you are using Pipedream in a manner that complies with HIPAA. This includes:
* You may only use [HIPAA-eligible services](/docs/privacy-and-security/hipaa/#hipaa-eligible-services) to process or store PHI
* You may not include PHI in Pipedream resource names, like the names of projects or workflows
## Signing a Business Associate Addendum
Pipedream is considered a Business Associate under HIPAA regulations. If you are a Covered Entity or Business Associate under HIPAA, you must have a Business Associate Agreement (BAA) in place with Pipedream before passing PHI to Pipedream. This agreement is an addendum to our standard terms, and outlines your obligations as a customer and Pipedream’s obligations as a Business Associate under HIPAA.
Please request a BAA by visiting [https://pipedream.com/support](https://pipedream.com/support).
## Requesting information on HIPAA controls
Please request compliance reports from [https://pipedream.com/support](https://pipedream.com/support). Pipedream can provide a SOC 2 Type II report covering Security controls, and a SOC 2 Type I report for Confidentiality and Availability. In 2025, Pipedream plans to include Confidentiality and Availability controls in our standard Type II audit.
# PGP Key
Source: https://pipedream.com/docs/privacy-and-security/pgp-key
If you’d like to encrypt sensitive information in communications to Pipedream, use this PGP key.
* Key ID: `3C85BC49602873EB`
* Fingerprint: `E0AD ABAC 0597 5F51 8BF5 3ECC 3C85 BC49 6028 73EB`
* User ID: `Pipedream Security
## Managing your plan
To cancel, upgrade or downgrade your plan, open the [pricing page](https://pipedream.com/pricing).
To update your billing details, such as your VAT number, email address, etc. use the **Manage Billing Information** button in your [workspace billing settings](https://pipedream.com/settings/billing) to change your plan. Within this portal you can cancel, upgrade or downgrade your plan at any time.
### Billing period
Many of the usage statistics for paid users are tied to a **billing period**. Your billing period starts when you sign up for a paid plan, and recurs roughly once a month for the duration of your subscription.
For example, if you sign up on Jan 1st, your first billing period will last one month, ending around Feb 1st, at which point you’ll start a new billing period.
Your invoices are tied to your billing period. [Read more about invoicing / billing here](/docs/pricing/faq/#when-am-i-billed-for-paid-plans).
### Upgrading
Upgrading your subscription instantly activates the features available to your workspace. For example, if you upgrade your workspace from Free to Basic, that workspace will immediately be able to activate more workflows and connected accounts.
### Downgrading
Downgrades will apply at the end of your billing cycle, and any workflows or integrations that use features outside the new billing plan will be automatically disabled.
For example, if your workspace downgrades from Advanced to Basic and a workflow uses an Advanced feature such as [auto-retries](/docs/workflows/building-workflows/settings/#auto-retry-errors), then this workflow will be disabled because the workspace plan no longer qualifies for that feature.
Additionally, resource limits such as the number of active workflows and connected accounts will also be enforced at this same time.
### Cancelling your plan
To cancel your plan, open the [pricing page](https://pipedream.com/pricing) and click **Cancel** beneath your current plan.
Cancelling your subscription will apply at the end of your current billing period. Workflows, connected accounts and sources will be deactivated from newest to oldest until the Free limits have been reached.
## Detailed pricing information
Refer to our [pricing page](https://pipedream.com/pricing) for detailed pricing information.
# FAQ
Source: https://pipedream.com/docs/pricing/faq
export const MEMORY_LIMIT = '256MB';
## How does workflow memory affect credits?
Pipedream charges credits proportional to the memory configuration. If you run your workflow at the default memory of {MEMORY_LIMIT}, you are charged one credit each time your workflow executes for 30 seconds. But if you configure your workflow with `1024MB` of memory, for example, you’re charged **four** credits, since you’re using `4x` the default memory.
## Are there any limits on paid tiers?
**You can run any number of credits for any amount of compute time** on any paid tier. [Other platform limits](/docs/workflows/limits/) apply.
## When am I billed for paid plans?
When you upgrade to a paid tier, Stripe will immediately charge your payment method on file for the platform fee tied to your plan (see [https://pipedream.com/pricing](https://pipedream.com/pricing))
If you accrue any [additional credits](/docs/pricing/#additional-credits), that usage is reported to Stripe throughout the [billing period](/docs/pricing/#billing-period). That overage, as well as the next platform fee, is charged at the start of the *next* billing period.
## Do any plans support payment by invoice, instead of credit / debit card?
Yes, Pipedream can issue invoices on the Business Plan. [Please reach out to support](https://pipedream.com/support)
## How does Pipedream secure my credit card data?
Pipedream stores no information on your payment method and uses Stripe as our payment processor. [See our security docs](/docs/privacy-and-security/#payment-processor) for more information.
## Are unused credits rolled over from one period to the next?
**No**. On the Free tier, unused included daily credits under the daily limit are **not** rolled over to the next day.
On paid tiers, unused included credits are also **not** rolled over to the next month.
## How do I change my billing payment method?
Please visit your [Stripe customer portal](https://pipedream.com/settings/billing?rtsbp=1) to change your payment method.
## How can I view my past invoices?
Invoices are emailed to your billing email address. You can also visit your [Stripe customer portal](https://pipedream.com/settings/billing?rtsbp=1) to view past invoices.
## Can I retrieve my billing information via API?
Yes. You can retrieve your usage and billing metadata from the [/users/me](/docs/rest-api/#get-current-user-info) endpoint in the Pipedream REST API.
## How do I cancel my paid plan?
You can cancel your plan in your [Billing and Usage Settings](https://pipedream.com/settings/billing). You will have access to your paid plan through the end of your current billing period. Pipedream does not prorate plans cancelled within a billing period.
If you’d like to process your cancellation immediately, and downgrade to the free tier, please [reach out](https://pipedream.com/support).
## How do I change the billing email, VAT, or other company details tied to my invoice?
You can update your billing information in your [Stripe customer portal](https://pipedream.com/settings/billing?rtsbp=1).
## How do I contact the Pipedream team with other questions?
You can start a support ticket [on our support page](https://pipedream.com/support). Select the **Billing Issues** category to start a billing related ticket.
# Privacy And Security At Pipedream
Source: https://pipedream.com/docs/privacy-and-security
export const PUBLIC_APPS = '2,700';
Pipedream is committed to the privacy and security of your data. Below, we outline how we handle specific data and what we do to secure it. This is not an exhaustive list of practices, but an overview of key policies and procedures.
It is also your responsibility as a customer to ensure you’re securing your workflows’ code and data. See our [security best practices](/docs/privacy-and-security/best-practices/) for more information.
Pipedream has demonstrated SOC 2 compliance and can provide a SOC 2 Type 2 report upon request (please reach out to [support@pipedream.com](mailto:support@pipedream.com)).
If you have any questions related to data privacy, please email [privacy@pipedream.com](mailto:privacy@pipedream.com). If you have any security-related questions, or if you’d like to report a suspected vulnerability, please email [security@pipedream.com](mailto:security@pipedream.com).
## Reporting a Vulnerability
If you’d like to report a suspected vulnerability, please contact [security@pipedream.com](mailto:security@pipedream.com).
If you need to encrypt sensitive data as part of your report, you can use our security team’s [PGP key](/docs/privacy-and-security/pgp-key/).
## Reporting abuse
If you suspect Pipedream resources are being used for illegal purposes, or otherwise violate [the Pipedream Terms](https://pipedream.com/terms), [report abuse here](/docs/abuse/).
## Compliance
### SOC 2
Pipedream undergoes annual third-party audits. We have demonstrated SOC 2 compliance and can provide a SOC 2 Type 2 report upon request. Please reach out to [support@pipedream.com](mailto:support@pipedream.com) to request the latest report.
We use [Drata](https://drata.com) to continuosly monitor our infrastructure’s compliance with standards like SOC 2, and you can visit our [Security Report](https://app.drata.com/security-report/b45c2f79-1968-496b-8a10-321115b55845/27f61ebf-57e1-4917-9536-780faed1f236) to see a list of policies and processes we implement and track within Drata.
### Annual penetration test
Pipedream performs annual pen tests with a third-party security firm. Please reach out to [support@pipedream.com](mailto:support@pipedream.com) to request the latest report.
### GDPR
#### Data Protection Addendum
Pipedream is considered both a Controller and a Processor as defined by the GDPR. As a Processor, Pipedream implements policies and practices that secure the personal data you send to the platform, and includes a [Data Protection Addendum](https://pipedream.com/dpa) as part of our standard [Terms of Service](https://pipedream.com/terms).
The Pipedream Data Protection Addendum includes the [Standard Contractual Clauses (SCCs)](https://ec.europa.eu/info/law/law-topic/data-protection/international-dimension-data-protection/standard-contractual-clauses-scc_en). These clarify how Pipedream handles your data, and they update our GDPR policies to cover the latest standards set by the European Commission.
You can find a list of Pipedream subprocessors [here](/docs/subprocessors/).
#### Submitting a GDPR deletion request
When you [delete your account](/docs/account/user-settings/#delete-account), Pipedream deletes all personal data we hold on you in our system and our vendors.
If you need to delete data on behalf of one of your users, you can delete the event data yourself in your workflow or event source (for example, by deleting the events, or by removing the data from data stores). Your customer event data is automatically deleted from Pipedream subprocessors.
### HIPAA
Pipedream can sign Business Associate Addendum (BAAs) for customers intending to pass PHI to Pipedream. We can also provide a third-party SOC 2 report detailing our HIPAA-related controls. See our [dedicated HIPAA docs](/docs/privacy-and-security/hipaa/) for more details.
## Hosting Details
Pipedream is hosted on the [Amazon Web Services](https://aws.amazon.com/) (AWS) platform in the `us-east-1` region. The physical hardware powering Pipedream, and the data stored by our platform, is hosted in data centers controlled and secured by AWS. You can read more about AWS’s security practices and compliance certifications [here](https://aws.amazon.com/security/).
Pipedream further secures access to AWS resources through a series of controls, including but not limited to: using multi-factor authentication to access AWS, hosting services within a private network inaccessible to the public internet, and more.
## Intrustion Detection and Prevention
Pipedream uses AWS WAF, GuardDuty, CloudTrail, CloudWatch, Datadog, and other custom alerts to monitor and block suspected attacks against Pipedream infrastructure, including DDoS attacks.
Pipedream reacts to potential threats quickly based on [our incident response policy](/docs/privacy-and-security/#incident-response).
## User Accounts, Authentication and Authorization
When you sign up for a Pipedream account, you can choose to link your Pipedream login to either an existing [Google](https://google.com) or [Github](https://github.com) account, or create an account directly with Pipedream. Pipedream also supports [single-sign on](/docs/workspaces/#configuring-single-sign-on-sso).
When you link your Pipedream login to an existing identity provider, Pipedream does not store any passwords tied to your user account —that information is secured with the identity provider. We recommend you configure two-factor authentication in the provider to further protect access to your Pipedream account.
When you create an account on Pipedream directly, with a username and password, Pipedream implements account security best practices (for example: Pipedream hashes your password, and the hashed password is encrypted in our database, which resides in a private network accessible only to select Pipedream employees).
## Third party OAuth grants, API keys, and environment variables
When you link an account from a third party application, you may be asked to either authorize a Pipedream OAuth application access to your account, or provide an API key or other credentials. This section describes how we handle these grants and keys.
When a third party application supports an [OAuth integration](https://oauth.net/2/), Pipedream prefers that interface. The OAuth protocol allows Pipedream to request scoped access to specific resources in your third party account without you having to provide long-term credentials directly. Pipedream must request short-term access tokens at regular intervals, and most applications provide a way to revoke Pipedream’s access to your account at any time.
Some third party applications do not provide an OAuth interface. To access these services, you must provide the required authorization mechanism (often an API key). As a best practice, if your application provides such functionality, Pipedream recommends you limit that API key’s access to only the resources you need access to within Pipedream.
Pipedream encrypts all OAuth grants, key-based credentials, and environment variables at rest in our production database. That database resides in a private network. Backups of that database are encrypted. The key used to encrypt this database is managed by [AWS KMS](https://aws.amazon.com/kms/) and controlled by Pipedream. KMS keys are 256 bit in length and use the Advanced Encryption Standard (AES) in Galois/Counter Mode (GCM). Access to administer these keys is limited to specific members of our team. Keys are automatically rotated once a year. KMS has achieved SOC 1, 2, 3, and ISO 9001, 27001, 27017, 27018 compliance. Copies of these certifications are available from Amazon on request.
When you link credentials to a specific source or workflow, the credentials are loaded into that program’s [execution environment](/docs/privacy-and-security/#execution-environment), which runs in its own virtual machine, with access to RAM and disk isolated from other users’ code.
No credentials are logged in your source or workflow by default. If you log their values or [export data from a step](/docs/workflows/#step-exports), you can always delete the data for that execution from your source or workflow. These logs will also be deleted automatically based on the [event retention](/docs/workflows/limits/#event-history) for your account.
You can delete your OAuth grants or key-based credentials at any time by visiting [https://pipedream.com/accounts](https://pipedream.com/accounts). Deleting OAuth grants within Pipedream **do not** revoke Pipedream’s access to your account. You must revoke that access wherever you manage OAuth grants in your third party application.
## Pipedream REST API security, OAuth clients
The Pipedream API supports two methods of authentication: [OAuth](/docs/rest-api/auth/#oauth) and [User API keys](/docs/rest-api/auth/#user-api-keys). **We recommend using OAuth clients** for a few reasons:
✅ OAuth clients are tied to the workspace, administered by workspace admins\
✅ Tokens are short-lived\
✅ OAuth clients support scopes, limiting access to specific operations
When testing the API or using the CLI, you can use your user API key. This key is tied to your user account and provides full access to any resources your user has access to, across workspaces.
### OAuth clients
Pipedream supports client credentials OAuth clients, which exchange a client ID and client secret for a short-lived access token. These clients are not tied to individual end users, and are meant to be used server-side. You must store these credentials securely on your server, never allowing them to be exposed in client-side code.
Client secrets are salted and hashed before being saved to the database. The hashed secret is encrypted at rest. Pipedream does not store the client secret in plaintext.
You can revoke a specific client secret at any time by visiting [https://pipedream.com/settings/api](https://pipedream.com/settings/api).
### OAuth tokens
Since Pipedream uses client credentials grants, access tokens must not be shared with end users or stored anywhere outside of your server environment.
Access tokens are issued as JWTs, signed with an ED25519 private key. The public key used to verify these tokens is available at [https://api.pipedream.com/.well-known/jwks.json](https://api.pipedream.com/.well-known/jwks.json). See [this workflow template](https://pipedream.com/new?h=tch_rBf76M) for example code you can use to validate these tokens.
Access tokens are hashed before being saved in the Pipedream database, and are encrypted at rest.
Access tokens expire after 1 hour. Tokens can be revoked at any time.
## Pipedream Connect
[Pipedream Connect](/docs/connect/) is the easiest way for your users to connect to [over {PUBLIC_APPS}+ APIs](https://pipedream.com/apps), **right in your product**.
### Client-side SDK
Pipedream provides a [client-side SDK](/docs/connect/api-reference/introduction) to initiate authorization or accept API keys on behalf of your users in environments that can run JavaScript. You can see the code for that SDK [here](https://github.com/PipedreamHQ/pipedream/tree/master/packages/sdk).
When you initiate authorization, you must:
1. [Create a server-side token for a specific end user](/docs/connect/api-reference/create-connect-token)
2. Initiate auth with that token, connecting an account for a specific user
These tokens can only initiate the auth connection flow. They have no permissions to access credentials or perform other operations against the REST API. They are meant to be scoped to a specific user, for use in clients that need to initiate auth flows.
Tokens expire after 4 hours, at which point you must create a new token for that specific user.
### Connect Link
You can also use [Connect Link](/docs/connect/managed-auth/connect-link/) to generate a URL that initiates the authorization flow for a specific user. This is useful when you want to initiate the auth flow from a client-side environment that can’t run JavaScript, or include the link in an email, chat message, etc.
Like tokens, Connect Links are coupled to specific users, and expire after 4 hours.
### REST API
The Pipedream Connect API is a subset of the [Pipedream REST API](/docs/rest-api/). See the [REST API Security](/docs/privacy-and-security/#pipedream-rest-api-security-oauth-clients) section for more information on how we secure the API.
## Execution environment
The **execution environment** refers to the environment in which your sources, workflows, and other Pipedream code is executed.
Each version of a source or workflow is deployed to its own virtual machine in AWS. This means your execution environment has its own RAM and disk, isolated from other users’ environments. You can read more about the details of the virtualization and isolation mechanisms used to secure your execution environment [here](https://firecracker-microvm.github.io/).
Instances of running VMs are called **workers**. If Pipedream spins up three VMs to handle multiple, concurrent requests for a single workflow, we’re running three **workers**. Each worker runs the same Pipedream execution environment. Workers are ephemeral —AWS will shut them down within \~5 minutes of inactivity —but you can configure [dedicated workers](/docs/workflows/building-workflows/settings/#eliminate-cold-starts) to ensure workers are always available to handle incoming requests.
## Controlling egress traffic from Pipedream
By default, outbound traffic shares the same network as other AWS services deployed in the `us-east-1` region. That means network requests from your workflows (e.g. an HTTP request or a connection to a database) originate from the standard range of AWS IP addresses.
[Pipedream VPCs](/docs/workflows/vpc/) enable you to run workflows in dedicated and isolated networks with static outbound egress IP addresses that are unique to your workspace (unlike other platforms that provide static IPs common to all customers on the platform). Outbound network requests from workflows that run in a VPC will originate from these IP addresses, and only workflows in your workspace will run there.
## Encryption of data in transit, TLS (SSL) Certificates
When you use the Pipedream web application at [https://pipedream.com](https://pipedream.com), traffic between your client and Pipedream services is encrypted in transit. When you create an HTTP interface in Pipedream, the Pipedream UI defaults to displaying the HTTPS endpoint, which we recommend you use when sending HTTP traffic to Pipedream so that your data is encrypted in transit.
All Pipedream-managed certificates, including those we create for [custom domains](/docs/workflows/domains/), are created using [AWS Certificate Manager](https://aws.amazon.com/certificate-manager/). This eliminates the need for our employees to manage certificate private keys: these keys are managed and secured by Amazon. Certificate renewal is also handled by Amazon.
## Encryption of data at rest
Pipedream encrypts customer data at rest in our databases and data stores. We use [AWS KMS](https://aws.amazon.com/kms/) to manage encryption keys, and all keys are controlled by Pipedream. KMS keys are 256 bit in length and use the Advanced Encryption Standard (AES) in Galois/Counter Mode (GCM). Access to administer these keys is limited to specific members of our team. Keys are automatically rotated once a year. KMS has achieved SOC 1, 2, 3, and ISO 9001, 27001, 27017, 27018 compliance. Copies of these certifications are available from Amazon on request.
## Email Security
Pipedream delivers emails to users for the purpose of email verification, error notifications, and more. Pipedream implements [SPF](https://en.wikipedia.org/wiki/Sender_Policy_Framework) and [DMARC](https://en.wikipedia.org/wiki/DMARC) DNS records to guard against email spoofing / forgery. You can review these records by using a DNS lookup tool like `dig`:
```
# SPF
dig pipedream.com TXT +short
# DMARC
dig _dmarc.pipedream.com TXT +short
```
## Incident Response
Pipedream implements incident response best practices for identifying, documenting, resolving and communicating incidents. Pipedream publishes incident notifications to a status page at [status.pipedream.com](https://status.pipedream.com/) and to the [@PipedreamStatus Twitter account](https://twitter.com/pipedreamstatus).
Pipedream notifies customers of any data breaches according to our [Data Protection Addendum](https://pipedream.com/dpa).
## Software Development
Pipedream uses GitHub to store and version all production code. Employee access to Pipedream’s GitHub organization is protected by multi-factor authentication.
Only authorized employees are able to deploy code to production. Deploys are tested and monitored before and after release.
## Vulnerability Management
Pipedream monitors our code, infrastructure and core application for known vulnerabilities and addresses critical vulnerabilities in a timely manner.
## Corporate Security
### Background Checks
Pipedream performs background checks on all new hires.
### Workstation Security
Pipedream provides hardware to all new hires. These machines run a local agent that sets configuration of the operating system to hardened standards, including:
* Automatic OS updates
* Hard disk encryption
* Anti-malware software
* Screen lock
and more.
### System Access
Employee access to systems is granted on a least-privilege basis. This means that employees only have access to the data they need to perform their job. System access is reviewed quarterly, on any change in role, or upon termination.
### Security Training
Pipedream provides annual security training to all employees. Developers go through a separate, annual training on secure software development practices.
## Data Retention
Pipedream retains data only for as long as necessary to provide the core service. Pipedream stores your workflow code, data in data stores, and other data indefinitely, until you choose to delete it.
Event data and the logs associated with workflow executions are stored according to [the retention rules on your account](/docs/workflows/limits/#event-history).
Pipedream deletes most internal application logs and logs tied to subprocessors within 30 days. We retain a subset of logs for longer periods where required for security investigations.
## Data Deletion
If you choose to delete your Pipedream account, Pipedream deletes all customer data and event data associated with your account. We also make a request to all subprocessors to delete any data those vendors store on our behalf.
Pipedream deletes customer data in backups within 30 days.
## Payment Processor
Pipedream uses [Stripe](https://stripe.com) as our payment processor. When you sign up for a paid plan, the details of your payment method are transmitted to and stored by Stripe [according to their security policy](https://stripe.com/docs/security/stripe). Pipedream stores no information about your payment method.
# Security Best Practices
Source: https://pipedream.com/docs/privacy-and-security/best-practices
Pipedream implements a range of [privacy and security measures](/docs/privacy-and-security/) meant to protect your data from unauthorized access. Since Pipedream [workflows](/docs/workflows/building-workflows/), [event sources](/docs/workflows/building-workflows/triggers/), and other resources can run any code and process any event data, you also have a responsibility to ensure you handle that code and data securely. We’ve outlined a handful of best practices for that below.
## Store secrets as Pipedream connected accounts or environment variables
Never store secrets like API keys directly in code. These secrets should be stored in one of two ways:
* [If Pipedream integrates with the app](https://pipedream.com/apps), use [connected accounts](/docs/apps/connected-accounts/) to link your apps / APIs.
* If you need to store credentials for an app Pipedream doesn’t support, or you need to store arbitrary configuration data, use [environment variables](/docs/workflows/environment-variables/).
Read more about how Pipedream secures connected accounts / environment variables [here](/docs/privacy-and-security/#third-party-oauth-grants-api-keys-and-environment-variables).
## Deliver data to Pipedream securely
Always send data over HTTPS to Pipedream endpoints.
## Send data out of Pipedream securely
When you connect to APIs in a workflow, or deliver data to third-party destinations, encrypt that data in transit. For example, use HTTPS endpoints when sending HTTP traffic to third parties.
## Require authorization for HTTP triggers
HTTP triggers are public by default, and require no authorization or token to invoke.
For many workflows, you should [configure authorization](/docs/workflows/building-workflows/triggers/#authorizing-http-requests) to ensure that only authorized parties can invoke your HTTP trigger.
For third-party services like webhooks, that authorize requests using their own mechanism, use the [Validate Webhook Auth action](https://pipedream.com/apps/http/actions/validate-webhook-auth). This supports common auth options, and you don’t have to write any code to configure it.
## Validate signatures for incoming events, where available
Many apps pass a **signature** with event data delivered via webhooks (or other push delivery systems). The signature is an opaque value computed from the incoming event data and a secret that only you and the app know. When you receive the event, you can validate the signature by computing it yourself and comparing it to the signature sent by the app. If the two values match, it verifies that the app sent the data, and not some third party.
Signatures are specific to the app sending the data, and the app should provide instructions for signature validation. **Not all apps compute signatures, but when they do, you should always verify them**.
When you use a Pipedream [event source](/docs/workflows/building-workflows/triggers/) as your workflow trigger, Pipedream should verify the signature for you. You can always [audit the code behind the event source](/docs/privacy-and-security/best-practices/#audit-code-or-packages-you-use-within-a-workflow) to confirm this, and suggest further security improvements that you find.
See [Stripe’s signature docs](https://stripe.com/docs/webhooks/signatures) for a real-world example. Pipedream’s Stripe event source [verifies this signature for you](https://github.com/PipedreamHQ/pipedream/blob/bb1ebedf8cbcc6f1f755a8878c759522b8cc145b/components/stripe/sources/custom-webhook-events/custom-webhook-events.js#L49).
## Audit code or packages you use within a workflow
Pipedream workflows are just code. Pipedream provides prebuilt triggers and actions that facilitate common use cases, but these are written and run as code within your workflow. You can examine and modify this code in any way you’d like.
This also means that you can audit the code for any triggers or actions you use in your workflow. We encourage this as a best practice. Even code authored by Pipedream can be improved, and if you notice a vulnerability or other issue, you can submit a patch or raise an issue [in our GitHub repo](https://github.com/PipedreamHQ/pipedream/tree/master/components).
The same follows for [npm](https://www.npmjs.com/) packages. Before you use a new npm package in your workflow, review its page on npm and its repo, if available. Good packages should have recent updates. The package should have a healthy number of downloads and related activity (like GitHub stars), and the package author should be responsive to issues raised by the community. If you don’t observe these signals, be wary of using the package in your workflow.
## Limit what you log and return from steps
[Pipedream retains a limited history of event data](/docs/workflows/limits/#event-history) and associated logs for event sources and workflows. But if you cannot log specific data in Pipedream for privacy / security reasons, or if you want to limit risk, remember that **Pipedream only stores data returned from or logged in steps**. Specifically, Pipedream will only store:
* The event data emitted from event sources, and any `console` logs / errors
* The event data that triggers your workflow, any `console` logs / errors, [step exports](/docs/workflows/#step-exports), and any data included in error stack traces.
Variables stored in memory that aren’t logged or returned from steps are not included in Pipedream logs. Since you can modify any code in your Pipedream workflow, if you want to limit what gets logged from a Pipedream action or other step, you can adjust the code accordingly, removing any logs or step exports.
# HIPAA Compliance
Source: https://pipedream.com/docs/privacy-and-security/hipaa
Pipedream can [sign Business Associate Addendums (BAAs)](/docs/privacy-and-security/hipaa/#signing-a-business-associate-addendum) for Business customers intending to pass PHI to Pipedream. We can also provide a third-party SOC 2 report detailing our HIPAA-related controls.
## HIPAA-eligible services
* [Workflows](/docs/workflows/building-workflows/)
* [Event sources](/docs/workflows/building-workflows/triggers/)
* [Data stores](/docs/workflows/data-management/data-stores/)
* [Destinations](/docs/workflows/data-management/destinations/)
* [Pipedream Connect](/docs/connect/)
### Ineligible services
Any service not listed in the [HIPAA-eligible services](/docs/privacy-and-security/hipaa/#hipaa-eligible-services) section is not eligible for use with PHI under HIPAA. Please reach out to [Pipedream support](https://pipedream.com/support) if you have questions about a specific service.
The following services are explicitly not eligible for use with PHI under HIPAA.
* [v1 workflows](/docs/deprecated/migrate-from-v1/)
* [File stores](/docs/workflows/data-management/file-stores/)
## Your obligations as a customer
If you are a covered entity or business associate under HIPAA, you must ensure that [you have a BAA in place with Pipedream](/docs/privacy-and-security/hipaa/#signing-a-business-associate-addendum) before passing PHI to Pipedream.
You must also ensure that you are using Pipedream in a manner that complies with HIPAA. This includes:
* You may only use [HIPAA-eligible services](/docs/privacy-and-security/hipaa/#hipaa-eligible-services) to process or store PHI
* You may not include PHI in Pipedream resource names, like the names of projects or workflows
## Signing a Business Associate Addendum
Pipedream is considered a Business Associate under HIPAA regulations. If you are a Covered Entity or Business Associate under HIPAA, you must have a Business Associate Agreement (BAA) in place with Pipedream before passing PHI to Pipedream. This agreement is an addendum to our standard terms, and outlines your obligations as a customer and Pipedream’s obligations as a Business Associate under HIPAA.
Please request a BAA by visiting [https://pipedream.com/support](https://pipedream.com/support).
## Requesting information on HIPAA controls
Please request compliance reports from [https://pipedream.com/support](https://pipedream.com/support). Pipedream can provide a SOC 2 Type II report covering Security controls, and a SOC 2 Type I report for Confidentiality and Availability. In 2025, Pipedream plans to include Confidentiality and Availability controls in our standard Type II audit.
# PGP Key
Source: https://pipedream.com/docs/privacy-and-security/pgp-key
If you’d like to encrypt sensitive information in communications to Pipedream, use this PGP key.
* Key ID: `3C85BC49602873EB`
* Fingerprint: `E0AD ABAC 0597 5F51 8BF5 3ECC 3C85 BC49 6028 73EB`
* User ID: `Pipedream Security 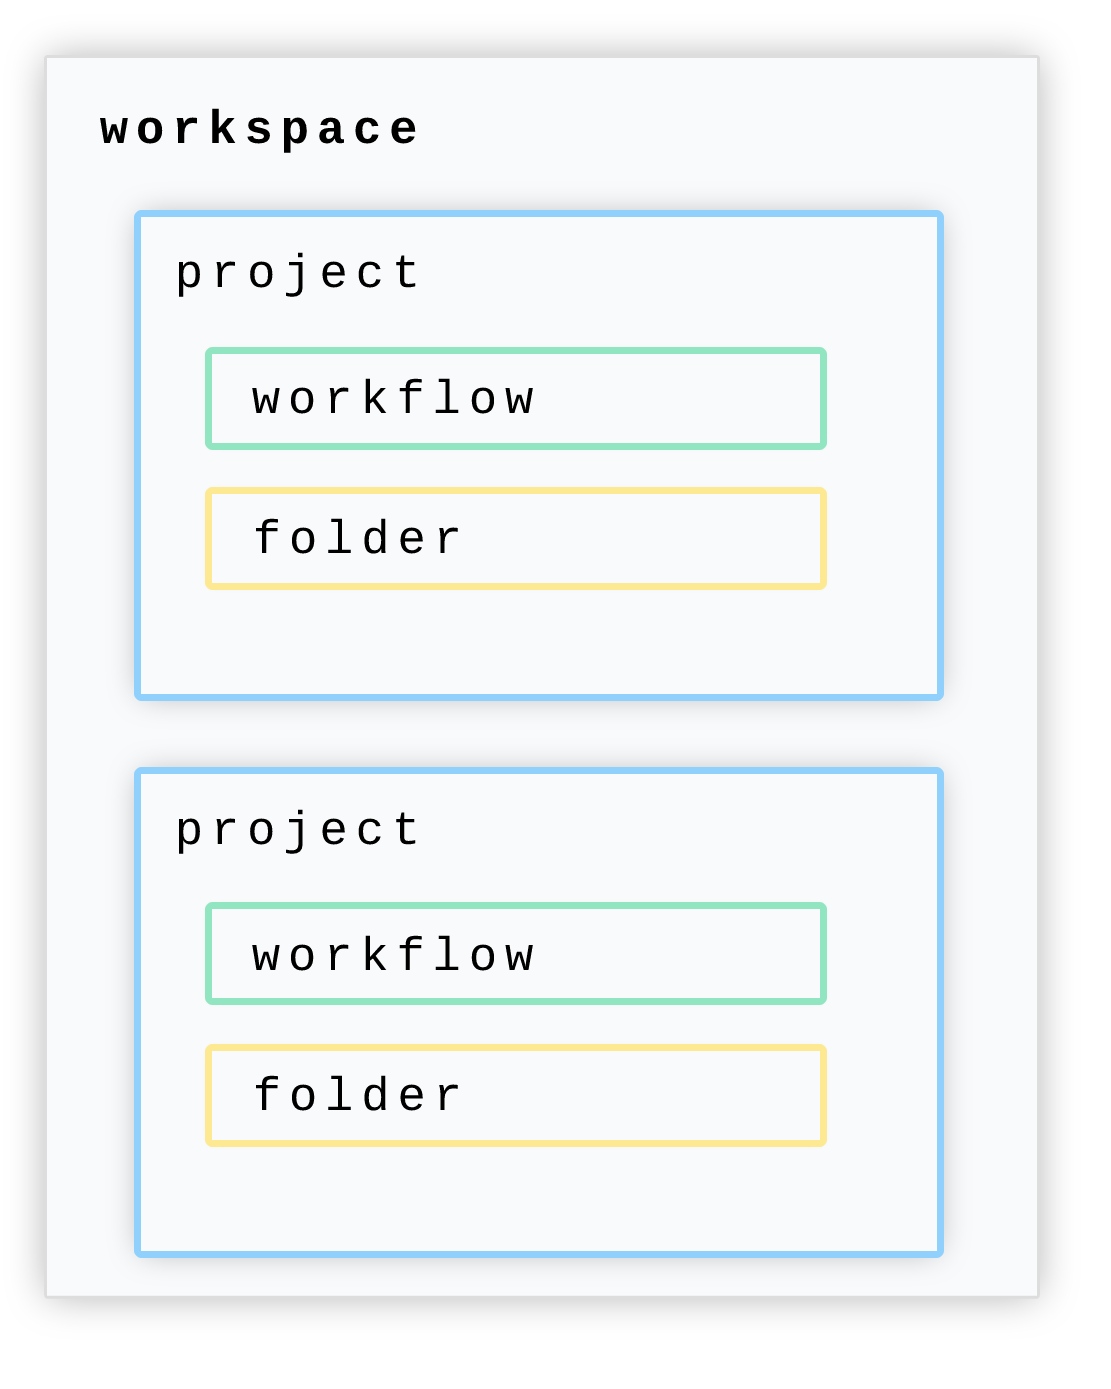 ## Getting started with projects
### Creating projects
To create a new project, first [open the Projects section in the dashboard](https://pipedream.com/projects).
Then click **Create project** to start a new project.
Enter in your desired name for the project in the prompt, then click **Create**.
That’s it, you now have a dedicated new project created within your workspace. Now you can create workflows within this project, or move workflows into it or create folders for further organization.
### Creating folders and workflows in projects
Within a given project, you can create folders for your workflows.
Open your project, and then click the **New** button for a dropdown to create a workflow in your current project.
## Getting started with projects
### Creating projects
To create a new project, first [open the Projects section in the dashboard](https://pipedream.com/projects).
Then click **Create project** to start a new project.
Enter in your desired name for the project in the prompt, then click **Create**.
That’s it, you now have a dedicated new project created within your workspace. Now you can create workflows within this project, or move workflows into it or create folders for further organization.
### Creating folders and workflows in projects
Within a given project, you can create folders for your workflows.
Open your project, and then click the **New** button for a dropdown to create a workflow in your current project.
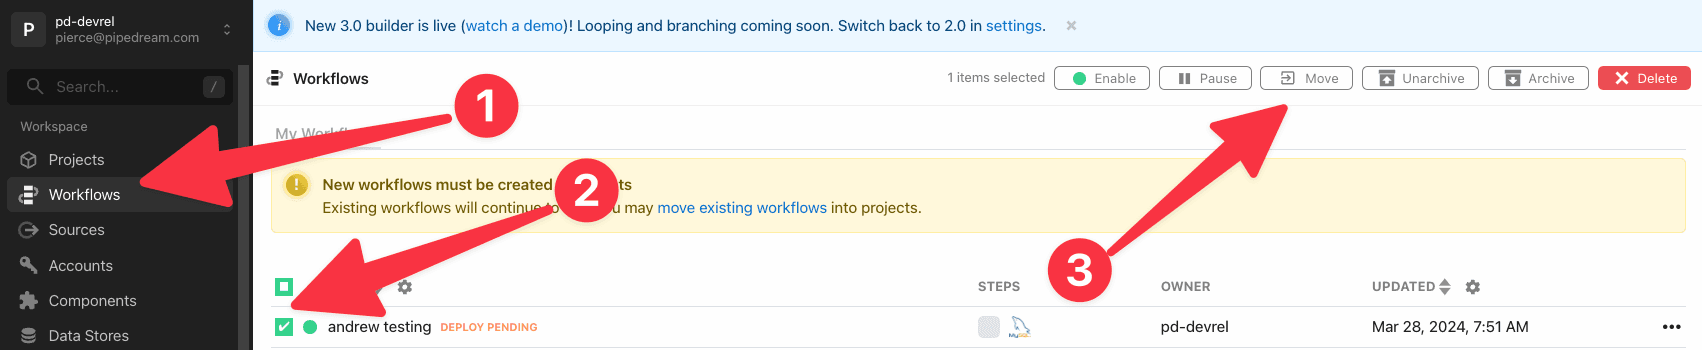 ### Moving workflows between projects
To move a workflow from one project to another project, first check the workflow and then click **Move** to open a dropdown of projects. Select the project to move this workflow to, and click **Move** once more to complete the move.
### Moving workflows between projects
To move a workflow from one project to another project, first check the workflow and then click **Move** to open a dropdown of projects. Select the project to move this workflow to, and click **Move** once more to complete the move.

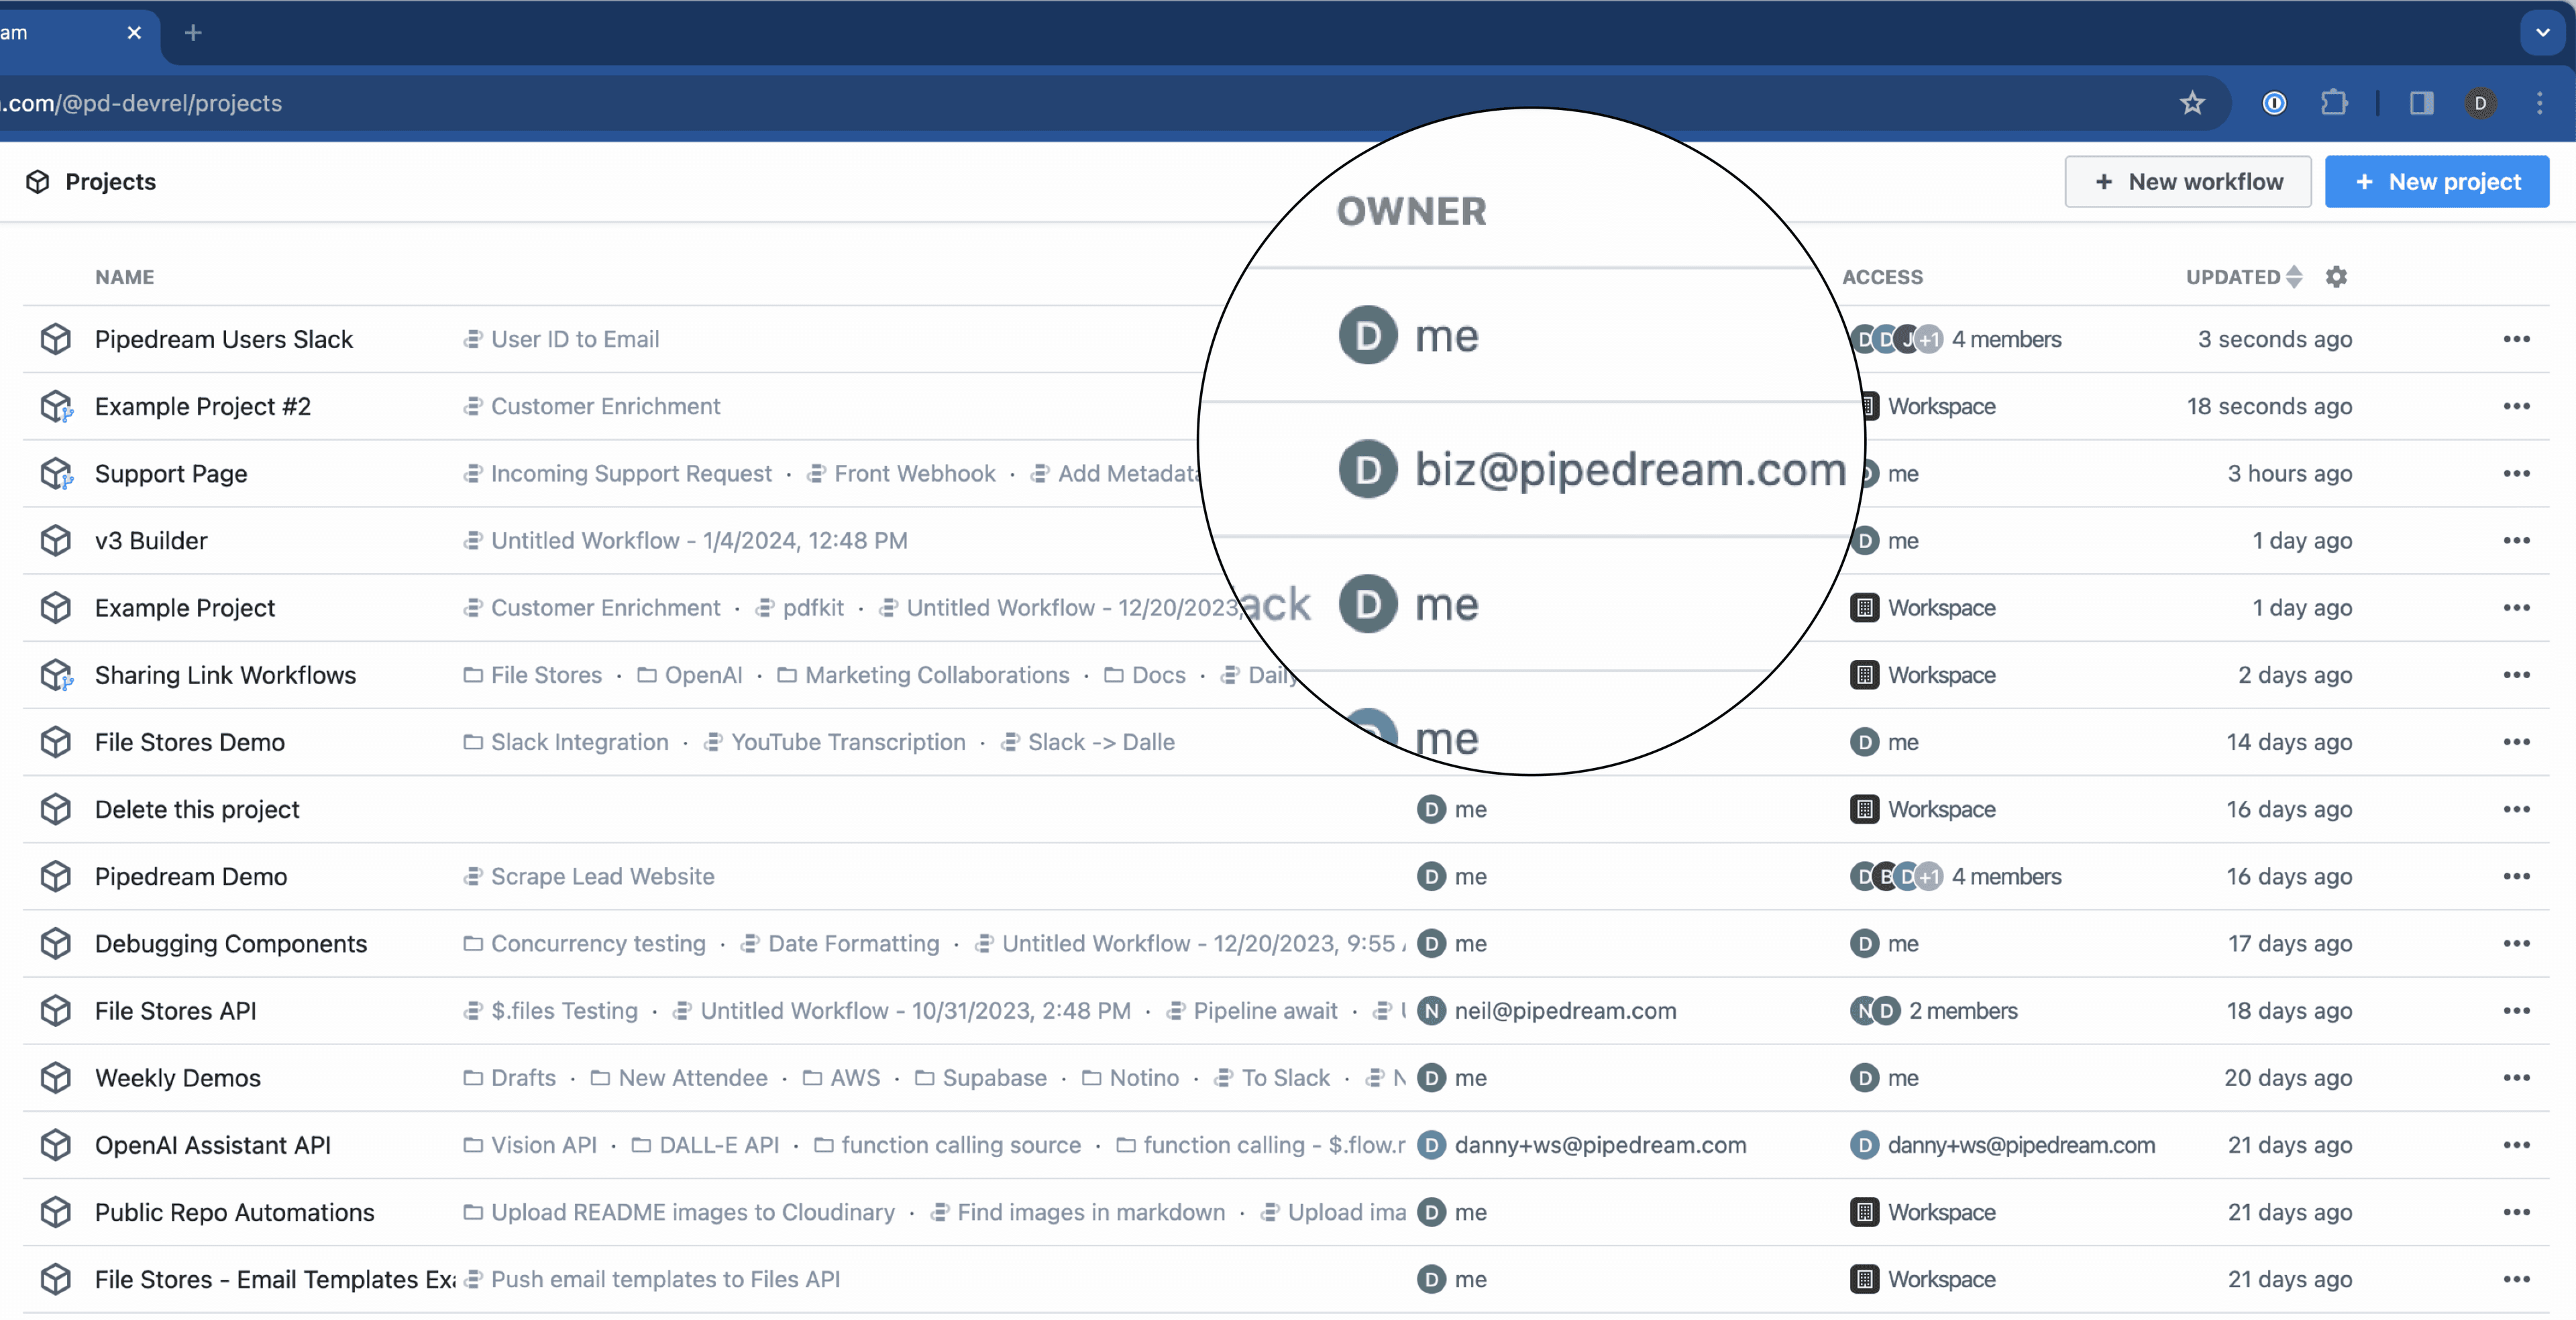
 ## Permissions
Workspace owners and admins are able to perform all actions in projects, whereas workspace members are restricted from performing certain actions in projects.
| Operation | Project creator | Workspace members |
| ------------------------------------------------------------ | --------------- | ----------------- |
| View in [projects listing](https://pipedream.com/projects) | ✅ | ✅ |
| View in [Event History](https://pipedream.com/event-history) | ✅ | ✅ |
| View in global search | ✅ | ✅ |
| Manage project workflows | ✅ | ✅ |
| Manage project files | ✅ | ✅ |
| Manage project variables | ✅ | ✅ |
| Manage member access | ✅ | ❌ |
| Manage GitHub Sync settings | ✅ | ❌ |
| Delete project | ✅ | ❌ |
## Permissions
Workspace owners and admins are able to perform all actions in projects, whereas workspace members are restricted from performing certain actions in projects.
| Operation | Project creator | Workspace members |
| ------------------------------------------------------------ | --------------- | ----------------- |
| View in [projects listing](https://pipedream.com/projects) | ✅ | ✅ |
| View in [Event History](https://pipedream.com/event-history) | ✅ | ✅ |
| View in global search | ✅ | ✅ |
| Manage project workflows | ✅ | ✅ |
| Manage project files | ✅ | ✅ |
| Manage project variables | ✅ | ✅ |
| Manage member access | ✅ | ❌ |
| Manage GitHub Sync settings | ✅ | ❌ |
| Delete project | ✅ | ❌ |
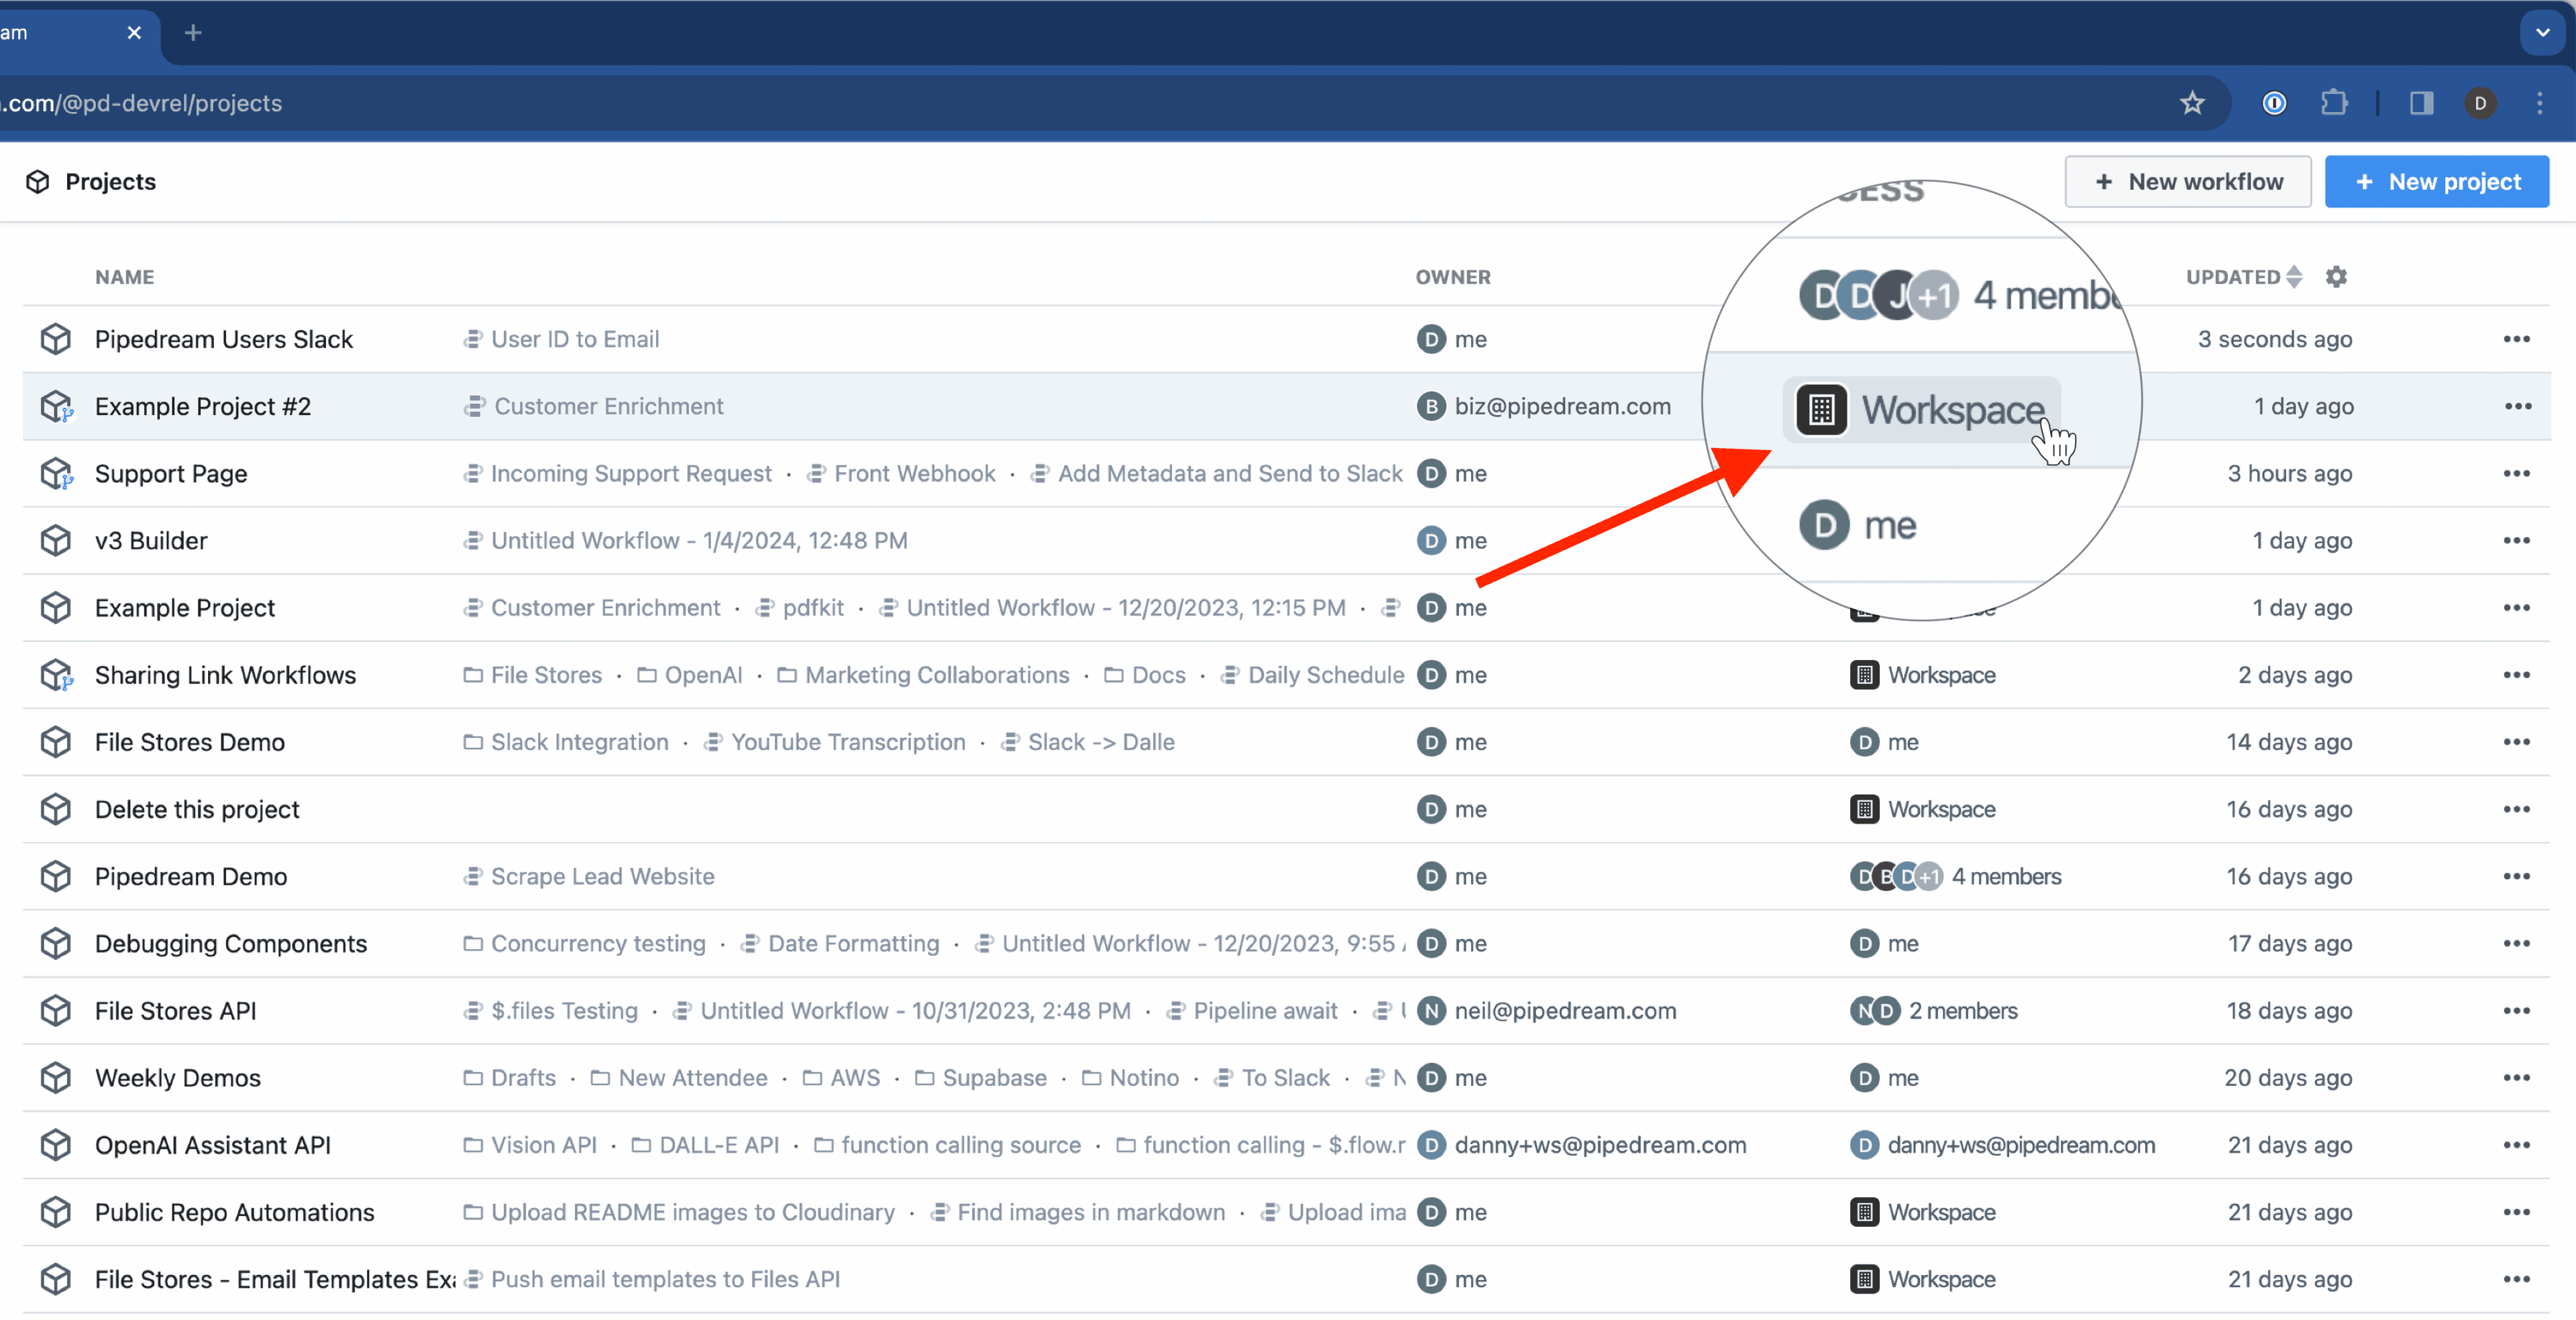 Via the action menu (fig 2):
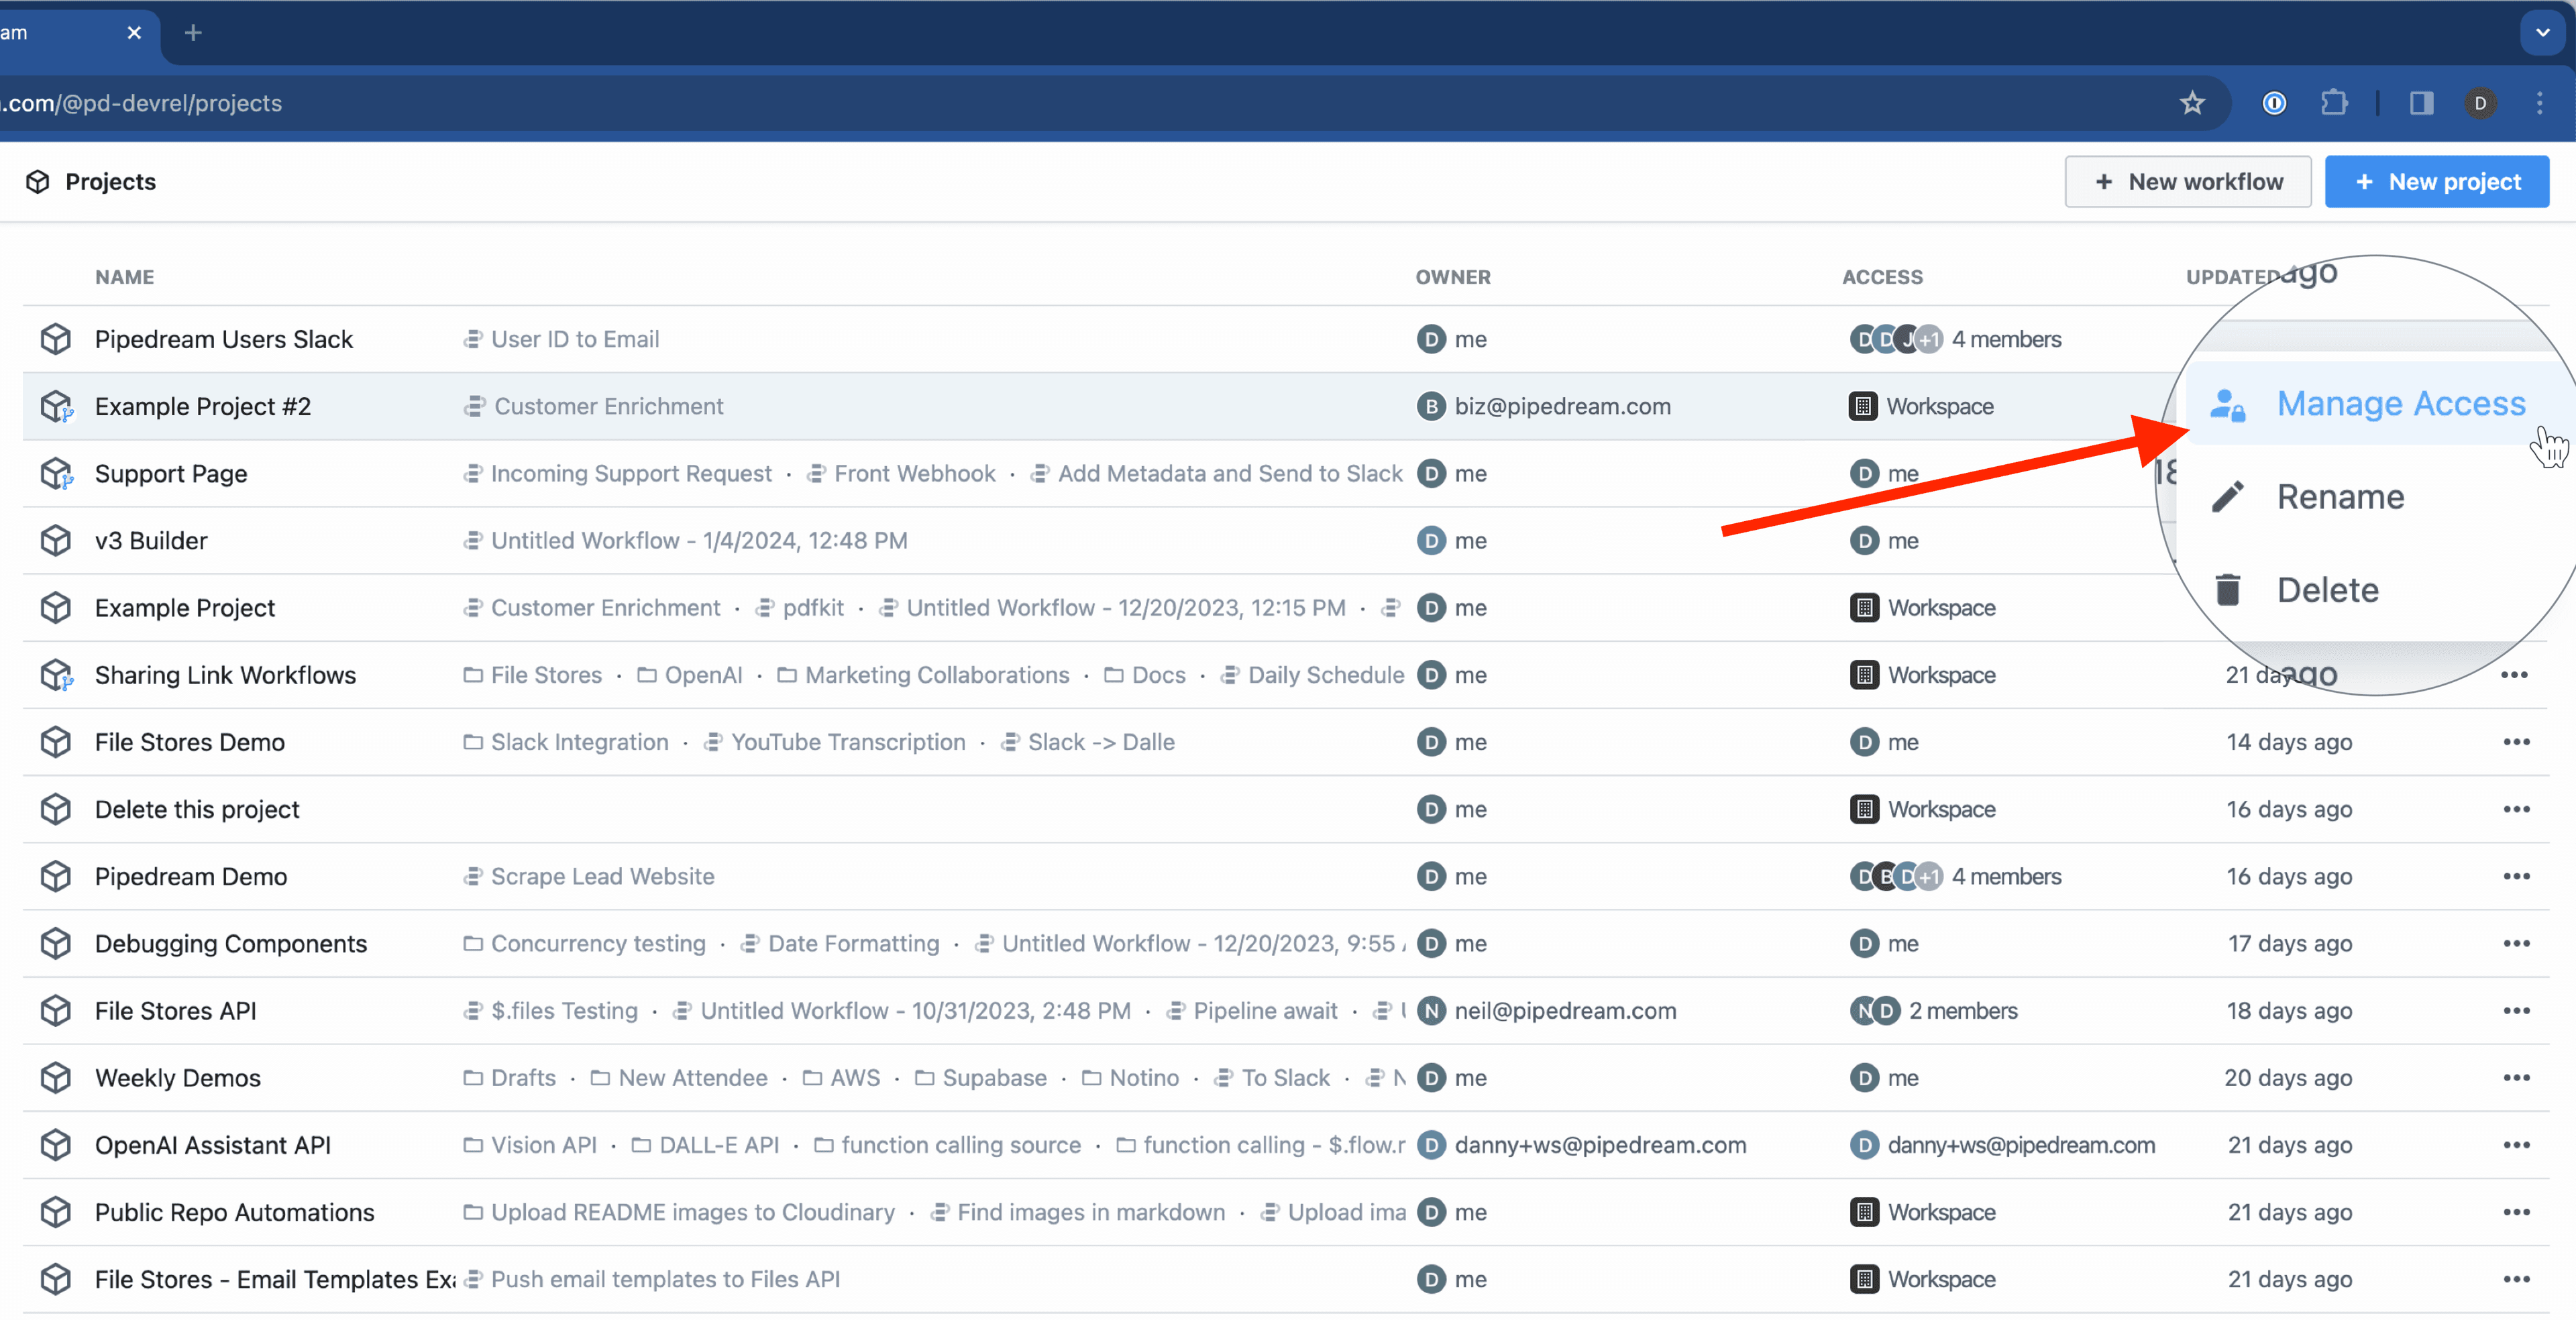 From here, a slideout drawer reveals the access management configuration:
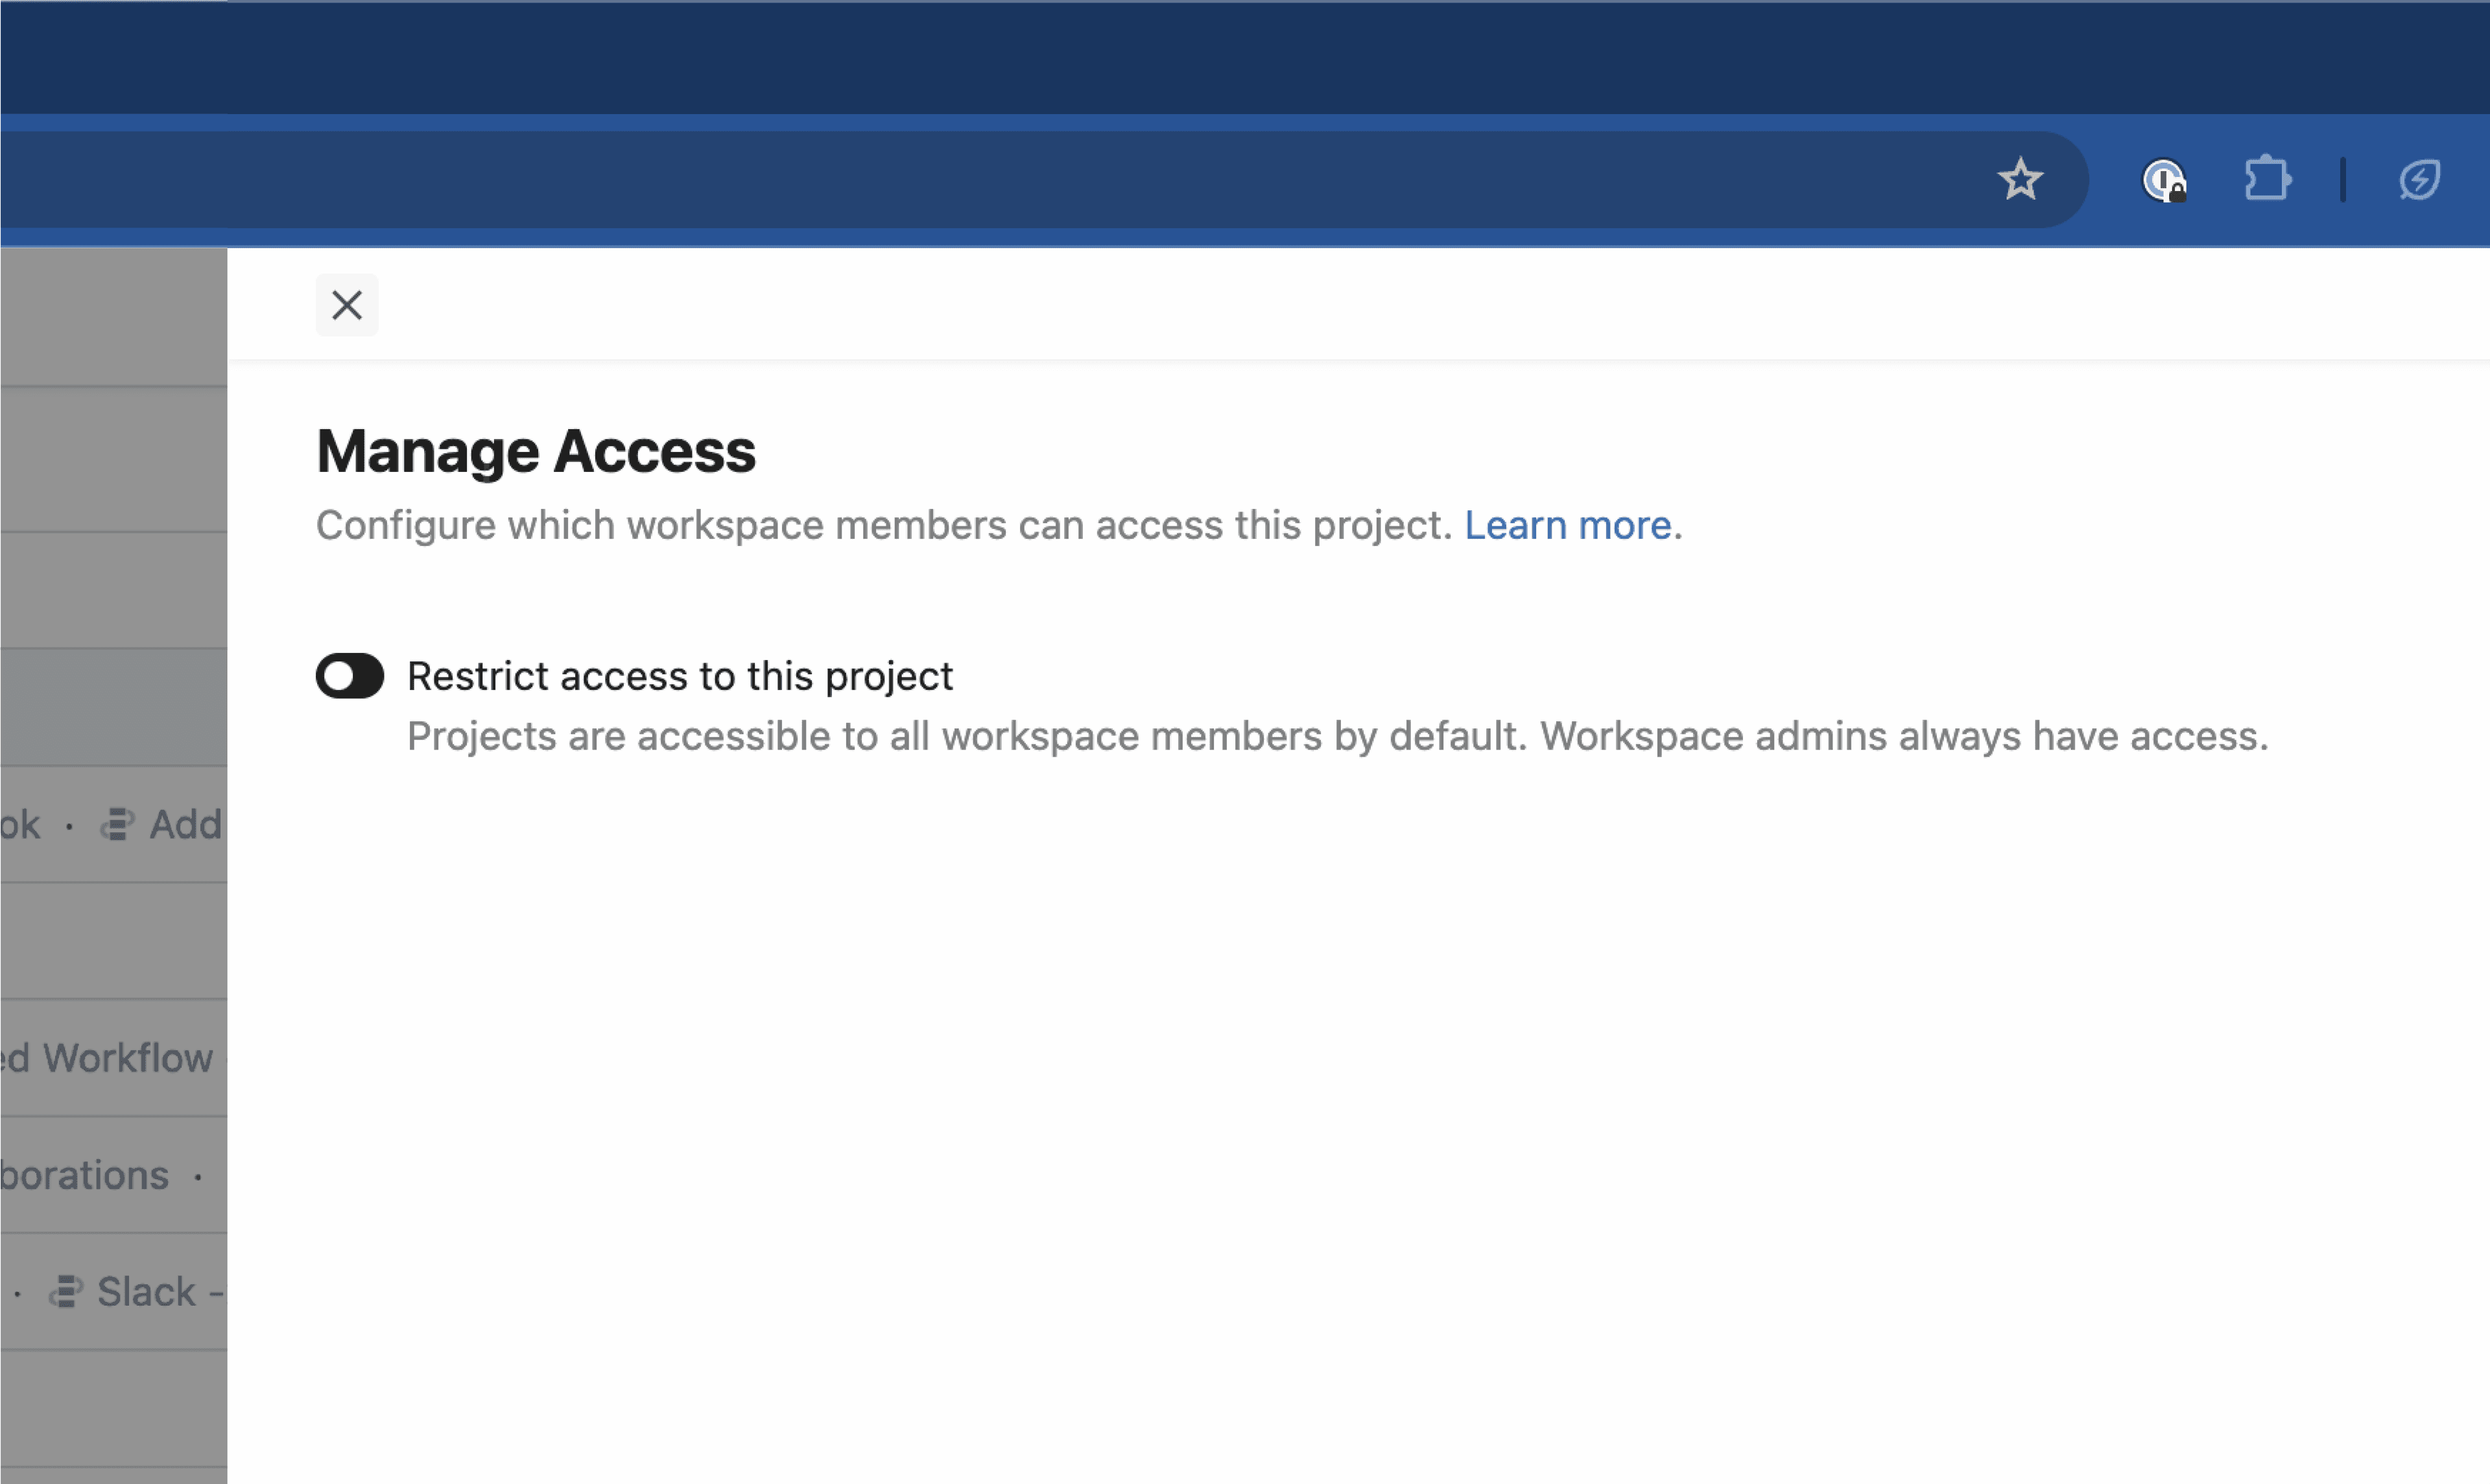 Toggle the **Restrict access to this project** switch to manage access:
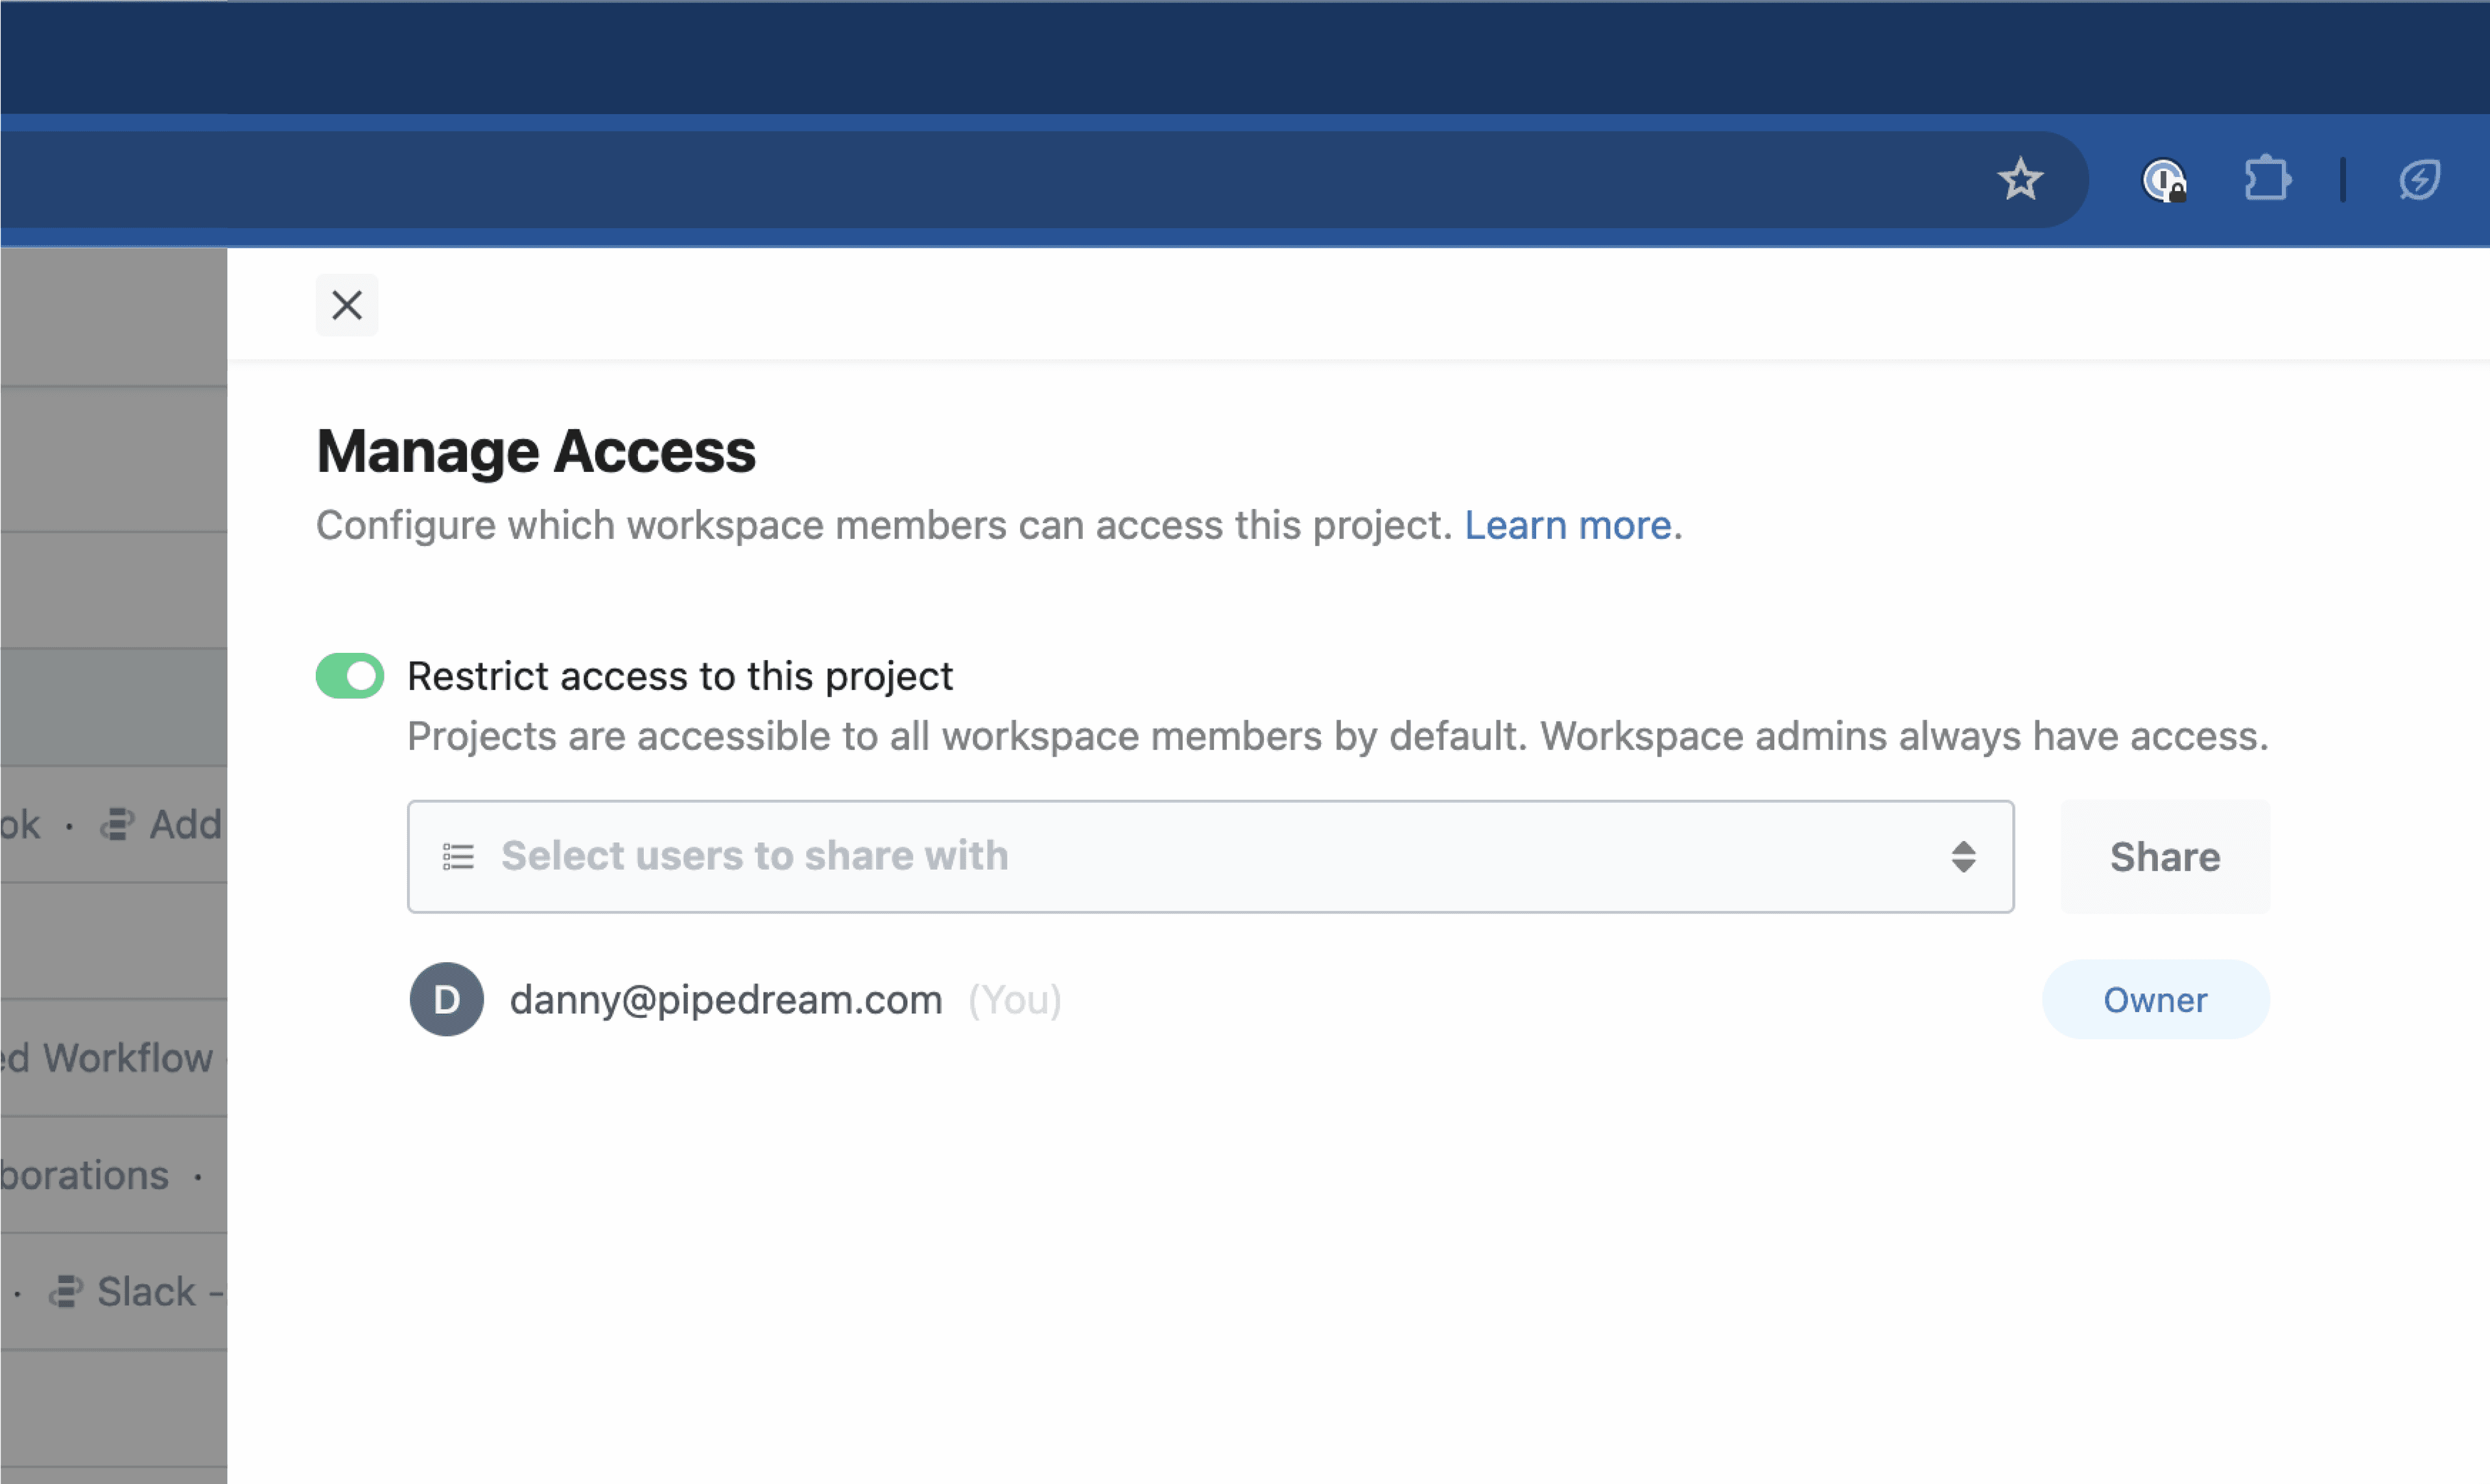 Select specific members of the workspace to grant access:
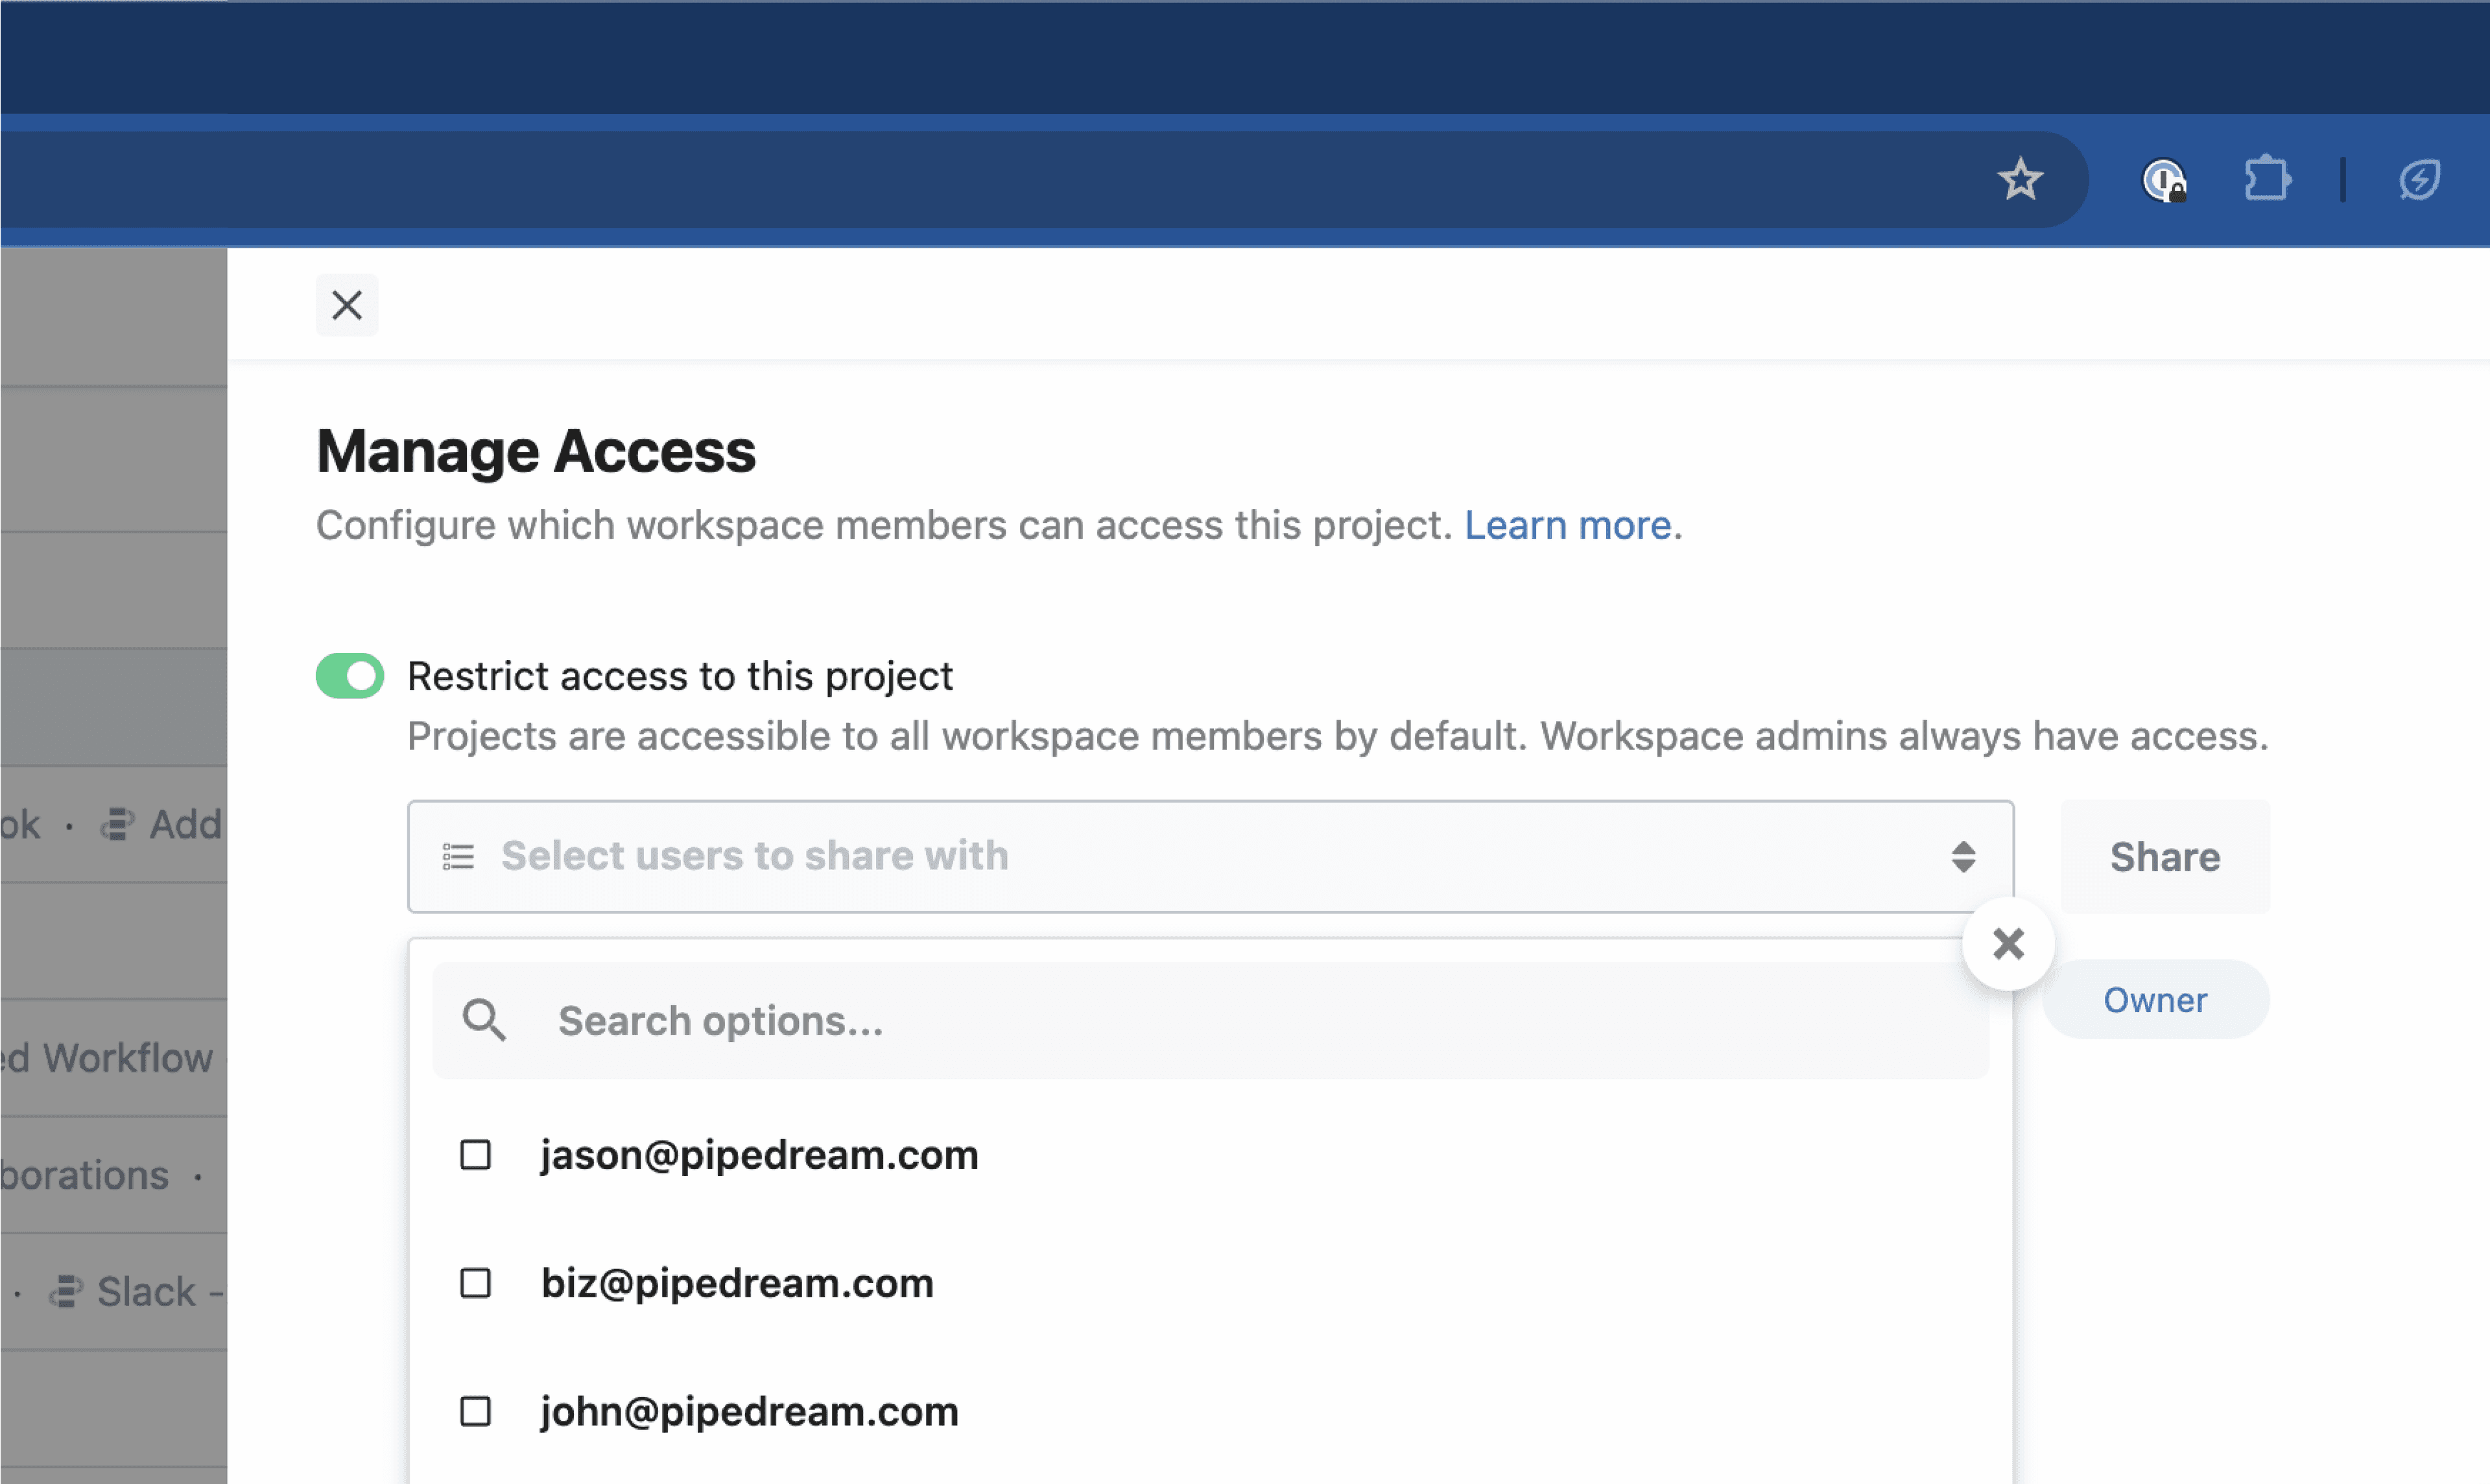 You can always see who has access and remove access if necessary:
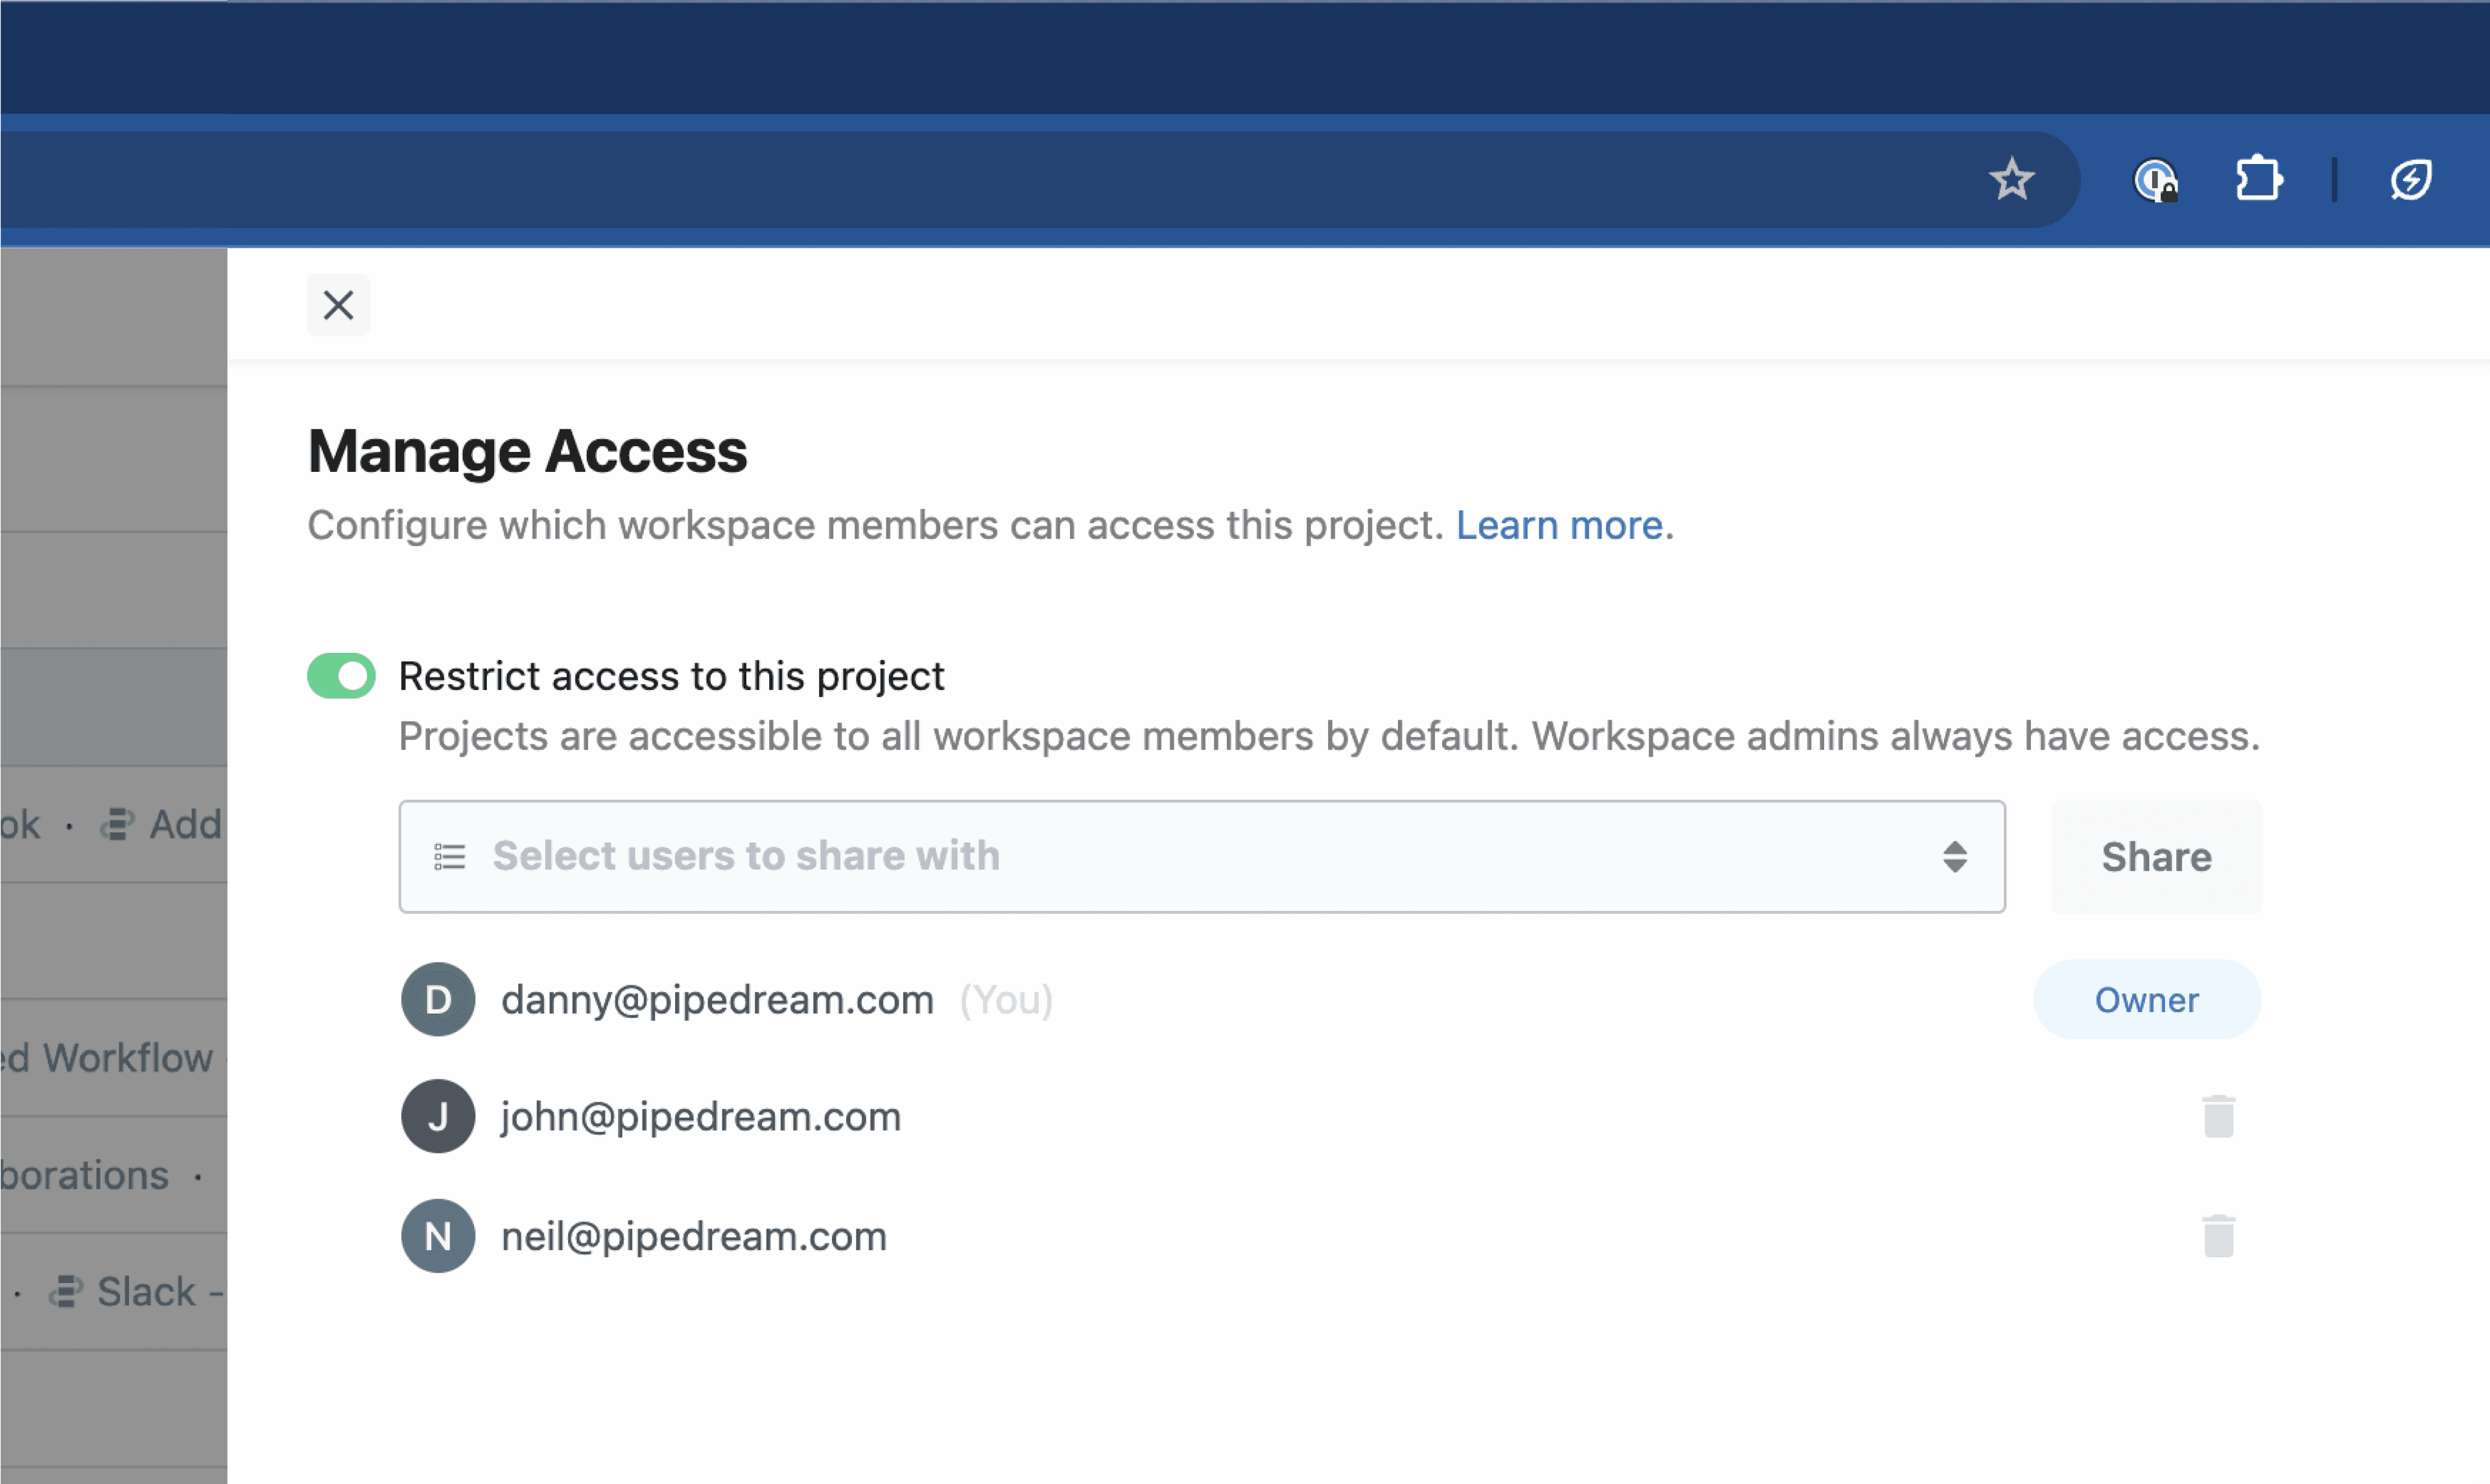 # Project Variables and Secrets
Source: https://pipedream.com/docs/projects/secrets
Environment variables defined at the global workspace level are accessible to all workspace members and workflows within the workspace. To restrict access to sensitive variables or secrets, define them at the project-level and [configure access controls for the project](/docs/projects/access-controls/#managing-access).
[See here](/docs/workflows/environment-variables/) for info on creating, managing, and using environment variables and secrets.
# Project Variables and Secrets
Source: https://pipedream.com/docs/projects/secrets
Environment variables defined at the global workspace level are accessible to all workspace members and workflows within the workspace. To restrict access to sensitive variables or secrets, define them at the project-level and [configure access controls for the project](/docs/projects/access-controls/#managing-access).
[See here](/docs/workflows/environment-variables/) for info on creating, managing, and using environment variables and secrets.
 ### Step 1 - retrieve the source’s ID
First, you’ll need the ID of your source. You can visit [https://pipedream.com/sources](https://pipedream.com/sources), select a source, and copy its ID from the URL. It’s the string that starts with `dc_`:
### Step 1 - retrieve the source’s ID
First, you’ll need the ID of your source. You can visit [https://pipedream.com/sources](https://pipedream.com/sources), select a source, and copy its ID from the URL. It’s the string that starts with `dc_`:
 You can also find the ID by running `pd list sources` using [the CLI](/docs/cli/reference/#pd-list).
### Step 2 - Create a webhook
You can create a webhook using the [`POST /webhooks` endpoint](/docs/rest-api/#create-a-webhook). The endpoint accepts 3 params:
* `url`: the endpoint to which you’d like to deliver events
* `name`: a name to assign to the webhook, for your own reference
* `description`: a longer description
You can make a request to this endpoint using `cURL`:
```powershell
curl "https://api.pipedream.com/v1/webhooks?url=https://endpoint.m.pipedream.net&name=name&description=description" \
-X POST \
-H "Authorization: Bearer
You can also find the ID by running `pd list sources` using [the CLI](/docs/cli/reference/#pd-list).
### Step 2 - Create a webhook
You can create a webhook using the [`POST /webhooks` endpoint](/docs/rest-api/#create-a-webhook). The endpoint accepts 3 params:
* `url`: the endpoint to which you’d like to deliver events
* `name`: a name to assign to the webhook, for your own reference
* `description`: a longer description
You can make a request to this endpoint using `cURL`:
```powershell
curl "https://api.pipedream.com/v1/webhooks?url=https://endpoint.m.pipedream.net&name=name&description=description" \
-X POST \
-H "Authorization: Bearer  Sources for apps like [Telegram](https://pipedream.com/apps/telegram-bot-api/triggers/message-updates) and [Google Sheets](https://pipedream.com/apps/google-sheets/triggers/new-row-added) use webhooks and get triggered immediately.
#### Timer-based polling sources
These sources will fetch new events on a regular interval, based on a schedule you specify in the trigger configuration.
Sources for apps like [Telegram](https://pipedream.com/apps/telegram-bot-api/triggers/message-updates) and [Google Sheets](https://pipedream.com/apps/google-sheets/triggers/new-row-added) use webhooks and get triggered immediately.
#### Timer-based polling sources
These sources will fetch new events on a regular interval, based on a schedule you specify in the trigger configuration.
 In most cases, Pipedream will automatically fetch recent historical events to help enable easier workflow development. Sources for apps like [Twitter](https://pipedream.com/apps/twitter/triggers/search-mentions) and [Spotify](https://pipedream.com/apps/spotify/triggers/new-playlist) require we poll their endpoints in order to fetch new events.
### Where do I find my event source’s ID?
Open [https://pipedream.com/sources](https://pipedream.com/sources) and click on your event source. Copy the URL that appears in your browser’s address bar. For example:
```
https://pipedream.com/sources/dc_abc123
```
Your source’s ID is the value that starts with `dc_`. In this example: `dc_abc123`.
### Where can I find the trigger logs?
Find your [source](/docs/troubleshooting/#where-do-i-find-my-event-sources-id), then click on the logs or visit this URL:
```
https://pipedream.com/sources/dc_abc123/logs
```
### Why is my trigger paused?
Pipedream automatically disables sources with a 100% error rate in the past 5 days for accounts on the Free plan.
To troubleshoot, you can look at the errors in the [source](/docs/workflows/building-workflows/triggers/) logs, and may need to reconnect your account and re-enable the source for it to run again. If the issue persists, please reach out in [the community](https://pipedream.com/support).
## Warnings
Pipedream displays warnings below steps in certain conditions. These warnings do not stop the execution of your workflow, but can signal an issue you should be aware of.
### Code was still running when the step ended
This error occurs when Promises or asynchronous code is not properly finished before the next step begins execution.
See the [Asynchronous section of the Node.js documentation](/docs/workflows/building-workflows/code/nodejs/async/#the-problem) for more details.
### Undeployed changes — You have made changes to this workflow. Deploy the latest version from the editor
On workflows that are not [synced with GitHub](/docs/workflows/git/), you may notice the following warning at the top of your workflow:
> **Undeployed changes** — You have made changes to this workflow. Deploy the latest version from the editor
This means that you’ve made some changes to your workflow that you haven’t yet deployed. To see a diff of what’s changed, we recommend [enabling GitHub sync](/docs/workflows/git/), where you’ll get a full commit history of changes made to your workflows, synced to your own GitHub repo.
## Errors
### Limit Exceeded Errors
Pipedream sets [limits](/docs/workflows/limits/) on runtime, memory, and other execution-related properties. If you exceed these limits, you’ll receive one of the errors below. [See the limits doc](/docs/workflows/limits/) for details on specific limits.
### Quota Exceeded
On the Free tier, Pipedream imposes a limit on the [daily credits](/docs/workflows/limits/#daily-credits-limit) across all workflows and sources. If you hit this limit, you’ll see a **Quota Exceeded** error.
Paid plans have no credit limit. [Upgrade here](https://pipedream.com/pricing).
### Runtime Quota Exceeded
You **do not** use credits testing workflows, but workspaces on the **Free** plan are limited to {MAX_WORKFLOW_EXECUTION_LIMIT} of test runtime per day. If you exceed this limit when testing in the builder, you’ll see a **Runtime Quota Exceeded** error.
### Timeout
Event sources and workflows have a [default time limit on a given execution](/docs/workflows/limits/#time-per-execution). If your code exceeds that limit, you may encounter a **Timeout** error.
To address timeouts, you’ll either need to:
1. Figure out why your code is running for longer than expected. It’s important to note that **timeouts are not an issue with Pipedream — they are specific to your workflow**. Often, you’re making a request to a third party API that doesn’t respond in the time you expect, or you’re processing a large amount of data in your workflow, and it doesn’t complete before you hit the execution limit.
2. If it’s expected that your code is taking a long time to run, you can raise the execution limit of a workflow in your [workflow’s settings](/docs/workflows/building-workflows/settings/#execution-timeout-limit). If you need to change the execution limit for an event source, please [reach out to our team](https://pipedream.com/support/).
### Out of Memory
Pipedream [limits the default memory](/docs/workflows/limits/#memory) available to workflows and event sources. If you exceed this memory, you’ll see an **Out of Memory** error. **You can raise the memory of your workflow [in your workflow’s Settings](/docs/workflows/building-workflows/settings/#memory)**.
⚠️
Even though the event may appear to have stopped at the trigger, the workflow steps were executed. We currently are unable to pinpoint the exact step where the OOM error occurred.
This can happen for two main reasons:
1. Even for small files or objects, avoid loading the entire content into memory (e.g., by saving it in a variable). Always stream files to/from disk to prevent potential memory leaks, using a [technique like this](/docs/workflows/building-workflows/code/nodejs/http-requests/#download-a-file-to-the-tmp-directory).
2. When you have many steps in your Pipedream workflow. When your workflow runs, Pipedream runs a separate process for each step in your workflow. That incurs some memory overhead. Typically this happens when you have more than 8-10 steps. When you see an OOM error on a workflow with many steps, try increasing the memory.
### Rate Limit Exceeded
Pipedream limits the number of events that can be processed by a given interface (e.g. HTTP endpoints) during a given interval. This limit is most commonly reached for HTTP interfaces - see the [QPS limits documentation](/docs/workflows/limits/#qps-queries-per-second) for more information on that limit.
**This limit can be raised for HTTP endpoints**. [Reach out to our team](https://pipedream.com/support/) to request an increase.
### Request Entity Too Large
By default, Pipedream limits the size of incoming HTTP payloads. If you exceed this limit, you’ll see a **Request Entity Too Large** error.
Pipedream supports two different ways to bypass this limit. Both of these interfaces support uploading data up to `5TB`, though you may encounter other [platform limits](/docs/workflows/limits/).
* You can send large HTTP payloads by passing the `pipedream_upload_body=1` query string or an `x-pd-upload-body: 1` HTTP header in your HTTP request. [Read more here](/docs/workflows/building-workflows/triggers/#sending-large-payloads).
* You can upload multiple large files, like images and videos, using the [large file upload interface](/docs/workflows/building-workflows/triggers/#large-file-support).
### Function Payload Limit Exceeded
The total size of `console.log()` statements, [step exports](/docs/workflows/#step-exports), and the original event data sent to workflows and sources cannot exceed a combined size of {FUNCTION_PAYLOAD_LIMIT}. If you produce logs or step exports larger than this - for example, passing around large API responses, CSVs, or other data - you may encounter a **Function Payload Limit Exceeded** in your workflow.
Often, this occurs when you pass large data between steps using [step exports](/docs/workflows/#step-exports). You can avoid this error by [writing that data to the `/tmp` directory](/docs/workflows/building-workflows/code/nodejs/working-with-files/#writing-a-file-to-tmp) in one step, and [reading the data into another step](/docs/workflows/building-workflows/code/nodejs/working-with-files/#reading-a-file-from-tmp), which avoids the use of step exports and should keep you under the payload limit.
Pipedream also compresses the function payload from your workflow, which can yield roughly a 2x-3x increase in payload size (somewhere between `12MB` and `18MB`), depending on the data.
### JSON Nested Property Limit Exceeded
Working with nested JavaScript objects that have more than 256 nested objects will trigger a **JSON Nested Property Limit Exceeded** error.
Often, objects with this many nested objects result from a programming error that explodes the object in an unexpected way. Please confirm the code you’re using to convert data into an object is correctly parsing the object.
### Event Queue Full
Workflows have a maximum event queue size when using concurrency and throttling controls. If the number of unprocessed events exceeds the [maximum queue size](/docs/workflows/building-workflows/settings/concurrency-and-throttling/#increasing-the-queue-size-for-a-workflow), you may encounter an **Event Queue Full** error.
[Paid plans](https://pipedream.com/pricing) can [increase their queue size up to {MAX_WORKFLOW_QUEUE_SIZE}](/docs/workflows/building-workflows/settings/concurrency-and-throttling/#increasing-the-queue-size-for-a-workflow) for a given workflow.
### Credit Budget Exceeded
Credit Budgets are configurable limits on your credit usage at the account or workspace level.
If you’re receiving this warning on a source or workflow, this means your allocated Credit Budget has been reached for the defined period.
You can increase this limit at any time in the [billing area of your settings](https://pipedream.com/settings/billing).
### Pipedream Internal Error
A `Pipedream Internal Error` is thrown whenever there’s an exception during the building or executing of a workflow that’s outside the scope of the code for the individual components (steps or actions).
There are a few known ways this can be caused and how to solve them.
## Out of date actions or sources
Pipedream components are updated continously. But when new versions of actions and sources are published to the Pipedream Component Registry, your workflows are not updated by default.
[An **Update** prompt](/docs/workflows/building-workflows/actions/#updating-actions-to-the-latest-version) is shown in the in the top right of the action if the component has a new version available.
Sources do not feature an update button at this time, to receive the latest version, you’ll need to create a new source, then attach it to your workflow.
### New package versions issues
If an NPM or PyPI package throws an error during either the building of the workflow or during it’s execution, it may cause a `Pipedream Internal Error`.
By default, Pipedream automatically updates NPM and PyPI packages to the latest version available. This is designed to make sure your workflows receive the latest package updates automatically.
However, if a new package version includes bugs, or changes it’s export signature, then this may cause a `Pipedream Internal Error`.
You can potentially fix this issue by downgrading packages by pinning in [your Node.js](/docs/workflows/building-workflows/code/nodejs/#pinning-package-versions) or [Python code steps](/docs/workflows/building-workflows/code/python/#pinning-package-versions) to the last known working version.
Alternatively, if the error is due to a major release that changes the import signature of a package, then modifying your code to match the signature may help.
⚠️
Some Pipedream components use NPM packages
Some Pipedream components like pre-built [actions and triggers for Slack use NPM packages](https://github.com/PipedreamHQ/pipedream/blob/9aea8653dc65d438d968971df72e95b17f52d51c/components/slack/slack.app.mjs#L1).
In order to downgrade these packages, you’ll need to fork the Pipedream Github Repository and deploy your own changes to test them privately. Then you can [contribute the fix back into the main Pipedream Repository](/docs/components/contributing/#contribution-process).
### Packages consuming all available storage
A `Pipedream Internal Error` could be the result of NPM or PyPI packages using the entireity of the workflow’s storage capacity.
The `lodash` library for example will import the entire package if individual modules are imported with this type of signature:
```javascript
// This style of import will cause the entire lodash package to be installed, not just the pick module
import { pick } from "lodash"
```
Instead, use the specific package that exports the `pick` module alone:
```javascript
// This style imports only the pick module, since the lodash.pick package only contains this module
import pick from "lodash.pick"
```
## Is there a way to replay workflow events programmatically?
Not via the API, but you can bulk select and replay failed events using the [Event History](/docs/workflows/event-history/).
## How do I store and retrieve data across workflow executions?
If you operate your own database or data store, you can connect to it directly in Pipedream.
Pipedream also operates a [built-in key-value store](/docs/workflows/data-management/data-stores/) that you can use to get and set data across workflow executions and different workflows.
## How do I delay the execution of a workflow?
Use Pipedream’s [built-in Delay actions](/docs/workflows/building-workflows/control-flow/delay/) to delay a workflow at any step.
## How can my workflow run faster?
Here are a few things that can help your workflow execute faster:
1. **Increase memory:** Increase your [workflow memory](/docs/workflows/building-workflows/settings/#memory) to at least 512 MB. Raising the memory limit will proportionally increase CPU resources, leading to improved performance and reduced latency.
2. **Return static HTTP responses:** If your workflow is triggered by an HTTP source, return a [static HTTP response](/docs/workflows/building-workflows/triggers/#http-responses) directly from the trigger configuration. This ensures the HTTP response is sent to the caller immediately, before the rest of the workflow steps are executed.
3. **Simplify your workflow:** Reduce the number of [steps](/docs/workflows/#code-actions) and [segments](/docs/workflows/building-workflows/control-flow/#workflow-segments) in your workflow, combining multiple steps into one, if possible. This lowers the overhead involved in managing step execution and exports.
4. **Activate warm workers:** Use [warm workers](/docs/workflows/building-workflows/settings/#eliminate-cold-starts) to reduce the startup time of workflows. Set [as many warm workers](/docs/workflows/building-workflows/settings/#how-many-workers-should-i-configure) as you want for high-volume traffic.
## How can I save common functions as steps?
You can create your own custom triggers and actions (“components”) on Pipedream using [the Component API](/docs/components/contributing/api/). These components are private to your account and can be used in any workflow.
You can also publish common functions in your own package on a public registry like [npm](https://www.npmjs.com/) or [PyPI](https://pypi.org/).
## Is Puppeteer supported in Pipedream?
Yes, see [our Puppeteer docs](/docs/workflows/building-workflows/code/nodejs/browser-automation/#puppeteer) for more detail.
## Is Playwright supported in Pipedream?
Yes, see [our Playwright docs](/docs/workflows/building-workflows/code/nodejs/browser-automation/#playwright) for more detail.
# What Are Workflows?
Source: https://pipedream.com/docs/workflows
export const PUBLIC_APPS = '2,700';
Workflows make it easy to integrate your apps, data, and APIs - all with no servers or infrastructure to manage. They’re sequences of [steps](/docs/workflows/#steps) [triggered by an event](/docs/workflows/building-workflows/triggers/), like an HTTP request, or new rows in a Google sheet.
You can use [pre-built actions](/docs/workflows/building-workflows/actions/) or custom [Node.js](/docs/workflows/building-workflows/code/nodejs/), [Python](/docs/workflows/building-workflows/code/python/), [Golang](/docs/workflows/building-workflows/code/go/), or [Bash](/docs/workflows/building-workflows/code/bash/) code in workflows and connect to any of our {PUBLIC_APPS} integrated apps.
Read [our quickstart](/docs/workflows/quickstart/) or watch our videos on [Pipedream University](https://pipedream.com/university) to learn more.
## Steps
Steps are the building blocks you use to create workflows.
* Use [triggers](/docs/workflows/building-workflows/triggers/), [code](/docs/workflows/building-workflows/code/), and [pre-built actions](/docs/components/contributing/#actions)
* Steps are run linearly, in the order they appear in your workflow
* You can pass data between steps using [the `steps` object](/docs/workflows/#step-exports)
* Observe the logs, errors, timing, and other execution details for every step
### Triggers
Every workflow begins with a [trigger](/docs/workflows/building-workflows/triggers/) step. Trigger steps initiate the execution of a workflow; i.e., workflows execute on each trigger event. For example, you can create an [HTTP trigger](/docs/workflows/building-workflows/triggers/#http) to accept HTTP requests. We give you a unique URL where you can send HTTP requests, and your workflow is executed on each request.
You can add [multiple triggers](/docs/workflows/building-workflows/triggers/#can-i-add-multiple-triggers-to-a-workflow) to a workflow, allowing you to run it on distinct events.
### Code, Actions
[Actions](/docs/components/contributing/#actions) and [code](/docs/workflows/building-workflows/code/) steps drive the logic of your workflow. Anytime your workflow runs, Pipedream executes each step of your workflow in order. Actions are prebuilt code steps that let you connect to hundreds of APIs without writing code. When you need more control than the default actions provide, code steps let you write any custom Node.js code.
Code and action steps cannot precede triggers, since they’ll have no data to operate on.
Once you save a workflow, we deploy it to our servers. Each event triggers the workflow code, whether you have the workflow open in your browser, or not.
## Step Names
Steps have names, which appear at the top of the step:
In most cases, Pipedream will automatically fetch recent historical events to help enable easier workflow development. Sources for apps like [Twitter](https://pipedream.com/apps/twitter/triggers/search-mentions) and [Spotify](https://pipedream.com/apps/spotify/triggers/new-playlist) require we poll their endpoints in order to fetch new events.
### Where do I find my event source’s ID?
Open [https://pipedream.com/sources](https://pipedream.com/sources) and click on your event source. Copy the URL that appears in your browser’s address bar. For example:
```
https://pipedream.com/sources/dc_abc123
```
Your source’s ID is the value that starts with `dc_`. In this example: `dc_abc123`.
### Where can I find the trigger logs?
Find your [source](/docs/troubleshooting/#where-do-i-find-my-event-sources-id), then click on the logs or visit this URL:
```
https://pipedream.com/sources/dc_abc123/logs
```
### Why is my trigger paused?
Pipedream automatically disables sources with a 100% error rate in the past 5 days for accounts on the Free plan.
To troubleshoot, you can look at the errors in the [source](/docs/workflows/building-workflows/triggers/) logs, and may need to reconnect your account and re-enable the source for it to run again. If the issue persists, please reach out in [the community](https://pipedream.com/support).
## Warnings
Pipedream displays warnings below steps in certain conditions. These warnings do not stop the execution of your workflow, but can signal an issue you should be aware of.
### Code was still running when the step ended
This error occurs when Promises or asynchronous code is not properly finished before the next step begins execution.
See the [Asynchronous section of the Node.js documentation](/docs/workflows/building-workflows/code/nodejs/async/#the-problem) for more details.
### Undeployed changes — You have made changes to this workflow. Deploy the latest version from the editor
On workflows that are not [synced with GitHub](/docs/workflows/git/), you may notice the following warning at the top of your workflow:
> **Undeployed changes** — You have made changes to this workflow. Deploy the latest version from the editor
This means that you’ve made some changes to your workflow that you haven’t yet deployed. To see a diff of what’s changed, we recommend [enabling GitHub sync](/docs/workflows/git/), where you’ll get a full commit history of changes made to your workflows, synced to your own GitHub repo.
## Errors
### Limit Exceeded Errors
Pipedream sets [limits](/docs/workflows/limits/) on runtime, memory, and other execution-related properties. If you exceed these limits, you’ll receive one of the errors below. [See the limits doc](/docs/workflows/limits/) for details on specific limits.
### Quota Exceeded
On the Free tier, Pipedream imposes a limit on the [daily credits](/docs/workflows/limits/#daily-credits-limit) across all workflows and sources. If you hit this limit, you’ll see a **Quota Exceeded** error.
Paid plans have no credit limit. [Upgrade here](https://pipedream.com/pricing).
### Runtime Quota Exceeded
You **do not** use credits testing workflows, but workspaces on the **Free** plan are limited to {MAX_WORKFLOW_EXECUTION_LIMIT} of test runtime per day. If you exceed this limit when testing in the builder, you’ll see a **Runtime Quota Exceeded** error.
### Timeout
Event sources and workflows have a [default time limit on a given execution](/docs/workflows/limits/#time-per-execution). If your code exceeds that limit, you may encounter a **Timeout** error.
To address timeouts, you’ll either need to:
1. Figure out why your code is running for longer than expected. It’s important to note that **timeouts are not an issue with Pipedream — they are specific to your workflow**. Often, you’re making a request to a third party API that doesn’t respond in the time you expect, or you’re processing a large amount of data in your workflow, and it doesn’t complete before you hit the execution limit.
2. If it’s expected that your code is taking a long time to run, you can raise the execution limit of a workflow in your [workflow’s settings](/docs/workflows/building-workflows/settings/#execution-timeout-limit). If you need to change the execution limit for an event source, please [reach out to our team](https://pipedream.com/support/).
### Out of Memory
Pipedream [limits the default memory](/docs/workflows/limits/#memory) available to workflows and event sources. If you exceed this memory, you’ll see an **Out of Memory** error. **You can raise the memory of your workflow [in your workflow’s Settings](/docs/workflows/building-workflows/settings/#memory)**.
⚠️
Even though the event may appear to have stopped at the trigger, the workflow steps were executed. We currently are unable to pinpoint the exact step where the OOM error occurred.
This can happen for two main reasons:
1. Even for small files or objects, avoid loading the entire content into memory (e.g., by saving it in a variable). Always stream files to/from disk to prevent potential memory leaks, using a [technique like this](/docs/workflows/building-workflows/code/nodejs/http-requests/#download-a-file-to-the-tmp-directory).
2. When you have many steps in your Pipedream workflow. When your workflow runs, Pipedream runs a separate process for each step in your workflow. That incurs some memory overhead. Typically this happens when you have more than 8-10 steps. When you see an OOM error on a workflow with many steps, try increasing the memory.
### Rate Limit Exceeded
Pipedream limits the number of events that can be processed by a given interface (e.g. HTTP endpoints) during a given interval. This limit is most commonly reached for HTTP interfaces - see the [QPS limits documentation](/docs/workflows/limits/#qps-queries-per-second) for more information on that limit.
**This limit can be raised for HTTP endpoints**. [Reach out to our team](https://pipedream.com/support/) to request an increase.
### Request Entity Too Large
By default, Pipedream limits the size of incoming HTTP payloads. If you exceed this limit, you’ll see a **Request Entity Too Large** error.
Pipedream supports two different ways to bypass this limit. Both of these interfaces support uploading data up to `5TB`, though you may encounter other [platform limits](/docs/workflows/limits/).
* You can send large HTTP payloads by passing the `pipedream_upload_body=1` query string or an `x-pd-upload-body: 1` HTTP header in your HTTP request. [Read more here](/docs/workflows/building-workflows/triggers/#sending-large-payloads).
* You can upload multiple large files, like images and videos, using the [large file upload interface](/docs/workflows/building-workflows/triggers/#large-file-support).
### Function Payload Limit Exceeded
The total size of `console.log()` statements, [step exports](/docs/workflows/#step-exports), and the original event data sent to workflows and sources cannot exceed a combined size of {FUNCTION_PAYLOAD_LIMIT}. If you produce logs or step exports larger than this - for example, passing around large API responses, CSVs, or other data - you may encounter a **Function Payload Limit Exceeded** in your workflow.
Often, this occurs when you pass large data between steps using [step exports](/docs/workflows/#step-exports). You can avoid this error by [writing that data to the `/tmp` directory](/docs/workflows/building-workflows/code/nodejs/working-with-files/#writing-a-file-to-tmp) in one step, and [reading the data into another step](/docs/workflows/building-workflows/code/nodejs/working-with-files/#reading-a-file-from-tmp), which avoids the use of step exports and should keep you under the payload limit.
Pipedream also compresses the function payload from your workflow, which can yield roughly a 2x-3x increase in payload size (somewhere between `12MB` and `18MB`), depending on the data.
### JSON Nested Property Limit Exceeded
Working with nested JavaScript objects that have more than 256 nested objects will trigger a **JSON Nested Property Limit Exceeded** error.
Often, objects with this many nested objects result from a programming error that explodes the object in an unexpected way. Please confirm the code you’re using to convert data into an object is correctly parsing the object.
### Event Queue Full
Workflows have a maximum event queue size when using concurrency and throttling controls. If the number of unprocessed events exceeds the [maximum queue size](/docs/workflows/building-workflows/settings/concurrency-and-throttling/#increasing-the-queue-size-for-a-workflow), you may encounter an **Event Queue Full** error.
[Paid plans](https://pipedream.com/pricing) can [increase their queue size up to {MAX_WORKFLOW_QUEUE_SIZE}](/docs/workflows/building-workflows/settings/concurrency-and-throttling/#increasing-the-queue-size-for-a-workflow) for a given workflow.
### Credit Budget Exceeded
Credit Budgets are configurable limits on your credit usage at the account or workspace level.
If you’re receiving this warning on a source or workflow, this means your allocated Credit Budget has been reached for the defined period.
You can increase this limit at any time in the [billing area of your settings](https://pipedream.com/settings/billing).
### Pipedream Internal Error
A `Pipedream Internal Error` is thrown whenever there’s an exception during the building or executing of a workflow that’s outside the scope of the code for the individual components (steps or actions).
There are a few known ways this can be caused and how to solve them.
## Out of date actions or sources
Pipedream components are updated continously. But when new versions of actions and sources are published to the Pipedream Component Registry, your workflows are not updated by default.
[An **Update** prompt](/docs/workflows/building-workflows/actions/#updating-actions-to-the-latest-version) is shown in the in the top right of the action if the component has a new version available.
Sources do not feature an update button at this time, to receive the latest version, you’ll need to create a new source, then attach it to your workflow.
### New package versions issues
If an NPM or PyPI package throws an error during either the building of the workflow or during it’s execution, it may cause a `Pipedream Internal Error`.
By default, Pipedream automatically updates NPM and PyPI packages to the latest version available. This is designed to make sure your workflows receive the latest package updates automatically.
However, if a new package version includes bugs, or changes it’s export signature, then this may cause a `Pipedream Internal Error`.
You can potentially fix this issue by downgrading packages by pinning in [your Node.js](/docs/workflows/building-workflows/code/nodejs/#pinning-package-versions) or [Python code steps](/docs/workflows/building-workflows/code/python/#pinning-package-versions) to the last known working version.
Alternatively, if the error is due to a major release that changes the import signature of a package, then modifying your code to match the signature may help.
⚠️
Some Pipedream components use NPM packages
Some Pipedream components like pre-built [actions and triggers for Slack use NPM packages](https://github.com/PipedreamHQ/pipedream/blob/9aea8653dc65d438d968971df72e95b17f52d51c/components/slack/slack.app.mjs#L1).
In order to downgrade these packages, you’ll need to fork the Pipedream Github Repository and deploy your own changes to test them privately. Then you can [contribute the fix back into the main Pipedream Repository](/docs/components/contributing/#contribution-process).
### Packages consuming all available storage
A `Pipedream Internal Error` could be the result of NPM or PyPI packages using the entireity of the workflow’s storage capacity.
The `lodash` library for example will import the entire package if individual modules are imported with this type of signature:
```javascript
// This style of import will cause the entire lodash package to be installed, not just the pick module
import { pick } from "lodash"
```
Instead, use the specific package that exports the `pick` module alone:
```javascript
// This style imports only the pick module, since the lodash.pick package only contains this module
import pick from "lodash.pick"
```
## Is there a way to replay workflow events programmatically?
Not via the API, but you can bulk select and replay failed events using the [Event History](/docs/workflows/event-history/).
## How do I store and retrieve data across workflow executions?
If you operate your own database or data store, you can connect to it directly in Pipedream.
Pipedream also operates a [built-in key-value store](/docs/workflows/data-management/data-stores/) that you can use to get and set data across workflow executions and different workflows.
## How do I delay the execution of a workflow?
Use Pipedream’s [built-in Delay actions](/docs/workflows/building-workflows/control-flow/delay/) to delay a workflow at any step.
## How can my workflow run faster?
Here are a few things that can help your workflow execute faster:
1. **Increase memory:** Increase your [workflow memory](/docs/workflows/building-workflows/settings/#memory) to at least 512 MB. Raising the memory limit will proportionally increase CPU resources, leading to improved performance and reduced latency.
2. **Return static HTTP responses:** If your workflow is triggered by an HTTP source, return a [static HTTP response](/docs/workflows/building-workflows/triggers/#http-responses) directly from the trigger configuration. This ensures the HTTP response is sent to the caller immediately, before the rest of the workflow steps are executed.
3. **Simplify your workflow:** Reduce the number of [steps](/docs/workflows/#code-actions) and [segments](/docs/workflows/building-workflows/control-flow/#workflow-segments) in your workflow, combining multiple steps into one, if possible. This lowers the overhead involved in managing step execution and exports.
4. **Activate warm workers:** Use [warm workers](/docs/workflows/building-workflows/settings/#eliminate-cold-starts) to reduce the startup time of workflows. Set [as many warm workers](/docs/workflows/building-workflows/settings/#how-many-workers-should-i-configure) as you want for high-volume traffic.
## How can I save common functions as steps?
You can create your own custom triggers and actions (“components”) on Pipedream using [the Component API](/docs/components/contributing/api/). These components are private to your account and can be used in any workflow.
You can also publish common functions in your own package on a public registry like [npm](https://www.npmjs.com/) or [PyPI](https://pypi.org/).
## Is Puppeteer supported in Pipedream?
Yes, see [our Puppeteer docs](/docs/workflows/building-workflows/code/nodejs/browser-automation/#puppeteer) for more detail.
## Is Playwright supported in Pipedream?
Yes, see [our Playwright docs](/docs/workflows/building-workflows/code/nodejs/browser-automation/#playwright) for more detail.
# What Are Workflows?
Source: https://pipedream.com/docs/workflows
export const PUBLIC_APPS = '2,700';
Workflows make it easy to integrate your apps, data, and APIs - all with no servers or infrastructure to manage. They’re sequences of [steps](/docs/workflows/#steps) [triggered by an event](/docs/workflows/building-workflows/triggers/), like an HTTP request, or new rows in a Google sheet.
You can use [pre-built actions](/docs/workflows/building-workflows/actions/) or custom [Node.js](/docs/workflows/building-workflows/code/nodejs/), [Python](/docs/workflows/building-workflows/code/python/), [Golang](/docs/workflows/building-workflows/code/go/), or [Bash](/docs/workflows/building-workflows/code/bash/) code in workflows and connect to any of our {PUBLIC_APPS} integrated apps.
Read [our quickstart](/docs/workflows/quickstart/) or watch our videos on [Pipedream University](https://pipedream.com/university) to learn more.
## Steps
Steps are the building blocks you use to create workflows.
* Use [triggers](/docs/workflows/building-workflows/triggers/), [code](/docs/workflows/building-workflows/code/), and [pre-built actions](/docs/components/contributing/#actions)
* Steps are run linearly, in the order they appear in your workflow
* You can pass data between steps using [the `steps` object](/docs/workflows/#step-exports)
* Observe the logs, errors, timing, and other execution details for every step
### Triggers
Every workflow begins with a [trigger](/docs/workflows/building-workflows/triggers/) step. Trigger steps initiate the execution of a workflow; i.e., workflows execute on each trigger event. For example, you can create an [HTTP trigger](/docs/workflows/building-workflows/triggers/#http) to accept HTTP requests. We give you a unique URL where you can send HTTP requests, and your workflow is executed on each request.
You can add [multiple triggers](/docs/workflows/building-workflows/triggers/#can-i-add-multiple-triggers-to-a-workflow) to a workflow, allowing you to run it on distinct events.
### Code, Actions
[Actions](/docs/components/contributing/#actions) and [code](/docs/workflows/building-workflows/code/) steps drive the logic of your workflow. Anytime your workflow runs, Pipedream executes each step of your workflow in order. Actions are prebuilt code steps that let you connect to hundreds of APIs without writing code. When you need more control than the default actions provide, code steps let you write any custom Node.js code.
Code and action steps cannot precede triggers, since they’ll have no data to operate on.
Once you save a workflow, we deploy it to our servers. Each event triggers the workflow code, whether you have the workflow open in your browser, or not.
## Step Names
Steps have names, which appear at the top of the step:
 When you [share data between steps](/docs/workflows/#step-exports), you’ll use this name to reference that shared data. For example, `steps.trigger.event` contains the event that triggered your workflow. If you exported a property called `myData` from this code step, you’d reference that in other steps using `steps.code.myData`. See the docs on [step exports](/docs/workflows/#step-exports) to learn more.
You can rename a step by clicking on its name and typing a new one in its place:
When you [share data between steps](/docs/workflows/#step-exports), you’ll use this name to reference that shared data. For example, `steps.trigger.event` contains the event that triggered your workflow. If you exported a property called `myData` from this code step, you’d reference that in other steps using `steps.code.myData`. See the docs on [step exports](/docs/workflows/#step-exports) to learn more.
You can rename a step by clicking on its name and typing a new one in its place:
 After changing a step name, you’ll need to update any references to the old step. In this example, you’d now reference this step as `steps.get_data`.
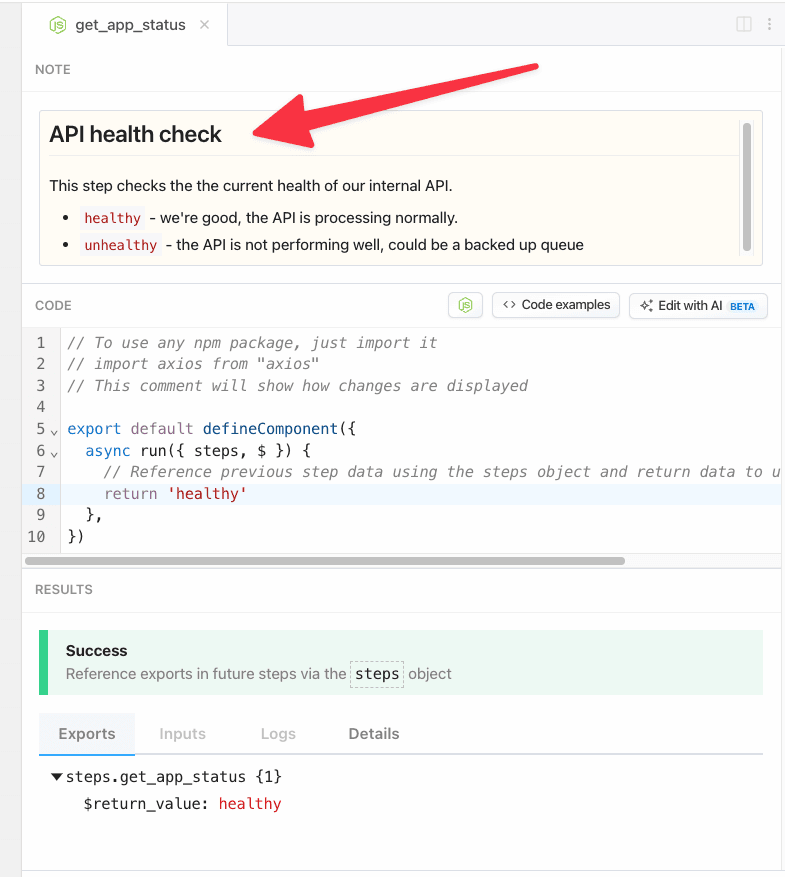 ### Adding or editing a note
1. Enter build mode on any workflow
2. Click into the overflow menu (3 dots) at the top right of any step
3. Select **Add note** (or **Edit note** if making changes to an existing note)
4. Add any text or markdown, then click **Update**
### Adding or editing a note
1. Enter build mode on any workflow
2. Click into the overflow menu (3 dots) at the top right of any step
3. Select **Add note** (or **Edit note** if making changes to an existing note)
4. Add any text or markdown, then click **Update**
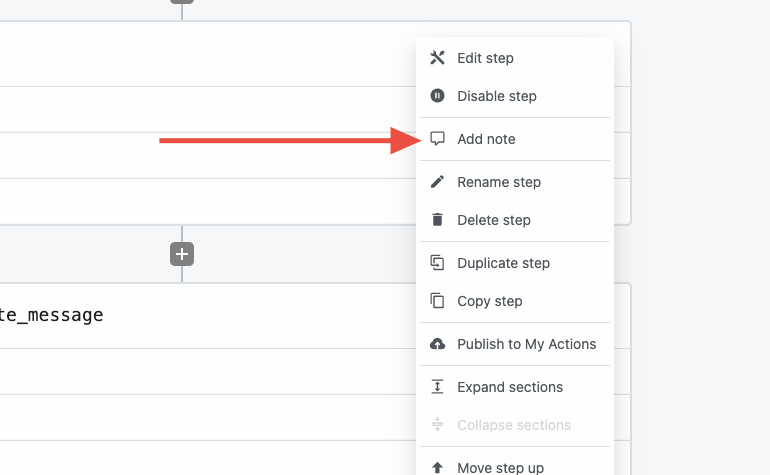
 ### Showing notes
Any step that has a note will have a **Note** section in the top panel in the editor pane.
### Current limitations
* Step notes are only accessible in Build mode, not in the Inspector.
# Actions
Source: https://pipedream.com/docs/workflows/building-workflows/actions
export const PUBLIC_APPS = '2,700';
Actions are reusable code steps that integrate your apps, data and APIs. For example, you can send HTTP requests to an external service using our HTTP actions, or use our Google Sheets actions to add new data. You can use thousands of actions across {PUBLIC_APPS}+ apps today.
Typically, integrating with these services requires custom code to manage connection logic, error handling, and more. Actions handle that for you. You only need to specify the parameters required for the action. For example, the HTTP `GET` Request action requires you enter the URL whose data you want to retrieve.
You can also [create your own actions](/docs/workflows/building-workflows/actions/#creating-your-own-actions) that can be shared across your own workflows, or published to all Pipedream users.
## Using Existing Actions
Adding existing actions to your workflow is easy:
1. Click the **+** button below any step.
2. Search for the app you’re looking for and select it from the list.
3. Search for the action and select it to add it to your workflow.
For example, here’s how to add the HTTP `GET` Request action:
### Showing notes
Any step that has a note will have a **Note** section in the top panel in the editor pane.
### Current limitations
* Step notes are only accessible in Build mode, not in the Inspector.
# Actions
Source: https://pipedream.com/docs/workflows/building-workflows/actions
export const PUBLIC_APPS = '2,700';
Actions are reusable code steps that integrate your apps, data and APIs. For example, you can send HTTP requests to an external service using our HTTP actions, or use our Google Sheets actions to add new data. You can use thousands of actions across {PUBLIC_APPS}+ apps today.
Typically, integrating with these services requires custom code to manage connection logic, error handling, and more. Actions handle that for you. You only need to specify the parameters required for the action. For example, the HTTP `GET` Request action requires you enter the URL whose data you want to retrieve.
You can also [create your own actions](/docs/workflows/building-workflows/actions/#creating-your-own-actions) that can be shared across your own workflows, or published to all Pipedream users.
## Using Existing Actions
Adding existing actions to your workflow is easy:
1. Click the **+** button below any step.
2. Search for the app you’re looking for and select it from the list.
3. Search for the action and select it to add it to your workflow.
For example, here’s how to add the HTTP `GET` Request action:
 ## Updating actions to the latest version
When you use existing actions or create your own, you’ll often want to update an action you added to a workflow to the newest version. For example, the community might publish a new feature or bug fix that you want to use.
In your code steps with out of date actions, you’ll see a button appear that will update your action to the latest version. Click on this button to update your code step:
## Updating actions to the latest version
When you use existing actions or create your own, you’ll often want to update an action you added to a workflow to the newest version. For example, the community might publish a new feature or bug fix that you want to use.
In your code steps with out of date actions, you’ll see a button appear that will update your action to the latest version. Click on this button to update your code step:
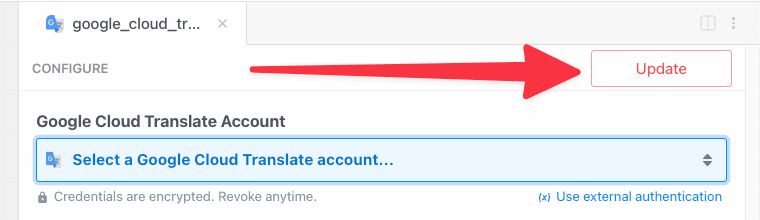 ## Creating your own actions
You can author your own actions on Pipedream, too. Anytime you need to reuse the same code across steps, consider making that an action.
Start with our [action development quickstart](/docs/components/contributing/actions-quickstart/). You can read more about all the capabilities of actions in [our API docs](/docs/components/contributing/api/), and review [example actions here](/docs/components/contributing/api/#example-components).
You can also publish actions to [the Pipedream registry](/docs/components/contributing/), which makes them available for anyone on Pipedream to use.
## Reporting a bug / feature request
If you’d like to report a bug, request a new action, or submit a feature request for an existing action, [open an issue in our GitHub repo](https://github.com/PipedreamHQ/pipedream).
# Overview
Source: https://pipedream.com/docs/workflows/building-workflows/code
export const PIPEDREAM_NODE_VERSION = '20';
Pipedream comes with thousands of prebuilt [triggers](/docs/workflows/building-workflows/triggers/) and [actions](/docs/components/contributing/#actions) for [hundreds of apps](https://pipedream.com/apps). Often, these will be sufficient for building simple workflows.
But sometimes you need to run your own custom logic. You may need to make an API request to fetch additional metadata about the event, transform data into a custom format, or end the execution of a workflow early under some conditions. **Code steps let you do this and more**.
Code steps let you execute [Node.js v{PIPEDREAM_NODE_VERSION}](https://nodejs.org/) (JavaScript) code, Python, Go or even Bash right in a workflow.
Choose a language to get started:
## Creating your own actions
You can author your own actions on Pipedream, too. Anytime you need to reuse the same code across steps, consider making that an action.
Start with our [action development quickstart](/docs/components/contributing/actions-quickstart/). You can read more about all the capabilities of actions in [our API docs](/docs/components/contributing/api/), and review [example actions here](/docs/components/contributing/api/#example-components).
You can also publish actions to [the Pipedream registry](/docs/components/contributing/), which makes them available for anyone on Pipedream to use.
## Reporting a bug / feature request
If you’d like to report a bug, request a new action, or submit a feature request for an existing action, [open an issue in our GitHub repo](https://github.com/PipedreamHQ/pipedream).
# Overview
Source: https://pipedream.com/docs/workflows/building-workflows/code
export const PIPEDREAM_NODE_VERSION = '20';
Pipedream comes with thousands of prebuilt [triggers](/docs/workflows/building-workflows/triggers/) and [actions](/docs/components/contributing/#actions) for [hundreds of apps](https://pipedream.com/apps). Often, these will be sufficient for building simple workflows.
But sometimes you need to run your own custom logic. You may need to make an API request to fetch additional metadata about the event, transform data into a custom format, or end the execution of a workflow early under some conditions. **Code steps let you do this and more**.
Code steps let you execute [Node.js v{PIPEDREAM_NODE_VERSION}](https://nodejs.org/) (JavaScript) code, Python, Go or even Bash right in a workflow.
Choose a language to get started:
 Accepting a single string is just one example, you can build a step to accept arrays of strings through a dropdown presented in the workflow builder.
[Read the props reference for the full list of options](/docs/components/contributing/api/#props).
## How Pipedream Node.js components work
When you add a new Node.js code step or use the examples in this doc, you’ll notice a common structure to the code:
```javascript
export default defineComponent({
async run({ steps, $ }) {
// this Node.js code will execute when the step runs
},
});
```
This defines [a Node.js component](/docs/components/contributing/api/). Components let you:
* Pass input to steps using [props](/docs/workflows/building-workflows/code/nodejs/#passing-props-to-code-steps)
* [Connect an account to a step](/docs/apps/connected-accounts/#from-a-code-step)
* [Issue HTTP responses](/docs/workflows/building-workflows/triggers/#http-responses)
* Perform workflow-level flow control, like [ending a workflow early](/docs/workflows/building-workflows/code/nodejs/#ending-a-workflow-early)
When the step runs, Pipedream executes the `run` method:
* Any asynchronous code within a code step [**must** be run synchronously](/docs/workflows/building-workflows/code/nodejs/async/), using the `await` keyword or with a Promise chain, using `.then()`, `.catch()`, and related methods.
* Pipedream passes the `steps` variable to the run method. `steps` is also an object, and contains the [data exported from previous steps](/docs/workflows/#step-exports) in your workflow.
* You also have access to the `$` variable, which gives you access to methods like `$.respond`, `$.export`, [and more](/docs/components/contributing/api/#actions).
If you’re using [props](/docs/workflows/building-workflows/code/nodejs/#passing-props-to-code-steps) or [connect an account to a step](/docs/apps/connected-accounts/#from-a-code-step), the component exposes them in the variable `this`, which refers to the current step:
```javascript
export default defineComponent({
async run({ steps, $ }) {
// `this` refers to the running component. Props, connected accounts, etc. are exposed here
console.log(this);
},
});
```
When you [connect an account to a step](/docs/apps/connected-accounts/#from-a-code-step), Pipedream exposes the auth info in the variable [`this.appName.$auth`](/docs/workflows/building-workflows/code/nodejs/auth/#accessing-connected-account-data-with-thisappnameauth).
## Logs
You can call `console.log` or `console.error` to add logs to the execution of a code step.
These logs will appear just below the associated step. `console.log` messages appear in black, `console.error` in red.
### `console.dir`
If you need to print the contents of JavaScript objects, use `console.dir`:
```javascript
export default defineComponent({
async run({ steps, $ }) {
console.dir({
name: "Luke",
});
},
});
```
## Syntax errors
Pipedream will attempt to catch syntax errors when you’re writing code, highlighting the lines where the error occurred in red.
Accepting a single string is just one example, you can build a step to accept arrays of strings through a dropdown presented in the workflow builder.
[Read the props reference for the full list of options](/docs/components/contributing/api/#props).
## How Pipedream Node.js components work
When you add a new Node.js code step or use the examples in this doc, you’ll notice a common structure to the code:
```javascript
export default defineComponent({
async run({ steps, $ }) {
// this Node.js code will execute when the step runs
},
});
```
This defines [a Node.js component](/docs/components/contributing/api/). Components let you:
* Pass input to steps using [props](/docs/workflows/building-workflows/code/nodejs/#passing-props-to-code-steps)
* [Connect an account to a step](/docs/apps/connected-accounts/#from-a-code-step)
* [Issue HTTP responses](/docs/workflows/building-workflows/triggers/#http-responses)
* Perform workflow-level flow control, like [ending a workflow early](/docs/workflows/building-workflows/code/nodejs/#ending-a-workflow-early)
When the step runs, Pipedream executes the `run` method:
* Any asynchronous code within a code step [**must** be run synchronously](/docs/workflows/building-workflows/code/nodejs/async/), using the `await` keyword or with a Promise chain, using `.then()`, `.catch()`, and related methods.
* Pipedream passes the `steps` variable to the run method. `steps` is also an object, and contains the [data exported from previous steps](/docs/workflows/#step-exports) in your workflow.
* You also have access to the `$` variable, which gives you access to methods like `$.respond`, `$.export`, [and more](/docs/components/contributing/api/#actions).
If you’re using [props](/docs/workflows/building-workflows/code/nodejs/#passing-props-to-code-steps) or [connect an account to a step](/docs/apps/connected-accounts/#from-a-code-step), the component exposes them in the variable `this`, which refers to the current step:
```javascript
export default defineComponent({
async run({ steps, $ }) {
// `this` refers to the running component. Props, connected accounts, etc. are exposed here
console.log(this);
},
});
```
When you [connect an account to a step](/docs/apps/connected-accounts/#from-a-code-step), Pipedream exposes the auth info in the variable [`this.appName.$auth`](/docs/workflows/building-workflows/code/nodejs/auth/#accessing-connected-account-data-with-thisappnameauth).
## Logs
You can call `console.log` or `console.error` to add logs to the execution of a code step.
These logs will appear just below the associated step. `console.log` messages appear in black, `console.error` in red.
### `console.dir`
If you need to print the contents of JavaScript objects, use `console.dir`:
```javascript
export default defineComponent({
async run({ steps, $ }) {
console.dir({
name: "Luke",
});
},
});
```
## Syntax errors
Pipedream will attempt to catch syntax errors when you’re writing code, highlighting the lines where the error occurred in red.
 Or you can use it for validating the format of a given `email` prop:
```javascript
import { ConfigurationError } from "@pipedream/platform";
export default defineComponent({
props: {
email: { type: "string" },
},
async run({ steps, $ }) {
// if the email address doesn't include a @, it's not valid
if (!this.email.includes("@")) {
throw new ConfigurationError("Provide a valid email address");
}
},
});
```
## Using secrets in code
Workflow code is private. Still, we recommend you don’t include secrets — API keys, tokens, or other sensitive values — directly in code steps.
Pipedream supports [environment variables](/docs/workflows/environment-variables/) for keeping secrets separate from code. Once you create an environment variable in Pipedream, you can reference it in any workflow using `process.env.VARIABLE_NAME`. The values of environment variables are private.
See the [Environment Variables](/docs/workflows/environment-variables/) docs for more information.
## Limitations of code steps
Code steps operate within the [general constraints on workflows](/docs/workflows/limits/#workflows). As long as you stay within those limits and abide by our [acceptable use policy](/docs/workflows/limits/#acceptable-use), you can add any number of code steps in a workflow to do virtually anything you’d be able to do in Node.js.
If you’re trying to run code that doesn’t work or you have questions about any limits on code steps, [please reach out](https://pipedream.com/support/).
## Editor settings
We use the [Monaco Editor](https://microsoft.github.io/monaco-editor/), which powers VS Code and other web-based editors.
We also let you customize the editor. For example, you can enable Vim mode, and change the default tab size for indented code. Visit your [Settings](https://pipedream.com/settings) to modify these settings.
## Keyboard Shortcuts
We use the [Monaco Editor](https://microsoft.github.io/monaco-editor/), which powers VS Code. As a result, many of the VS Code [keyboard shortcuts](https://code.visualstudio.com/docs/getstarted/keybindings) should work in the context of the editor.
For example, you can use shortcuts to search for text, format code, and more.
## New to JavaScript?
We understand many of you might be new to JavaScript, and provide resources for you to learn the language below.
When you’re searching for how to do something in JavaScript, some of the code you try might not work in Pipedream. This could be because the code expects to run in a browser, not a Node.js environment. The same goes for [npm packages](/docs/workflows/building-workflows/code/nodejs/#using-npm-packages).
### I’m new to programming
Many of the most basic JavaScript tutorials are geared towards writing code for a web browser to run. This is great for learning — a webpage is one of the coolest things you can build with code. We recommend starting with these general JavaScript tutorials and trying the code you learn on Pipedream:
* [JavaScript For Cats](http://jsforcats.com/)
* [Mozilla - JavaScript First Steps](https://developer.mozilla.org/en-US/docs/Learn/JavaScript/First_steps)
* [StackOverflow](https://stackoverflow.com/) operates a programming Q\&A site that typically has the first Google result when you’re searching for something specific. It’s a great place to find answers to common questions.
### I know how to code, but don’t know JavaScript
* [A re-introduction to JavaScript (JS tutorial)](https://developer.mozilla.org/en-US/docs/Web/JavaScript/A_re-introduction_to_JavaScript)
* [MDN language overview](https://developer.mozilla.org/en-US/docs/Web/JavaScript)
* [Eloquent Javascript](https://eloquentjavascript.net/)
* [Node School](https://nodeschool.io/)
* [You Don’t Know JS](https://github.com/getify/You-Dont-Know-JS)
# Using AI To Generate Code
Source: https://pipedream.com/docs/workflows/building-workflows/code/nodejs/ai-code-generation
Tell Pipedream the code you want, we generate it for you.
Or you can use it for validating the format of a given `email` prop:
```javascript
import { ConfigurationError } from "@pipedream/platform";
export default defineComponent({
props: {
email: { type: "string" },
},
async run({ steps, $ }) {
// if the email address doesn't include a @, it's not valid
if (!this.email.includes("@")) {
throw new ConfigurationError("Provide a valid email address");
}
},
});
```
## Using secrets in code
Workflow code is private. Still, we recommend you don’t include secrets — API keys, tokens, or other sensitive values — directly in code steps.
Pipedream supports [environment variables](/docs/workflows/environment-variables/) for keeping secrets separate from code. Once you create an environment variable in Pipedream, you can reference it in any workflow using `process.env.VARIABLE_NAME`. The values of environment variables are private.
See the [Environment Variables](/docs/workflows/environment-variables/) docs for more information.
## Limitations of code steps
Code steps operate within the [general constraints on workflows](/docs/workflows/limits/#workflows). As long as you stay within those limits and abide by our [acceptable use policy](/docs/workflows/limits/#acceptable-use), you can add any number of code steps in a workflow to do virtually anything you’d be able to do in Node.js.
If you’re trying to run code that doesn’t work or you have questions about any limits on code steps, [please reach out](https://pipedream.com/support/).
## Editor settings
We use the [Monaco Editor](https://microsoft.github.io/monaco-editor/), which powers VS Code and other web-based editors.
We also let you customize the editor. For example, you can enable Vim mode, and change the default tab size for indented code. Visit your [Settings](https://pipedream.com/settings) to modify these settings.
## Keyboard Shortcuts
We use the [Monaco Editor](https://microsoft.github.io/monaco-editor/), which powers VS Code. As a result, many of the VS Code [keyboard shortcuts](https://code.visualstudio.com/docs/getstarted/keybindings) should work in the context of the editor.
For example, you can use shortcuts to search for text, format code, and more.
## New to JavaScript?
We understand many of you might be new to JavaScript, and provide resources for you to learn the language below.
When you’re searching for how to do something in JavaScript, some of the code you try might not work in Pipedream. This could be because the code expects to run in a browser, not a Node.js environment. The same goes for [npm packages](/docs/workflows/building-workflows/code/nodejs/#using-npm-packages).
### I’m new to programming
Many of the most basic JavaScript tutorials are geared towards writing code for a web browser to run. This is great for learning — a webpage is one of the coolest things you can build with code. We recommend starting with these general JavaScript tutorials and trying the code you learn on Pipedream:
* [JavaScript For Cats](http://jsforcats.com/)
* [Mozilla - JavaScript First Steps](https://developer.mozilla.org/en-US/docs/Learn/JavaScript/First_steps)
* [StackOverflow](https://stackoverflow.com/) operates a programming Q\&A site that typically has the first Google result when you’re searching for something specific. It’s a great place to find answers to common questions.
### I know how to code, but don’t know JavaScript
* [A re-introduction to JavaScript (JS tutorial)](https://developer.mozilla.org/en-US/docs/Web/JavaScript/A_re-introduction_to_JavaScript)
* [MDN language overview](https://developer.mozilla.org/en-US/docs/Web/JavaScript)
* [Eloquent Javascript](https://eloquentjavascript.net/)
* [Node School](https://nodeschool.io/)
* [You Don’t Know JS](https://github.com/getify/You-Dont-Know-JS)
# Using AI To Generate Code
Source: https://pipedream.com/docs/workflows/building-workflows/code/nodejs/ai-code-generation
Tell Pipedream the code you want, we generate it for you.
 Pipedream’s [built-in actions](/docs/workflows/building-workflows/actions/) are great for running common API operations without having to write code, but sometimes you need code-level control in a workflow. You can [write this code yourself](/docs/workflows/building-workflows/code/), or you can let Pipedream generate it for you with AI.
This feature is new, and [we welcome feedback](https://pipedream.com/support). Please let us know what we can improve or add to make this more useful for you.
## Getting Started
Access the feature either from within a Node.js code cell or from any app in the step selector.
Pipedream’s [built-in actions](/docs/workflows/building-workflows/actions/) are great for running common API operations without having to write code, but sometimes you need code-level control in a workflow. You can [write this code yourself](/docs/workflows/building-workflows/code/), or you can let Pipedream generate it for you with AI.
This feature is new, and [we welcome feedback](https://pipedream.com/support). Please let us know what we can improve or add to make this more useful for you.
## Getting Started
Access the feature either from within a Node.js code cell or from any app in the step selector.
 A window should pop up and ask for your prompt. Write exactly what you want to do within that step. **Be verbose** and see our tips for [getting the best results](/docs/workflows/building-workflows/code/nodejs/ai-code-generation/#getting-the-best-results).
* **Bad**: “Send a Slack message”
* **Good**: “Send a Slack message in the following format: `Hello, ${name}`. Let me select the channel from a list of available options.”
Once you’re done, hit **Enter** or click **Generate**.
Code will immediately start streaming to the editor. You can modify the prompt and re-generate the code if it doesn’t look right, or click **Use this code** to add it to your code cell and test it.
Pipedream will automatically refresh the step to show connected accounts and any input fields (props) above the step.
A window should pop up and ask for your prompt. Write exactly what you want to do within that step. **Be verbose** and see our tips for [getting the best results](/docs/workflows/building-workflows/code/nodejs/ai-code-generation/#getting-the-best-results).
* **Bad**: “Send a Slack message”
* **Good**: “Send a Slack message in the following format: `Hello, ${name}`. Let me select the channel from a list of available options.”
Once you’re done, hit **Enter** or click **Generate**.
Code will immediately start streaming to the editor. You can modify the prompt and re-generate the code if it doesn’t look right, or click **Use this code** to add it to your code cell and test it.
Pipedream will automatically refresh the step to show connected accounts and any input fields (props) above the step.
 Edit the code however you’d like. Once you’re done, test the code. You’ll see the option to provide a :+1: or :-1: on the code, which helps us learn what’s working and what’s not.
## Editing existing code
You can also edit existing code with AI. Click the **Edit with AI** button at the top-right of any Node.js code step. You’ll see the code gen window appear with the original code from your step. Enter a prompt to suggest an edit, and we’ll give you the modified code.
Edit the code however you’d like. Once you’re done, test the code. You’ll see the option to provide a :+1: or :-1: on the code, which helps us learn what’s working and what’s not.
## Editing existing code
You can also edit existing code with AI. Click the **Edit with AI** button at the top-right of any Node.js code step. You’ll see the code gen window appear with the original code from your step. Enter a prompt to suggest an edit, and we’ll give you the modified code.
 ## Getting the best results
**Generating code works best with clear, precise, and detailed instructions of what you want to do in your step.** The code gen service understands the [Pipedream component API](/docs/components/contributing/api/) and references the API docs of [integrated apps](https://pipedream.com/apps). For example, you can tell it to include specific [props](/docs/components/contributing/api/#props) (input) or [async options](/docs/components/contributing/api/#async-options-example), and reference specific API endpoints you want to use for the selected app.
### Examples
#### Slack
Send a message to the `#general` channel that says, “This message was sent with AI-generate code!” Format it as a Slack block, with a header named, “Hello, world!”
**Output**:
```php
import { axios } from "@pipedream/platform";
export default defineComponent({
props: {
slack: {
type: "app",
app: "slack",
},
},
async run({ steps, $ }) {
return await axios($, {
method: "POST",
url: `https://slack.com/api/chat.postMessage`,
headers: {
Authorization: `Bearer ${this.slack.$auth.oauth_access_token}`,
},
data: {
channel: "#general",
blocks: [
{
type: "header",
text: {
type: "plain_text",
text: "Hello, world!",
},
},
{
type: "section",
text: {
type: "mrkdwn",
text: "This message was sent with AI-generated code!",
},
},
],
},
});
},
});
```
#### Stripe
Get the subscription information about a specific customer based on their email address
**Output:**
```php
import { axios } from "@pipedream/platform";
export default defineComponent({
props: {
stripe: {
type: "app",
app: "stripe",
},
email: {
type: "string",
label: "Email Address",
description:
"The email address of the customer to get subscription information for",
},
},
async run({ steps, $ }) {
const customerResponse = await axios($, {
method: "GET",
url: `https://api.stripe.com/v1/customers`,
headers: {
Authorization: `Bearer ${this.stripe.$auth.api_key}`,
},
params: {
email: this.email,
},
});
if (customerResponse.data.length === 0) {
throw new Error("Customer not found");
}
const customerId = customerResponse.data[0].id;
return await axios($, {
method: "GET",
url: `https://api.stripe.com/v1/subscriptions`,
headers: {
Authorization: `Bearer ${this.stripe.$auth.api_key}`,
},
params: {
customer: customerId,
},
});
},
});
```
## Current limitations, and what we’re working on next
* Currently supports Pipedream actions, not triggers
* Only supports Node.js output. Python coming soon.
* It supports single steps, and not entire workflows (also coming soon)
# Running Asynchronous Code In Node.Js
Source: https://pipedream.com/docs/workflows/building-workflows/code/nodejs/async
If you’re not familiar with asynchronous programming concepts like [callback functions](https://developer.mozilla.org/en-US/docs/Glossary/Callback_function) or [Promises](https://developer.mozilla.org/en-US/docs/Web/JavaScript/Guide/Using_promises), see [this overview](https://eloquentjavascript.net/11_async.html).
## The problem
**Any asynchronous code within a Node.js code step must complete before the next step runs**. This ensures future steps have access to its data. If Pipedream detects that code is still running by the time the step completes, you’ll see the following warning below the code step:
> **This step was still trying to run code when the step ended. Make sure you await all Promises, or promisify callback functions.**
As the warning notes, this often arises from one of two issues:
* You forgot to `await` a Promise. [All Promises must be awaited](/docs/workflows/building-workflows/code/nodejs/async/#await-all-promises) within a step so they resolve before the step finishes.
* You tried to run a callback function. Since callback functions run asynchronously, they typically will not finish before the step ends. [You can wrap your function in a Promise](/docs/workflows/building-workflows/code/nodejs/async/#wrap-callback-functions-in-a-promise) to make sure it resolves before the step finishes.
## Solutions
### `await` all Promises
Most Node.js packages that run async code return Promises as the result of method calls. For example, [`axios`](/docs/workflows/building-workflows/code/nodejs/http-requests/#basic-axios-usage-notes) is an HTTP client. If you make an HTTP request like this in a Pipedream code step:
```php
const resp = axios({
method: "GET",
url: `https://swapi.dev/api/films/`,
});
```
It won’t send the HTTP request, since **`axios` returns a Promise**. Instead, add an `await` in front of the call to `axios`:
```php
const resp = await axios({
method: "GET",
url: `https://swapi.dev/api/films/`,
});
```
In short, always do this:
```javascript
const res = await runAsyncCode();
```
instead of this:
```javascript
// This code may not finish by the time the workflow finishes
runAsyncCode();
```
### Wrap callback functions in a Promise
Before support for Promises was widespread, [callback functions](https://developer.mozilla.org/en-US/docs/Glossary/Callback_function) were a popular way to run some code asynchronously, after some operation was completed. For example, [PDFKit](https://pdfkit.org/) lets you pass a callback function that runs when certain events fire, like when the PDF has been finalized:
```javascript
import PDFDocument from "pdfkit";
import fs from "fs";
let doc = new PDFDocument({ size: "A4", margin: 50 });
this.fileName = `tmp/test.pdf`;
let file = fs.createWriteStream(this.fileName);
doc.pipe(file);
doc.text("Hello world!");
// Finalize PDF file
doc.end();
file.on("finish", () => {
console.log(fs.statSync(this.fileName));
});
```
This is the callback function:
```javascript
() => {
console.log(fs.statSync(this.fileName));
};
```
and **it will not run**. By running a callback function in this way, we’re saying that we want the function to be run asynchronously. But on Pipedream, this code must finish by the time the step ends. **You can wrap this callback function in a Promise to make sure that happens**. Instead of running:
```javascript
file.on("finish", () => {
console.log(fs.statSync(this.fileName));
});
```
run:
```javascript
// Wait for PDF to finalize
await new Promise((resolve) => file.on("finish", resolve));
// Once done, get stats
const stats = fs.statSync(this.filePath);
```
This is called “[promisification](https://javascript.info/promisify)”.
You can often promisify a function in one line using Node.js’ [`util.promisify` function](https://2ality.com/2017/05/util-promisify.html).
### Other solutions
If a specific library doesn’t support Promises, you can often find an equivalent library that does. For example, many older HTTP clients like `request` didn’t support Promises natively, but the community [published packages that wrapped it with a Promise-based interface](https://www.npmjs.com/package/request#promises--asyncawait) (note: `request` has been deprecated, this is just an example).
## False positives
This warning can also be a false positive. If you’re successfully awaiting all Promises, Pipedream could be throwing the warning in error. If you observe this, please [file a bug](https://github.com/PipedreamHQ/pipedream/issues/new?assignees=\&labels=bug\&template=bug_report.md\&title=%5BBUG%5D+).
Packages that make HTTP requests or read data from disk (for example) fail to resolve Promises at the right time, or at all. This means that Pipedream is correctly detecting that code is still running, but there’s also no issue - the library successfully ran, but just failed to resolve the Promise. You can safely ignore the error if all relevant operations are truly succeeding.
# Connecting Apps In Node.Js
Source: https://pipedream.com/docs/workflows/building-workflows/code/nodejs/auth
When you use [prebuilt actions](/docs/components/contributing/#actions) tied to apps, you don’t need to write the code to authorize API requests. Just [connect your account](/docs/apps/connected-accounts/#connecting-accounts) for that app and run your workflow.
But sometimes you’ll need to [write your own code](/docs/workflows/building-workflows/code/nodejs/). You can also connect apps to custom code steps, using the auth information to authorize requests to that app.
For example, you may want to send a Slack message from a step. We use Slack’s OAuth integration to authorize sending messages from your workflows.
To wire up a Slack account to a workflow, define it as a `prop` to the workflow.
```javascript
import { WebClient } from '@slack/web-api'
export default defineComponent({
props: {
// This creates a connection called "slack" that connects a Slack account.
slack: {
type: 'app',
app: 'slack'
}
},
async run({ steps, $ }) {
const web = new WebClient(this.slack.$auth.oauth_access_token)
return await web.chat.postMessage({
text: "Hello, world!",
channel: "#general",
})
}
});
```
Then click the **Refresh fields** button in the editor to render the Slack field based on the `slack` prop:
## Getting the best results
**Generating code works best with clear, precise, and detailed instructions of what you want to do in your step.** The code gen service understands the [Pipedream component API](/docs/components/contributing/api/) and references the API docs of [integrated apps](https://pipedream.com/apps). For example, you can tell it to include specific [props](/docs/components/contributing/api/#props) (input) or [async options](/docs/components/contributing/api/#async-options-example), and reference specific API endpoints you want to use for the selected app.
### Examples
#### Slack
Send a message to the `#general` channel that says, “This message was sent with AI-generate code!” Format it as a Slack block, with a header named, “Hello, world!”
**Output**:
```php
import { axios } from "@pipedream/platform";
export default defineComponent({
props: {
slack: {
type: "app",
app: "slack",
},
},
async run({ steps, $ }) {
return await axios($, {
method: "POST",
url: `https://slack.com/api/chat.postMessage`,
headers: {
Authorization: `Bearer ${this.slack.$auth.oauth_access_token}`,
},
data: {
channel: "#general",
blocks: [
{
type: "header",
text: {
type: "plain_text",
text: "Hello, world!",
},
},
{
type: "section",
text: {
type: "mrkdwn",
text: "This message was sent with AI-generated code!",
},
},
],
},
});
},
});
```
#### Stripe
Get the subscription information about a specific customer based on their email address
**Output:**
```php
import { axios } from "@pipedream/platform";
export default defineComponent({
props: {
stripe: {
type: "app",
app: "stripe",
},
email: {
type: "string",
label: "Email Address",
description:
"The email address of the customer to get subscription information for",
},
},
async run({ steps, $ }) {
const customerResponse = await axios($, {
method: "GET",
url: `https://api.stripe.com/v1/customers`,
headers: {
Authorization: `Bearer ${this.stripe.$auth.api_key}`,
},
params: {
email: this.email,
},
});
if (customerResponse.data.length === 0) {
throw new Error("Customer not found");
}
const customerId = customerResponse.data[0].id;
return await axios($, {
method: "GET",
url: `https://api.stripe.com/v1/subscriptions`,
headers: {
Authorization: `Bearer ${this.stripe.$auth.api_key}`,
},
params: {
customer: customerId,
},
});
},
});
```
## Current limitations, and what we’re working on next
* Currently supports Pipedream actions, not triggers
* Only supports Node.js output. Python coming soon.
* It supports single steps, and not entire workflows (also coming soon)
# Running Asynchronous Code In Node.Js
Source: https://pipedream.com/docs/workflows/building-workflows/code/nodejs/async
If you’re not familiar with asynchronous programming concepts like [callback functions](https://developer.mozilla.org/en-US/docs/Glossary/Callback_function) or [Promises](https://developer.mozilla.org/en-US/docs/Web/JavaScript/Guide/Using_promises), see [this overview](https://eloquentjavascript.net/11_async.html).
## The problem
**Any asynchronous code within a Node.js code step must complete before the next step runs**. This ensures future steps have access to its data. If Pipedream detects that code is still running by the time the step completes, you’ll see the following warning below the code step:
> **This step was still trying to run code when the step ended. Make sure you await all Promises, or promisify callback functions.**
As the warning notes, this often arises from one of two issues:
* You forgot to `await` a Promise. [All Promises must be awaited](/docs/workflows/building-workflows/code/nodejs/async/#await-all-promises) within a step so they resolve before the step finishes.
* You tried to run a callback function. Since callback functions run asynchronously, they typically will not finish before the step ends. [You can wrap your function in a Promise](/docs/workflows/building-workflows/code/nodejs/async/#wrap-callback-functions-in-a-promise) to make sure it resolves before the step finishes.
## Solutions
### `await` all Promises
Most Node.js packages that run async code return Promises as the result of method calls. For example, [`axios`](/docs/workflows/building-workflows/code/nodejs/http-requests/#basic-axios-usage-notes) is an HTTP client. If you make an HTTP request like this in a Pipedream code step:
```php
const resp = axios({
method: "GET",
url: `https://swapi.dev/api/films/`,
});
```
It won’t send the HTTP request, since **`axios` returns a Promise**. Instead, add an `await` in front of the call to `axios`:
```php
const resp = await axios({
method: "GET",
url: `https://swapi.dev/api/films/`,
});
```
In short, always do this:
```javascript
const res = await runAsyncCode();
```
instead of this:
```javascript
// This code may not finish by the time the workflow finishes
runAsyncCode();
```
### Wrap callback functions in a Promise
Before support for Promises was widespread, [callback functions](https://developer.mozilla.org/en-US/docs/Glossary/Callback_function) were a popular way to run some code asynchronously, after some operation was completed. For example, [PDFKit](https://pdfkit.org/) lets you pass a callback function that runs when certain events fire, like when the PDF has been finalized:
```javascript
import PDFDocument from "pdfkit";
import fs from "fs";
let doc = new PDFDocument({ size: "A4", margin: 50 });
this.fileName = `tmp/test.pdf`;
let file = fs.createWriteStream(this.fileName);
doc.pipe(file);
doc.text("Hello world!");
// Finalize PDF file
doc.end();
file.on("finish", () => {
console.log(fs.statSync(this.fileName));
});
```
This is the callback function:
```javascript
() => {
console.log(fs.statSync(this.fileName));
};
```
and **it will not run**. By running a callback function in this way, we’re saying that we want the function to be run asynchronously. But on Pipedream, this code must finish by the time the step ends. **You can wrap this callback function in a Promise to make sure that happens**. Instead of running:
```javascript
file.on("finish", () => {
console.log(fs.statSync(this.fileName));
});
```
run:
```javascript
// Wait for PDF to finalize
await new Promise((resolve) => file.on("finish", resolve));
// Once done, get stats
const stats = fs.statSync(this.filePath);
```
This is called “[promisification](https://javascript.info/promisify)”.
You can often promisify a function in one line using Node.js’ [`util.promisify` function](https://2ality.com/2017/05/util-promisify.html).
### Other solutions
If a specific library doesn’t support Promises, you can often find an equivalent library that does. For example, many older HTTP clients like `request` didn’t support Promises natively, but the community [published packages that wrapped it with a Promise-based interface](https://www.npmjs.com/package/request#promises--asyncawait) (note: `request` has been deprecated, this is just an example).
## False positives
This warning can also be a false positive. If you’re successfully awaiting all Promises, Pipedream could be throwing the warning in error. If you observe this, please [file a bug](https://github.com/PipedreamHQ/pipedream/issues/new?assignees=\&labels=bug\&template=bug_report.md\&title=%5BBUG%5D+).
Packages that make HTTP requests or read data from disk (for example) fail to resolve Promises at the right time, or at all. This means that Pipedream is correctly detecting that code is still running, but there’s also no issue - the library successfully ran, but just failed to resolve the Promise. You can safely ignore the error if all relevant operations are truly succeeding.
# Connecting Apps In Node.Js
Source: https://pipedream.com/docs/workflows/building-workflows/code/nodejs/auth
When you use [prebuilt actions](/docs/components/contributing/#actions) tied to apps, you don’t need to write the code to authorize API requests. Just [connect your account](/docs/apps/connected-accounts/#connecting-accounts) for that app and run your workflow.
But sometimes you’ll need to [write your own code](/docs/workflows/building-workflows/code/nodejs/). You can also connect apps to custom code steps, using the auth information to authorize requests to that app.
For example, you may want to send a Slack message from a step. We use Slack’s OAuth integration to authorize sending messages from your workflows.
To wire up a Slack account to a workflow, define it as a `prop` to the workflow.
```javascript
import { WebClient } from '@slack/web-api'
export default defineComponent({
props: {
// This creates a connection called "slack" that connects a Slack account.
slack: {
type: 'app',
app: 'slack'
}
},
async run({ steps, $ }) {
const web = new WebClient(this.slack.$auth.oauth_access_token)
return await web.chat.postMessage({
text: "Hello, world!",
channel: "#general",
})
}
});
```
Then click the **Refresh fields** button in the editor to render the Slack field based on the `slack` prop:
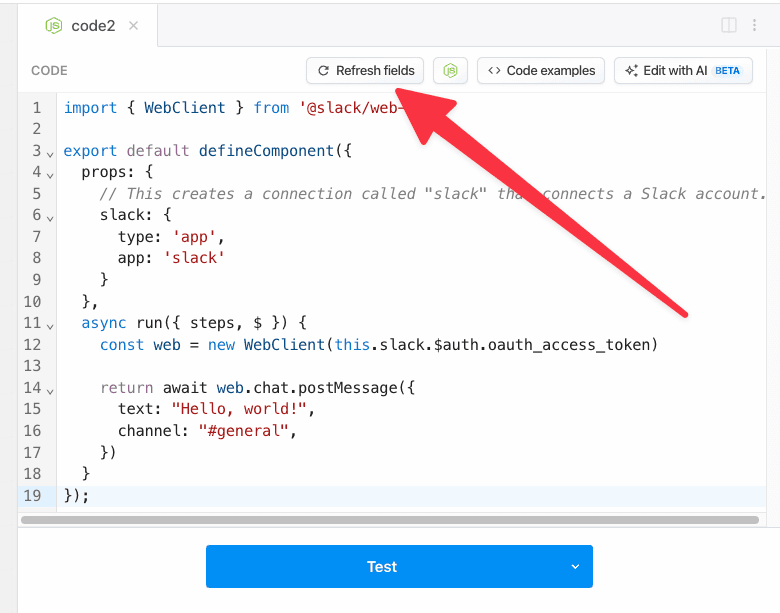 Now the step in the workflow builder will allow you to connect your Slack account:
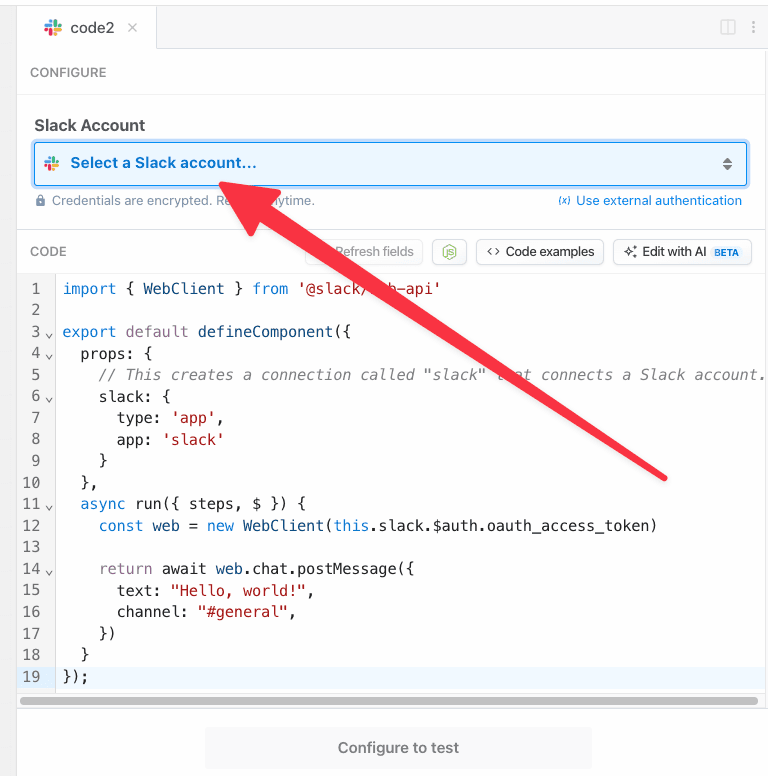 ## Accessing connected account data with `this.appName.$auth`
In our Slack example above, we created a Slack `WebClient` using the Slack OAuth access token:
```javascript
const web = new WebClient(this.slack.$auth.oauth_access_token);
```
Where did `this.slack` come from? Good question. It was generated by the definition we made in `props`:
```javascript highlight={4-9}
export default defineComponent({
props: {
// the name of the app from the key of the prop, in this case it's "slack"
slack: {
// define that this prop is an app
type: 'app',
// define that this app connects to Slack
app: 'slack'
}
}
// ... rest of the Node.js step
```
The Slack access token is generated by Pipedream, and is available to this step in the `this.slack.$auth` object:
```javascript highlight={11}
export default defineComponent({
props: {
slack: {
type: 'app',
app: 'slack'
}
},
async run({ steps, $ }) {
async (steps, $) => {
// Authentication details for all of your apps are accessible under the special $ variable:
console.log(this.slack.$auth);
}
})
});
```
`this.appName.$auth` contains named properties for each account you connect to the associated step. Here, we connected Slack, so `this.slack.$auth` contains the Slack auth info (the `oauth_access_token`).
The names of the properties for each connected account will differ with the account. Pipedream typically exposes OAuth access tokens as `oauth_access_token`, and API keys under the property `api_key`. But if there’s a service-specific name for the tokens (for example, if the service calls it `server_token`), we prefer that name, instead.
To list the `this.[app name].$auth` properties available to you for a given app, run `Object.keys` on the app:
```javascript
console.log(Object.keys(this.slack.$auth)) // Replace this.slack with your app's name
```
and run your workflow. You’ll see the property names in the logs below your step.
## Writing custom steps to use `this.appName.$auth`
You can write code that utilizes connected accounts in a few different ways:
### Using the code templates tied to apps
When you write custom code that connects to an app, you can start with a code snippet Pipedream provides for each app. This is called the **test request**.
When you search for an app in a step:
1. Click the **+** button below any step.
2. Search for the app you’re looking for and select it from the list.
3. Select the option to **Use any \
## Accessing connected account data with `this.appName.$auth`
In our Slack example above, we created a Slack `WebClient` using the Slack OAuth access token:
```javascript
const web = new WebClient(this.slack.$auth.oauth_access_token);
```
Where did `this.slack` come from? Good question. It was generated by the definition we made in `props`:
```javascript highlight={4-9}
export default defineComponent({
props: {
// the name of the app from the key of the prop, in this case it's "slack"
slack: {
// define that this prop is an app
type: 'app',
// define that this app connects to Slack
app: 'slack'
}
}
// ... rest of the Node.js step
```
The Slack access token is generated by Pipedream, and is available to this step in the `this.slack.$auth` object:
```javascript highlight={11}
export default defineComponent({
props: {
slack: {
type: 'app',
app: 'slack'
}
},
async run({ steps, $ }) {
async (steps, $) => {
// Authentication details for all of your apps are accessible under the special $ variable:
console.log(this.slack.$auth);
}
})
});
```
`this.appName.$auth` contains named properties for each account you connect to the associated step. Here, we connected Slack, so `this.slack.$auth` contains the Slack auth info (the `oauth_access_token`).
The names of the properties for each connected account will differ with the account. Pipedream typically exposes OAuth access tokens as `oauth_access_token`, and API keys under the property `api_key`. But if there’s a service-specific name for the tokens (for example, if the service calls it `server_token`), we prefer that name, instead.
To list the `this.[app name].$auth` properties available to you for a given app, run `Object.keys` on the app:
```javascript
console.log(Object.keys(this.slack.$auth)) // Replace this.slack with your app's name
```
and run your workflow. You’ll see the property names in the logs below your step.
## Writing custom steps to use `this.appName.$auth`
You can write code that utilizes connected accounts in a few different ways:
### Using the code templates tied to apps
When you write custom code that connects to an app, you can start with a code snippet Pipedream provides for each app. This is called the **test request**.
When you search for an app in a step:
1. Click the **+** button below any step.
2. Search for the app you’re looking for and select it from the list.
3. Select the option to **Use any \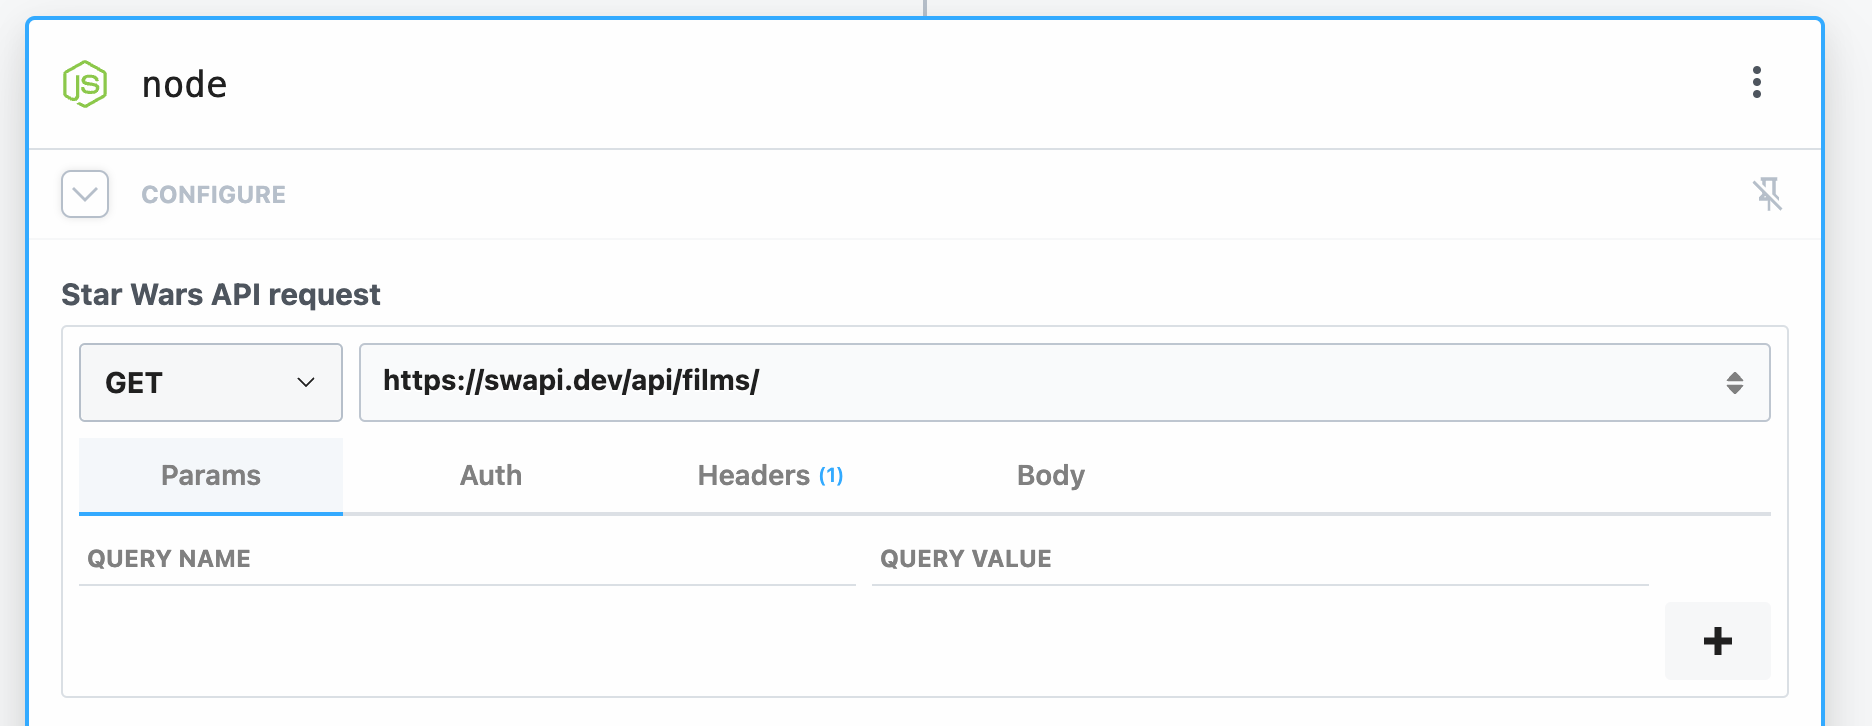 ## Send a `POST` request to submit data
POST sample JSON to [JSONPlaceholder](https://jsonplaceholder.typicode.com/), a free mock API service:
## Send a `POST` request to submit data
POST sample JSON to [JSONPlaceholder](https://jsonplaceholder.typicode.com/), a free mock API service:
 And can resume or cancel the rest of the workflow by clicking on the appropriate link.
### `resume_url` and `cancel_url`
In general, calling `$.flow.suspend` returns a `cancel_url` and `resume_url` that lets you cancel or resume paused executions. Since Pipedream pauses your workflow at the *end* of the step, you can pass these URLs to any external service before the workflow pauses. If that service accepts a callback URL, it can trigger the `resume_url` when its work is complete.
These URLs are specific to a single execution of your workflow. While the workflow is paused, you can load these in your browser or send any HTTP request to them:
* Sending an HTTP request to the `cancel_url` will cancel that execution
* Sending an HTTP request to the `resume_url` will resume that execution
If you resume a workflow, any data sent in the HTTP request is passed to the workflow and returned in the `$resume_data` [step export](/docs/workflows/#step-exports) of the suspended step. For example, if you call `$.flow.suspend` within a step named `code`, the `$resume_data` export should contain the data sent in the `resume_url` request:
And can resume or cancel the rest of the workflow by clicking on the appropriate link.
### `resume_url` and `cancel_url`
In general, calling `$.flow.suspend` returns a `cancel_url` and `resume_url` that lets you cancel or resume paused executions. Since Pipedream pauses your workflow at the *end* of the step, you can pass these URLs to any external service before the workflow pauses. If that service accepts a callback URL, it can trigger the `resume_url` when its work is complete.
These URLs are specific to a single execution of your workflow. While the workflow is paused, you can load these in your browser or send any HTTP request to them:
* Sending an HTTP request to the `cancel_url` will cancel that execution
* Sending an HTTP request to the `resume_url` will resume that execution
If you resume a workflow, any data sent in the HTTP request is passed to the workflow and returned in the `$resume_data` [step export](/docs/workflows/#step-exports) of the suspended step. For example, if you call `$.flow.suspend` within a step named `code`, the `$resume_data` export should contain the data sent in the `resume_url` request:
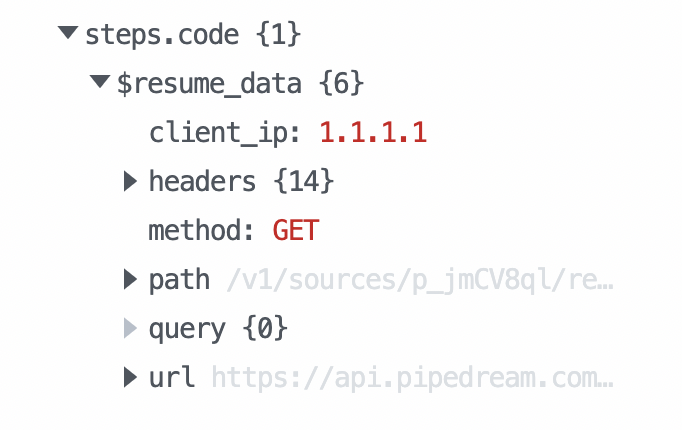 Requests to the `resume_url` have [the same limits as any HTTP request to Pipedream](/docs/workflows/limits/#http-request-body-size), but you can send larger payloads using our [large payload](/docs/workflows/building-workflows/triggers/#sending-large-payloads) or [large file](/docs/workflows/building-workflows/triggers/#large-file-support) interfaces.
### Default timeout of 24 hours
By default, `$.flow.suspend` will automatically cancel the workflow after 24 hours. You can set your own timeout (in milliseconds) as the first argument:
```javascript
export default defineComponent({
async run({ $ }) {
// 7 days
const TIMEOUT = 1000 * 60 * 60 * 24 * 7;
$.flow.suspend(TIMEOUT);
},
});
```
## `$.flow.rerun`
Use `$.flow.rerun` when you want to run a specific step of a workflow multiple times. This is useful when you need to start a job in an external API and poll for its completion, or have the service call back to the step and let you process the HTTP request within the step.
### Retrying a Failed API Request
`$.flow.rerun` can be used to conditionally retry a failed API request due to a service outage or rate limit reached. Place the `$.flow.rerun` call within a `catch` block to only retry the API request if an error is thrown:
```php
import { axios } from "@pipedream/platform";
export default defineComponent({
props: {
openai: {
type: "app",
app: "openai",
},
},
async run({ steps, $ }) {
try {
return await axios($, {
url: `https://api.openai.com/v1/completions`,
method: "post",
headers: {
Authorization: `Bearer ${this.openai.$auth.api_key}`,
},
data: {
model: "text-davinci-003",
prompt: "Say this is a test",
max_tokens: 7,
temperature: 0,
},
});
} catch (error) {
const MAX_RETRIES = 3;
const DELAY = 1000 * 30;
// Retry the request every 30 seconds, for up to 3 times
$.flow.rerun(DELAY, null, MAX_RETRIES);
}
},
});
```
### Polling for the status of an external job
Sometimes you need to poll for the status of an external job until it completes. `$.flow.rerun` lets you rerun a specific step multiple times:
```javascript
import axios from "axios";
export default defineComponent({
async run({ $ }) {
const MAX_RETRIES = 3;
// 10 seconds
const DELAY = 1000 * 10;
const { run } = $.context;
// $.context.run.runs starts at 1 and increments when the step is rerun
if (run.runs === 1) {
// $.flow.rerun(delay, context (discussed below), max retries)
$.flow.rerun(DELAY, null, MAX_RETRIES);
} else if (run.runs === MAX_RETRIES + 1) {
throw new Error("Max retries exceeded");
} else {
// Poll external API for status
const { data } = await axios({
method: "GET",
url: "https://example.com/status",
});
// If we're done, continue with the rest of the workflow
if (data.status === "DONE") return data;
// Else retry later
$.flow.rerun(DELAY, null, MAX_RETRIES);
}
},
});
```
`$.flow.rerun` accepts the following arguments:
```javascript
$.flow.rerun(
delay, // The number of milliseconds until the step will be rerun
context, // JSON-serializable data you need to pass between runs
maxRetries // The total number of times the step will rerun. Defaults to 10
);
```
### Accept an HTTP callback from an external service
When you trigger a job in an external service, and that service can send back data in an HTTP callback to Pipedream, you can process that data within the same step using `$.flow.rerun`:
```javascript
import axios from "axios";
export default defineComponent({
async run({ steps, $ }) {
const TIMEOUT = 86400 * 1000;
const { run } = $.context;
// $.context.run.runs starts at 1 and increments when the step is rerun
if (run.runs === 1) {
const { cancel_url, resume_url } = $.flow.rerun(TIMEOUT, null, 1);
// Send resume_url to external service
await axios({
method: "POST",
url: "your callback URL",
data: {
resume_url,
cancel_url,
},
});
}
// When the external service calls back into the resume_url, you have access to
// the callback data within $.context.run.callback_request
else if (run.callback_request) {
return run.callback_request;
}
},
});
```
### Passing `context` to `$.flow.rerun`
Within a Node.js code step, `$.context.run.context` contains the `context` passed from the prior call to `rerun`. This lets you pass data from one run to another. For example, if you call:
```javascript
$.flow.rerun(1000, { hello: "world" });
```
`$.context.run.context` will contain:
Requests to the `resume_url` have [the same limits as any HTTP request to Pipedream](/docs/workflows/limits/#http-request-body-size), but you can send larger payloads using our [large payload](/docs/workflows/building-workflows/triggers/#sending-large-payloads) or [large file](/docs/workflows/building-workflows/triggers/#large-file-support) interfaces.
### Default timeout of 24 hours
By default, `$.flow.suspend` will automatically cancel the workflow after 24 hours. You can set your own timeout (in milliseconds) as the first argument:
```javascript
export default defineComponent({
async run({ $ }) {
// 7 days
const TIMEOUT = 1000 * 60 * 60 * 24 * 7;
$.flow.suspend(TIMEOUT);
},
});
```
## `$.flow.rerun`
Use `$.flow.rerun` when you want to run a specific step of a workflow multiple times. This is useful when you need to start a job in an external API and poll for its completion, or have the service call back to the step and let you process the HTTP request within the step.
### Retrying a Failed API Request
`$.flow.rerun` can be used to conditionally retry a failed API request due to a service outage or rate limit reached. Place the `$.flow.rerun` call within a `catch` block to only retry the API request if an error is thrown:
```php
import { axios } from "@pipedream/platform";
export default defineComponent({
props: {
openai: {
type: "app",
app: "openai",
},
},
async run({ steps, $ }) {
try {
return await axios($, {
url: `https://api.openai.com/v1/completions`,
method: "post",
headers: {
Authorization: `Bearer ${this.openai.$auth.api_key}`,
},
data: {
model: "text-davinci-003",
prompt: "Say this is a test",
max_tokens: 7,
temperature: 0,
},
});
} catch (error) {
const MAX_RETRIES = 3;
const DELAY = 1000 * 30;
// Retry the request every 30 seconds, for up to 3 times
$.flow.rerun(DELAY, null, MAX_RETRIES);
}
},
});
```
### Polling for the status of an external job
Sometimes you need to poll for the status of an external job until it completes. `$.flow.rerun` lets you rerun a specific step multiple times:
```javascript
import axios from "axios";
export default defineComponent({
async run({ $ }) {
const MAX_RETRIES = 3;
// 10 seconds
const DELAY = 1000 * 10;
const { run } = $.context;
// $.context.run.runs starts at 1 and increments when the step is rerun
if (run.runs === 1) {
// $.flow.rerun(delay, context (discussed below), max retries)
$.flow.rerun(DELAY, null, MAX_RETRIES);
} else if (run.runs === MAX_RETRIES + 1) {
throw new Error("Max retries exceeded");
} else {
// Poll external API for status
const { data } = await axios({
method: "GET",
url: "https://example.com/status",
});
// If we're done, continue with the rest of the workflow
if (data.status === "DONE") return data;
// Else retry later
$.flow.rerun(DELAY, null, MAX_RETRIES);
}
},
});
```
`$.flow.rerun` accepts the following arguments:
```javascript
$.flow.rerun(
delay, // The number of milliseconds until the step will be rerun
context, // JSON-serializable data you need to pass between runs
maxRetries // The total number of times the step will rerun. Defaults to 10
);
```
### Accept an HTTP callback from an external service
When you trigger a job in an external service, and that service can send back data in an HTTP callback to Pipedream, you can process that data within the same step using `$.flow.rerun`:
```javascript
import axios from "axios";
export default defineComponent({
async run({ steps, $ }) {
const TIMEOUT = 86400 * 1000;
const { run } = $.context;
// $.context.run.runs starts at 1 and increments when the step is rerun
if (run.runs === 1) {
const { cancel_url, resume_url } = $.flow.rerun(TIMEOUT, null, 1);
// Send resume_url to external service
await axios({
method: "POST",
url: "your callback URL",
data: {
resume_url,
cancel_url,
},
});
}
// When the external service calls back into the resume_url, you have access to
// the callback data within $.context.run.callback_request
else if (run.callback_request) {
return run.callback_request;
}
},
});
```
### Passing `context` to `$.flow.rerun`
Within a Node.js code step, `$.context.run.context` contains the `context` passed from the prior call to `rerun`. This lets you pass data from one run to another. For example, if you call:
```javascript
$.flow.rerun(1000, { hello: "world" });
```
`$.context.run.context` will contain:
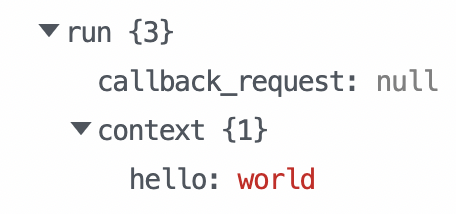 ### `maxRetries`
By default, `maxRetries` is **10**.
When you exceed `maxRetries`, the workflow proceeds to the next step. If you need to handle this case with an exception, `throw` an error from the step:
```javascript
export default defineComponent({
async run({ $ }) {
const MAX_RETRIES = 3;
const { run } = $.context;
if (run.runs === 1) {
$.flow.rerun(1000, null, MAX_RETRIES);
} else if (run.runs === MAX_RETRIES + 1) {
throw new Error("Max retries exceeded");
}
},
});
```
## Behavior when testing
When you’re building a workflow and test a step with `$.flow.suspend` or `$.flow.rerun`, it will not suspend the workflow, and you’ll see a message like the following:
> Workflow execution canceled — this may be due to `$.flow.suspend()` usage (not supported in test)
These functions will only suspend and resume when run in production.
## Credits when using `suspend` / `rerun`
You are not charged for the time your workflow is suspended during a `$.flow.rerun` or `$.flow.suspend`. Only when workflows are resumed will compute time count toward [credit usage](/docs/pricing/#credits-and-billing).
### `maxRetries`
By default, `maxRetries` is **10**.
When you exceed `maxRetries`, the workflow proceeds to the next step. If you need to handle this case with an exception, `throw` an error from the step:
```javascript
export default defineComponent({
async run({ $ }) {
const MAX_RETRIES = 3;
const { run } = $.context;
if (run.runs === 1) {
$.flow.rerun(1000, null, MAX_RETRIES);
} else if (run.runs === MAX_RETRIES + 1) {
throw new Error("Max retries exceeded");
}
},
});
```
## Behavior when testing
When you’re building a workflow and test a step with `$.flow.suspend` or `$.flow.rerun`, it will not suspend the workflow, and you’ll see a message like the following:
> Workflow execution canceled — this may be due to `$.flow.suspend()` usage (not supported in test)
These functions will only suspend and resume when run in production.
## Credits when using `suspend` / `rerun`
You are not charged for the time your workflow is suspended during a `$.flow.rerun` or `$.flow.suspend`. Only when workflows are resumed will compute time count toward [credit usage](/docs/pricing/#credits-and-billing).
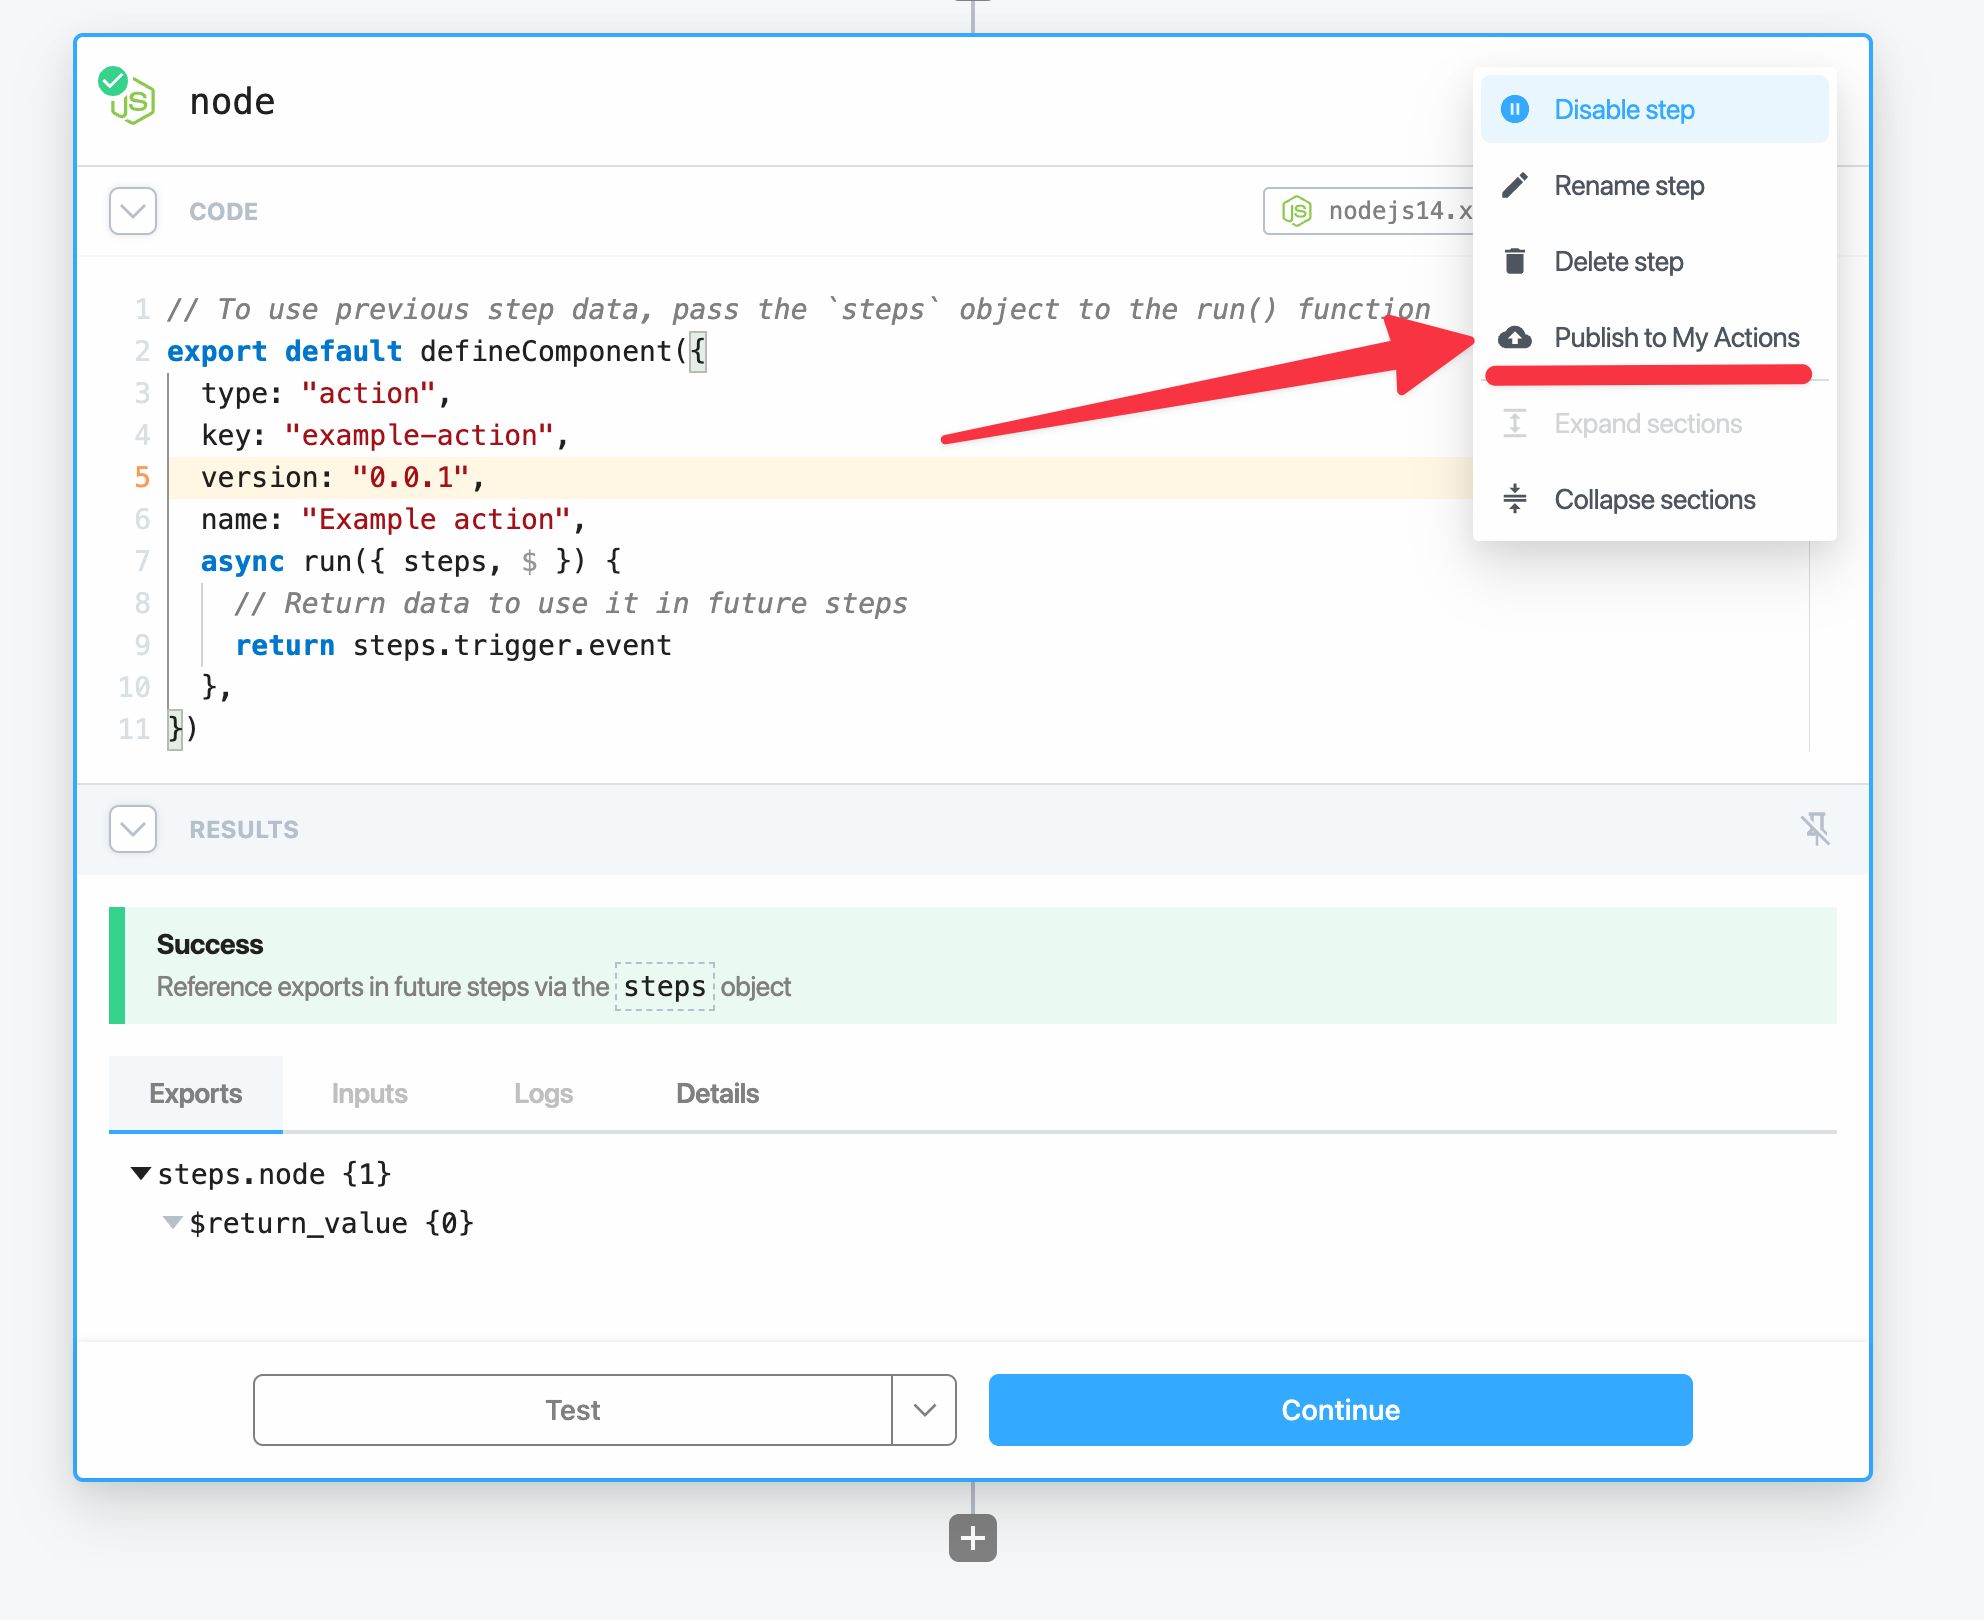 And now you’ve successfully saved a custom Node.js code step to your account. You’ll be able to use this code step in any of your workflows.
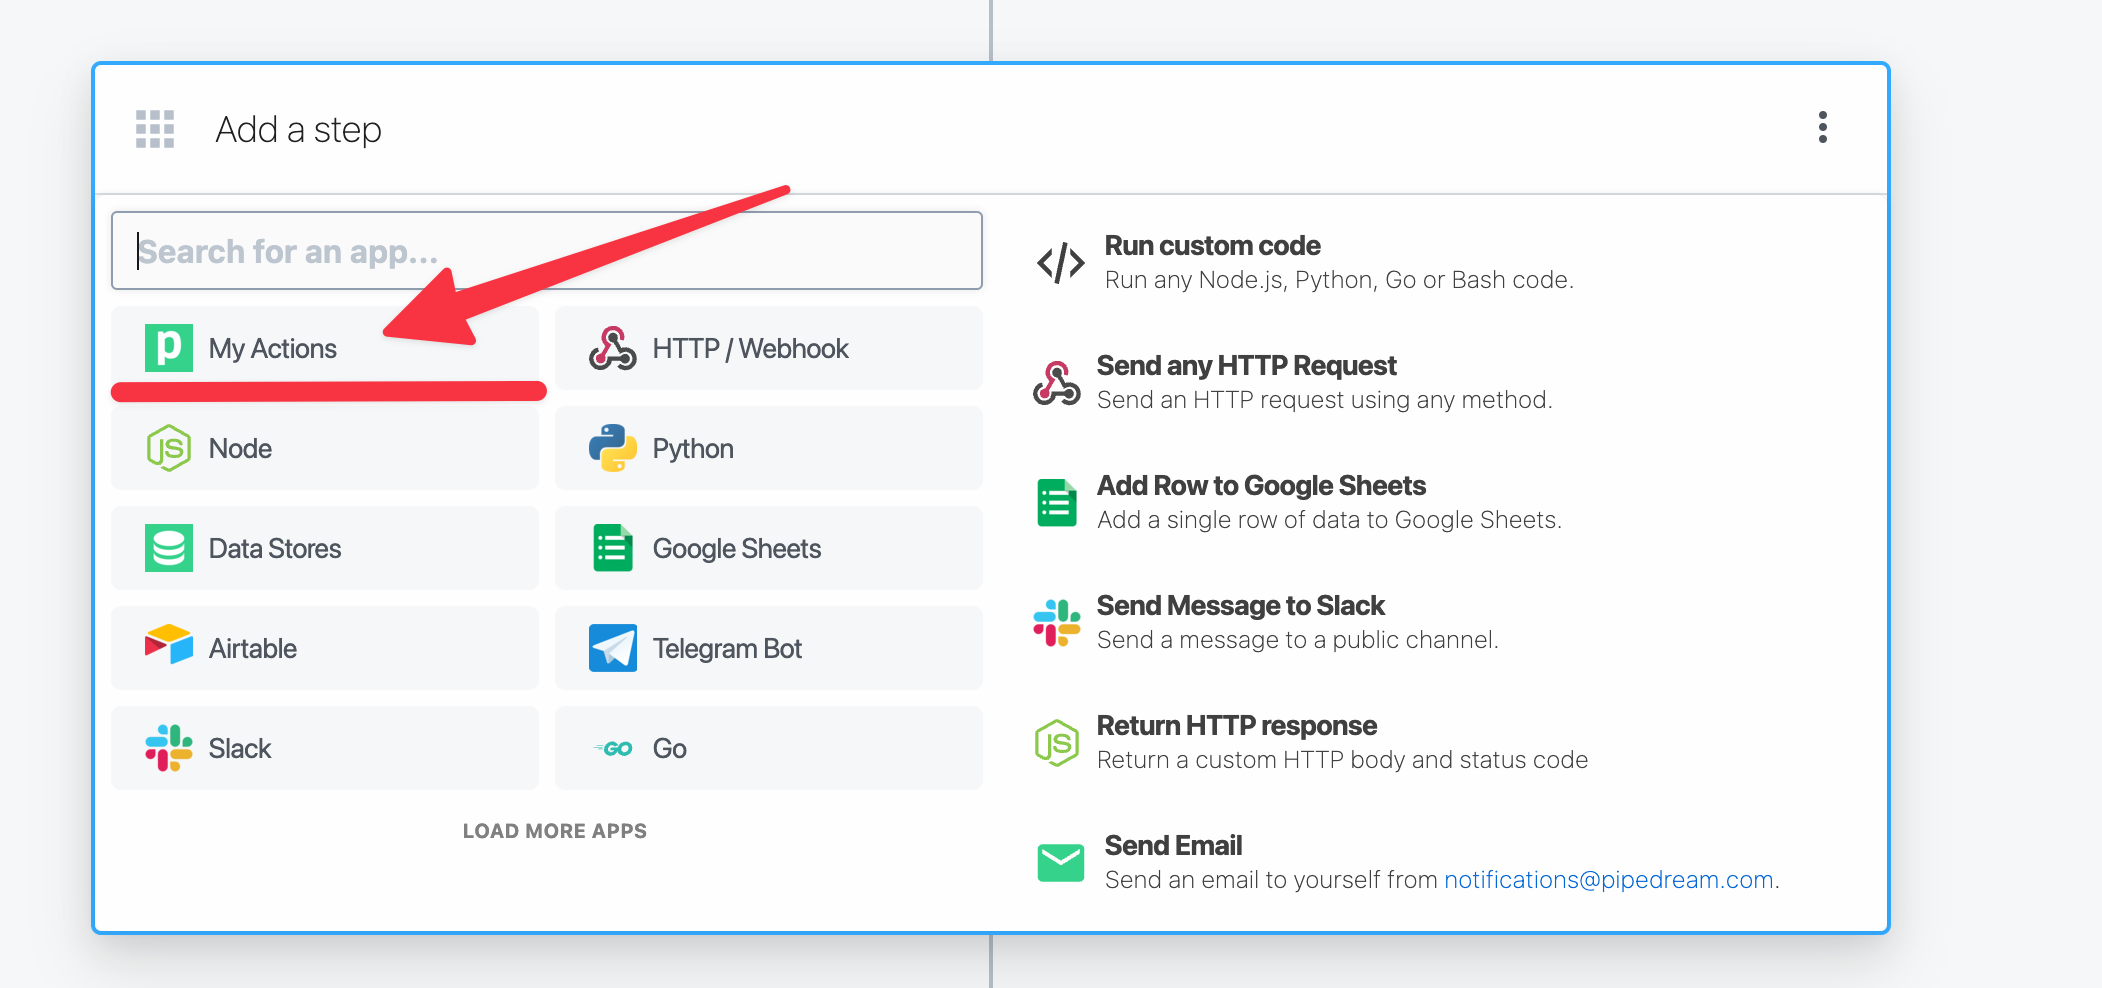 From there you’ll be able to view and select any of your published actions and use them as steps.
## Updating published Node.js code step actions
If you need to make a change and update the underlying code to your published Node.js code step, you can do so by incrementing the `version` field on the Node.js code step.
Every instance of your published action from a code step is editable. In any workflow where you’ve reused a published action, open the menu on the right side of the action and click **Edit action** button.
This will open up the code editor for this action, even if this wasn’t the original code step.
Now increment the `version` field in the code:
```js highlight={6}
import { parseISO, format } from 'date-fns';
// The version field on a Node.js action is versioned
export default defineComponent({
name: 'Format Date',
version: '0.0.2',
key: 'format-date',
type: 'action',
props: {
date: {
type: "string",
label: "Date",
description: "Date to be formatted",
},
format: {
type: 'string',
label: "Format",
description: "Format to apply to the date. [See date-fns format](https://date-fns.org/v2.29.3/docs/format) as a reference."
}
},
async run({ $ }) {
const formatted = format(parseISO(this.date), this.format);
return formatted;
},
})
```
Finally use the **Publish to My Actions** button in the right hand side menu to publish this new version.
From there you’ll be able to view and select any of your published actions and use them as steps.
## Updating published Node.js code step actions
If you need to make a change and update the underlying code to your published Node.js code step, you can do so by incrementing the `version` field on the Node.js code step.
Every instance of your published action from a code step is editable. In any workflow where you’ve reused a published action, open the menu on the right side of the action and click **Edit action** button.
This will open up the code editor for this action, even if this wasn’t the original code step.
Now increment the `version` field in the code:
```js highlight={6}
import { parseISO, format } from 'date-fns';
// The version field on a Node.js action is versioned
export default defineComponent({
name: 'Format Date',
version: '0.0.2',
key: 'format-date',
type: 'action',
props: {
date: {
type: "string",
label: "Date",
description: "Date to be formatted",
},
format: {
type: 'string',
label: "Format",
description: "Format to apply to the date. [See date-fns format](https://date-fns.org/v2.29.3/docs/format) as a reference."
}
},
async run({ $ }) {
const formatted = format(parseISO(this.date), this.format);
return formatted;
},
})
```
Finally use the **Publish to My Actions** button in the right hand side menu to publish this new version.
 ## Saving data
Data Stores are key-value stores. Save data within a Data Store using the `this.dataStore.set` method. The first argument is the *key* where the data should be held, and the second argument is the *value* assigned to that key.
```javascript
export default defineComponent({
props: {
dataStore: { type: "data_store" },
},
async run({ steps, $ }) {
// Store a timestamp each time this step is executed in the workflow
await this.dataStore.set("lastRanAt", new Date());
},
});
```
### Setting expiration (TTL) for records
You can set an expiration time for a record by passing a TTL (Time-To-Live) option as the third argument to the `set` method. The TTL value is specified in seconds:
```javascript
export default defineComponent({
props: {
dataStore: { type: "data_store" },
},
async run({ steps, $ }) {
// Store a temporary value that will expire after 1 hour (3600 seconds)
await this.dataStore.set("temporaryToken", "abc123", { ttl: 3600 });
// Store a value that will expire after 1 day
await this.dataStore.set("dailyMetric", 42, { ttl: 86400 });
},
});
```
When the TTL period elapses, the record will be automatically deleted from the data store.
### Updating TTL for existing records
You can update the TTL for an existing record using the `setTtl` method:
```javascript
export default defineComponent({
props: {
dataStore: { type: "data_store" },
},
async run({ steps, $ }) {
// Update an existing record to expire after 30 minutes
await this.dataStore.setTtl("temporaryToken", 1800);
// Remove expiration from a record
await this.dataStore.setTtl("temporaryToken", null);
},
});
```
This is useful for extending the lifetime of temporary data or removing expiration from records that should now be permanent.
## Retrieving keys
Fetch all the keys in a given Data Store using the `keys` method:
```javascript
export default defineComponent({
props: {
dataStore: { type: "data_store" },
},
async run({ steps, $ }) {
// Return a list of all the keys in a given Data Store
return await this.dataStore.keys();
},
});
```
## Checking for the existence of specific keys
If you need to check whether a specific `key` exists in a Data Store, you can pass the `key` to the `has` method to get back a `true` or `false`:
```javascript
export default defineComponent({
props: {
dataStore: { type: "data_store" },
},
async run({ steps, $ }) {
// Check if a specific key exists in your Data Store
return await this.dataStore.has("lastRanAt");
},
});
```
## Retrieving data
You can retrieve data with the Data Store using the `get` method. Pass the *key* to the `get` method to retrieve the content that was stored there with `set`.
```javascript
export default defineComponent({
props: {
dataStore: { type: "data_store" },
},
async run({ steps, $ }) {
// Check if the lastRanAt key exists
const lastRanAt = await this.dataStore.get("lastRanAt");
},
});
```
## Retrieving all records
Use an async iterator to efficiently retrieve all records or keys in your data store:
```javascript
export default defineComponent({
props: {
dataStore: { type: "data_store" },
},
async run({ steps, $ }) {
const records = {};
for await (const [k,v] of this.dataStore) {
records[k] = v;
}
return records;
},
});
```
## Deleting or updating values within a record
To delete or update the *value* of an individual record, use the `set` method for an existing `key` and pass either the new value or `''` as the second argument to remove the value but retain the key.
```javascript
export default defineComponent({
props: {
dataStore: { type: "data_store" },
},
async run({ steps, $ }) {
// Update the value associated with the key, myKey
await this.dataStore.set("myKey", "newValue");
// Remove the value but retain the key
await this.dataStore.set("myKey", "");
},
});
```
## Deleting specific records
To delete individual records in a Data Store, use the `delete` method for a specific `key`:
```javascript
export default defineComponent({
props: {
dataStore: { type: "data_store" },
},
async run({ steps, $ }) {
// Delete the lastRanAt record
const lastRanAt = await this.dataStore.delete("lastRanAt");
},
});
```
## Deleting all records from a specific Data Store
If you need to delete all records in a given Data Store, you can use the `clear` method. **Note that this is an irreversible change, even when testing code in the workflow builder.**
```javascript
export default defineComponent({
props: {
dataStore: { type: "data_store" },
},
async run({ steps, $ }) {
// Delete all records from a specific Data Store
return await this.dataStore.clear();
},
});
```
## Viewing store data
You can view the contents of your data stores in your [Pipedream dashboard](https://pipedream.com/stores).
From here you can also manually edit your data store’s data, rename stores, delete stores or create new stores.
## Using multiple data stores in a single code step
It is possible to use multiple data stores in a single code step, just make a unique name per store in the `props` definition. Let’s define 2 separate `customers` and `orders` data sources and leverage them in a single code step:
```csharp
export default defineComponent({
props: {
customers: { type: "data_store" },
orders: { type: "data_store" },
},
async run({ steps, $ }) {
// Retrieve the customer from our customer store
const customer = await this.customer.get(steps.trigger.event.customer_id);
// Retrieve the order from our order data store
const order = await this.orders.get(steps.trigger.event.order_id);
},
});
```
## Workflow counter example
You can use a data store as a counter. For example, this code counts the number of times the workflow runs:
```javascript
export default defineComponent({
props: {
dataStore: { type: "data_store" },
},
async run({ steps, $ }) {
// By default, all database entries are undefined.
// It's wise to set a default value so our code as an initial value to work with
const counter = (await this.dataStore.get("counter")) ?? 0;
// On the first run "counter" will be 0 and we'll increment it to 1
// The next run will increment the counter to 2, and so forth
await this.dataStore.set("counter", counter + 1);
},
});
```
## Dedupe data example
Data Stores are also useful for storing data from prior runs to prevent acting on duplicate data, or data that’s been seen before.
For example, this workflow’s trigger contains an email address from a potential new customer. But we want to track all emails collected so we don’t send a welcome email twice:
```javascript
export default defineComponent({
props: {
dataStore: { type: "data_store" },
},
async run({ steps, $ }) {
const email = steps.trigger.event.body.new_customer_email;
// Retrieve the past recorded emails from other runs
const emails = (await this.dataStore.get("emails")) ?? [];
// If the current email being passed from our webhook is already in our list, exit early
if (emails.includes(email)) {
return $.flow.exit("Already welcomed this user");
}
// Add the current email to the list of past emails so we can detect it in the future runs
await this.dataStore.set("emails", [...emails, email]);
},
});
```
## TTL use case: temporary caching and rate limiting
TTL functionality is particularly useful for implementing temporary caching and rate limiting. Here’s an example of a simple rate limiter that prevents a user from making more than 5 requests per hour:
```javascript
export default defineComponent({
props: {
dataStore: { type: "data_store" },
},
async run({ steps, $ }) {
const userId = steps.trigger.event.userId;
const rateKey = `ratelimit:${userId}`;
// Try to get current rate limit counter
let requests = await this.dataStore.get(rateKey);
if (requests === undefined) {
// First request from this user in the time window
await this.dataStore.set(rateKey, 1, { ttl: 3600 }); // Expire after 1 hour
return { allowed: true, remaining: 4 };
}
if (requests >= 5) {
// Rate limit exceeded
return { allowed: false, error: "Rate limit exceeded", retryAfter: "1 hour" };
}
// Increment the counter
await this.dataStore.set(rateKey, requests + 1);
return { allowed: true, remaining: 4 - requests };
},
});
```
This pattern can be extended for various temporary caching scenarios like:
* Session tokens with automatic expiration
* Short-lived feature flags
* Temporary access grants
* Time-based promotional codes
### Supported data types
Data stores can hold any JSON-serializable data within the storage limits. This includes data types including:
* Strings
* Objects
* Arrays
* Dates
* Integers
* Floats
But you cannot serialize Functions, Classes, or other more complex objects.
# Working With The Filesystem In Node.Js
Source: https://pipedream.com/docs/workflows/building-workflows/code/nodejs/working-with-files
export const TMP_SIZE_LIMIT = '2GB';
You’ll commonly need to work with files in a workflow, for example: downloading content from some service to upload to another. This doc explains how to work with files in Pipedream workflows and provides some sample code for common operations.
## The `/tmp` directory
Within a workflow, you have full read-write access to the `/tmp` directory. You have {TMP_SIZE_LIMIT} of available space in `/tmp` to save any file.
### Managing `/tmp` across workflow runs
The `/tmp` directory is stored on the virtual machine that runs your workflow. We call this the execution environment (“EE”). More than one EE may be created to handle high-volume workflows. And EEs can be destroyed at any time (for example, after about 10 minutes of receiving no events). This means that you should not expect to have access to files across executions. At the same time, files *may* remain, so you should clean them up to make sure that doesn’t affect your workflow. **Use [the `tmp-promise` package](https://github.com/benjamingr/tmp-promise) to cleanup files after use, or [delete the files manually](/docs/workflows/building-workflows/code/nodejs/working-with-files/#delete-a-file).**
### Reading a file from `/tmp`
This example uses [step exports](/docs/workflows/#step-exports) to return the contents of a test file saved in `/tmp` as a string:
```javascript
import fs from "fs";
export default defineComponent({
async run({ steps, $ }) {
return (await fs.promises.readFile('/tmp/your-file')).toString()
}
});
```
### Writing a file to `/tmp`
Use the [`fs` module](https://nodejs.org/api/fs.html) to write data to `/tmp`:
```javascript
import fs from "fs"
import { file } from 'tmp-promise'
export default defineComponent({
async run({ steps, $ }) {
const { path, cleanup } = await file();
await fs.promises.appendFile(path, Buffer.from("hello, world"))
await cleanup();
}
});
```
### Listing files in `/tmp`
Return a list of the files saved in `/tmp`:
```javascript
import fs from "fs";
export default defineComponent({
async run({ steps, $ }) {
return fs.readdirSync("/tmp");
}
});
```
### Delete a file
```javascript
import fs from "fs";
export default defineComponent({
async run({ steps, $ }) {
return await fs.promises.unlink('/tmp/your-file');
}
});
```
### Download a file to `/tmp`
[See this example](/docs/workflows/building-workflows/code/nodejs/http-requests/#download-a-file-to-the-tmp-directory) to learn how to download a file to `/tmp`.
### Upload a file from `/tmp`
[See this example](/docs/workflows/building-workflows/code/nodejs/http-requests/#upload-a-file-from-the-tmp-directory) to learn how to upload a file from `/tmp` in an HTTP request.
### Download a file, uploading it in another `multipart/form-data` request
[This workflow](https://pipedream.com/@dylburger/download-file-then-upload-file-via-multipart-form-data-request-p_QPCx7p/edit) provides an example of how to download a file at a specified **Download URL**, uploading that file to an **Upload URL** as form data.
### Download email attachments to `/tmp`, upload to Amazon S3
[This workflow](https://pipedream.com/@dylan/upload-email-attachments-to-s3-p_V9CGAQ/edit) is triggered by incoming emails. When copied, you’ll get a workflow-specific email address you can send any email to. This workflow takes any attachments included with inbound emails, saves them to `/tmp`, and uploads them to Amazon S3.
You should also be aware of the [inbound payload limits](/docs/workflows/limits/#email-triggers) associated with the email trigger.
### Downloading and uploading files from File Stores
Within Node.js code steps, you can download files from a File Store to the `/tmp` directory and vice versa.
The `$.files` helper includes methods to upload and download files from the Project’s File Store.
[Read the File Stores `$.files` helper documentation.](/docs/workflows/data-management/file-stores/#managing-file-stores-from-workflows)
# Python
Source: https://pipedream.com/docs/workflows/building-workflows/code/python
export const PYTHON_VERSION = '3.12';
Pipedream supports [Python v{PYTHON_VERSION}](https://www.python.org) in workflows. Run any Python code, use any [PyPI package](https://pypi.org/), connect to APIs, and more.
## Adding a Python code step
1. Click the + icon to add a new step
2. Click **Custom Code**
3. In the new step, select the `python` language runtime in language dropdown
## Python Code Step Structure
A new Python Code step will have the following structure:
```python
def handler(pd: "pipedream"):
# Reference data from previous steps
print(pd.steps["trigger"]["context"]["id"])
# Return data for use in future steps
return {"foo": {"test": True}}
```
You can also perform more complex operations, including [leveraging your connected accounts to make authenticated API requests](/docs/workflows/building-workflows/code/python/auth/), [accessing Data Stores](/docs/workflows/building-workflows/code/python/using-data-stores/) and [installing PyPI packages](/docs/workflows/building-workflows/code/python/#using-third-party-packages).
* [Install PyPI Packages](/docs/workflows/building-workflows/code/python/#using-third-party-packages)
* [Import data exported from other steps](/docs/workflows/building-workflows/code/python/#using-data-from-another-step)
* [Export data to downstream steps](/docs/workflows/building-workflows/code/python/#sending-data-downstream-to-other-steps)
* [Retrieve data from a data store](/docs/workflows/building-workflows/code/python/using-data-stores/#retrieving-data)
* [Store data into a data store](/docs/workflows/building-workflows/code/python/using-data-stores/#saving-data)
* [Access API credentials from connected accounts](/docs/workflows/building-workflows/code/python/auth/)
## Logging and debugging
You can use `print` at any time in a Python code step to log information as the script is running.
The output for the `print` **logs** will appear in the `Results` section just beneath the code editor.
## Saving data
Data Stores are key-value stores. Save data within a Data Store using the `this.dataStore.set` method. The first argument is the *key* where the data should be held, and the second argument is the *value* assigned to that key.
```javascript
export default defineComponent({
props: {
dataStore: { type: "data_store" },
},
async run({ steps, $ }) {
// Store a timestamp each time this step is executed in the workflow
await this.dataStore.set("lastRanAt", new Date());
},
});
```
### Setting expiration (TTL) for records
You can set an expiration time for a record by passing a TTL (Time-To-Live) option as the third argument to the `set` method. The TTL value is specified in seconds:
```javascript
export default defineComponent({
props: {
dataStore: { type: "data_store" },
},
async run({ steps, $ }) {
// Store a temporary value that will expire after 1 hour (3600 seconds)
await this.dataStore.set("temporaryToken", "abc123", { ttl: 3600 });
// Store a value that will expire after 1 day
await this.dataStore.set("dailyMetric", 42, { ttl: 86400 });
},
});
```
When the TTL period elapses, the record will be automatically deleted from the data store.
### Updating TTL for existing records
You can update the TTL for an existing record using the `setTtl` method:
```javascript
export default defineComponent({
props: {
dataStore: { type: "data_store" },
},
async run({ steps, $ }) {
// Update an existing record to expire after 30 minutes
await this.dataStore.setTtl("temporaryToken", 1800);
// Remove expiration from a record
await this.dataStore.setTtl("temporaryToken", null);
},
});
```
This is useful for extending the lifetime of temporary data or removing expiration from records that should now be permanent.
## Retrieving keys
Fetch all the keys in a given Data Store using the `keys` method:
```javascript
export default defineComponent({
props: {
dataStore: { type: "data_store" },
},
async run({ steps, $ }) {
// Return a list of all the keys in a given Data Store
return await this.dataStore.keys();
},
});
```
## Checking for the existence of specific keys
If you need to check whether a specific `key` exists in a Data Store, you can pass the `key` to the `has` method to get back a `true` or `false`:
```javascript
export default defineComponent({
props: {
dataStore: { type: "data_store" },
},
async run({ steps, $ }) {
// Check if a specific key exists in your Data Store
return await this.dataStore.has("lastRanAt");
},
});
```
## Retrieving data
You can retrieve data with the Data Store using the `get` method. Pass the *key* to the `get` method to retrieve the content that was stored there with `set`.
```javascript
export default defineComponent({
props: {
dataStore: { type: "data_store" },
},
async run({ steps, $ }) {
// Check if the lastRanAt key exists
const lastRanAt = await this.dataStore.get("lastRanAt");
},
});
```
## Retrieving all records
Use an async iterator to efficiently retrieve all records or keys in your data store:
```javascript
export default defineComponent({
props: {
dataStore: { type: "data_store" },
},
async run({ steps, $ }) {
const records = {};
for await (const [k,v] of this.dataStore) {
records[k] = v;
}
return records;
},
});
```
## Deleting or updating values within a record
To delete or update the *value* of an individual record, use the `set` method for an existing `key` and pass either the new value or `''` as the second argument to remove the value but retain the key.
```javascript
export default defineComponent({
props: {
dataStore: { type: "data_store" },
},
async run({ steps, $ }) {
// Update the value associated with the key, myKey
await this.dataStore.set("myKey", "newValue");
// Remove the value but retain the key
await this.dataStore.set("myKey", "");
},
});
```
## Deleting specific records
To delete individual records in a Data Store, use the `delete` method for a specific `key`:
```javascript
export default defineComponent({
props: {
dataStore: { type: "data_store" },
},
async run({ steps, $ }) {
// Delete the lastRanAt record
const lastRanAt = await this.dataStore.delete("lastRanAt");
},
});
```
## Deleting all records from a specific Data Store
If you need to delete all records in a given Data Store, you can use the `clear` method. **Note that this is an irreversible change, even when testing code in the workflow builder.**
```javascript
export default defineComponent({
props: {
dataStore: { type: "data_store" },
},
async run({ steps, $ }) {
// Delete all records from a specific Data Store
return await this.dataStore.clear();
},
});
```
## Viewing store data
You can view the contents of your data stores in your [Pipedream dashboard](https://pipedream.com/stores).
From here you can also manually edit your data store’s data, rename stores, delete stores or create new stores.
## Using multiple data stores in a single code step
It is possible to use multiple data stores in a single code step, just make a unique name per store in the `props` definition. Let’s define 2 separate `customers` and `orders` data sources and leverage them in a single code step:
```csharp
export default defineComponent({
props: {
customers: { type: "data_store" },
orders: { type: "data_store" },
},
async run({ steps, $ }) {
// Retrieve the customer from our customer store
const customer = await this.customer.get(steps.trigger.event.customer_id);
// Retrieve the order from our order data store
const order = await this.orders.get(steps.trigger.event.order_id);
},
});
```
## Workflow counter example
You can use a data store as a counter. For example, this code counts the number of times the workflow runs:
```javascript
export default defineComponent({
props: {
dataStore: { type: "data_store" },
},
async run({ steps, $ }) {
// By default, all database entries are undefined.
// It's wise to set a default value so our code as an initial value to work with
const counter = (await this.dataStore.get("counter")) ?? 0;
// On the first run "counter" will be 0 and we'll increment it to 1
// The next run will increment the counter to 2, and so forth
await this.dataStore.set("counter", counter + 1);
},
});
```
## Dedupe data example
Data Stores are also useful for storing data from prior runs to prevent acting on duplicate data, or data that’s been seen before.
For example, this workflow’s trigger contains an email address from a potential new customer. But we want to track all emails collected so we don’t send a welcome email twice:
```javascript
export default defineComponent({
props: {
dataStore: { type: "data_store" },
},
async run({ steps, $ }) {
const email = steps.trigger.event.body.new_customer_email;
// Retrieve the past recorded emails from other runs
const emails = (await this.dataStore.get("emails")) ?? [];
// If the current email being passed from our webhook is already in our list, exit early
if (emails.includes(email)) {
return $.flow.exit("Already welcomed this user");
}
// Add the current email to the list of past emails so we can detect it in the future runs
await this.dataStore.set("emails", [...emails, email]);
},
});
```
## TTL use case: temporary caching and rate limiting
TTL functionality is particularly useful for implementing temporary caching and rate limiting. Here’s an example of a simple rate limiter that prevents a user from making more than 5 requests per hour:
```javascript
export default defineComponent({
props: {
dataStore: { type: "data_store" },
},
async run({ steps, $ }) {
const userId = steps.trigger.event.userId;
const rateKey = `ratelimit:${userId}`;
// Try to get current rate limit counter
let requests = await this.dataStore.get(rateKey);
if (requests === undefined) {
// First request from this user in the time window
await this.dataStore.set(rateKey, 1, { ttl: 3600 }); // Expire after 1 hour
return { allowed: true, remaining: 4 };
}
if (requests >= 5) {
// Rate limit exceeded
return { allowed: false, error: "Rate limit exceeded", retryAfter: "1 hour" };
}
// Increment the counter
await this.dataStore.set(rateKey, requests + 1);
return { allowed: true, remaining: 4 - requests };
},
});
```
This pattern can be extended for various temporary caching scenarios like:
* Session tokens with automatic expiration
* Short-lived feature flags
* Temporary access grants
* Time-based promotional codes
### Supported data types
Data stores can hold any JSON-serializable data within the storage limits. This includes data types including:
* Strings
* Objects
* Arrays
* Dates
* Integers
* Floats
But you cannot serialize Functions, Classes, or other more complex objects.
# Working With The Filesystem In Node.Js
Source: https://pipedream.com/docs/workflows/building-workflows/code/nodejs/working-with-files
export const TMP_SIZE_LIMIT = '2GB';
You’ll commonly need to work with files in a workflow, for example: downloading content from some service to upload to another. This doc explains how to work with files in Pipedream workflows and provides some sample code for common operations.
## The `/tmp` directory
Within a workflow, you have full read-write access to the `/tmp` directory. You have {TMP_SIZE_LIMIT} of available space in `/tmp` to save any file.
### Managing `/tmp` across workflow runs
The `/tmp` directory is stored on the virtual machine that runs your workflow. We call this the execution environment (“EE”). More than one EE may be created to handle high-volume workflows. And EEs can be destroyed at any time (for example, after about 10 minutes of receiving no events). This means that you should not expect to have access to files across executions. At the same time, files *may* remain, so you should clean them up to make sure that doesn’t affect your workflow. **Use [the `tmp-promise` package](https://github.com/benjamingr/tmp-promise) to cleanup files after use, or [delete the files manually](/docs/workflows/building-workflows/code/nodejs/working-with-files/#delete-a-file).**
### Reading a file from `/tmp`
This example uses [step exports](/docs/workflows/#step-exports) to return the contents of a test file saved in `/tmp` as a string:
```javascript
import fs from "fs";
export default defineComponent({
async run({ steps, $ }) {
return (await fs.promises.readFile('/tmp/your-file')).toString()
}
});
```
### Writing a file to `/tmp`
Use the [`fs` module](https://nodejs.org/api/fs.html) to write data to `/tmp`:
```javascript
import fs from "fs"
import { file } from 'tmp-promise'
export default defineComponent({
async run({ steps, $ }) {
const { path, cleanup } = await file();
await fs.promises.appendFile(path, Buffer.from("hello, world"))
await cleanup();
}
});
```
### Listing files in `/tmp`
Return a list of the files saved in `/tmp`:
```javascript
import fs from "fs";
export default defineComponent({
async run({ steps, $ }) {
return fs.readdirSync("/tmp");
}
});
```
### Delete a file
```javascript
import fs from "fs";
export default defineComponent({
async run({ steps, $ }) {
return await fs.promises.unlink('/tmp/your-file');
}
});
```
### Download a file to `/tmp`
[See this example](/docs/workflows/building-workflows/code/nodejs/http-requests/#download-a-file-to-the-tmp-directory) to learn how to download a file to `/tmp`.
### Upload a file from `/tmp`
[See this example](/docs/workflows/building-workflows/code/nodejs/http-requests/#upload-a-file-from-the-tmp-directory) to learn how to upload a file from `/tmp` in an HTTP request.
### Download a file, uploading it in another `multipart/form-data` request
[This workflow](https://pipedream.com/@dylburger/download-file-then-upload-file-via-multipart-form-data-request-p_QPCx7p/edit) provides an example of how to download a file at a specified **Download URL**, uploading that file to an **Upload URL** as form data.
### Download email attachments to `/tmp`, upload to Amazon S3
[This workflow](https://pipedream.com/@dylan/upload-email-attachments-to-s3-p_V9CGAQ/edit) is triggered by incoming emails. When copied, you’ll get a workflow-specific email address you can send any email to. This workflow takes any attachments included with inbound emails, saves them to `/tmp`, and uploads them to Amazon S3.
You should also be aware of the [inbound payload limits](/docs/workflows/limits/#email-triggers) associated with the email trigger.
### Downloading and uploading files from File Stores
Within Node.js code steps, you can download files from a File Store to the `/tmp` directory and vice versa.
The `$.files` helper includes methods to upload and download files from the Project’s File Store.
[Read the File Stores `$.files` helper documentation.](/docs/workflows/data-management/file-stores/#managing-file-stores-from-workflows)
# Python
Source: https://pipedream.com/docs/workflows/building-workflows/code/python
export const PYTHON_VERSION = '3.12';
Pipedream supports [Python v{PYTHON_VERSION}](https://www.python.org) in workflows. Run any Python code, use any [PyPI package](https://pypi.org/), connect to APIs, and more.
## Adding a Python code step
1. Click the + icon to add a new step
2. Click **Custom Code**
3. In the new step, select the `python` language runtime in language dropdown
## Python Code Step Structure
A new Python Code step will have the following structure:
```python
def handler(pd: "pipedream"):
# Reference data from previous steps
print(pd.steps["trigger"]["context"]["id"])
# Return data for use in future steps
return {"foo": {"test": True}}
```
You can also perform more complex operations, including [leveraging your connected accounts to make authenticated API requests](/docs/workflows/building-workflows/code/python/auth/), [accessing Data Stores](/docs/workflows/building-workflows/code/python/using-data-stores/) and [installing PyPI packages](/docs/workflows/building-workflows/code/python/#using-third-party-packages).
* [Install PyPI Packages](/docs/workflows/building-workflows/code/python/#using-third-party-packages)
* [Import data exported from other steps](/docs/workflows/building-workflows/code/python/#using-data-from-another-step)
* [Export data to downstream steps](/docs/workflows/building-workflows/code/python/#sending-data-downstream-to-other-steps)
* [Retrieve data from a data store](/docs/workflows/building-workflows/code/python/using-data-stores/#retrieving-data)
* [Store data into a data store](/docs/workflows/building-workflows/code/python/using-data-stores/#saving-data)
* [Access API credentials from connected accounts](/docs/workflows/building-workflows/code/python/auth/)
## Logging and debugging
You can use `print` at any time in a Python code step to log information as the script is running.
The output for the `print` **logs** will appear in the `Results` section just beneath the code editor.
 ## Using third party packages
You can use any packages from [PyPI](https://pypi.org) in your Pipedream workflows. This includes popular choices such as:
* [`requests` for making HTTP requests](https://pypi.org/project/requests/)
* [`sqlalchemy`for retrieving or inserting data in a SQL database](https://pypi.org/project/sqlalchemy/)
* [`pandas` for working with complex datasets](https://pypi.org/project/pandas/)
To use a PyPI package, just include it in your step’s code:
```javascript
import requests
```
And that’s it. No need to update a `requirements.txt` or specify elsewhere in your workflow of which packages you need. Pipedream will automatically install the dependency for you.
### If your package’s `import` name differs from its PyPI package name
Pipedream’s package installation uses [the `pipreqs` package](https://github.com/bndr/pipreqs) to detect package imports and install the associated package for you. Some packages, like [`python-telegram-bot`](https://python-telegram-bot.org/), use an `import` name that differs from their PyPI name:
```sh
pip install python-telegram-bot
```
vs.
```javascript
import telegram
```
Use the built in [magic comment system to resolve these mismatches](/docs/workflows/building-workflows/code/python/import-mappings/):
```python
# pipedream add-package python-telegram-bot
import telegram
```
### Pinning package versions
Each time you deploy a workflow with Python code, Pipedream downloads the PyPi packages you `import` in your step. **By default, Pipedream deploys the latest version of the PyPi package each time you deploy a change**.
There are many cases where you may want to specify the version of the packages you’re using. If you’d like to use a *specific* version of a package in a workflow, you can add that version in a [magic comment](/docs/workflows/building-workflows/code/python/import-mappings/), for example:
```python
# pipedream add-package pandas==2.0.0
import pandas
```
## Using third party packages
You can use any packages from [PyPI](https://pypi.org) in your Pipedream workflows. This includes popular choices such as:
* [`requests` for making HTTP requests](https://pypi.org/project/requests/)
* [`sqlalchemy`for retrieving or inserting data in a SQL database](https://pypi.org/project/sqlalchemy/)
* [`pandas` for working with complex datasets](https://pypi.org/project/pandas/)
To use a PyPI package, just include it in your step’s code:
```javascript
import requests
```
And that’s it. No need to update a `requirements.txt` or specify elsewhere in your workflow of which packages you need. Pipedream will automatically install the dependency for you.
### If your package’s `import` name differs from its PyPI package name
Pipedream’s package installation uses [the `pipreqs` package](https://github.com/bndr/pipreqs) to detect package imports and install the associated package for you. Some packages, like [`python-telegram-bot`](https://python-telegram-bot.org/), use an `import` name that differs from their PyPI name:
```sh
pip install python-telegram-bot
```
vs.
```javascript
import telegram
```
Use the built in [magic comment system to resolve these mismatches](/docs/workflows/building-workflows/code/python/import-mappings/):
```python
# pipedream add-package python-telegram-bot
import telegram
```
### Pinning package versions
Each time you deploy a workflow with Python code, Pipedream downloads the PyPi packages you `import` in your step. **By default, Pipedream deploys the latest version of the PyPi package each time you deploy a change**.
There are many cases where you may want to specify the version of the packages you’re using. If you’d like to use a *specific* version of a package in a workflow, you can add that version in a [magic comment](/docs/workflows/building-workflows/code/python/import-mappings/), for example:
```python
# pipedream add-package pandas==2.0.0
import pandas
```
 Then within the Python code step, `pd.inputs["slack"]["$auth"]["oauth_access_token"]` will contain your Slack account OAuth token.
With that token, you can make authenticated API calls to Slack:
```python
from slack_sdk import WebClient
def handler(pd: "pipedream"):
# Your Slack OAuth token is available under pd.inputs
token = pd.inputs["slack"]["$auth"]["oauth_access_token"]
# Instantiate a new Slack client with your token
client = WebClient(token=token)
# Use the client to send messages to Slack channels
response = client.chat_postMessage(
channel='#general',
text='Hello from Pipedream!'
)
# Export the Slack response payload for use in future steps
pd.export("response", response.data)
```
## Accessing connected account data with `pd.inputs[appName]["$auth"]`
In our Slack example above, we created a Slack `WebClient` using the Slack OAuth access token:
```python
# Instantiate a new Slack client with your token
client = WebClient(token=token)
```
Where did `pd.inputs["slack"]` come from? Good question. It was generated when we connected Slack to our Python step.
Then within the Python code step, `pd.inputs["slack"]["$auth"]["oauth_access_token"]` will contain your Slack account OAuth token.
With that token, you can make authenticated API calls to Slack:
```python
from slack_sdk import WebClient
def handler(pd: "pipedream"):
# Your Slack OAuth token is available under pd.inputs
token = pd.inputs["slack"]["$auth"]["oauth_access_token"]
# Instantiate a new Slack client with your token
client = WebClient(token=token)
# Use the client to send messages to Slack channels
response = client.chat_postMessage(
channel='#general',
text='Hello from Pipedream!'
)
# Export the Slack response payload for use in future steps
pd.export("response", response.data)
```
## Accessing connected account data with `pd.inputs[appName]["$auth"]`
In our Slack example above, we created a Slack `WebClient` using the Slack OAuth access token:
```python
# Instantiate a new Slack client with your token
client = WebClient(token=token)
```
Where did `pd.inputs["slack"]` come from? Good question. It was generated when we connected Slack to our Python step.
 The Slack access token is generated by Pipedream, and is available to this step in the `pd.inputs[appName]["$auth"]` object:
```python
from slack_sdk import WebClient
def handler(pd: "pipedream"):
token = pd.inputs["slack"]["$auth"]["oauth_access_token"]
# Authentication details for all of your apps are accessible under the special pd.inputs["slack"] variable:
console.log(pd.inputs["slack"]["$auth"])
```
`pd.inputs["slack"]["$auth"]` contains named properties for each account you connect to the associated step. Here, we connected Slack, so `this.slack.$auth` contains the Slack auth info (the `oauth_access_token`).
The names of the properties for each connected account will differ with the account. Pipedream typically exposes OAuth access tokens as `oauth_access_token`, and API keys under the property `api_key`. But if there’s a service-specific name for the tokens (for example, if the service calls it `server_token`), we prefer that name, instead.
To list the `pd.inputs["slack"]["$auth"]` properties available to you for a given app, just print the contents of the `$auth` property:
```php
print(pd.inputs["slack"]["$auth"]) # Replace "slack" with your app's name
```
and run your workflow. You’ll see the property names in the logs below your step.
### Using the code templates tied to apps
When you write custom code that connects to an app, you can start with a code snippet Pipedream provides for each app. This is called the **test request**.
When you search for an app in a step:
1. Click the **+** button below any step.
2. Search for the app you’re looking for and select it from the list.
3. Select the option to **Run Python with any \[app] API**.
The Slack access token is generated by Pipedream, and is available to this step in the `pd.inputs[appName]["$auth"]` object:
```python
from slack_sdk import WebClient
def handler(pd: "pipedream"):
token = pd.inputs["slack"]["$auth"]["oauth_access_token"]
# Authentication details for all of your apps are accessible under the special pd.inputs["slack"] variable:
console.log(pd.inputs["slack"]["$auth"])
```
`pd.inputs["slack"]["$auth"]` contains named properties for each account you connect to the associated step. Here, we connected Slack, so `this.slack.$auth` contains the Slack auth info (the `oauth_access_token`).
The names of the properties for each connected account will differ with the account. Pipedream typically exposes OAuth access tokens as `oauth_access_token`, and API keys under the property `api_key`. But if there’s a service-specific name for the tokens (for example, if the service calls it `server_token`), we prefer that name, instead.
To list the `pd.inputs["slack"]["$auth"]` properties available to you for a given app, just print the contents of the `$auth` property:
```php
print(pd.inputs["slack"]["$auth"]) # Replace "slack" with your app's name
```
and run your workflow. You’ll see the property names in the logs below your step.
### Using the code templates tied to apps
When you write custom code that connects to an app, you can start with a code snippet Pipedream provides for each app. This is called the **test request**.
When you search for an app in a step:
1. Click the **+** button below any step.
2. Search for the app you’re looking for and select it from the list.
3. Select the option to **Run Python with any \[app] API**.
 This code operates as a template you can extend, and comes preconfigured with the connection to the target app and the code for authorizing requests to the API. You can modify this code however you’d like.
## Custom auth tokens / secrets
When you want to connect to a 3rd party service that isn’t supported by Pipedream, you can store those secrets in [Environment Variables](/docs/workflows/environment-variables/).
# Delaying a workflow
Source: https://pipedream.com/docs/workflows/building-workflows/code/python/delay
export const DELAY_MIN_MAX_TIME = 'You can pause your workflow for as little as one millisecond, or as long as one year';
export const MAX_WORKFLOW_EXECUTION_LIMIT = '750';
Use `pd.flow.delay` to [delay a step in a workflow](/docs/workflows/building-workflows/control-flow/delay/).
These docs show you how to write Python code to handle delays. If you don’t need to write code, see [our built-in delay actions](/docs/workflows/building-workflows/control-flow/delay/#delay-actions).
## Using `pd.flow.delay`
`pd.flow.delay` takes one argument: the number of **milliseconds** you’d like to pause your workflow until the next step executes. {DELAY_MIN_MAX_TIME}.
Note that [delays happen at the end of the step where they’re called](/docs/workflows/building-workflows/code/python/delay/#when-delays-happen).
```python
import random
def handler(pd: 'pipedream'):
# Delay a workflow for 60 seconds (60,000 ms)
pd.flow.delay(60 * 1000)
# Delay a workflow for 15 minutes
pd.flow.delay(15 * 60 * 1000)
# Delay a workflow based on the value of incoming event data,
# or default to 60 seconds if that variable is undefined
default = 60 * 1000
delayMs = pd.steps["trigger"].get("event", {}).get("body", {}).get("delayMs", default)
pd.flow.delay(delayMs)
# Delay a workflow a random amount of time
pd.flow.delay(random.randint(0, 999))
```
And can resume or cancel the rest of the workflow by clicking on the appropriate link.
### `resume_url` and `cancel_url`
In general, calling `pd.flow.suspend` returns a `cancel_url` and `resume_url` that lets you cancel or resume paused executions. Since Pipedream pauses your workflow at the *end* of the step, you can pass these URLs to any external service before the workflow pauses. If that service accepts a callback URL, it can trigger the `resume_url` when its work is complete.
These URLs are specific to a single execution of your workflow. While the workflow is paused, you can load these in your browser or send any HTTP request to them:
* Sending an HTTP request to the `cancel_url` will cancel that execution
* Sending an HTTP request to the `resume_url` will resume that execution
If you resume a workflow, any data sent in the HTTP request is passed to the workflow and returned in the `$resume_data` [step export](/docs/workflows/#step-exports) of the suspended step. For example, if you call `pd.flow.suspend` within a step named `code`, the `$resume_data` export should contain the data sent in the `resume_url` request:
### Default timeout of 24 hours
By default, `pd.flow.suspend` will automatically cancel the workflow after 24 hours. You can set your own timeout (in milliseconds) as the first argument:
```python
def handler(pd: 'pipedream'):
# 7 days
TIMEOUT = 1000 * 60 * 60 * 24 * 7
pd.flow.suspend(TIMEOUT)
```
## `pd.flow.rerun`
Use `pd.flow.rerun` when you want to run a specific step of a workflow multiple times. This is useful when you need to start a job in an external API and poll for its completion, or have the service call back to the step and let you process the HTTP request within the step.
### Polling for the status of an external job
Sometimes you need to poll for the status of an external job until it completes. `pd.flow.rerun` lets you rerun a specific step multiple times:
```python
import requests
def handler(pd: 'pipedream'):
MAX_RETRIES = 3
# 10 seconds
DELAY = 1000 * 10
run = pd.context['run']
print(pd.context)
# pd.context.run.runs starts at 1 and increments when the step is rerun
if run['runs'] == 1:
# pd.flow.rerun(delay, context (discussed below), max retries)
pd.flow.rerun(DELAY, None, MAX_RETRIES)
elif run['runs'] == MAX_RETRIES + 1:
raise Exception("Max retries exceeded")
else:
# Poll external API for status
response = requests.get("https://example.com/status")
# If we're done, continue with the rest of the workflow
if response.json().status == "DONE":
return response.json()
# Else retry later
pd.flow.rerun(DELAY, None, MAX_RETRIES)
```
`pd.flow.rerun` accepts the following arguments:
```python
pd.flow.rerun(
delay, # The number of milliseconds until the step will be rerun
context, # JSON-serializable data you need to pass between runs
maxRetries, # The total number of times the step will rerun. Defaults to 10
)
```
### Accept an HTTP callback from an external service
When you trigger a job in an external service, and that service can send back data in an HTTP callback to Pipedream, you can process that data within the same step using `pd.flow.retry`:
```python
import requests
def handler(pd: 'pipedream'):
TIMEOUT = 86400 * 1000
run = pd.context['run']
# pd.context['run']['runs'] starts at 1 and increments when the step is rerun
if run['runs'] == 1:
links = pd.flow.rerun(TIMEOUT, None, 1)
# links contains a dictionary with two entries: resume_url and cancel_url
# Send resume_url to external service
await request.post("your callback URL", json=links)
# When the external service calls back into the resume_url, you have access to
# the callback data within pd.context.run['callback_request']
elif 'callback_request' in run:
return run['callback_request']
```
### Passing `context` to `pd.flow.rerun`
Within a Python code step, `pd.context.run.context` contains the `context` passed from the prior call to `rerun`. This lets you pass data from one run to another. For example, if you call:
```javascript
pd.flow.rerun(1000, { "hello": "world" })
```
`pd.context.run.context` will contain:
### `maxRetries`
By default, `maxRetries` is **10**.
When you exceed `maxRetries`, the workflow proceeds to the next step. If you need to handle this case with an exception, `raise` an Exception from the step:
```python
def handler(pd: 'pipedream'):
MAX_RETRIES = 3
run = pd.context['run']
if run['runs'] == 1:
pd.flow.rerun(1000, None, MAX_RETRIES)
else if (run['runs'] == MAX_RETRIES + 1):
raise Exception("Max retries exceeded")
```
## Behavior when testing
When you’re building a workflow and test a step with `pd.flow.suspend` or `pd.flow.rerun`, it will not suspend the workflow, and you’ll see a message like the following:
> Workflow execution canceled — this may be due to `pd.flow.suspend()` usage (not supported in test)
These functions will only suspend and resume when run in production.
## Credits usage when using `pd.flow.suspend` / `pd.flow.rerun`
You are not charged for the time your workflow is suspended during a `pd.flow.suspend` or `pd.flow.rerun`. Only when workflows are resumed will compute time count toward [credit usage](/docs/pricing/#credits-and-billing).
This code operates as a template you can extend, and comes preconfigured with the connection to the target app and the code for authorizing requests to the API. You can modify this code however you’d like.
## Custom auth tokens / secrets
When you want to connect to a 3rd party service that isn’t supported by Pipedream, you can store those secrets in [Environment Variables](/docs/workflows/environment-variables/).
# Delaying a workflow
Source: https://pipedream.com/docs/workflows/building-workflows/code/python/delay
export const DELAY_MIN_MAX_TIME = 'You can pause your workflow for as little as one millisecond, or as long as one year';
export const MAX_WORKFLOW_EXECUTION_LIMIT = '750';
Use `pd.flow.delay` to [delay a step in a workflow](/docs/workflows/building-workflows/control-flow/delay/).
These docs show you how to write Python code to handle delays. If you don’t need to write code, see [our built-in delay actions](/docs/workflows/building-workflows/control-flow/delay/#delay-actions).
## Using `pd.flow.delay`
`pd.flow.delay` takes one argument: the number of **milliseconds** you’d like to pause your workflow until the next step executes. {DELAY_MIN_MAX_TIME}.
Note that [delays happen at the end of the step where they’re called](/docs/workflows/building-workflows/code/python/delay/#when-delays-happen).
```python
import random
def handler(pd: 'pipedream'):
# Delay a workflow for 60 seconds (60,000 ms)
pd.flow.delay(60 * 1000)
# Delay a workflow for 15 minutes
pd.flow.delay(15 * 60 * 1000)
# Delay a workflow based on the value of incoming event data,
# or default to 60 seconds if that variable is undefined
default = 60 * 1000
delayMs = pd.steps["trigger"].get("event", {}).get("body", {}).get("delayMs", default)
pd.flow.delay(delayMs)
# Delay a workflow a random amount of time
pd.flow.delay(random.randint(0, 999))
```
And can resume or cancel the rest of the workflow by clicking on the appropriate link.
### `resume_url` and `cancel_url`
In general, calling `pd.flow.suspend` returns a `cancel_url` and `resume_url` that lets you cancel or resume paused executions. Since Pipedream pauses your workflow at the *end* of the step, you can pass these URLs to any external service before the workflow pauses. If that service accepts a callback URL, it can trigger the `resume_url` when its work is complete.
These URLs are specific to a single execution of your workflow. While the workflow is paused, you can load these in your browser or send any HTTP request to them:
* Sending an HTTP request to the `cancel_url` will cancel that execution
* Sending an HTTP request to the `resume_url` will resume that execution
If you resume a workflow, any data sent in the HTTP request is passed to the workflow and returned in the `$resume_data` [step export](/docs/workflows/#step-exports) of the suspended step. For example, if you call `pd.flow.suspend` within a step named `code`, the `$resume_data` export should contain the data sent in the `resume_url` request:
### Default timeout of 24 hours
By default, `pd.flow.suspend` will automatically cancel the workflow after 24 hours. You can set your own timeout (in milliseconds) as the first argument:
```python
def handler(pd: 'pipedream'):
# 7 days
TIMEOUT = 1000 * 60 * 60 * 24 * 7
pd.flow.suspend(TIMEOUT)
```
## `pd.flow.rerun`
Use `pd.flow.rerun` when you want to run a specific step of a workflow multiple times. This is useful when you need to start a job in an external API and poll for its completion, or have the service call back to the step and let you process the HTTP request within the step.
### Polling for the status of an external job
Sometimes you need to poll for the status of an external job until it completes. `pd.flow.rerun` lets you rerun a specific step multiple times:
```python
import requests
def handler(pd: 'pipedream'):
MAX_RETRIES = 3
# 10 seconds
DELAY = 1000 * 10
run = pd.context['run']
print(pd.context)
# pd.context.run.runs starts at 1 and increments when the step is rerun
if run['runs'] == 1:
# pd.flow.rerun(delay, context (discussed below), max retries)
pd.flow.rerun(DELAY, None, MAX_RETRIES)
elif run['runs'] == MAX_RETRIES + 1:
raise Exception("Max retries exceeded")
else:
# Poll external API for status
response = requests.get("https://example.com/status")
# If we're done, continue with the rest of the workflow
if response.json().status == "DONE":
return response.json()
# Else retry later
pd.flow.rerun(DELAY, None, MAX_RETRIES)
```
`pd.flow.rerun` accepts the following arguments:
```python
pd.flow.rerun(
delay, # The number of milliseconds until the step will be rerun
context, # JSON-serializable data you need to pass between runs
maxRetries, # The total number of times the step will rerun. Defaults to 10
)
```
### Accept an HTTP callback from an external service
When you trigger a job in an external service, and that service can send back data in an HTTP callback to Pipedream, you can process that data within the same step using `pd.flow.retry`:
```python
import requests
def handler(pd: 'pipedream'):
TIMEOUT = 86400 * 1000
run = pd.context['run']
# pd.context['run']['runs'] starts at 1 and increments when the step is rerun
if run['runs'] == 1:
links = pd.flow.rerun(TIMEOUT, None, 1)
# links contains a dictionary with two entries: resume_url and cancel_url
# Send resume_url to external service
await request.post("your callback URL", json=links)
# When the external service calls back into the resume_url, you have access to
# the callback data within pd.context.run['callback_request']
elif 'callback_request' in run:
return run['callback_request']
```
### Passing `context` to `pd.flow.rerun`
Within a Python code step, `pd.context.run.context` contains the `context` passed from the prior call to `rerun`. This lets you pass data from one run to another. For example, if you call:
```javascript
pd.flow.rerun(1000, { "hello": "world" })
```
`pd.context.run.context` will contain:
### `maxRetries`
By default, `maxRetries` is **10**.
When you exceed `maxRetries`, the workflow proceeds to the next step. If you need to handle this case with an exception, `raise` an Exception from the step:
```python
def handler(pd: 'pipedream'):
MAX_RETRIES = 3
run = pd.context['run']
if run['runs'] == 1:
pd.flow.rerun(1000, None, MAX_RETRIES)
else if (run['runs'] == MAX_RETRIES + 1):
raise Exception("Max retries exceeded")
```
## Behavior when testing
When you’re building a workflow and test a step with `pd.flow.suspend` or `pd.flow.rerun`, it will not suspend the workflow, and you’ll see a message like the following:
> Workflow execution canceled — this may be due to `pd.flow.suspend()` usage (not supported in test)
These functions will only suspend and resume when run in production.
## Credits usage when using `pd.flow.suspend` / `pd.flow.rerun`
You are not charged for the time your workflow is suspended during a `pd.flow.suspend` or `pd.flow.rerun`. Only when workflows are resumed will compute time count toward [credit usage](/docs/pricing/#credits-and-billing).
 This will add the selected data store to your Python code step.
## Saving data
Data stores are key-value stores. Saving data within a data store is just like setting a property on a dictionary:
```python
from datetime import datetime
def handler(pd: "pipedream"):
# Access the data store under the pd.inputs
data_store = pd.inputs["data_store"]
# Store a timestamp
data_store["last_ran_at"] = datetime.now().isoformat()
```
### Setting expiration (TTL) for records
You can set an expiration time for a record by passing a TTL (Time-To-Live) option as the third argument to the `set` method. The TTL value is specified in seconds:
```python
def handler(pd: "pipedream"):
# Access the data store under the pd.inputs
data_store = pd.inputs["data_store"]
# Store a temporary value that will expire after 1 hour (3600 seconds)
data_store.set("temporaryToken", "abc123", ttl=3600)
# Store a value that will expire after 1 day
data_store.set("dailyMetric", 42, ttl=86400)
```
When the TTL period elapses, the record will be automatically deleted from the data store.
### Updating TTL for existing records
You can update the TTL for an existing record using the `set_ttl` method:
```python
def handler(pd: "pipedream"):
# Access the data store under the pd.inputs
data_store = pd.inputs["data_store"]
# Update an existing record to expire after 30 minutes
data_store.set_ttl("temporaryToken", ttl=1800)
# Remove expiration from a record
data_store.set_ttl("temporaryToken", ttl=None)
```
This is useful for extending the lifetime of temporary data or removing expiration from records that should now be permanent.
## Retrieving keys
Fetch all the keys in a given data store using the `keys` method:
```python
def handler(pd: "pipedream"):
# Access the data store under the pd.inputs
data_store = pd.inputs["data_store"]
# Retrieve all keys in the data store
keys = pd.inputs["data_store"].keys()
# Print a comma separated string of all keys
print(*keys, sep=",")
```
This will add the selected data store to your Python code step.
## Saving data
Data stores are key-value stores. Saving data within a data store is just like setting a property on a dictionary:
```python
from datetime import datetime
def handler(pd: "pipedream"):
# Access the data store under the pd.inputs
data_store = pd.inputs["data_store"]
# Store a timestamp
data_store["last_ran_at"] = datetime.now().isoformat()
```
### Setting expiration (TTL) for records
You can set an expiration time for a record by passing a TTL (Time-To-Live) option as the third argument to the `set` method. The TTL value is specified in seconds:
```python
def handler(pd: "pipedream"):
# Access the data store under the pd.inputs
data_store = pd.inputs["data_store"]
# Store a temporary value that will expire after 1 hour (3600 seconds)
data_store.set("temporaryToken", "abc123", ttl=3600)
# Store a value that will expire after 1 day
data_store.set("dailyMetric", 42, ttl=86400)
```
When the TTL period elapses, the record will be automatically deleted from the data store.
### Updating TTL for existing records
You can update the TTL for an existing record using the `set_ttl` method:
```python
def handler(pd: "pipedream"):
# Access the data store under the pd.inputs
data_store = pd.inputs["data_store"]
# Update an existing record to expire after 30 minutes
data_store.set_ttl("temporaryToken", ttl=1800)
# Remove expiration from a record
data_store.set_ttl("temporaryToken", ttl=None)
```
This is useful for extending the lifetime of temporary data or removing expiration from records that should now be permanent.
## Retrieving keys
Fetch all the keys in a given data store using the `keys` method:
```python
def handler(pd: "pipedream"):
# Access the data store under the pd.inputs
data_store = pd.inputs["data_store"]
# Retrieve all keys in the data store
keys = pd.inputs["data_store"].keys()
# Print a comma separated string of all keys
print(*keys, sep=",")
```
 * With the introduction of non-linear workflows, steps may or may not be executed depending on the rules configured for control flow operators and the results exported from prior steps.
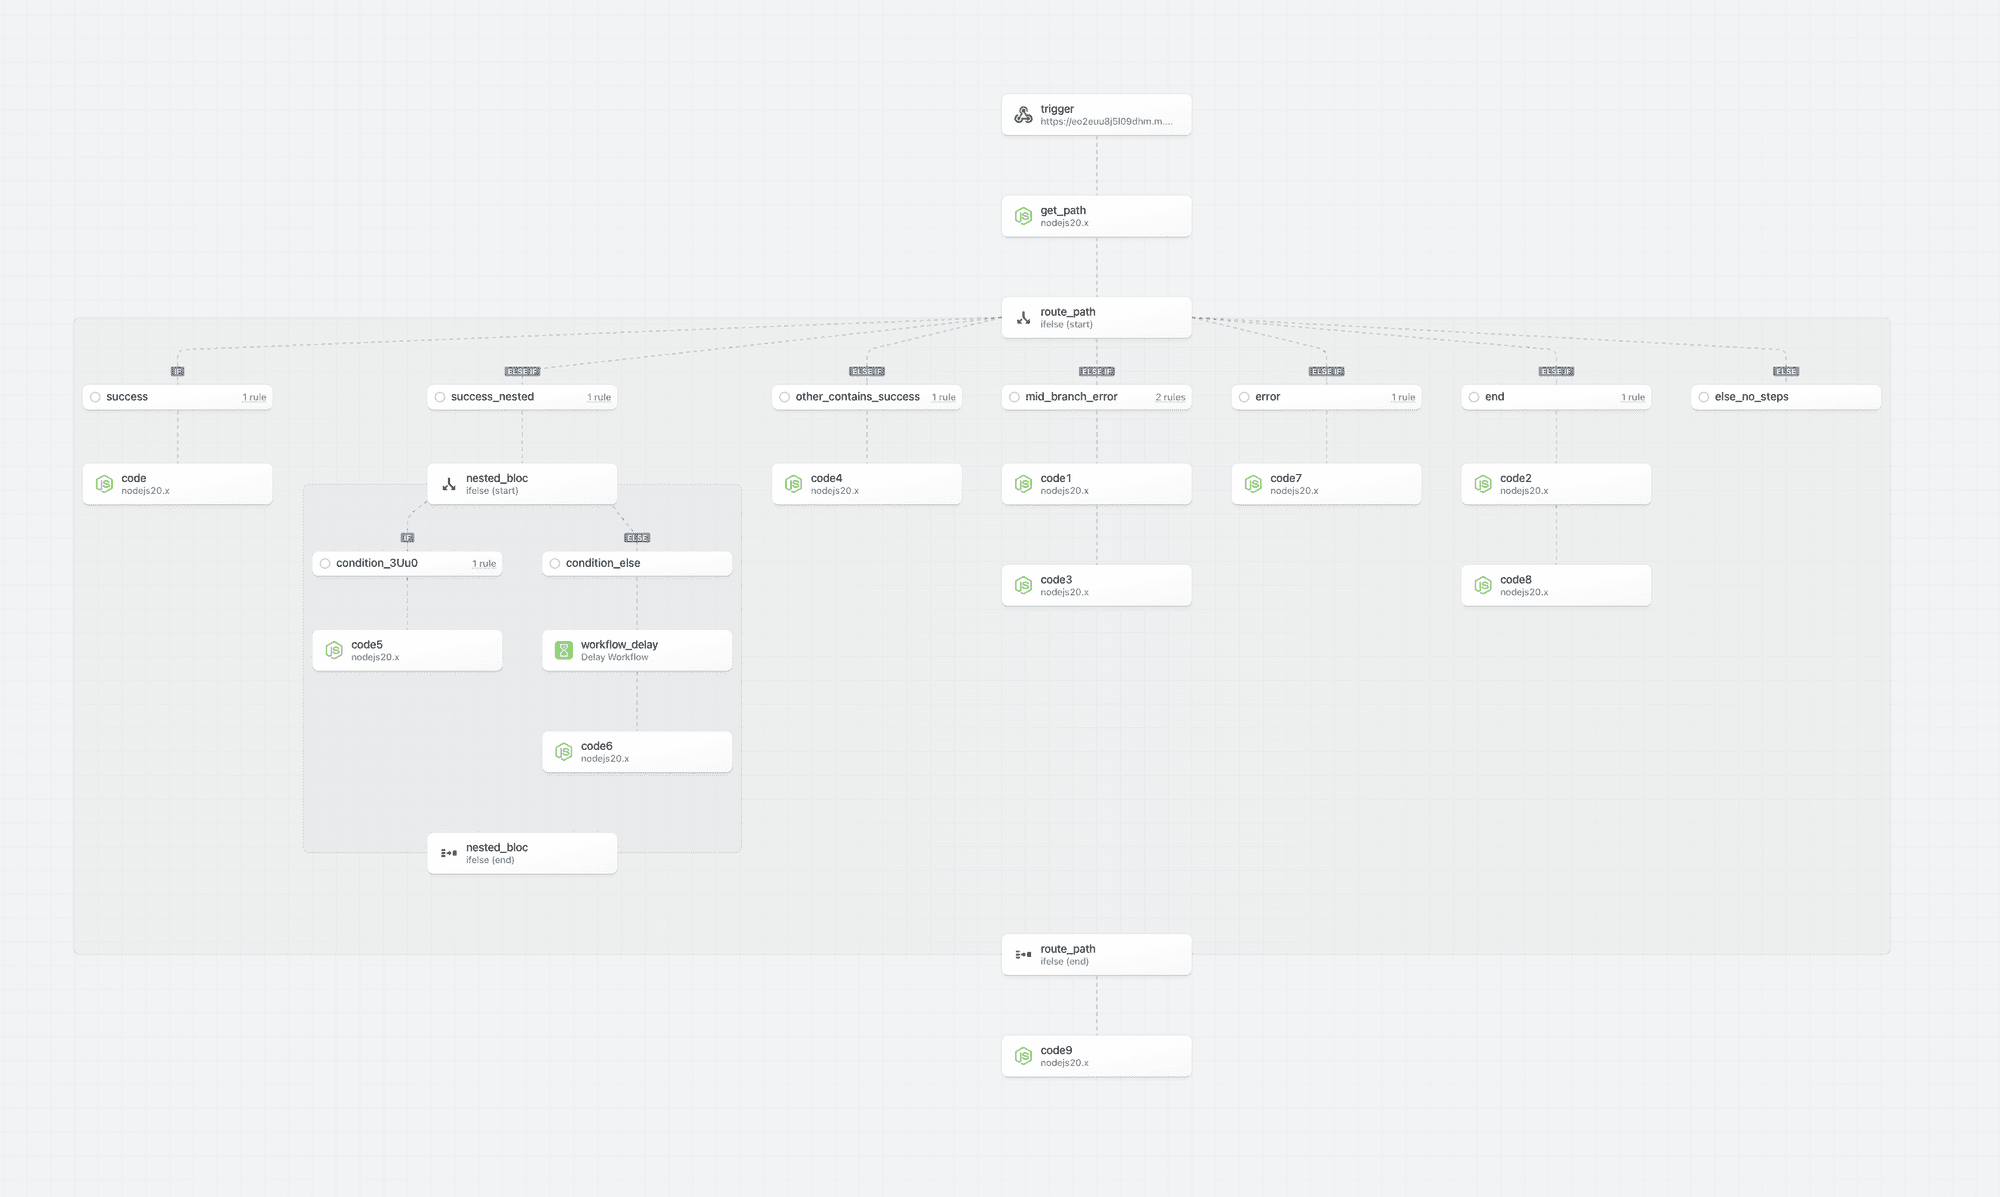 Therefore, we introduced new patterns to signal the execution path and help you build, test and inspect workflows.
### Executed Path
Step borders, backgrounds and connectors now highlight the **executed path** — the steps that are executed on the execution path. If a non-execution path step is tested, it will not be reflected as being on the execution path.
Therefore, we introduced new patterns to signal the execution path and help you build, test and inspect workflows.
### Executed Path
Step borders, backgrounds and connectors now highlight the **executed path** — the steps that are executed on the execution path. If a non-execution path step is tested, it will not be reflected as being on the execution path.
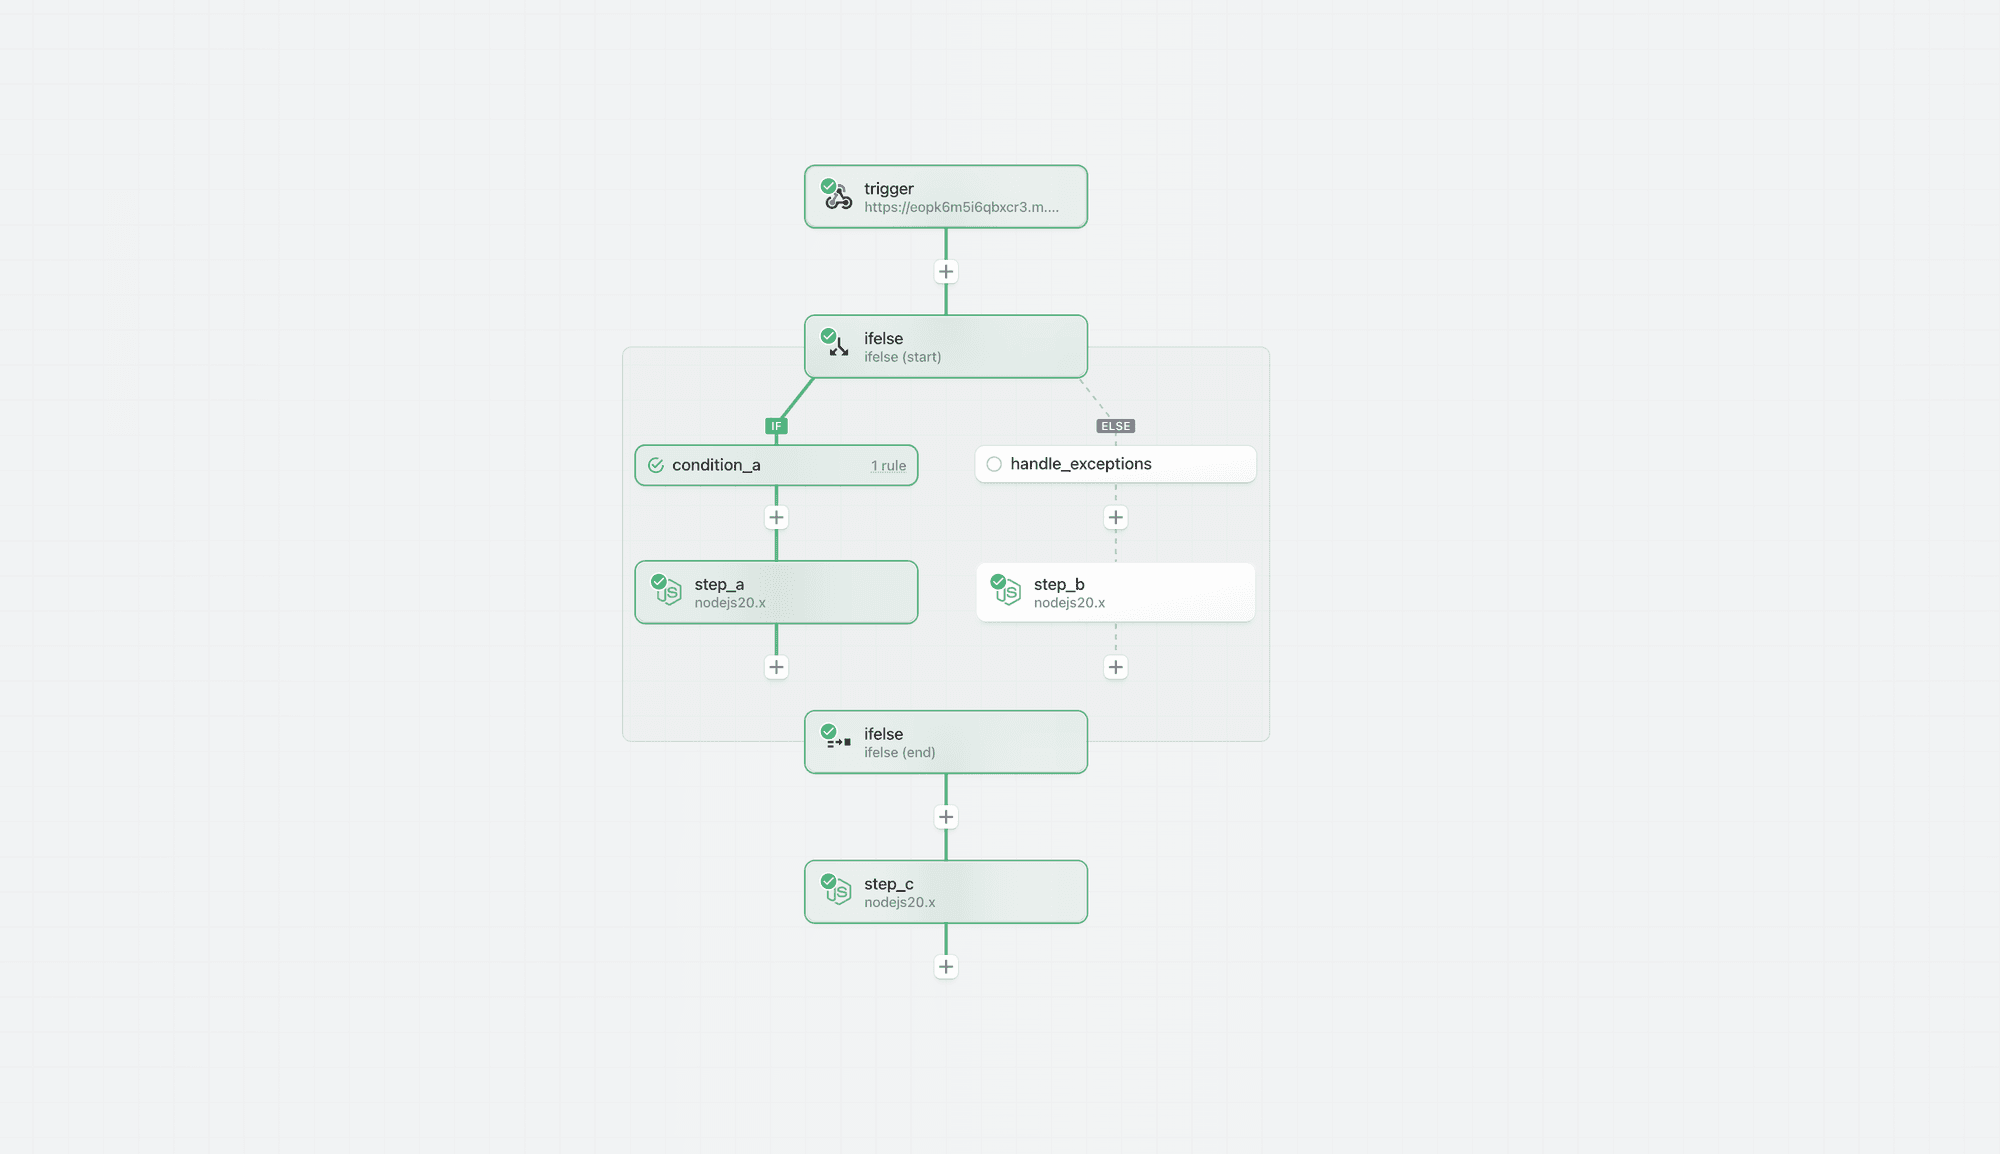 ### Building and Testing in an Unknown or Non-Execution Path
You may add and test steps in any path. However, Pipedream highlights that the results may not be reliable if the step is outside the executed path; the results may not match the outcome if the steps were in a known execution path and may lead to invalid or misleading results.
### Building and Testing in an Unknown or Non-Execution Path
You may add and test steps in any path. However, Pipedream highlights that the results may not be reliable if the step is outside the executed path; the results may not match the outcome if the steps were in a known execution path and may lead to invalid or misleading results.
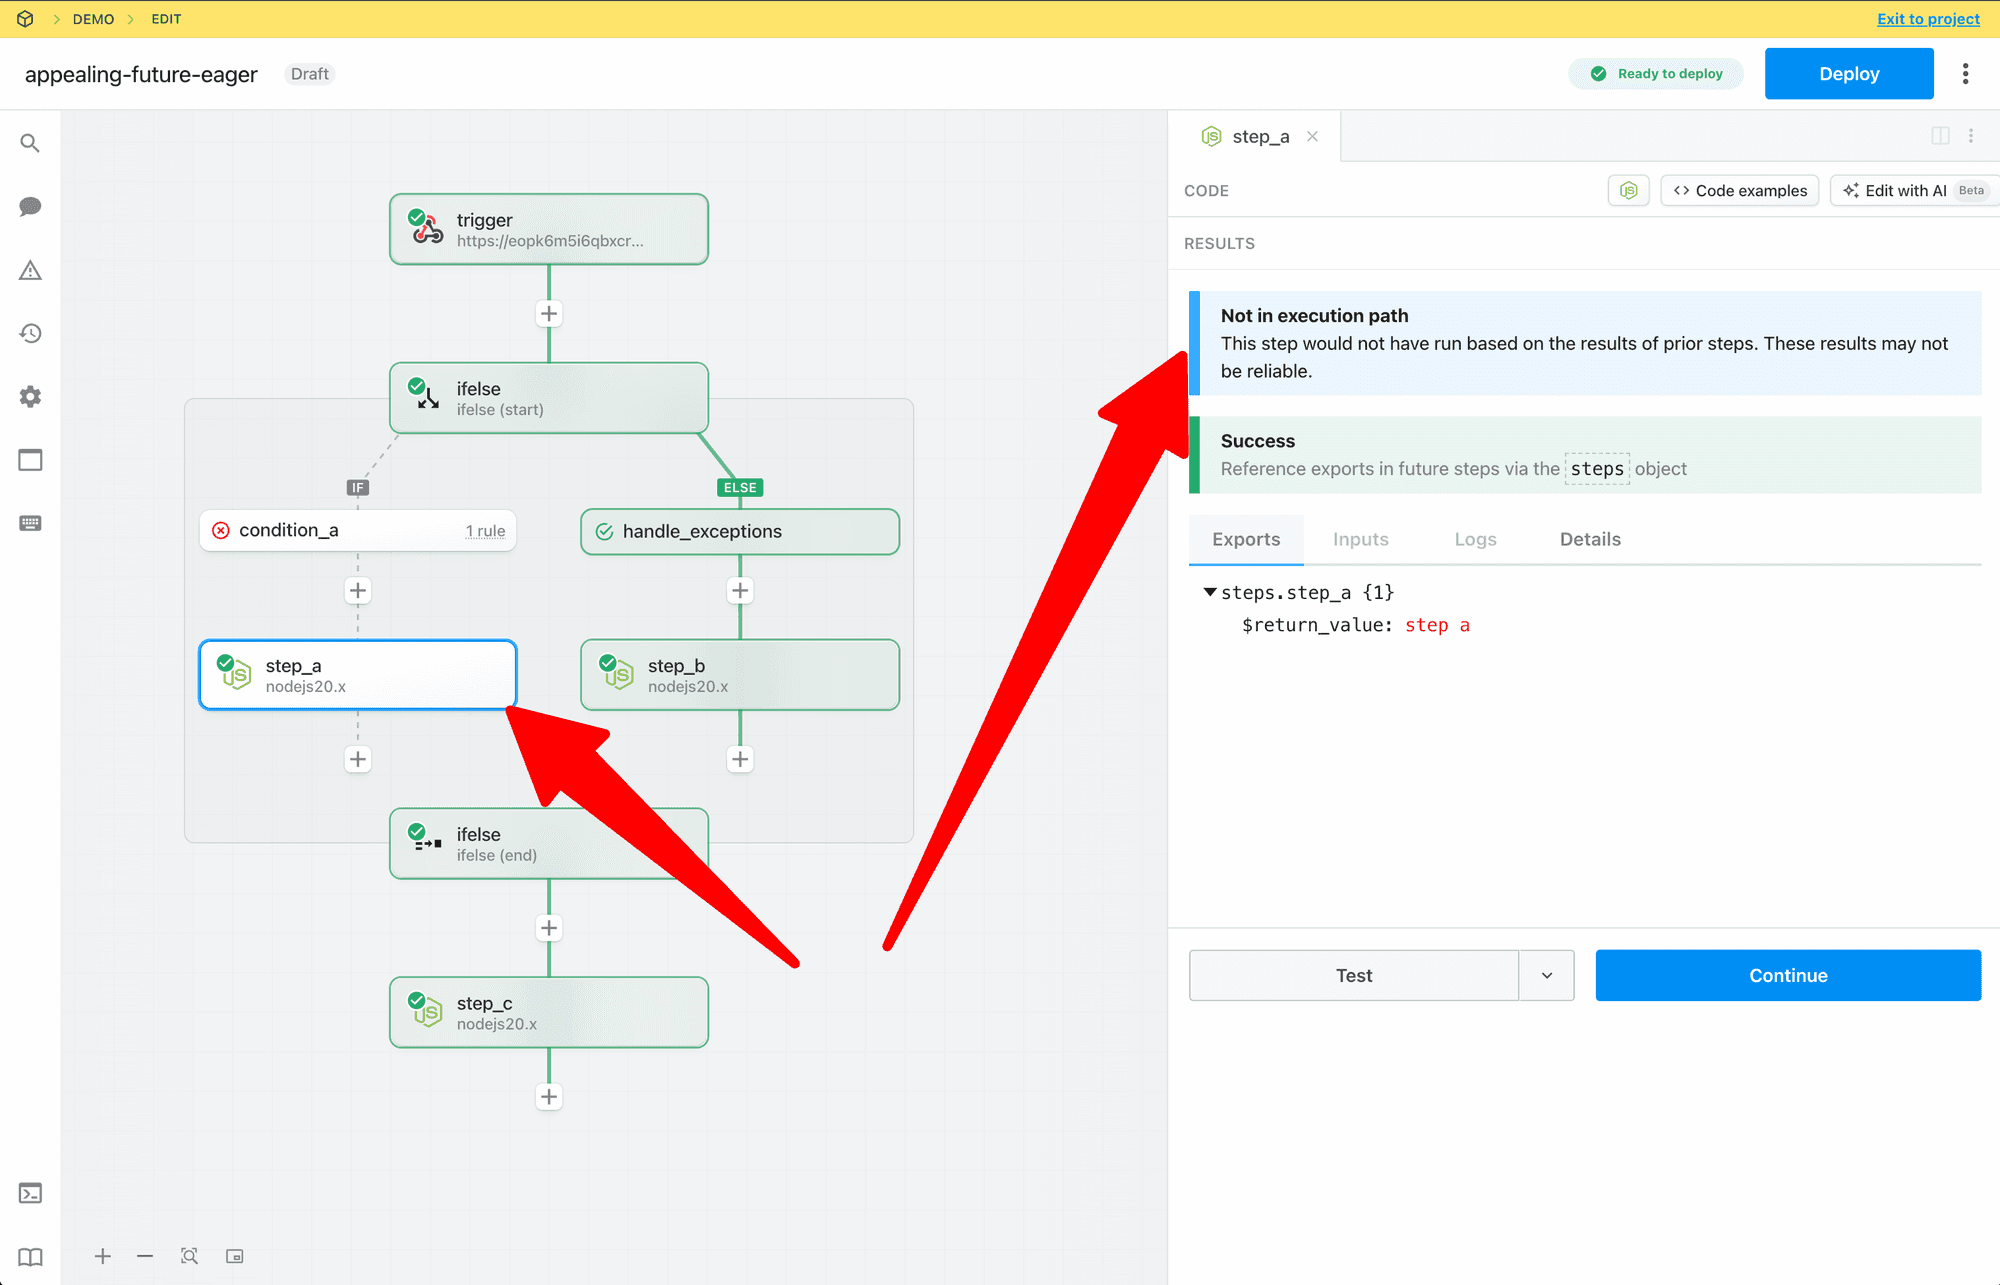 ### Signaling Steps are “Out of Date”
If prior steps in a workflow are modified or retested, Pipedream marks later steps in the execution path as *stale* to signal that the results may be out of date. In the non-linear model, Pipedream only marks steps that are in the confirmed execution path as stale.
* If a change is made to a prior step, then the executed path is cleared.
### Signaling Steps are “Out of Date”
If prior steps in a workflow are modified or retested, Pipedream marks later steps in the execution path as *stale* to signal that the results may be out of date. In the non-linear model, Pipedream only marks steps that are in the confirmed execution path as stale.
* If a change is made to a prior step, then the executed path is cleared.
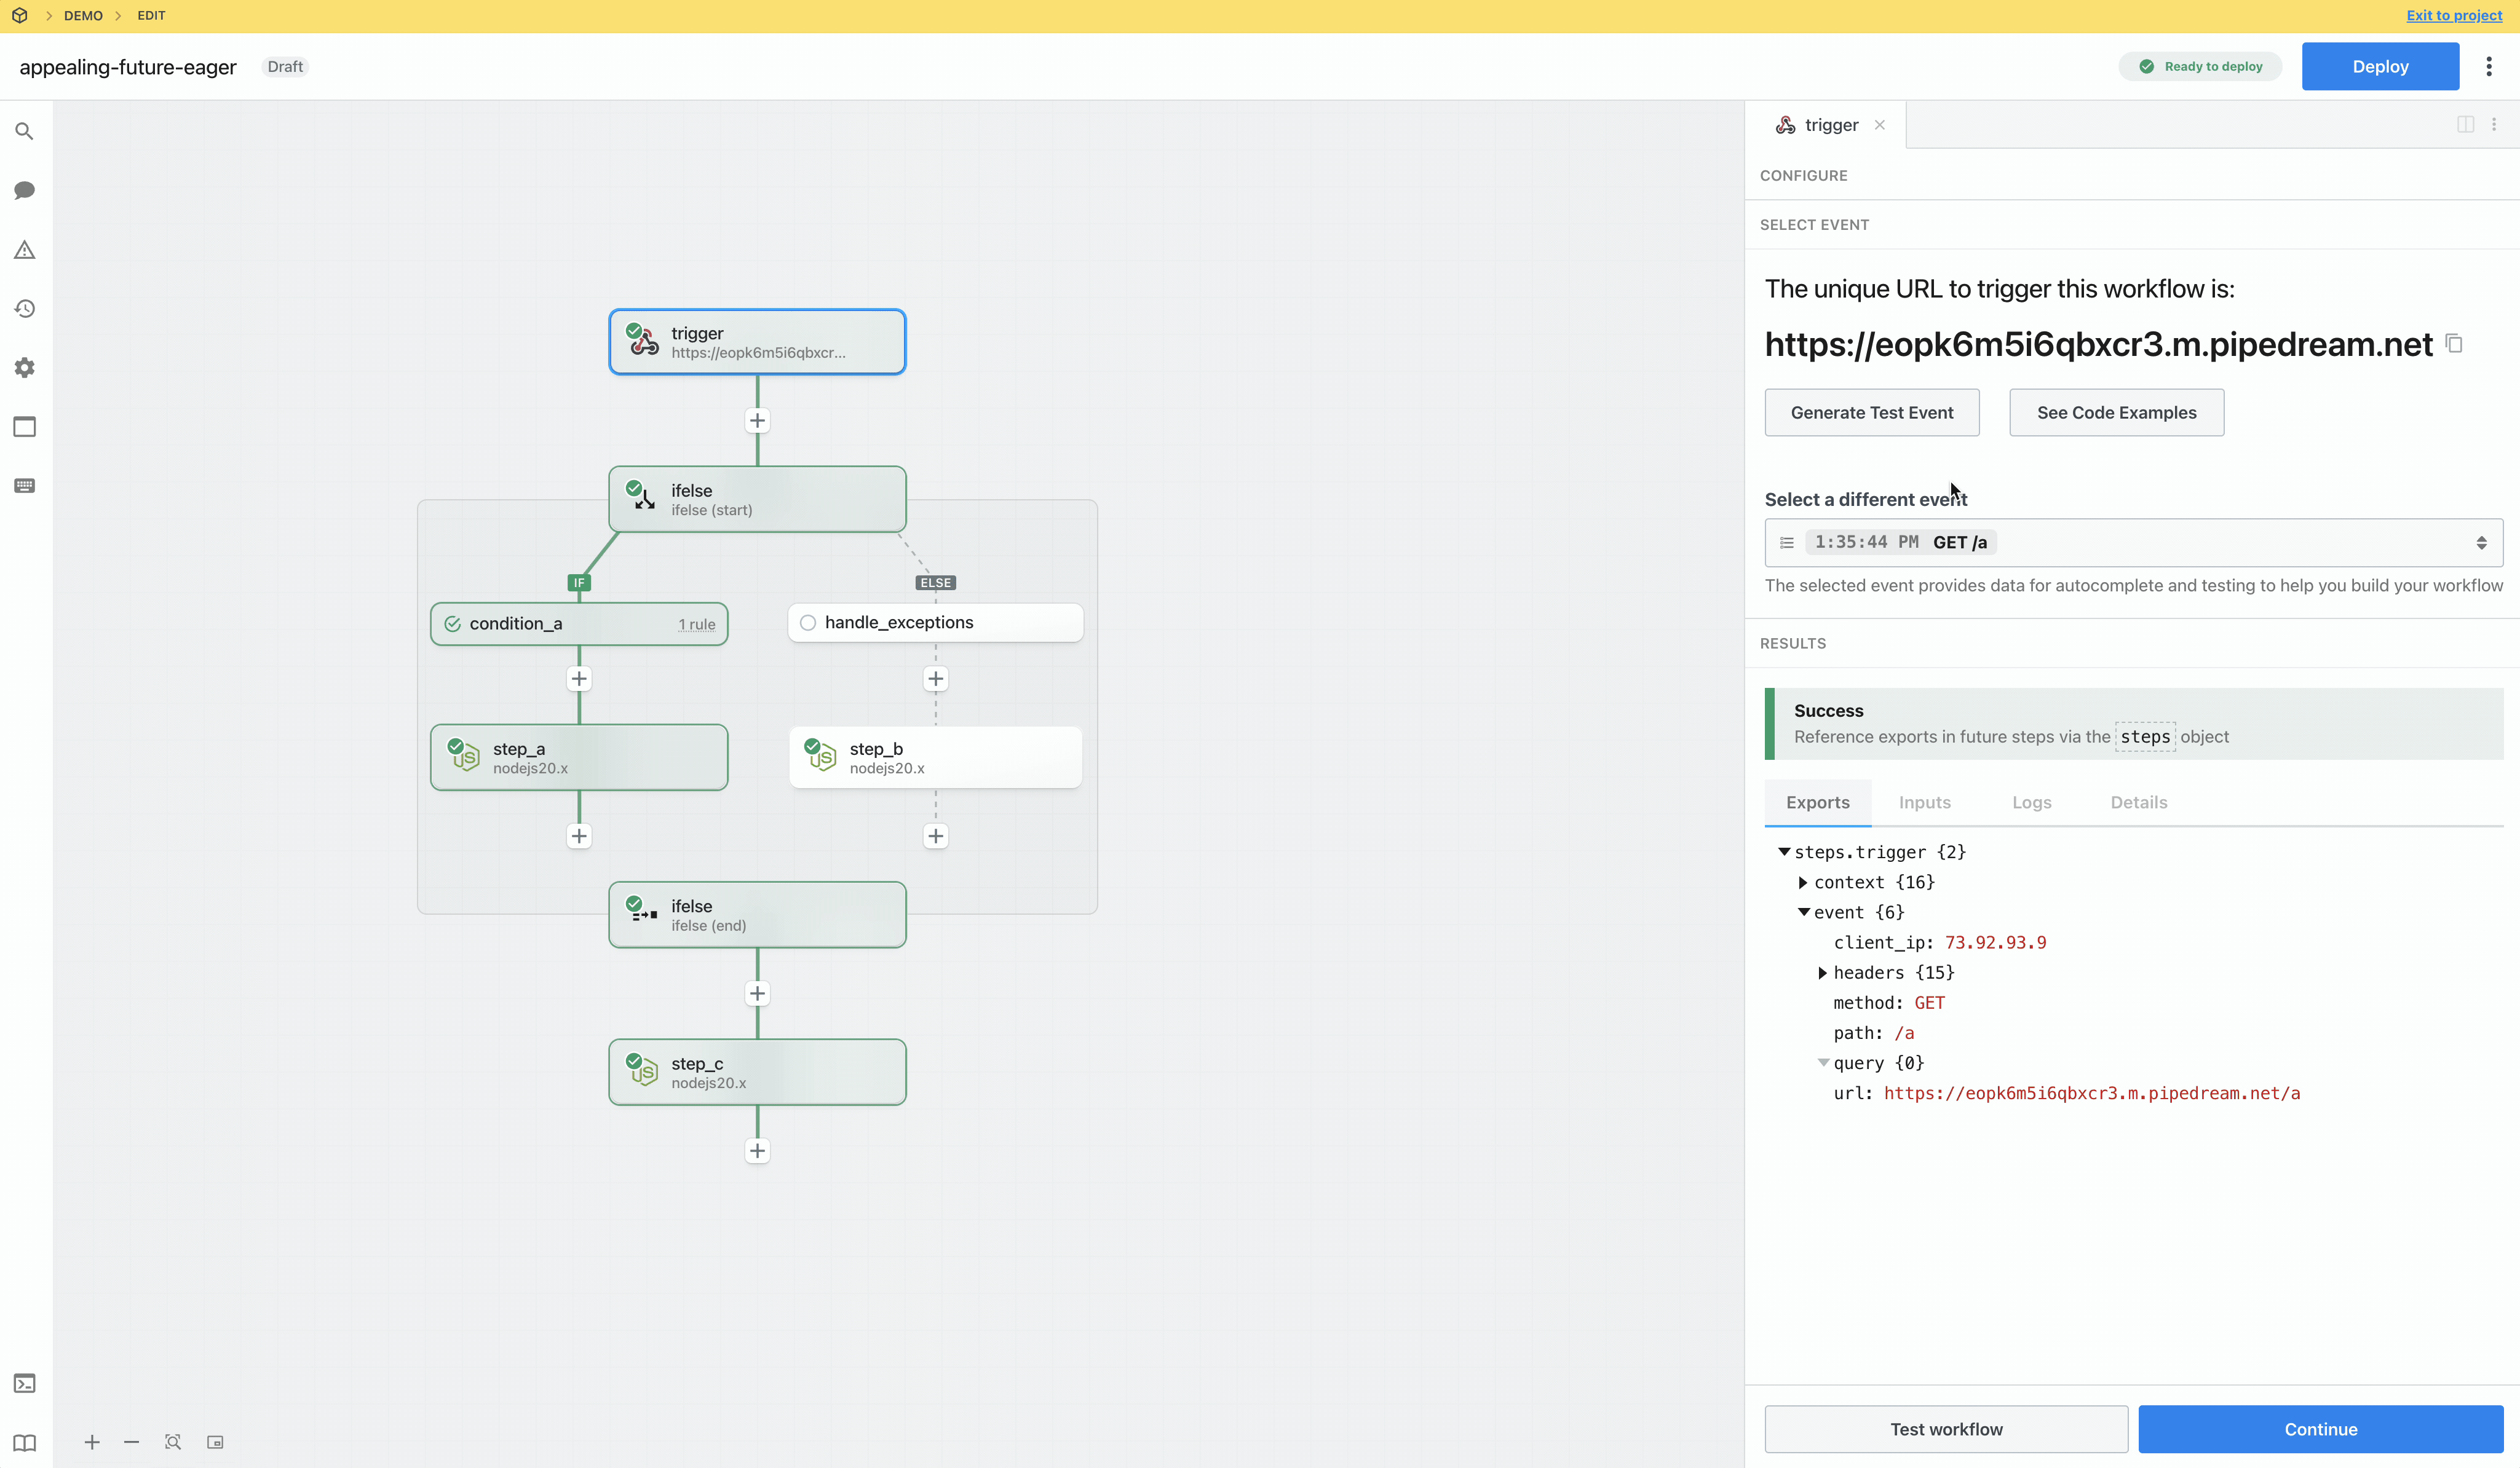 * Steps in the known execution path are immediately marked as stale
* State within conditional blocks is not updated until the start phase is tested and execution path is identified.
* Steps in the known execution path are immediately marked as stale
* State within conditional blocks is not updated until the start phase is tested and execution path is identified.
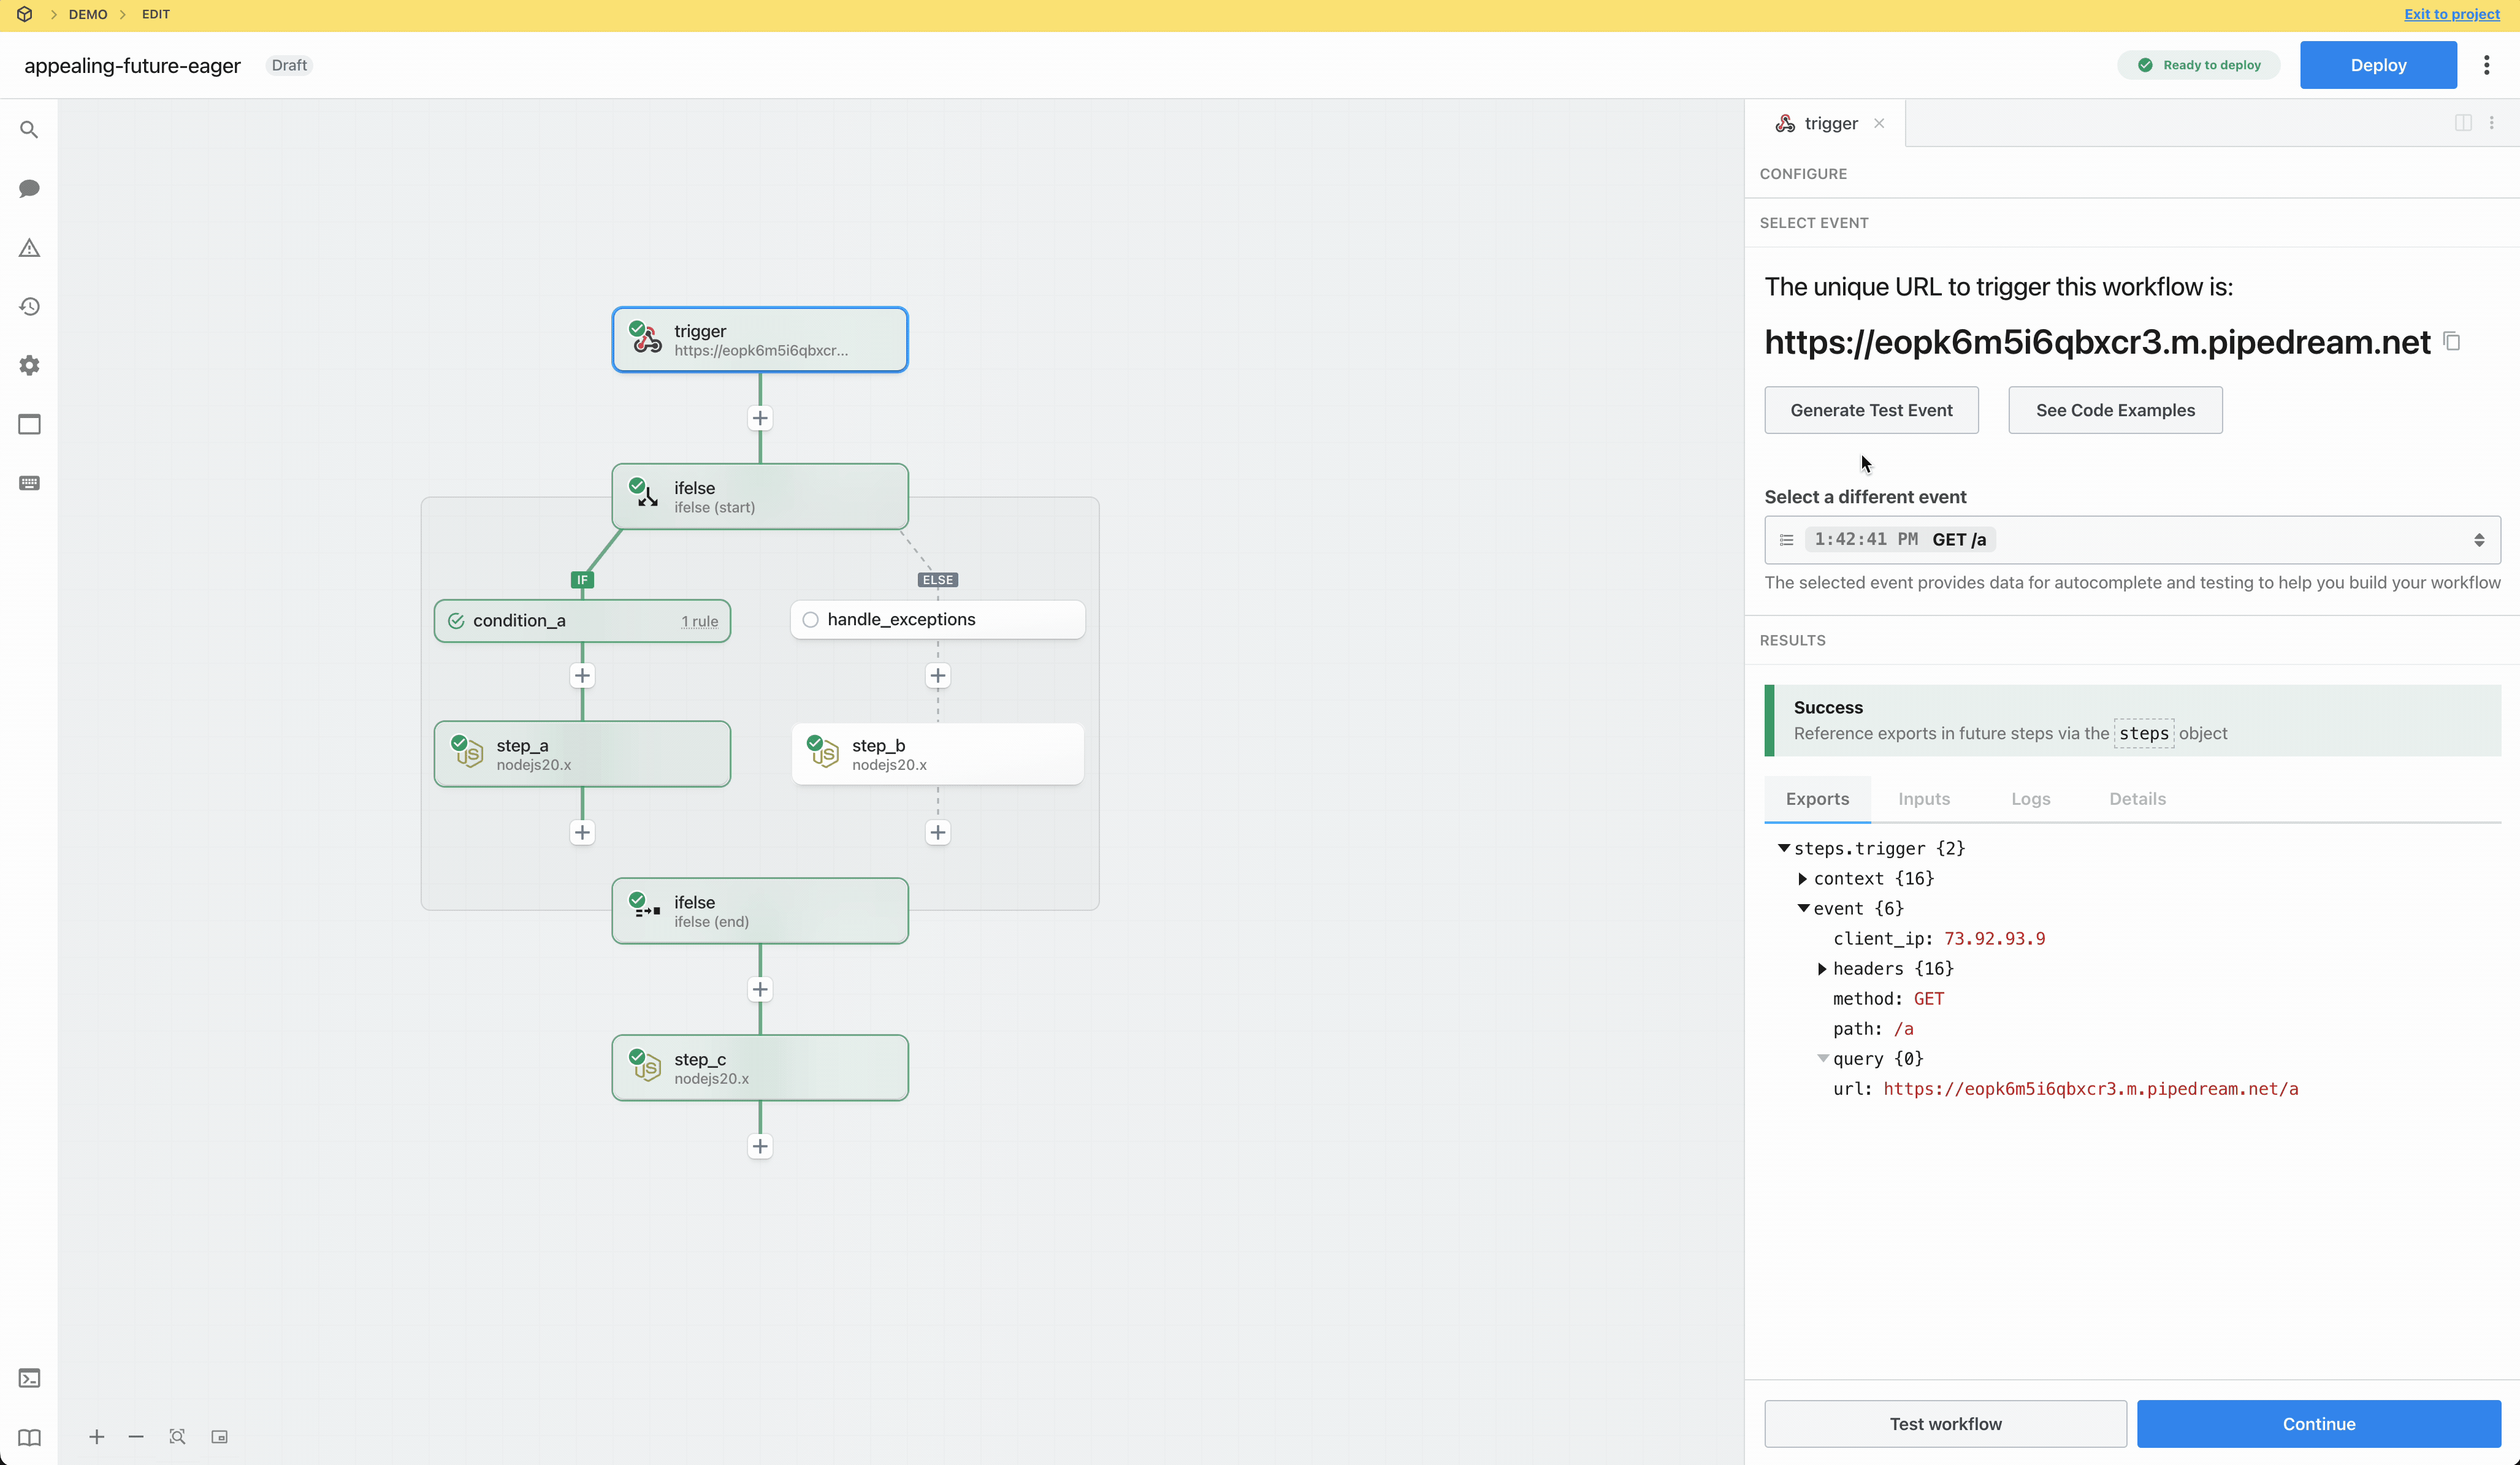 ### Test State vs Execution Path
Steps may be tested whether or not they are in the execution path. The test state for a step reflects whether a step was successfully tested or needs attention (the step may have errored, the results may be out of date, etc) and is denoted by the icon at the top left of each step.
* Last test was successful
### Test State vs Execution Path
Steps may be tested whether or not they are in the execution path. The test state for a step reflects whether a step was successfully tested or needs attention (the step may have errored, the results may be out of date, etc) and is denoted by the icon at the top left of each step.
* Last test was successful
 * Results may be stale, step may be untested, etc
 * **Step has an error or is not configured**
 ## Workflow Segments
### Context
Workflow segments are a linear series of steps that with no control flow operators.
* A simple linear workflow is composed of a single workflow segment.
* When a control flow operator is introduced, then the workflow contains multiple segments. For example, when a Delay operator is added to the simple linear workflow above the workflow goes from 1 to 2 segements.
## Workflow Segments
### Context
Workflow segments are a linear series of steps that with no control flow operators.
* A simple linear workflow is composed of a single workflow segment.
* When a control flow operator is introduced, then the workflow contains multiple segments. For example, when a Delay operator is added to the simple linear workflow above the workflow goes from 1 to 2 segements.
 * The following example using If/Else contains 5 workflow segments. However, since only 1 branch within the If/Else control flow block is run on each workflow execution, the maximum number of segments that will be executed for each trigger event is 3.
 ### Billing
Pipedream compiles each workflow segment into an executable function to optimize performance and reduce credit usage; credit usage is calculated independently for each workflow segment independent of the number of steps (rather than per step like many other platforms).
* For example, the two workflow segments below both use a single credit:
* **Trigger + 1 step workflow segment (1 credit)**
### Billing
Pipedream compiles each workflow segment into an executable function to optimize performance and reduce credit usage; credit usage is calculated independently for each workflow segment independent of the number of steps (rather than per step like many other platforms).
* For example, the two workflow segments below both use a single credit:
* **Trigger + 1 step workflow segment (1 credit)**
 * **Trigger + 5 step workflow segment (1 credit)**
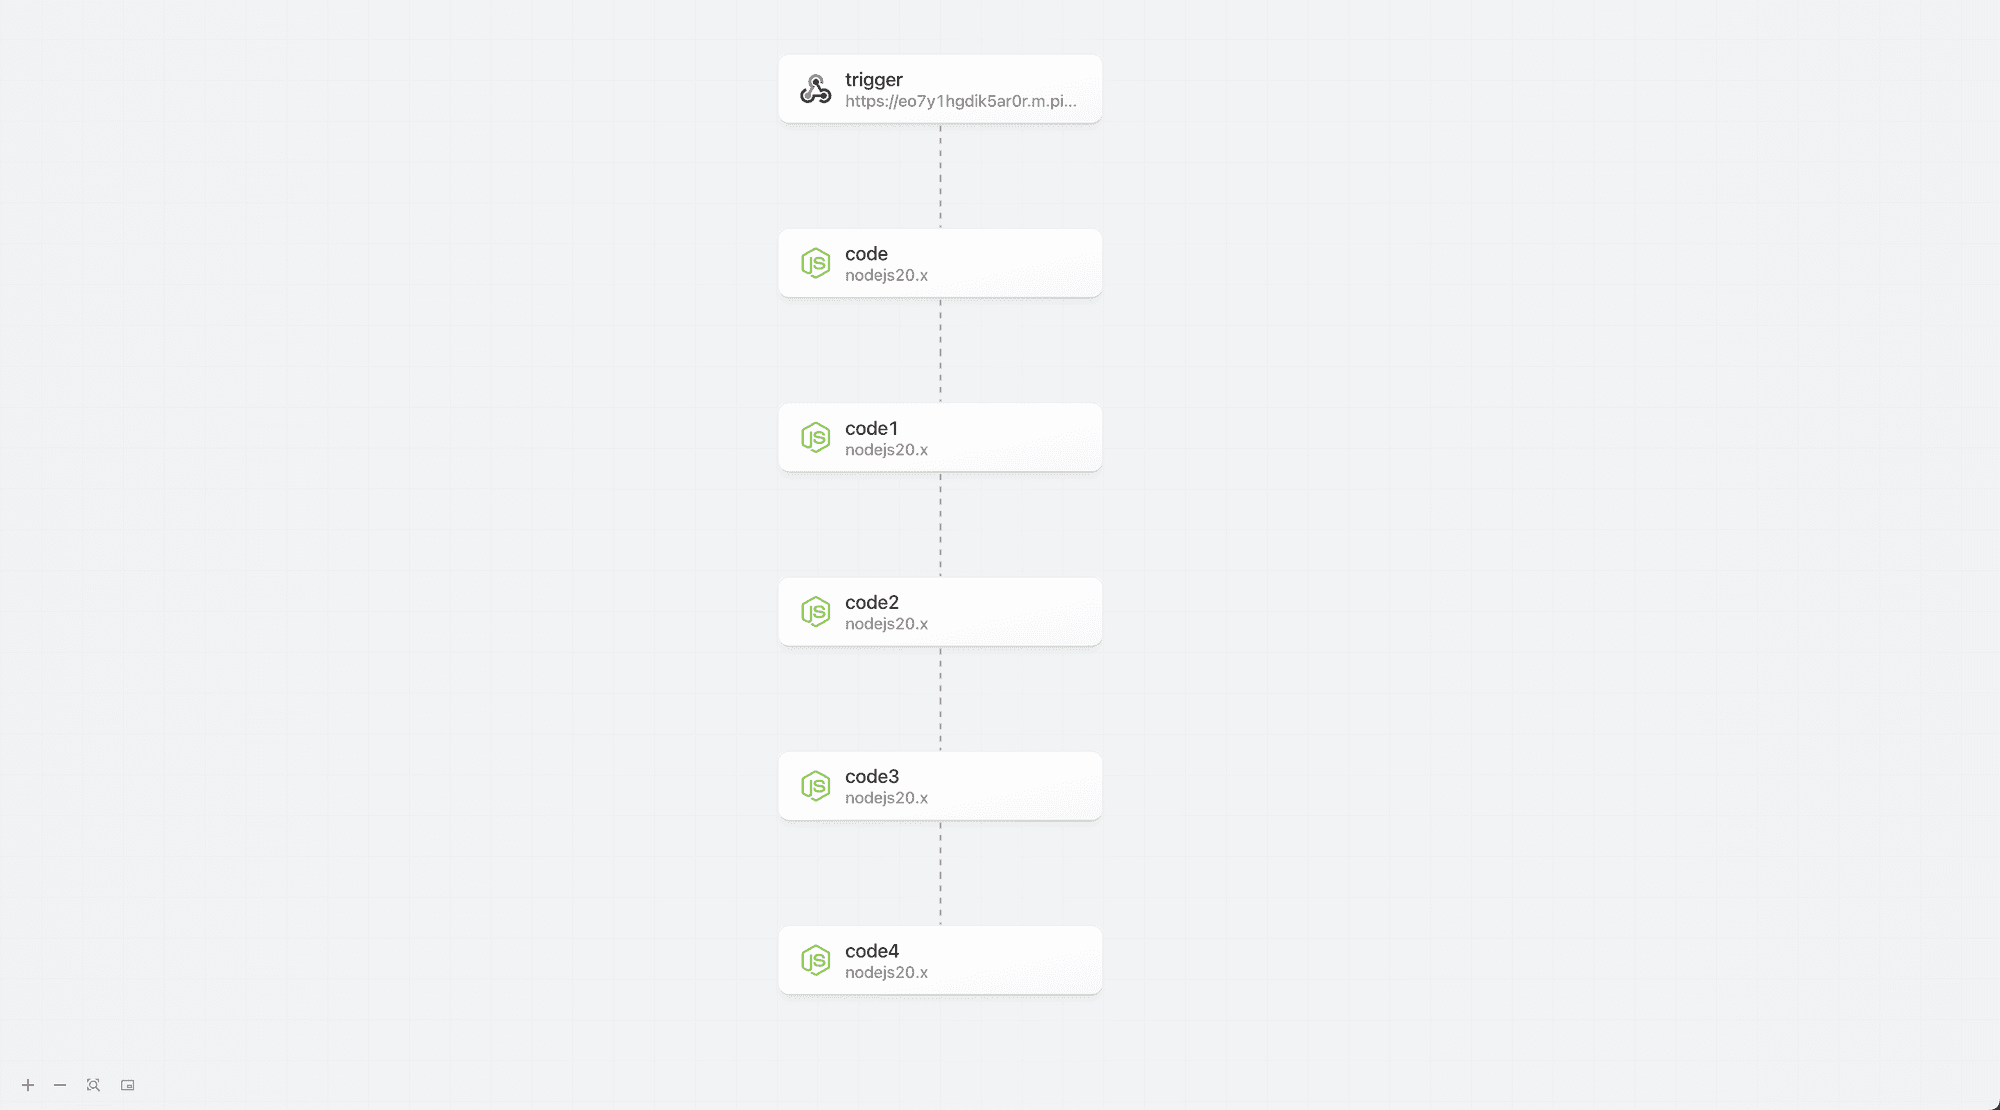 * The If/Else example above that contains 5 workflow segments, but only 3 workflow segments in any given execution path will only incur 3 credits of usage per execution.
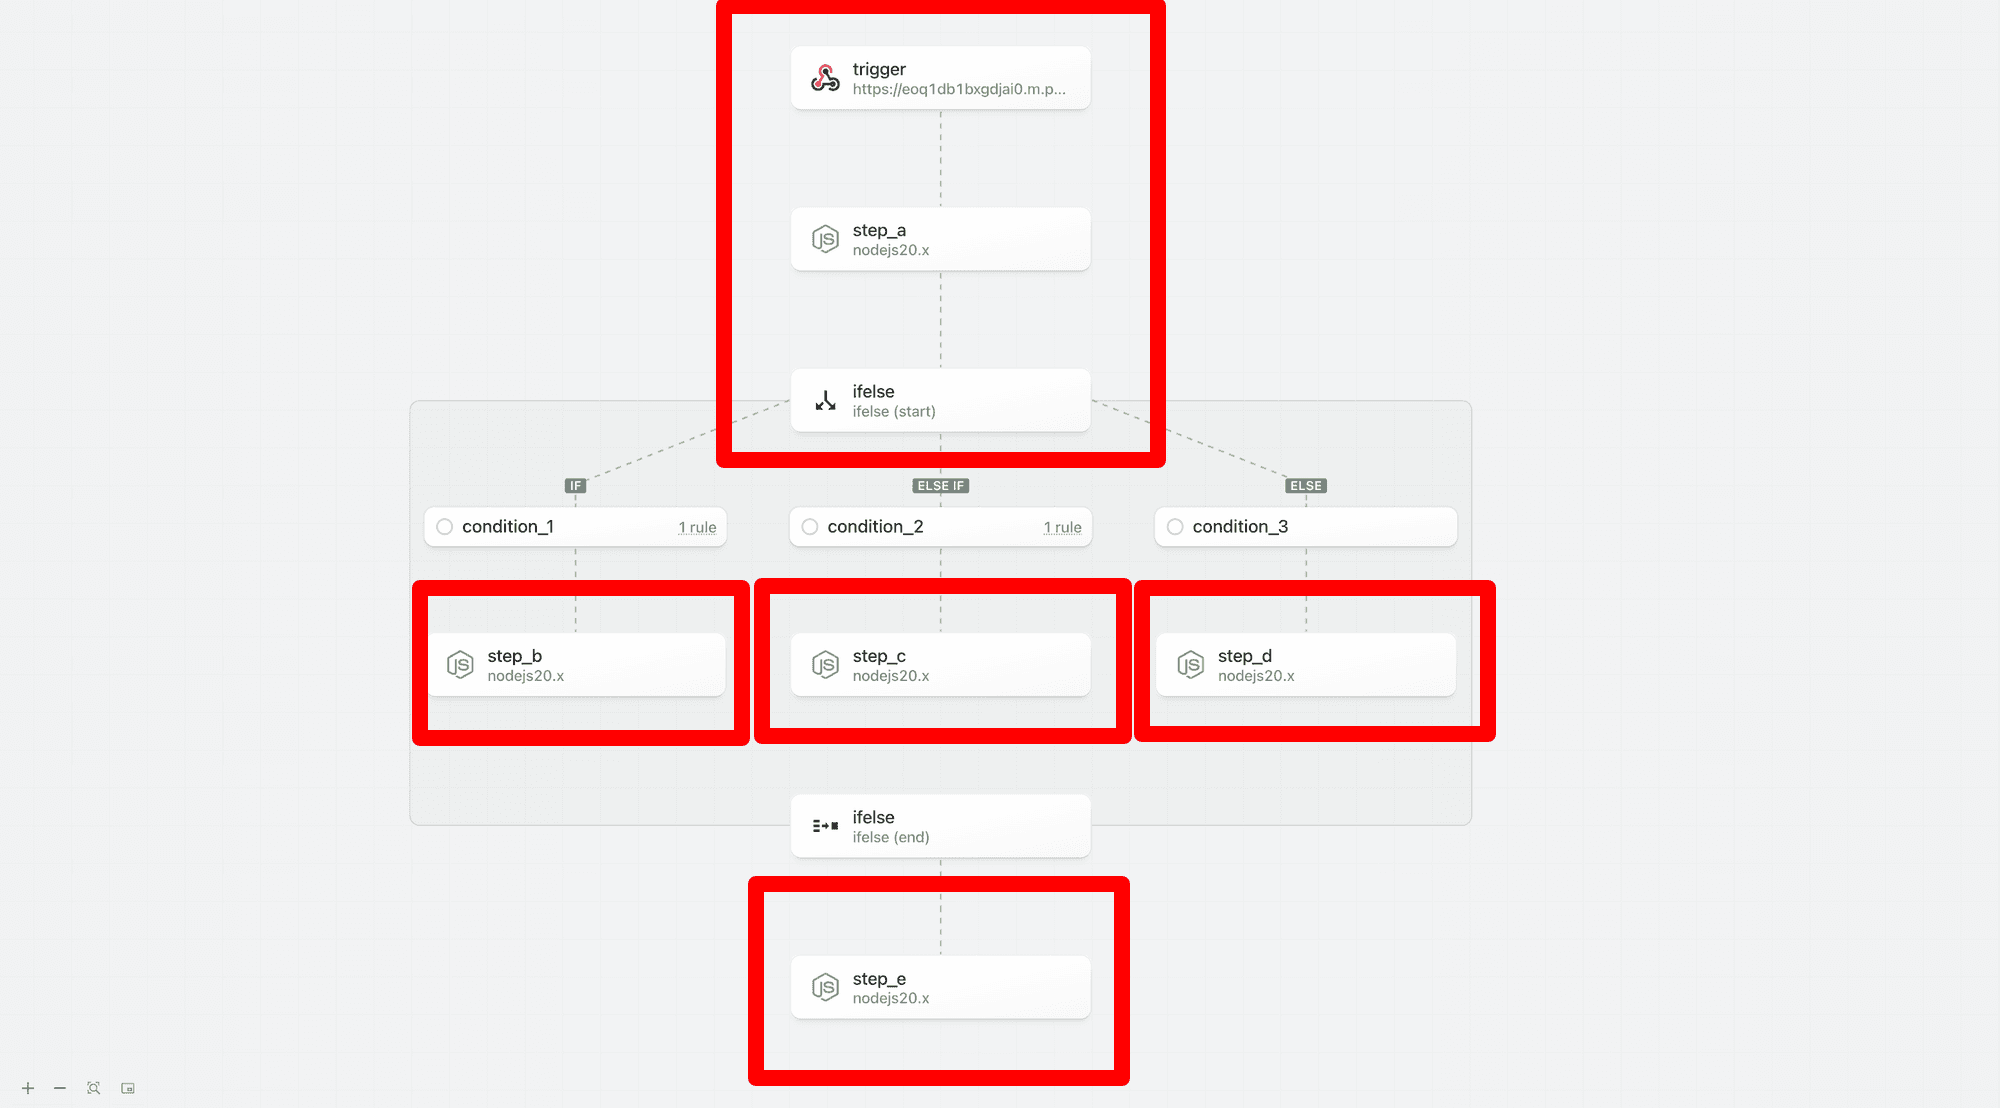 ### Timeout and Memory
For the preview, all workflow segments inherit the global timeout and memory settings. In the future, Pipedream will support customization of timeout and memory settings for each segment. For example, if you need expanded memory for select steps, you will be able to restrict higher memory execution to that segment instead of having to run the entire workflow with the higher memory settings. This can help you reduce credit usage.
### Long Running Workflows
Users may create long running workflows that greatly exceed the upper bound timeout of 12 minutes for current workflow (each workflow segment has an upper bound of 12 minutes).
### `/tmp` directory access
`tmp` directory access is scoped per workflow segment (since each segment is executed as an independent function). If you need to persist files across multiple segments (or workflow executions) use File Stores.
### Warm Workers
Warm workers are globally configured per segment. For example, if you have a workflow with 3 segments and you configure your workflow to use 1 warm worker per segment, 3 warm workers will be used.
### Segment Relationships
Steps may only reference prior steps in the same workflow segment or it’s direct ancestors.
| Type | Description |
| ------ | ----------------------------------------------------------------------------------------------------------------------------------------------------------------------------------------------------------------------------- |
| Root | The root segment is the top level for a workflow — it may have children but no parents. If you do not include any control flow blocks in your workflow, your entire workflow definition is contained within the root segment. |
| Parent | A segment that has a child. |
| Child | A flow that has a parent. |
## Blocks
### Context
**Blocks** are compound steps that are composed of a **start** and an **end** phase. Blocks may contain one or more workflow segments between the phases.
* Most non-linear control flow operators will be structured as blocks (vs. standard steps)
* You may add steps or blocks to [workflow segments](/docs/workflows/building-workflows/control-flow/#workflow-segments) between start and end phases of a block
* The start and end phases are independently testable
* The start phase evaluates the rules/configuration for a block; the results may influence the execution path
* The end phase exports results from the control flow block that can be referenced in future workflow steps
* For example, for the If/Else control flow operator, the start phase evaluates the branching rules while the end phase exports the results from the executed branch.
### Testing
When building a workflow with a control flow block, we recommend testing the start phase, followed by steps in the execution path followed by the end phase.
### Timeout and Memory
For the preview, all workflow segments inherit the global timeout and memory settings. In the future, Pipedream will support customization of timeout and memory settings for each segment. For example, if you need expanded memory for select steps, you will be able to restrict higher memory execution to that segment instead of having to run the entire workflow with the higher memory settings. This can help you reduce credit usage.
### Long Running Workflows
Users may create long running workflows that greatly exceed the upper bound timeout of 12 minutes for current workflow (each workflow segment has an upper bound of 12 minutes).
### `/tmp` directory access
`tmp` directory access is scoped per workflow segment (since each segment is executed as an independent function). If you need to persist files across multiple segments (or workflow executions) use File Stores.
### Warm Workers
Warm workers are globally configured per segment. For example, if you have a workflow with 3 segments and you configure your workflow to use 1 warm worker per segment, 3 warm workers will be used.
### Segment Relationships
Steps may only reference prior steps in the same workflow segment or it’s direct ancestors.
| Type | Description |
| ------ | ----------------------------------------------------------------------------------------------------------------------------------------------------------------------------------------------------------------------------- |
| Root | The root segment is the top level for a workflow — it may have children but no parents. If you do not include any control flow blocks in your workflow, your entire workflow definition is contained within the root segment. |
| Parent | A segment that has a child. |
| Child | A flow that has a parent. |
## Blocks
### Context
**Blocks** are compound steps that are composed of a **start** and an **end** phase. Blocks may contain one or more workflow segments between the phases.
* Most non-linear control flow operators will be structured as blocks (vs. standard steps)
* You may add steps or blocks to [workflow segments](/docs/workflows/building-workflows/control-flow/#workflow-segments) between start and end phases of a block
* The start and end phases are independently testable
* The start phase evaluates the rules/configuration for a block; the results may influence the execution path
* The end phase exports results from the control flow block that can be referenced in future workflow steps
* For example, for the If/Else control flow operator, the start phase evaluates the branching rules while the end phase exports the results from the executed branch.
### Testing
When building a workflow with a control flow block, we recommend testing the start phase, followed by steps in the execution path followed by the end phase.
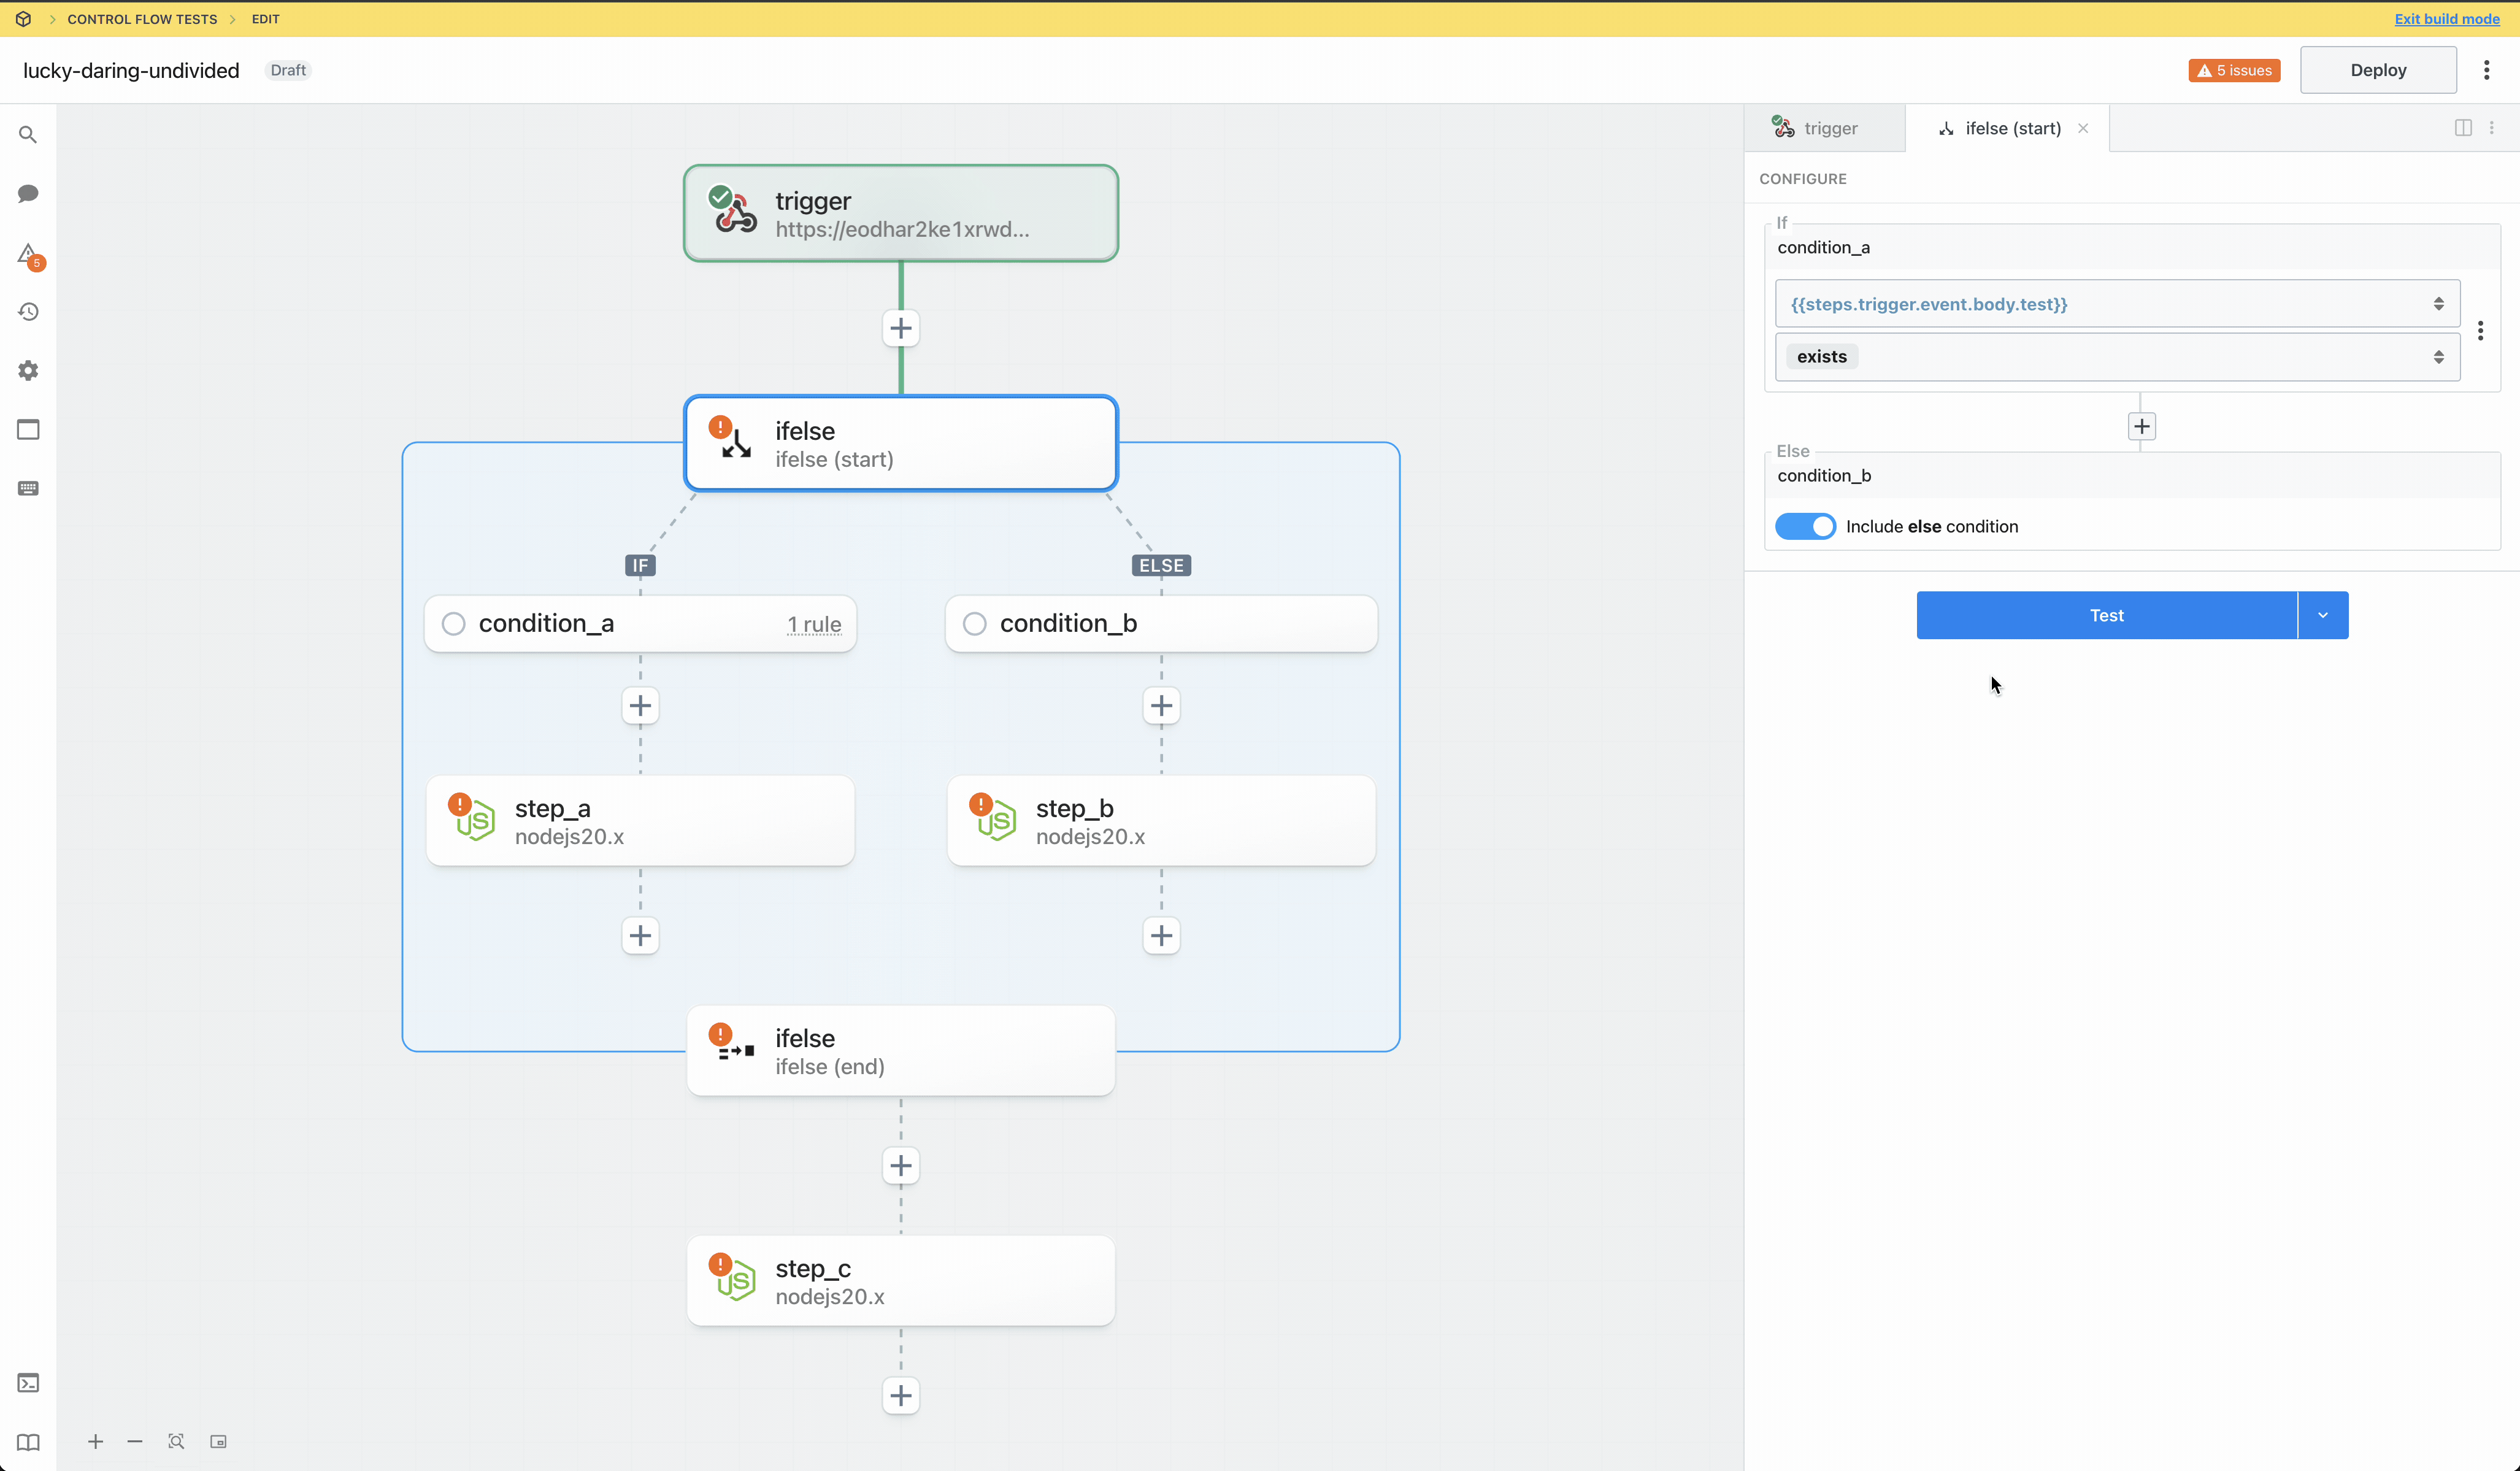 For a conditional operator like if/else, we then recommend generating events that trigger alternate conditions and testing those.
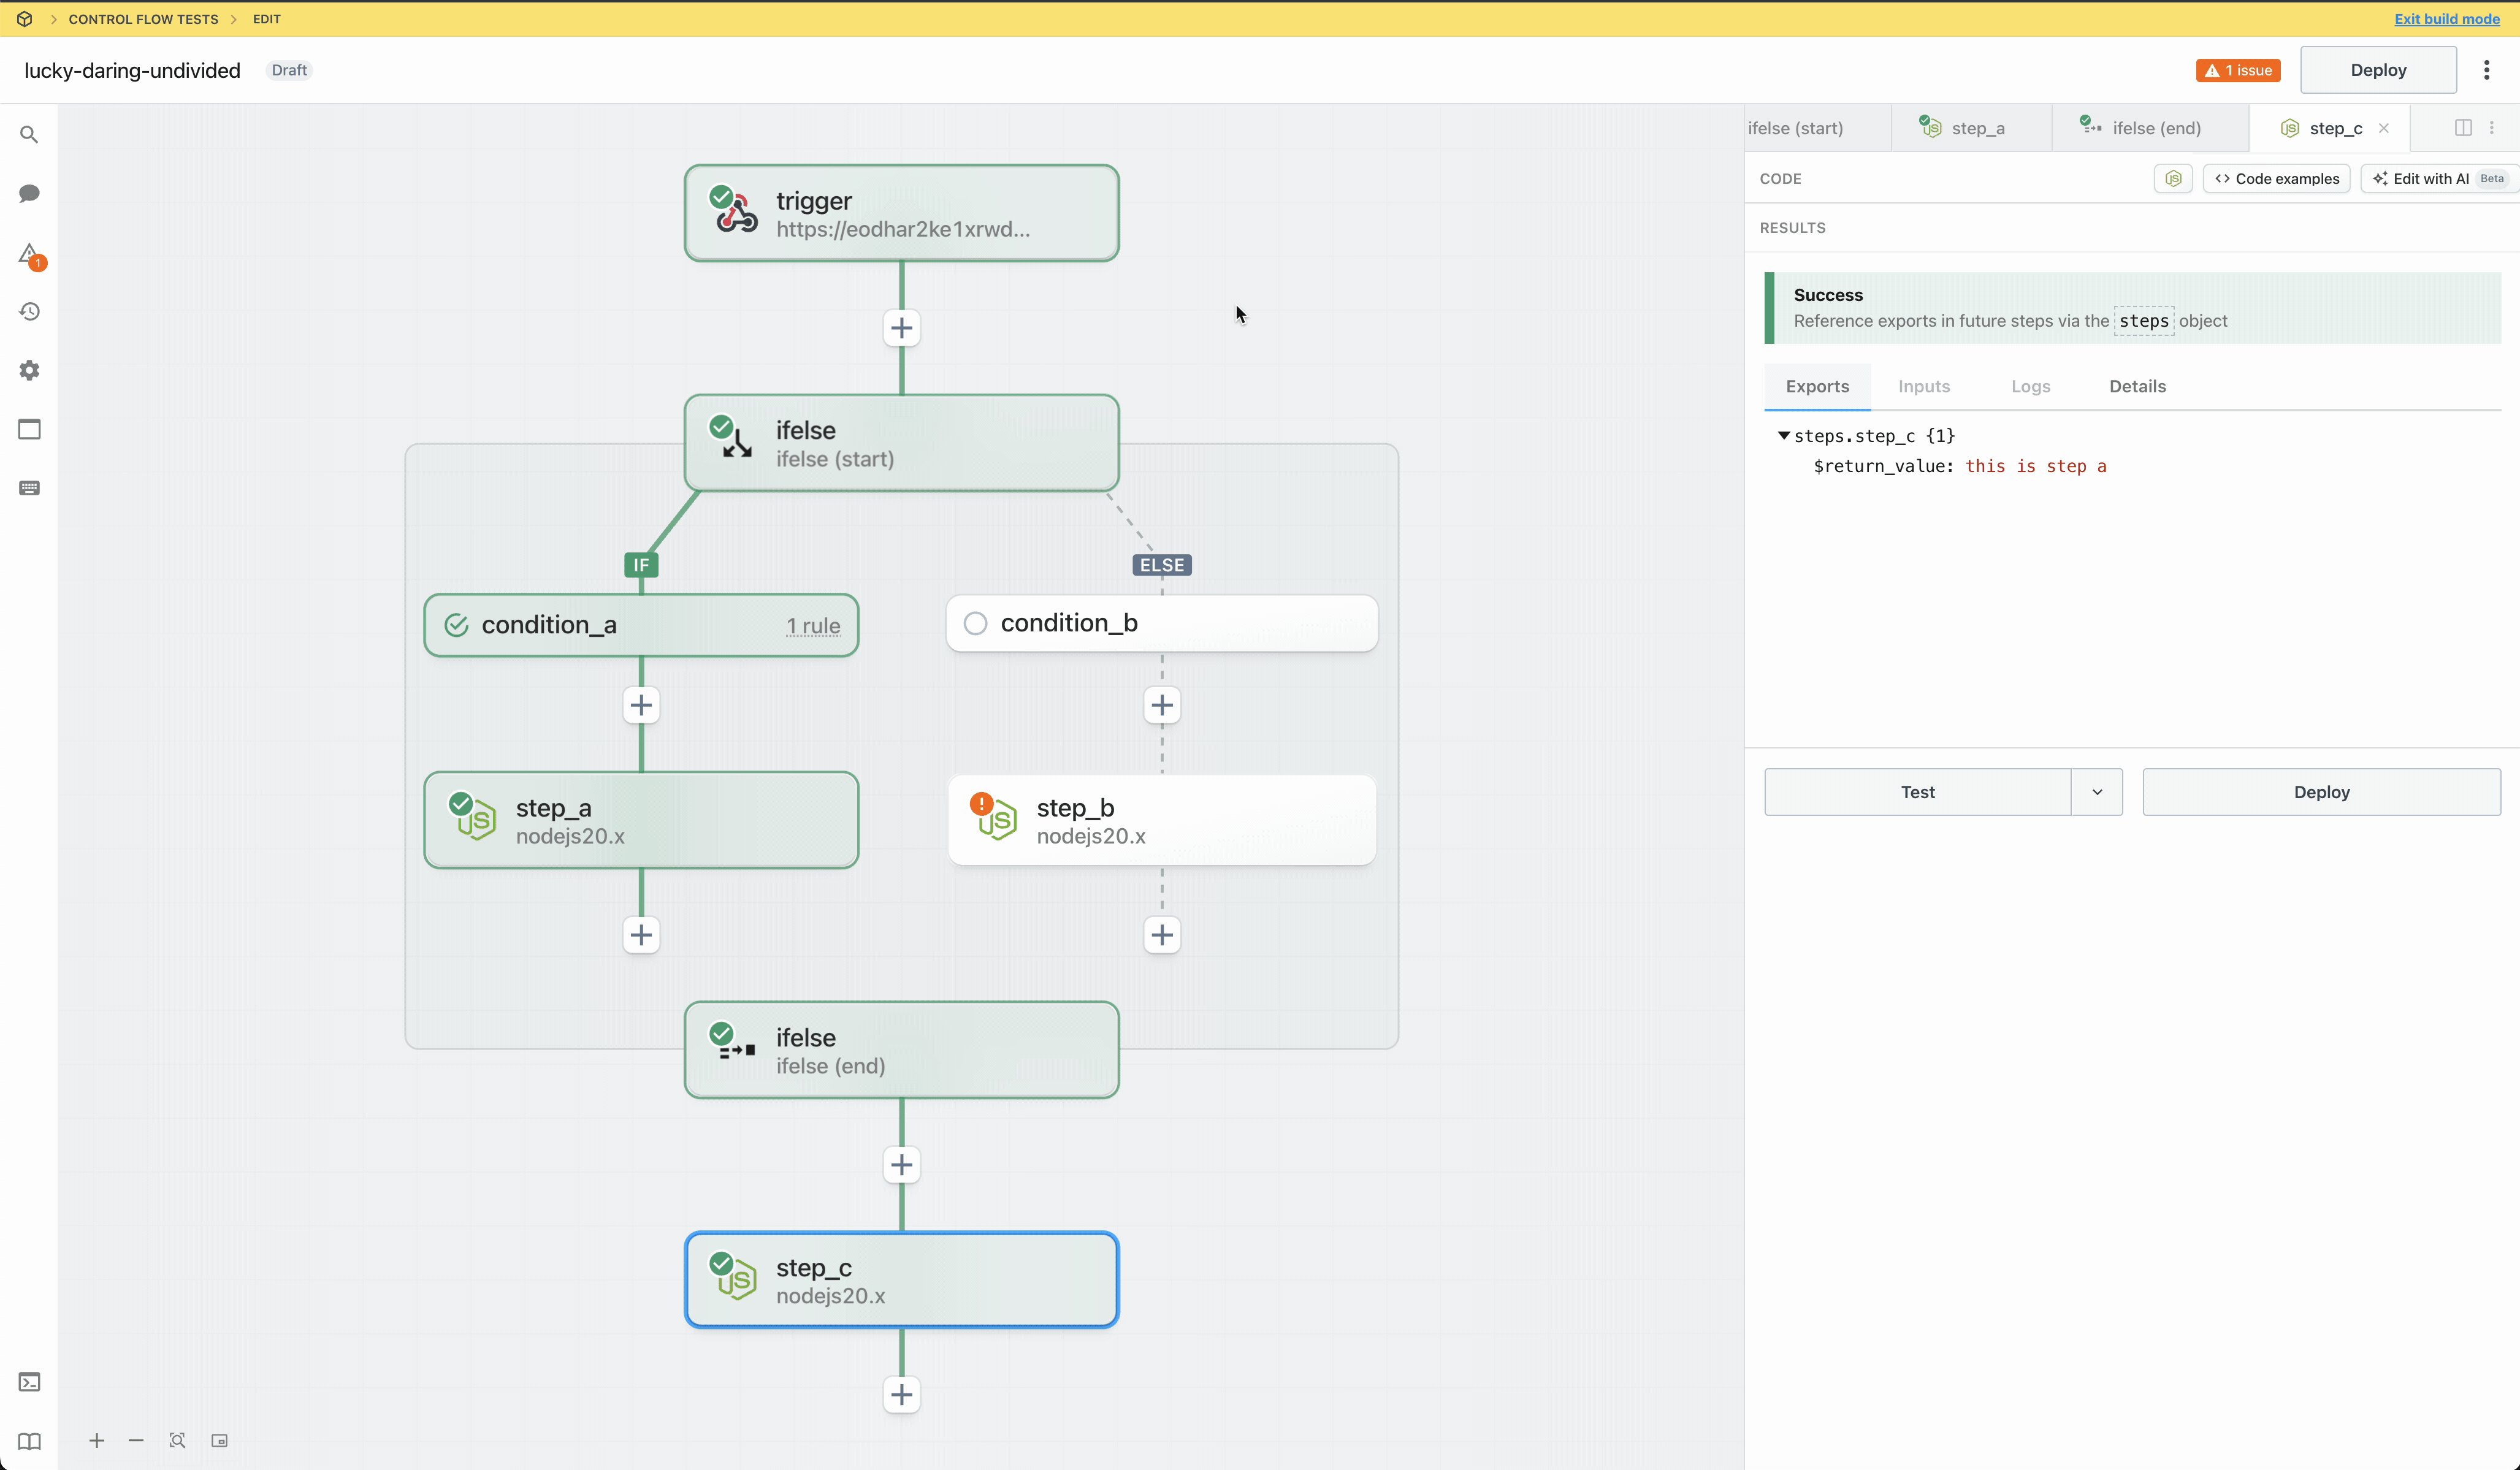 #### Passing data to steps in a control flow block
Steps may only reference prior steps in the same workflow segment or it’s direct ancestors. In the following example, `step_c` and `step_d` (within the if/else control flow block) can directly reference any exports from `trigger`, `step_a`, or `step_b` (in the parent/root workflow segment) via the steps object. `step_c` and `step_d` are siblings and cannot reference exports from each other.
#### Passing data to steps in a control flow block
Steps may only reference prior steps in the same workflow segment or it’s direct ancestors. In the following example, `step_c` and `step_d` (within the if/else control flow block) can directly reference any exports from `trigger`, `step_a`, or `step_b` (in the parent/root workflow segment) via the steps object. `step_c` and `step_d` are siblings and cannot reference exports from each other.
 #### Referencing data from steps in a previous block
Steps after the end phase may not directly reference steps within a control flow block (between the start and end phases). E.g., in the following workflow there are two branches:
#### Referencing data from steps in a previous block
Steps after the end phase may not directly reference steps within a control flow block (between the start and end phases). E.g., in the following workflow there are two branches:
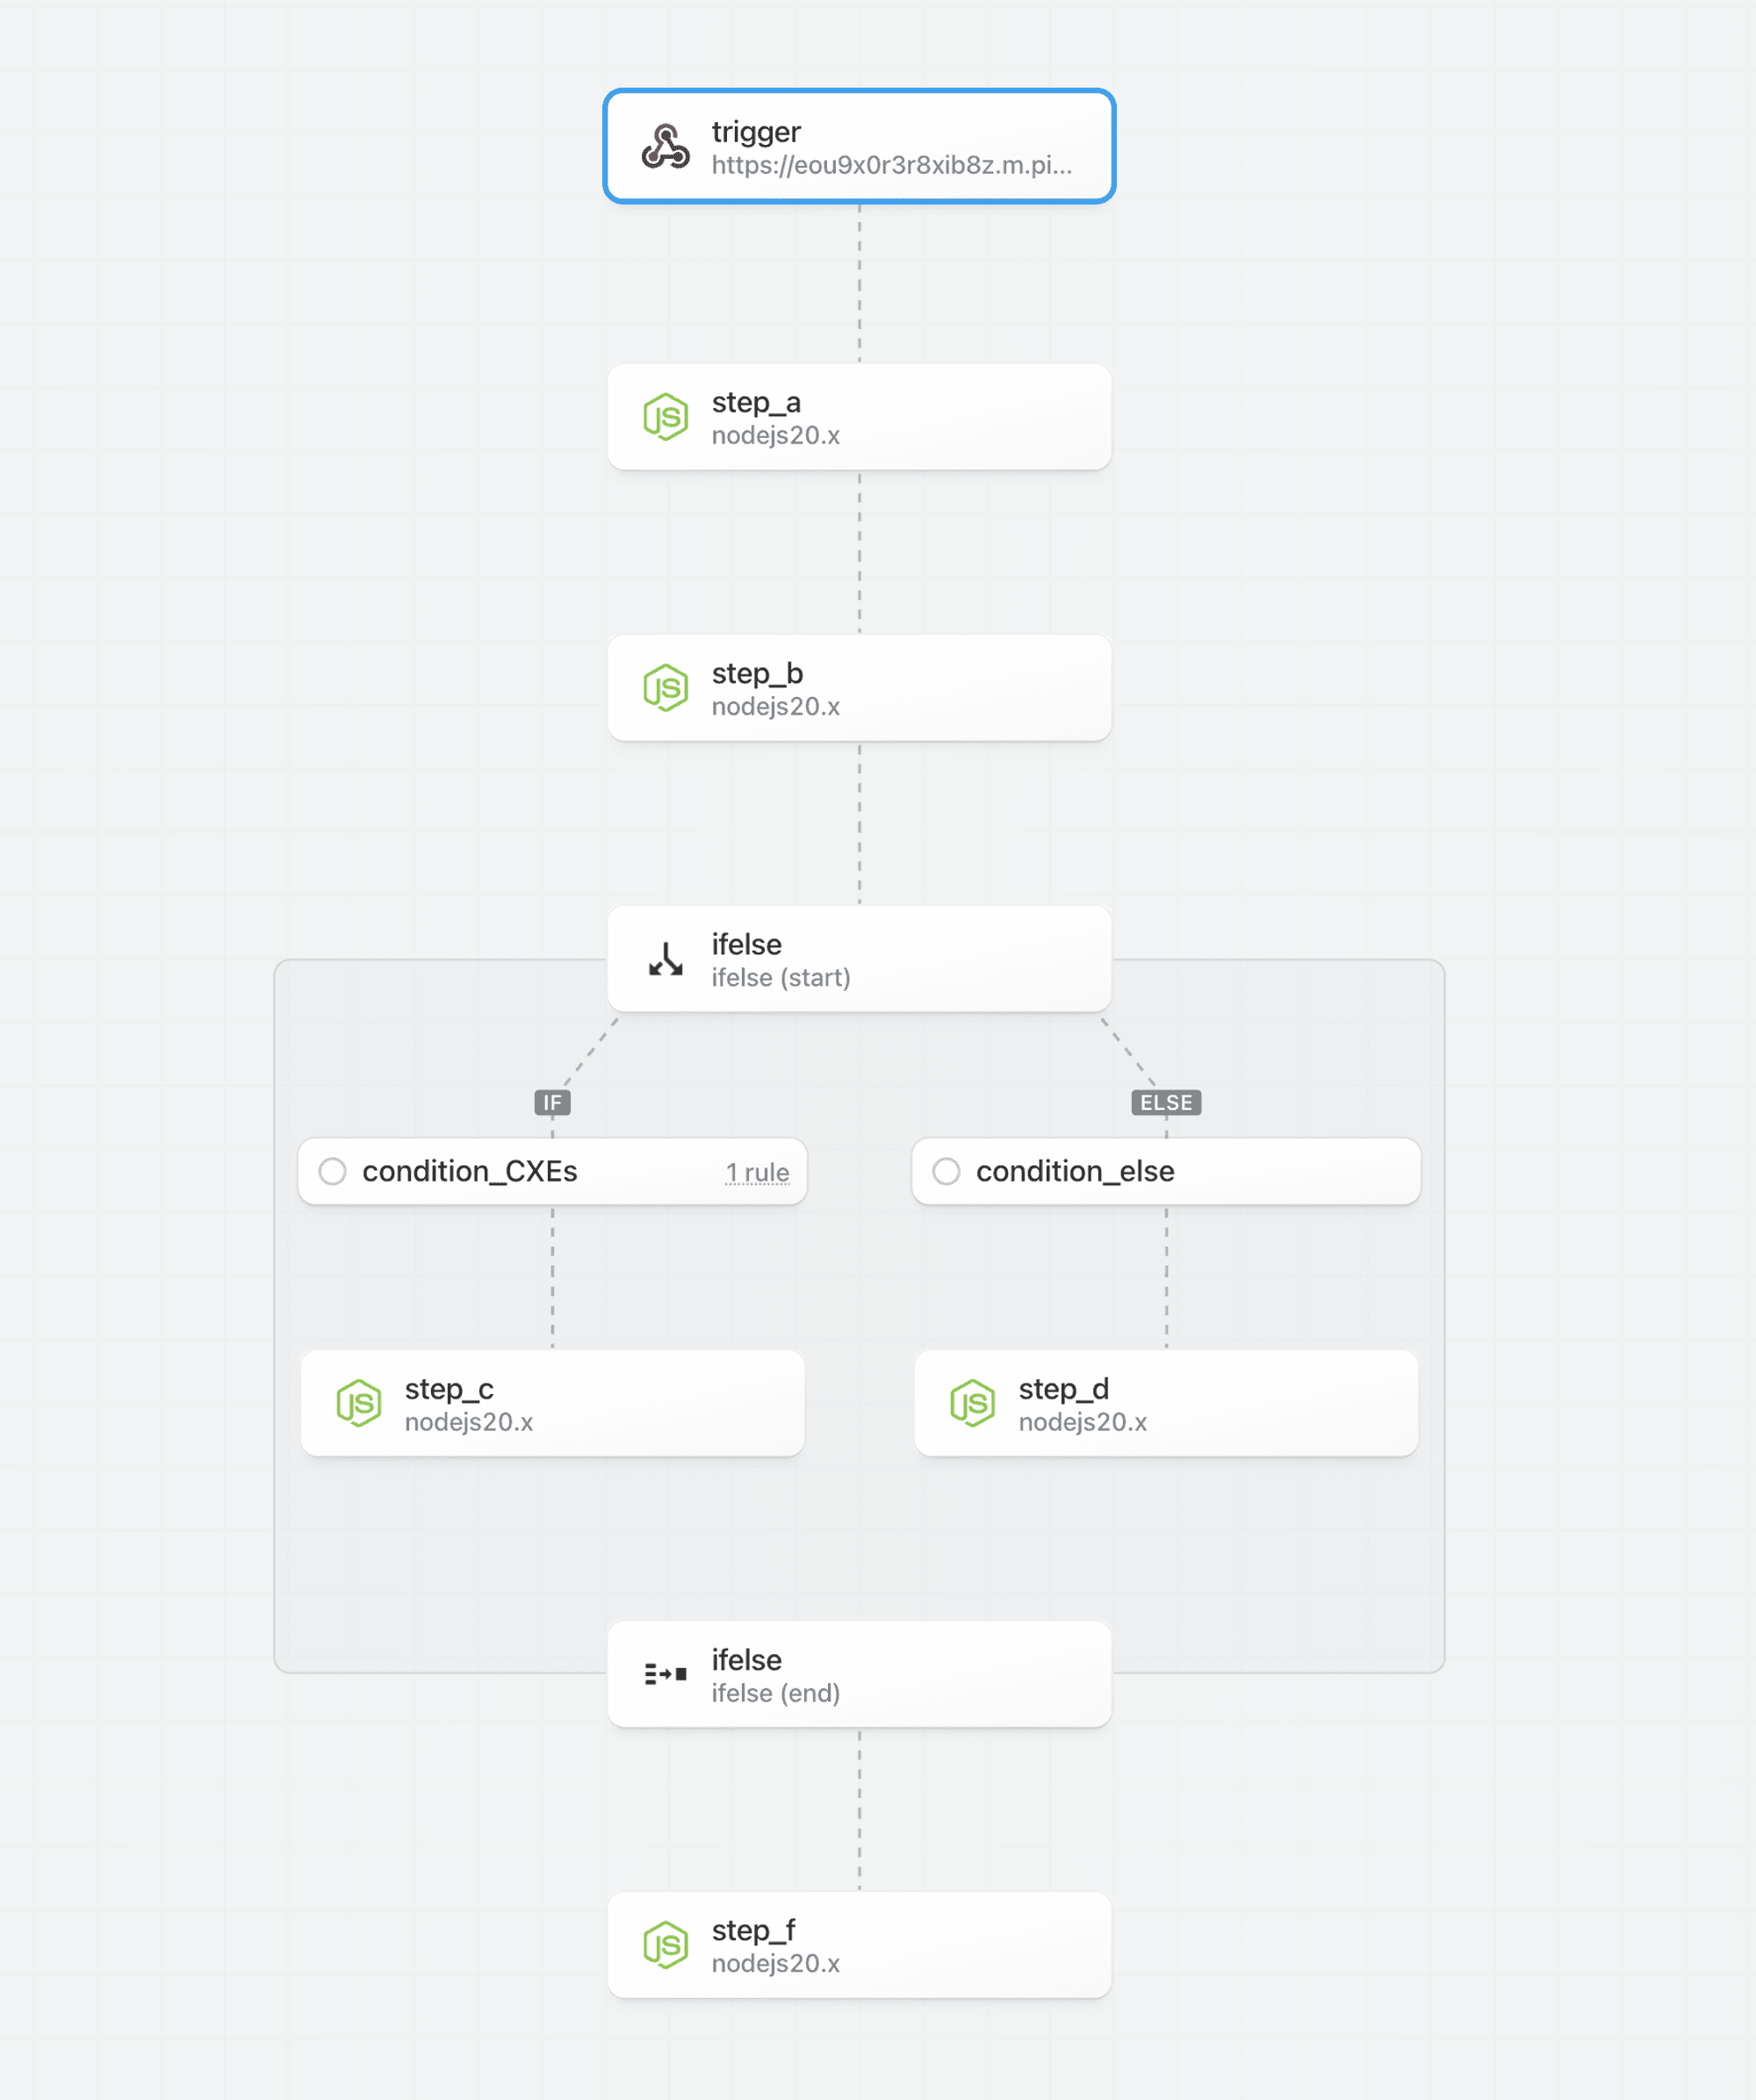 In this example, `step_f` is executed after a control flow block. It can directly reference prior steps in the root workflow segment (`trigger`, `step_a` and `step_b` using the `steps` object).
However, `step_f` cannot reference directly reference data exported by `step_c` or `step_d`. The reason is that due to the non-linear execution, `step_c` and `step_d` are not guaranteed to execute for every event. **To reference data from a control flow block, reference the exports of the end phase.** Refer to the documentation to understand how data is exported for each control flow operator (e.g., for if/else, the exports of the last step in the branch are returned as the exports for the end phase; you can easily normalize the results across branches using a code step).
In this example, `step_f` can reference the exported data for an executed branch by referencing `steps.ifelse.$return_value`.
### Nesting
Control flow blocks may be nested within other control flow blocks:
* If/Else blocks may be nested within other If/Else blocks
* In the future, Loops may be nested within If/Else blocks and vice versa.
There is currently no limit on the number of nested elements.
In this example, `step_f` is executed after a control flow block. It can directly reference prior steps in the root workflow segment (`trigger`, `step_a` and `step_b` using the `steps` object).
However, `step_f` cannot reference directly reference data exported by `step_c` or `step_d`. The reason is that due to the non-linear execution, `step_c` and `step_d` are not guaranteed to execute for every event. **To reference data from a control flow block, reference the exports of the end phase.** Refer to the documentation to understand how data is exported for each control flow operator (e.g., for if/else, the exports of the last step in the branch are returned as the exports for the end phase; you can easily normalize the results across branches using a code step).
In this example, `step_f` can reference the exported data for an executed branch by referencing `steps.ifelse.$return_value`.
### Nesting
Control flow blocks may be nested within other control flow blocks:
* If/Else blocks may be nested within other If/Else blocks
* In the future, Loops may be nested within If/Else blocks and vice versa.
There is currently no limit on the number of nested elements.
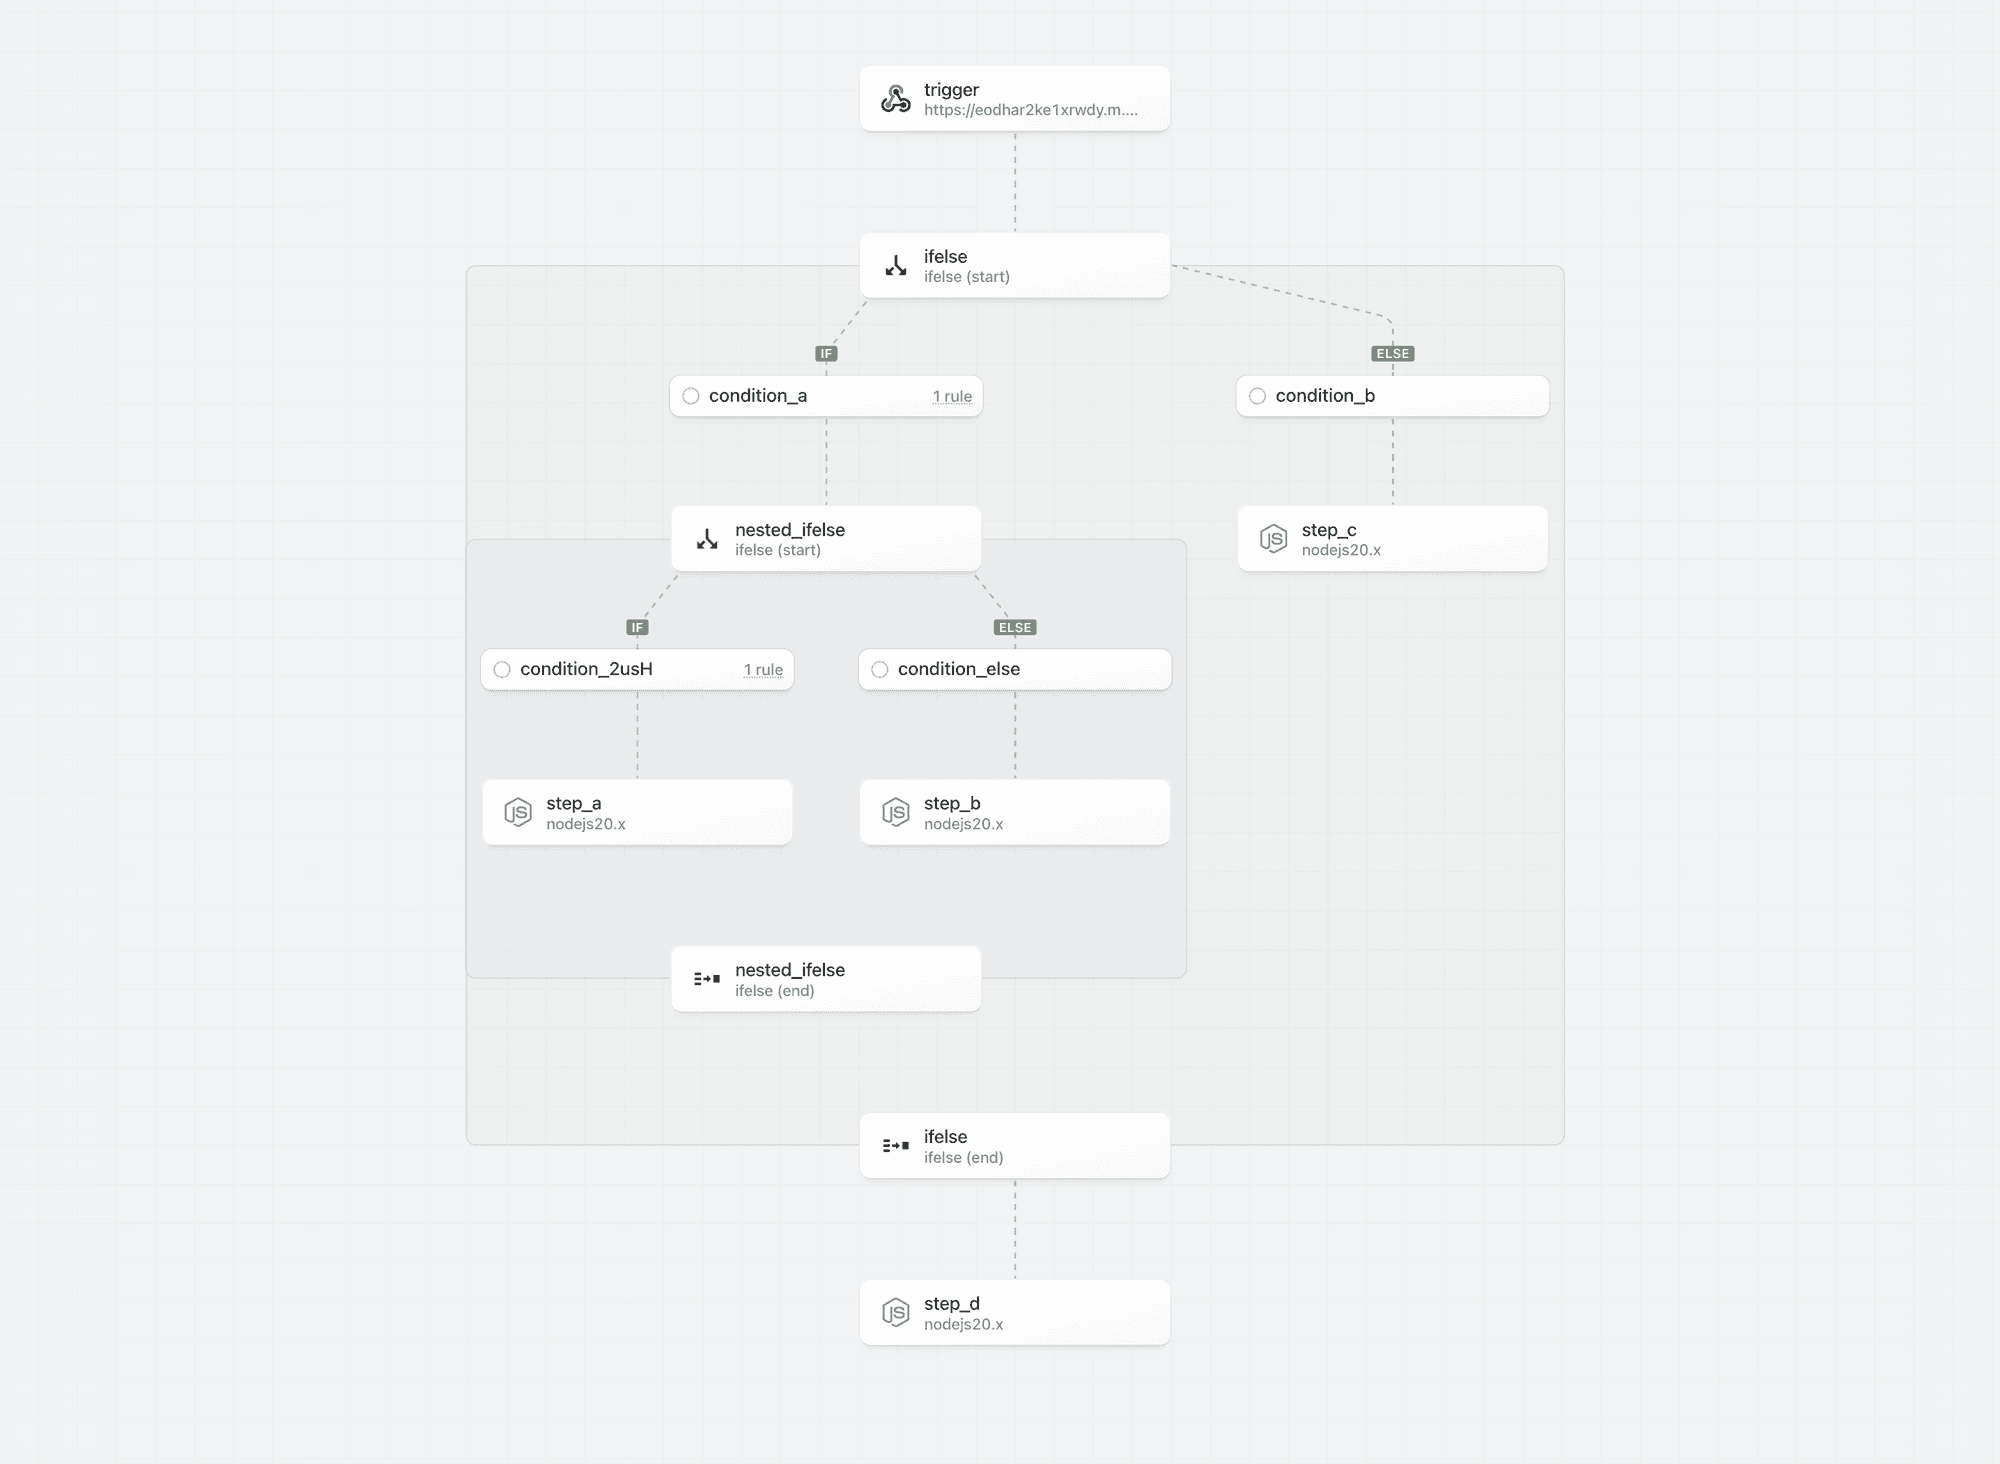 ## Rule Builder
### Context
Pipedream is introducing a rule builder for comparative operations. The rule builder is currently only supported by the If/Else operator, but it will be extended to other operators including Switch and Filter.
## Rule Builder
### Context
Pipedream is introducing a rule builder for comparative operations. The rule builder is currently only supported by the If/Else operator, but it will be extended to other operators including Switch and Filter.
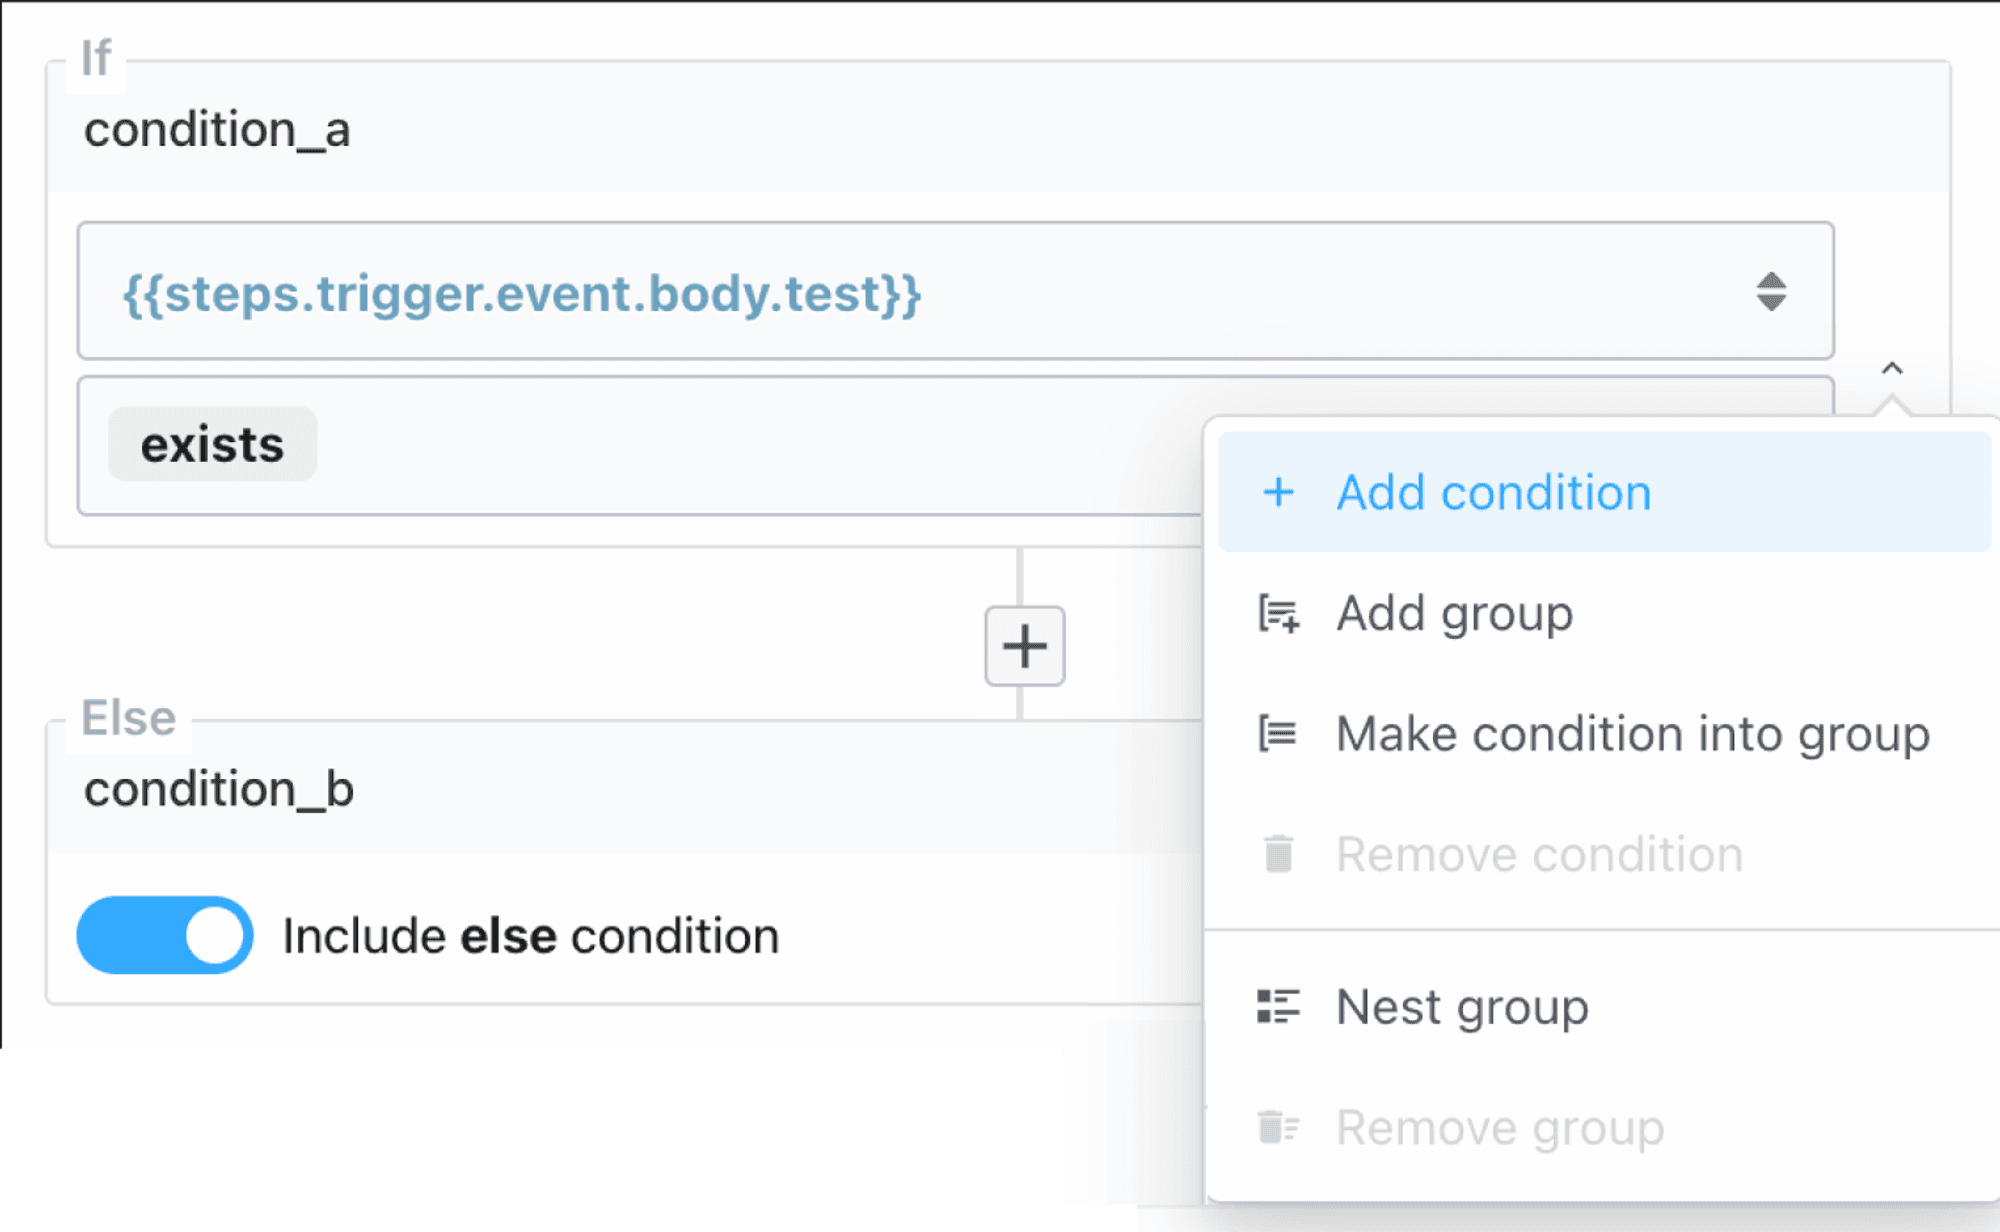 ### Simple conditions
Compare values using supported operators.
### Simple conditions
Compare values using supported operators.
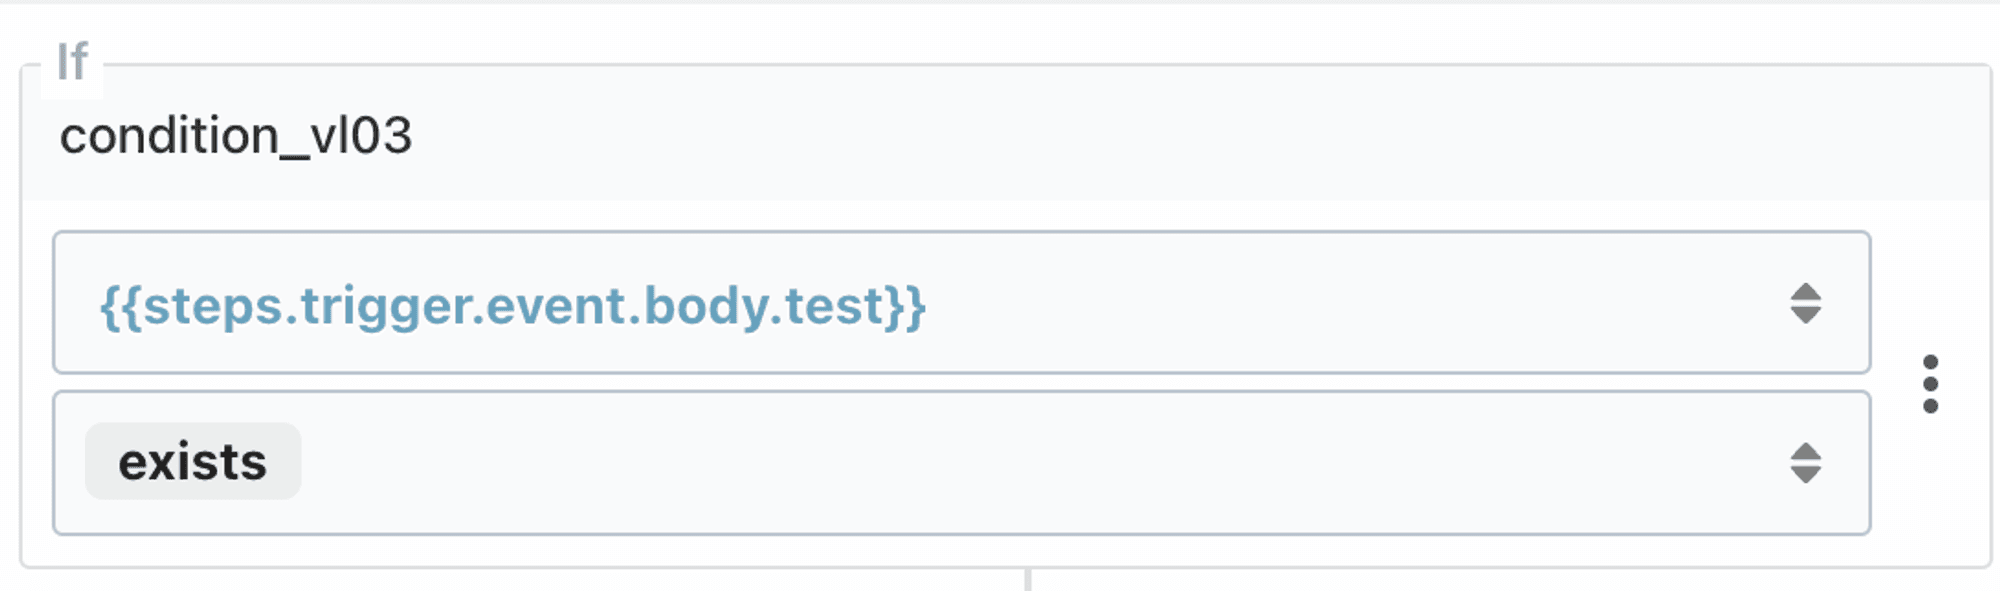 ### Combine multiple conditions using AND / OR
Click “Add condition” using the menu on the right to add multiple conditions. Click on AND / OR to toggle the operator.
### Combine multiple conditions using AND / OR
Click “Add condition” using the menu on the right to add multiple conditions. Click on AND / OR to toggle the operator.
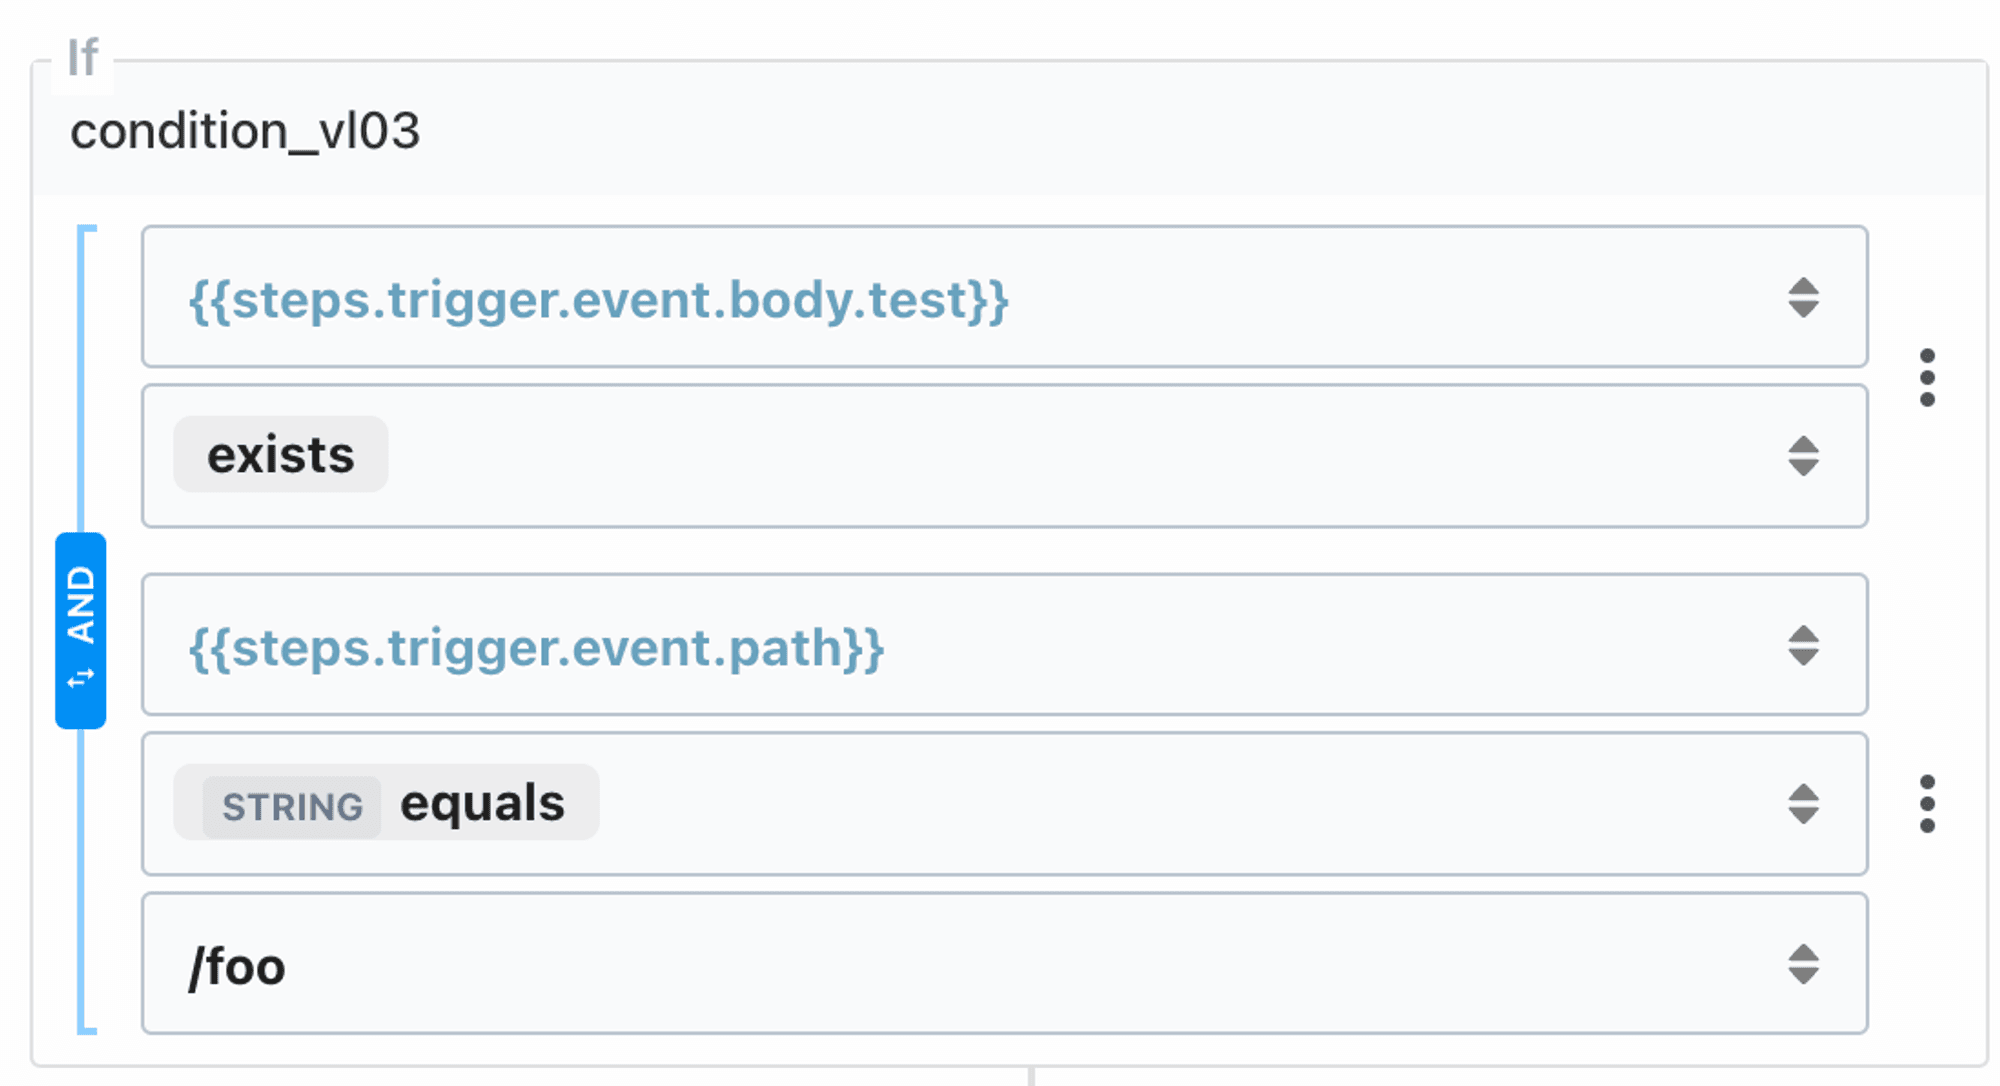 ### Test for multiple conditions using Groups
Create and manage groups using the menu options to “Add group”, “Make condition into group”, “Nest group” and “Remove group”.
### Test for multiple conditions using Groups
Create and manage groups using the menu options to “Add group”, “Make condition into group”, “Nest group” and “Remove group”.
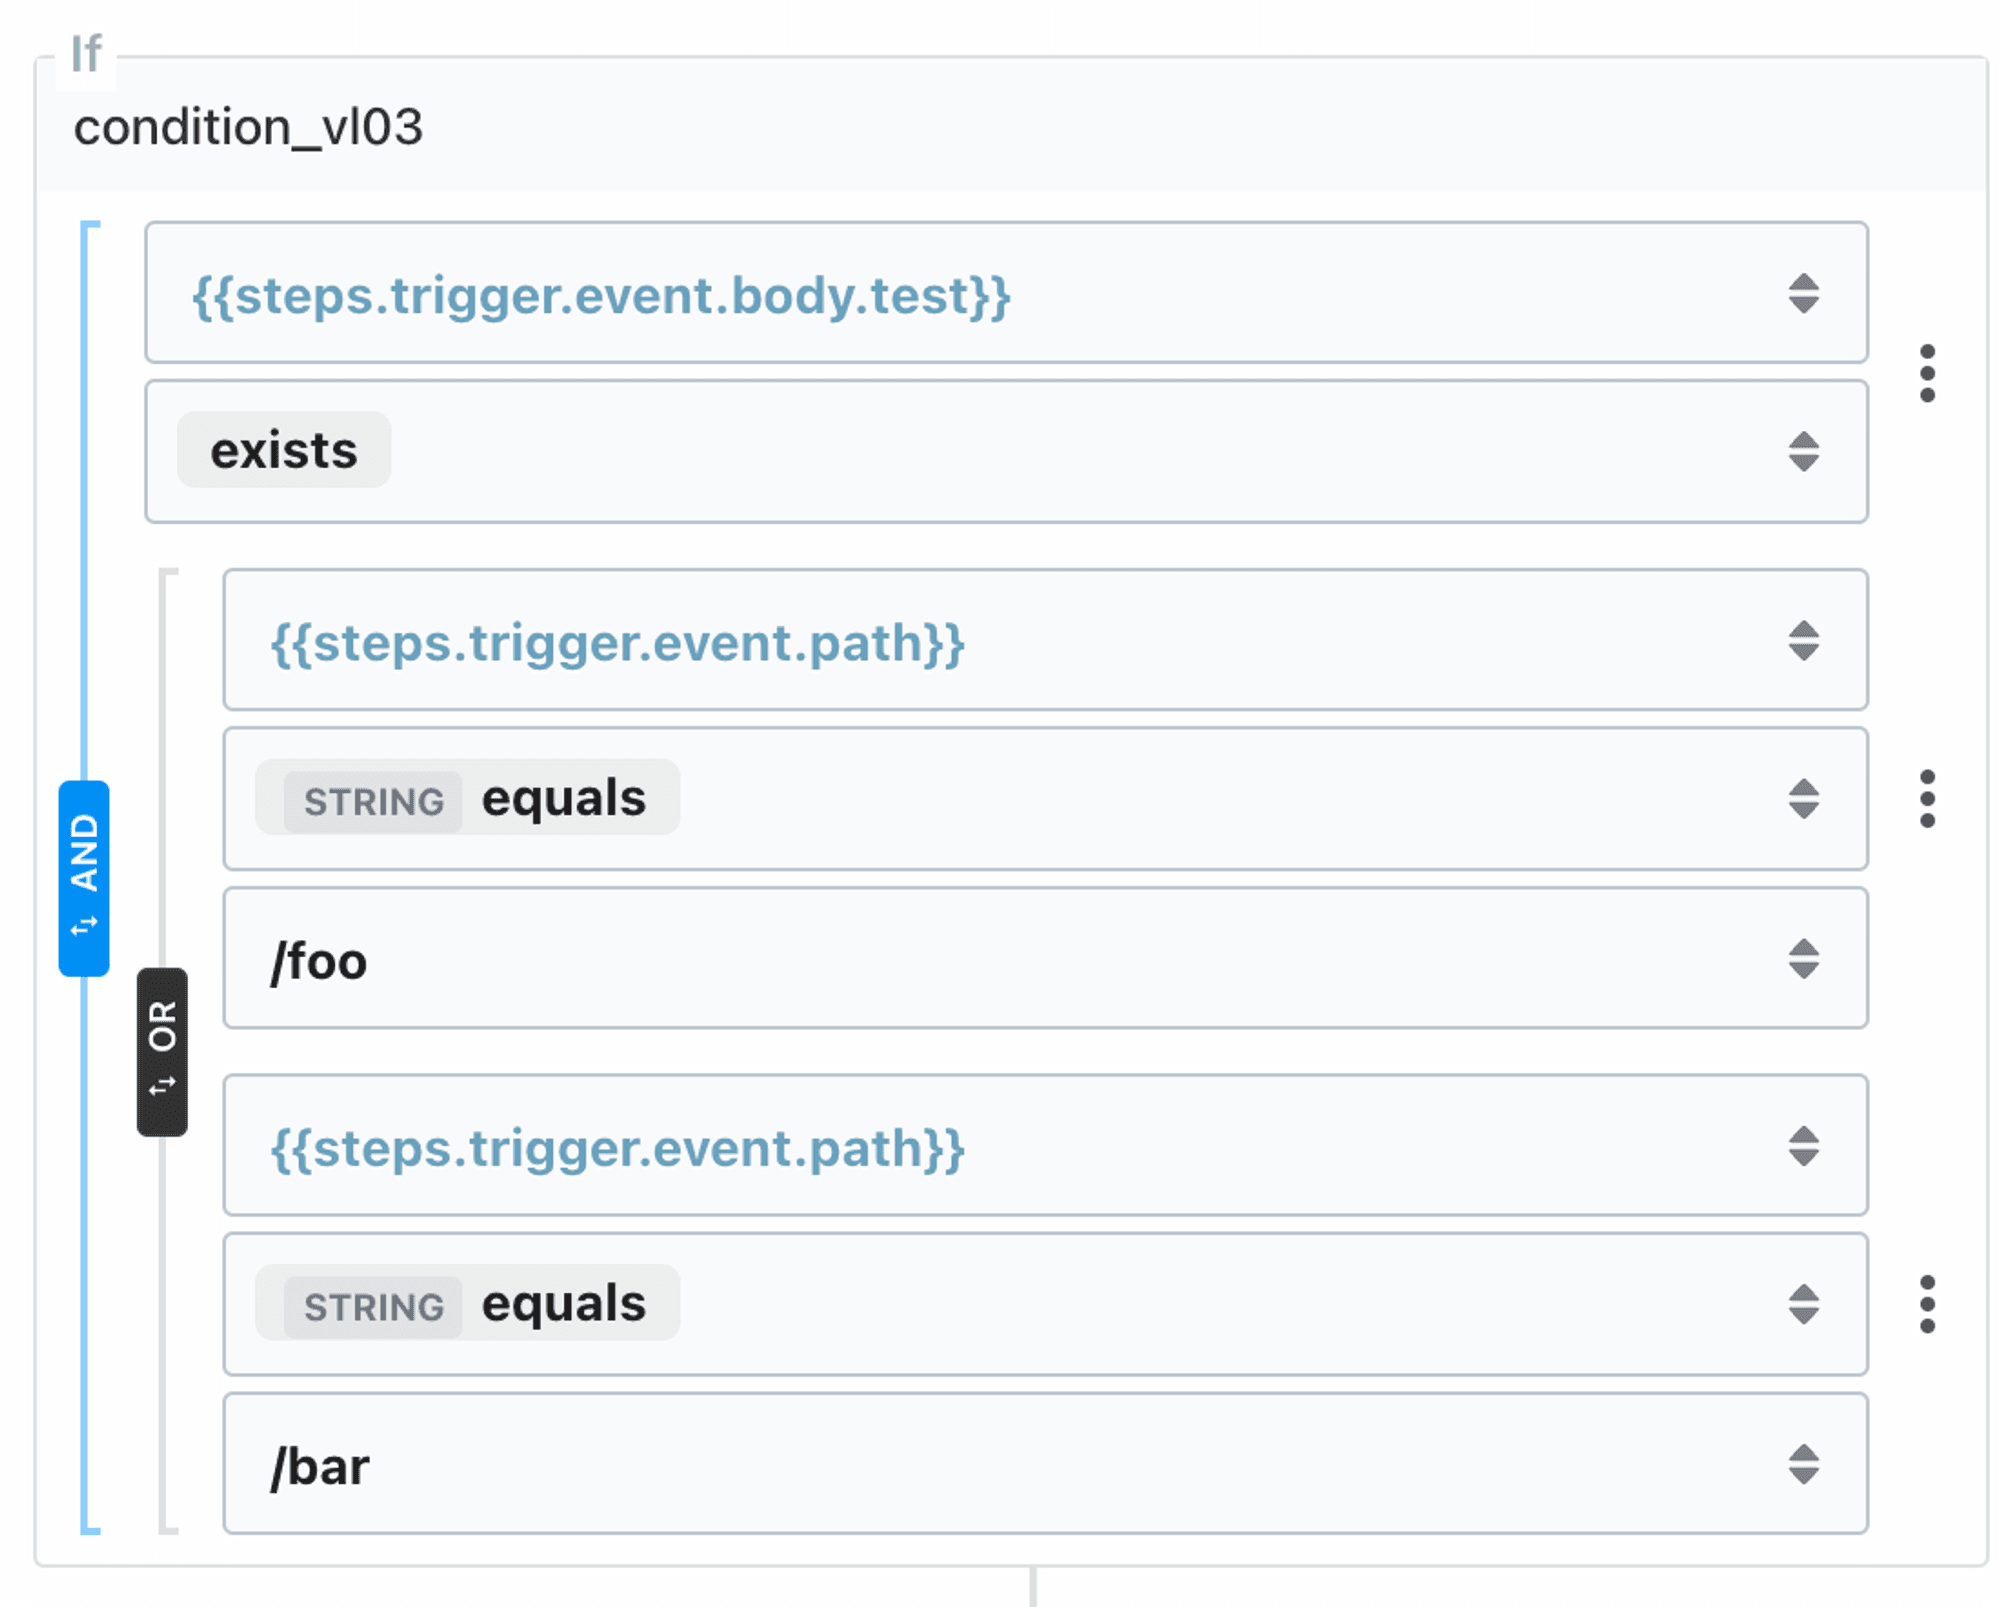 ### Supported Operators
* Exists
* Doesn’t exist
* String
* Equals
* Doesn’t equal
* Is blank
* Is not blank
* Starts with
* Contains
* Ends with
* Number
* Equals
* Does not equal
* Is greater than
* Is greater than or equal to
* Is less than
* Is less than or equal to
* Boolean (equals)
* Type checks
* Is null
* Is not null
* Is string
* Is not a string
* Is a number
* Is not a number
* Is a boolean
* Is not a boolean
* Value checks
* Is true
* Is false
# Delay
Source: https://pipedream.com/docs/workflows/building-workflows/control-flow/delay
export const DELAY_MIN_MAX_TIME = 'You can pause your workflow for as little as one millisecond, or as long as one year';
### Delay
Sometimes you need to wait a specific amount of time before the next step of your workflow proceeds. Pipedream supports this in one of two ways:
1. The built-in **Delay** actions
2. The `$.flow.delay` function in Node.js
{DELAY_MIN_MAX_TIME}. For example, we at Pipedream use this functionality to delay welcome emails to our customers until they’ve had a chance to use the product.
#### Delay actions
You can pause your workflow without writing code using the **Delay** actions:
1. Click the **+** button below any step
2. Search for the **Delay** app
3. Select the **Delay Workflow** action
4. Configure the action to delay any amount of time, up to one year
### Supported Operators
* Exists
* Doesn’t exist
* String
* Equals
* Doesn’t equal
* Is blank
* Is not blank
* Starts with
* Contains
* Ends with
* Number
* Equals
* Does not equal
* Is greater than
* Is greater than or equal to
* Is less than
* Is less than or equal to
* Boolean (equals)
* Type checks
* Is null
* Is not null
* Is string
* Is not a string
* Is a number
* Is not a number
* Is a boolean
* Is not a boolean
* Value checks
* Is true
* Is false
# Delay
Source: https://pipedream.com/docs/workflows/building-workflows/control-flow/delay
export const DELAY_MIN_MAX_TIME = 'You can pause your workflow for as little as one millisecond, or as long as one year';
### Delay
Sometimes you need to wait a specific amount of time before the next step of your workflow proceeds. Pipedream supports this in one of two ways:
1. The built-in **Delay** actions
2. The `$.flow.delay` function in Node.js
{DELAY_MIN_MAX_TIME}. For example, we at Pipedream use this functionality to delay welcome emails to our customers until they’ve had a chance to use the product.
#### Delay actions
You can pause your workflow without writing code using the **Delay** actions:
1. Click the **+** button below any step
2. Search for the **Delay** app
3. Select the **Delay Workflow** action
4. Configure the action to delay any amount of time, up to one year
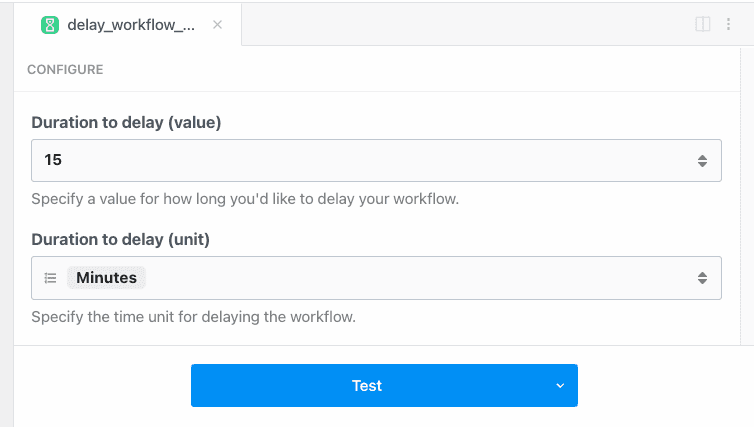 #### `$.flow.delay`
If you need to delay a workflow within Node.js code, or you need detailed control over how delays occur, [see the docs on `$.flow.delay`](/docs/workflows/building-workflows/code/nodejs/delay/).
#### The state of delayed executions
Delayed executions can hold one of three states:
* **Paused**: The execution is within the delay window, and the workflow is still paused
* **Resumed**: The workflow has been resumed at the end of its delay window automatically, or resumed manually
* **Cancelled**: The execution was cancelled manually
You’ll see the current state of an execution by [viewing its event data](/docs/workflows/building-workflows/inspect/).
#### Cancelling or resuming execution manually
The [**Delay** actions](/docs/workflows/building-workflows/control-flow/delay/#delay-actions) and [`$.flow.delay`](/docs/workflows/building-workflows/code/nodejs/delay/) return two URLs each time they run:
#### `$.flow.delay`
If you need to delay a workflow within Node.js code, or you need detailed control over how delays occur, [see the docs on `$.flow.delay`](/docs/workflows/building-workflows/code/nodejs/delay/).
#### The state of delayed executions
Delayed executions can hold one of three states:
* **Paused**: The execution is within the delay window, and the workflow is still paused
* **Resumed**: The workflow has been resumed at the end of its delay window automatically, or resumed manually
* **Cancelled**: The execution was cancelled manually
You’ll see the current state of an execution by [viewing its event data](/docs/workflows/building-workflows/inspect/).
#### Cancelling or resuming execution manually
The [**Delay** actions](/docs/workflows/building-workflows/control-flow/delay/#delay-actions) and [`$.flow.delay`](/docs/workflows/building-workflows/code/nodejs/delay/) return two URLs each time they run:
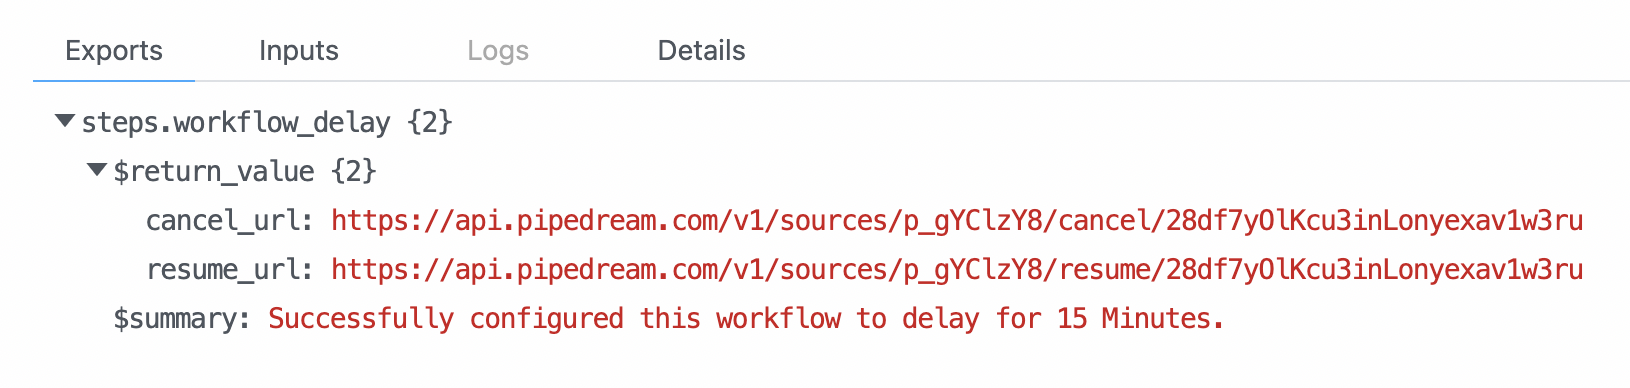 These URLs are specific to a single execution of your workflow. While the workflow is paused, you can load these in your browser or send an HTTP request to either:
* Hitting the `cancel_url` will immediately cancel that execution
* Hitting the `resume_url` will immediately resume that execution early
If you use [`$.flow.delay`](/docs/workflows/building-workflows/code/nodejs/delay/), you can send these URLs to your own system to handle cancellation / resumption. You can even email your customers to let them cancel / resume workflows that run on their behalf.
# End Workflow
Source: https://pipedream.com/docs/workflows/building-workflows/control-flow/end-workflow
To terminate the workflow prior to the last step, use the **End Workflow** pre-built action or `$.flow.exit()` in code.
These URLs are specific to a single execution of your workflow. While the workflow is paused, you can load these in your browser or send an HTTP request to either:
* Hitting the `cancel_url` will immediately cancel that execution
* Hitting the `resume_url` will immediately resume that execution early
If you use [`$.flow.delay`](/docs/workflows/building-workflows/code/nodejs/delay/), you can send these URLs to your own system to handle cancellation / resumption. You can even email your customers to let them cancel / resume workflows that run on their behalf.
# End Workflow
Source: https://pipedream.com/docs/workflows/building-workflows/control-flow/end-workflow
To terminate the workflow prior to the last step, use the **End Workflow** pre-built action or `$.flow.exit()` in code.
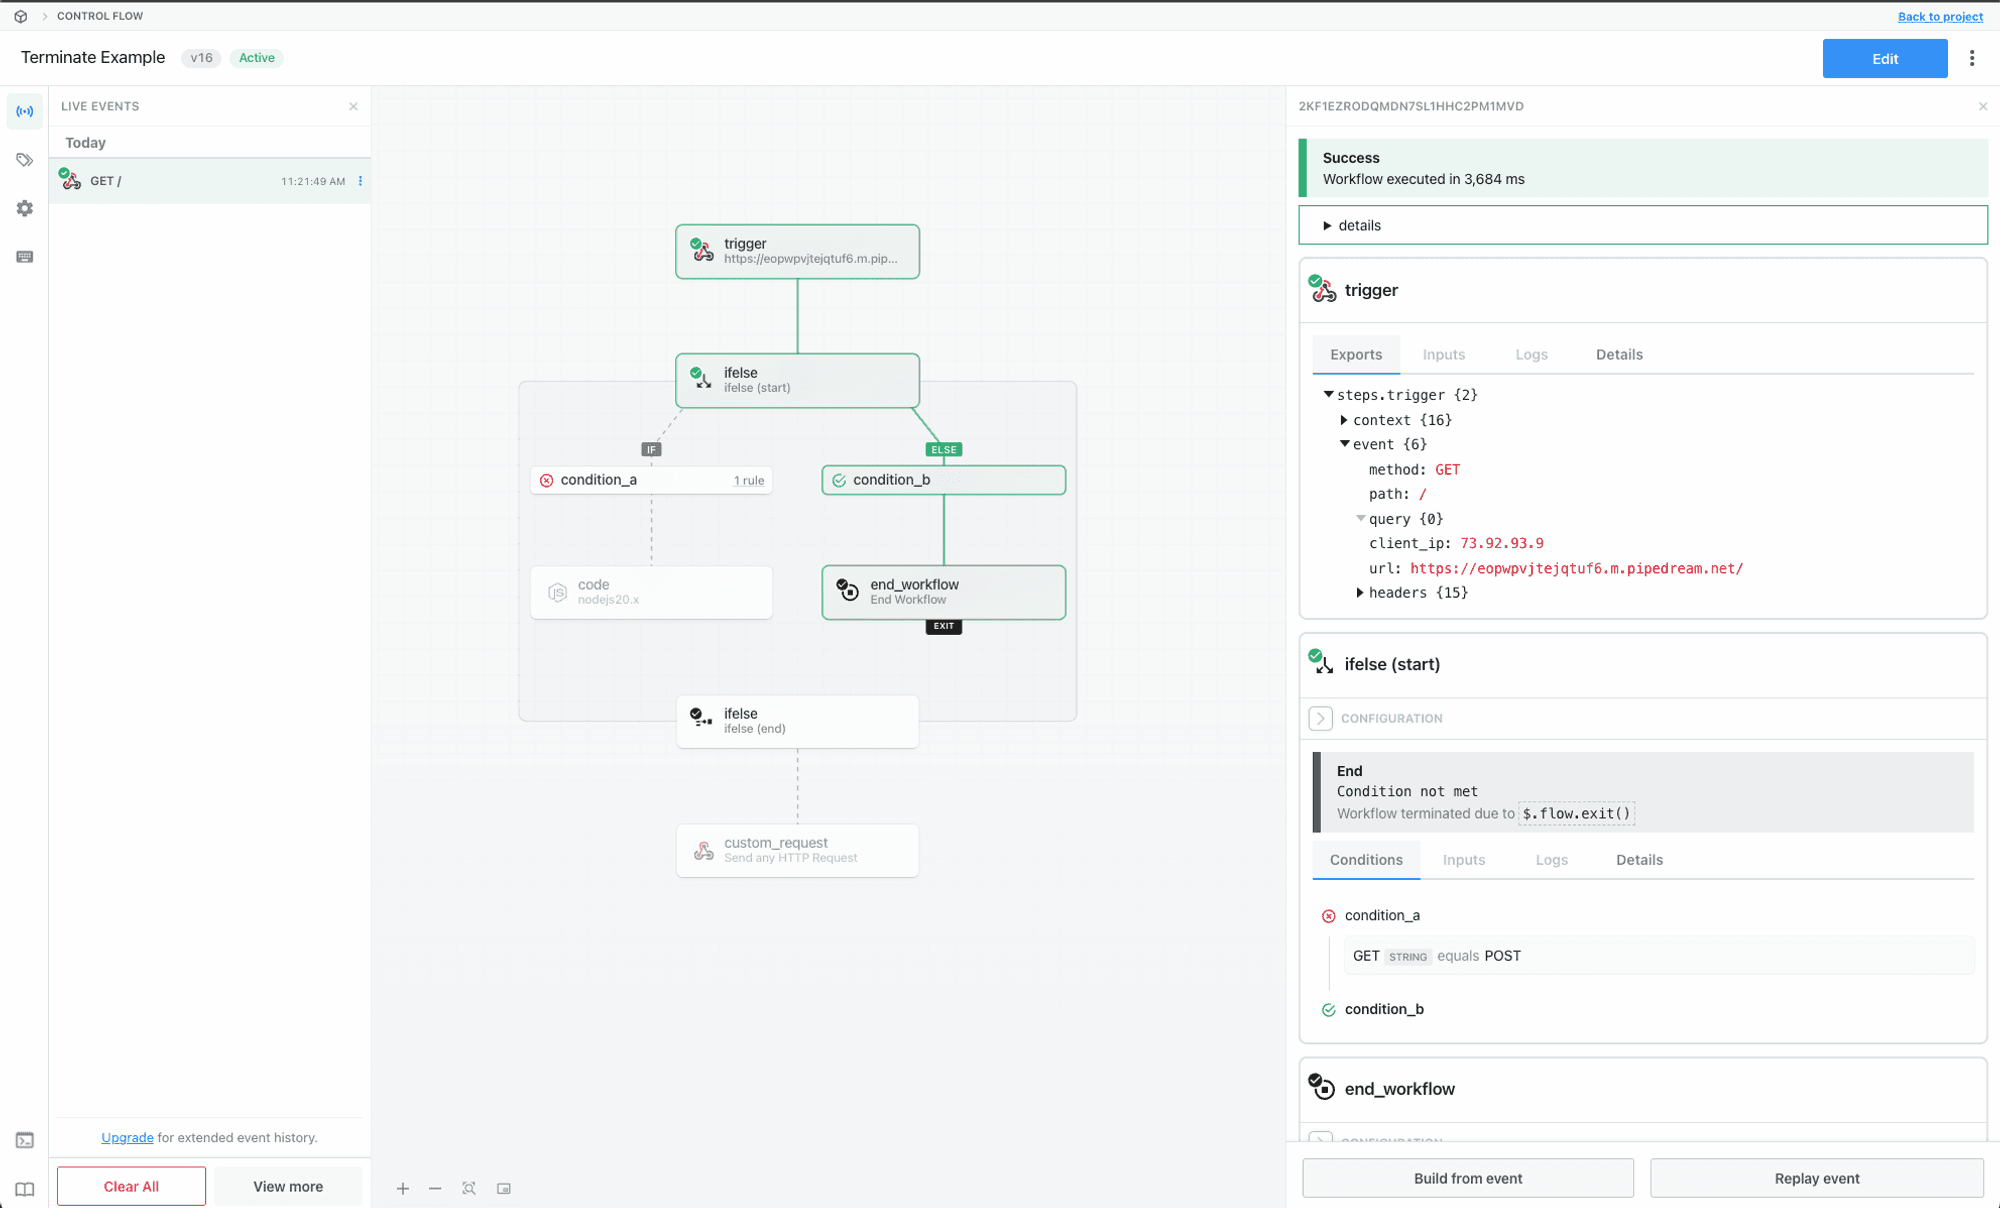 ## End Workflow Using a Pre-Built Action
* Select and configure the End Workflow action from the step selector
* When the step runs, the workflow execution will stop
* You may configure an optional reason for ending the workflow execution. This reason will be surfaced when inspecting the event execution.
## End Workflow Using a Pre-Built Action
* Select and configure the End Workflow action from the step selector
* When the step runs, the workflow execution will stop
* You may configure an optional reason for ending the workflow execution. This reason will be surfaced when inspecting the event execution.
 ## End Workflow in Code
Check the reference for your preferred language to learn how to end the workflow execution in code.
* [Ending a workflow in Node.js](/docs/workflows/building-workflows/code/nodejs/#ending-a-workflow-early)
* [Ending a workflow in Python](/docs/workflows/building-workflows/code/python/#ending-a-workflow-early)
# Filter
Source: https://pipedream.com/docs/workflows/building-workflows/control-flow/filter
### Filter
Use the Filter action to quickly stop or continue workflows on certain conditions.
## End Workflow in Code
Check the reference for your preferred language to learn how to end the workflow execution in code.
* [Ending a workflow in Node.js](/docs/workflows/building-workflows/code/nodejs/#ending-a-workflow-early)
* [Ending a workflow in Python](/docs/workflows/building-workflows/code/python/#ending-a-workflow-early)
# Filter
Source: https://pipedream.com/docs/workflows/building-workflows/control-flow/filter
### Filter
Use the Filter action to quickly stop or continue workflows on certain conditions.
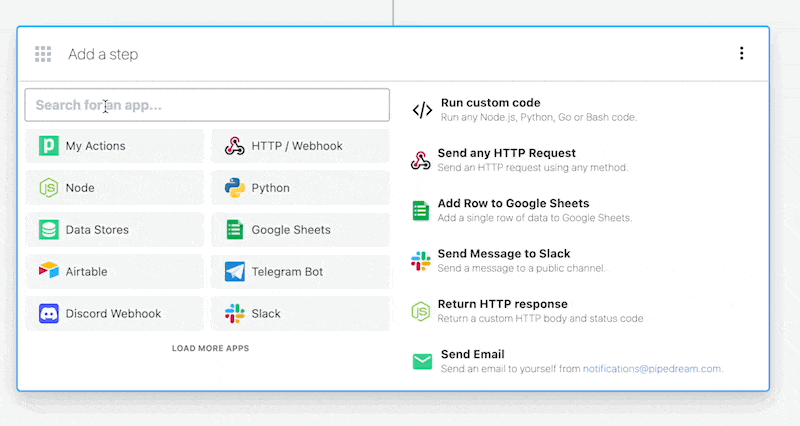 Add a filter action to your workflow by searching for the **Filter** app in a new step.
The **Filter** app includes several built-in actions: Continue Workflow on Condition, Exit Workflow on Condition and Exit Workflow on Custom Condition.
In each of these actions, the **Value** is the subject of the condition, and the **Condition** is the operand to compare the value against.
For example, to only process orders with a `status = ready`
#### Continue Workflow on Condition
With this action, only when values that *pass* a set condition will the workflow continue to execute steps after this filter.
# If/Else
Source: https://pipedream.com/docs/workflows/building-workflows/control-flow/ifelse
## Overview
**If/Else** is single path branching operator. You can create multiple execution branches, but Pipedream will execute the **first** branch that matches the configured rules. **The order in which rules are defined will affect the path of execution.**
If/Else operator is useful when you need to branch based on the value of **multiple input variables**. You must define both the input variable and condition to evaluate for every rule. If you only need to test for the value of a **single input variable** (e.g., if you are branching based on the path of an inbound request), the [Switch operator](/docs/workflows/building-workflows/control-flow/switch/) may be a better choice.
Add a filter action to your workflow by searching for the **Filter** app in a new step.
The **Filter** app includes several built-in actions: Continue Workflow on Condition, Exit Workflow on Condition and Exit Workflow on Custom Condition.
In each of these actions, the **Value** is the subject of the condition, and the **Condition** is the operand to compare the value against.
For example, to only process orders with a `status = ready`
#### Continue Workflow on Condition
With this action, only when values that *pass* a set condition will the workflow continue to execute steps after this filter.
# If/Else
Source: https://pipedream.com/docs/workflows/building-workflows/control-flow/ifelse
## Overview
**If/Else** is single path branching operator. You can create multiple execution branches, but Pipedream will execute the **first** branch that matches the configured rules. **The order in which rules are defined will affect the path of execution.**
If/Else operator is useful when you need to branch based on the value of **multiple input variables**. You must define both the input variable and condition to evaluate for every rule. If you only need to test for the value of a **single input variable** (e.g., if you are branching based on the path of an inbound request), the [Switch operator](/docs/workflows/building-workflows/control-flow/switch/) may be a better choice.
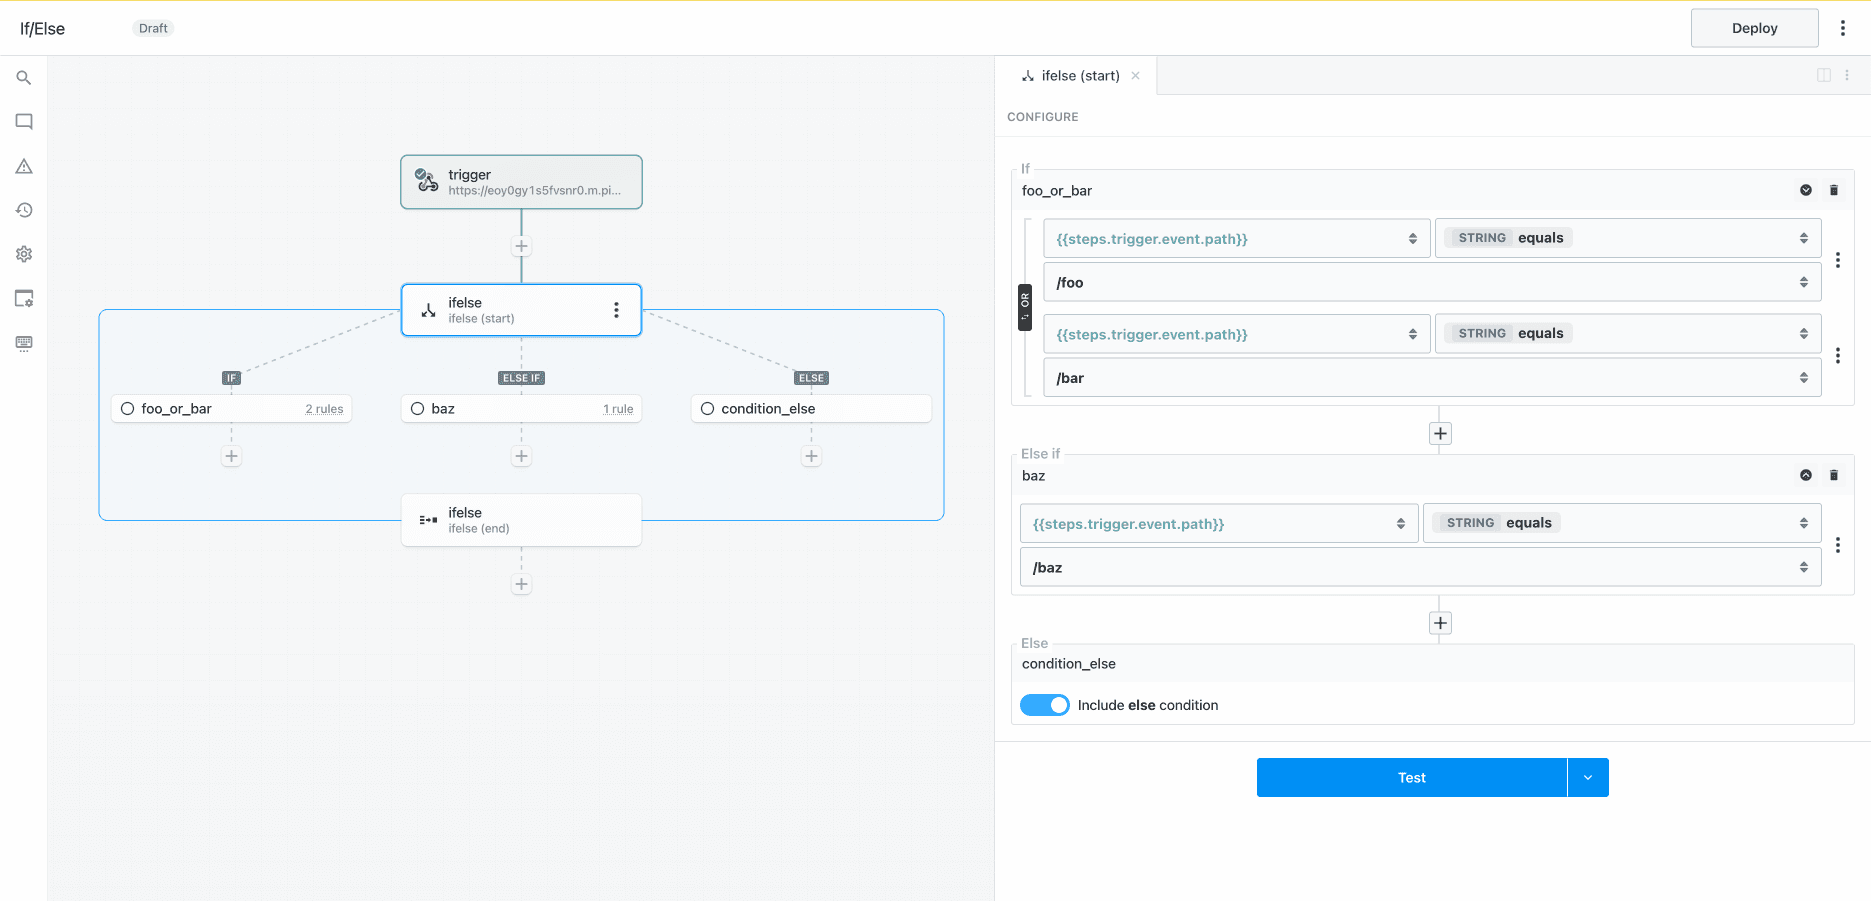 ## Capabilities
* Define rules to conditionally execute one of many branches
* Evaluate one or more expressions for each condition (use boolean operators to combine muliple rules)
* Use the **Else** condition as a fallback
* Merge and continue execution in the parent flow after the branching operation
## Capabilities
* Define rules to conditionally execute one of many branches
* Evaluate one or more expressions for each condition (use boolean operators to combine muliple rules)
* Use the **Else** condition as a fallback
* Merge and continue execution in the parent flow after the branching operation
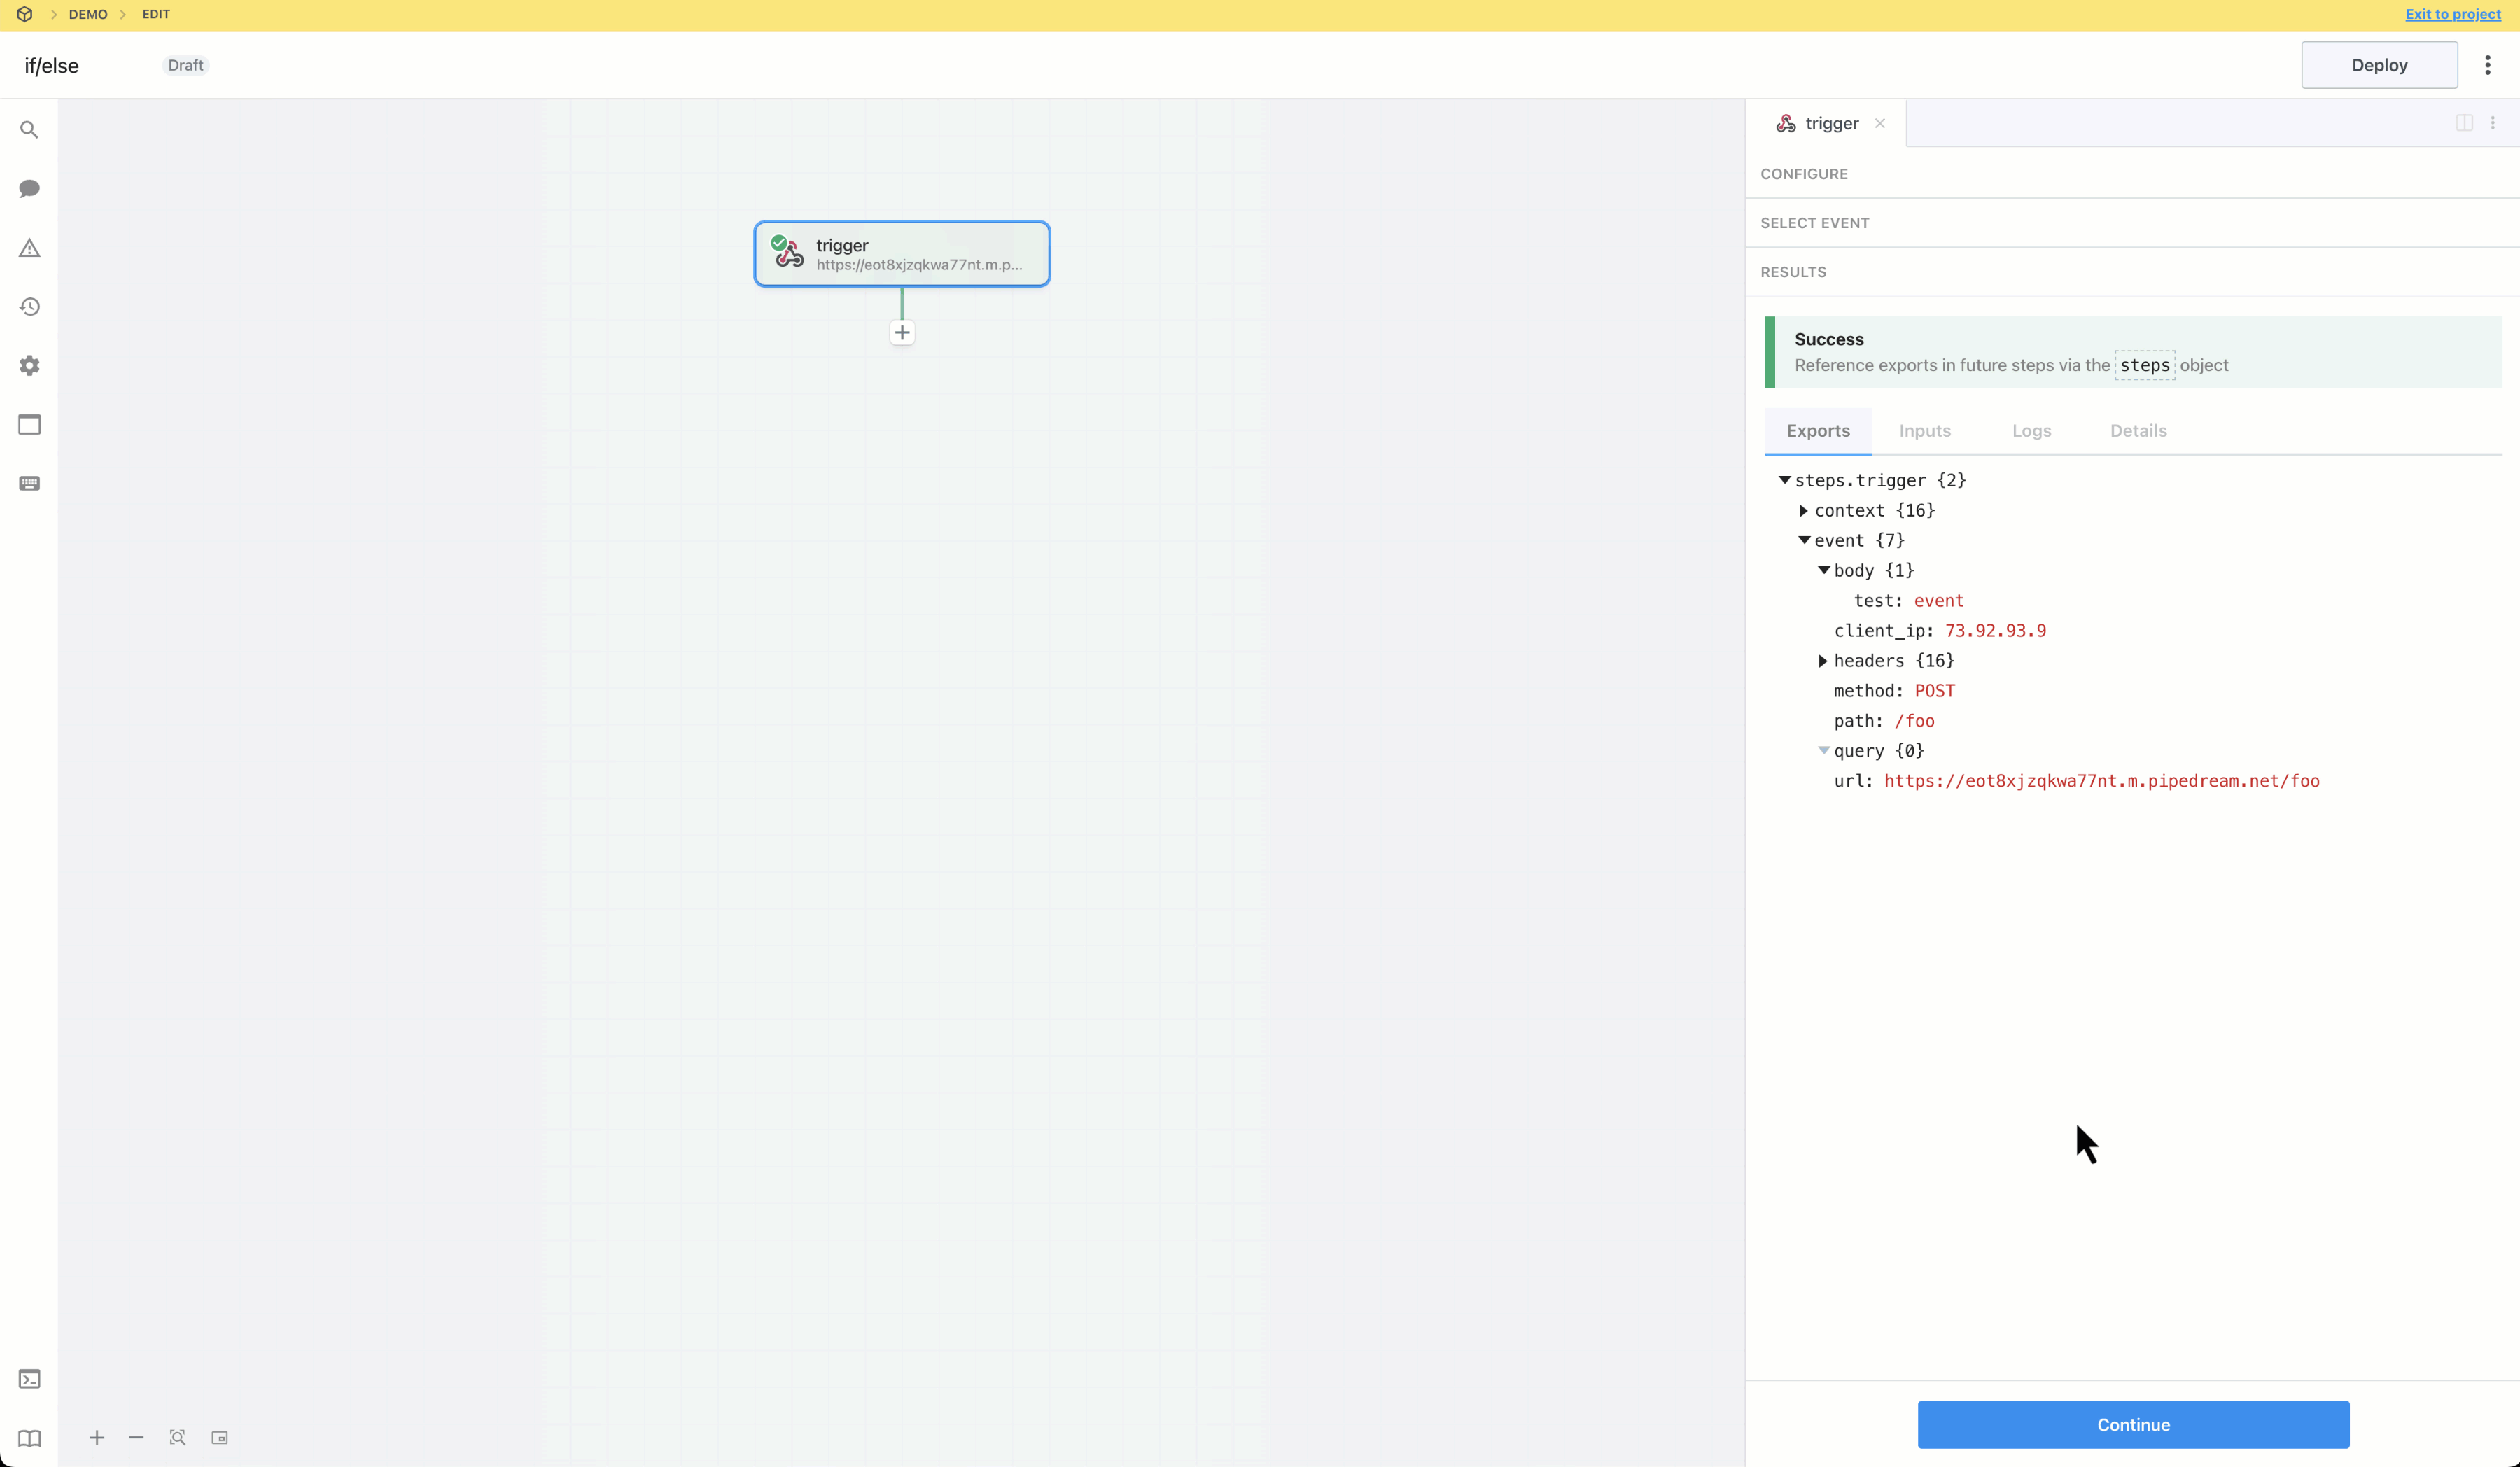
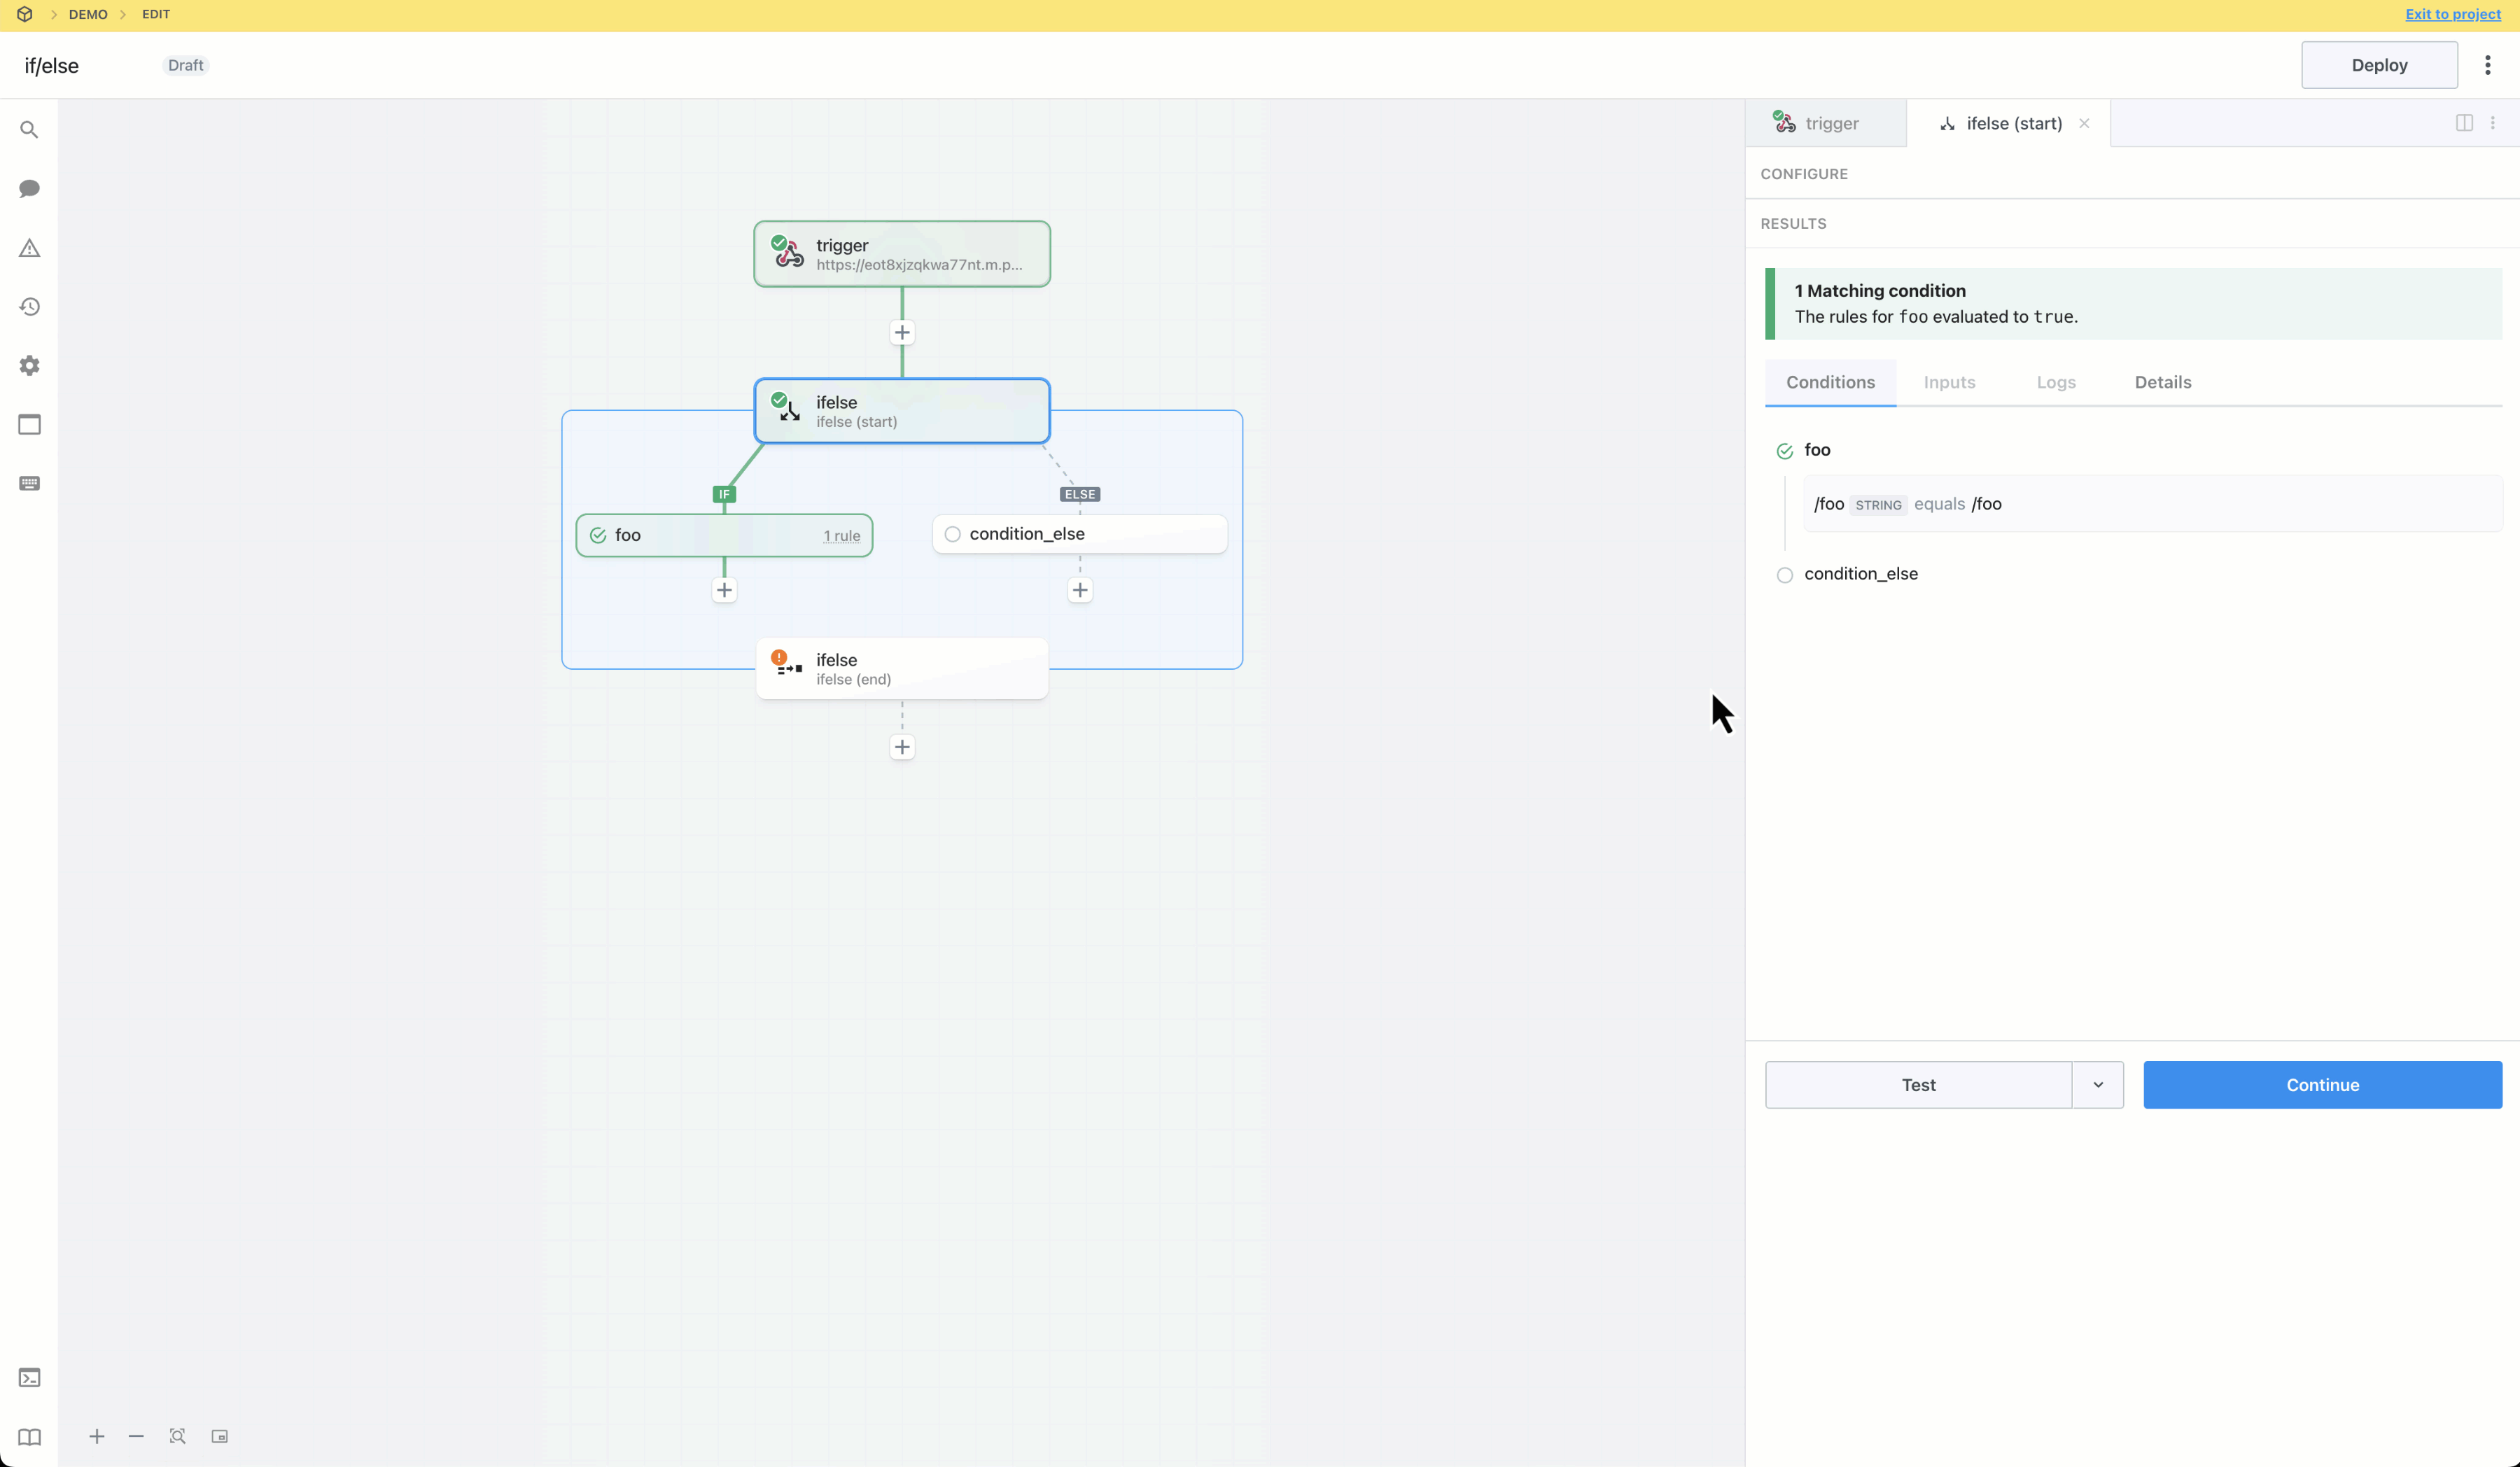
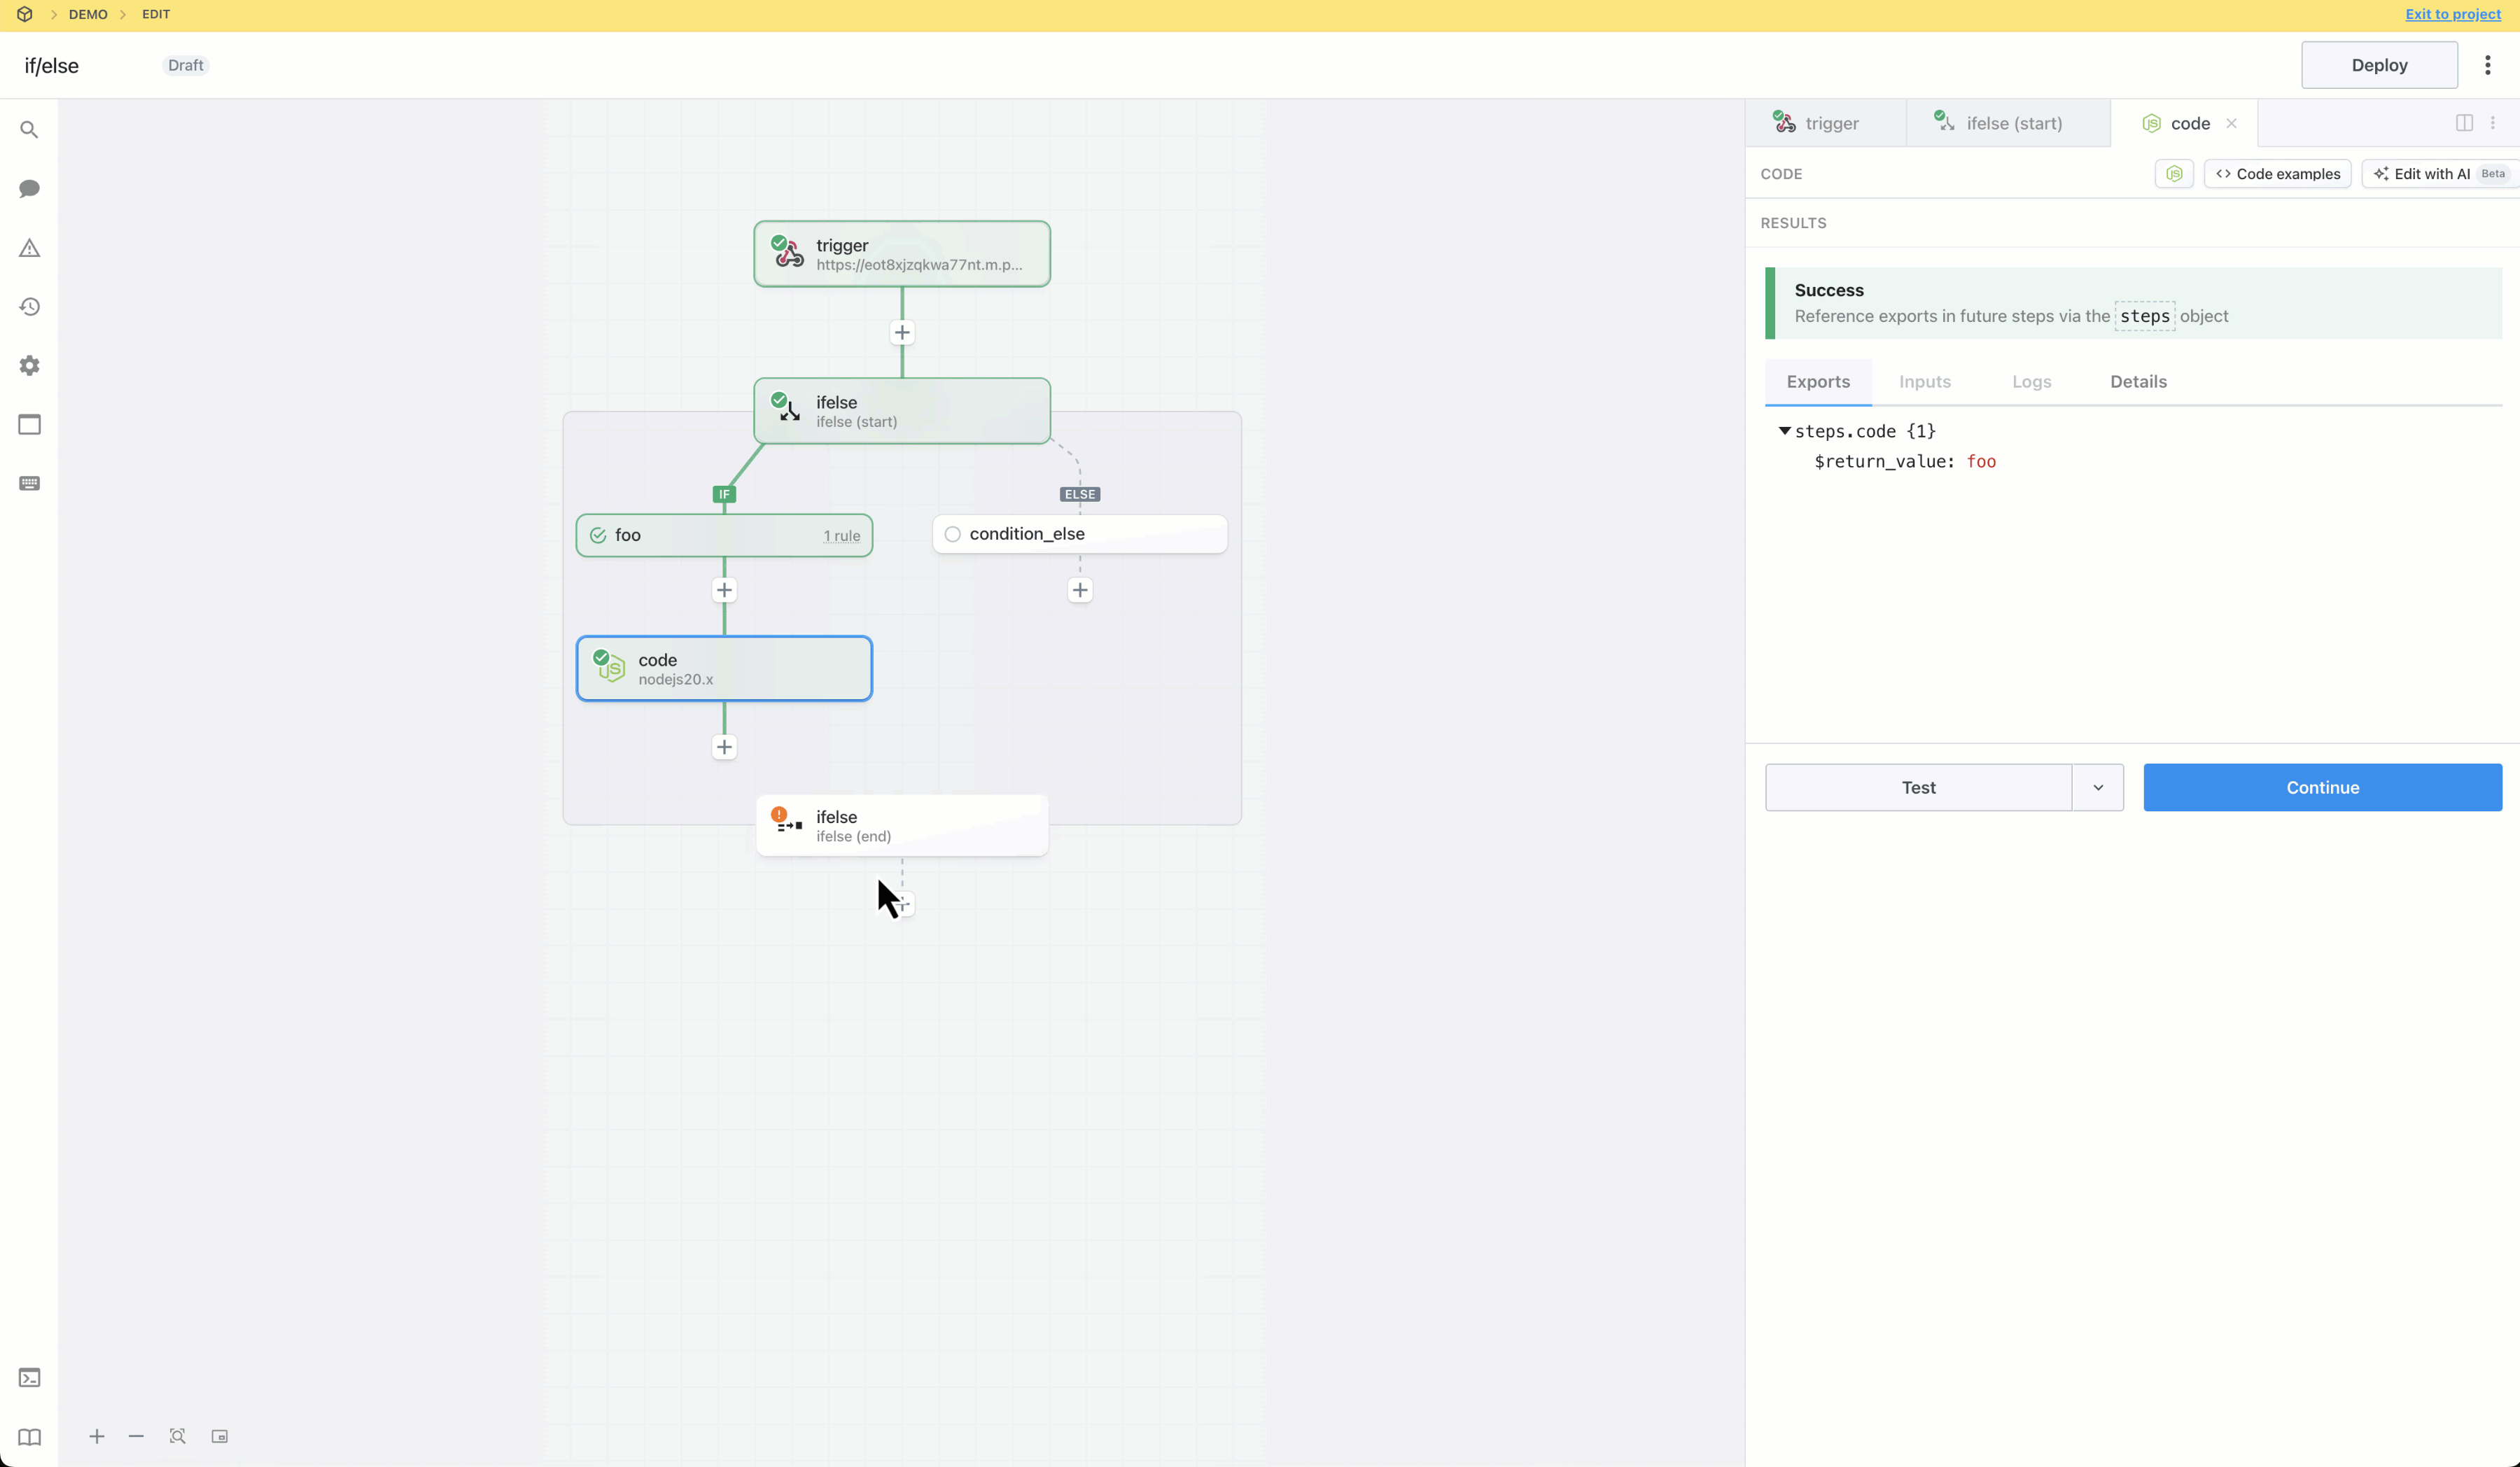 Add a step and reference the exports from `ifelse` using the steps object.
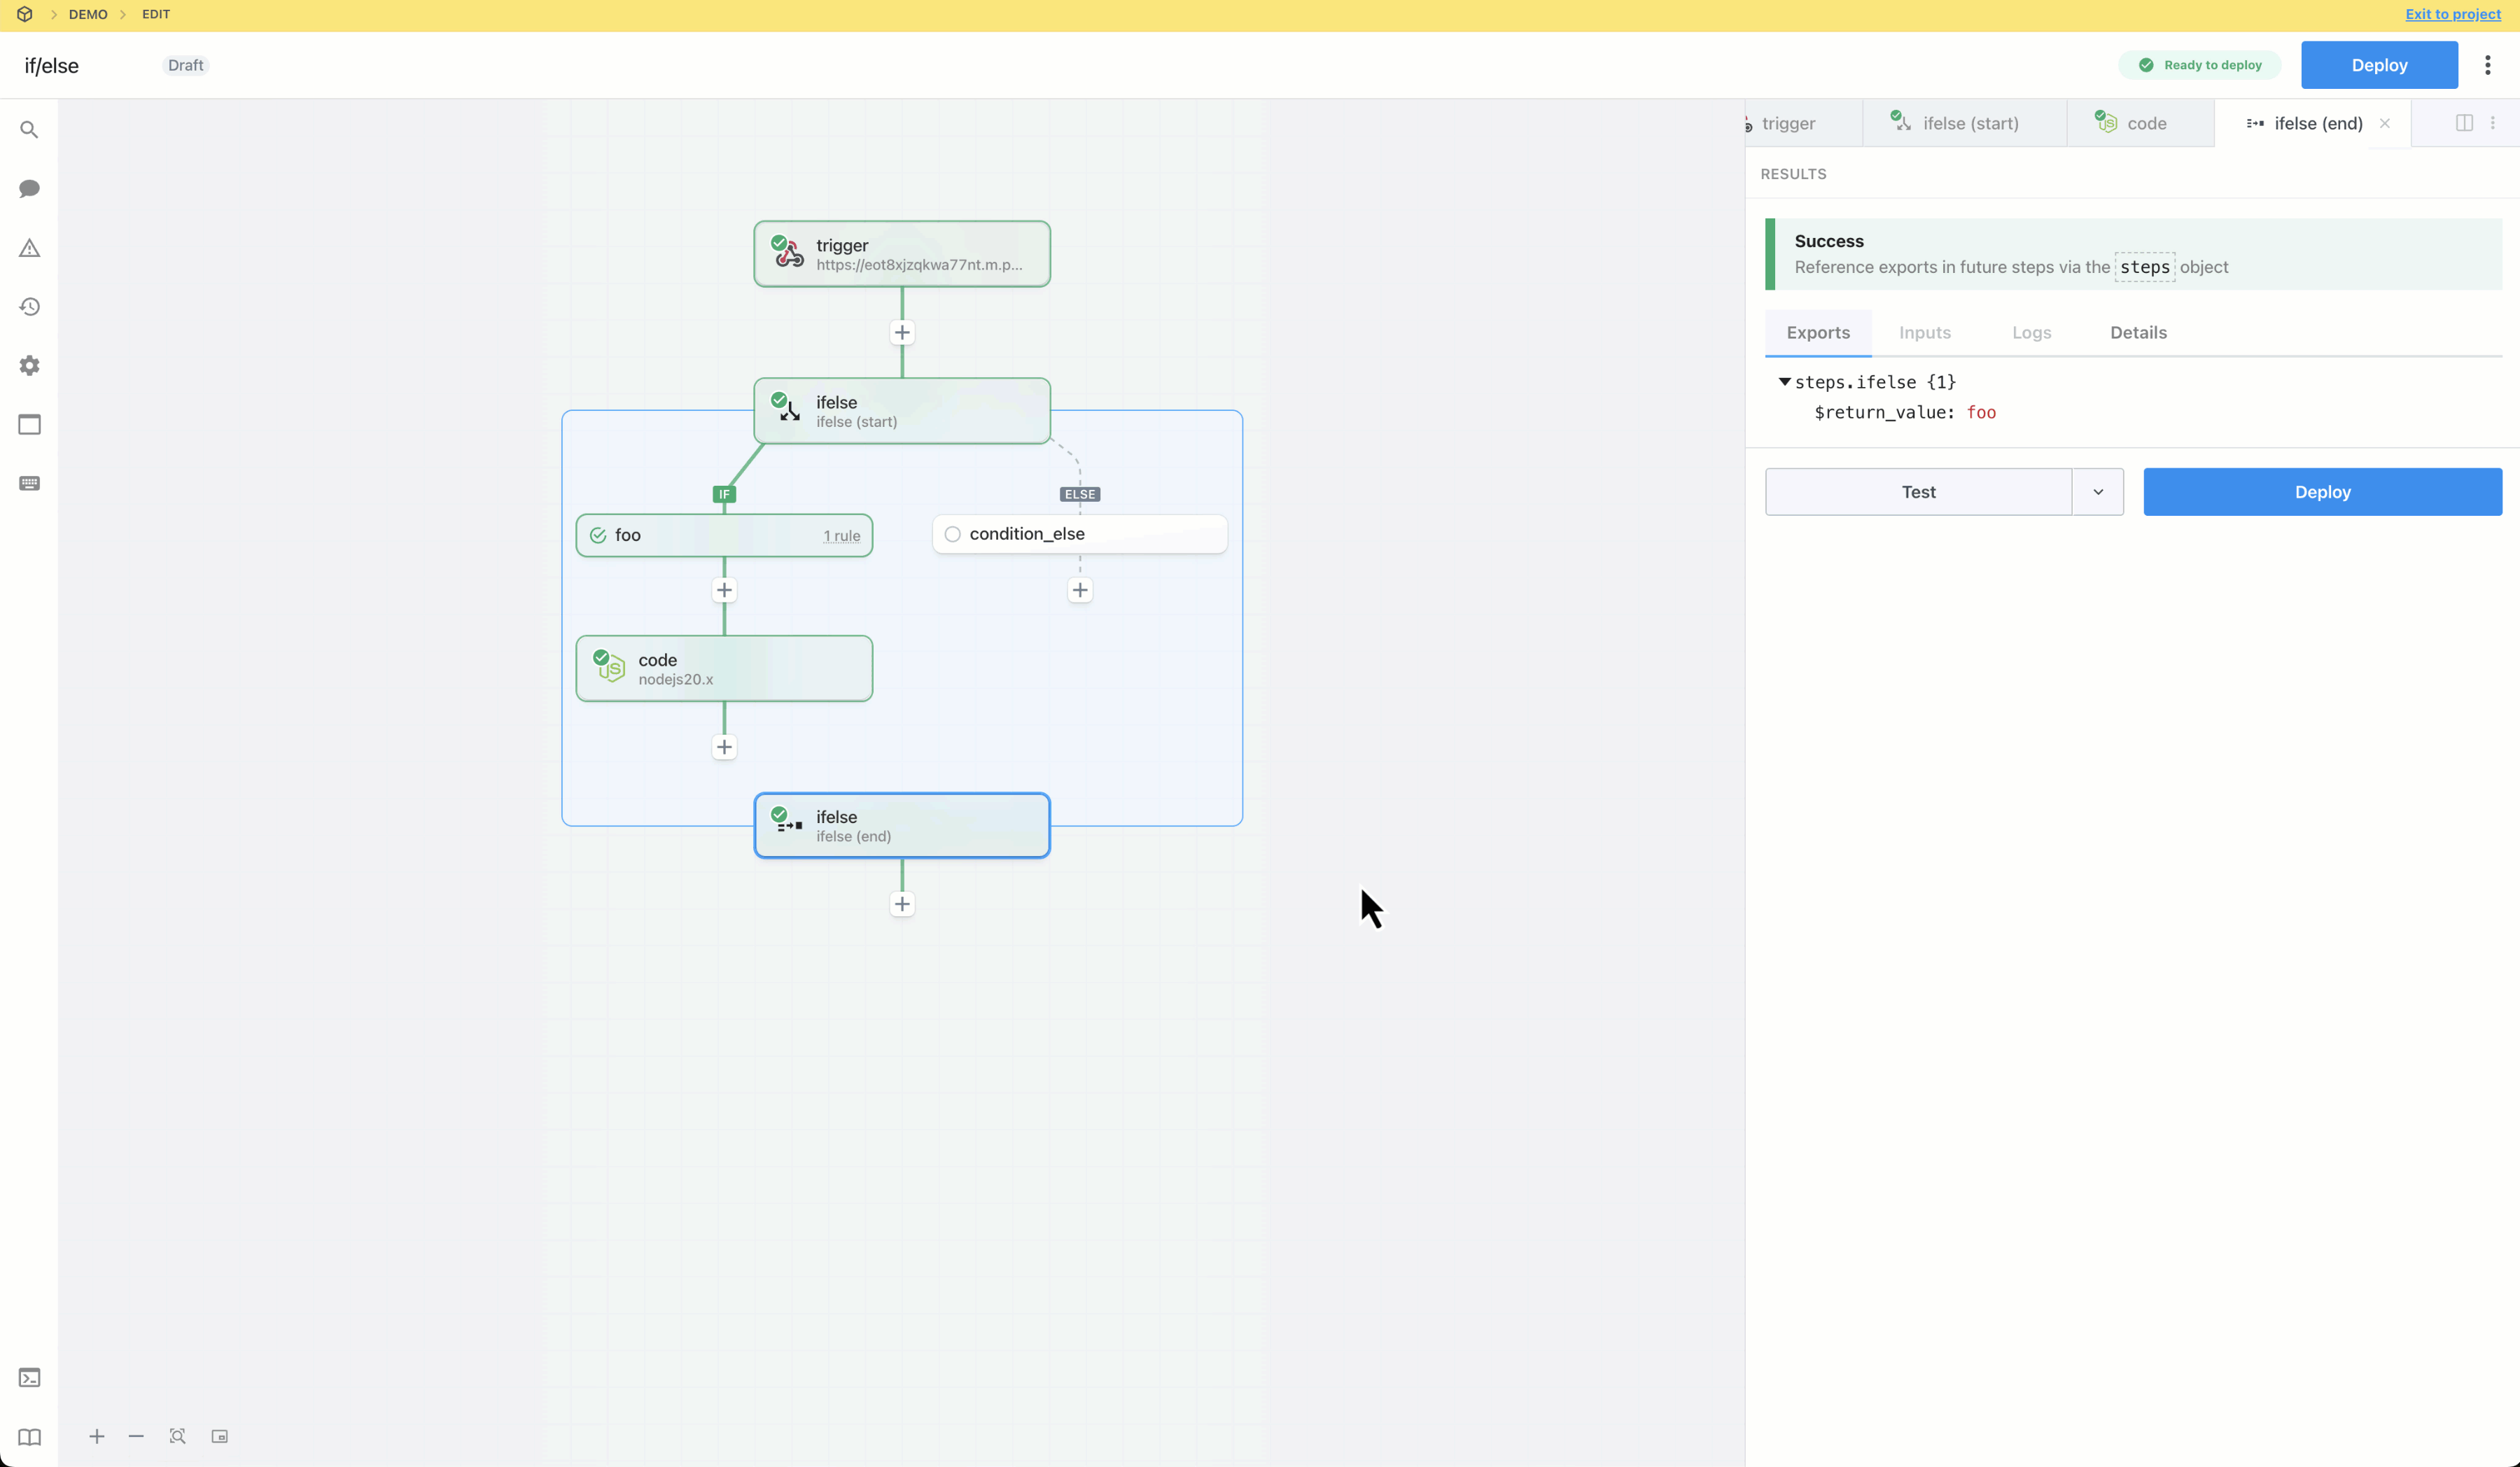
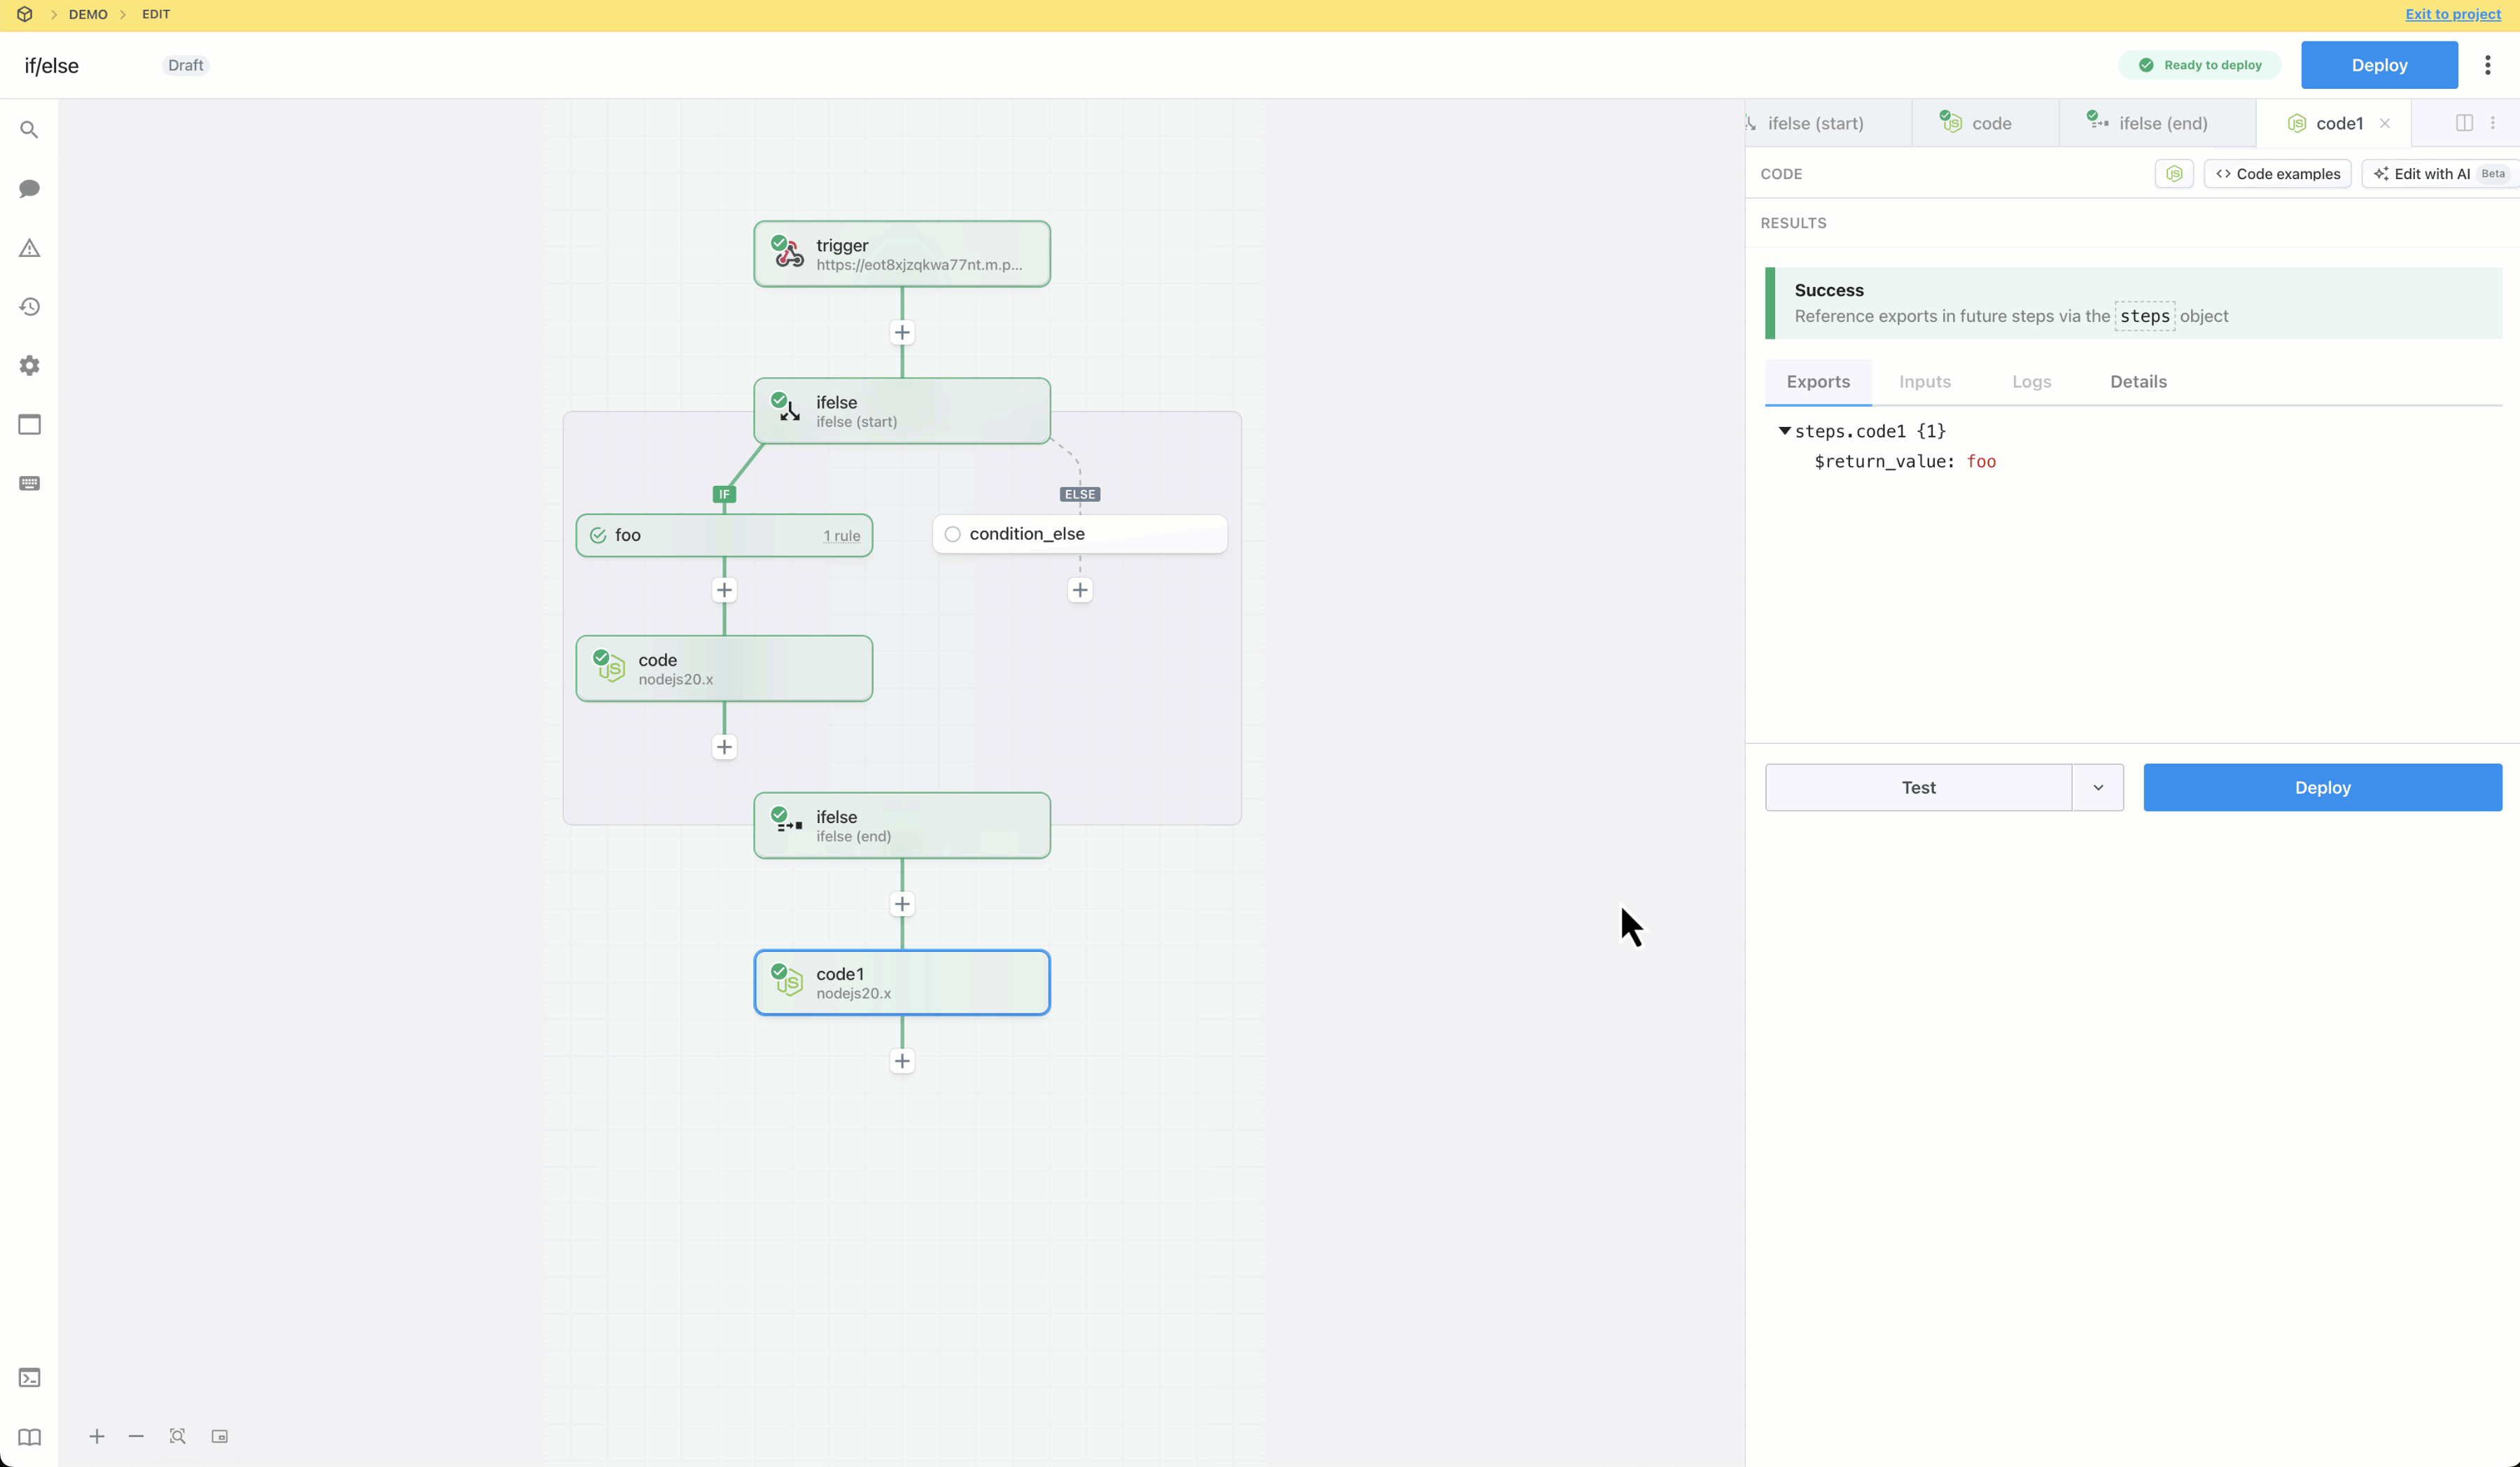 Build, test and deploy the workflow.
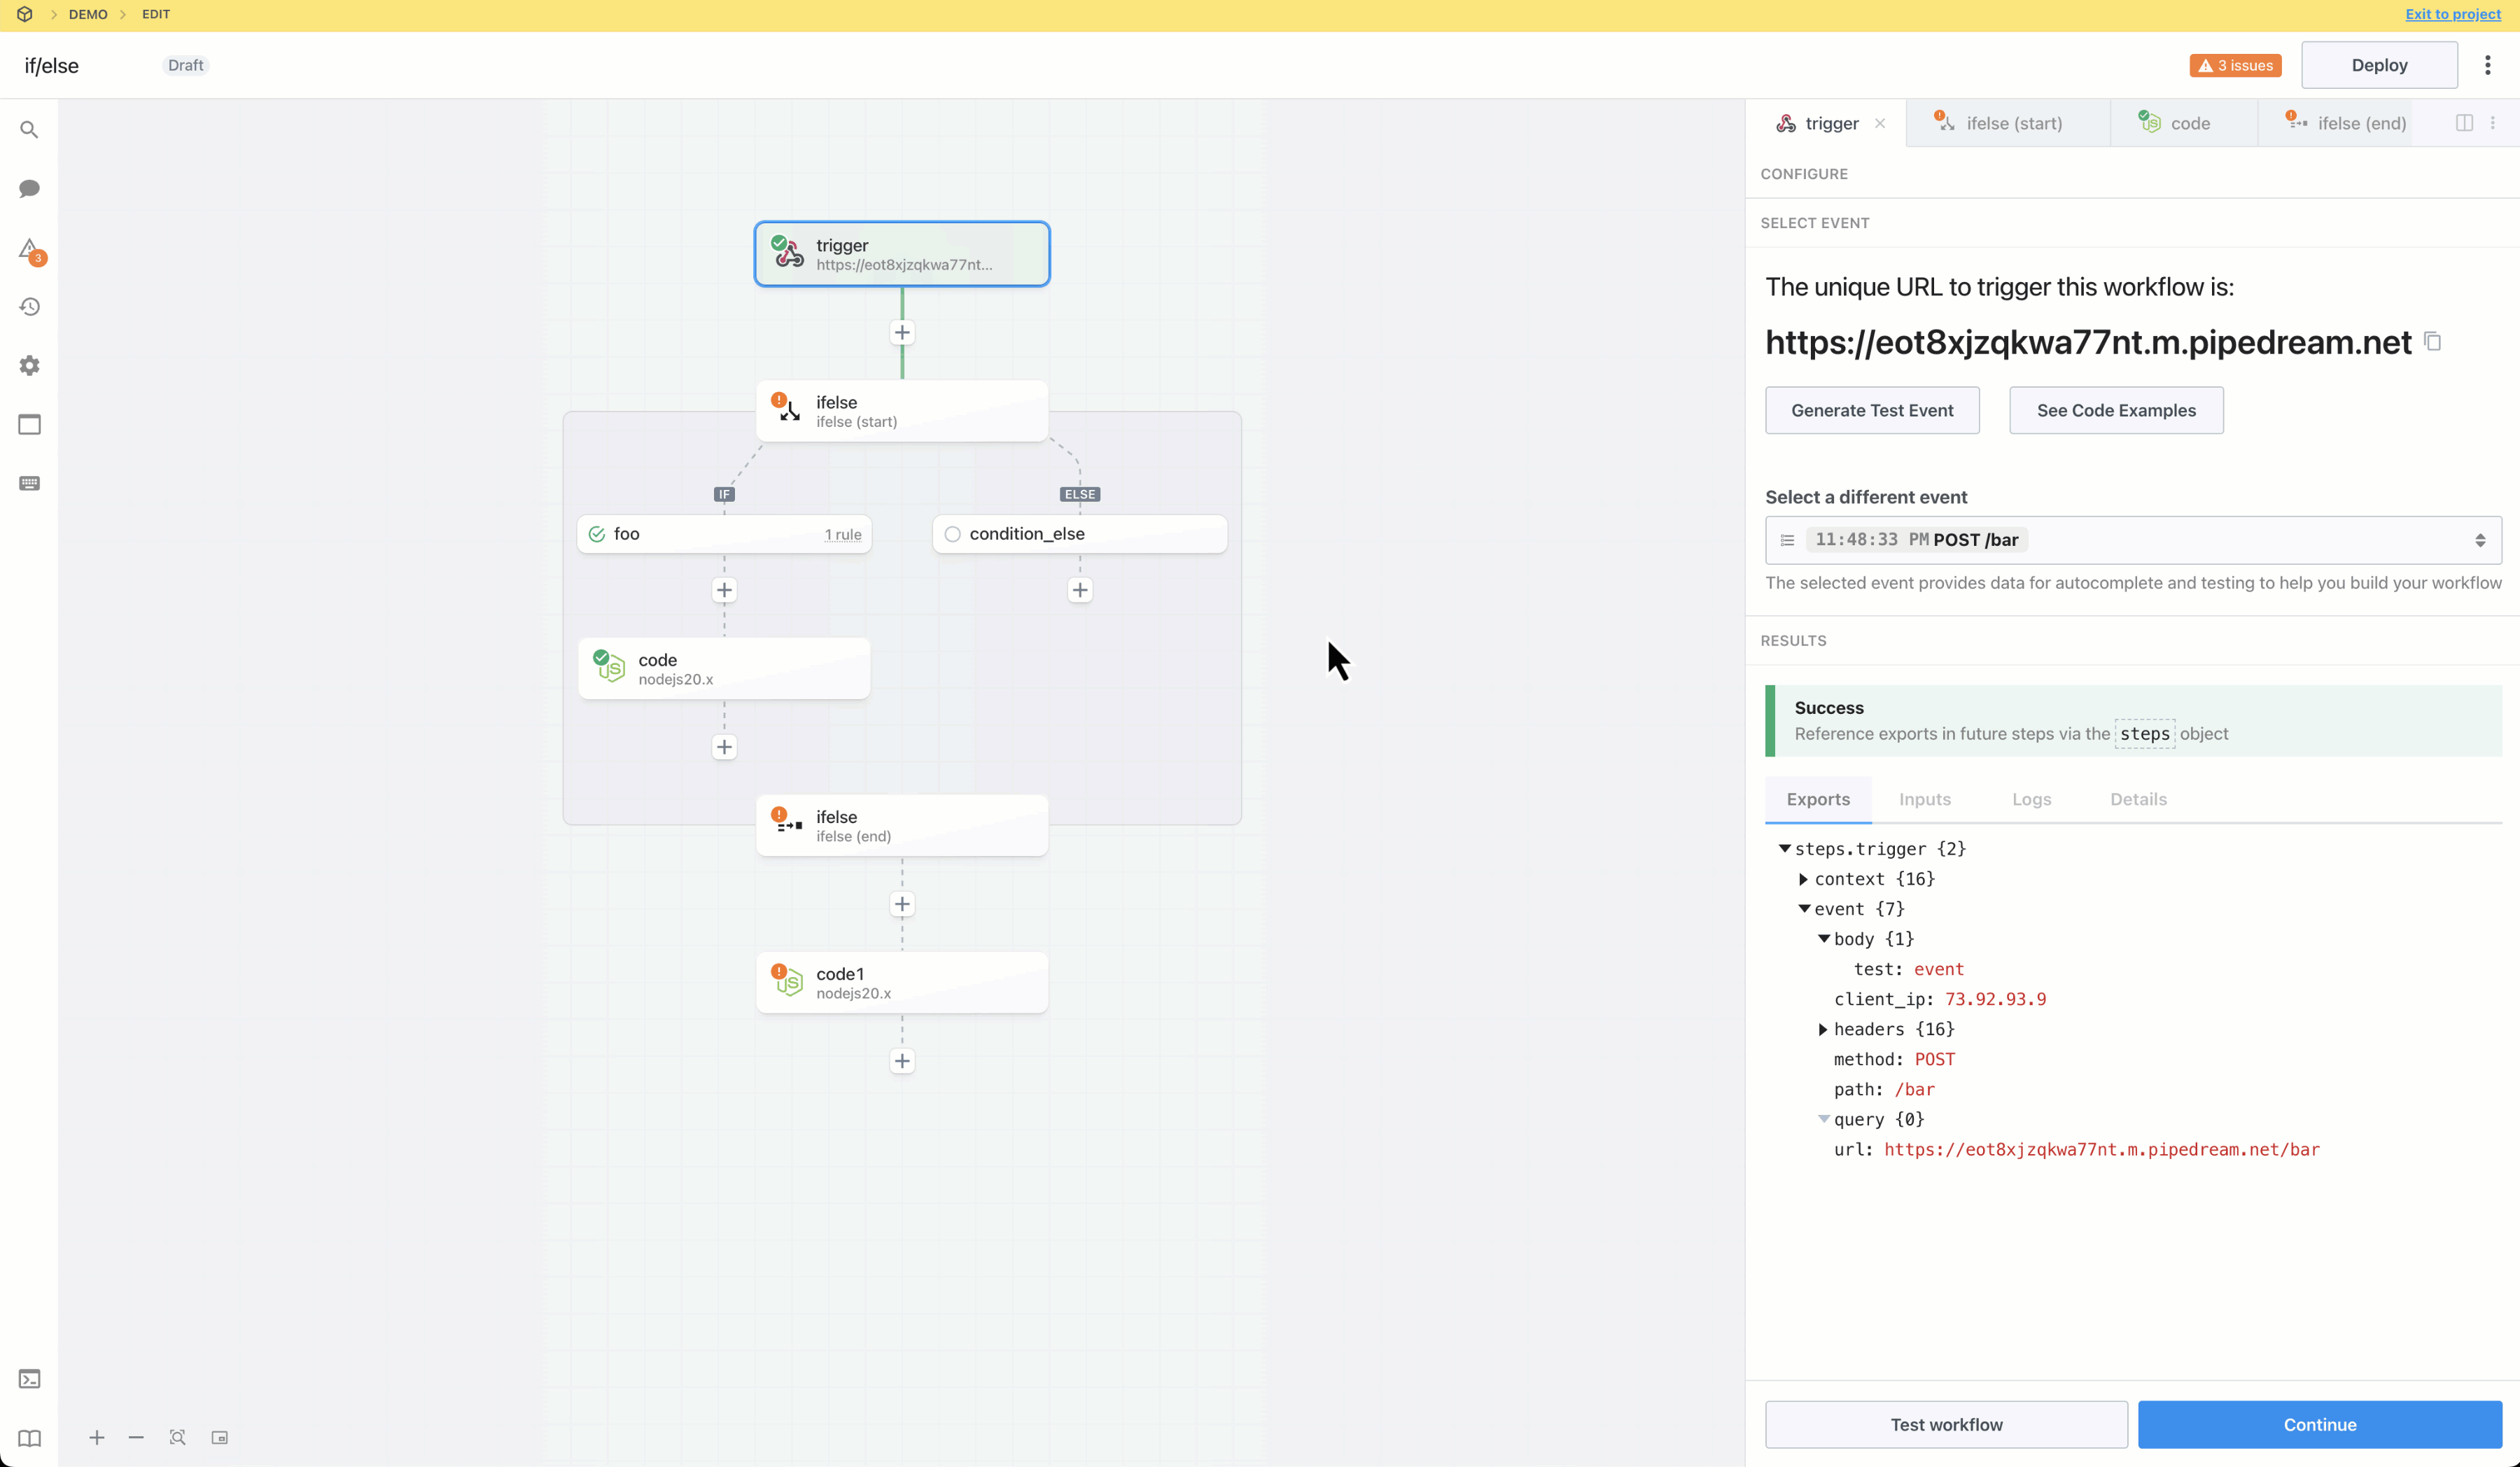

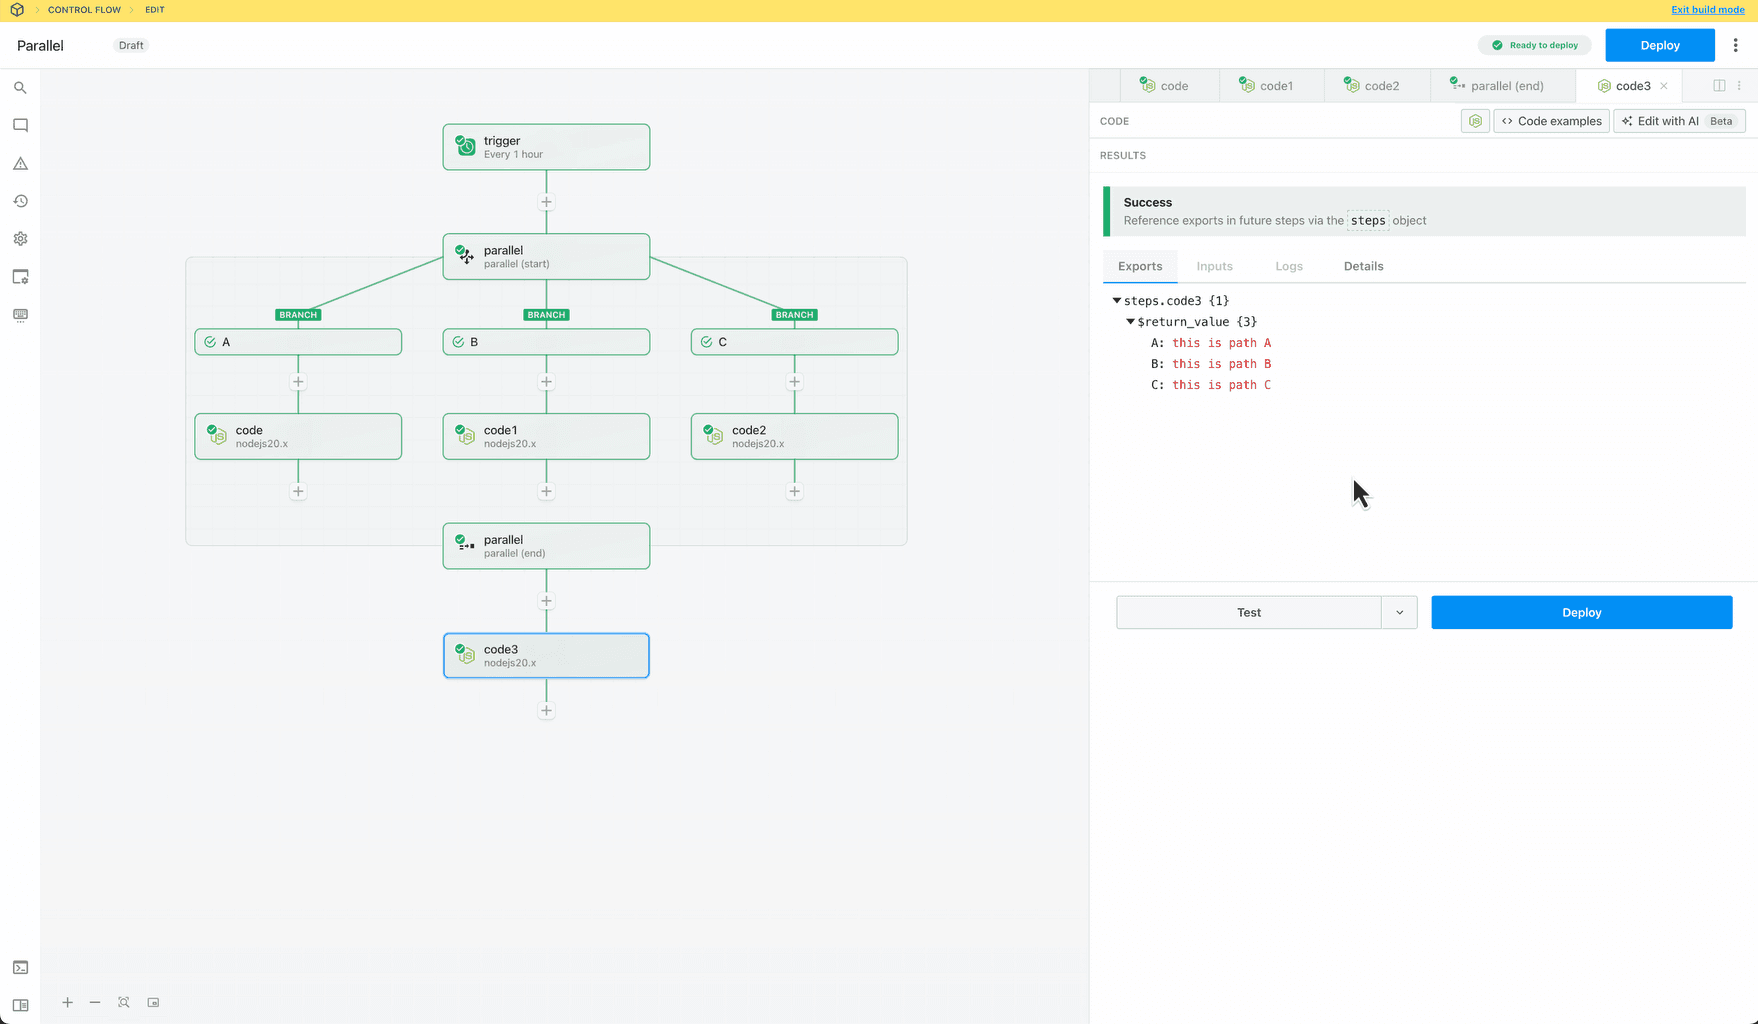 ## Capabilities
* Create non-linear workflows that execute steps in parallel branches
* Define when branches run — always, conditionally or never (to disable a branch)
* Merge and continue execution in the parent flow after the branching operation
## Capabilities
* Create non-linear workflows that execute steps in parallel branches
* Define when branches run — always, conditionally or never (to disable a branch)
* Merge and continue execution in the parent flow after the branching operation
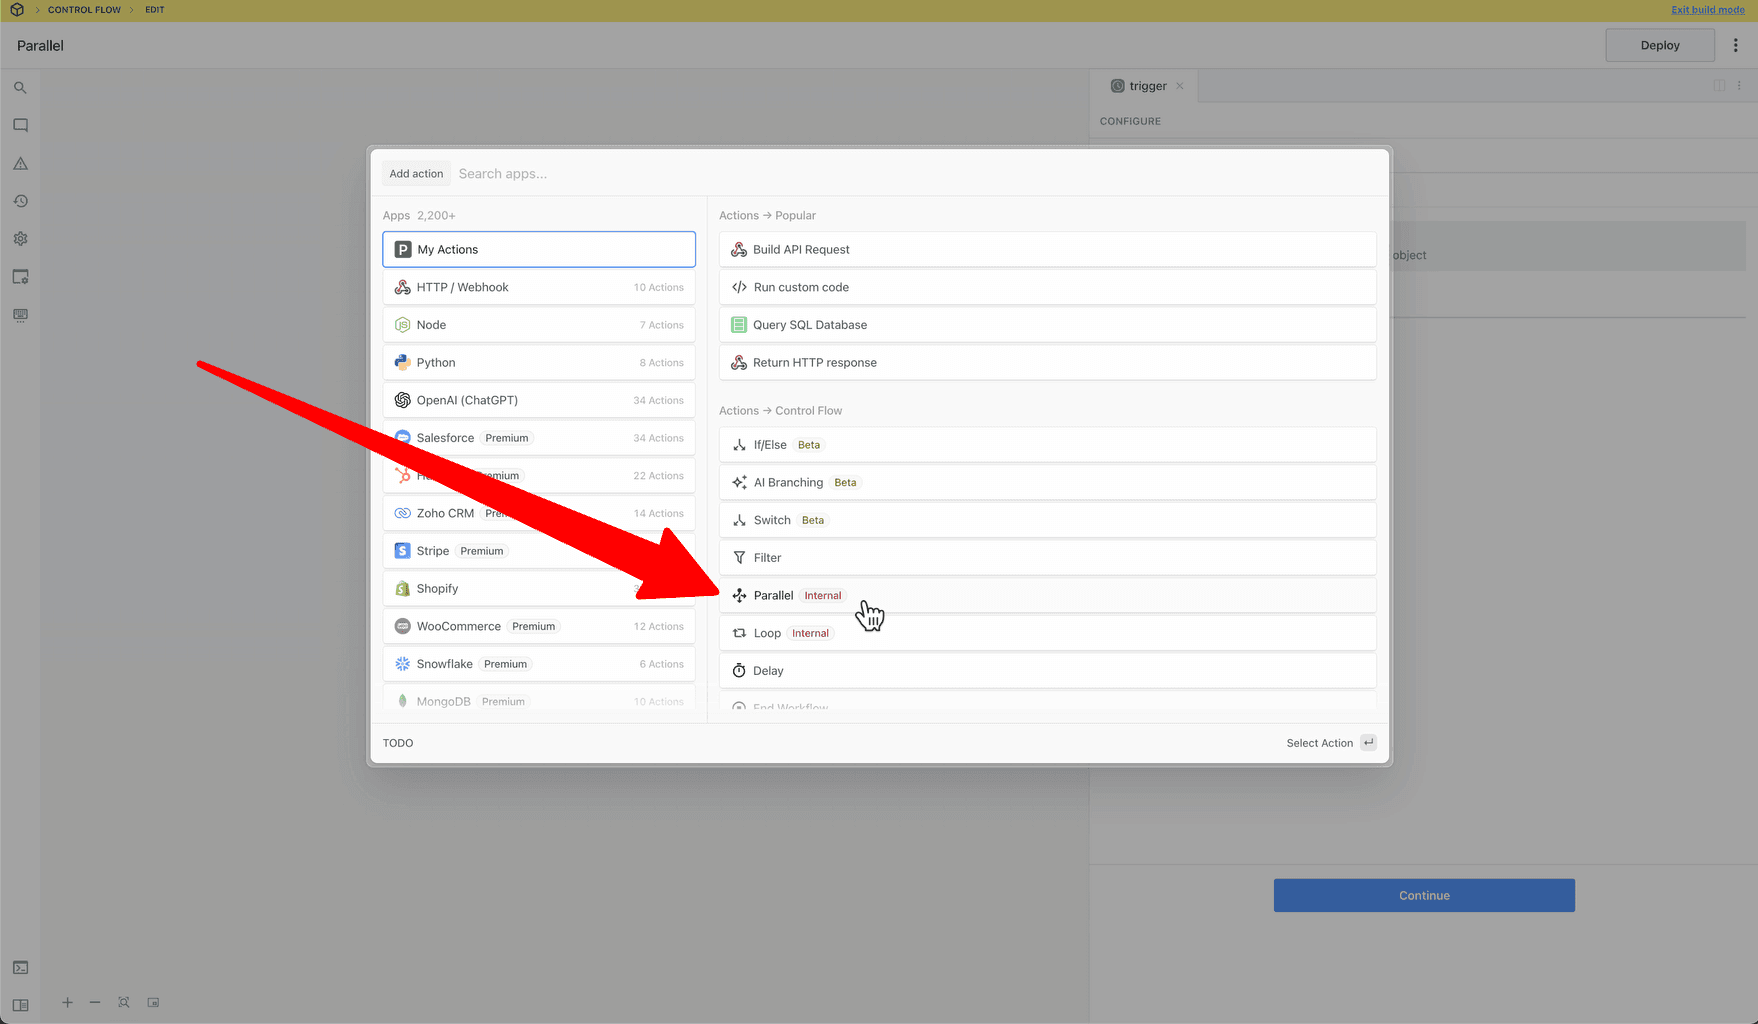 ### Create Branches
To create new branches, click the `+` button:
### Create Branches
To create new branches, click the `+` button:
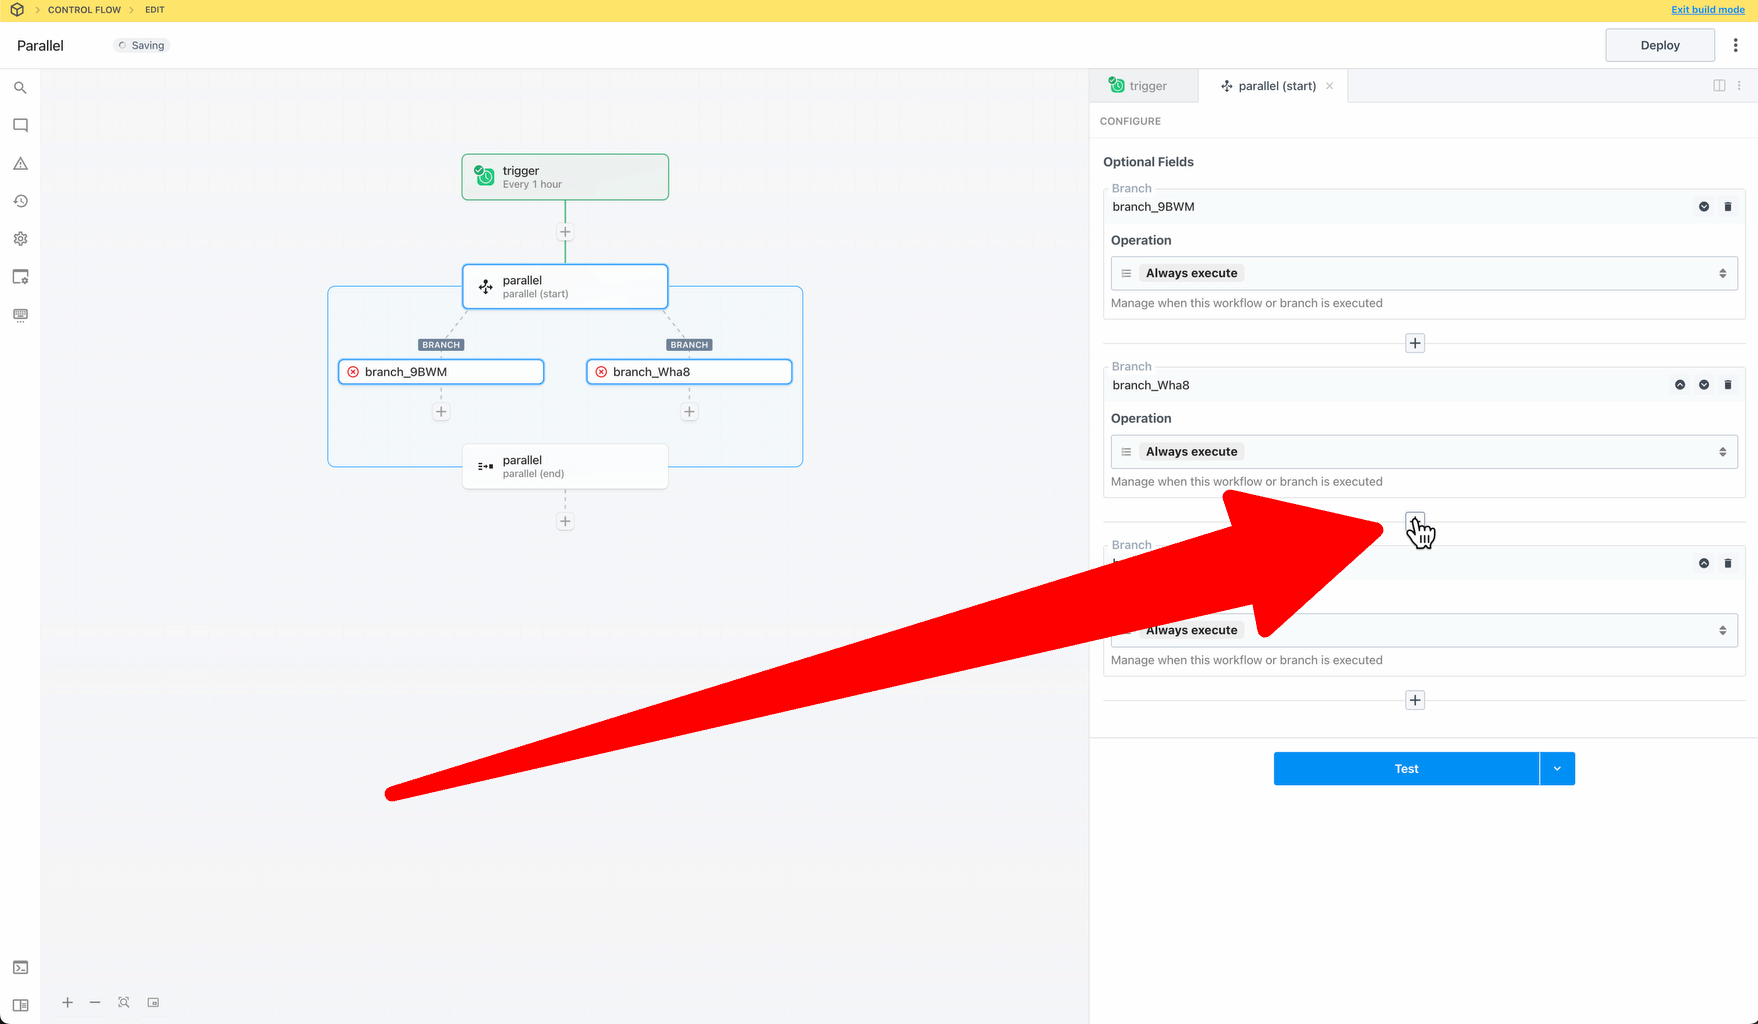 ### Rename Branches
Edit the branch’s nameslug on the canvas or in the right pane after selecting the **Start** phase of the parallel block. The nameslug communicates the branch’s purpose and affects workflow execution—the end phase exports an object, with each key corresponding to a branch name.
### Rename Branches
Edit the branch’s nameslug on the canvas or in the right pane after selecting the **Start** phase of the parallel block. The nameslug communicates the branch’s purpose and affects workflow execution—the end phase exports an object, with each key corresponding to a branch name.
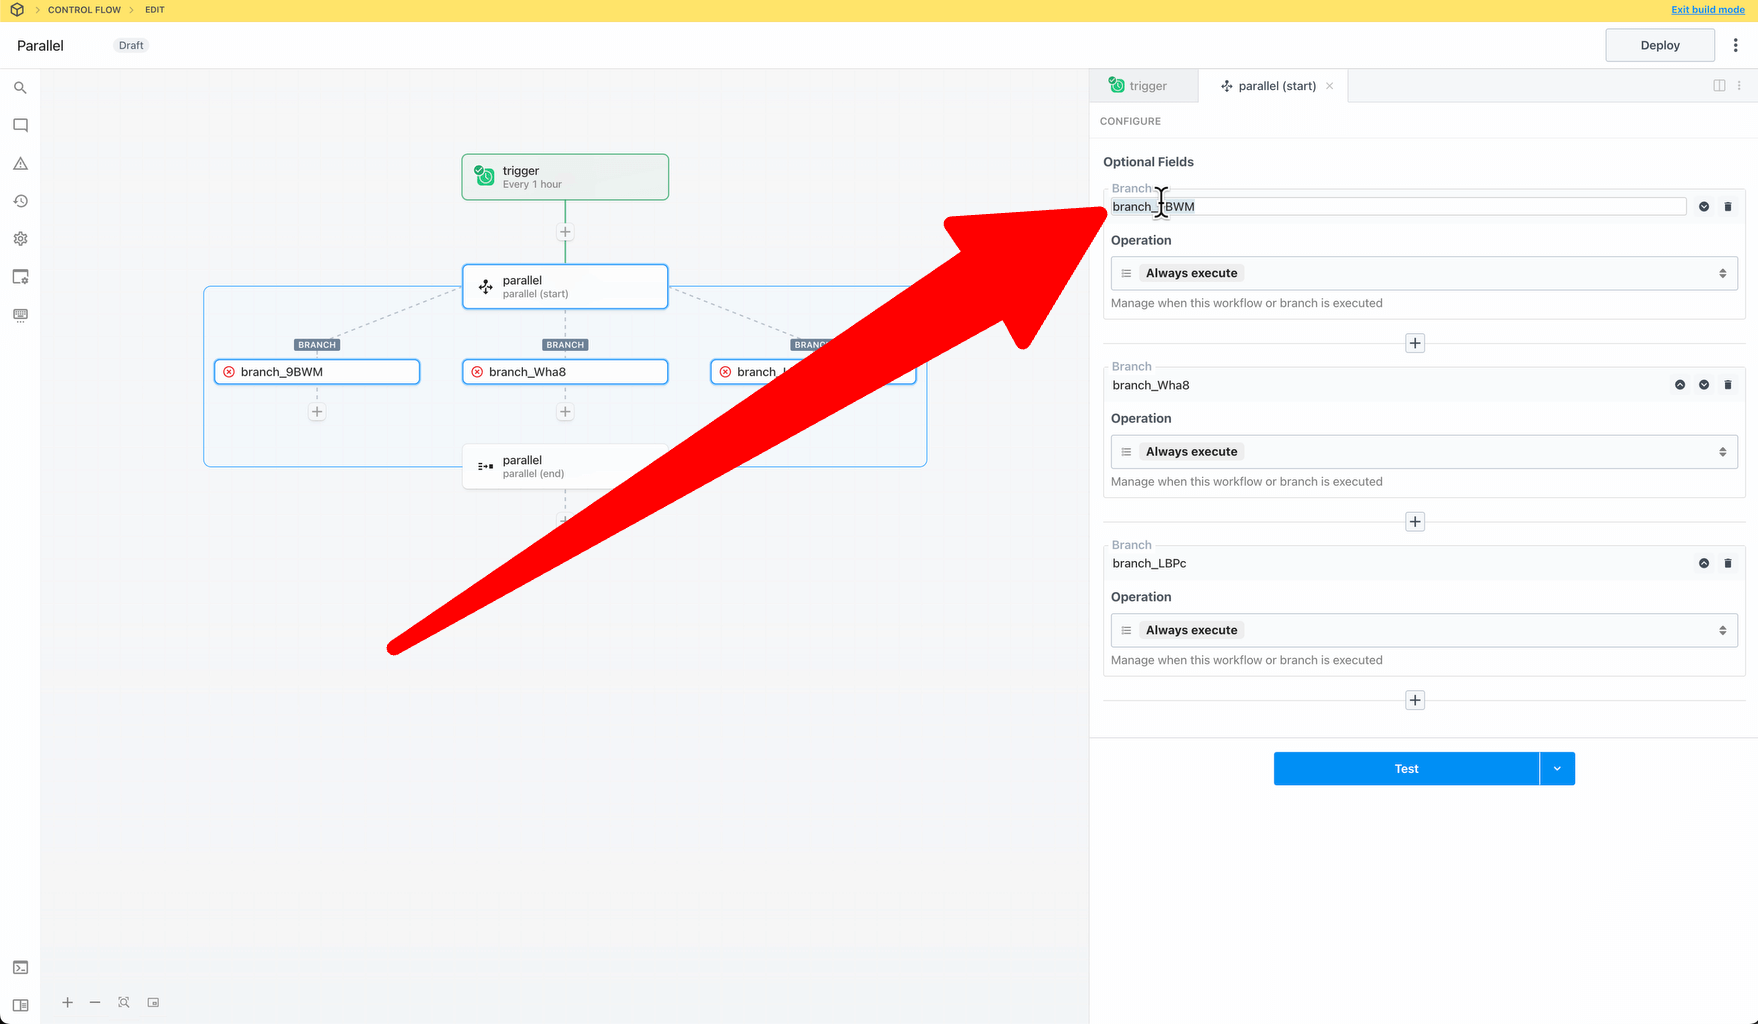 ### Export Data to the Parent Flow
You can export data from a parallel operation and continue execution in the parent flow.
* The parallel block exports data as a JSON object
* Branch exports are assigned to a key corresponding to the branch name slug (in the object exported from the block)
* Only the exports from the last step of each executed branch are included in the parallel block’s return value
* To preview the exported data, test the **End** phase of the parallel block
### Beta Limitations
Workflow queue settings (concurrency, execution rate) may not work as expected with workflows using the parallel operator.
## Getting Started
### Export Data to the Parent Flow
You can export data from a parallel operation and continue execution in the parent flow.
* The parallel block exports data as a JSON object
* Branch exports are assigned to a key corresponding to the branch name slug (in the object exported from the block)
* Only the exports from the last step of each executed branch are included in the parallel block’s return value
* To preview the exported data, test the **End** phase of the parallel block
### Beta Limitations
Workflow queue settings (concurrency, execution rate) may not work as expected with workflows using the parallel operator.
## Getting Started
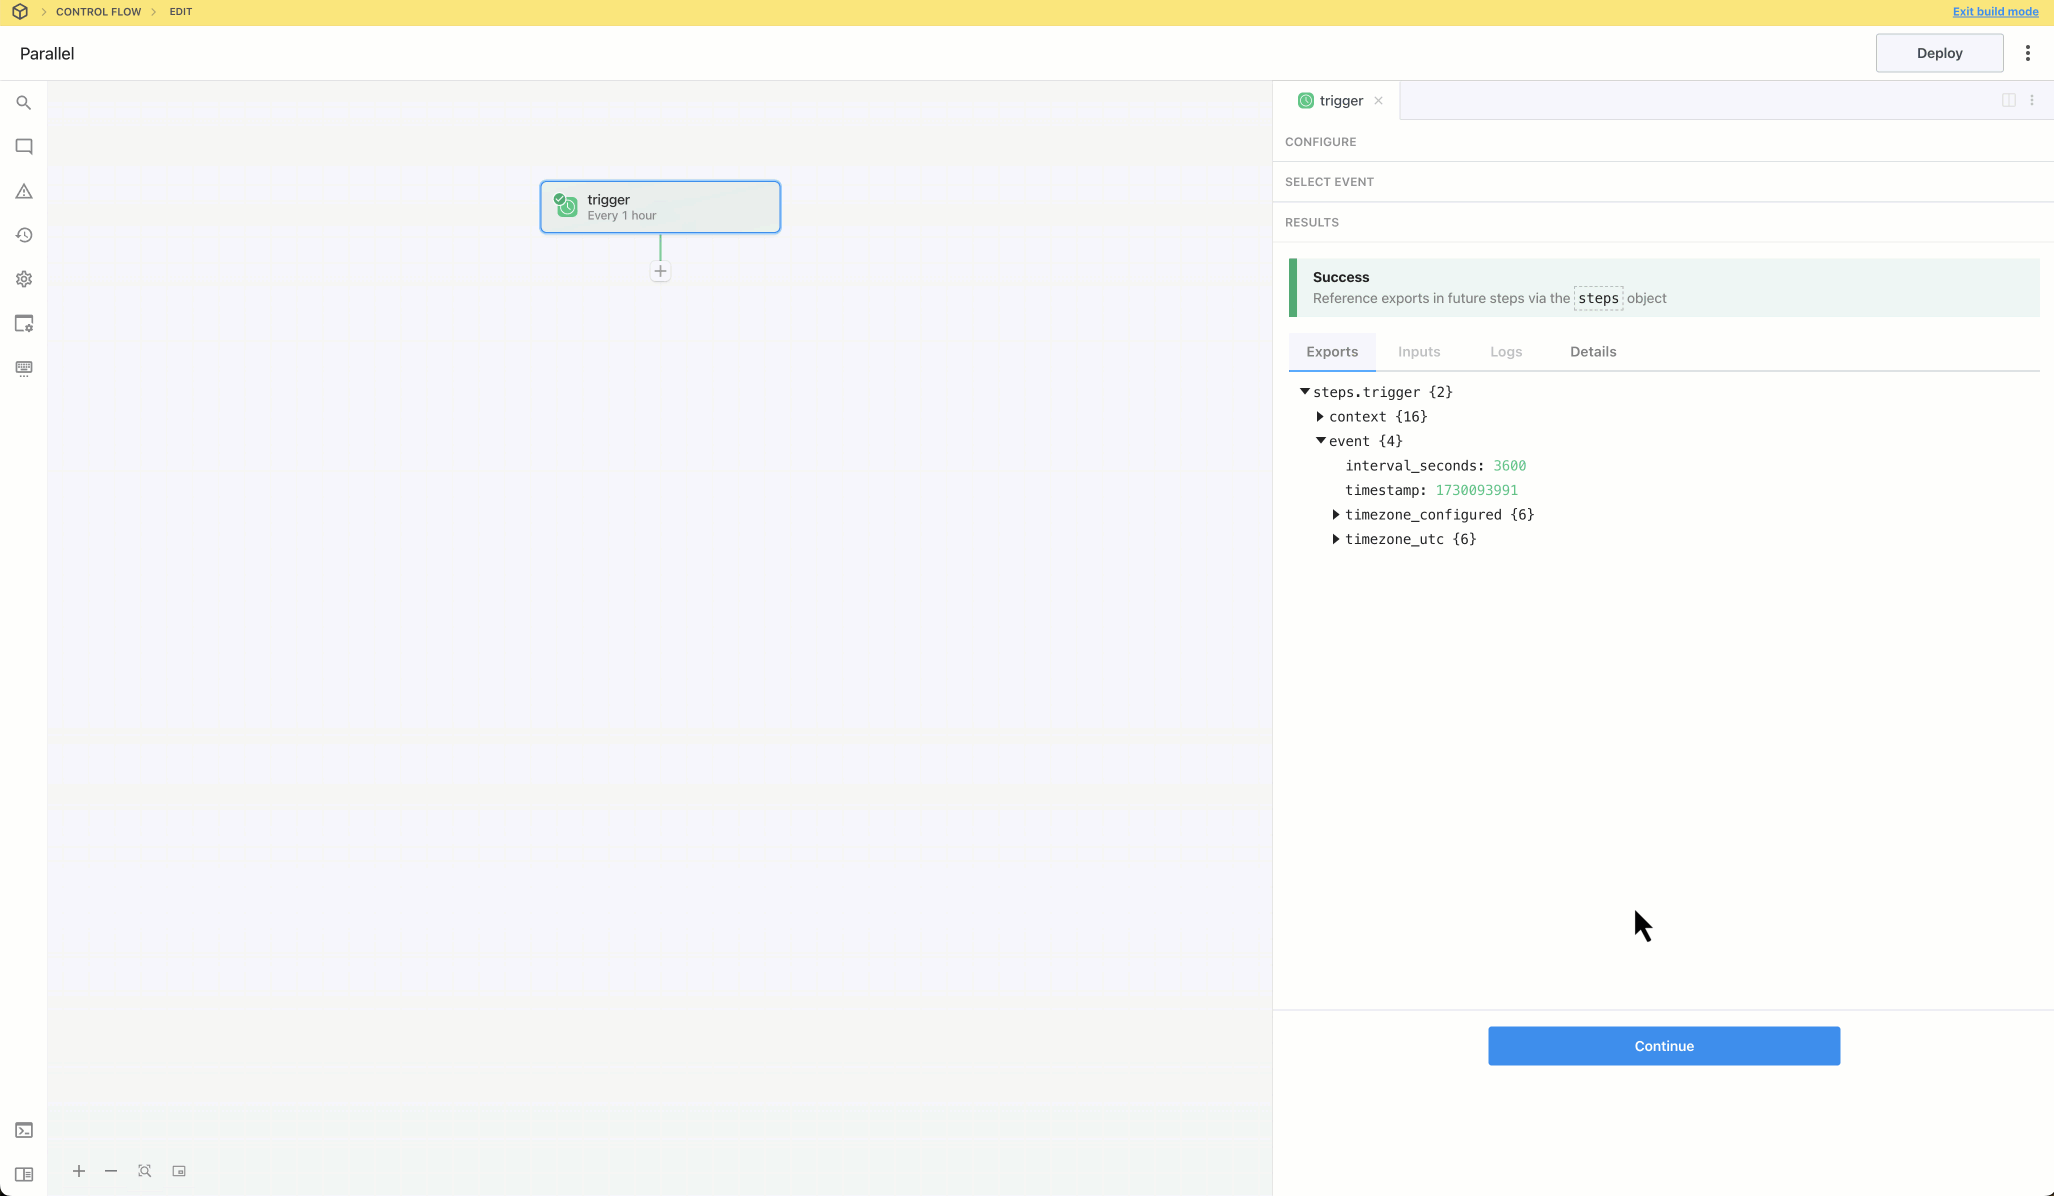
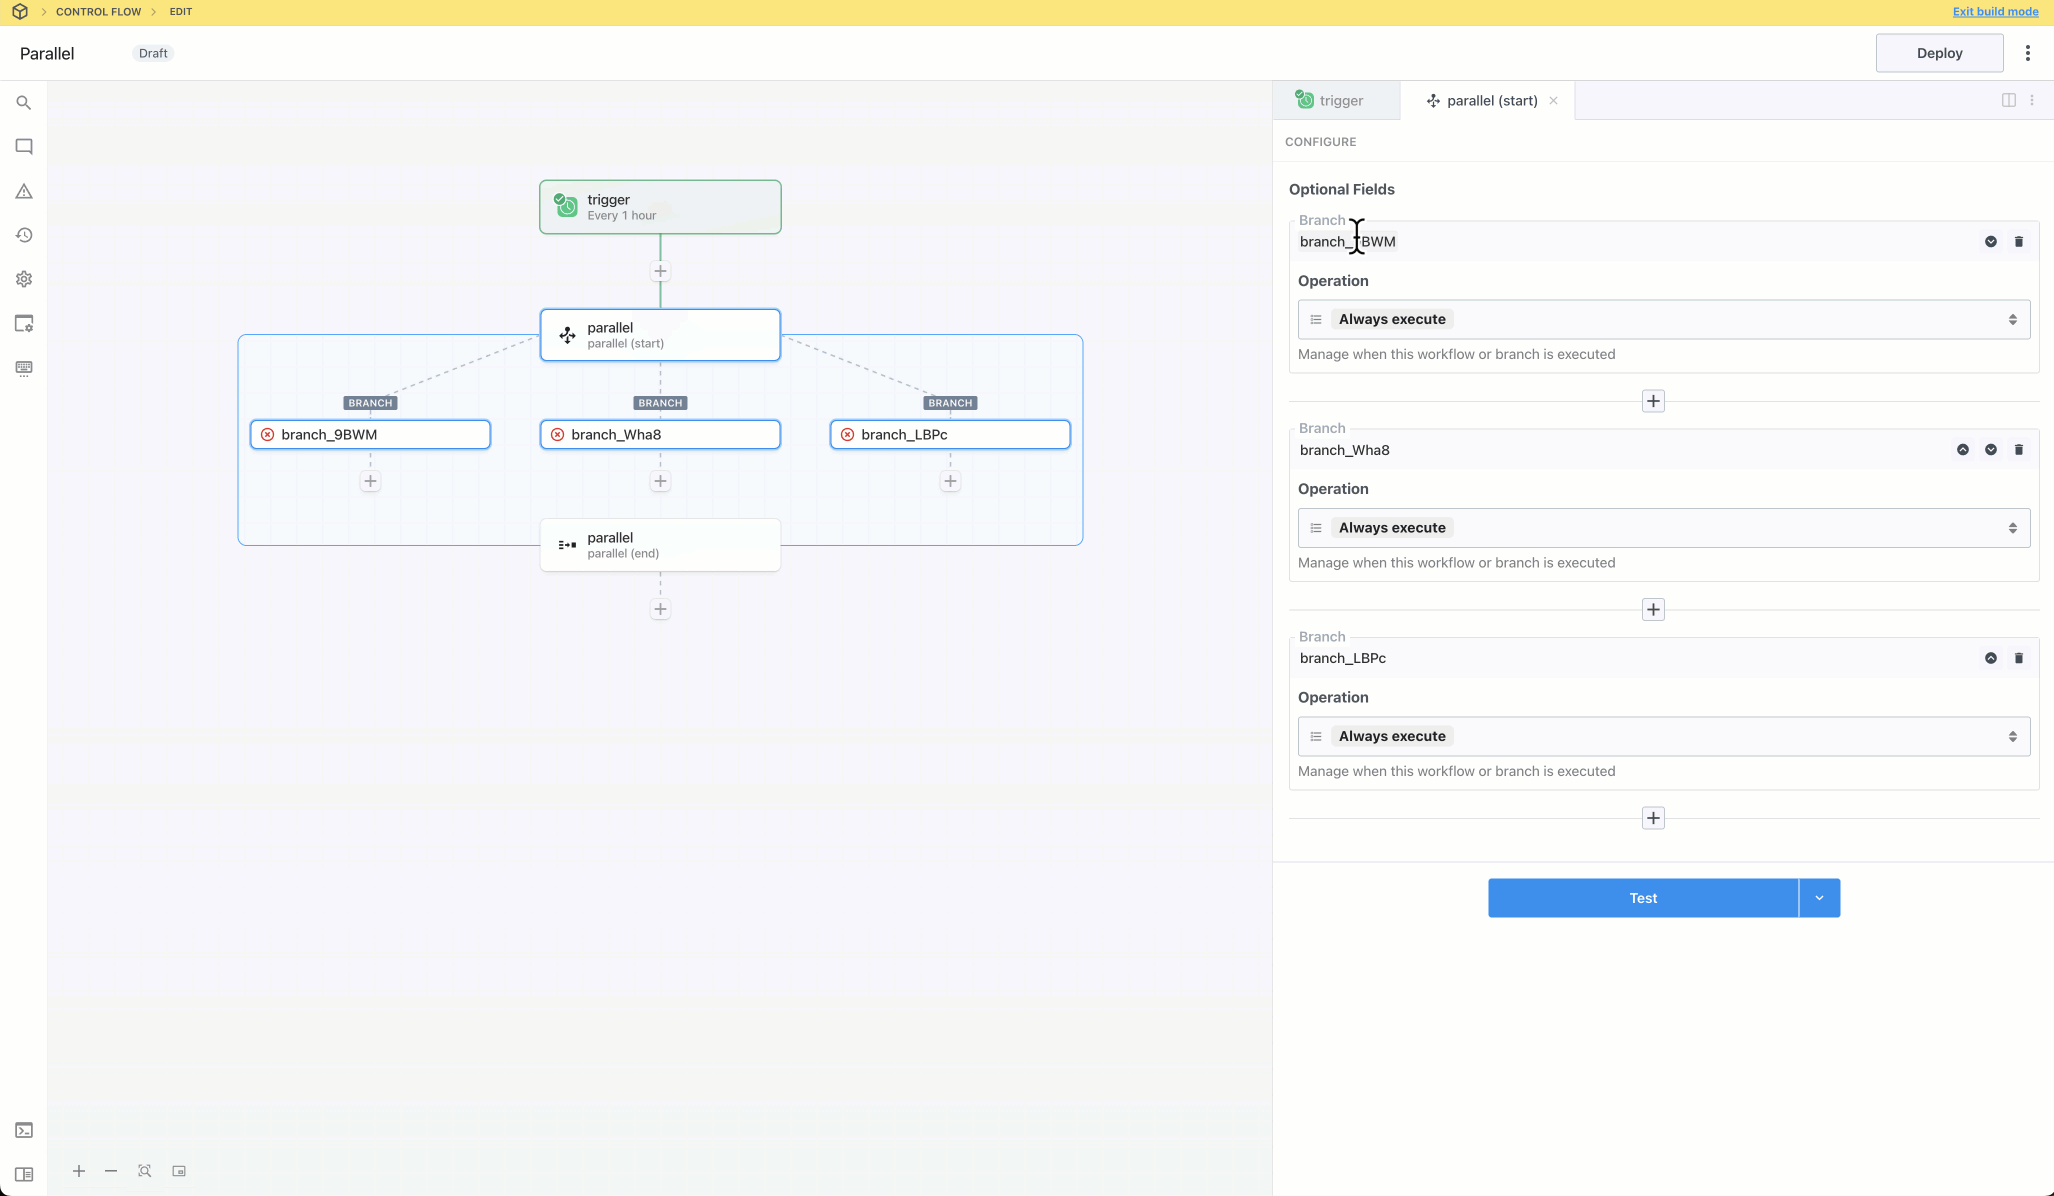
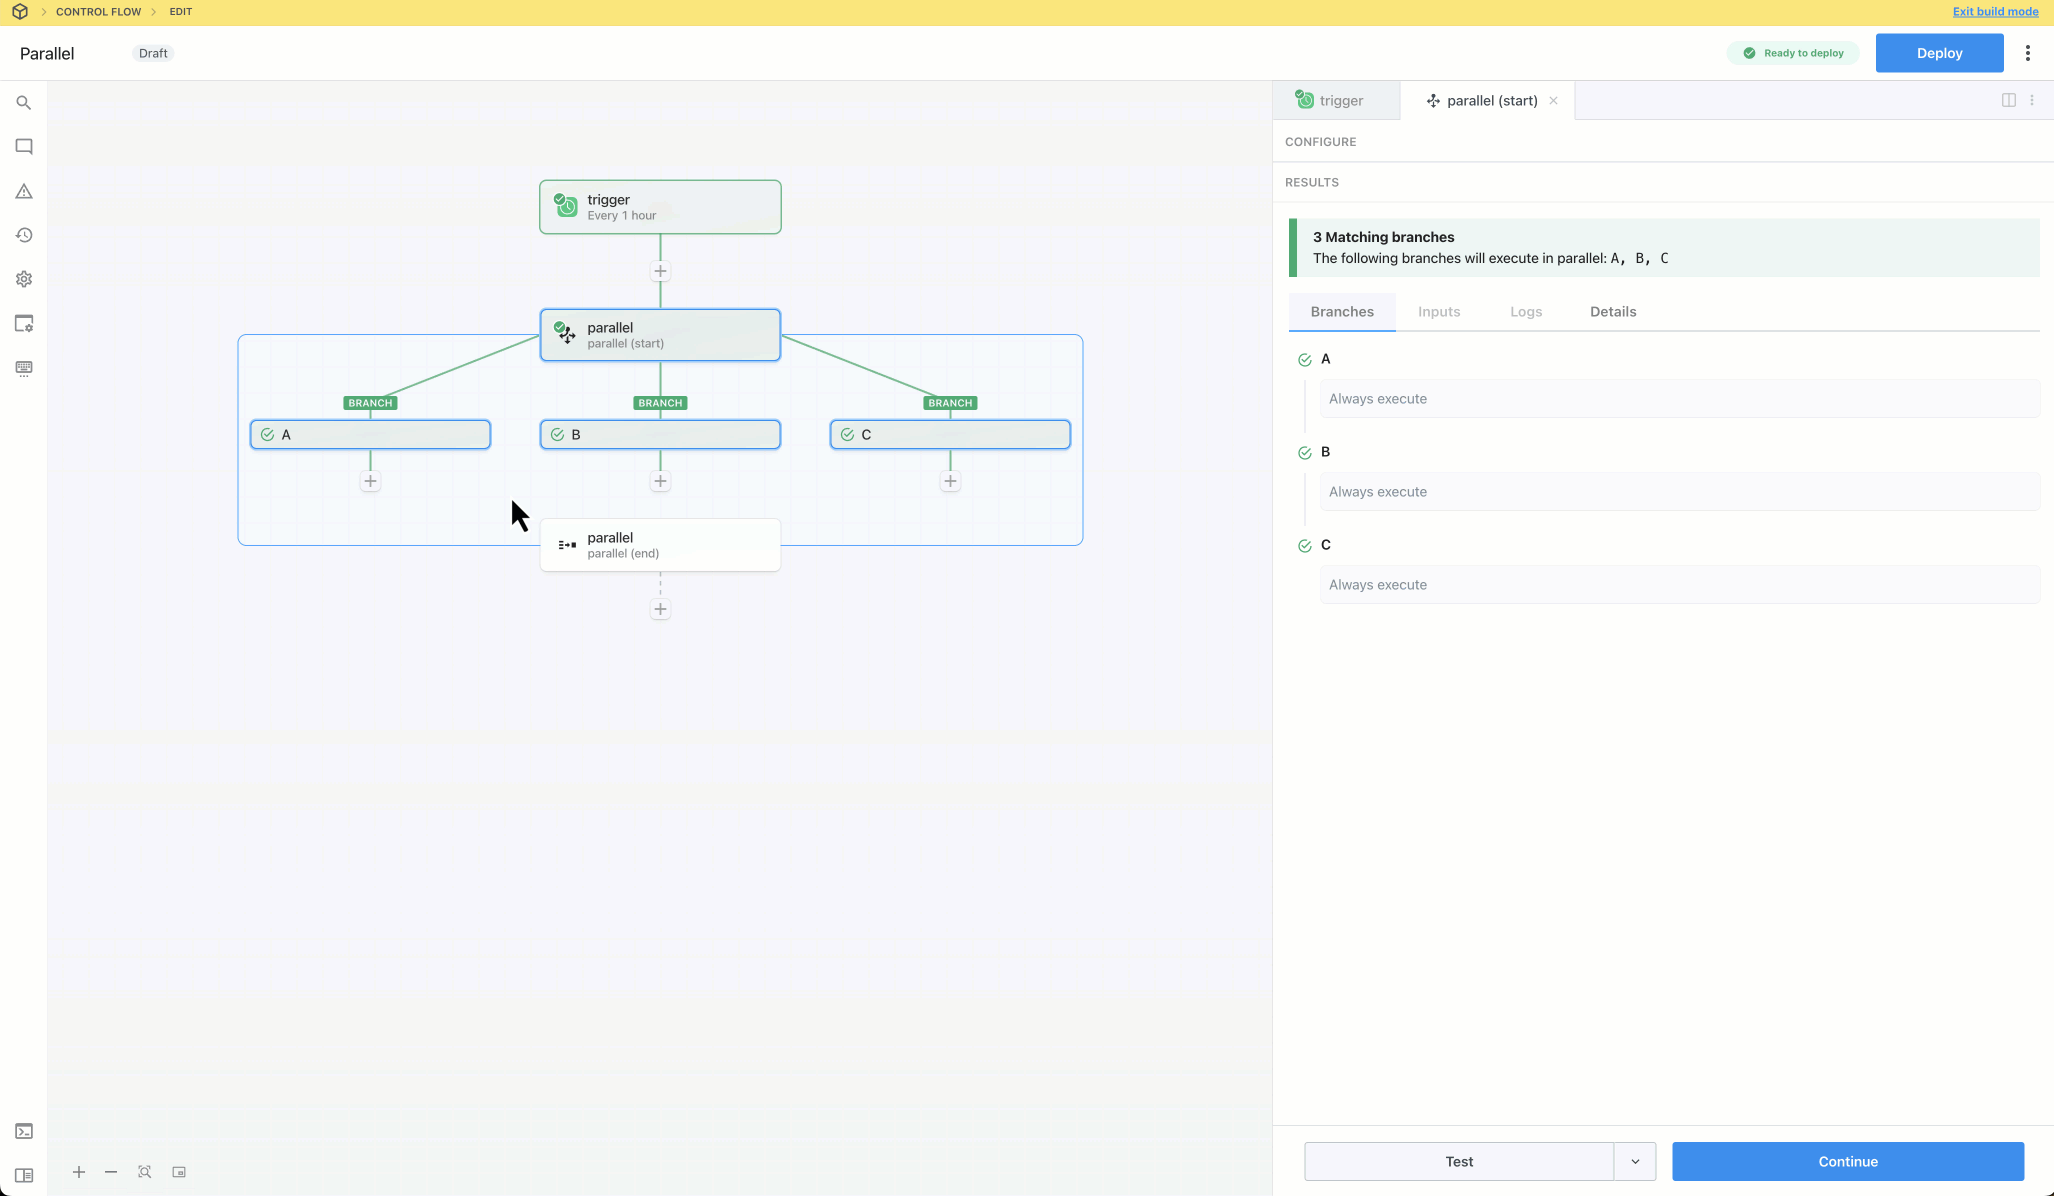
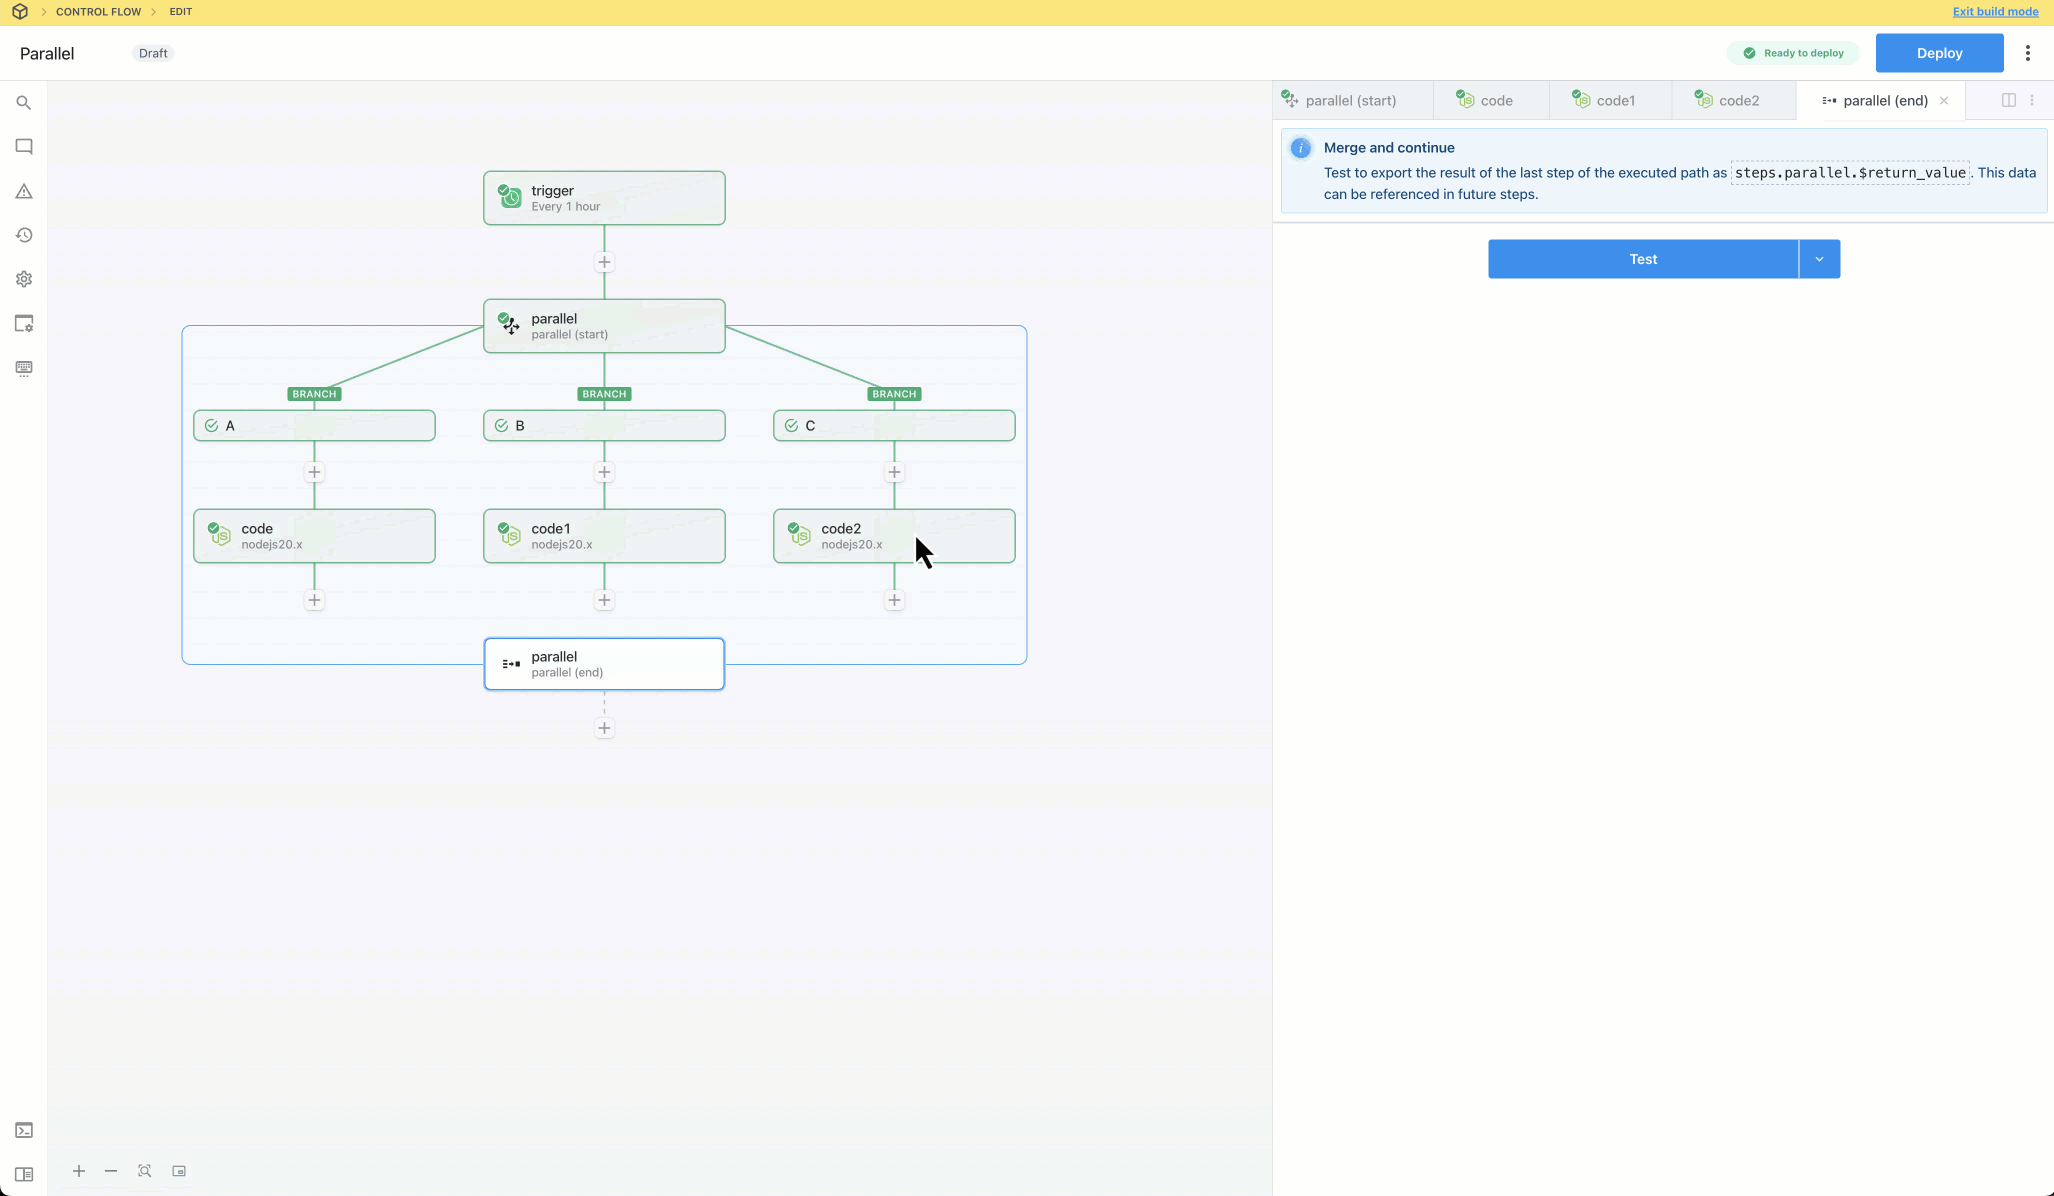
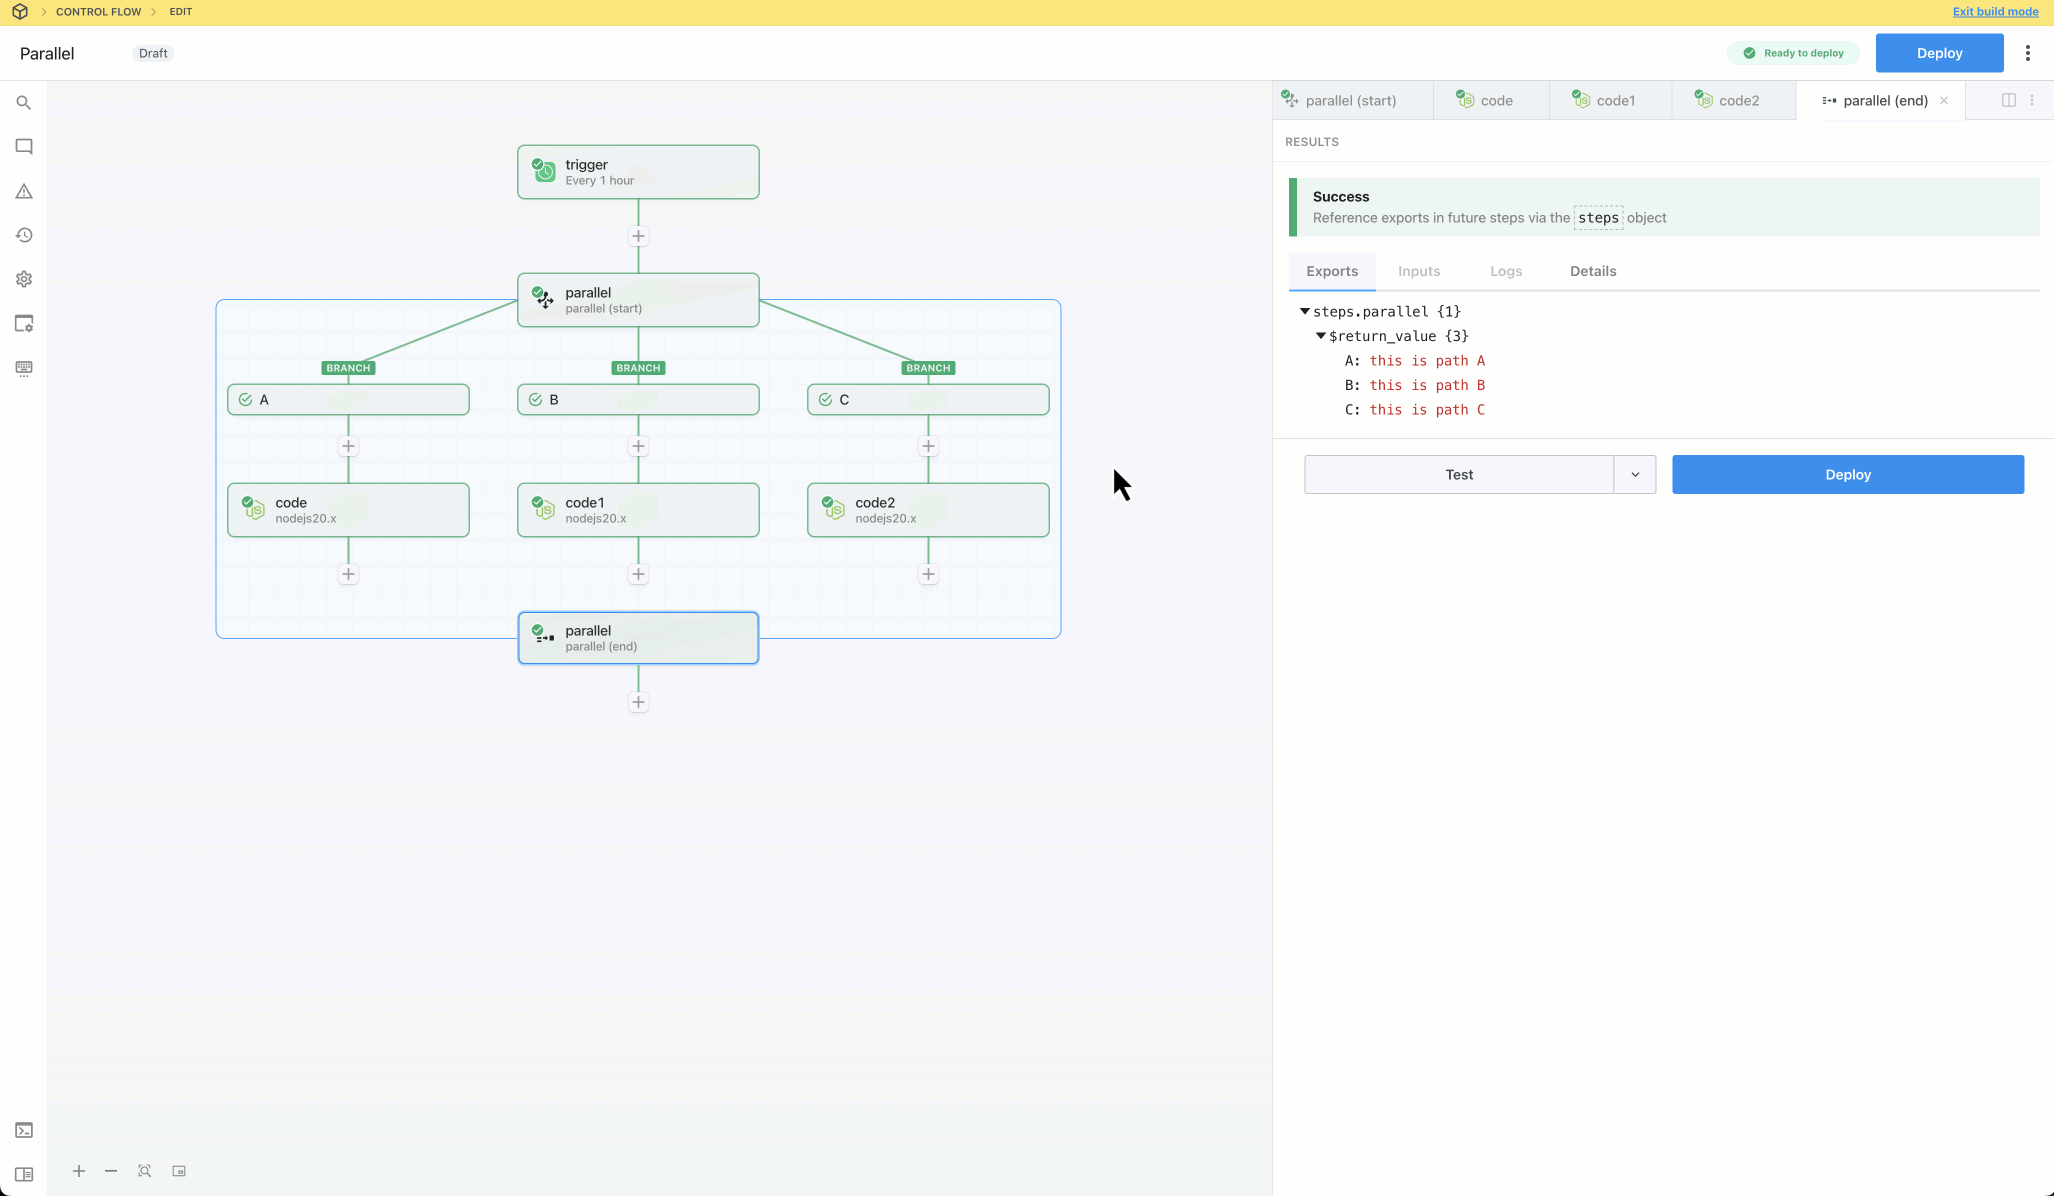
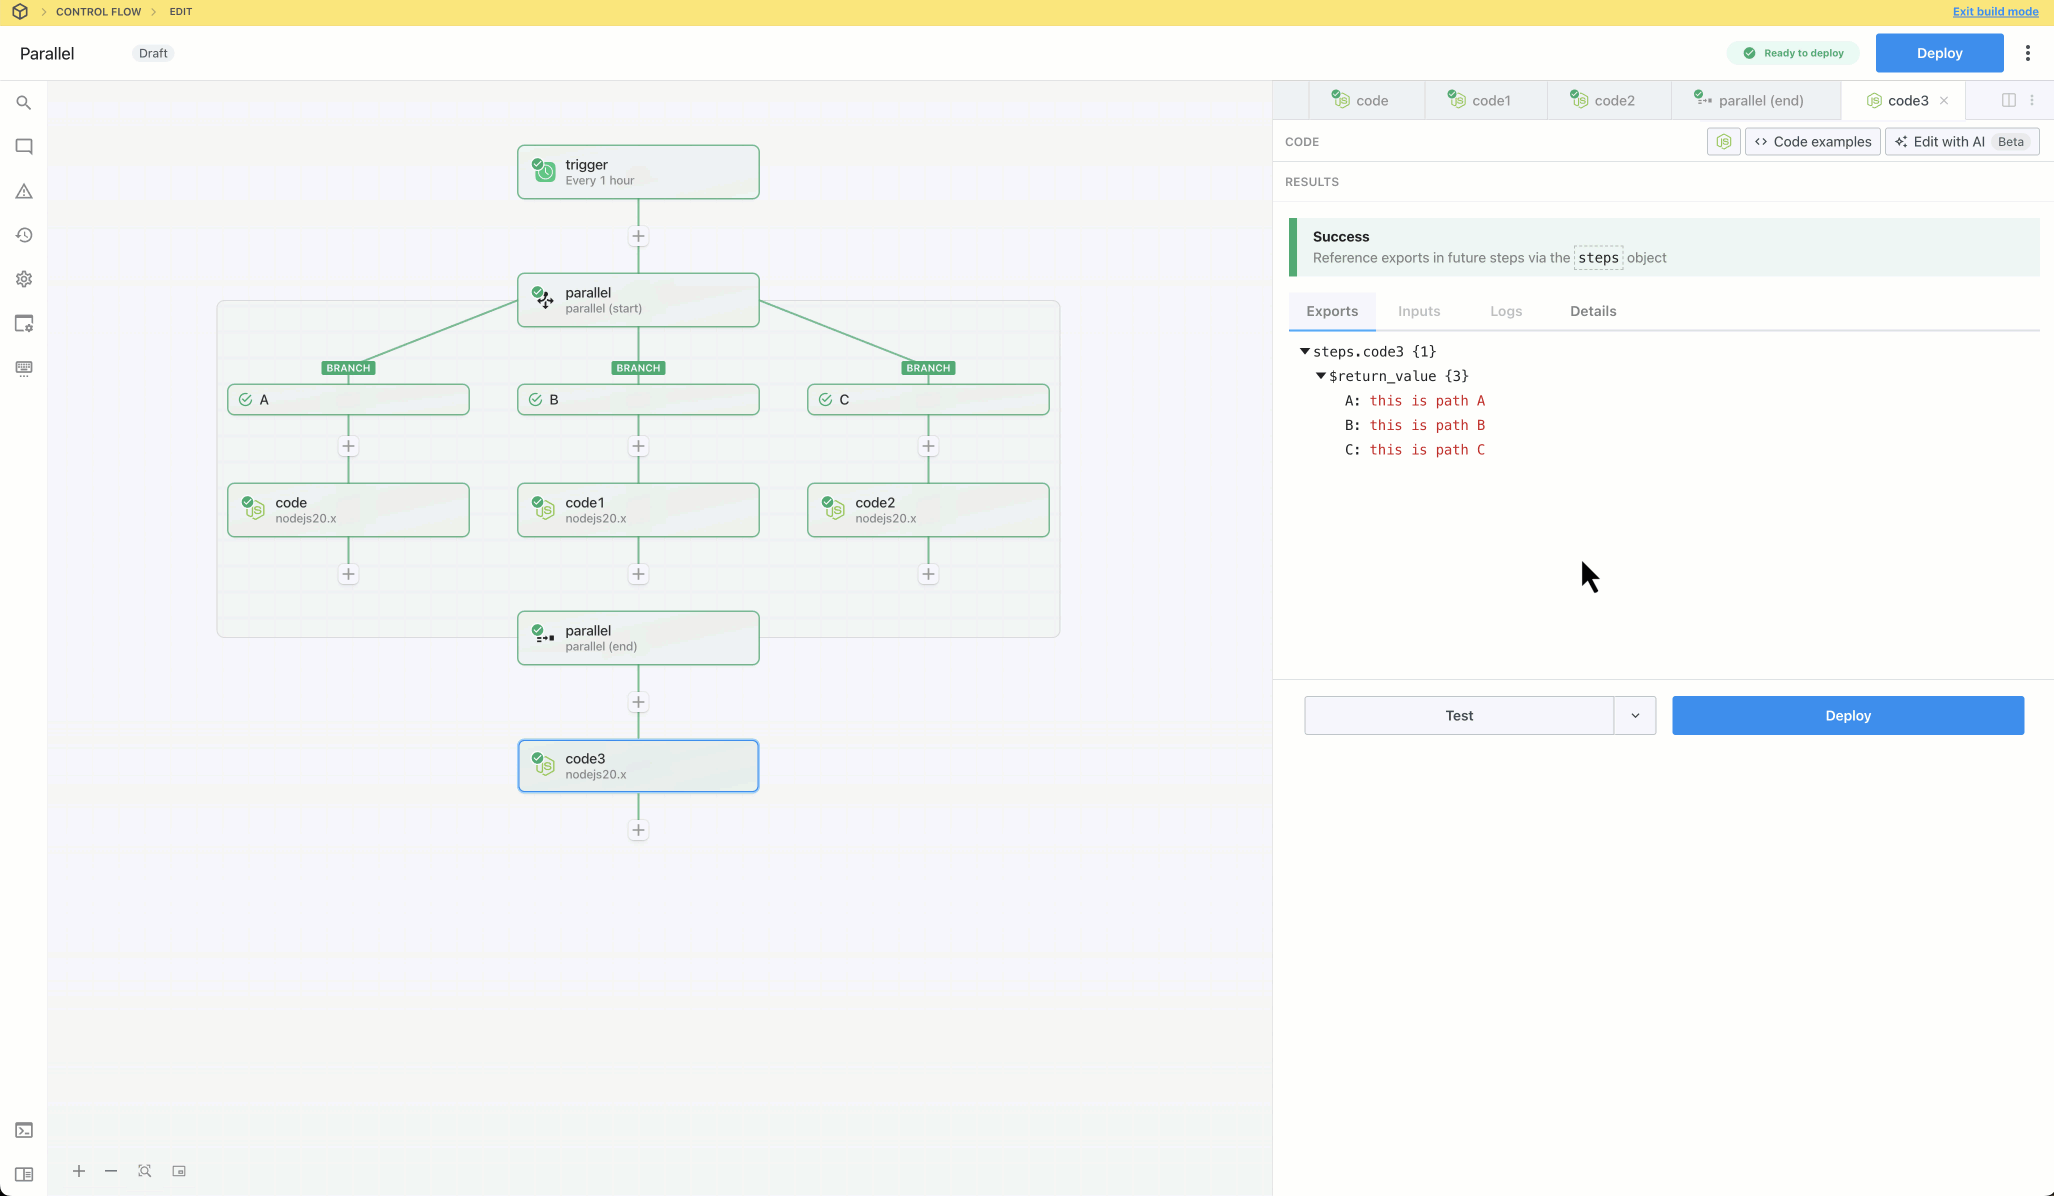
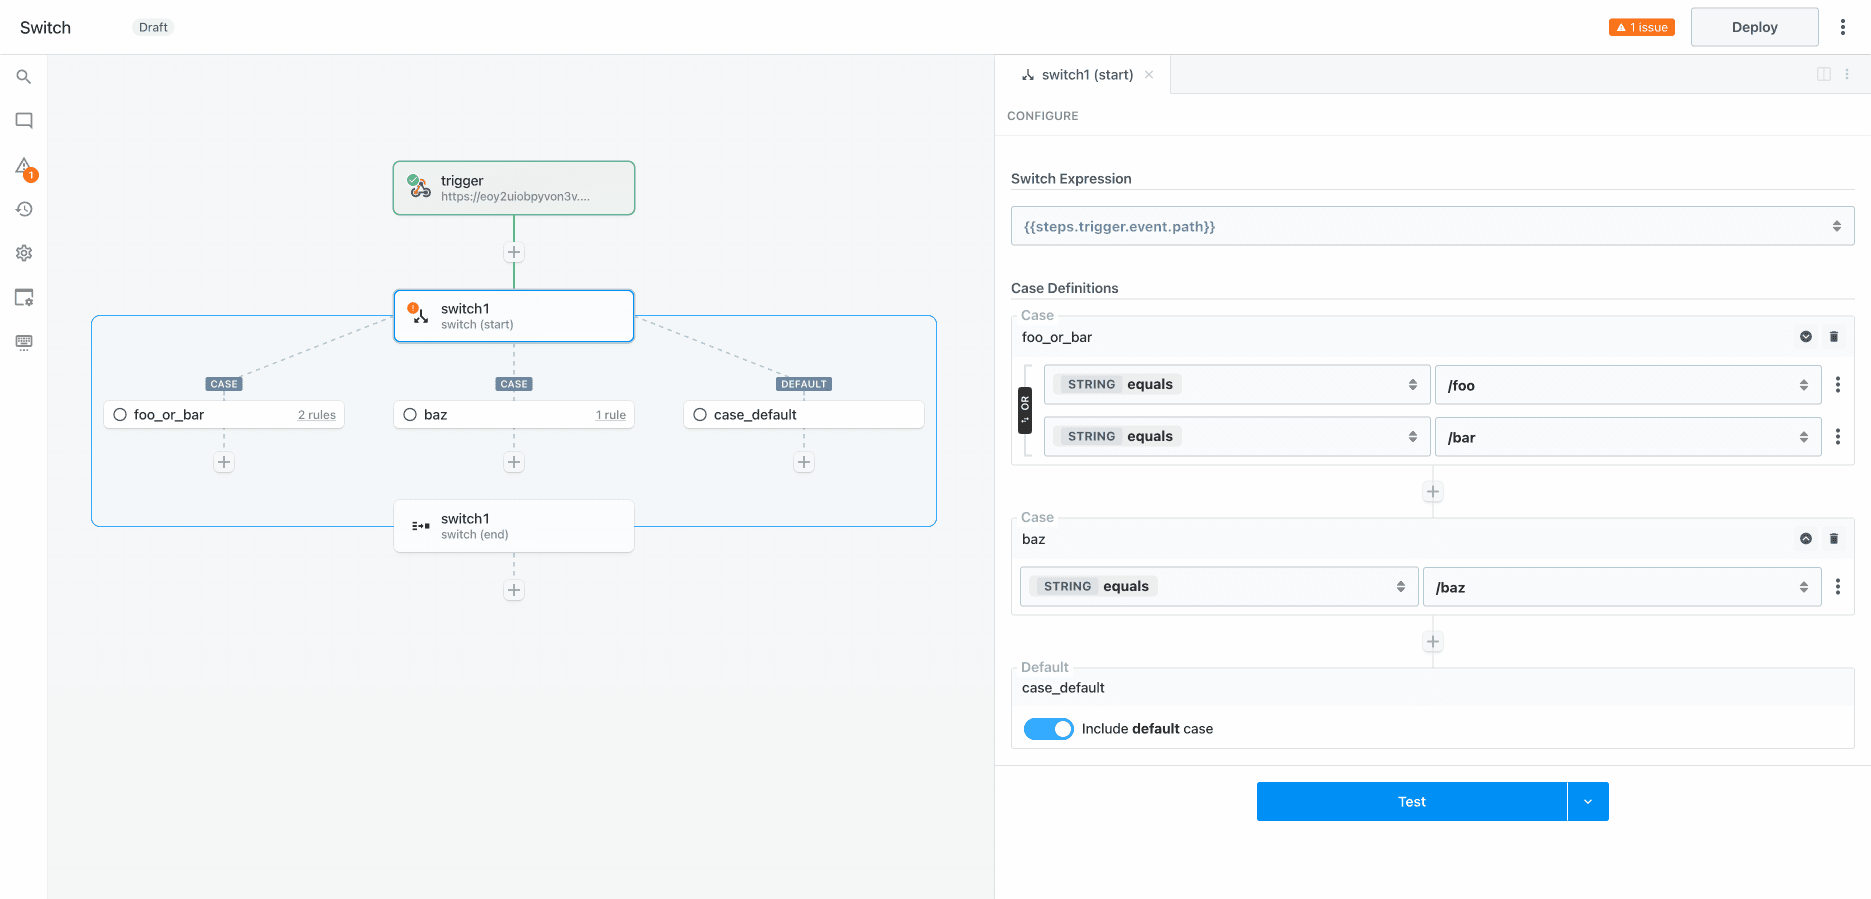 ## Capabilities
* Define cases to conditionally execute one of many branches
* Define the expression to evaluate once and configure cases to compare values (use boolean operators to combine muliple rules for each case)
* Use the **Default** case as a fallback
* Merge and continue execution in the parent flow after the branching operation
## Capabilities
* Define cases to conditionally execute one of many branches
* Define the expression to evaluate once and configure cases to compare values (use boolean operators to combine muliple rules for each case)
* Use the **Default** case as a fallback
* Merge and continue execution in the parent flow after the branching operation
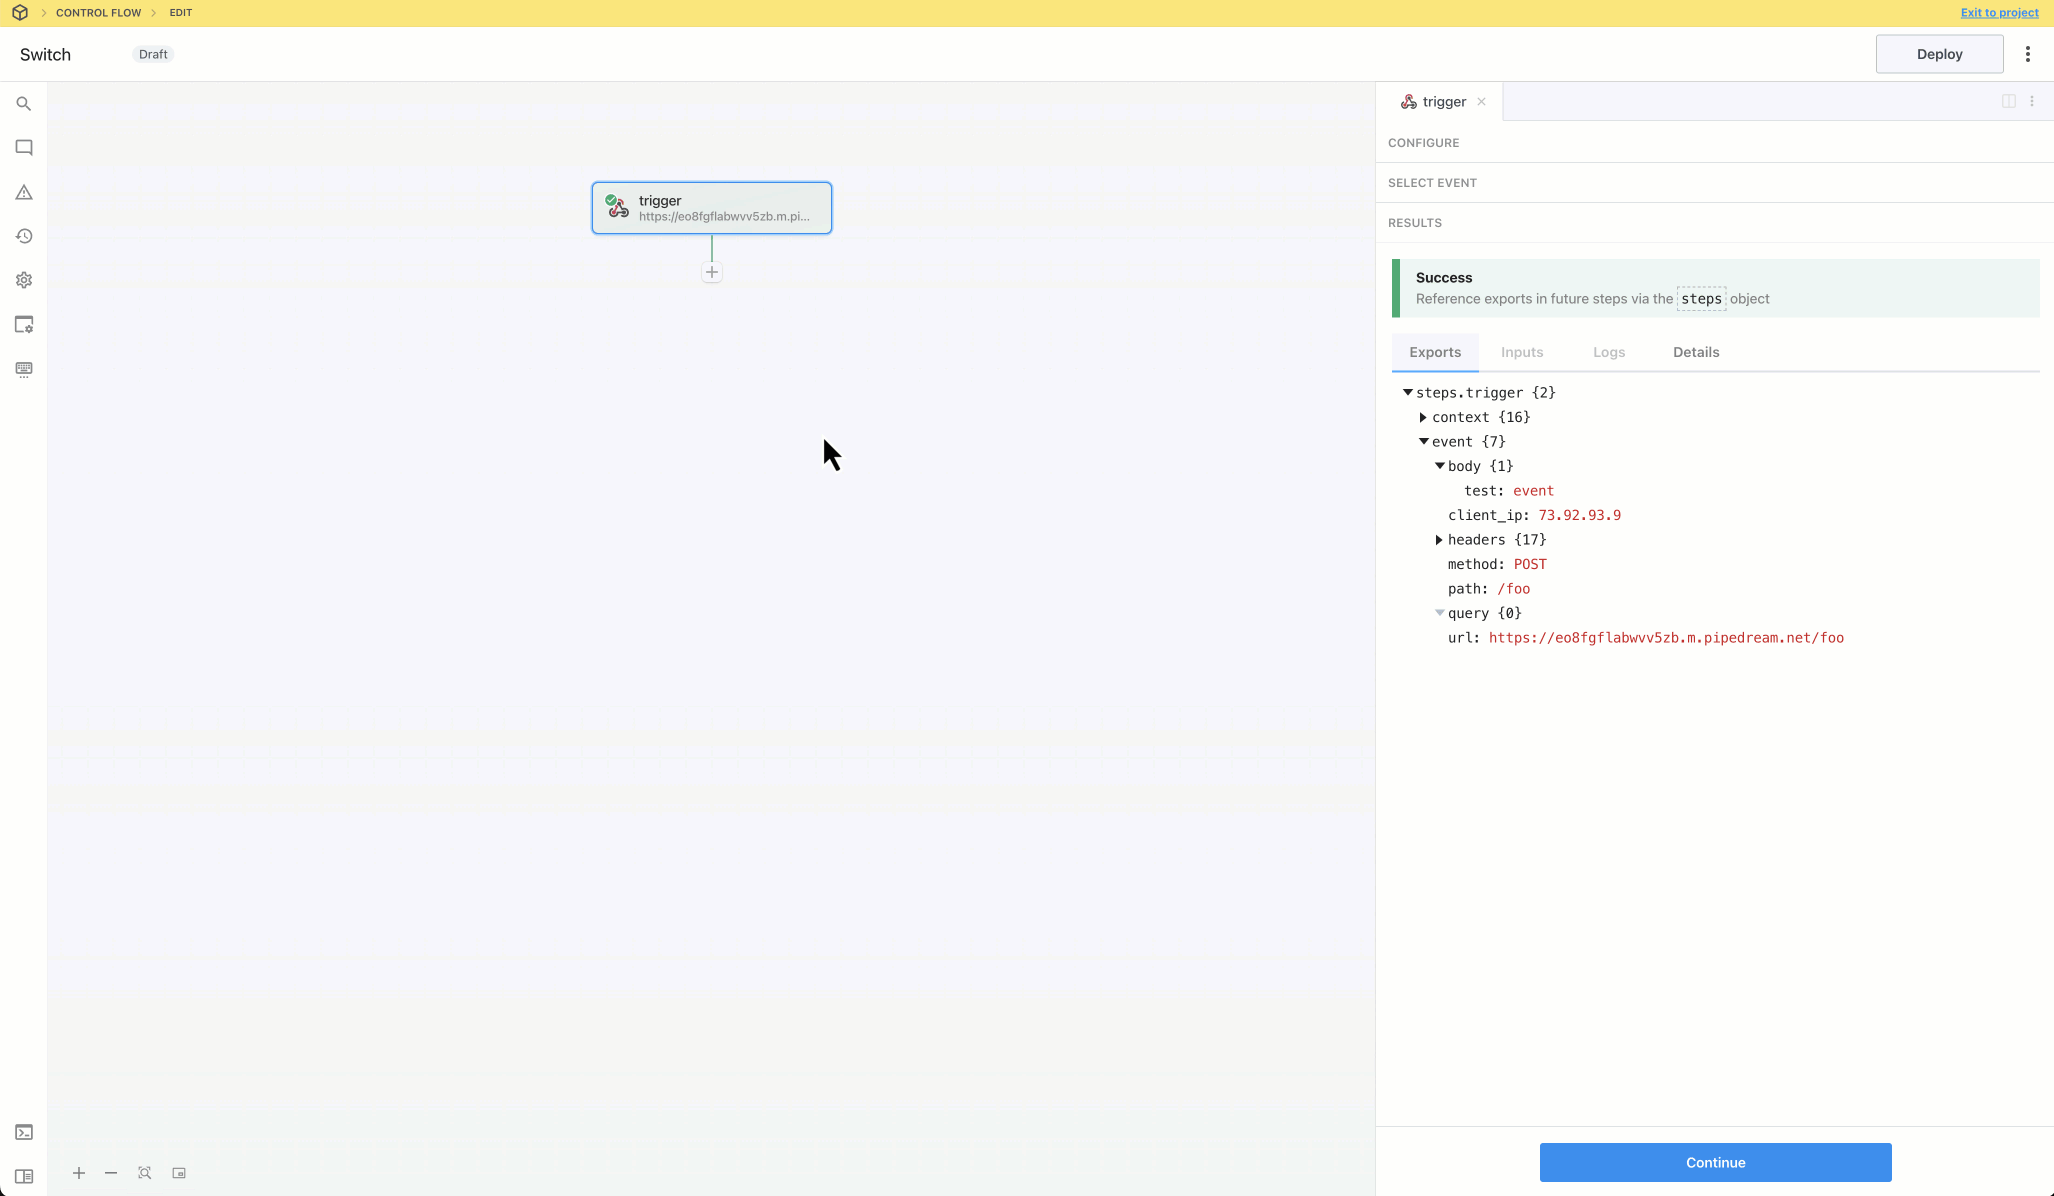 **IMPORTANT:** If you disable the **Default** condition and an event does not match any of the rules, the workflow will continue to the next step after the **Switch** section. If you want to end workflow execution if no other conditions evaluate to `true`, enable the Default condition and add a **Terminate Workflow** action.
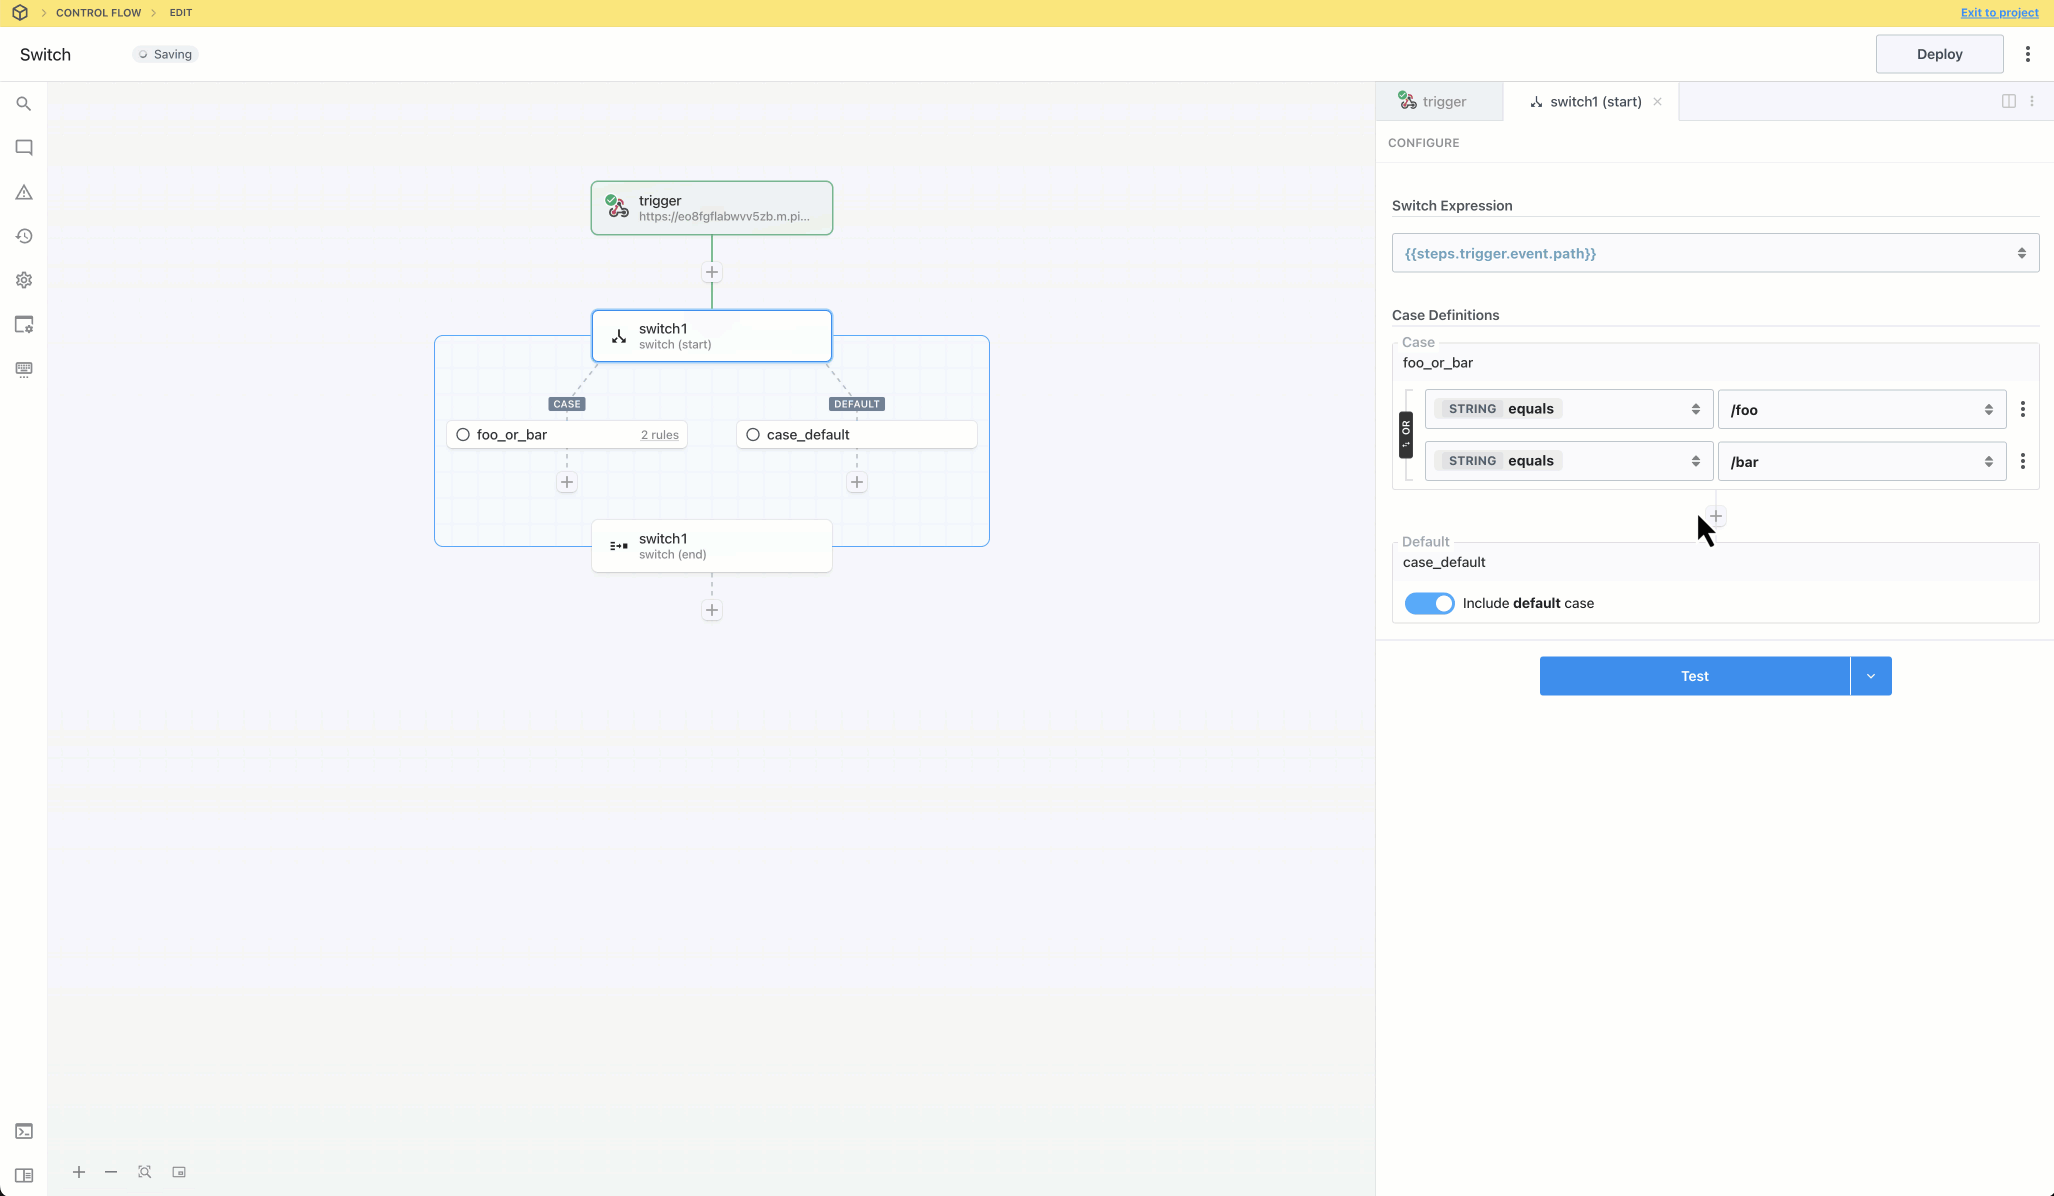
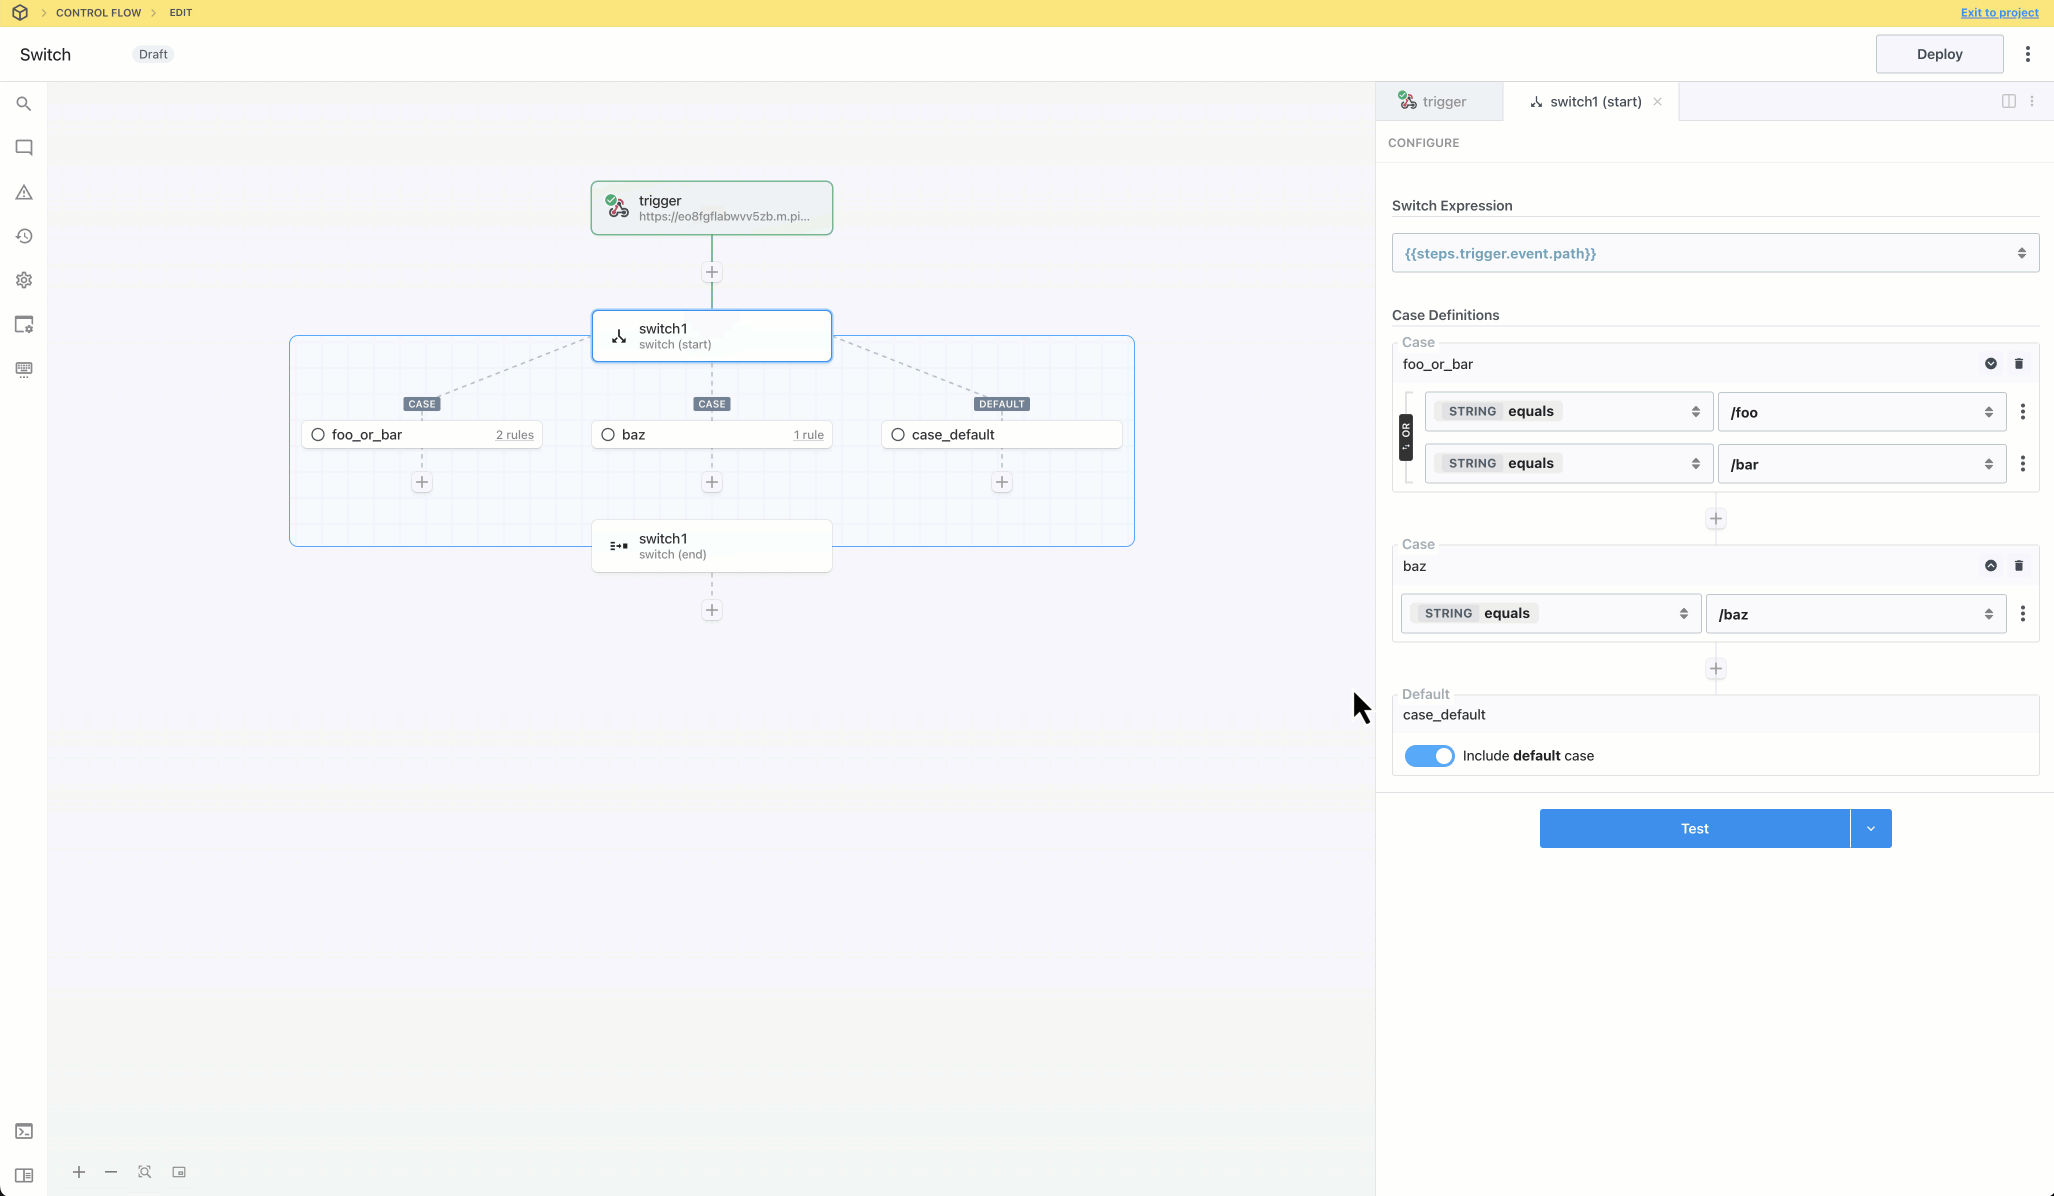
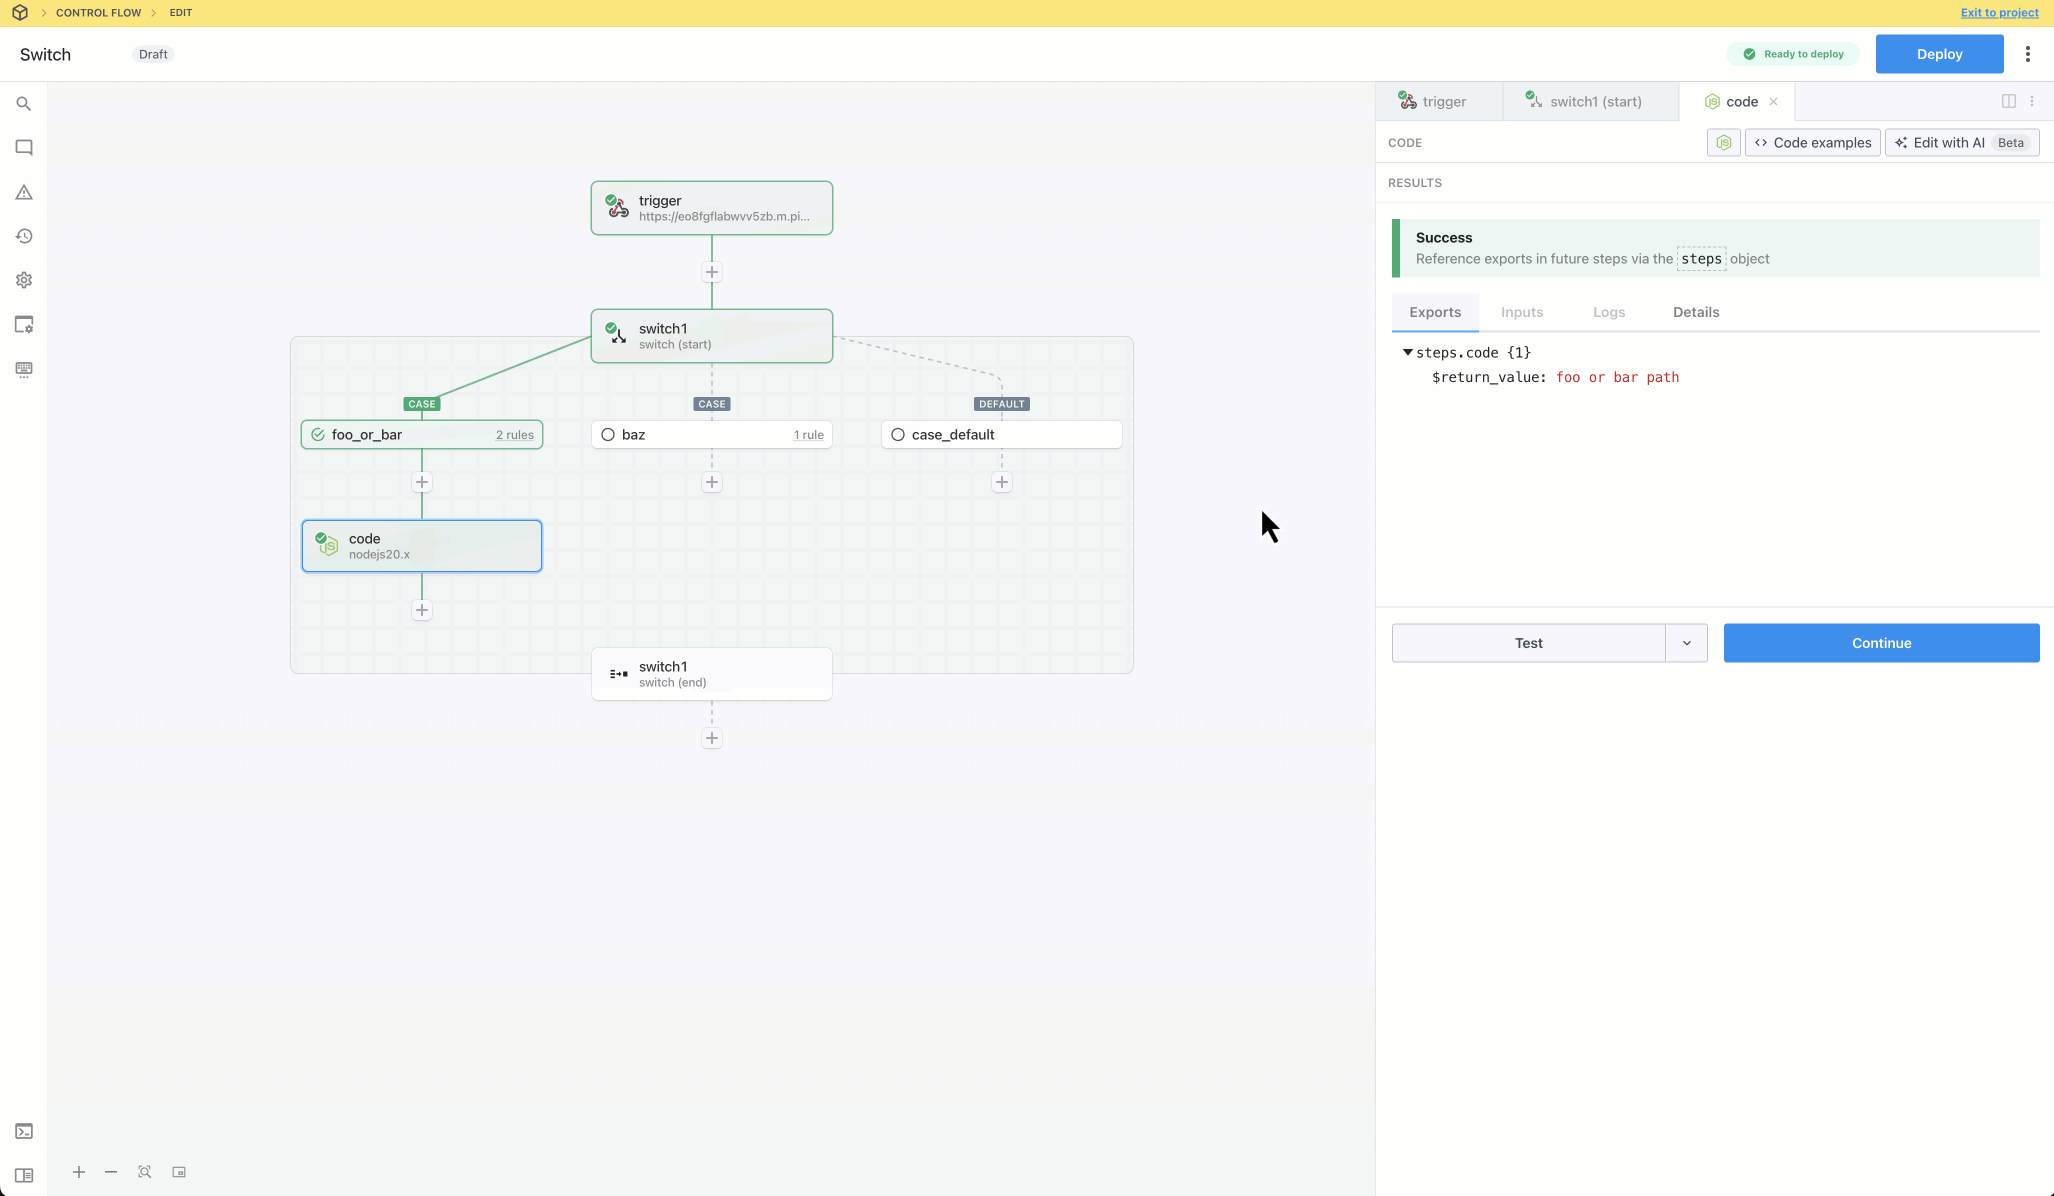
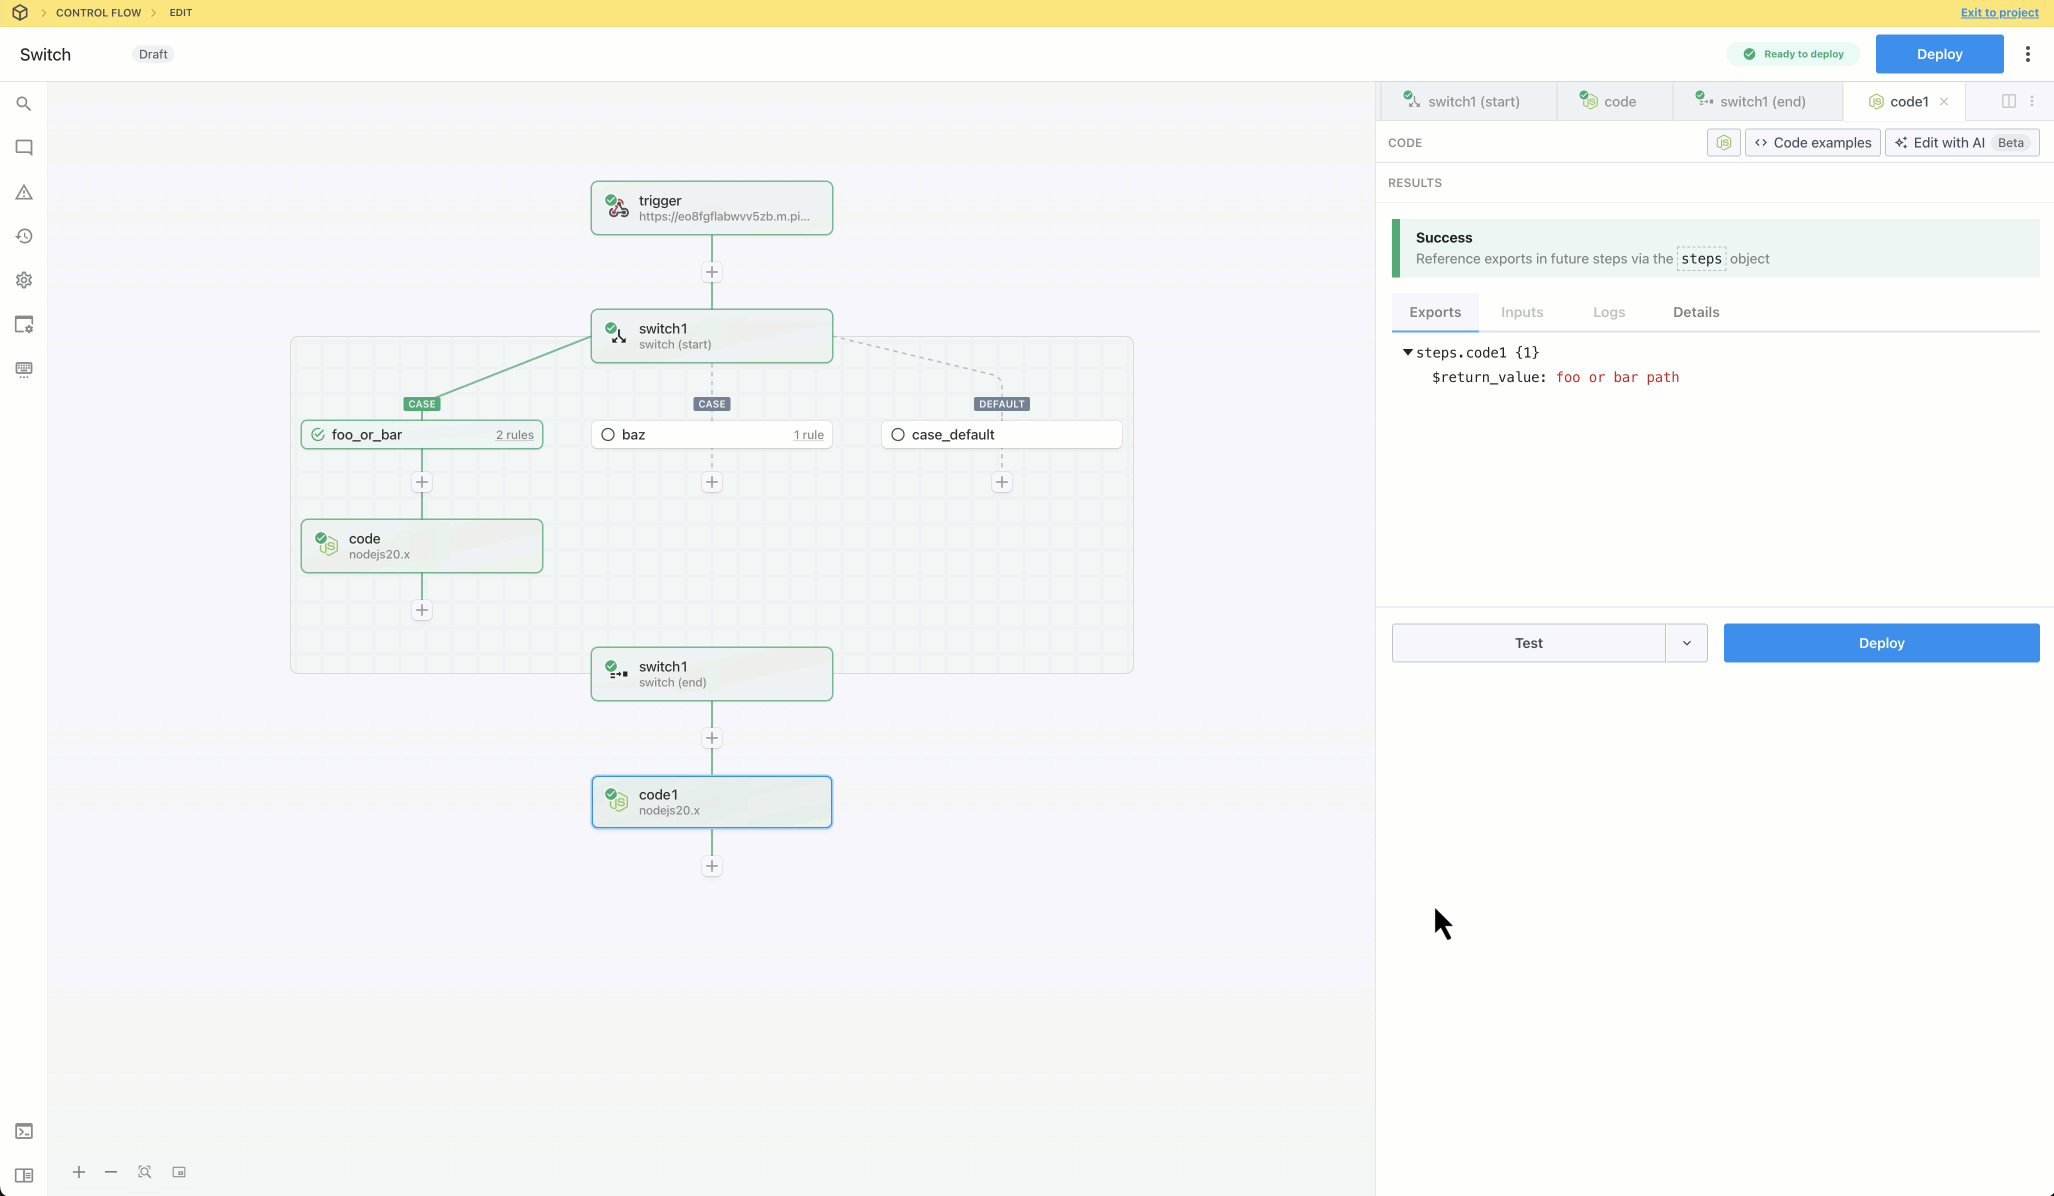
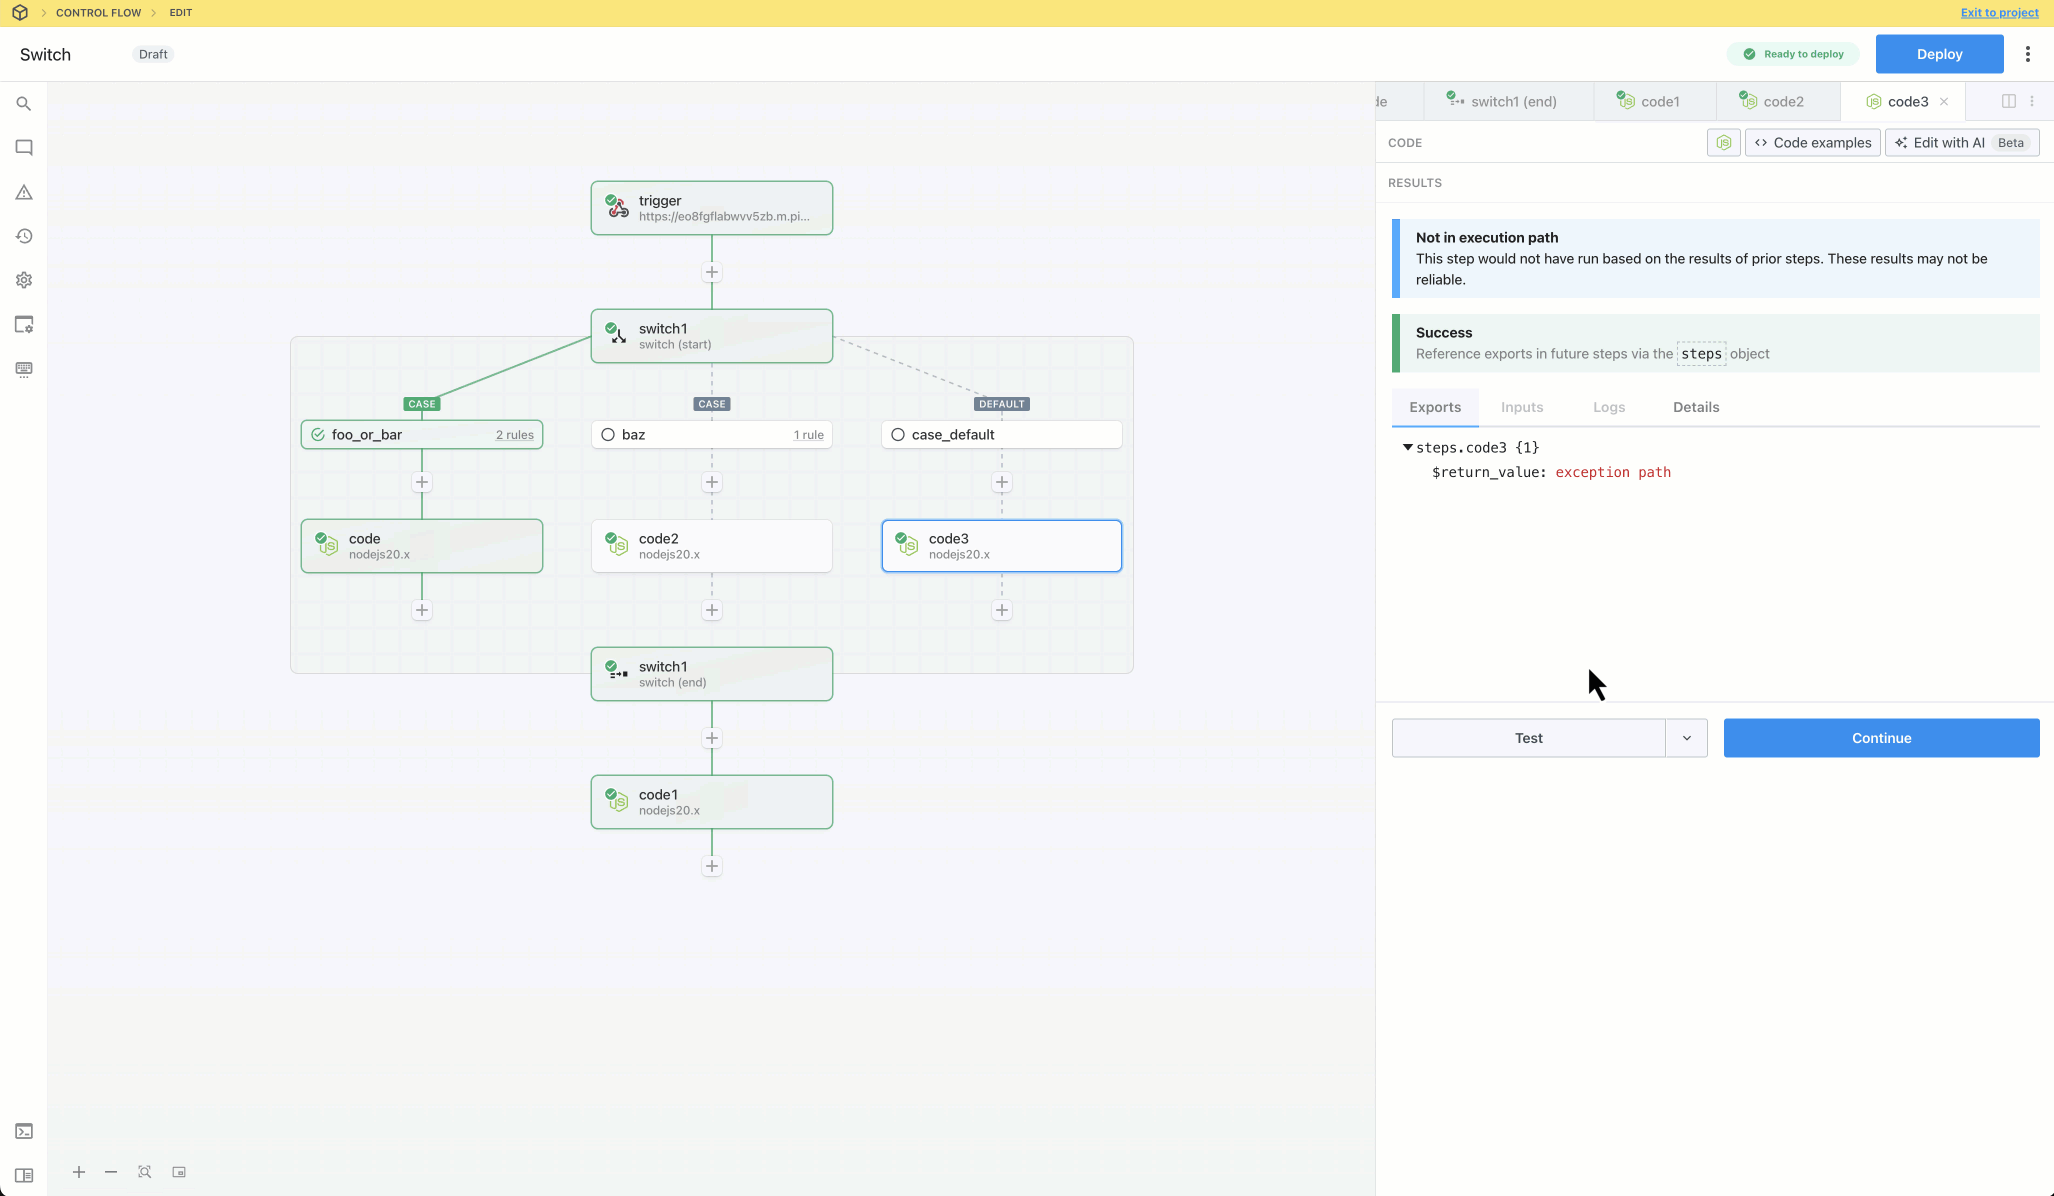
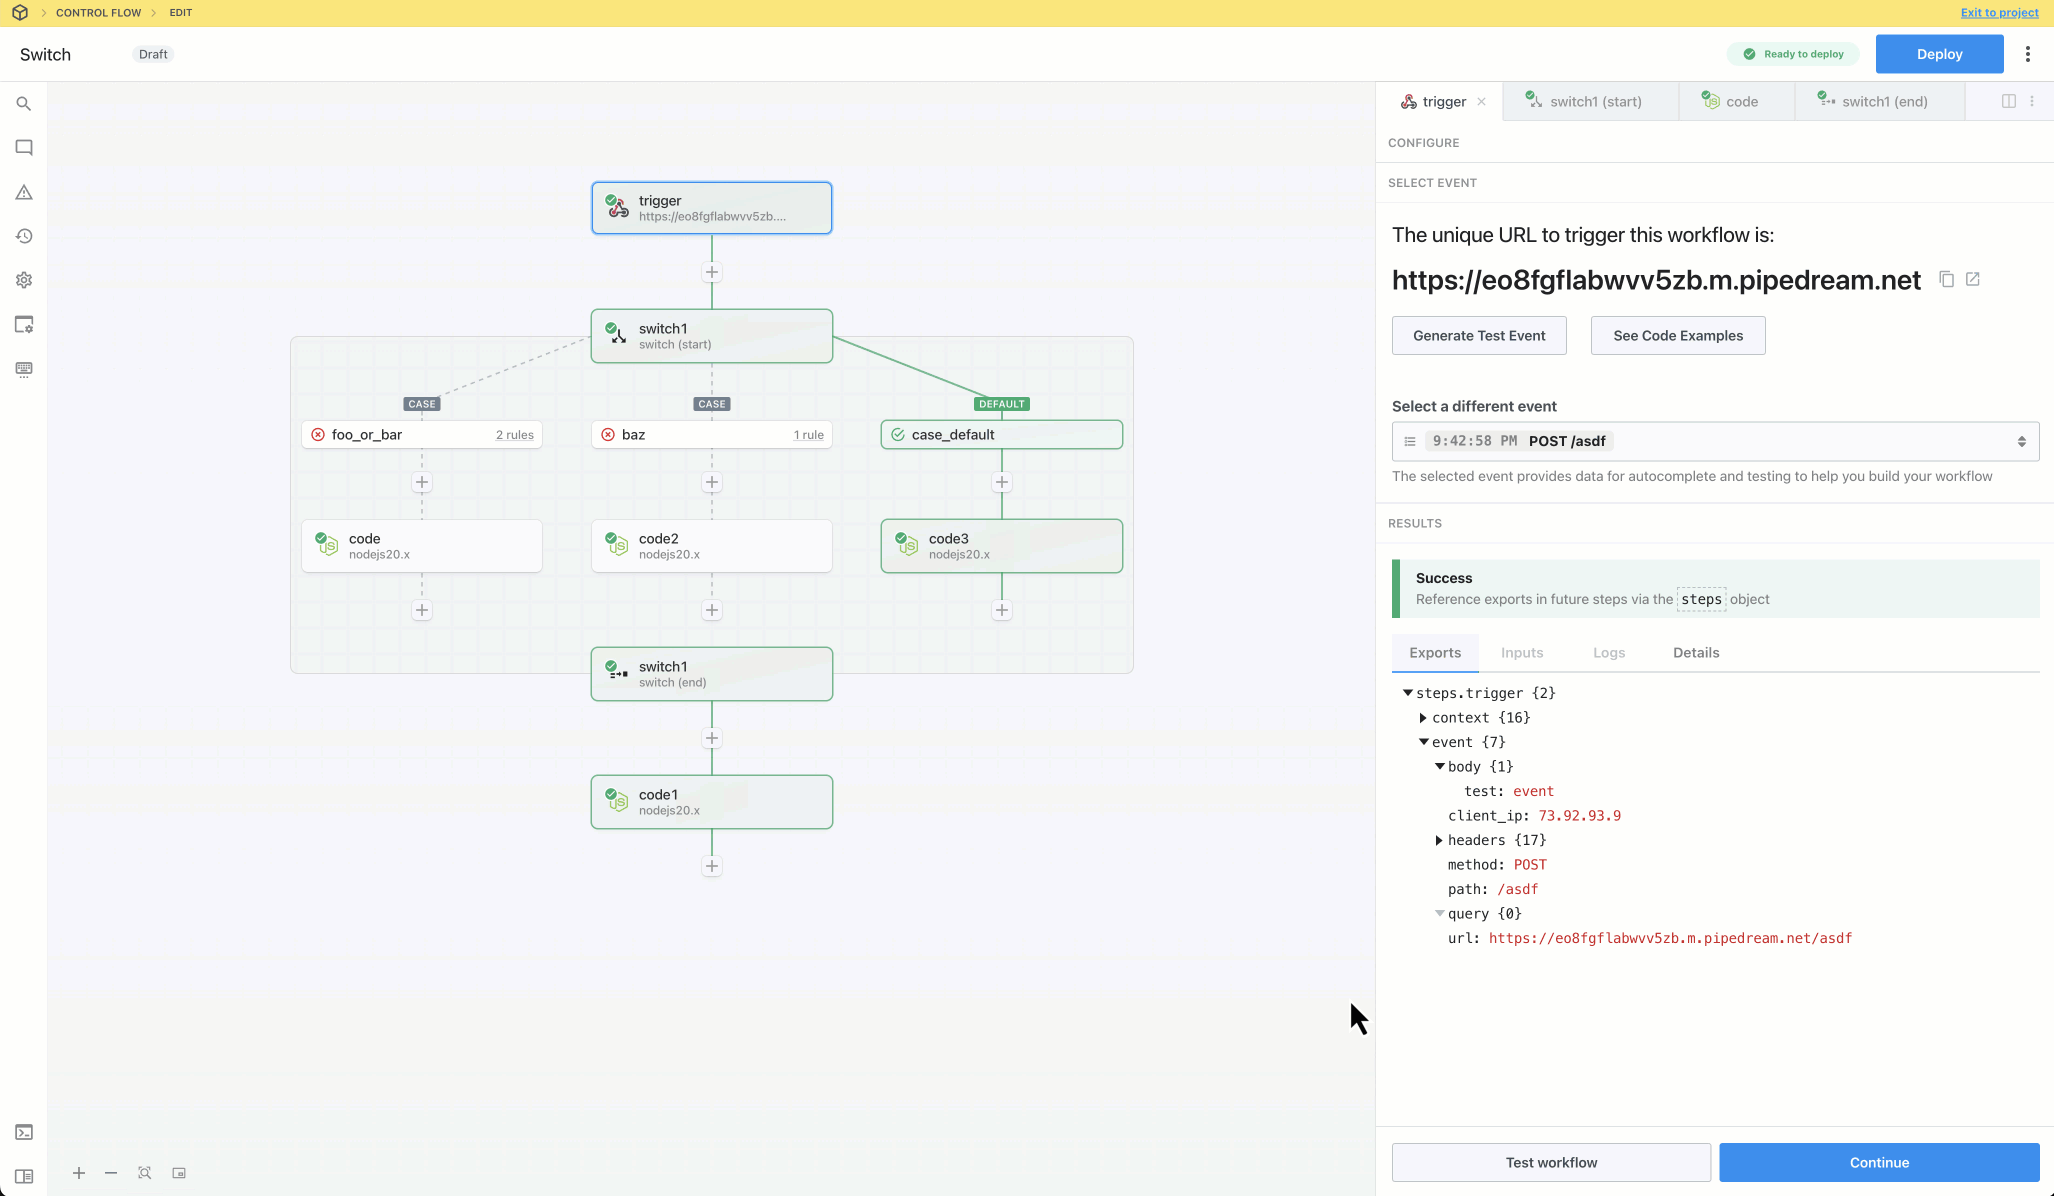
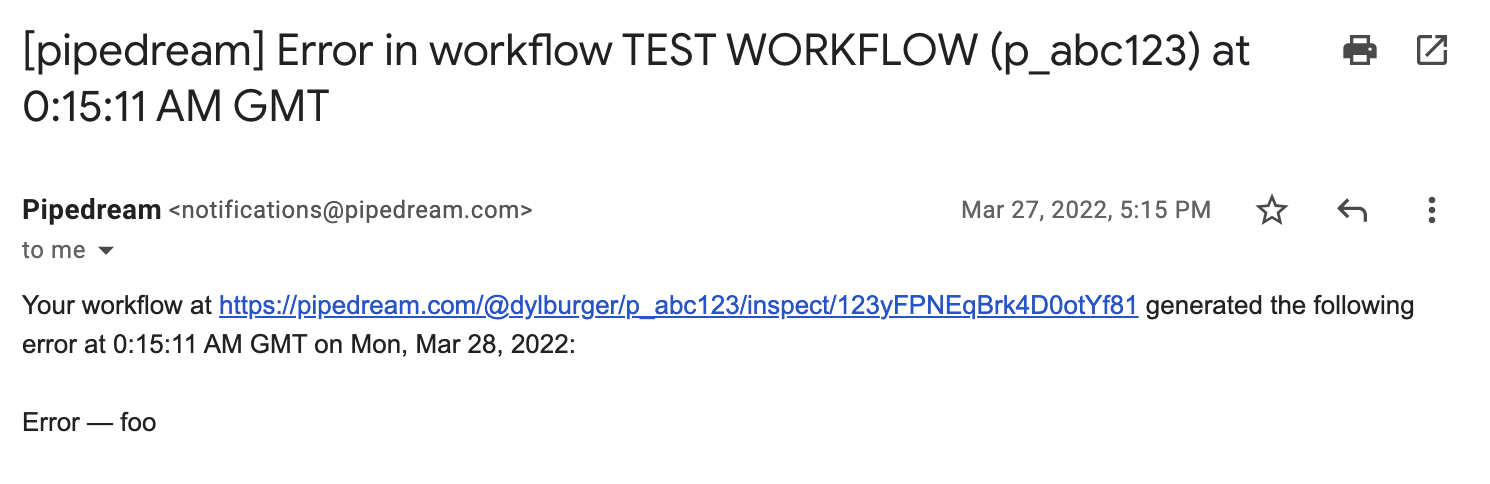 This email includes a link to the error so you can see the data and logs associated with the run. When you inspect the data in the Pipedream UI, you’ll see details on the error below the step that threw the error, e.g. the full stack trace.
#### Duplicate errors do not trigger duplicate emails
High-volume errors can lead to lots of notifications, so Pipedream only sends at most one email, per error, per workflow, per 24 hour period.
For example, if your workflow throws a `TypeError`, we’ll send you an email, but if it continues to throw that same `TypeError`, we won’t email you about the duplicate errors until the next day. If a different workflow throws a `TypeError`, you **will** receive an email about that.
### Test mode vs. live mode
When you’re editing and testing your workflow, any unhandled errors will **not** raise errors as emails, nor are they forwarded to [error listeners](/docs/workflows/building-workflows/errors/#handle-errors-with-custom-logic). Error notifications are only sent when a deployed workflow encounters an error on a live event.
## Debug with AI
You can debug errors in [code](/docs/workflows/building-workflows/code/) or [action](/docs/workflows/building-workflows/actions/) steps with AI by pressing the **Debug with AI** button at the bottom of any error.
### Data we send with errors
When you debug an error with AI, Pipedream sends the following information to OpenAI:
* The error code, message, and stack trace
* The step’s code
* The input added to the step configuration. This **does not** contain the event data that triggered your workflow, just the static input entered in the step configuration, like the URL of an HTTP request, or the names of [step exports](/docs/workflows/#step-exports).
We explicitly **do not** send the event data that triggered the error, or any other information about your account or workflow.
## Handle errors with custom logic
Pipedream exposes a global stream of all errors, raised from all workflows. You can subscribe to this stream, triggering a workflow on every event. This lets you handle errors in a custom way. Instead of sending all errors to email, you can send them to Slack, Discord, AWS, or any other service, and handle them in any custom way.
To do this:
1. Create a new workflow.
2. Add a new trigger. Search for the `Pipedream` app.
3. Select the custom source `Workspace $error events`.
4. Generate an error in a live version of any workflow (errors raised while you’re testing your workflow [do not send errors to the `$errors` stream](/docs/workflows/building-workflows/errors/#test-mode-vs-live-mode)). You should see this error trigger the workflow in step #1. From there, you can build any logic you want to handle errors across workflows.
### Duplicate errors *do* trigger duplicate error events on custom workflows
Unlike [the default system emails](/docs/workflows/building-workflows/errors/#duplicate-errors-do-not-trigger-duplicate-emails), duplicate errors are sent to any workflow listeners.
## Poll the REST API for workflow errors
Pipedream provides a REST API endpoint to [list the most recent 100 workflow errors](/docs/rest-api/#get-workflow-errors) for any given workflow. For example, to list the errors from workflow `p_abc123`, run:
```sh
curl 'https://api.pipedream.com/v1/workflows/p_abc123/$errors/event_summaries?expand=event' \
-H 'Authorization: Bearer
This email includes a link to the error so you can see the data and logs associated with the run. When you inspect the data in the Pipedream UI, you’ll see details on the error below the step that threw the error, e.g. the full stack trace.
#### Duplicate errors do not trigger duplicate emails
High-volume errors can lead to lots of notifications, so Pipedream only sends at most one email, per error, per workflow, per 24 hour period.
For example, if your workflow throws a `TypeError`, we’ll send you an email, but if it continues to throw that same `TypeError`, we won’t email you about the duplicate errors until the next day. If a different workflow throws a `TypeError`, you **will** receive an email about that.
### Test mode vs. live mode
When you’re editing and testing your workflow, any unhandled errors will **not** raise errors as emails, nor are they forwarded to [error listeners](/docs/workflows/building-workflows/errors/#handle-errors-with-custom-logic). Error notifications are only sent when a deployed workflow encounters an error on a live event.
## Debug with AI
You can debug errors in [code](/docs/workflows/building-workflows/code/) or [action](/docs/workflows/building-workflows/actions/) steps with AI by pressing the **Debug with AI** button at the bottom of any error.
### Data we send with errors
When you debug an error with AI, Pipedream sends the following information to OpenAI:
* The error code, message, and stack trace
* The step’s code
* The input added to the step configuration. This **does not** contain the event data that triggered your workflow, just the static input entered in the step configuration, like the URL of an HTTP request, or the names of [step exports](/docs/workflows/#step-exports).
We explicitly **do not** send the event data that triggered the error, or any other information about your account or workflow.
## Handle errors with custom logic
Pipedream exposes a global stream of all errors, raised from all workflows. You can subscribe to this stream, triggering a workflow on every event. This lets you handle errors in a custom way. Instead of sending all errors to email, you can send them to Slack, Discord, AWS, or any other service, and handle them in any custom way.
To do this:
1. Create a new workflow.
2. Add a new trigger. Search for the `Pipedream` app.
3. Select the custom source `Workspace $error events`.
4. Generate an error in a live version of any workflow (errors raised while you’re testing your workflow [do not send errors to the `$errors` stream](/docs/workflows/building-workflows/errors/#test-mode-vs-live-mode)). You should see this error trigger the workflow in step #1. From there, you can build any logic you want to handle errors across workflows.
### Duplicate errors *do* trigger duplicate error events on custom workflows
Unlike [the default system emails](/docs/workflows/building-workflows/errors/#duplicate-errors-do-not-trigger-duplicate-emails), duplicate errors are sent to any workflow listeners.
## Poll the REST API for workflow errors
Pipedream provides a REST API endpoint to [list the most recent 100 workflow errors](/docs/rest-api/#get-workflow-errors) for any given workflow. For example, to list the errors from workflow `p_abc123`, run:
```sh
curl 'https://api.pipedream.com/v1/workflows/p_abc123/$errors/event_summaries?expand=event' \
-H 'Authorization: Bearer 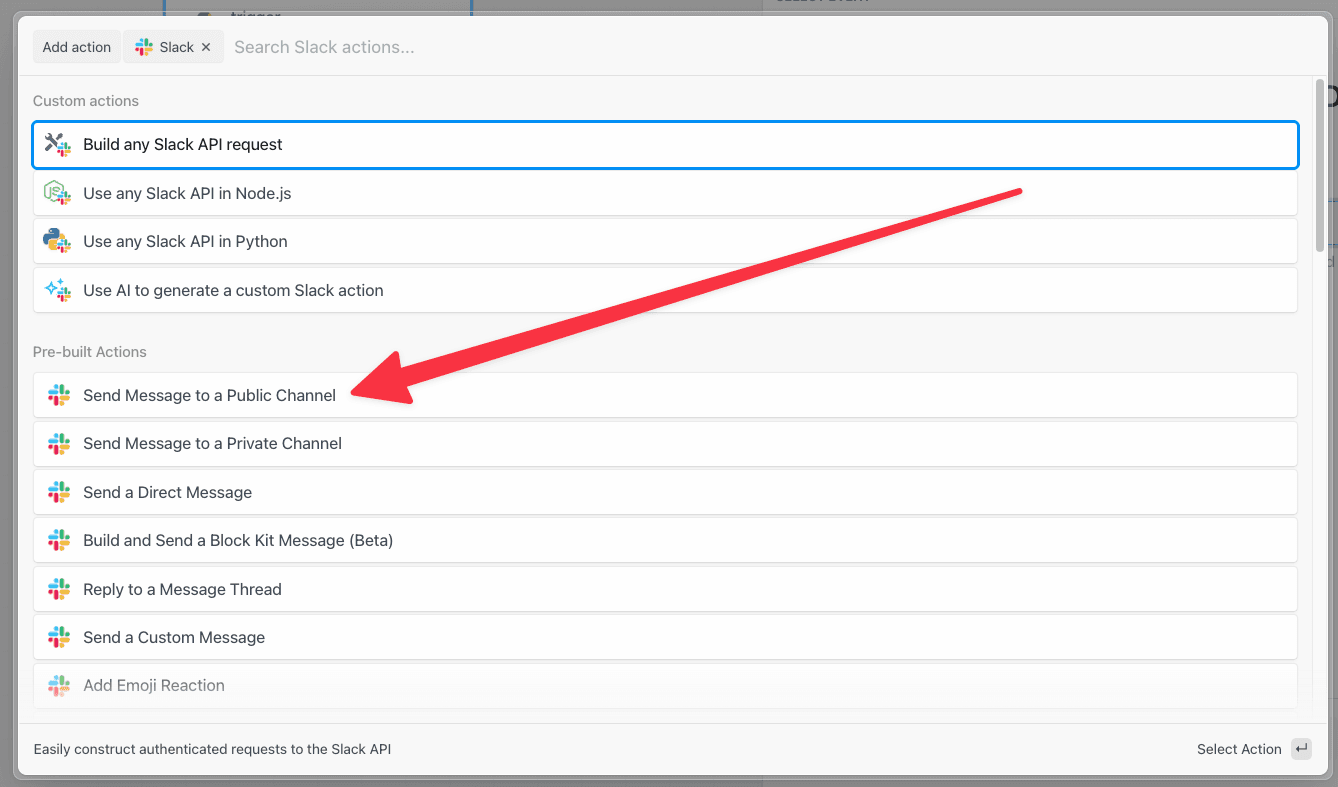 Then connect your Slack account, select a channel and write your message:
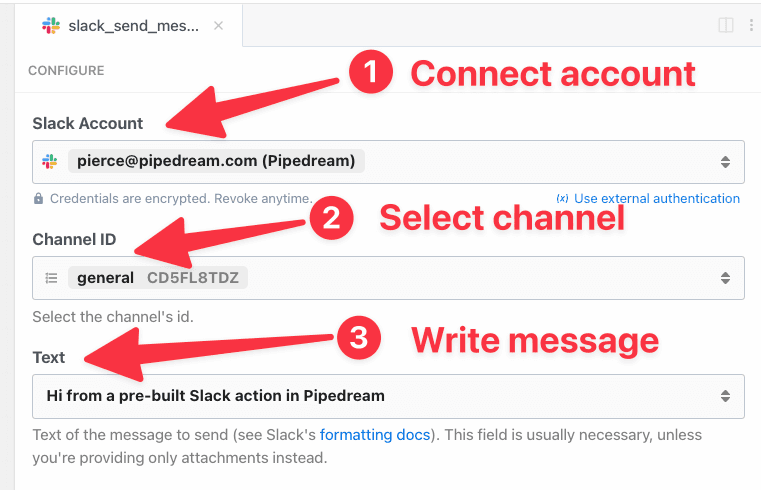 Now with a few clicks and some text you’ve integrated Slack into a Pipedream workflow.
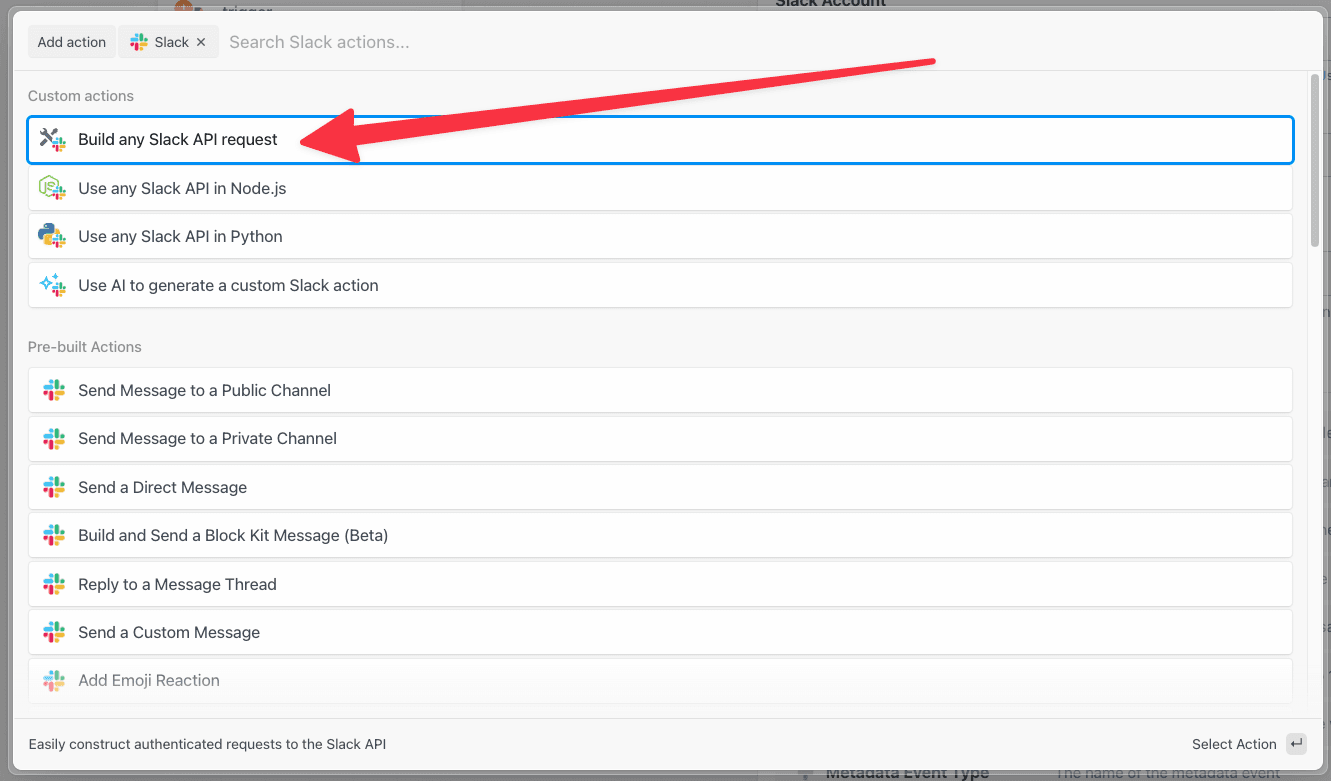 Selecting this action will display an HTTP request builder, with the Slack app slot to connect your account with.
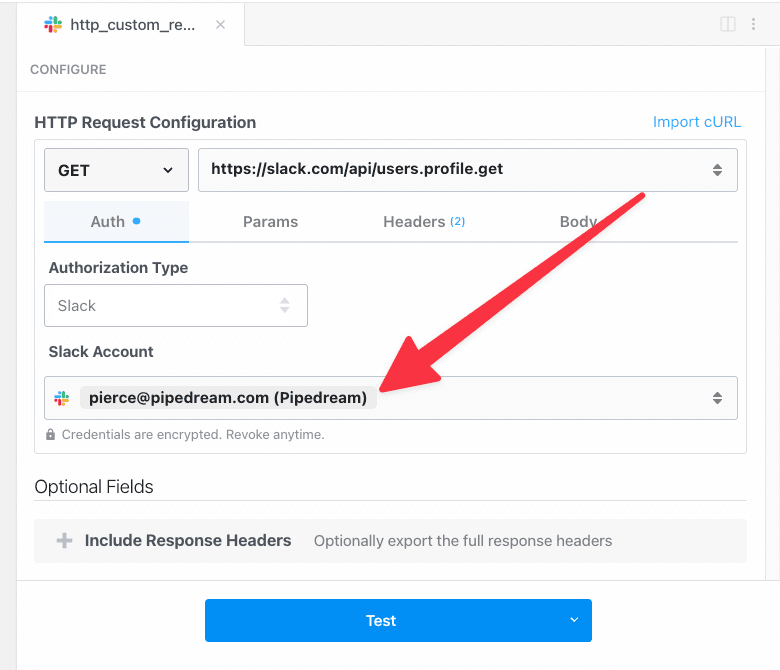 Once you connect your account to the step, it will automatically configure the authorization headers to match.
For example, the Slack API expects a Bearer token with the `Authorization` header. So Pipedream automatically configures this HTTP request to pass your token to that specific header:
Once you connect your account to the step, it will automatically configure the authorization headers to match.
For example, the Slack API expects a Bearer token with the `Authorization` header. So Pipedream automatically configures this HTTP request to pass your token to that specific header:
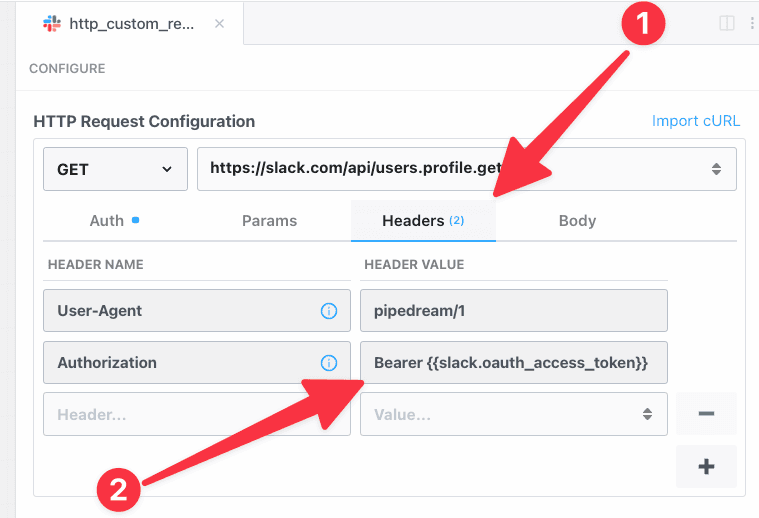 The configuration of the request and management of your token is automatically handled for you. So you can simply modify the request to match the API endpoint you’re seeking to interact with.
### Adding apps to an HTTP request builder action
You can also attach apps to the *Send any HTTP Request* action from the action selection menu. After adding a new step to your workflow, select the *Send any HTTP Request* action:
The configuration of the request and management of your token is automatically handled for you. So you can simply modify the request to match the API endpoint you’re seeking to interact with.
### Adding apps to an HTTP request builder action
You can also attach apps to the *Send any HTTP Request* action from the action selection menu. After adding a new step to your workflow, select the *Send any HTTP Request* action:
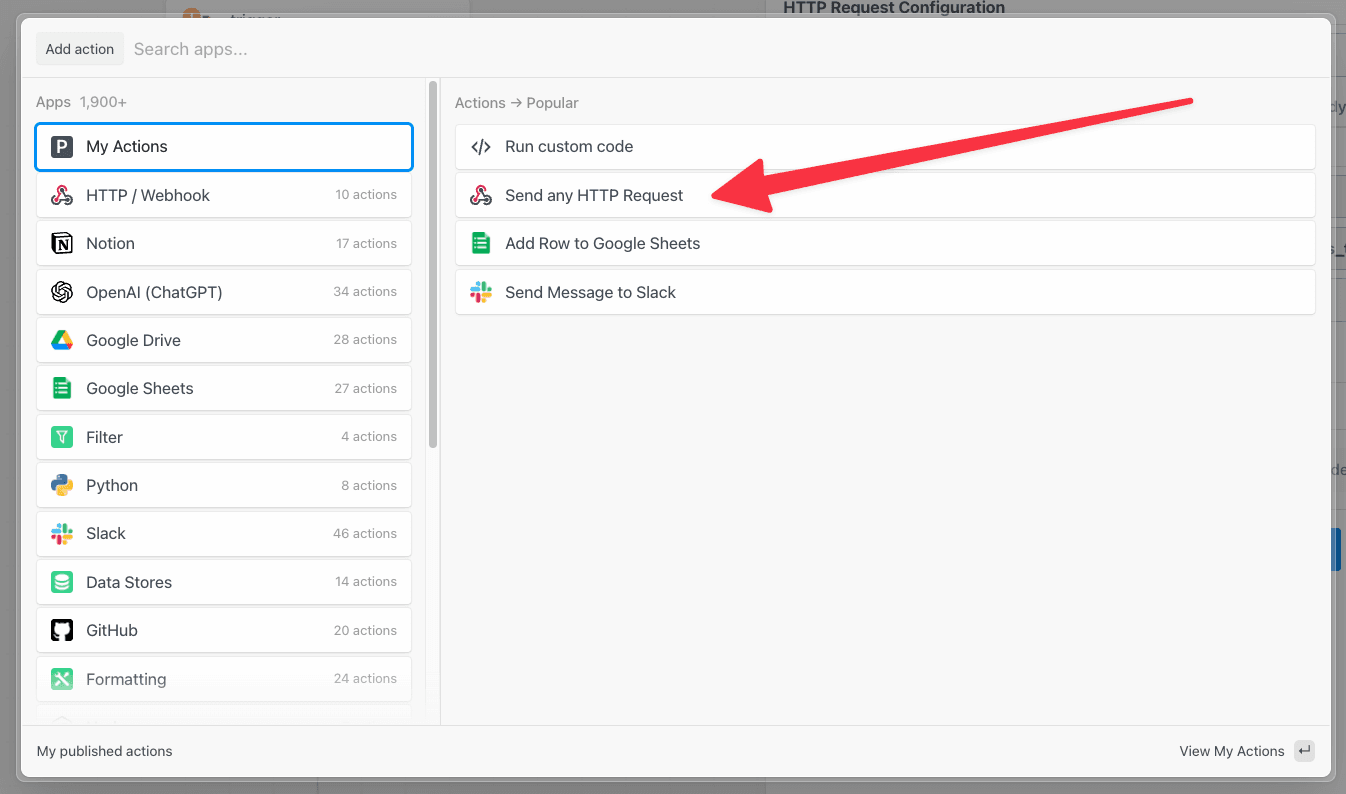 Then within the HTTP request builder, click the *Autorization Type* dropdown to select a method, and click **Select an app**:
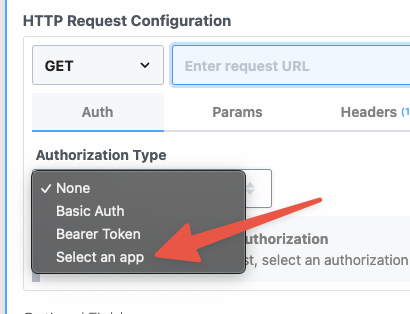 Then you can choose **Slack** as the service to connect the HTTP request with:
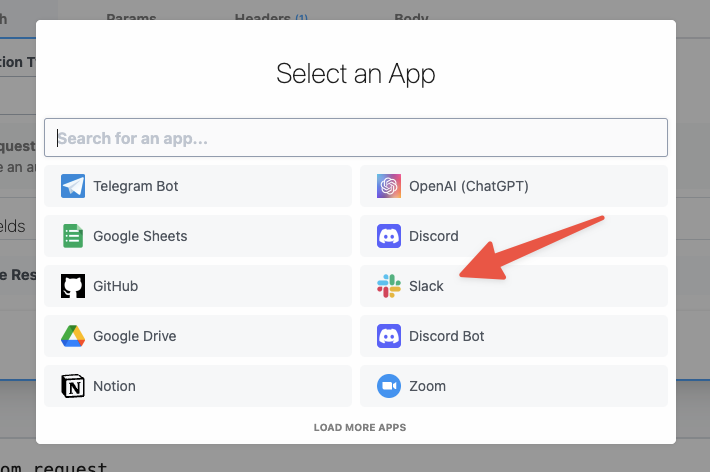 The HTTP request action will automatically be configured with the Slack connection, you’ll just need to select your account to finish the authentication.
Then it’s simply updating the URL to send a message which is [`https://slack.com/api/chat.postMessage`](https://api.slack.com/methods/chat.postMessage):
The HTTP request action will automatically be configured with the Slack connection, you’ll just need to select your account to finish the authentication.
Then it’s simply updating the URL to send a message which is [`https://slack.com/api/chat.postMessage`](https://api.slack.com/methods/chat.postMessage):
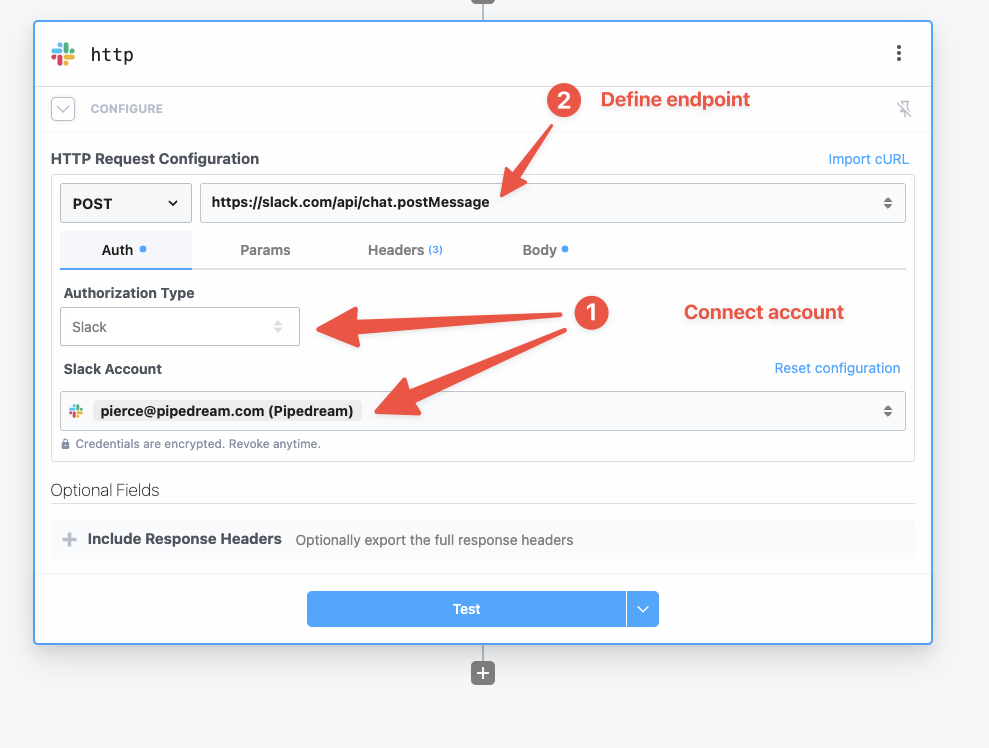 Finally modify the body of the request to specify the `channel` and `message` for the request:
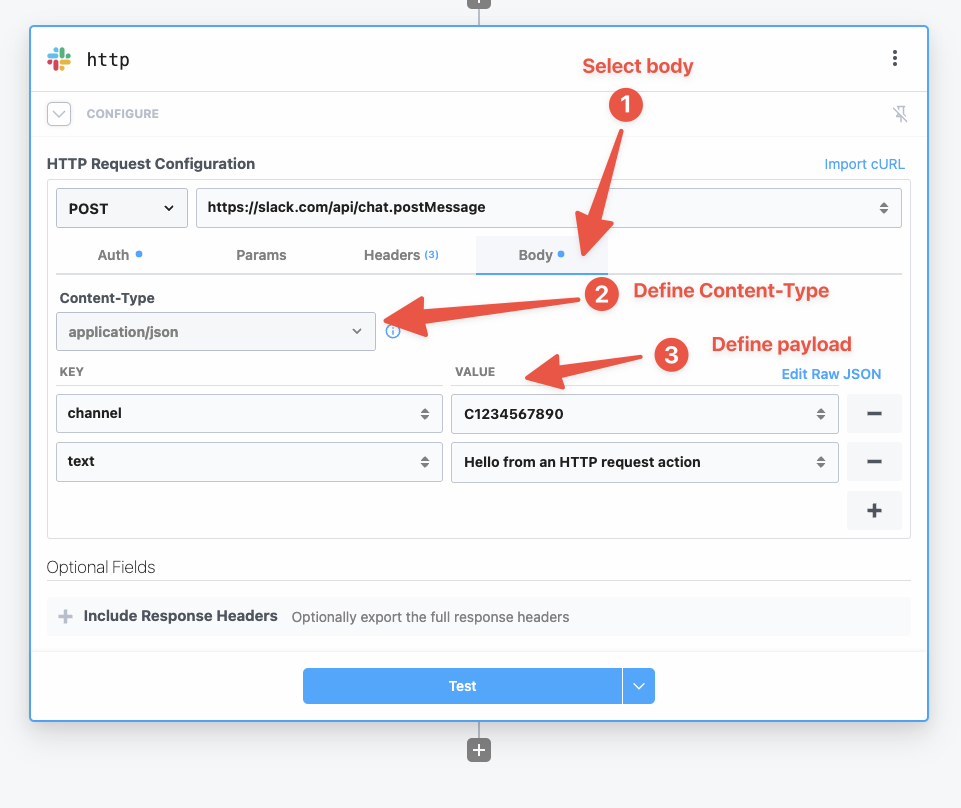 HTTP Request actions can be used to quickly scaffold API requests, but are not as flexible as code for a few reasons:
* Conditionally sending requests - The HTTP request action will always request, to send requests conditionally you’ll need to use code.
* Workflow execution halts - if an HTTP request fails, the entire workflow cancels
* Automatically retrying - `$.flow.retry` isn’t available in the HTTP Request action to retry automatically if the request fails
* Error handling - It’s not possible to set up a secondary action if an HTTP request fails.
## HTTP Requests in code
When you need more control, use code. You can use your connected accounts with Node.js or Python code steps.
This gives you the flexibility to catch errors, use retries, or send multiple API requests in a single step.
First, connect your account to the code step:
* [Connecting any account to a Node.js step](/docs/workflows/building-workflows/code/nodejs/auth/#accessing-connected-account-data-with-thisappnameauth)
* [Connecting any account to a Python step](/docs/workflows/building-workflows/code/python/auth/)
### Conditionally sending an API Request
You may only want to send a Slack message on a certain condition, in this example we’ll only send a Slack message if the HTTP request triggering the workflow passes a special variable: `steps.trigger.event.body.send_message`
```javascript
import { axios } from "@pipedream/platform"
export default defineComponent({
props: {
slack: {
type: "app",
app: "slack",
}
},
async run({steps, $}) {
// only send the Slack message if the HTTP request has a `send_message` property in the body
if(steps.trigger.body.send_message) {
return await axios($, {
headers: {
Authorization: `Bearer ${this.slack.$auth.oauth_access_token}`,
},
url: `https://slack.com/api/chat.postMessage`,
method: 'post',
data: {
channel: 'C123456',
text: 'Hi from a Pipedream Node.js code step'
}
})
}
},
})
```
### Error Handling
The other advantage of using code is handling error messages using `try...catch` blocks. In this example, we’ll only send a Slack message if another API request fails:
```php
import { axios } from "@pipedream/platform"
export default defineComponent({
props: {
openai: {
type: "app",
app: "openai"
},
slack: {
type: "app",
app: "slack",
}
},
async run({steps, $}) {
try {
return await axios($, {
url: `https://api.openai.com/v1/completions`,
method: 'post',
headers: {
Authorization: `Bearer ${this.openai.$auth.api_key}`,
},
data: {
"model": "text-davinci-003",
"prompt": "Say this is a test",
"max_tokens": 7,
"temperature": 0
}
})
} catch(error) {
return await axios($, {
url: `https://slack.com/api/chat.postMessage`,
method: 'post',
headers: {
Authorization: `Bearer ${this.slack.$auth.oauth_access_token}`,
},
data: {
channel: 'C123456',
text: `OpenAI returned an error: ${error}`
}
})
}
},
})
```
HTTP Request actions can be used to quickly scaffold API requests, but are not as flexible as code for a few reasons:
* Conditionally sending requests - The HTTP request action will always request, to send requests conditionally you’ll need to use code.
* Workflow execution halts - if an HTTP request fails, the entire workflow cancels
* Automatically retrying - `$.flow.retry` isn’t available in the HTTP Request action to retry automatically if the request fails
* Error handling - It’s not possible to set up a secondary action if an HTTP request fails.
## HTTP Requests in code
When you need more control, use code. You can use your connected accounts with Node.js or Python code steps.
This gives you the flexibility to catch errors, use retries, or send multiple API requests in a single step.
First, connect your account to the code step:
* [Connecting any account to a Node.js step](/docs/workflows/building-workflows/code/nodejs/auth/#accessing-connected-account-data-with-thisappnameauth)
* [Connecting any account to a Python step](/docs/workflows/building-workflows/code/python/auth/)
### Conditionally sending an API Request
You may only want to send a Slack message on a certain condition, in this example we’ll only send a Slack message if the HTTP request triggering the workflow passes a special variable: `steps.trigger.event.body.send_message`
```javascript
import { axios } from "@pipedream/platform"
export default defineComponent({
props: {
slack: {
type: "app",
app: "slack",
}
},
async run({steps, $}) {
// only send the Slack message if the HTTP request has a `send_message` property in the body
if(steps.trigger.body.send_message) {
return await axios($, {
headers: {
Authorization: `Bearer ${this.slack.$auth.oauth_access_token}`,
},
url: `https://slack.com/api/chat.postMessage`,
method: 'post',
data: {
channel: 'C123456',
text: 'Hi from a Pipedream Node.js code step'
}
})
}
},
})
```
### Error Handling
The other advantage of using code is handling error messages using `try...catch` blocks. In this example, we’ll only send a Slack message if another API request fails:
```php
import { axios } from "@pipedream/platform"
export default defineComponent({
props: {
openai: {
type: "app",
app: "openai"
},
slack: {
type: "app",
app: "slack",
}
},
async run({steps, $}) {
try {
return await axios($, {
url: `https://api.openai.com/v1/completions`,
method: 'post',
headers: {
Authorization: `Bearer ${this.openai.$auth.api_key}`,
},
data: {
"model": "text-davinci-003",
"prompt": "Say this is a test",
"max_tokens": 7,
"temperature": 0
}
})
} catch(error) {
return await axios($, {
url: `https://slack.com/api/chat.postMessage`,
method: 'post',
headers: {
Authorization: `Bearer ${this.slack.$auth.oauth_access_token}`,
},
data: {
channel: 'C123456',
text: `OpenAI returned an error: ${error}`
}
})
}
},
})
```
 This only communicates the error code, and not any other information (like the body or headers) returned from the server.
Pipedream publishes an `axios` wrapper as a part of [the `@pipedream/platform` package](https://github.com/PipedreamHQ/pipedream/tree/master/platform). This presents the same programming API as `axios`, but implements two helpful features:
1. When the HTTP request succeeds (response code \< `400`), it returns only the `data` property of the response object — the HTTP response body. This is typically what users want to see when they make an HTTP request:
This only communicates the error code, and not any other information (like the body or headers) returned from the server.
Pipedream publishes an `axios` wrapper as a part of [the `@pipedream/platform` package](https://github.com/PipedreamHQ/pipedream/tree/master/platform). This presents the same programming API as `axios`, but implements two helpful features:
1. When the HTTP request succeeds (response code \< `400`), it returns only the `data` property of the response object — the HTTP response body. This is typically what users want to see when they make an HTTP request:
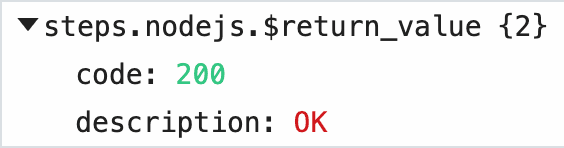 2. When the HTTP request *fails* (response code >= `400`), it displays a detailed error message in the Pipedream UI (the HTTP response body), and returns the whole `axios` response object so users can review details on the HTTP request and response:
 ### Using `@pipedream/platform` axios in component actions
To use `@pipedream/platform` axios in component actions, import it:
```javascript
import { axios } from "@pipedream/platform"
```
`@pipedream/platform` axios uses methods [provided by the `$` object](/docs/components/contributing/api/#actions), so you’ll need to pass that as the first argument to `axios` when making HTTP requests, and pass the [standard `axios` request config](https://github.com/axios/axios#request-config) as the second argument.
Here’s an example action:
```javascript
import { axios } from "@pipedream/platform"
export default {
key: "my-test-component",
name: "My Test component",
version: "0.0.1",
type: "action",
async run({ $ }) {
return await axios($, {
url: "https://httpstat.us/200",
})
}
}
```
# Inspect Events
Source: https://pipedream.com/docs/workflows/building-workflows/inspect
[The inspector](/docs/workflows/building-workflows/inspect/#the-inspector) lists the events you send to a [workflow](/docs/workflows/building-workflows/). Once you choose a [trigger](/docs/workflows/building-workflows/triggers/) and send events to it, you’ll see those events in the inspector, to the left of your workflow.
Clicking on an event from the list lets you [review the incoming event data and workflow execution logs](/docs/workflows/building-workflows/triggers/#examining-event-data) for that event.
You can use the inspector to replay events, delete them, and more.
## The inspector
The inspector lists your workflow’s events:
### Using `@pipedream/platform` axios in component actions
To use `@pipedream/platform` axios in component actions, import it:
```javascript
import { axios } from "@pipedream/platform"
```
`@pipedream/platform` axios uses methods [provided by the `$` object](/docs/components/contributing/api/#actions), so you’ll need to pass that as the first argument to `axios` when making HTTP requests, and pass the [standard `axios` request config](https://github.com/axios/axios#request-config) as the second argument.
Here’s an example action:
```javascript
import { axios } from "@pipedream/platform"
export default {
key: "my-test-component",
name: "My Test component",
version: "0.0.1",
type: "action",
async run({ $ }) {
return await axios($, {
url: "https://httpstat.us/200",
})
}
}
```
# Inspect Events
Source: https://pipedream.com/docs/workflows/building-workflows/inspect
[The inspector](/docs/workflows/building-workflows/inspect/#the-inspector) lists the events you send to a [workflow](/docs/workflows/building-workflows/). Once you choose a [trigger](/docs/workflows/building-workflows/triggers/) and send events to it, you’ll see those events in the inspector, to the left of your workflow.
Clicking on an event from the list lets you [review the incoming event data and workflow execution logs](/docs/workflows/building-workflows/triggers/#examining-event-data) for that event.
You can use the inspector to replay events, delete them, and more.
## The inspector
The inspector lists your workflow’s events:
 ## Event Duration
The duration shown when clicking an individual event notes the time it took to run your code, in addition to the time it took Pipedream to handle the execution of that code and manage its output. Specifically,
**Duration = Time Your Code Ran + Pipedream Execution Time**
## Replaying and deleting events
Hover over an event, and you’ll see two buttons:
## Event Duration
The duration shown when clicking an individual event notes the time it took to run your code, in addition to the time it took Pipedream to handle the execution of that code and manage its output. Specifically,
**Duration = Time Your Code Ran + Pipedream Execution Time**
## Replaying and deleting events
Hover over an event, and you’ll see two buttons:
 The blue button with the arrow **replays** the event against the newest version of your workflow. The red button with the X **deletes** the event.
## Messages
Any `console.log()` statements or other output of code steps is attached to the associated code cells. But [`$.flow.exit()`](/docs/workflows/building-workflows/code/nodejs/#ending-a-workflow-early) or [errors](/docs/workflows/building-workflows/code/nodejs/#errors) end a workflow’s execution, so their details appear in the inspector.
## Limits
Pipedream retains a limited history of events for a given workflow. See the [limits docs](/docs/workflows/limits/#event-history) for more information.
# Settings
Source: https://pipedream.com/docs/workflows/building-workflows/settings
export const WARM_WORKERS_CREDITS_PER_INTERVAL = '5';
export const WARM_WORKERS_INTERVAL = '10 minutes';
export const MEMORY_ABSOLUTE_LIMIT = '10GB';
export const MEMORY_LIMIT = '256MB';
You can control workflow-specific settings in your workflow’s **Settings**:
1. Visit your workflow
2. Click on Workflow Settings on the top left:
The blue button with the arrow **replays** the event against the newest version of your workflow. The red button with the X **deletes** the event.
## Messages
Any `console.log()` statements or other output of code steps is attached to the associated code cells. But [`$.flow.exit()`](/docs/workflows/building-workflows/code/nodejs/#ending-a-workflow-early) or [errors](/docs/workflows/building-workflows/code/nodejs/#errors) end a workflow’s execution, so their details appear in the inspector.
## Limits
Pipedream retains a limited history of events for a given workflow. See the [limits docs](/docs/workflows/limits/#event-history) for more information.
# Settings
Source: https://pipedream.com/docs/workflows/building-workflows/settings
export const WARM_WORKERS_CREDITS_PER_INTERVAL = '5';
export const WARM_WORKERS_INTERVAL = '10 minutes';
export const MEMORY_ABSOLUTE_LIMIT = '10GB';
export const MEMORY_LIMIT = '256MB';
You can control workflow-specific settings in your workflow’s **Settings**:
1. Visit your workflow
2. Click on Workflow Settings on the top left:

 ## Auto-retry Errors
 If the step execution succeeds during any retry, the execution will proceed to the next step of the workflow.
If the step fails on all 8 retries and throws a final error, you’ll receive [an error notification](/docs/workflows/building-workflows/errors/) through your standard notification channel.
### Send error notifications on the first error
By default, if a step fails on all 8 retries, and throws a final error, you’ll receive [an error notification](/docs/workflows/building-workflows/errors/) through your standard notification channel. But sometimes you need to investigate errors as soon as they happen. If you’re connecting to your database, and receive an error that the DB is down, you may want to investigate that immediately.
On any workflow with auto-retry enabled, you can optionally choose to **Send notification on first error**. This is disabled by default so you don’t get emails for transient errors, but you can enable for critical workflows where you want visibility into all errors.
For custom control over error handling, you can implement error logic in code steps (e.g. `try` / `catch` statements in Node.js code), or [create your own custom error workflow](/docs/workflows/building-workflows/errors/#handle-errors-with-custom-logic).
## Data Retention Controls
By default, Pipedream stores exports, logs, and other data tied to workflow executions. You can view these logs in two places:
1. [The workflow inspector](/docs/workflows/building-workflows/inspect/#the-inspector)
2. [Event History](/docs/workflows/event-history/)
But if you’re processing sensitive data, you may not want to store those logs. You can **Disable data retention** in your workflow settings to disable **all** logging. Since Pipedream stores no workflow logs with this setting enabled, you’ll see no logs in the inspector or event history UI.
If the step execution succeeds during any retry, the execution will proceed to the next step of the workflow.
If the step fails on all 8 retries and throws a final error, you’ll receive [an error notification](/docs/workflows/building-workflows/errors/) through your standard notification channel.
### Send error notifications on the first error
By default, if a step fails on all 8 retries, and throws a final error, you’ll receive [an error notification](/docs/workflows/building-workflows/errors/) through your standard notification channel. But sometimes you need to investigate errors as soon as they happen. If you’re connecting to your database, and receive an error that the DB is down, you may want to investigate that immediately.
On any workflow with auto-retry enabled, you can optionally choose to **Send notification on first error**. This is disabled by default so you don’t get emails for transient errors, but you can enable for critical workflows where you want visibility into all errors.
For custom control over error handling, you can implement error logic in code steps (e.g. `try` / `catch` statements in Node.js code), or [create your own custom error workflow](/docs/workflows/building-workflows/errors/#handle-errors-with-custom-logic).
## Data Retention Controls
By default, Pipedream stores exports, logs, and other data tied to workflow executions. You can view these logs in two places:
1. [The workflow inspector](/docs/workflows/building-workflows/inspect/#the-inspector)
2. [Event History](/docs/workflows/event-history/)
But if you’re processing sensitive data, you may not want to store those logs. You can **Disable data retention** in your workflow settings to disable **all** logging. Since Pipedream stores no workflow logs with this setting enabled, you’ll see no logs in the inspector or event history UI.
 Refer to our [pricing page](https://pipedream.com/pricing) to understand the latest limits based on your plan.
### Constraints
* **Data Retention Controls do not apply to sources**: Even with data retention disabled on your workflow, Pipedream will still log inbound events for the source.
* **No events will be shown in the UI**: When data retention is disabled for your workflow, the Pipedream UI will not show any new events in the inspector or Event History for that workflow.
Refer to our [pricing page](https://pipedream.com/pricing) to understand the latest limits based on your plan.
### Constraints
* **Data Retention Controls do not apply to sources**: Even with data retention disabled on your workflow, Pipedream will still log inbound events for the source.
* **No events will be shown in the UI**: When data retention is disabled for your workflow, the Pipedream UI will not show any new events in the inspector or Event History for that workflow.
 When you configure workers for a specific workflow, Pipedream initializes dedicated workers — virtual machines that run Pipedream’s [execution environment](/docs/privacy-and-security/#execution-environment). [It can take a few minutes](/docs/workflows/building-workflows/settings/#how-long-does-it-take-to-spin-up-a-dedicated-worker) for new dedicated workers to deploy. Once deployed, these workers are available at all times to respond to workflow executions, with no cold starts.
 For example, if you run a single dedicated worker for 24 hours, that would cost 720 credits:
```python
5 credits per 10 min
* 6 10-min periods per hour
* 24 hours
= 720 credits
```
{WARM_WORKERS_INTERVAL} is the *minimum* interval that Pipedream charges for usage. If you have a dedicated worker live for 1 minute, Pipedream will still charge {WARM_WORKERS_CREDITS_PER_INTERVAL} credits.
Additionally, any change to dedicated worker configuration, (including worklow deploys) will result in an extra {WARM_WORKERS_CREDITS_PER_INTERVAL} credits of usage.
For example, if you run a single dedicated worker for 24 hours, that would cost 720 credits:
```python
5 credits per 10 min
* 6 10-min periods per hour
* 24 hours
= 720 credits
```
{WARM_WORKERS_INTERVAL} is the *minimum* interval that Pipedream charges for usage. If you have a dedicated worker live for 1 minute, Pipedream will still charge {WARM_WORKERS_CREDITS_PER_INTERVAL} credits.
Additionally, any change to dedicated worker configuration, (including worklow deploys) will result in an extra {WARM_WORKERS_CREDITS_PER_INTERVAL} credits of usage.
 ### Limits
Each attachment is limited to `25MB` in size. The total size of all attachments within a single workflow cannot exceed `200MB`.
# Concurrency and Throttling
Source: https://pipedream.com/docs/workflows/building-workflows/settings/concurrency-and-throttling
export const MAX_WORKFLOW_QUEUE_SIZE = '10,000';
export const DEFAULT_WORKFLOW_QUEUE_SIZE = '100';
Pipedream makes it easy to manage the concurrency and rate at which events trigger your workflow code using execution controls.
## Overview
Workflows listen for events and execute as soon as they are triggered. While this behavior is expected for many use cases, there can be unintended consequences.
### Concurrency
Without restricting concurrency, events can be processed in parallel and there is no guarantee that they will execute in the order in which they were received. This can cause race conditions.
For example, if two workflow events try to add data to Google Sheets simultaneously, they may both attempt to write data to the same row. As a result, one event can overwrite data from another event. The diagram below illustrates this example — both `Event 1` and `Event 2` attempt to write data to Google Sheets concurrently — as a result, they will both write to the same row and the data for one event will be overwritten and lost (and no error will be thrown).
### Limits
Each attachment is limited to `25MB` in size. The total size of all attachments within a single workflow cannot exceed `200MB`.
# Concurrency and Throttling
Source: https://pipedream.com/docs/workflows/building-workflows/settings/concurrency-and-throttling
export const MAX_WORKFLOW_QUEUE_SIZE = '10,000';
export const DEFAULT_WORKFLOW_QUEUE_SIZE = '100';
Pipedream makes it easy to manage the concurrency and rate at which events trigger your workflow code using execution controls.
## Overview
Workflows listen for events and execute as soon as they are triggered. While this behavior is expected for many use cases, there can be unintended consequences.
### Concurrency
Without restricting concurrency, events can be processed in parallel and there is no guarantee that they will execute in the order in which they were received. This can cause race conditions.
For example, if two workflow events try to add data to Google Sheets simultaneously, they may both attempt to write data to the same row. As a result, one event can overwrite data from another event. The diagram below illustrates this example — both `Event 1` and `Event 2` attempt to write data to Google Sheets concurrently — as a result, they will both write to the same row and the data for one event will be overwritten and lost (and no error will be thrown).
 You can avoid race conditions like this by limiting workflow concurrency to a single “worker”. What this means is that only one event will be processed at a time, and the next event will not start processing until the first is complete (unprocesssed events will maintained in a queue and processed by the workflow in order). The following diagram illustrates how the events in the last diagram would executed if concurrency was limited to a single worker.
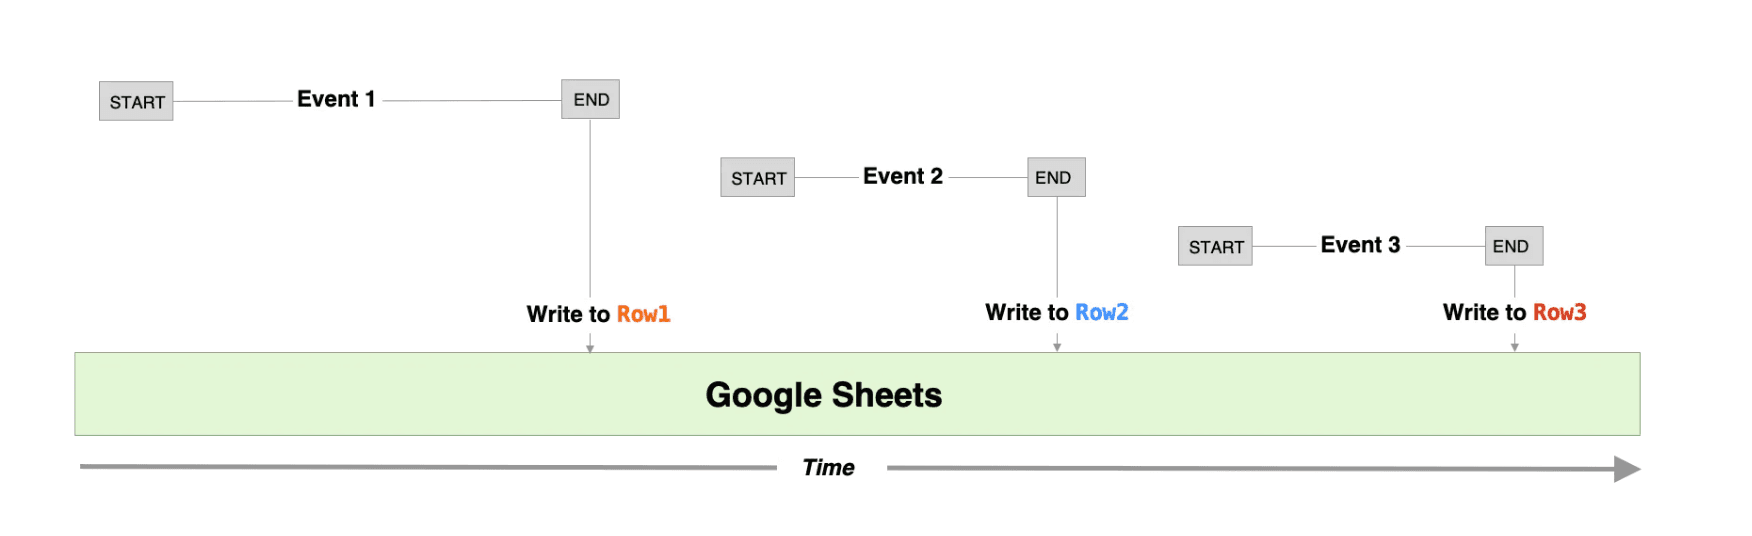 While the first example resulted in only two rows of data in Google Sheets, this time data for all three events are recorded to three separate rows.
### Throttling
If your workflow integrates with any APIs, then you may need to limit the rate at which your workflow executes to avoid hitting rate limits from your API provider. Since event-driven workflows are stateless, you can’t manage the rate of execution from within your workflow code. Pipedream’s execution controls solve this problem by allowing you to control the maximum number of times a workflow may be invoked over a specific period of time (e.g., up to 1 event every second).
While the first example resulted in only two rows of data in Google Sheets, this time data for all three events are recorded to three separate rows.
### Throttling
If your workflow integrates with any APIs, then you may need to limit the rate at which your workflow executes to avoid hitting rate limits from your API provider. Since event-driven workflows are stateless, you can’t manage the rate of execution from within your workflow code. Pipedream’s execution controls solve this problem by allowing you to control the maximum number of times a workflow may be invoked over a specific period of time (e.g., up to 1 event every second).
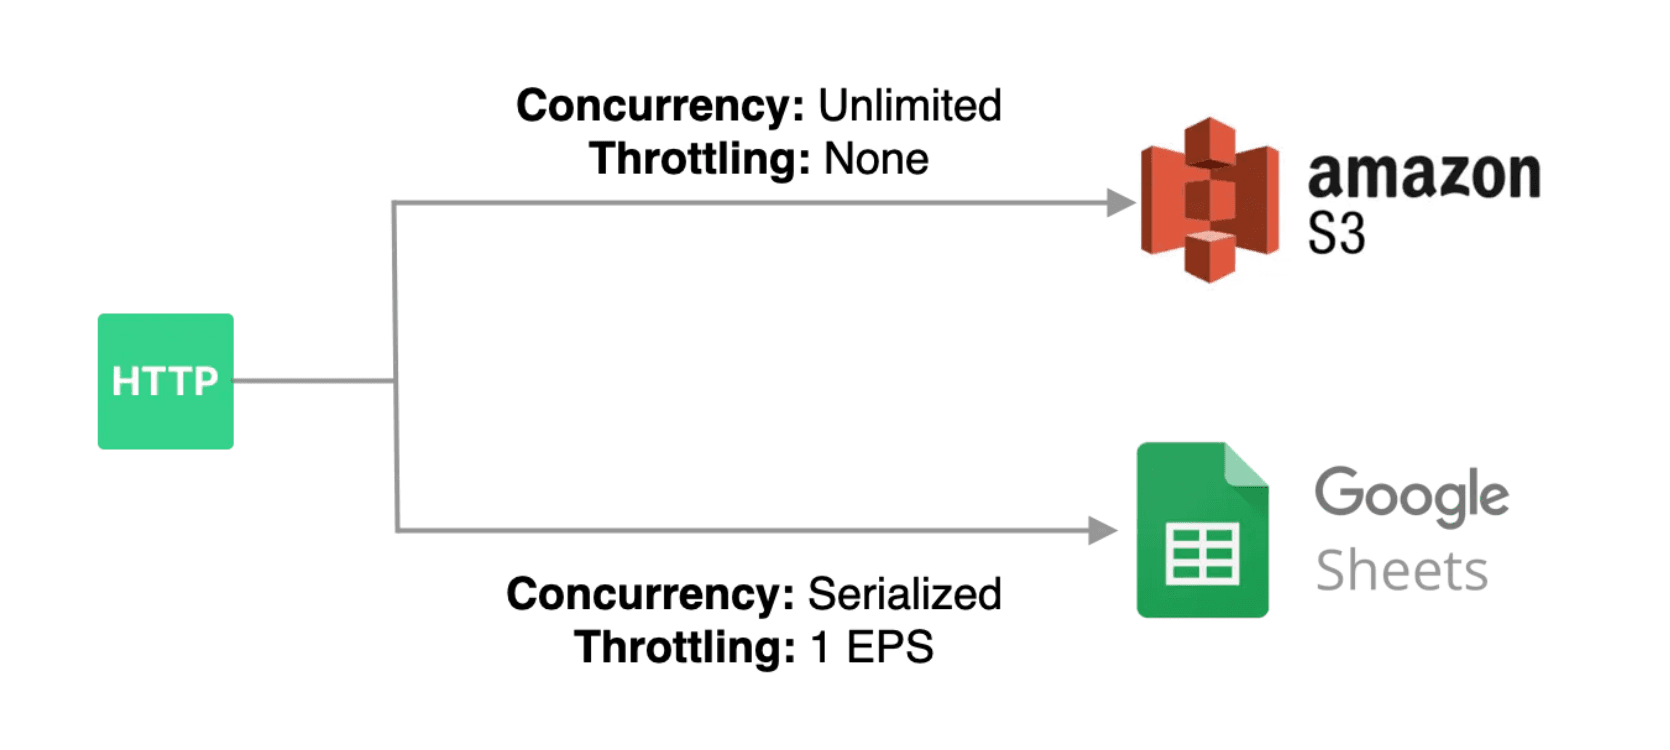 The maximum number of events Pipedream will queue per workflow depends on your account type.
* Up to 100 events will be queued per workflow for the workspaces on the free tier.
* Workflows owned by paid plans may have custom limits. If you need a larger queue size, [see here](/docs/workflows/building-workflows/settings/concurrency-and-throttling/#increasing-the-queue-size-for-a-workflow).
**IMPORTANT:** If the number of events emitted to a workflow exceeds the queue size, events will be lost. If that happens, you’ll see an error in your workflow, and you’ll receive an error email.
To learn more about how the feature works and technical details, check out our [engineering blog post](https://blog.pipedream.com/concurrency-controls-design/).
### Where Do I Manage Concurrency and Throttling?
Concurrency and throttling can be managed in the **Execution Controls** section of your **Workflow Settings**. Event queues are currently supported for any workflow that is triggered by an event source. Event queues are not currently supported for native workflow triggers (native HTTP, cron, SDK and email).
The maximum number of events Pipedream will queue per workflow depends on your account type.
* Up to 100 events will be queued per workflow for the workspaces on the free tier.
* Workflows owned by paid plans may have custom limits. If you need a larger queue size, [see here](/docs/workflows/building-workflows/settings/concurrency-and-throttling/#increasing-the-queue-size-for-a-workflow).
**IMPORTANT:** If the number of events emitted to a workflow exceeds the queue size, events will be lost. If that happens, you’ll see an error in your workflow, and you’ll receive an error email.
To learn more about how the feature works and technical details, check out our [engineering blog post](https://blog.pipedream.com/concurrency-controls-design/).
### Where Do I Manage Concurrency and Throttling?
Concurrency and throttling can be managed in the **Execution Controls** section of your **Workflow Settings**. Event queues are currently supported for any workflow that is triggered by an event source. Event queues are not currently supported for native workflow triggers (native HTTP, cron, SDK and email).
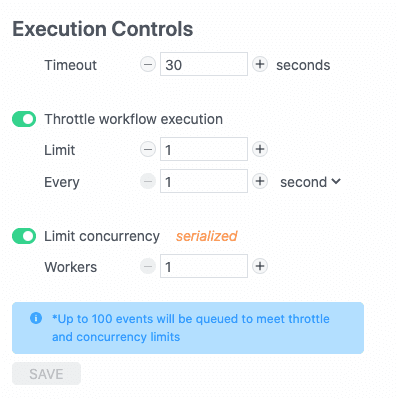 ### Managing Event Concurrency
Concurrency controls define how many events can be executed in parallel. To enforce serialized, in-order execution, limit concurrency to `1` worker. This guarantees that each event will only be processed once the execution for the previous event is complete.
To execute events in parallel, increase the number of workers (the number of workers defines the maximum number of concurrent events that may be processed), or disable concurrency controls for unlimited parallelization.
### Throttling Workflow Execution
To throttle workflow execution, enable it in your workflow settings and configure the **limit** and **interval**.
The limit defines how many events (from `0-10000`) to process in a given time period.
The interval defines the time period over which the limit will be enforced. You may specify the time period as a number of seconds, minutes or hours (ranging from `1-10000`)
### Applying Concurrency and Throttling Together
The conditions for both concurrency and throttling must be met in order for a new event to trigger a workflow execution. Here are some examples:
| Concurrency | Throttling | Result |
| ----------- | -------------------- | ------------------------------------------------------------------------------------------------------------------------------------------------------------------------------------------------------------------------------------------------------------------------------------------------------------------------------------------------------------------------------------------------------------------------- |
| Off | Off | Events will trigger your workflow **as soon as they are received**. Events may execute in parallel. |
| 1 Worker | Off | Events will trigger your workflow in a **serialized pattern** (a maximum of 1 event will be processed at a time). As soon as one event finishes processing, the next event in the queue will be processed. |
| 1 Worker | 1 Event per Second | Events will trigger your workflow in a **serialized pattern** at a **maximum rate** of 1 event per second. If an event takes *less* than one second to finish processing, the next event in the queue will not being processing until 1 second from the start of the most recently processed event. If an event takes *longer* than one second to process, the next event in the queue will begin processing immediately. |
| 1 Worker | 10 Events per Minute | Events will trigger your workflow in a **serialized pattern** at a **maximum rate** of 10 events per minute. If an event takes *less* than one minute to finish processing, the next event in the queue immediately begin processing. If 10 events been processed in less than one minute, the remaining events will be queued until 1 minute from the start of the initial event. |
| 5 Workers | Off | Up to 5 events will trigger your workflow in parallel as soon as they are received. If more events arrive while 5 events are being processed, they will be queued and executed in order as soon as an event completes processing. |
### Pausing Workflow Execution
To stop the queue from invoking your workflow, throttle workflow execution and set the limit to `0`.
### Increasing the queue size for a workflow
By default, your workflow can hold up to {DEFAULT_WORKFLOW_QUEUE_SIZE} events in its queue at once. Any events that arrive once the queue is full will be dropped, and you’ll see an [Event Queue Full](/docs/troubleshooting/#event-queue-full) error.
For example, if you serialize the execution of your workflow by setting a concurrency of `1`, but receive 200 events from your workflow’s event source at once, the workflow’s queue can only hold the first 100 events. The last 100 events will be dropped.
Users on [paid tiers](https://pipedream.com/pricing) can increase their queue size up to {MAX_WORKFLOW_QUEUE_SIZE} events for a given workflow, just below the **Concurrency** section of your **Execution Controls** settings:
### Managing Event Concurrency
Concurrency controls define how many events can be executed in parallel. To enforce serialized, in-order execution, limit concurrency to `1` worker. This guarantees that each event will only be processed once the execution for the previous event is complete.
To execute events in parallel, increase the number of workers (the number of workers defines the maximum number of concurrent events that may be processed), or disable concurrency controls for unlimited parallelization.
### Throttling Workflow Execution
To throttle workflow execution, enable it in your workflow settings and configure the **limit** and **interval**.
The limit defines how many events (from `0-10000`) to process in a given time period.
The interval defines the time period over which the limit will be enforced. You may specify the time period as a number of seconds, minutes or hours (ranging from `1-10000`)
### Applying Concurrency and Throttling Together
The conditions for both concurrency and throttling must be met in order for a new event to trigger a workflow execution. Here are some examples:
| Concurrency | Throttling | Result |
| ----------- | -------------------- | ------------------------------------------------------------------------------------------------------------------------------------------------------------------------------------------------------------------------------------------------------------------------------------------------------------------------------------------------------------------------------------------------------------------------- |
| Off | Off | Events will trigger your workflow **as soon as they are received**. Events may execute in parallel. |
| 1 Worker | Off | Events will trigger your workflow in a **serialized pattern** (a maximum of 1 event will be processed at a time). As soon as one event finishes processing, the next event in the queue will be processed. |
| 1 Worker | 1 Event per Second | Events will trigger your workflow in a **serialized pattern** at a **maximum rate** of 1 event per second. If an event takes *less* than one second to finish processing, the next event in the queue will not being processing until 1 second from the start of the most recently processed event. If an event takes *longer* than one second to process, the next event in the queue will begin processing immediately. |
| 1 Worker | 10 Events per Minute | Events will trigger your workflow in a **serialized pattern** at a **maximum rate** of 10 events per minute. If an event takes *less* than one minute to finish processing, the next event in the queue immediately begin processing. If 10 events been processed in less than one minute, the remaining events will be queued until 1 minute from the start of the initial event. |
| 5 Workers | Off | Up to 5 events will trigger your workflow in parallel as soon as they are received. If more events arrive while 5 events are being processed, they will be queued and executed in order as soon as an event completes processing. |
### Pausing Workflow Execution
To stop the queue from invoking your workflow, throttle workflow execution and set the limit to `0`.
### Increasing the queue size for a workflow
By default, your workflow can hold up to {DEFAULT_WORKFLOW_QUEUE_SIZE} events in its queue at once. Any events that arrive once the queue is full will be dropped, and you’ll see an [Event Queue Full](/docs/troubleshooting/#event-queue-full) error.
For example, if you serialize the execution of your workflow by setting a concurrency of `1`, but receive 200 events from your workflow’s event source at once, the workflow’s queue can only hold the first 100 events. The last 100 events will be dropped.
Users on [paid tiers](https://pipedream.com/pricing) can increase their queue size up to {MAX_WORKFLOW_QUEUE_SIZE} events for a given workflow, just below the **Concurrency** section of your **Execution Controls** settings:
 # Sharing Workflows
Source: https://pipedream.com/docs/workflows/building-workflows/sharing
Pipedream provides a few ways to share your workflow:
1. [Share a workflow as a link with anyone](/docs/workflows/building-workflows/sharing/#creating-a-share-link-for-a-workflow)
2. [Publish as a public template](/docs/workflows/building-workflows/sharing/#publish-to-the-templates-gallery)
You can share your workflows as templates with other Pipedream accounts with a unique shareable link.
Creating a share link for your workflow will allow anyone with the link to create a template version of your workflow in their own Pipedream account. This will allow others to use your workflow with their own Pipedream account and also their own connected accounts.
[Here’s an example of a workflow](https://pipedream.com/new?h=tch_OYWfjz) that sends you a daily SMS message with today’s schedule:
# Sharing Workflows
Source: https://pipedream.com/docs/workflows/building-workflows/sharing
Pipedream provides a few ways to share your workflow:
1. [Share a workflow as a link with anyone](/docs/workflows/building-workflows/sharing/#creating-a-share-link-for-a-workflow)
2. [Publish as a public template](/docs/workflows/building-workflows/sharing/#publish-to-the-templates-gallery)
You can share your workflows as templates with other Pipedream accounts with a unique shareable link.
Creating a share link for your workflow will allow anyone with the link to create a template version of your workflow in their own Pipedream account. This will allow others to use your workflow with their own Pipedream account and also their own connected accounts.
[Here’s an example of a workflow](https://pipedream.com/new?h=tch_OYWfjz) that sends you a daily SMS message with today’s schedule:
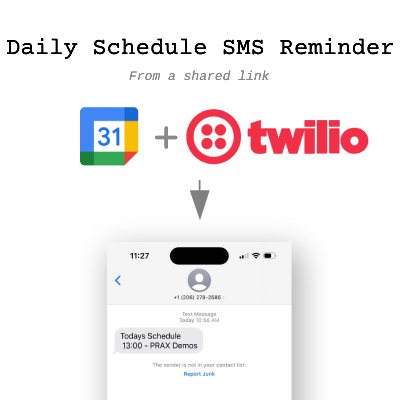 Click **Deploy to Pipedream** below to create a copy of this workflow in your own Pipedream account.
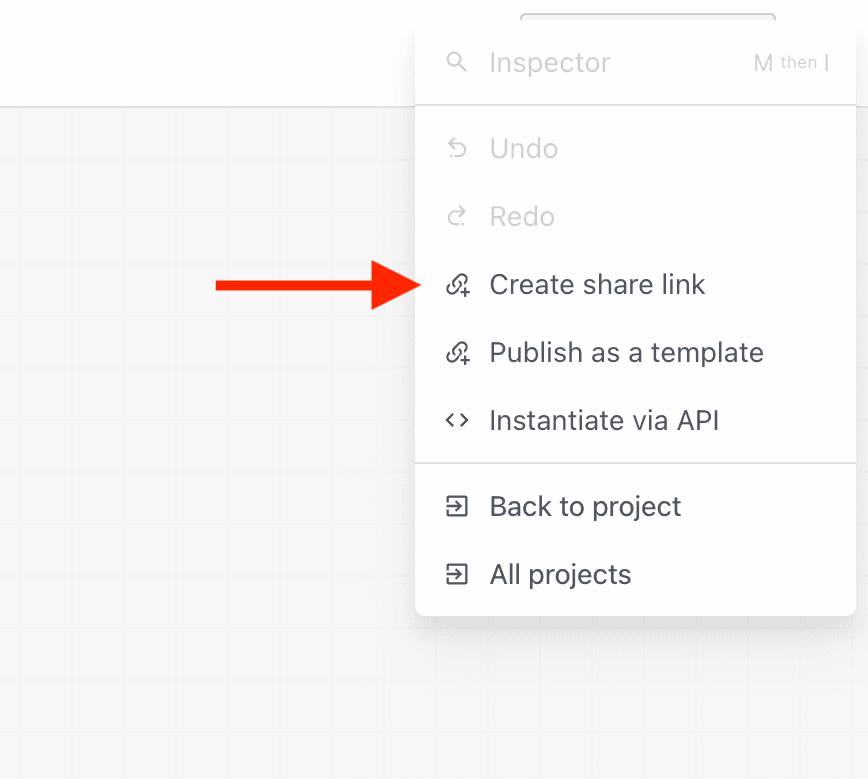 Now you can define which prop values should be included in this shareable link.
### Including props
Optionally, you can include the actual individual prop configurations as well. This helps speed up workflow development if the workflow relies on specific prop values to function properly.
You can choose to **Include all** prop values if you’d like, or only select specific props.
For the daily schedule reminder workflow, we included the props for filtering Google Calendar events, but we did *not* include the SMS number to send the message to. This is because the end user of this workflow will use their own phone number instead:
Now you can define which prop values should be included in this shareable link.
### Including props
Optionally, you can include the actual individual prop configurations as well. This helps speed up workflow development if the workflow relies on specific prop values to function properly.
You can choose to **Include all** prop values if you’d like, or only select specific props.
For the daily schedule reminder workflow, we included the props for filtering Google Calendar events, but we did *not* include the SMS number to send the message to. This is because the end user of this workflow will use their own phone number instead:
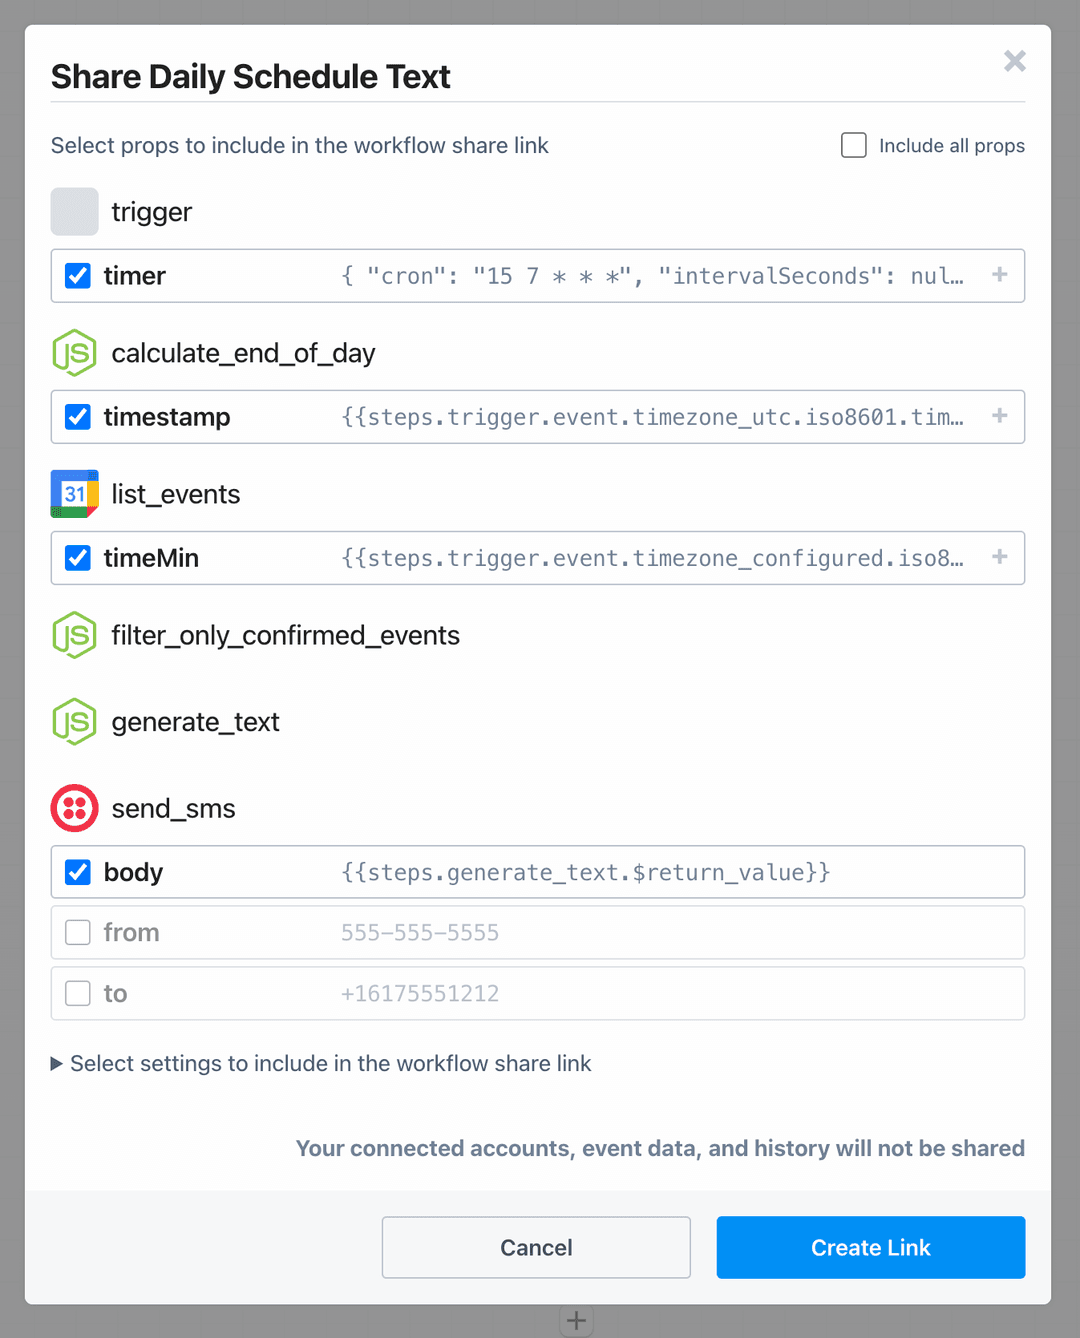
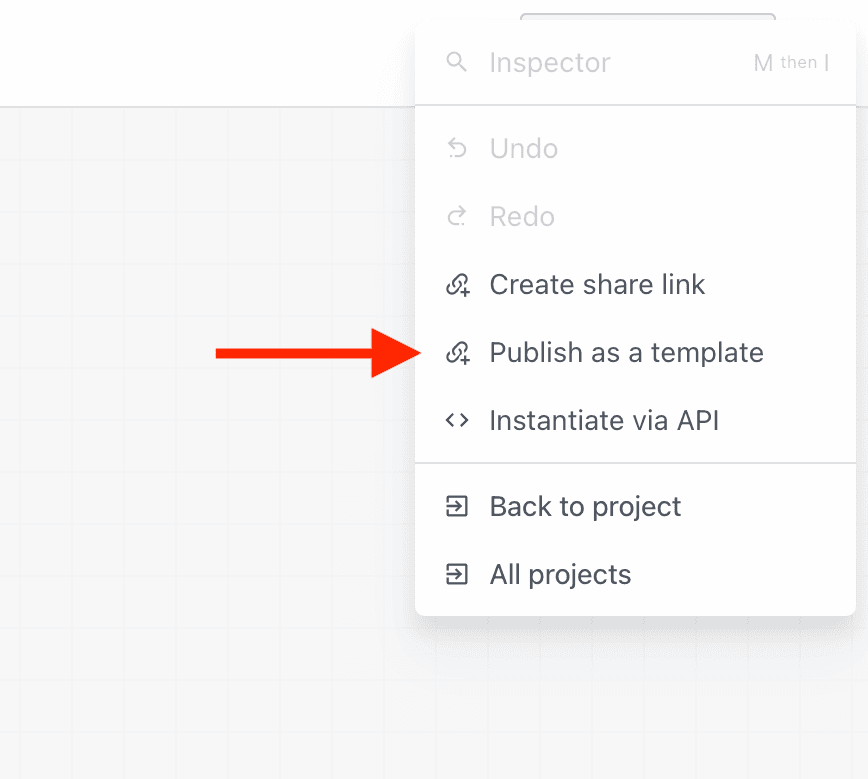
 This will open a new menu to search and choose a trigger for your workflow:
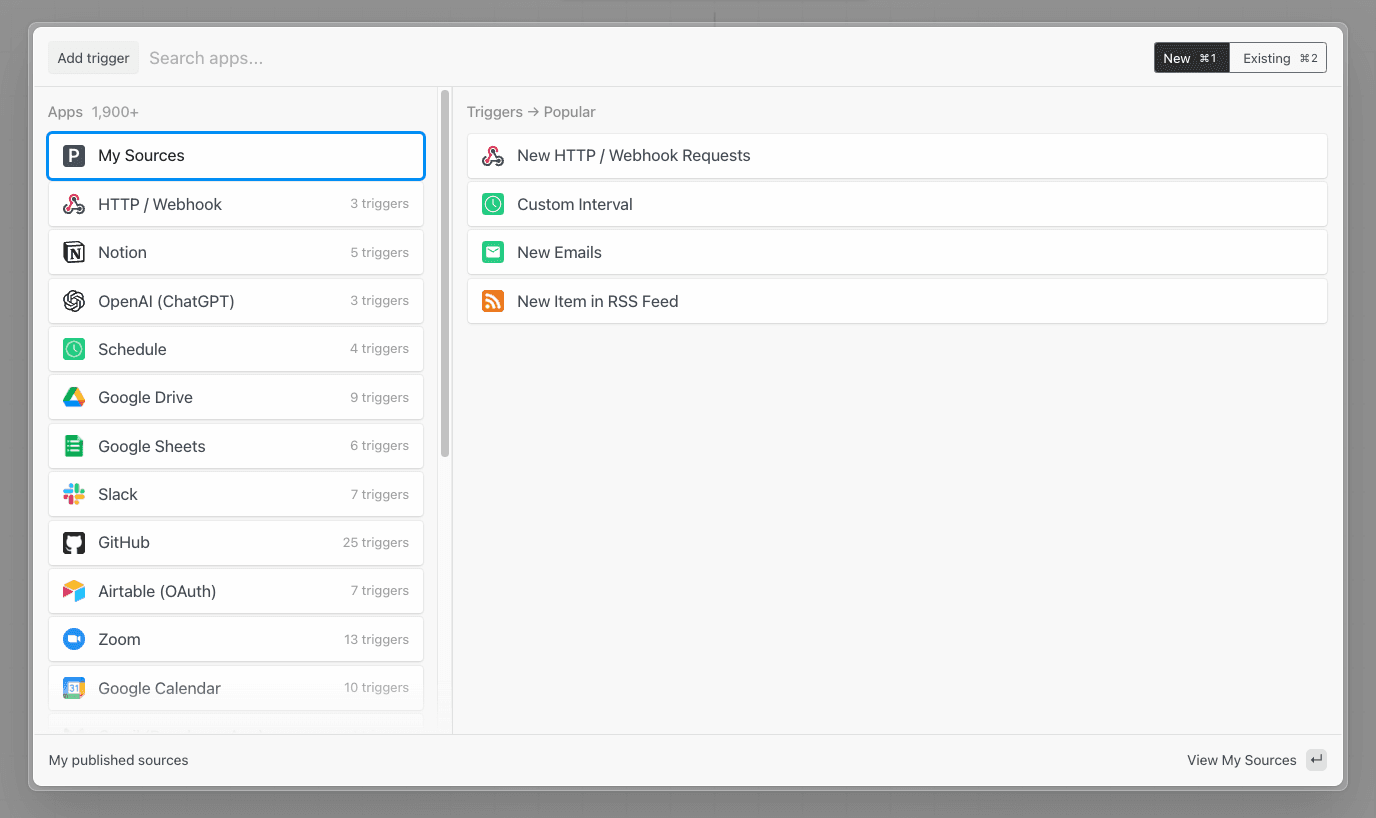 Search by **app name** to find triggers associated with your app. For Google Calendar, for example, you can run your workflow every time a new event is **added** to your calendar, each time an event **starts**, **ends**, and more:
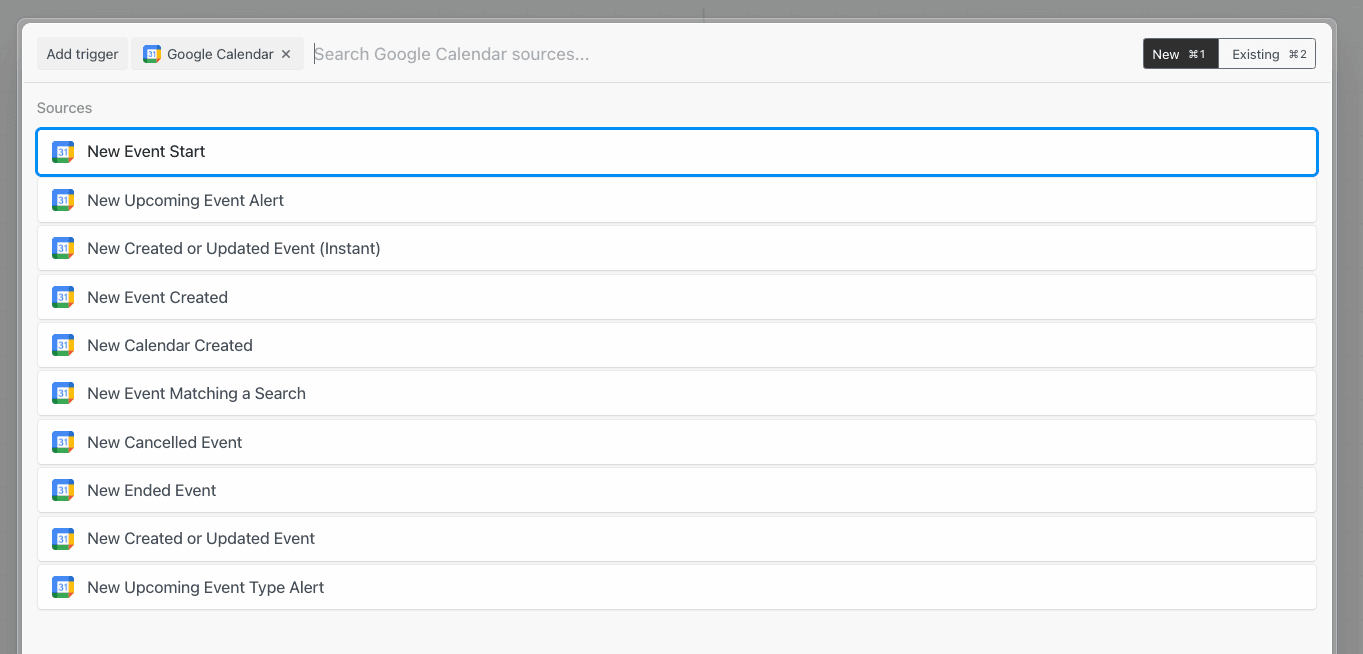 Once you select your trigger, you’ll be asked to connect any necessary accounts (for example, Google Calendar sources require you authorize Pipedream access to your Google account), and enter the values for any configuration settings.
Some sources are configured to retrieve an initial set of events when they’re created. Others require you to generate events in the app to trigger your workflow. If your source generates an initial set of events, you’ll see them appear in the **Select events** dropdown in the **Select Event** step:
Once you select your trigger, you’ll be asked to connect any necessary accounts (for example, Google Calendar sources require you authorize Pipedream access to your Google account), and enter the values for any configuration settings.
Some sources are configured to retrieve an initial set of events when they’re created. Others require you to generate events in the app to trigger your workflow. If your source generates an initial set of events, you’ll see them appear in the **Select events** dropdown in the **Select Event** step:
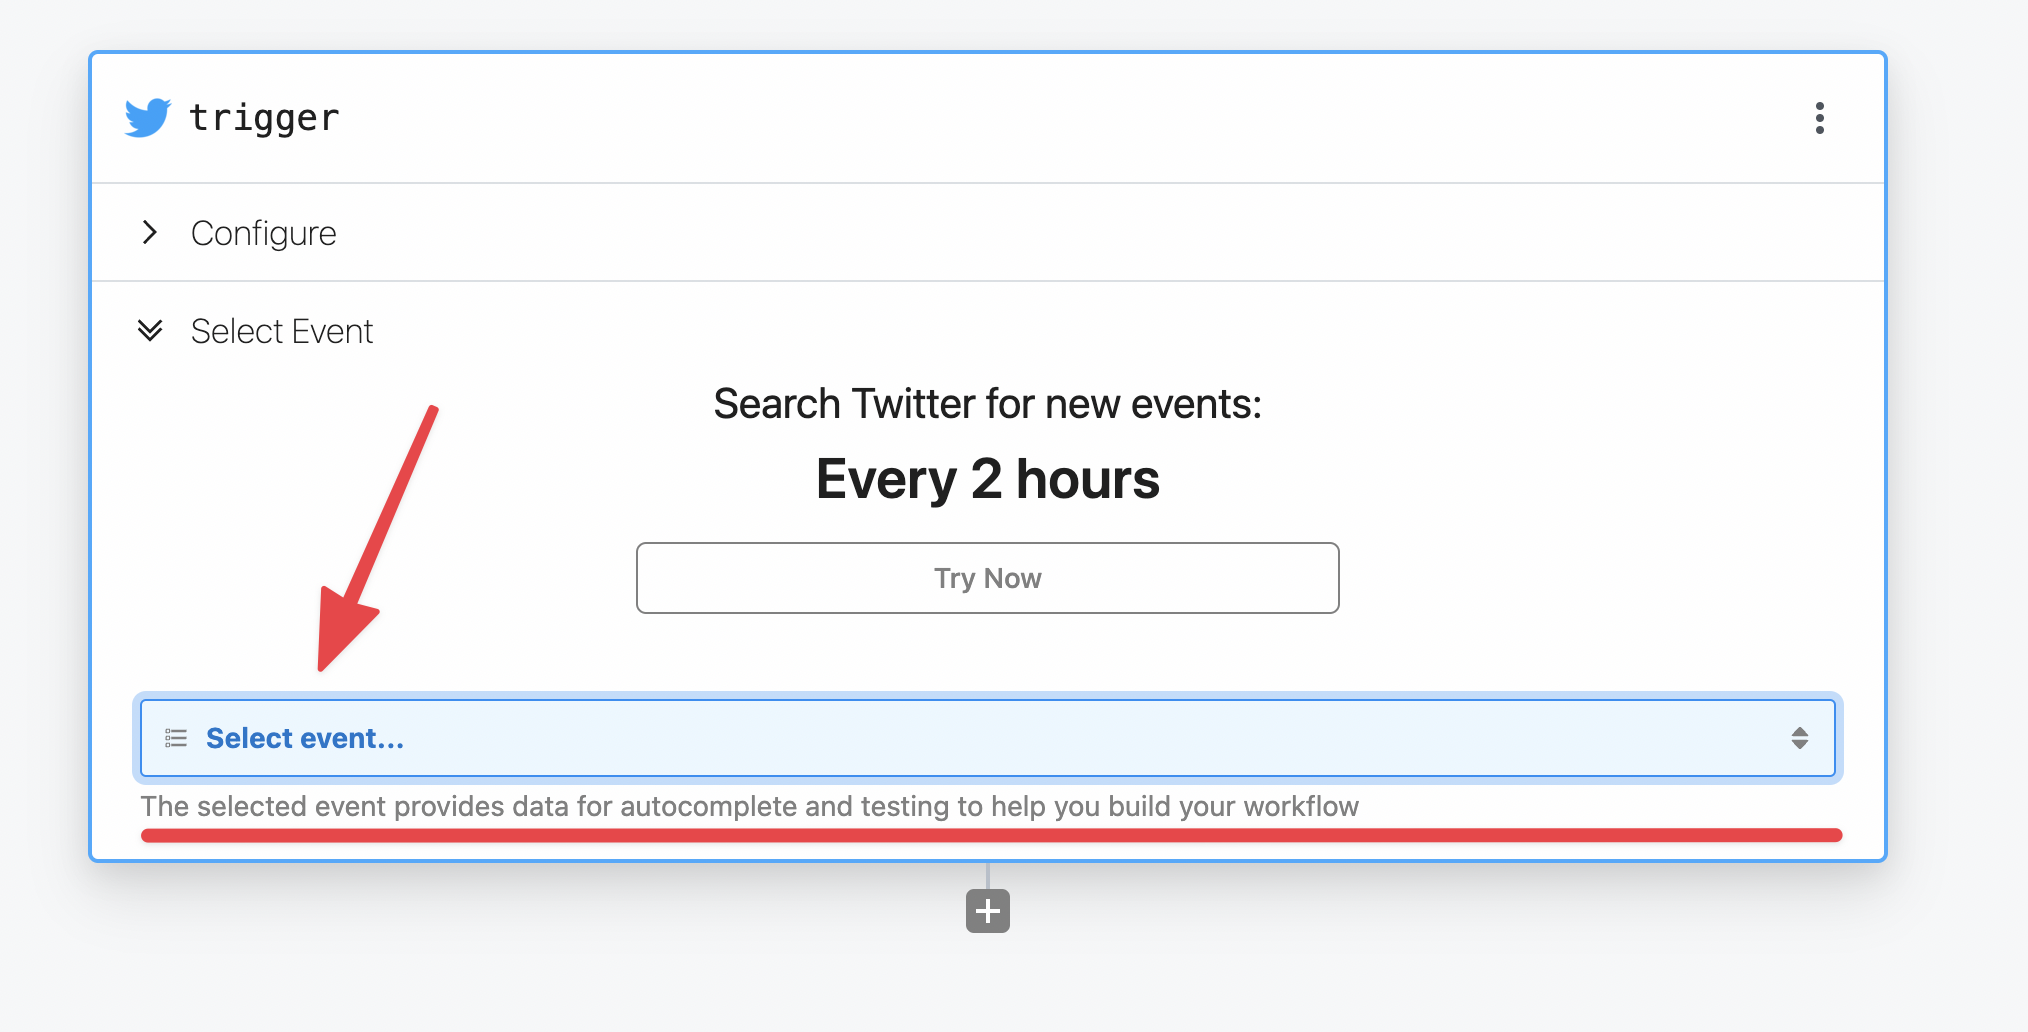 Then you can select a specific test event and manually trigger your workflow with that event data by clicking **Send Test Event**. Now you’re ready to build your workflow with the selected test event.
### What’s the difference between an event source and a trigger?
You’ll notice the docs use the terms **event source** and **trigger** interchangeably above. It’s useful to clarify the distinction in the context of workflows.
[Event sources](/docs/workflows/building-workflows/triggers/) run code that collects events from some app or service and emits events as the source produces them. An event source can be used to **trigger** any number of workflows.
For example, you might create a single source to listen for new Twitter mentions for a keyword, then trigger multiple workflows each time a new tweet is found: one to [send new tweets to Slack](https://pipedream.com/@pravin/twitter-mentions-slack-p_dDCA5e/edit), another to [save those tweets to an Amazon S3 bucket](https://pipedream.com/@dylan/twitter-to-s3-p_KwCZGA/readme), etc.
**This model allows you to separate the data produced by a service (the event source) from the logic to process those events in different contexts (the workflow)**.
Moreover, you can access events emitted by sources using Pipedream’s [SSE](/docs/workflows/data-management/destinations/sse/) and [REST APIs](/docs/rest-api/). This allows you to access these events in your own app, outside Pipedream’s platform.
### Can I add multiple triggers to a workflow?
Yes, you can add any number of triggers to a workflow. Click the top right menu in the trigger step and select **Add trigger**.
Then you can select a specific test event and manually trigger your workflow with that event data by clicking **Send Test Event**. Now you’re ready to build your workflow with the selected test event.
### What’s the difference between an event source and a trigger?
You’ll notice the docs use the terms **event source** and **trigger** interchangeably above. It’s useful to clarify the distinction in the context of workflows.
[Event sources](/docs/workflows/building-workflows/triggers/) run code that collects events from some app or service and emits events as the source produces them. An event source can be used to **trigger** any number of workflows.
For example, you might create a single source to listen for new Twitter mentions for a keyword, then trigger multiple workflows each time a new tweet is found: one to [send new tweets to Slack](https://pipedream.com/@pravin/twitter-mentions-slack-p_dDCA5e/edit), another to [save those tweets to an Amazon S3 bucket](https://pipedream.com/@dylan/twitter-to-s3-p_KwCZGA/readme), etc.
**This model allows you to separate the data produced by a service (the event source) from the logic to process those events in different contexts (the workflow)**.
Moreover, you can access events emitted by sources using Pipedream’s [SSE](/docs/workflows/data-management/destinations/sse/) and [REST APIs](/docs/rest-api/). This allows you to access these events in your own app, outside Pipedream’s platform.
### Can I add multiple triggers to a workflow?
Yes, you can add any number of triggers to a workflow. Click the top right menu in the trigger step and select **Add trigger**.
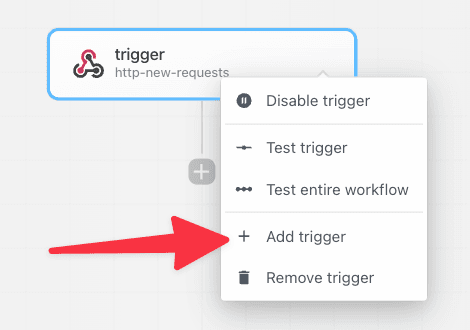 ### Shape of the `steps.trigger.event` object
In all workflows, you have access to [event data](/docs/workflows/building-workflows/triggers/#event-format) using the variable `steps.trigger.event`.
The shape of the event is specific to the source. For example, RSS sources produce events with a `url` and `title` property representing the data provided by new items from a feed. Google Calendar sources produce events with a meeting title, start date, etc.
## HTTP
When you select the **HTTP** trigger:
### Shape of the `steps.trigger.event` object
In all workflows, you have access to [event data](/docs/workflows/building-workflows/triggers/#event-format) using the variable `steps.trigger.event`.
The shape of the event is specific to the source. For example, RSS sources produce events with a `url` and `title` property representing the data provided by new items from a feed. Google Calendar sources produce events with a meeting title, start date, etc.
## HTTP
When you select the **HTTP** trigger:
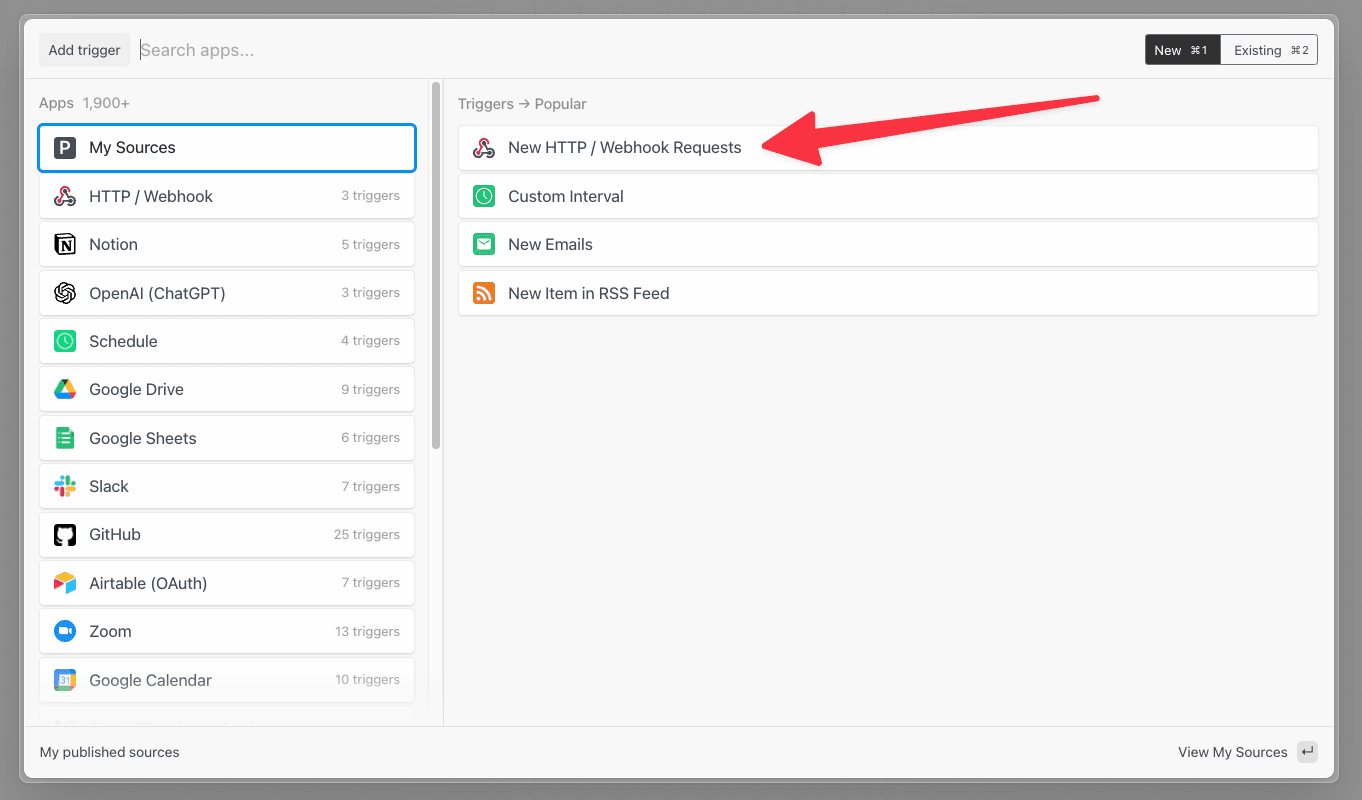 Pipedream creates a URL endpoint specific to your workflow:
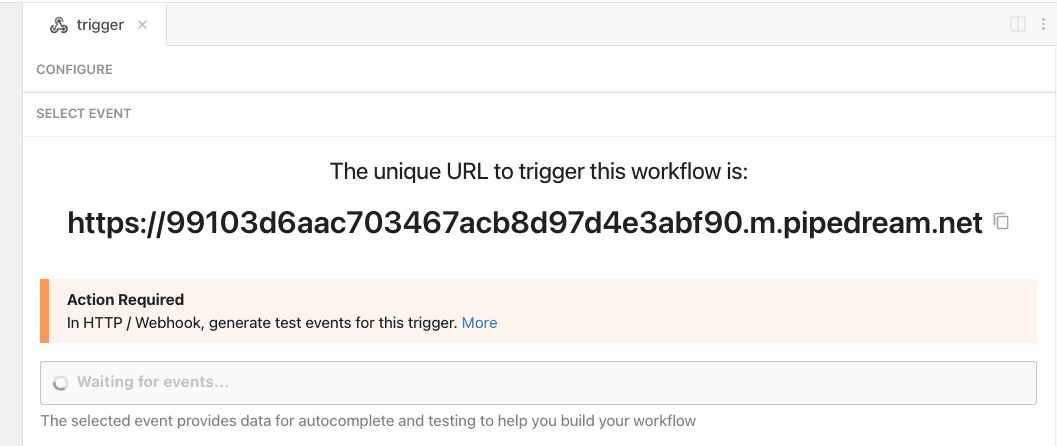 You can send any HTTP requests to this endpoint, from anywhere on the web. You can configure the endpoint as the destination URL for a webhook or send HTTP traffic from your application - we’ll accept any [valid HTTP request](/docs/workflows/building-workflows/triggers/#valid-requests).
 When making HTTP requests, pass the custom token as a `Bearer` token in the `Authorization` header:
```javascript
curl -H 'Authorization: Bearer
When making HTTP requests, pass the custom token as a `Bearer` token in the `Authorization` header:
```javascript
curl -H 'Authorization: Bearer 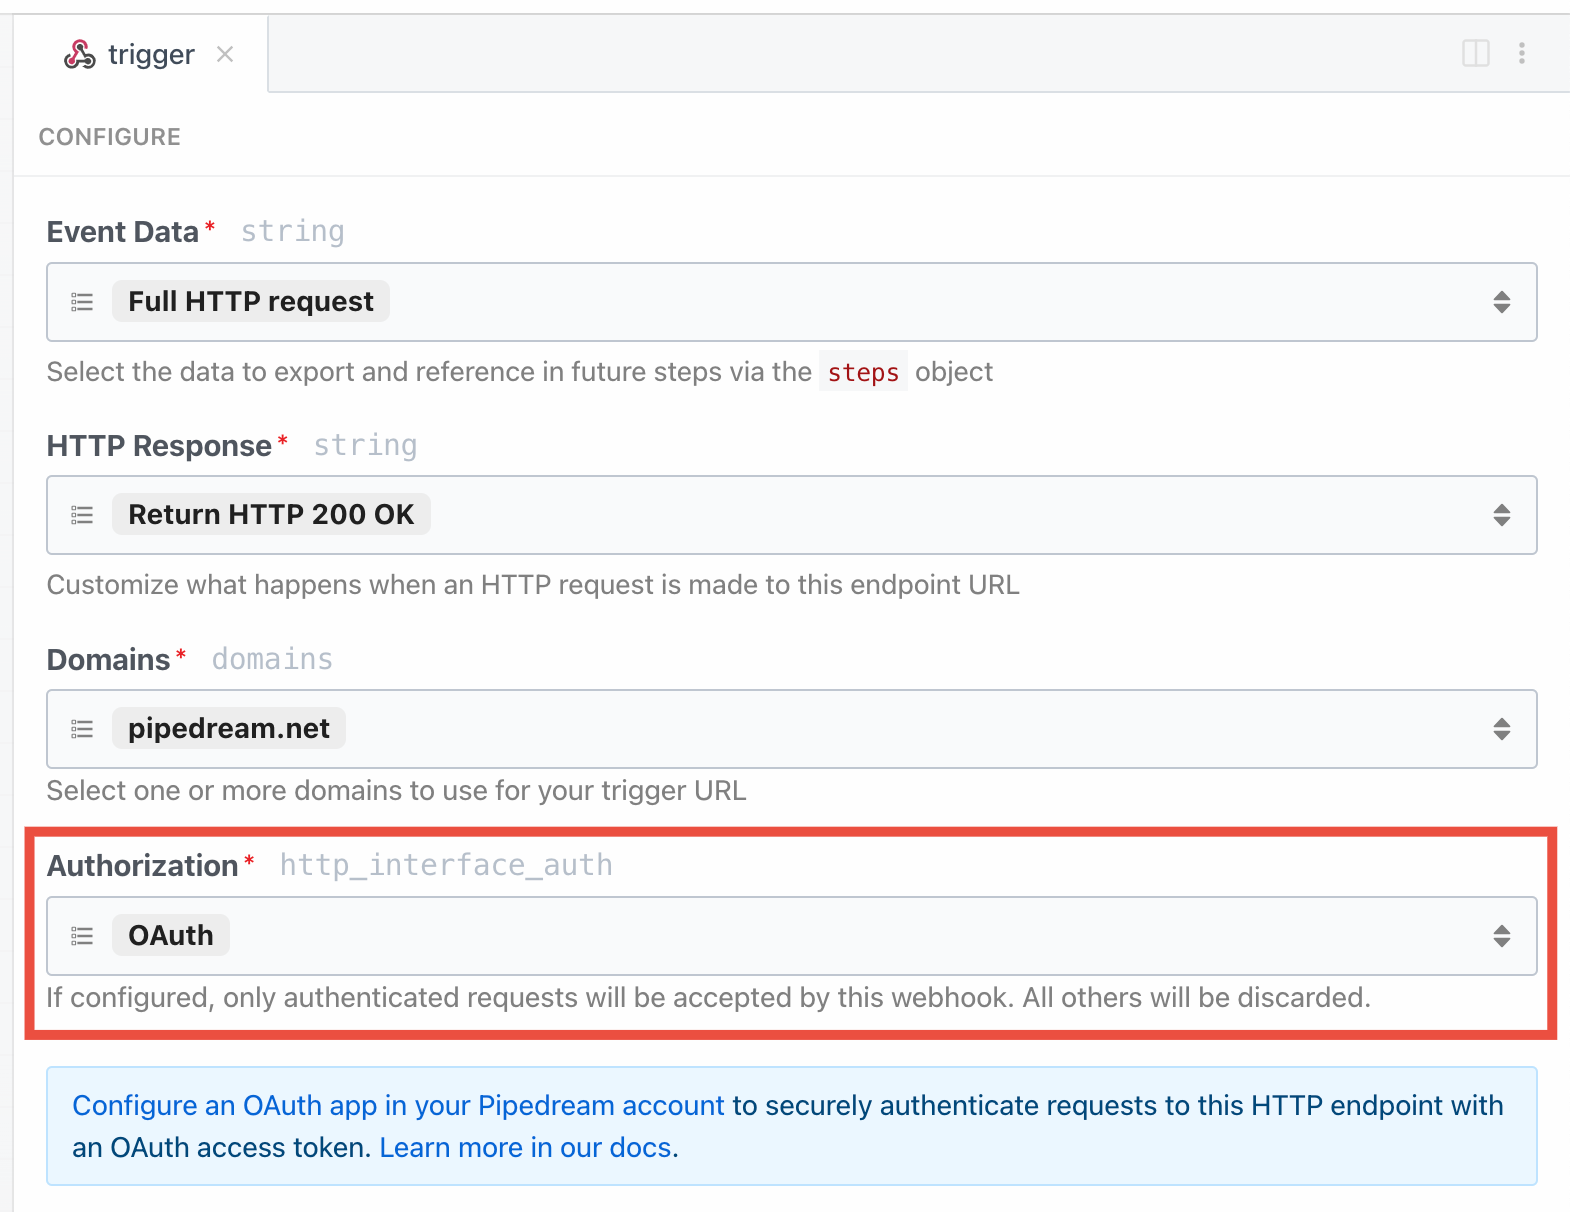 Next, you’ll need to [generate an OAuth access token](/docs/rest-api/auth/#how-to-get-an-access-token).
When making HTTP requests, pass the OAuth access token as a `Bearer` token in the `Authorization` header:
```javascript
curl -H 'Authorization: Bearer
Next, you’ll need to [generate an OAuth access token](/docs/rest-api/auth/#how-to-get-an-access-token).
When making HTTP requests, pass the OAuth access token as a `Bearer` token in the `Authorization` header:
```javascript
curl -H 'Authorization: Bearer 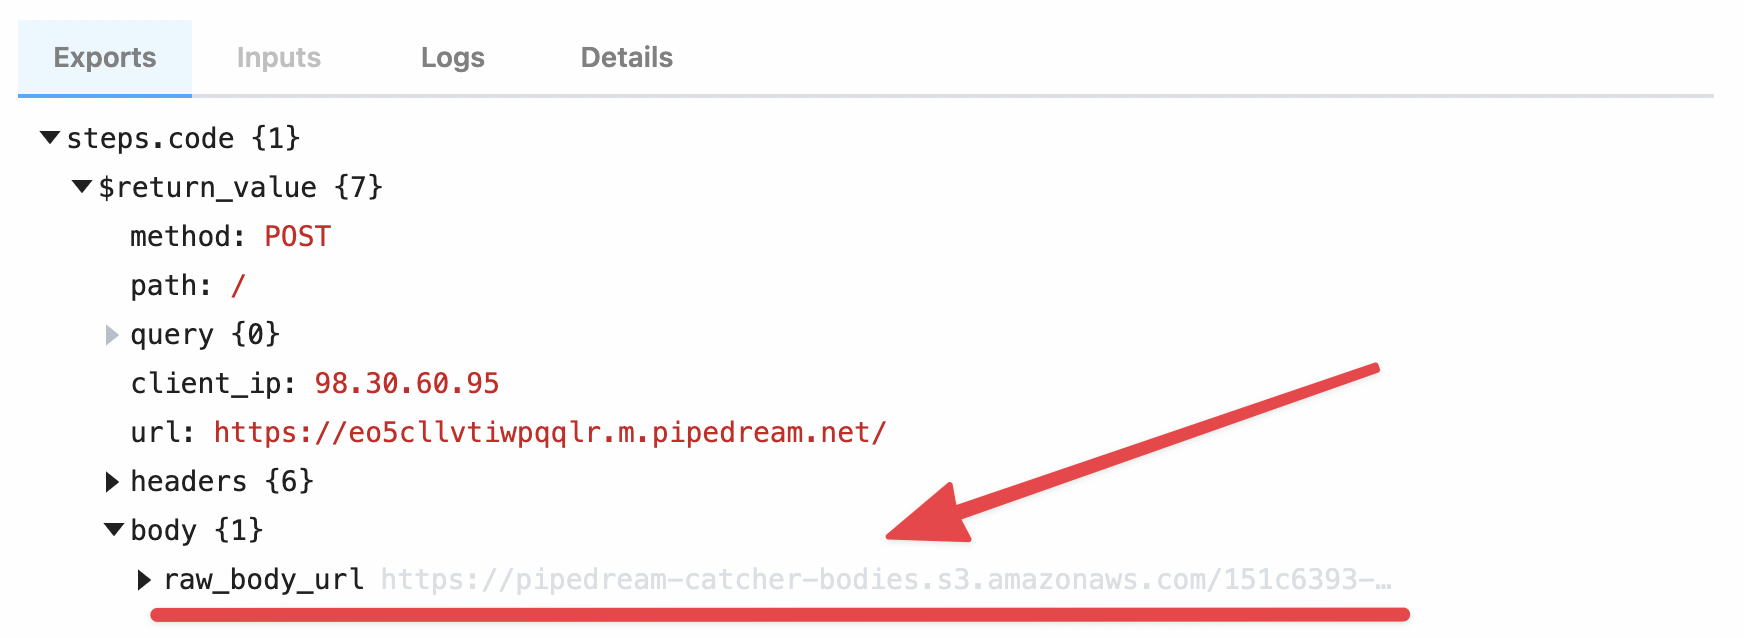 Within your workflow, you can download the contents of this data using the **Send HTTP Request** action, or [by saving the data as a file to the `/tmp` directory](/docs/workflows/building-workflows/code/nodejs/working-with-files/).
#### Example: Download the HTTP payload using the Send HTTP Request action
*Note: you can only download payloads at most {FUNCTION_PAYLOAD_LIMIT} in size using this method. Otherwise, you may encounter a [Function Payload Limit Exceeded](/docs/troubleshooting/#function-payload-limit-exceeded) error.*
You can download the large HTTP payload using the **Send HTTP Request** action. [Copy this workflow to see how this works](https://pipedream.com/new?h=tch_egfAby).
The payload from the trigger of the workflow is exported to the variable `steps.retrieve_large_payload.$return_value`:
Within your workflow, you can download the contents of this data using the **Send HTTP Request** action, or [by saving the data as a file to the `/tmp` directory](/docs/workflows/building-workflows/code/nodejs/working-with-files/).
#### Example: Download the HTTP payload using the Send HTTP Request action
*Note: you can only download payloads at most {FUNCTION_PAYLOAD_LIMIT} in size using this method. Otherwise, you may encounter a [Function Payload Limit Exceeded](/docs/troubleshooting/#function-payload-limit-exceeded) error.*
You can download the large HTTP payload using the **Send HTTP Request** action. [Copy this workflow to see how this works](https://pipedream.com/new?h=tch_egfAby).
The payload from the trigger of the workflow is exported to the variable `steps.retrieve_large_payload.$return_value`:
 #### Example: Download the HTTP payload to the `/tmp` directory
[This workflow](https://pipedream.com/new?h=tch_5ofXkX) downloads the HTTP payload, saving it as a file to the [`/tmp` directory](/docs/workflows/building-workflows/code/nodejs/working-with-files/#the-tmp-directory).
```javascript
import stream from "stream";
import { promisify } from "util";
import fs from "fs";
import got from "got";
export default defineComponent({
async run({ steps, $ }) {
const pipeline = promisify(stream.pipeline);
await pipeline(
got.stream(steps.trigger.event.body.raw_body_url),
fs.createWriteStream(`/tmp/raw_body`)
);
},
})
```
You can [read this file](/docs/workflows/building-workflows/code/nodejs/working-with-files/#reading-a-file-from-tmp) in subsequent steps of your workflow.
#### How the payload data is saved
Your raw payload is saved to a Pipedream-owned [Amazon S3 bucket](https://aws.amazon.com/s3/). Pipedream generates a [signed URL](https://docs.aws.amazon.com/AmazonS3/latest/dev/ShareObjectPreSignedURL.html) that allows you to access to that file for up to 30 minutes. After 30 minutes, the signed URL will be invalidated, and the file will be deleted.
#### Limits
**You can upload payloads up to 5TB in size**. However, payloads that large may trigger [other Pipedream limits](/docs/workflows/limits/). Please [reach out](https://pipedream.com/support/) with any specific questions or issues.
### Large File Support
*This interface is best used for uploading large files, like images or videos. If you’re sending JSON or other data directly in the HTTP payload, and encountering a **Request Entity Too Large** error, review the section above for [sending large payloads](/docs/workflows/building-workflows/triggers/#sending-large-payloads)*.
You can upload any file to a [workflow](/docs/workflows/building-workflows/) or an [event source](/docs/workflows/building-workflows/triggers/) by making a `multipart/form-data` HTTP request with the file as one of the form parts. **Pipedream saves that file to a Pipedream-owned [Amazon S3 bucket](https://aws.amazon.com/s3/), generating a [signed URL](https://docs.aws.amazon.com/AmazonS3/latest/dev/ShareObjectPreSignedURL.html) that allows you to access to that file for up to 30 minutes**. After 30 minutes, the signed URL will be invalidated, and the file will be deleted.
In workflows, these file URLs are provided in the `steps.trigger.event.body` variable, so you can download the file using the URL within your workflow, or pass the URL on to another third-party system for it to process.
#### Example: Download the HTTP payload to the `/tmp` directory
[This workflow](https://pipedream.com/new?h=tch_5ofXkX) downloads the HTTP payload, saving it as a file to the [`/tmp` directory](/docs/workflows/building-workflows/code/nodejs/working-with-files/#the-tmp-directory).
```javascript
import stream from "stream";
import { promisify } from "util";
import fs from "fs";
import got from "got";
export default defineComponent({
async run({ steps, $ }) {
const pipeline = promisify(stream.pipeline);
await pipeline(
got.stream(steps.trigger.event.body.raw_body_url),
fs.createWriteStream(`/tmp/raw_body`)
);
},
})
```
You can [read this file](/docs/workflows/building-workflows/code/nodejs/working-with-files/#reading-a-file-from-tmp) in subsequent steps of your workflow.
#### How the payload data is saved
Your raw payload is saved to a Pipedream-owned [Amazon S3 bucket](https://aws.amazon.com/s3/). Pipedream generates a [signed URL](https://docs.aws.amazon.com/AmazonS3/latest/dev/ShareObjectPreSignedURL.html) that allows you to access to that file for up to 30 minutes. After 30 minutes, the signed URL will be invalidated, and the file will be deleted.
#### Limits
**You can upload payloads up to 5TB in size**. However, payloads that large may trigger [other Pipedream limits](/docs/workflows/limits/). Please [reach out](https://pipedream.com/support/) with any specific questions or issues.
### Large File Support
*This interface is best used for uploading large files, like images or videos. If you’re sending JSON or other data directly in the HTTP payload, and encountering a **Request Entity Too Large** error, review the section above for [sending large payloads](/docs/workflows/building-workflows/triggers/#sending-large-payloads)*.
You can upload any file to a [workflow](/docs/workflows/building-workflows/) or an [event source](/docs/workflows/building-workflows/triggers/) by making a `multipart/form-data` HTTP request with the file as one of the form parts. **Pipedream saves that file to a Pipedream-owned [Amazon S3 bucket](https://aws.amazon.com/s3/), generating a [signed URL](https://docs.aws.amazon.com/AmazonS3/latest/dev/ShareObjectPreSignedURL.html) that allows you to access to that file for up to 30 minutes**. After 30 minutes, the signed URL will be invalidated, and the file will be deleted.
In workflows, these file URLs are provided in the `steps.trigger.event.body` variable, so you can download the file using the URL within your workflow, or pass the URL on to another third-party system for it to process.
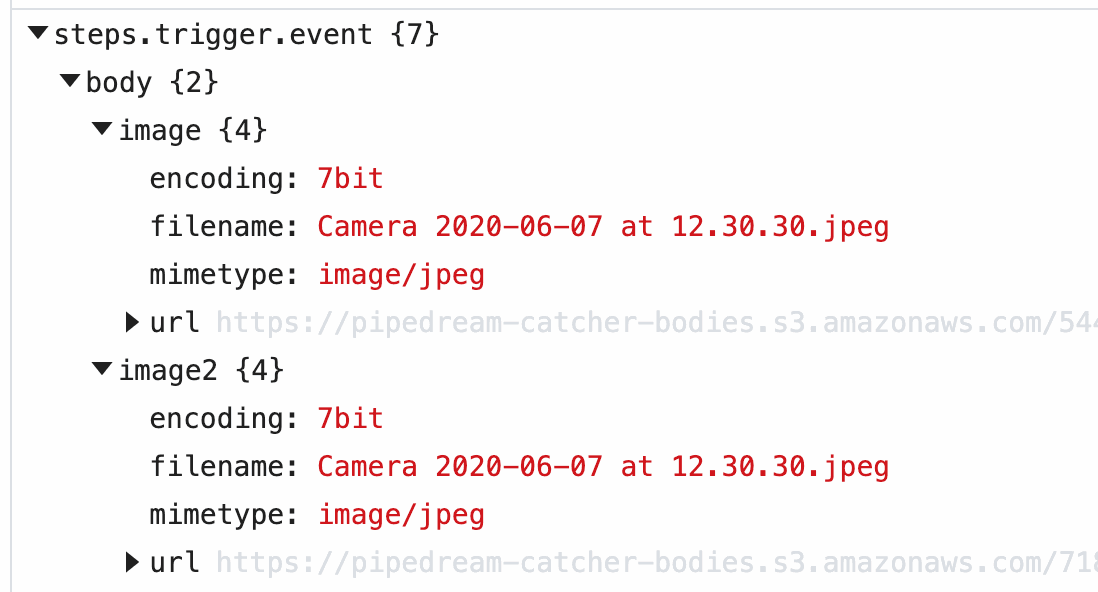 Within your workflow, you can download the contents of this data using the **Send HTTP Request** action, or [by saving the data as a file to the `/tmp` directory](/docs/workflows/building-workflows/code/nodejs/working-with-files/).
#### Example: upload a file using `cURL`
For example, you can upload an image to a workflow using `cURL`:
```powershell
curl -F 'image=@my_image.png' https://myendpoint.m.pipedream.net
```
The `-F` tells `cURL` we’re sending form data, with a single “part”: a field named `image`, with the content of the image as the value (the `@` allows `cURL` to reference a local file).
When you send this image to a workflow, Pipedream [parses the form data](/docs/workflows/building-workflows/triggers/#how-pipedream-handles-multipartform-data) and converts it to a JavaScript object, `event.body`. Select the event from the [inspector](/docs/workflows/building-workflows/inspect/#the-inspector), and you’ll see the `image` property under `event.body`:
Within your workflow, you can download the contents of this data using the **Send HTTP Request** action, or [by saving the data as a file to the `/tmp` directory](/docs/workflows/building-workflows/code/nodejs/working-with-files/).
#### Example: upload a file using `cURL`
For example, you can upload an image to a workflow using `cURL`:
```powershell
curl -F 'image=@my_image.png' https://myendpoint.m.pipedream.net
```
The `-F` tells `cURL` we’re sending form data, with a single “part”: a field named `image`, with the content of the image as the value (the `@` allows `cURL` to reference a local file).
When you send this image to a workflow, Pipedream [parses the form data](/docs/workflows/building-workflows/triggers/#how-pipedream-handles-multipartform-data) and converts it to a JavaScript object, `event.body`. Select the event from the [inspector](/docs/workflows/building-workflows/inspect/#the-inspector), and you’ll see the `image` property under `event.body`:
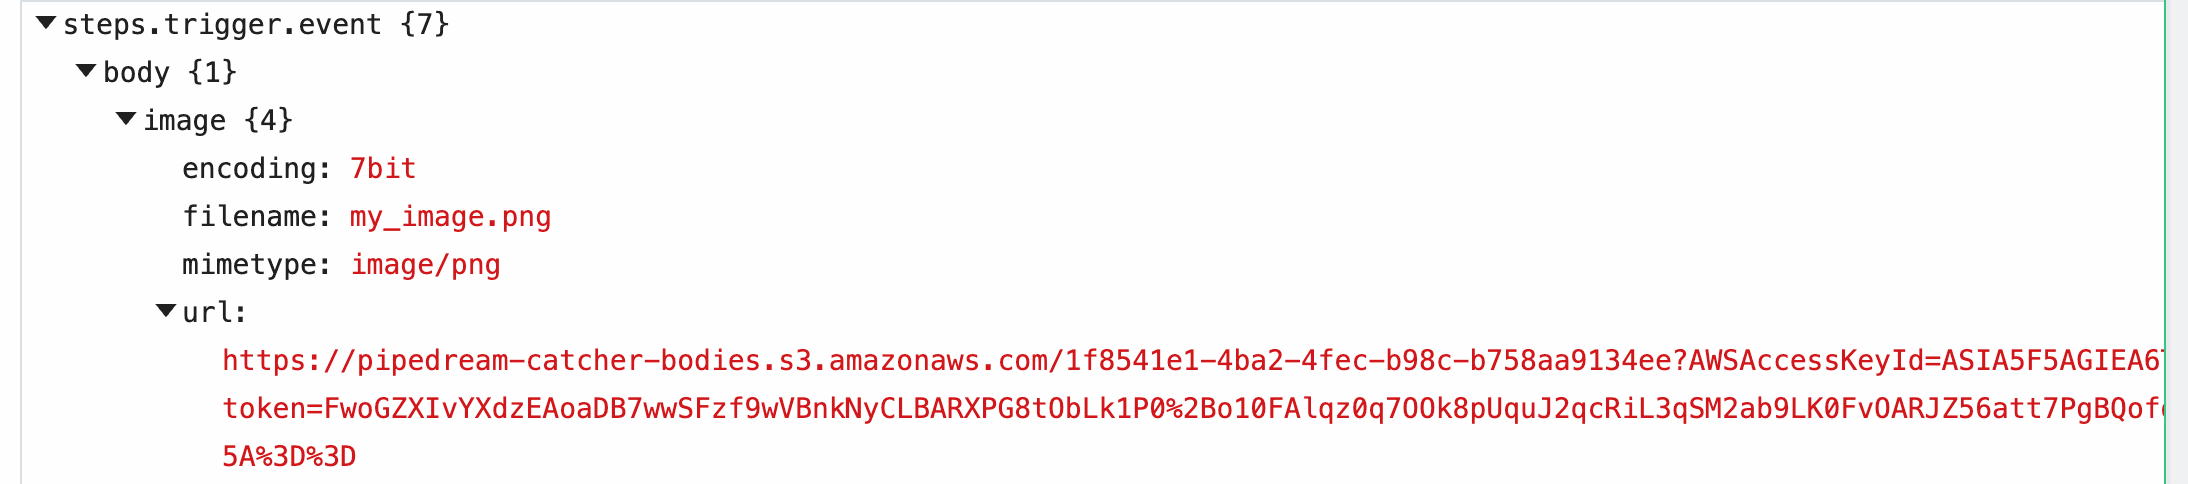 When you upload a file as a part of the form request, Pipedream saves it to a Pipedream-owned [Amazon S3 bucket](https://aws.amazon.com/s3/), generating a [signed URL](https://docs.aws.amazon.com/AmazonS3/latest/dev/ShareObjectPreSignedURL.html) that allows you to access to that file for up to 30 minutes. After 30 minutes, the signed URL will be invalidated, and the file will be deleted.
Within the `image` property of `event.body`, you’ll see the value of this URL in the `url` property, along with the `filename` and `mimetype` of the file. Within your workflow, you can download the file, or pass the URL to a third party system to handle, and more.
#### Example: Download this file to the `/tmp` directory
[This workflow](https://pipedream.com/@dylburger/example-download-an-image-to-tmp-p_KwC2Ad/edit) downloads an image passed in the `image` field in the form request, saving it to the [`/tmp` directory](/docs/workflows/building-workflows/code/nodejs/working-with-files/#the-tmp-directory).
```javascript
import stream from "stream";
import { promisify } from "util";
import fs from "fs";
import got from "got";
const pipeline = promisify(stream.pipeline);
await pipeline(
got.stream(steps.trigger.event.body.image.url),
fs.createWriteStream(`/tmp/${steps.trigger.event.body.image.filename}`)
);
```
#### Example: Upload image to your own Amazon S3 bucket
[This workflow](https://pipedream.com/@dylburger/example-save-uploaded-file-to-amazon-s3-p_o7Cm9z/edit) streams the uploaded file to an Amazon S3 bucket you specify, allowing you to save the file to long-term storage.
#### Limits
Since large files are uploaded using a `Content-Type` of `multipart/form-data`, the limits that apply to [form data](/docs/workflows/building-workflows/triggers/#how-pipedream-handles-multipartform-data) also apply here.
The content of the file itself does not contribute to the HTTP payload limit imposed for forms. **You can upload files up to 5TB in size**. However, files that large may trigger [other Pipedream limits](/docs/workflows/limits/). Please [reach out](https://pipedream.com/support/) with any specific questions or issues.
### Cross-Origin HTTP Requests
We return the following headers on HTTP `OPTIONS` requests:
```
Access-Control-Allow-Origin: *
Access-Control-Allow-Methods: GET,HEAD,PUT,PATCH,POST,DELETE
```
Thus, your endpoint will accept [cross-origin HTTP requests](https://developer.mozilla.org/en-US/docs/Web/HTTP/CORS) from any domain, using any standard HTTP method.
### HTTP Responses
#### Default HTTP response
By default, when you send a [valid HTTP request](/docs/workflows/building-workflows/triggers/#valid-requests) to your endpoint URL, you should expect to receive a `200 OK` status code with the following payload:
```html
When you upload a file as a part of the form request, Pipedream saves it to a Pipedream-owned [Amazon S3 bucket](https://aws.amazon.com/s3/), generating a [signed URL](https://docs.aws.amazon.com/AmazonS3/latest/dev/ShareObjectPreSignedURL.html) that allows you to access to that file for up to 30 minutes. After 30 minutes, the signed URL will be invalidated, and the file will be deleted.
Within the `image` property of `event.body`, you’ll see the value of this URL in the `url` property, along with the `filename` and `mimetype` of the file. Within your workflow, you can download the file, or pass the URL to a third party system to handle, and more.
#### Example: Download this file to the `/tmp` directory
[This workflow](https://pipedream.com/@dylburger/example-download-an-image-to-tmp-p_KwC2Ad/edit) downloads an image passed in the `image` field in the form request, saving it to the [`/tmp` directory](/docs/workflows/building-workflows/code/nodejs/working-with-files/#the-tmp-directory).
```javascript
import stream from "stream";
import { promisify } from "util";
import fs from "fs";
import got from "got";
const pipeline = promisify(stream.pipeline);
await pipeline(
got.stream(steps.trigger.event.body.image.url),
fs.createWriteStream(`/tmp/${steps.trigger.event.body.image.filename}`)
);
```
#### Example: Upload image to your own Amazon S3 bucket
[This workflow](https://pipedream.com/@dylburger/example-save-uploaded-file-to-amazon-s3-p_o7Cm9z/edit) streams the uploaded file to an Amazon S3 bucket you specify, allowing you to save the file to long-term storage.
#### Limits
Since large files are uploaded using a `Content-Type` of `multipart/form-data`, the limits that apply to [form data](/docs/workflows/building-workflows/triggers/#how-pipedream-handles-multipartform-data) also apply here.
The content of the file itself does not contribute to the HTTP payload limit imposed for forms. **You can upload files up to 5TB in size**. However, files that large may trigger [other Pipedream limits](/docs/workflows/limits/). Please [reach out](https://pipedream.com/support/) with any specific questions or issues.
### Cross-Origin HTTP Requests
We return the following headers on HTTP `OPTIONS` requests:
```
Access-Control-Allow-Origin: *
Access-Control-Allow-Methods: GET,HEAD,PUT,PATCH,POST,DELETE
```
Thus, your endpoint will accept [cross-origin HTTP requests](https://developer.mozilla.org/en-US/docs/Web/HTTP/CORS) from any domain, using any standard HTTP method.
### HTTP Responses
#### Default HTTP response
By default, when you send a [valid HTTP request](/docs/workflows/building-workflows/triggers/#valid-requests) to your endpoint URL, you should expect to receive a `200 OK` status code with the following payload:
```html
Success!
To customize this response, check out our docs here
``` When you’re processing HTTP requests, you often don’t need to issue any special response to the client. We issue this default response so you don’t have to write any code to do it yourself.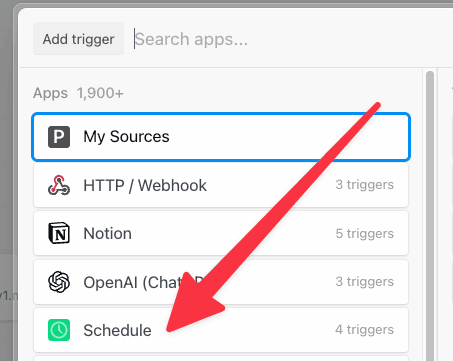 By default, your trigger will be turned **Off**. **To enable it, select either of the scheduling options**:
* **Every** : run the job every N days, hours, minutes (e.g. every 1 day, every 3 hours).
* **Cron Expression** : schedule your job using a cron expression. For example, the expression `0 0 * * *` will run the job every day at midnight. Cron expressions can be tied to any timezone.
### Testing a scheduled job
If you’re running a scheduled job once a day, you probably don’t want to wait until the next day’s run to test your new code. You can manually run the workflow associated with a scheduled job at any time by pressing the **Run Now** button.
### Job History
You’ll see the history of job executions under the **Job History** section of the [Inspector](/docs/workflows/building-workflows/inspect/).
Clicking on a specific job shows the execution details for that job — all the logs and observability associated with that run of the workflow.
### Trigger a notification to an external service (email, Slack, etc.)
You can send yourself a notification — for example, an email or a Slack message — at any point in a workflow by using the relevant [Action](/docs/components/contributing/#actions) or [Destination](/docs/workflows/data-management/destinations/).
If you’d like to email yourself when a job finishes successfully, you can use the [Email Destination](/docs/workflows/data-management/destinations/email/). You can send yourself a Slack message using the Slack Action, or trigger an [HTTP request](/docs/workflows/data-management/destinations/http/) to an external service.
You can also [write code](/docs/workflows/building-workflows/code/) to trigger any complex notification logic you’d like.
### Troubleshooting your scheduled jobs
When you run a scheduled job, you may need to troubleshoot errors or other execution issues. Pipedream offers built-in, step-level logs that show you detailed execution information that should aid troubleshooting.
Any time a scheduled job runs, you’ll see a new execution appear in the [Inspector](/docs/workflows/building-workflows/inspect/). This shows you when the job ran, how long it took to run, and any errors that might have occurred. **Click on any of these lines in the Inspector to view the details for a given run**.
Code steps show [logs](/docs/workflows/building-workflows/code/nodejs/#logs) below the step itself. Any time you run `console.log()` or other functions that print output, you should see the logs appear directly below the step where the code ran.
[Actions](/docs/components/contributing/#actions) and [Destinations](/docs/workflows/data-management/destinations/) also show execution details relevant to the specific Action or Destination. For example, when you use the [HTTP Destination](/docs/workflows/data-management/destinations/http/) to make an HTTP request, you’ll see the HTTP request and response details tied to that Destination step:
## Email
When you select the **Email** trigger:
By default, your trigger will be turned **Off**. **To enable it, select either of the scheduling options**:
* **Every** : run the job every N days, hours, minutes (e.g. every 1 day, every 3 hours).
* **Cron Expression** : schedule your job using a cron expression. For example, the expression `0 0 * * *` will run the job every day at midnight. Cron expressions can be tied to any timezone.
### Testing a scheduled job
If you’re running a scheduled job once a day, you probably don’t want to wait until the next day’s run to test your new code. You can manually run the workflow associated with a scheduled job at any time by pressing the **Run Now** button.
### Job History
You’ll see the history of job executions under the **Job History** section of the [Inspector](/docs/workflows/building-workflows/inspect/).
Clicking on a specific job shows the execution details for that job — all the logs and observability associated with that run of the workflow.
### Trigger a notification to an external service (email, Slack, etc.)
You can send yourself a notification — for example, an email or a Slack message — at any point in a workflow by using the relevant [Action](/docs/components/contributing/#actions) or [Destination](/docs/workflows/data-management/destinations/).
If you’d like to email yourself when a job finishes successfully, you can use the [Email Destination](/docs/workflows/data-management/destinations/email/). You can send yourself a Slack message using the Slack Action, or trigger an [HTTP request](/docs/workflows/data-management/destinations/http/) to an external service.
You can also [write code](/docs/workflows/building-workflows/code/) to trigger any complex notification logic you’d like.
### Troubleshooting your scheduled jobs
When you run a scheduled job, you may need to troubleshoot errors or other execution issues. Pipedream offers built-in, step-level logs that show you detailed execution information that should aid troubleshooting.
Any time a scheduled job runs, you’ll see a new execution appear in the [Inspector](/docs/workflows/building-workflows/inspect/). This shows you when the job ran, how long it took to run, and any errors that might have occurred. **Click on any of these lines in the Inspector to view the details for a given run**.
Code steps show [logs](/docs/workflows/building-workflows/code/nodejs/#logs) below the step itself. Any time you run `console.log()` or other functions that print output, you should see the logs appear directly below the step where the code ran.
[Actions](/docs/components/contributing/#actions) and [Destinations](/docs/workflows/data-management/destinations/) also show execution details relevant to the specific Action or Destination. For example, when you use the [HTTP Destination](/docs/workflows/data-management/destinations/http/) to make an HTTP request, you’ll see the HTTP request and response details tied to that Destination step:
## Email
When you select the **Email** trigger:
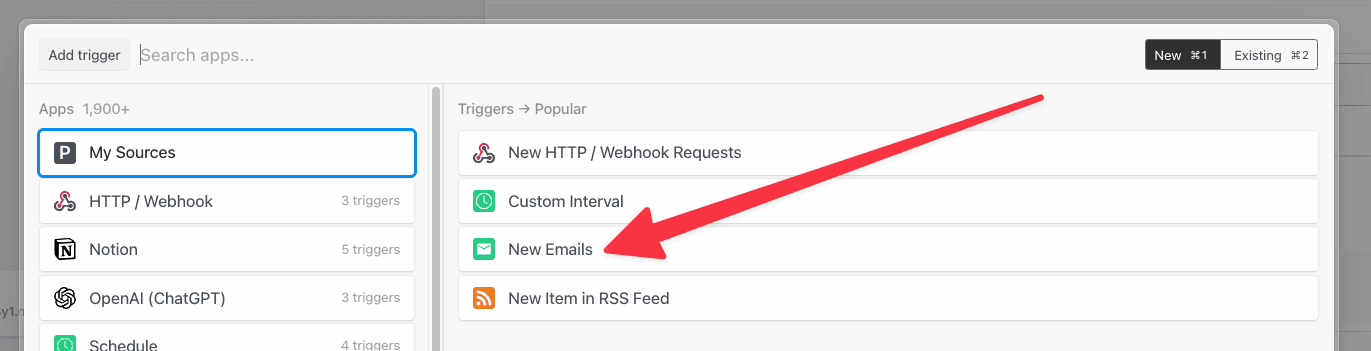 Pipedream creates an email address specific to your workflow. Any email sent to this address triggers your workflow:
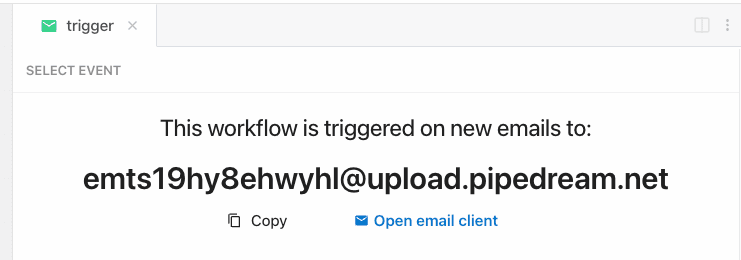 As soon as you send an email to the workflow-specific address, Pipedream parses its body, headers, and attachments into a JavaScript object it exposes in the `steps.trigger.event` variable that you can access within your workflow. This transformation can take a few seconds to perform. Once done, Pipedream will immediately trigger your workflow with the transformed payload.
[Read more about the shape of the email trigger event](/docs/workflows/building-workflows/triggers/#email).
### Sending large emails
By default, you can send emails up to {EMAIL_PAYLOAD_SIZE_LIMIT} in total size (content, headers, attachments). Emails over this size will be rejected, and you will not see them appear in your workflow.
**You can send emails up to `{EMAIL_PAYLOAD_SIZE_LIMIT}` in size by sending emails to `[YOUR EMAIL ENDPOINT]@upload.pipedream.net`**. If your workflow-specific email address is `endpoint@pipedream.net`, your “large email address” is `endpoint@upload.pipedream.net`.
Emails delivered to this address are uploaded to a private URL you have access to within your workflow, at the variable `steps.trigger.event.mail.content_url`. You can download and parse the email within your workflow using that URL. This content contains the *raw* email. Unlike the standard email interface, you must parse this email on your own - see the examples below.
#### Example: Download the email using the Send HTTP Request action
*Note: you can only download emails at most {FUNCTION_PAYLOAD_LIMIT} in size using this method. Otherwise, you may encounter a [Function Payload Limit Exceeded](/docs/troubleshooting/#function-payload-limit-exceeded) error.*
You can download the email using the **Send HTTP Request** action. [Copy this workflow to see how this works](https://pipedream.com/new?h=tch_1AfMyl).
This workflow also parses the contents of the email and exposes it as a JavaScript object using the [`mailparser` library](https://nodemailer.com/extras/mailparser/):
```javascript
import { simpleParser } from "mailparser";
export default defineComponent({
async run({ steps, $ }) {
return await simpleParser(steps.get_large_email_content.$return_value);
},
});
```
#### Example: Download the email to the `/tmp` directory, read it and parse it
[This workflow](https://pipedream.com/new?h=tch_jPfaEJ) downloads the email, saving it as a file to the [`/tmp` directory](/docs/workflows/building-workflows/code/nodejs/working-with-files/#the-tmp-directory). Then it reads the same file (as an example), and parses it using the [`mailparser` library](https://nodemailer.com/extras/mailparser/):
```javascript
import stream from "stream";
import { promisify } from "util";
import fs from "fs";
import got from "got";
import { simpleParser } from "mailparser";
// To use previous step data, pass the `steps` object to the run() function
export default defineComponent({
async run({ steps, $ }) {
const pipeline = promisify(stream.pipeline);
await pipeline(
got.stream(steps.trigger.event.mail.content_url),
fs.createWriteStream(`/tmp/raw_email`)
);
// Now read the file and parse its contents into the `parsed` variable
// See https://nodemailer.com/extras/mailparser/ for parsing options
const f = fs.readFileSync(`/tmp/raw_email`);
return await simpleParser(f);
},
});
```
#### How the email is saved
Your email is saved to a Pipedream-owned [Amazon S3 bucket](https://aws.amazon.com/s3/). Pipedream generates a [signed URL](https://docs.aws.amazon.com/AmazonS3/latest/dev/ShareObjectPreSignedURL.html) that allows you to access to that file for up to 30 minutes. After 30 minutes, the signed URL will be invalidated, and the file will be deleted.
### Email attachments
You can attach any files to your email, up to [the total email size limit](/docs/workflows/limits/#email-triggers).
Attachments are stored in `steps.trigger.event.attachments`, which provides an array of attachment objects. Each attachment in that array exposes key properties:
* `contentUrl`: a URL that hosts your attachment. You can [download this file to the `/tmp` directory](/docs/workflows/building-workflows/code/nodejs/http-requests/#download-a-file-to-the-tmp-directory) and process it in your workflow.
* `content`: If the attachment contains text-based content, Pipedream renders the attachment in `content`, up to 10,000 bytes.
* `contentTruncated`: `true` if the attachment contained text-based content larger than 10,000 bytes. If `true`, the data in `content` will be truncated, and you should fetch the full attachment from `contentUrl`.
### Appending metadata to the incoming email address with `+data`
Pipedream provides a way to append metadata to incoming emails by adding a `+` sign to the incoming email key, followed by any arbitrary string:
```java
myemailaddr+test@pipedream.net
```
Any emails sent to your workflow-specific email address will resolve to that address, triggering your workflow, no matter the data you add after the `+` sign. Sending an email to both of these addresses triggers the workflow with the address `myemailaddr@pipedream.net`:
```java
myemailaddr+test@pipedream.net
myemailaddr+unsubscribe@pipedream.net
```
This allows you implement conditional logic in your workflow based on the data in that string.
### Troubleshooting
#### I’m receiving an `Expired Token` error when trying to read an email attachment
Email attachments are saved to S3, and are accessible in your workflows over [pre-signed URLs](https://docs.aws.amazon.com/AmazonS3/latest/userguide/ShareObjectPreSignedURL.html).
If the presigned URL for the attachment has expired, then you’ll need to send another email to create a brand new pre-signed URL.
If you’re using email attachments in combination with [`$.flow.delay`](/docs/workflows/building-workflows/code/nodejs/delay/) or [`$.flow.rerun`](/docs/workflows/building-workflows/code/nodejs/rerun/) which introduces a gap of time between steps in your workflow, then there’s a chance the email attachment’s URL will expire.
To overcome this, we suggest uploading your email attachments to your Project’s [File Store](/docs/workflows/data-management/file-stores/) for persistent storage.
## RSS
Choose the RSS trigger to watch an RSS feed for new items:
As soon as you send an email to the workflow-specific address, Pipedream parses its body, headers, and attachments into a JavaScript object it exposes in the `steps.trigger.event` variable that you can access within your workflow. This transformation can take a few seconds to perform. Once done, Pipedream will immediately trigger your workflow with the transformed payload.
[Read more about the shape of the email trigger event](/docs/workflows/building-workflows/triggers/#email).
### Sending large emails
By default, you can send emails up to {EMAIL_PAYLOAD_SIZE_LIMIT} in total size (content, headers, attachments). Emails over this size will be rejected, and you will not see them appear in your workflow.
**You can send emails up to `{EMAIL_PAYLOAD_SIZE_LIMIT}` in size by sending emails to `[YOUR EMAIL ENDPOINT]@upload.pipedream.net`**. If your workflow-specific email address is `endpoint@pipedream.net`, your “large email address” is `endpoint@upload.pipedream.net`.
Emails delivered to this address are uploaded to a private URL you have access to within your workflow, at the variable `steps.trigger.event.mail.content_url`. You can download and parse the email within your workflow using that URL. This content contains the *raw* email. Unlike the standard email interface, you must parse this email on your own - see the examples below.
#### Example: Download the email using the Send HTTP Request action
*Note: you can only download emails at most {FUNCTION_PAYLOAD_LIMIT} in size using this method. Otherwise, you may encounter a [Function Payload Limit Exceeded](/docs/troubleshooting/#function-payload-limit-exceeded) error.*
You can download the email using the **Send HTTP Request** action. [Copy this workflow to see how this works](https://pipedream.com/new?h=tch_1AfMyl).
This workflow also parses the contents of the email and exposes it as a JavaScript object using the [`mailparser` library](https://nodemailer.com/extras/mailparser/):
```javascript
import { simpleParser } from "mailparser";
export default defineComponent({
async run({ steps, $ }) {
return await simpleParser(steps.get_large_email_content.$return_value);
},
});
```
#### Example: Download the email to the `/tmp` directory, read it and parse it
[This workflow](https://pipedream.com/new?h=tch_jPfaEJ) downloads the email, saving it as a file to the [`/tmp` directory](/docs/workflows/building-workflows/code/nodejs/working-with-files/#the-tmp-directory). Then it reads the same file (as an example), and parses it using the [`mailparser` library](https://nodemailer.com/extras/mailparser/):
```javascript
import stream from "stream";
import { promisify } from "util";
import fs from "fs";
import got from "got";
import { simpleParser } from "mailparser";
// To use previous step data, pass the `steps` object to the run() function
export default defineComponent({
async run({ steps, $ }) {
const pipeline = promisify(stream.pipeline);
await pipeline(
got.stream(steps.trigger.event.mail.content_url),
fs.createWriteStream(`/tmp/raw_email`)
);
// Now read the file and parse its contents into the `parsed` variable
// See https://nodemailer.com/extras/mailparser/ for parsing options
const f = fs.readFileSync(`/tmp/raw_email`);
return await simpleParser(f);
},
});
```
#### How the email is saved
Your email is saved to a Pipedream-owned [Amazon S3 bucket](https://aws.amazon.com/s3/). Pipedream generates a [signed URL](https://docs.aws.amazon.com/AmazonS3/latest/dev/ShareObjectPreSignedURL.html) that allows you to access to that file for up to 30 minutes. After 30 minutes, the signed URL will be invalidated, and the file will be deleted.
### Email attachments
You can attach any files to your email, up to [the total email size limit](/docs/workflows/limits/#email-triggers).
Attachments are stored in `steps.trigger.event.attachments`, which provides an array of attachment objects. Each attachment in that array exposes key properties:
* `contentUrl`: a URL that hosts your attachment. You can [download this file to the `/tmp` directory](/docs/workflows/building-workflows/code/nodejs/http-requests/#download-a-file-to-the-tmp-directory) and process it in your workflow.
* `content`: If the attachment contains text-based content, Pipedream renders the attachment in `content`, up to 10,000 bytes.
* `contentTruncated`: `true` if the attachment contained text-based content larger than 10,000 bytes. If `true`, the data in `content` will be truncated, and you should fetch the full attachment from `contentUrl`.
### Appending metadata to the incoming email address with `+data`
Pipedream provides a way to append metadata to incoming emails by adding a `+` sign to the incoming email key, followed by any arbitrary string:
```java
myemailaddr+test@pipedream.net
```
Any emails sent to your workflow-specific email address will resolve to that address, triggering your workflow, no matter the data you add after the `+` sign. Sending an email to both of these addresses triggers the workflow with the address `myemailaddr@pipedream.net`:
```java
myemailaddr+test@pipedream.net
myemailaddr+unsubscribe@pipedream.net
```
This allows you implement conditional logic in your workflow based on the data in that string.
### Troubleshooting
#### I’m receiving an `Expired Token` error when trying to read an email attachment
Email attachments are saved to S3, and are accessible in your workflows over [pre-signed URLs](https://docs.aws.amazon.com/AmazonS3/latest/userguide/ShareObjectPreSignedURL.html).
If the presigned URL for the attachment has expired, then you’ll need to send another email to create a brand new pre-signed URL.
If you’re using email attachments in combination with [`$.flow.delay`](/docs/workflows/building-workflows/code/nodejs/delay/) or [`$.flow.rerun`](/docs/workflows/building-workflows/code/nodejs/rerun/) which introduces a gap of time between steps in your workflow, then there’s a chance the email attachment’s URL will expire.
To overcome this, we suggest uploading your email attachments to your Project’s [File Store](/docs/workflows/data-management/file-stores/) for persistent storage.
## RSS
Choose the RSS trigger to watch an RSS feed for new items:
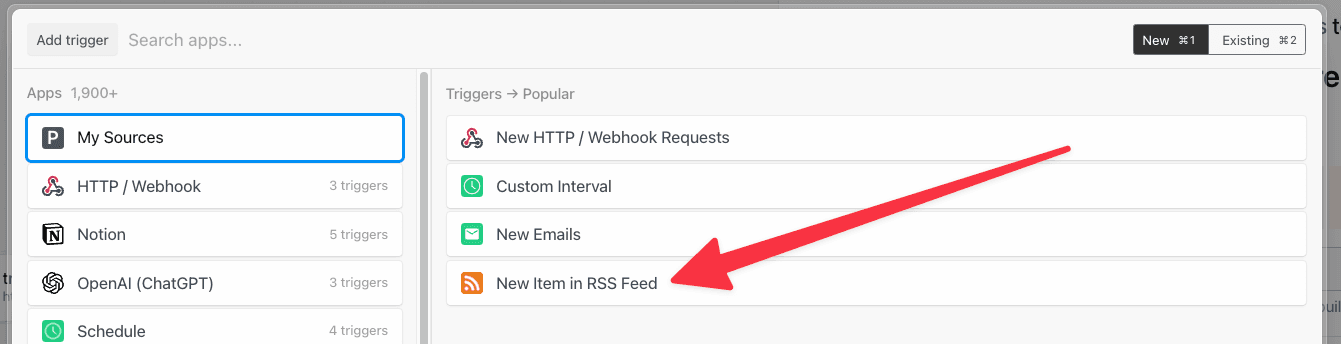 This will create an RSS [event source](/docs/workflows/building-workflows/triggers/) that polls the feed for new items on the schedule you select. Every time a new item is found, your workflow will run.
## Events
Events trigger workflow executions. The event that triggers your workflow depends on the trigger you select for your workflow:
* [HTTP triggers](/docs/workflows/building-workflows/triggers/#http) invoke your workflow on HTTP requests.
* [Cron triggers](/docs/workflows/building-workflows/triggers/#schedule) invoke your workflow on a time schedule (e.g., on an interval).
* [Email triggers](/docs/workflows/building-workflows/triggers/#email) invoke your workflow on inbound emails.
* [Event sources](/docs/workflows/building-workflows/triggers/#app-based-triggers) invoke your workflow on events from apps like Twitter, Google Calendar, and more.
### Selecting a test event
When you test any step in your workflow, Pipedream passes the test event you select in the trigger step:
This will create an RSS [event source](/docs/workflows/building-workflows/triggers/) that polls the feed for new items on the schedule you select. Every time a new item is found, your workflow will run.
## Events
Events trigger workflow executions. The event that triggers your workflow depends on the trigger you select for your workflow:
* [HTTP triggers](/docs/workflows/building-workflows/triggers/#http) invoke your workflow on HTTP requests.
* [Cron triggers](/docs/workflows/building-workflows/triggers/#schedule) invoke your workflow on a time schedule (e.g., on an interval).
* [Email triggers](/docs/workflows/building-workflows/triggers/#email) invoke your workflow on inbound emails.
* [Event sources](/docs/workflows/building-workflows/triggers/#app-based-triggers) invoke your workflow on events from apps like Twitter, Google Calendar, and more.
### Selecting a test event
When you test any step in your workflow, Pipedream passes the test event you select in the trigger step:
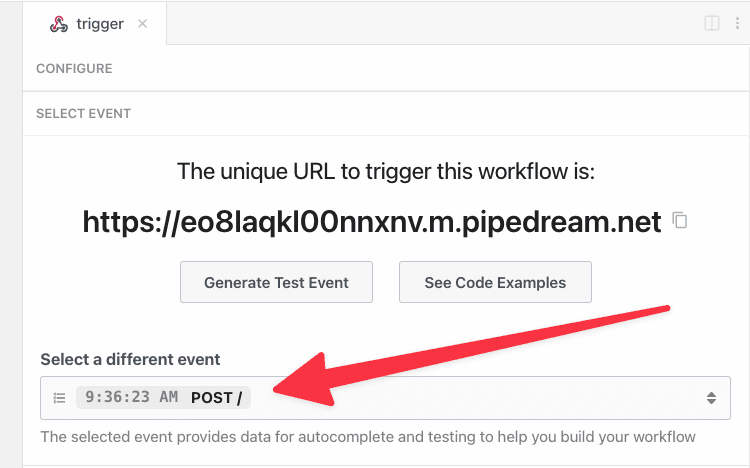 You can select any event you’ve previously sent to your trigger as your test event, or send a new one.
### Examining event data
When you select an event, you’ll see [the incoming event data](/docs/workflows/building-workflows/triggers/#event-format) and the [event context](/docs/workflows/building-workflows/triggers/#stepstriggercontext) for that event:
You can select any event you’ve previously sent to your trigger as your test event, or send a new one.
### Examining event data
When you select an event, you’ll see [the incoming event data](/docs/workflows/building-workflows/triggers/#event-format) and the [event context](/docs/workflows/building-workflows/triggers/#stepstriggercontext) for that event:
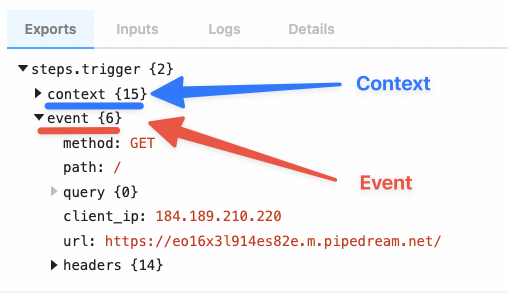 Pipedream parses your incoming data and exposes it in the variable [`steps.trigger.event`](/docs/workflows/building-workflows/triggers/#event-format), which you can access in any [workflow step](/docs/workflows/#steps).
### Copying references to event data
When you’re [examining event data](/docs/workflows/building-workflows/triggers/#examining-event-data), you’ll commonly want to copy the name of the variable that points to the data you need to reference in another step.
Hover over the property whose data you want to reference, and click the **Copy Path** button to its right:
Pipedream parses your incoming data and exposes it in the variable [`steps.trigger.event`](/docs/workflows/building-workflows/triggers/#event-format), which you can access in any [workflow step](/docs/workflows/#steps).
### Copying references to event data
When you’re [examining event data](/docs/workflows/building-workflows/triggers/#examining-event-data), you’ll commonly want to copy the name of the variable that points to the data you need to reference in another step.
Hover over the property whose data you want to reference, and click the **Copy Path** button to its right:
 ### Copying the values of event data
You can also copy the value of specific properties of your event data. Hover over the property whose data you want to copy, and click the **Copy Value** button to its right:
### Copying the values of event data
You can also copy the value of specific properties of your event data. Hover over the property whose data you want to copy, and click the **Copy Value** button to its right:
 ### Event format
When you send an event to your workflow, Pipedream takes the trigger data — for example, the HTTP payload, headers, etc. — and adds our own Pipedream metadata to it.
**This data is exposed in the `steps.trigger.event` variable. You can reference this variable in any step of your workflow**.
You can reference your event data in any [code](/docs/workflows/building-workflows/code/) or [action](/docs/components/contributing/#actions) step. See those docs or the general [docs on passing data between steps](/docs/workflows/#steps) for more information.
The specific shape of `steps.trigger.event` depends on the trigger type:
#### HTTP
| Property | Description |
| ----------- | ----------------------------------------------------- |
| `body` | A string or object representation of the HTTP payload |
| `client_ip` | IP address of the client that made the request |
| `headers` | HTTP headers, represented as an object |
| `method` | HTTP method |
| `path` | HTTP request path |
| `query` | Query string |
| `url` | Request host + path |
#### Cron Scheduler
| Property | Description |
| --------------------- | ----------------------------------------------------------------------------------------------- |
| `interval_seconds` | The number of seconds between scheduled executions |
| `cron` | When you’ve configured a custom cron schedule, the cron string |
| `timestamp` | The epoch timestamp when the workflow ran |
| `timezone_configured` | An object with formatted datetime data for the given execution, tied to the schedule’s timezone |
| `timezone_utc` | An object with formatted datetime data for the given execution, tied to the UTC timezone |
#### Email
We use Amazon SES to receive emails for the email trigger. You can find the shape of the event in the [SES docs](https://docs.aws.amazon.com/ses/latest/DeveloperGuide/receiving-email-notifications-contents.html).
### `steps.trigger.context`
`steps.trigger.event` contain your event’s **data**. `steps.trigger.context` contains *metadata* about the workflow and the execution tied to this event.
You can use the data in `steps.trigger.context` to uniquely identify the Pipedream event ID, the timestamp at which the event invoked the workflow, and more:
| Property | Description |
| ------------------ | ------------------------------------------------------------------------------------------------------------------------------------------------------------------------------------------------ |
| `deployment_id` | A globally-unique string representing the current version of the workflow |
| `emitter_id` | The ID of the workflow trigger that emitted this event, e.g. the [event source](/docs/workflows/building-workflows/triggers/) ID. |
| `id` | A unique, Pipedream-provided identifier for the event that triggered this workflow |
| `owner_id` | The Pipedream-assigned [workspace ID](/docs/workspaces/#finding-your-workspaces-id) that owns the workflow |
| `platform_version` | The version of the Pipedream execution environment this event ran on |
| `replay` | A boolean, whether the event was replayed via the UI |
| `trace_id` | Holds the same value for all executions tied to an original event. [See below for more details](/docs/workflows/building-workflows/triggers/#how-do-i-retrieve-the-execution-id-for-a-workflow). |
| `ts` | The ISO 8601 timestamp at which the event invoked the workflow |
| `workflow_id` | The workflow ID |
| `workflow_name` | The workflow name |
#### How do I retrieve the execution ID for a workflow?
Pipedream exposes two identifies for workflow executions: one for the execution, and one for the “trace”.
`steps.trigger.context.id` should be unique for every execution of a workflow.
`steps.trigger.context.trace_id` will hold the same value for all executions tied to the same original event, e.g. if you have auto-retry enabled and it retries a workflow three times, the `id` will change, but the `trace_id` will remain the same. For example, if you call `$.flow.suspend()` on a workflow, we run a new execution after the suspend, so you’d see two total executions: `id` will be unique before and after the suspend, but `trace_id` will be the same.
You may notice other properties in `context`. These are used internally by Pipedream, and are subject to change.
### Event retention
On the Free and Basic plans, each workflow retains at most 100 events or 7 days of history.
* After 100 events have been processed, Pipedream will delete the oldest event data as new events arrive, keeping only the last 100 events.
* Or if an event is older than 7 days, Pipedream will delete the event data.
Other paid plans have longer retention. [See the pricing page](https://pipedream.com/pricing) for details.
Events are also stored in [event history](/docs/workflows/event-history/) for up to 30 days, depending on your plan. [See the pricing page](https://pipedream.com/pricing) for the retention on your plan.
Events that are [delayed](/docs/workflows/building-workflows/control-flow/delay/) or [suspended](/docs/glossary/#suspend) are retained for the duration of the delay. After the delay, the workflow is executed, and the event data is retained according to the rules above.
### Event format
When you send an event to your workflow, Pipedream takes the trigger data — for example, the HTTP payload, headers, etc. — and adds our own Pipedream metadata to it.
**This data is exposed in the `steps.trigger.event` variable. You can reference this variable in any step of your workflow**.
You can reference your event data in any [code](/docs/workflows/building-workflows/code/) or [action](/docs/components/contributing/#actions) step. See those docs or the general [docs on passing data between steps](/docs/workflows/#steps) for more information.
The specific shape of `steps.trigger.event` depends on the trigger type:
#### HTTP
| Property | Description |
| ----------- | ----------------------------------------------------- |
| `body` | A string or object representation of the HTTP payload |
| `client_ip` | IP address of the client that made the request |
| `headers` | HTTP headers, represented as an object |
| `method` | HTTP method |
| `path` | HTTP request path |
| `query` | Query string |
| `url` | Request host + path |
#### Cron Scheduler
| Property | Description |
| --------------------- | ----------------------------------------------------------------------------------------------- |
| `interval_seconds` | The number of seconds between scheduled executions |
| `cron` | When you’ve configured a custom cron schedule, the cron string |
| `timestamp` | The epoch timestamp when the workflow ran |
| `timezone_configured` | An object with formatted datetime data for the given execution, tied to the schedule’s timezone |
| `timezone_utc` | An object with formatted datetime data for the given execution, tied to the UTC timezone |
#### Email
We use Amazon SES to receive emails for the email trigger. You can find the shape of the event in the [SES docs](https://docs.aws.amazon.com/ses/latest/DeveloperGuide/receiving-email-notifications-contents.html).
### `steps.trigger.context`
`steps.trigger.event` contain your event’s **data**. `steps.trigger.context` contains *metadata* about the workflow and the execution tied to this event.
You can use the data in `steps.trigger.context` to uniquely identify the Pipedream event ID, the timestamp at which the event invoked the workflow, and more:
| Property | Description |
| ------------------ | ------------------------------------------------------------------------------------------------------------------------------------------------------------------------------------------------ |
| `deployment_id` | A globally-unique string representing the current version of the workflow |
| `emitter_id` | The ID of the workflow trigger that emitted this event, e.g. the [event source](/docs/workflows/building-workflows/triggers/) ID. |
| `id` | A unique, Pipedream-provided identifier for the event that triggered this workflow |
| `owner_id` | The Pipedream-assigned [workspace ID](/docs/workspaces/#finding-your-workspaces-id) that owns the workflow |
| `platform_version` | The version of the Pipedream execution environment this event ran on |
| `replay` | A boolean, whether the event was replayed via the UI |
| `trace_id` | Holds the same value for all executions tied to an original event. [See below for more details](/docs/workflows/building-workflows/triggers/#how-do-i-retrieve-the-execution-id-for-a-workflow). |
| `ts` | The ISO 8601 timestamp at which the event invoked the workflow |
| `workflow_id` | The workflow ID |
| `workflow_name` | The workflow name |
#### How do I retrieve the execution ID for a workflow?
Pipedream exposes two identifies for workflow executions: one for the execution, and one for the “trace”.
`steps.trigger.context.id` should be unique for every execution of a workflow.
`steps.trigger.context.trace_id` will hold the same value for all executions tied to the same original event, e.g. if you have auto-retry enabled and it retries a workflow three times, the `id` will change, but the `trace_id` will remain the same. For example, if you call `$.flow.suspend()` on a workflow, we run a new execution after the suspend, so you’d see two total executions: `id` will be unique before and after the suspend, but `trace_id` will be the same.
You may notice other properties in `context`. These are used internally by Pipedream, and are subject to change.
### Event retention
On the Free and Basic plans, each workflow retains at most 100 events or 7 days of history.
* After 100 events have been processed, Pipedream will delete the oldest event data as new events arrive, keeping only the last 100 events.
* Or if an event is older than 7 days, Pipedream will delete the event data.
Other paid plans have longer retention. [See the pricing page](https://pipedream.com/pricing) for details.
Events are also stored in [event history](/docs/workflows/event-history/) for up to 30 days, depending on your plan. [See the pricing page](https://pipedream.com/pricing) for the retention on your plan.
Events that are [delayed](/docs/workflows/building-workflows/control-flow/delay/) or [suspended](/docs/glossary/#suspend) are retained for the duration of the delay. After the delay, the workflow is executed, and the event data is retained according to the rules above.
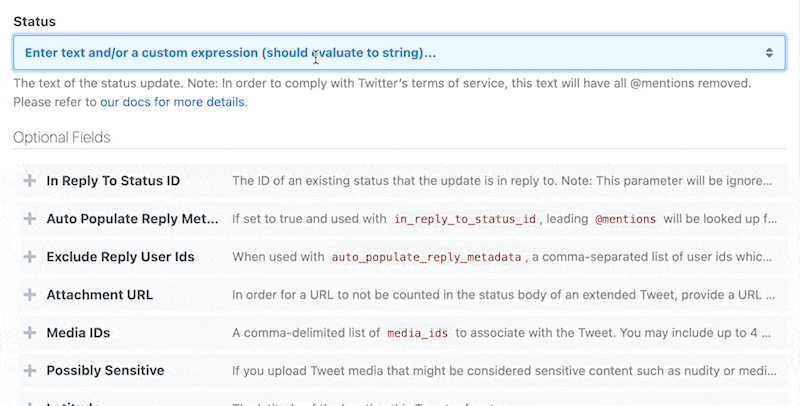 ### Manually enter or edit an expression
To manually enter or edit an expression, just enter or edit a value between double curly braces `{{ }}`. Pipedream provides auto-complete support as soon as you type.
### Manually enter or edit an expression
To manually enter or edit an expression, just enter or edit a value between double curly braces `{{ }}`. Pipedream provides auto-complete support as soon as you type.
 You can also run Node.js code in `{{ }}`. For example, if `event.foo` is a JSON object and you want to pass it to a param as a string, you can run `{{JSON.stringify(event.foo)}}`.
### Paste a reference from a step export
To paste a reference from a step export, find the reference you want to use, click **Copy Path** and then paste it into the input.
You can also run Node.js code in `{{ }}`. For example, if `event.foo` is a JSON object and you want to pass it to a param as a string, you can run `{{JSON.stringify(event.foo)}}`.
### Paste a reference from a step export
To paste a reference from a step export, find the reference you want to use, click **Copy Path** and then paste it into the input.
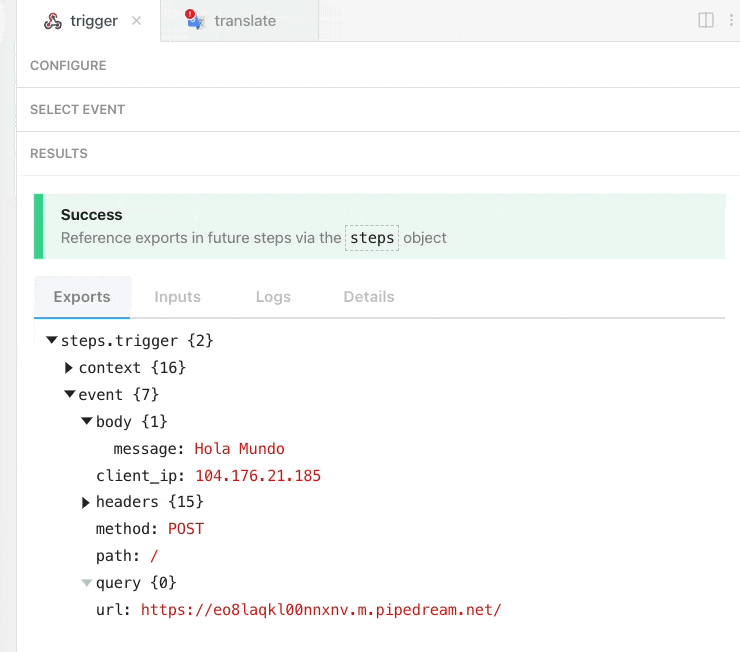 # Data Stores
Source: https://pipedream.com/docs/workflows/data-management/data-stores
**Data stores** are Pipedream’s built-in key-value store.
Data stores are useful for:
* Storing and retrieving data at a specific key
* Setting automatic expiration times for temporary data (TTL)
* Counting or summing values over time
* Retrieving JSON-serializable data across workflow executions
* Caching and rate limiting
* And any other case where you’d use a key-value store
You can connect to the same data store across workflows, so they’re also great for sharing state across different services.
You can use pre-built, no-code actions to store, update, and clear data, or interact with data stores programmatically in [Node.js](/docs/workflows/building-workflows/code/nodejs/using-data-stores/) or [Python](/docs/workflows/building-workflows/code/python/using-data-stores/).
## Using pre-built Data Store actions
Pipedream provides several pre-built actions to set, get, delete, and perform other operations with data stores.
### Inserting data
To insert data into a data store:
1. Add a new step to your workflow.
2. Search for the **Data Stores** app and select it.
3. Select the **Add or update a single record** pre-built action.
# Data Stores
Source: https://pipedream.com/docs/workflows/data-management/data-stores
**Data stores** are Pipedream’s built-in key-value store.
Data stores are useful for:
* Storing and retrieving data at a specific key
* Setting automatic expiration times for temporary data (TTL)
* Counting or summing values over time
* Retrieving JSON-serializable data across workflow executions
* Caching and rate limiting
* And any other case where you’d use a key-value store
You can connect to the same data store across workflows, so they’re also great for sharing state across different services.
You can use pre-built, no-code actions to store, update, and clear data, or interact with data stores programmatically in [Node.js](/docs/workflows/building-workflows/code/nodejs/using-data-stores/) or [Python](/docs/workflows/building-workflows/code/python/using-data-stores/).
## Using pre-built Data Store actions
Pipedream provides several pre-built actions to set, get, delete, and perform other operations with data stores.
### Inserting data
To insert data into a data store:
1. Add a new step to your workflow.
2. Search for the **Data Stores** app and select it.
3. Select the **Add or update a single record** pre-built action.
 Configure the action:
1. **Select or create a Data Store** — create a new data store or choose an existing data store.
2. **Key** - the unique ID for this data that you’ll use for lookup later
3. **Value** - The data to store at the specified `key`
4. **Time to Live (TTL)** - (Optional) The number of seconds until this record expires and is automatically deleted. Leave blank for records that should not expire.
Configure the action:
1. **Select or create a Data Store** — create a new data store or choose an existing data store.
2. **Key** - the unique ID for this data that you’ll use for lookup later
3. **Value** - The data to store at the specified `key`
4. **Time to Live (TTL)** - (Optional) The number of seconds until this record expires and is automatically deleted. Leave blank for records that should not expire.
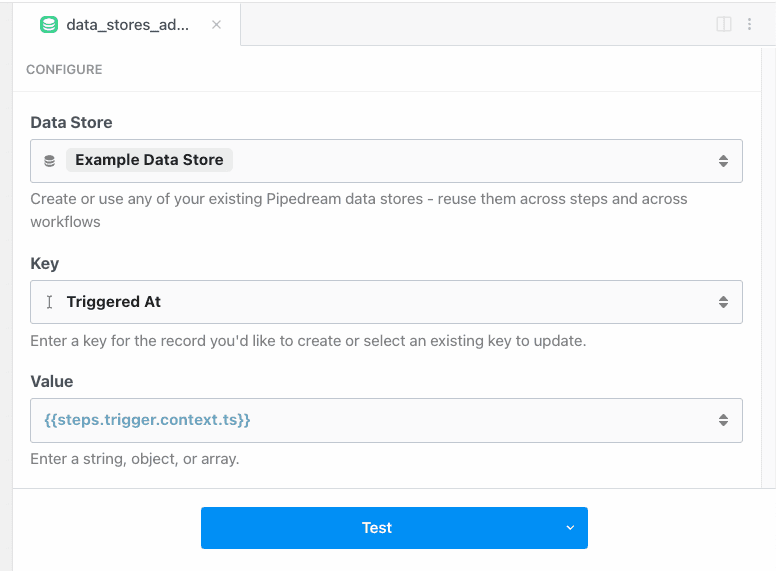 For example, to store the timestamp when the workflow was initially triggered, set the **Key** to **Triggered At** and the **Value** to `{{steps.trigger.context.ts}}`.
The **Key** must evaluate to a string. You can pass a static string, reference [exports](/docs/workflows/#step-exports) from a previous step, or use [any valid expression](/docs/workflows/building-workflows/using-props/#entering-expressions).
For example, to store the timestamp when the workflow was initially triggered, set the **Key** to **Triggered At** and the **Value** to `{{steps.trigger.context.ts}}`.
The **Key** must evaluate to a string. You can pass a static string, reference [exports](/docs/workflows/#step-exports) from a previous step, or use [any valid expression](/docs/workflows/building-workflows/using-props/#entering-expressions).

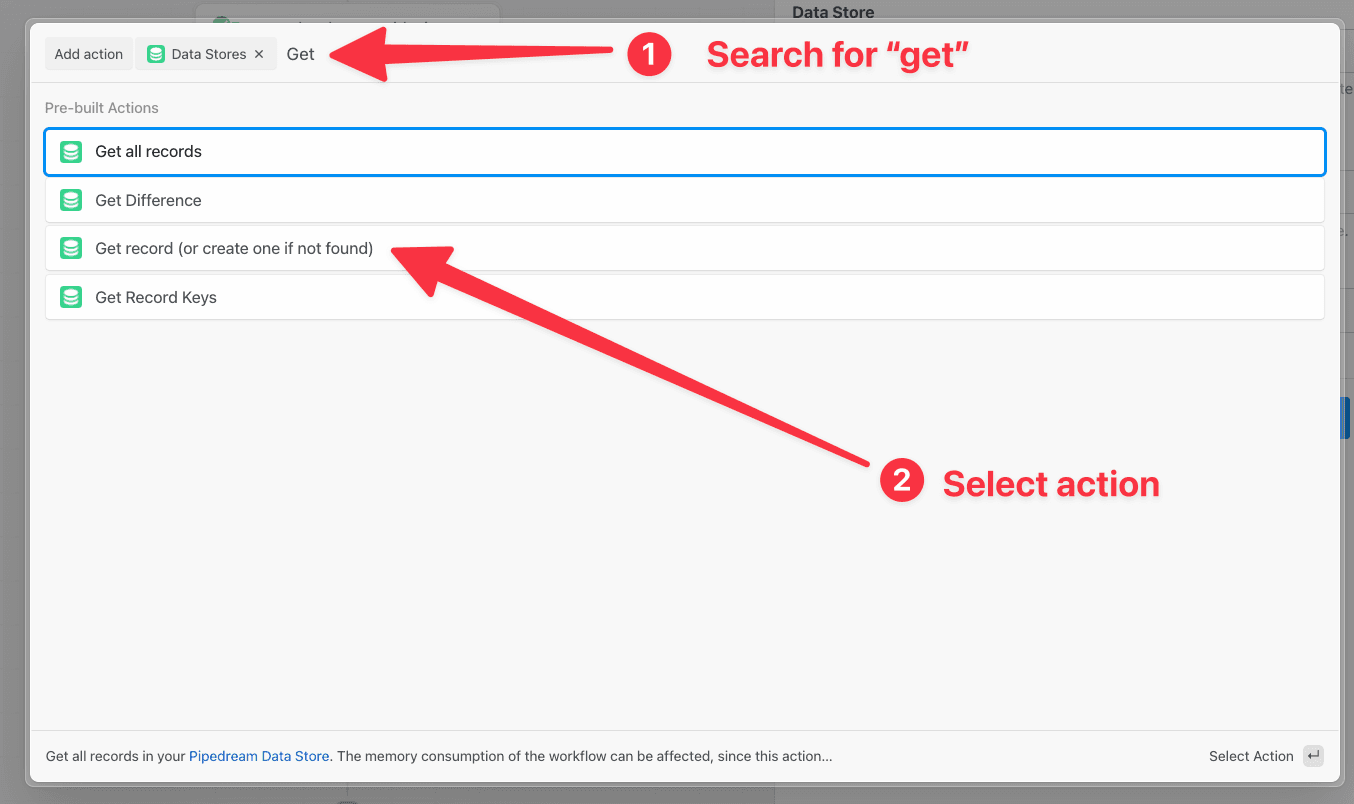 Configure the action:
1. **Select or create a Data Store** — create a new data store or choose an existing data store.
2. **Key** - the unique ID for this data that you’ll use for lookup later
3. **Create new record if key is not found** - if the specified key isn’t found, you can create a new record
4. **Value** - The data to store at the specified `key`
Configure the action:
1. **Select or create a Data Store** — create a new data store or choose an existing data store.
2. **Key** - the unique ID for this data that you’ll use for lookup later
3. **Create new record if key is not found** - if the specified key isn’t found, you can create a new record
4. **Value** - The data to store at the specified `key`
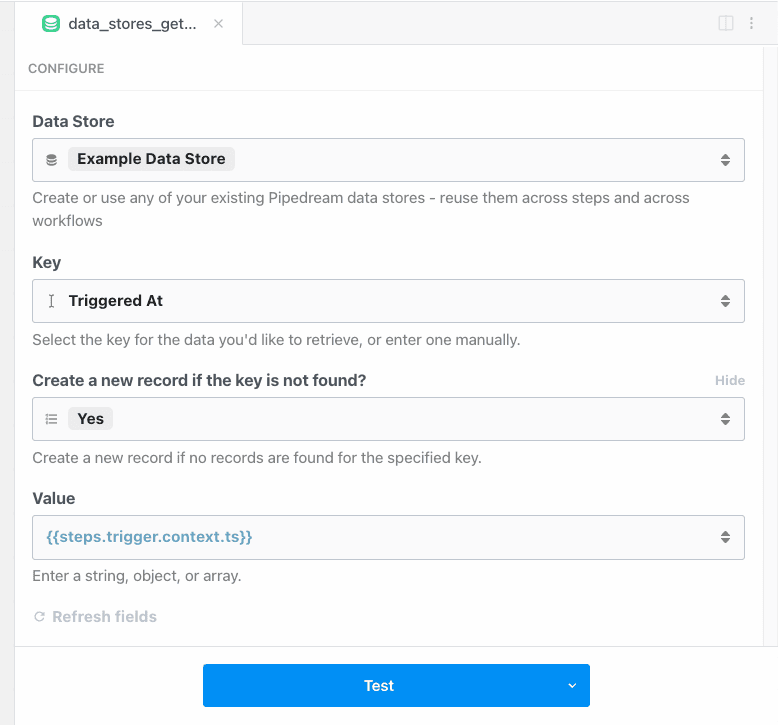 ### Setting or updating record expiration (TTL)
You can set automatic expiration times for records using the **Update record expiration** action:
1. Add a new step to your workflow.
2. Search for the **Data Stores** app and select it.
3. Select the **Update record expiration** pre-built action.
Configure the action:
1. **Select a Data Store** - select the data store containing the record to modify
2. **Key** - the key for the record you want to update the expiration for
3. **Expiration Type** - choose from preset expiration times (1 hour, 1 day, 1 week, etc.) or select “Custom value” to enter a specific time in seconds
4. **Custom TTL (seconds)** - (only if “Custom value” is selected) enter the number of seconds until the record expires
To remove expiration from a record, select “No expiration” as the expiration type.
### Deleting Data
To delete a single record from your data store, use the **Delete a single record** action in a step:
### Setting or updating record expiration (TTL)
You can set automatic expiration times for records using the **Update record expiration** action:
1. Add a new step to your workflow.
2. Search for the **Data Stores** app and select it.
3. Select the **Update record expiration** pre-built action.
Configure the action:
1. **Select a Data Store** - select the data store containing the record to modify
2. **Key** - the key for the record you want to update the expiration for
3. **Expiration Type** - choose from preset expiration times (1 hour, 1 day, 1 week, etc.) or select “Custom value” to enter a specific time in seconds
4. **Custom TTL (seconds)** - (only if “Custom value” is selected) enter the number of seconds until the record expires
To remove expiration from a record, select “No expiration” as the expiration type.
### Deleting Data
To delete a single record from your data store, use the **Delete a single record** action in a step:
 Then configure the action:
1. **Select a Data Store** - select the data store that contains the record to be deleted
2. **Key** - the key that identifies the individual record
For example, you can delete the data at the **Triggered At** key that we’ve created in the steps above:
Then configure the action:
1. **Select a Data Store** - select the data store that contains the record to be deleted
2. **Key** - the key that identifies the individual record
For example, you can delete the data at the **Triggered At** key that we’ve created in the steps above:
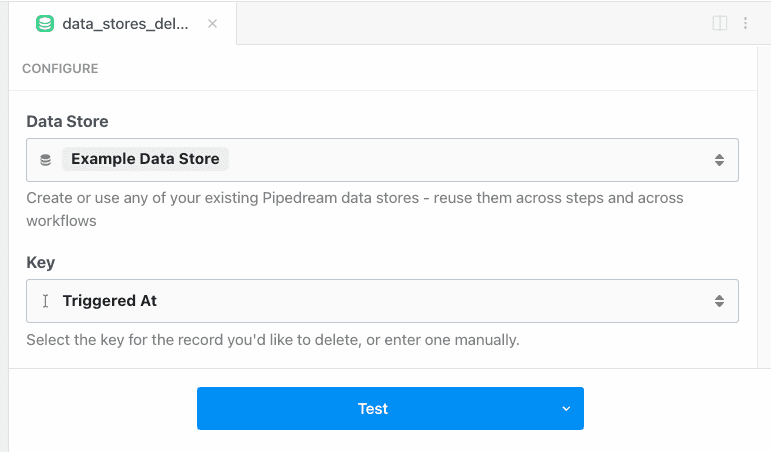 Deleting a record does not delete the entire data store. [To delete an entire data store, use the Pipedream Data Stores Dashboard](/docs/workflows/data-management/data-stores/#deleting-data-stores).
## Managing data stores
You can view the contents of your data stores at any time in the [Pipedream Data Stores dashboard](https://pipedream.com/data-stores/). You can also add, edit, or delete data store records manually from this view.
### Editing data store values manually
1. Select the data store
2. Click the pencil icon on the far right of the record you want to edit. This will open a text box that will allow you to edit the contents of the value. When you’re finished with your edits, save by clicking the checkmark icon.
Deleting a record does not delete the entire data store. [To delete an entire data store, use the Pipedream Data Stores Dashboard](/docs/workflows/data-management/data-stores/#deleting-data-stores).
## Managing data stores
You can view the contents of your data stores at any time in the [Pipedream Data Stores dashboard](https://pipedream.com/data-stores/). You can also add, edit, or delete data store records manually from this view.
### Editing data store values manually
1. Select the data store
2. Click the pencil icon on the far right of the record you want to edit. This will open a text box that will allow you to edit the contents of the value. When you’re finished with your edits, save by clicking the checkmark icon.
 ### Deleting data stores
You can delete a data store from this dashboard as well. On the far right in the data store row, click the trash can icon.
### Deleting data stores
You can delete a data store from this dashboard as well. On the far right in the data store row, click the trash can icon.
 **Deleting a data store is irreversible**.
 Then remove the data store from any linked steps.
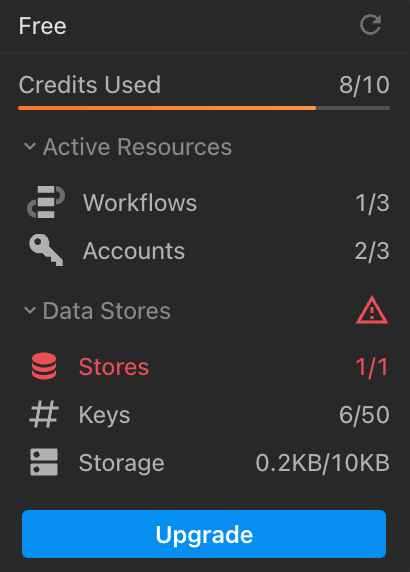 ## Atomic operations
Data store operations are not atomic or transactional, which can lead to race conditions. To ensure atomic operations, be sure to limit access to a data store key to a [single workflow with a single worker](/docs/workflows/building-workflows/settings/concurrency-and-throttling/) or use a service that supports atomic operations from among our [integrated apps](https://pipedream.com/apps).
## Supported data types
Data stores can hold any JSON-serializable data within the storage limits. This includes data types including:
* Strings
* Objects
* Arrays
* Dates
* Integers
* Floats
But you cannot serialize functions, classes, sets, maps, or other complex objects.
## Exporting data to an external service
In order to stay within the [data store limits](/docs/workflows/data-management/data-stores/#data-store-limits), you may need to export the data in your data store to an external service.
The following Node.js example action will export the data in chunks via an HTTP POST request. You may need to adapt the code to your needs. Click on [this link](https://pipedream.com/new?h=tch_egfAMv) to create a copy of the workflow in your workspace.
## Atomic operations
Data store operations are not atomic or transactional, which can lead to race conditions. To ensure atomic operations, be sure to limit access to a data store key to a [single workflow with a single worker](/docs/workflows/building-workflows/settings/concurrency-and-throttling/) or use a service that supports atomic operations from among our [integrated apps](https://pipedream.com/apps).
## Supported data types
Data stores can hold any JSON-serializable data within the storage limits. This includes data types including:
* Strings
* Objects
* Arrays
* Dates
* Integers
* Floats
But you cannot serialize functions, classes, sets, maps, or other complex objects.
## Exporting data to an external service
In order to stay within the [data store limits](/docs/workflows/data-management/data-stores/#data-store-limits), you may need to export the data in your data store to an external service.
The following Node.js example action will export the data in chunks via an HTTP POST request. You may need to adapt the code to your needs. Click on [this link](https://pipedream.com/new?h=tch_egfAMv) to create a copy of the workflow in your workspace.
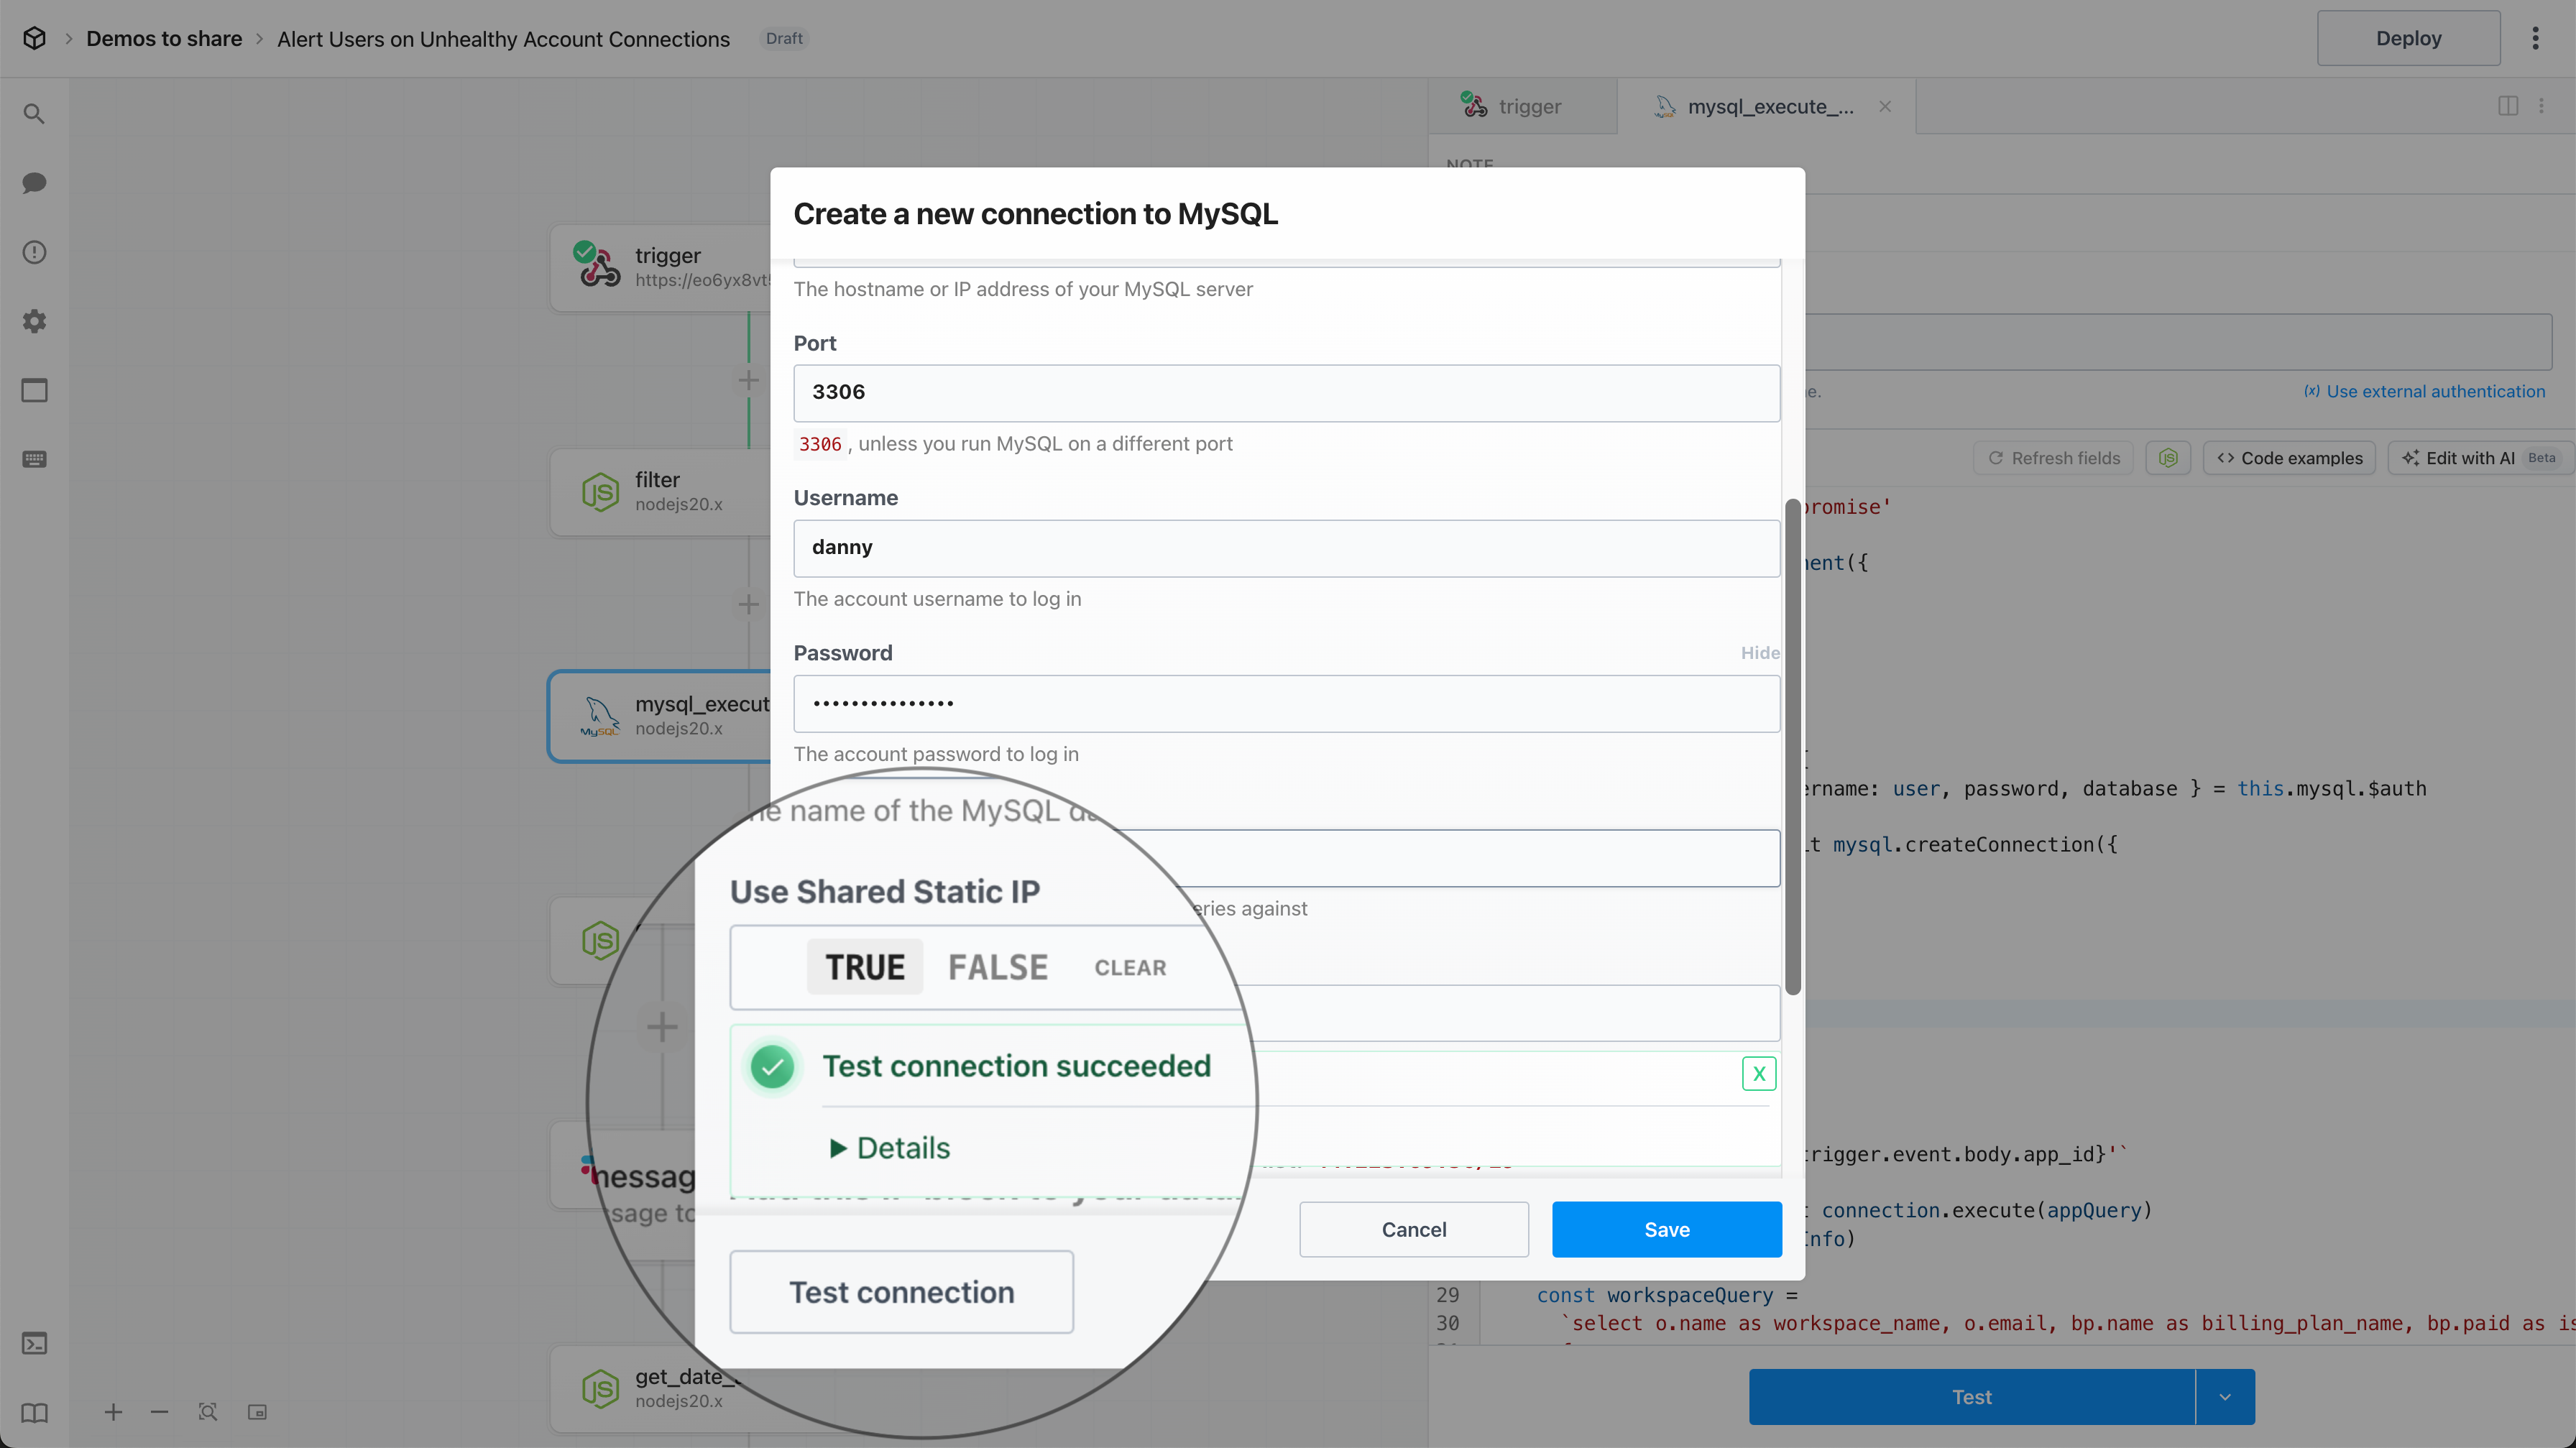 #### Shared Static IP Block
Add the following IP block to your database allow-list:
```
44.223.89.56/29
```
## FAQ
### What’s the difference between using a shared static IP with the SQL Proxy vs a dedicated IP using a VPC?
Both the SQL Proxy and VPCs enable secure database connections from a static IP.
* VPCs offer enhanced isolation and security by providing a **dedicated** static IP for workflows within your workspace
* The SQL proxy routes requests to your database connections through a set of **shared** static IPs
# Working With SQL
Source: https://pipedream.com/docs/workflows/data-management/databases/working-with-sql
Pipedream makes it easy to interact with SQL databases within your workflows. You can securely connect to your database and use either pre-built no-code triggers and actions to interact with your database, or execute custom SQL queries.
## SQL Editor
With the built-in SQL editor, you access linting and auto-complete features typical of modern SQL editors.
#### Shared Static IP Block
Add the following IP block to your database allow-list:
```
44.223.89.56/29
```
## FAQ
### What’s the difference between using a shared static IP with the SQL Proxy vs a dedicated IP using a VPC?
Both the SQL Proxy and VPCs enable secure database connections from a static IP.
* VPCs offer enhanced isolation and security by providing a **dedicated** static IP for workflows within your workspace
* The SQL proxy routes requests to your database connections through a set of **shared** static IPs
# Working With SQL
Source: https://pipedream.com/docs/workflows/data-management/databases/working-with-sql
Pipedream makes it easy to interact with SQL databases within your workflows. You can securely connect to your database and use either pre-built no-code triggers and actions to interact with your database, or execute custom SQL queries.
## SQL Editor
With the built-in SQL editor, you access linting and auto-complete features typical of modern SQL editors.
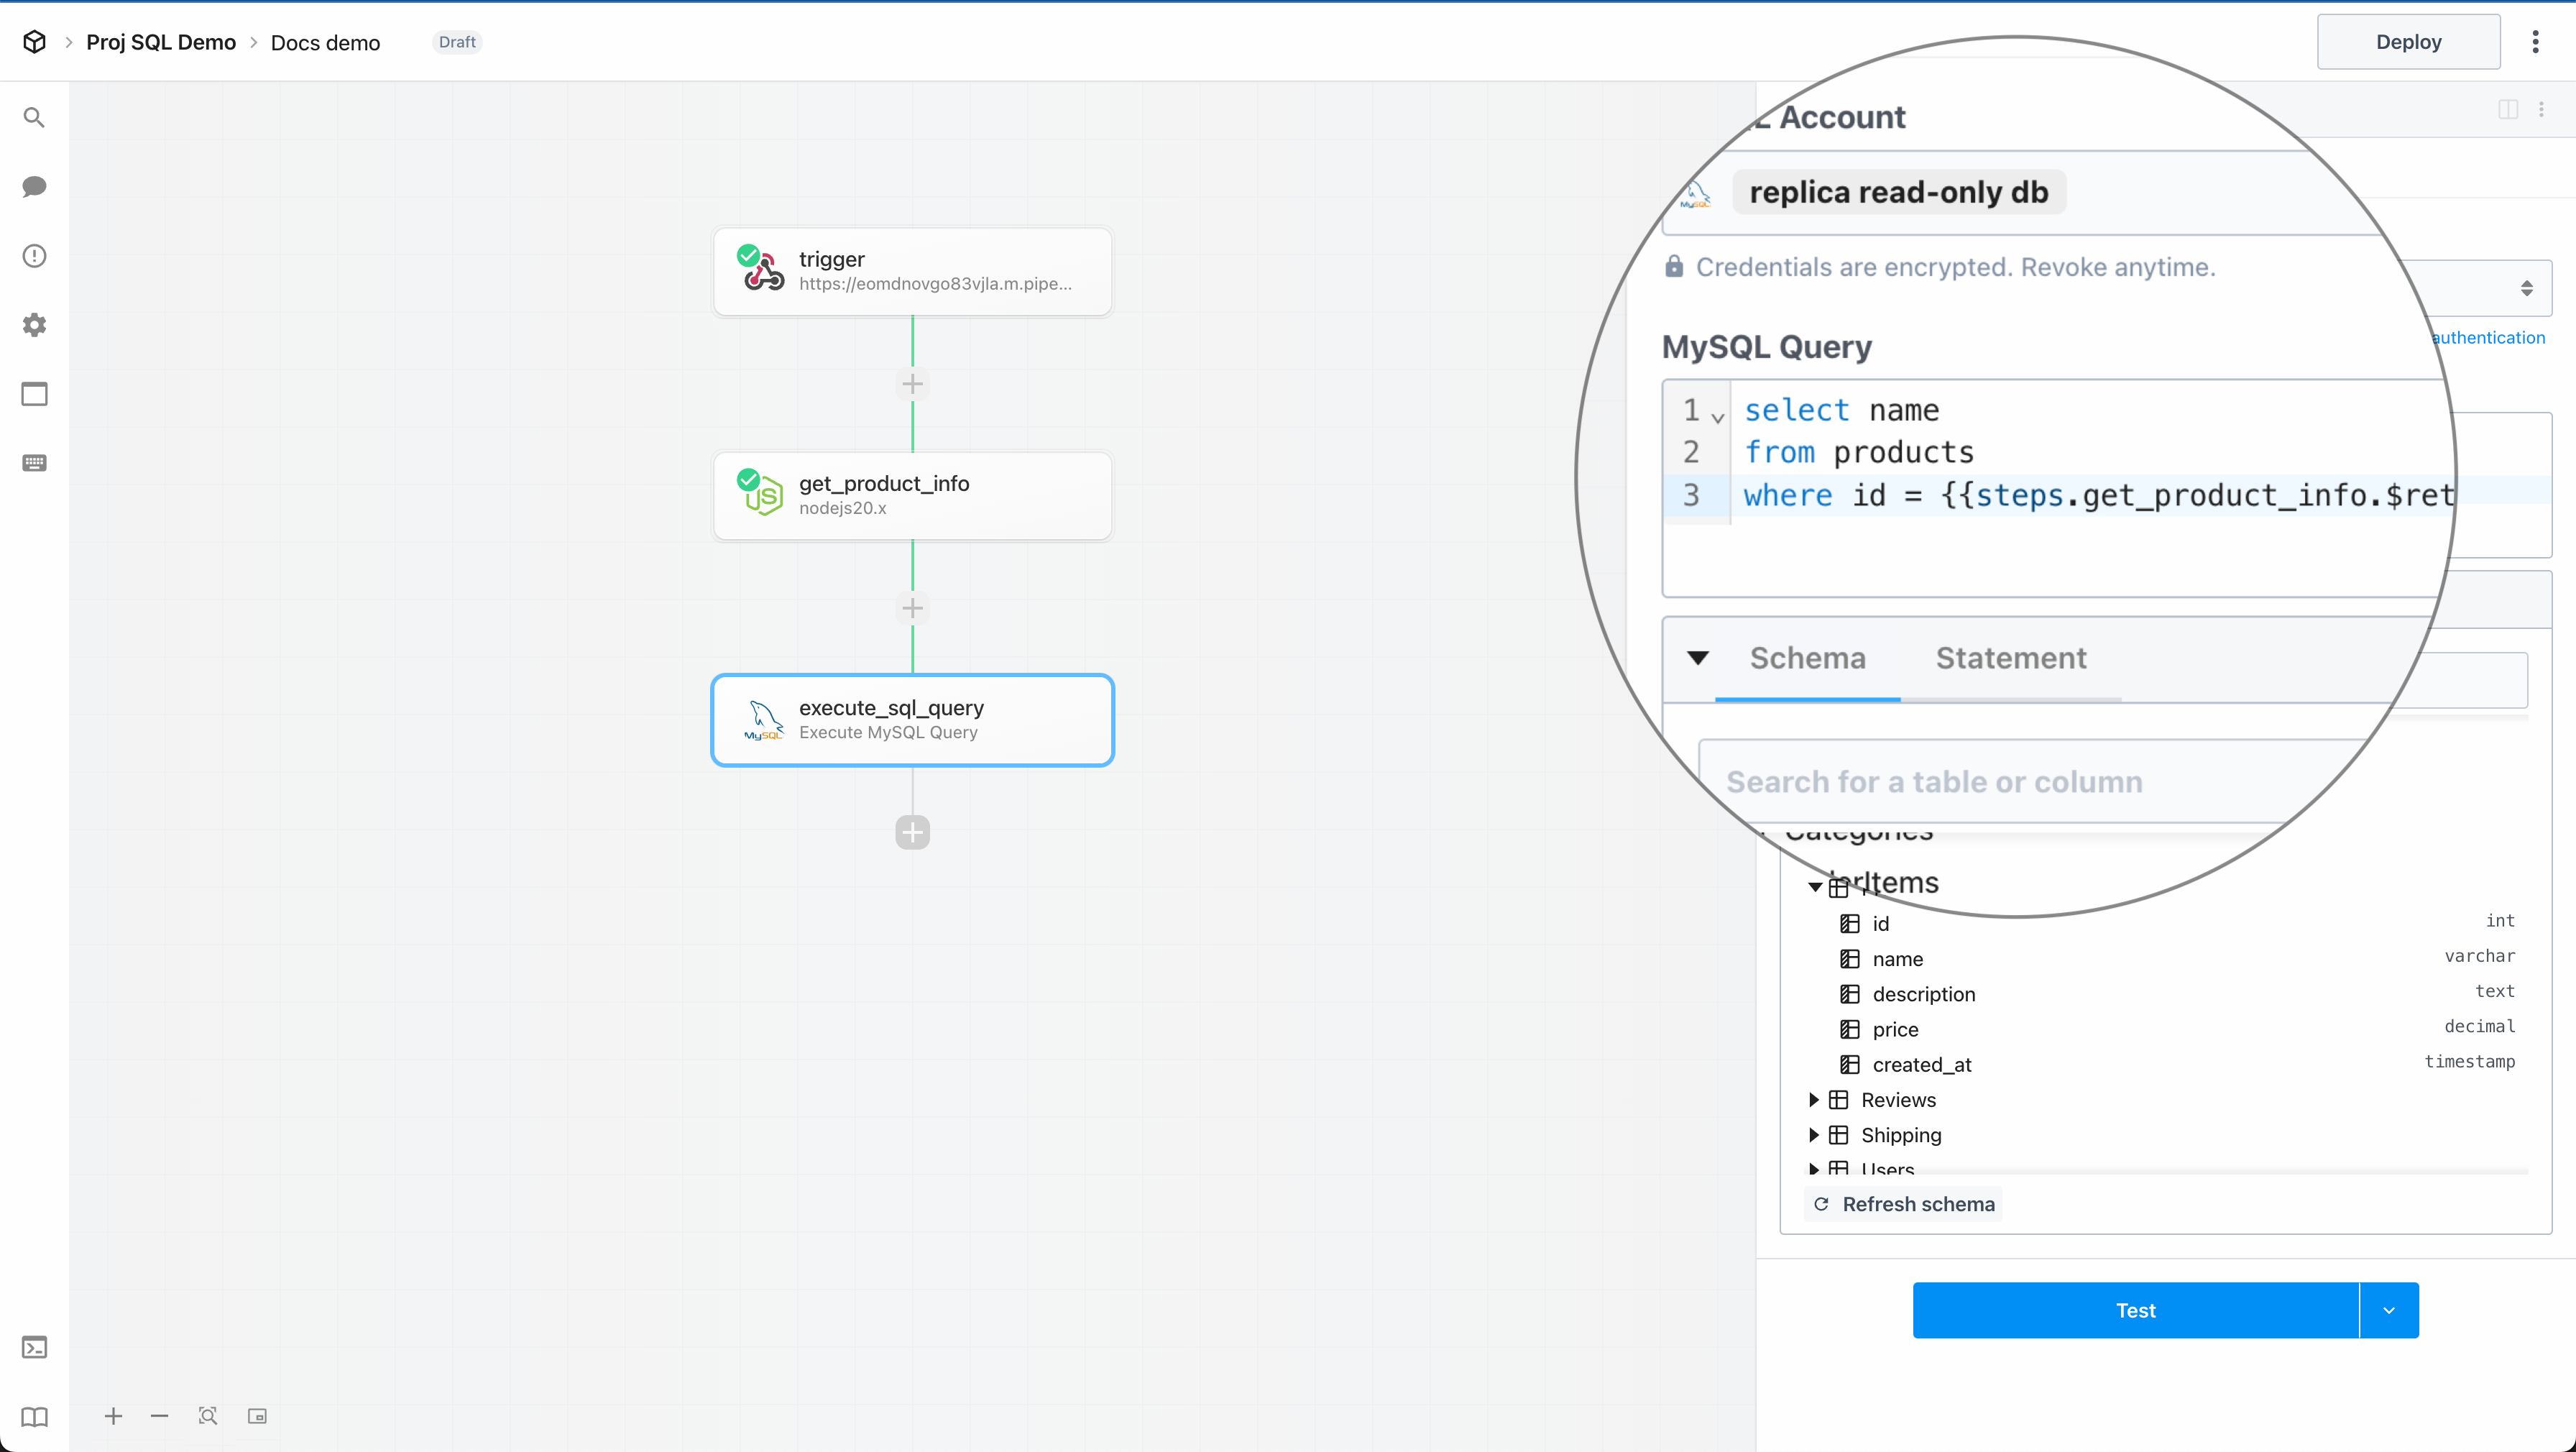 ## Schema Explorer
When querying a database, you need to understand the schema of the tables you’re working with. The schema explorer provides a visual interface to explore the tables in your database, view their columns, and understand the relationships between them.
* Once you connect your account with one of the [supported database apps](/docs/workflows/data-management/databases/working-with-sql/#supported-databases), we automatically fetch and display the details of the database schema below
* You can **view the columns of a table**, their data types, and relationships between tables
* You can also **search and filter** the set of tables that are listed in your schema based on table or column name
## Schema Explorer
When querying a database, you need to understand the schema of the tables you’re working with. The schema explorer provides a visual interface to explore the tables in your database, view their columns, and understand the relationships between them.
* Once you connect your account with one of the [supported database apps](/docs/workflows/data-management/databases/working-with-sql/#supported-databases), we automatically fetch and display the details of the database schema below
* You can **view the columns of a table**, their data types, and relationships between tables
* You can also **search and filter** the set of tables that are listed in your schema based on table or column name
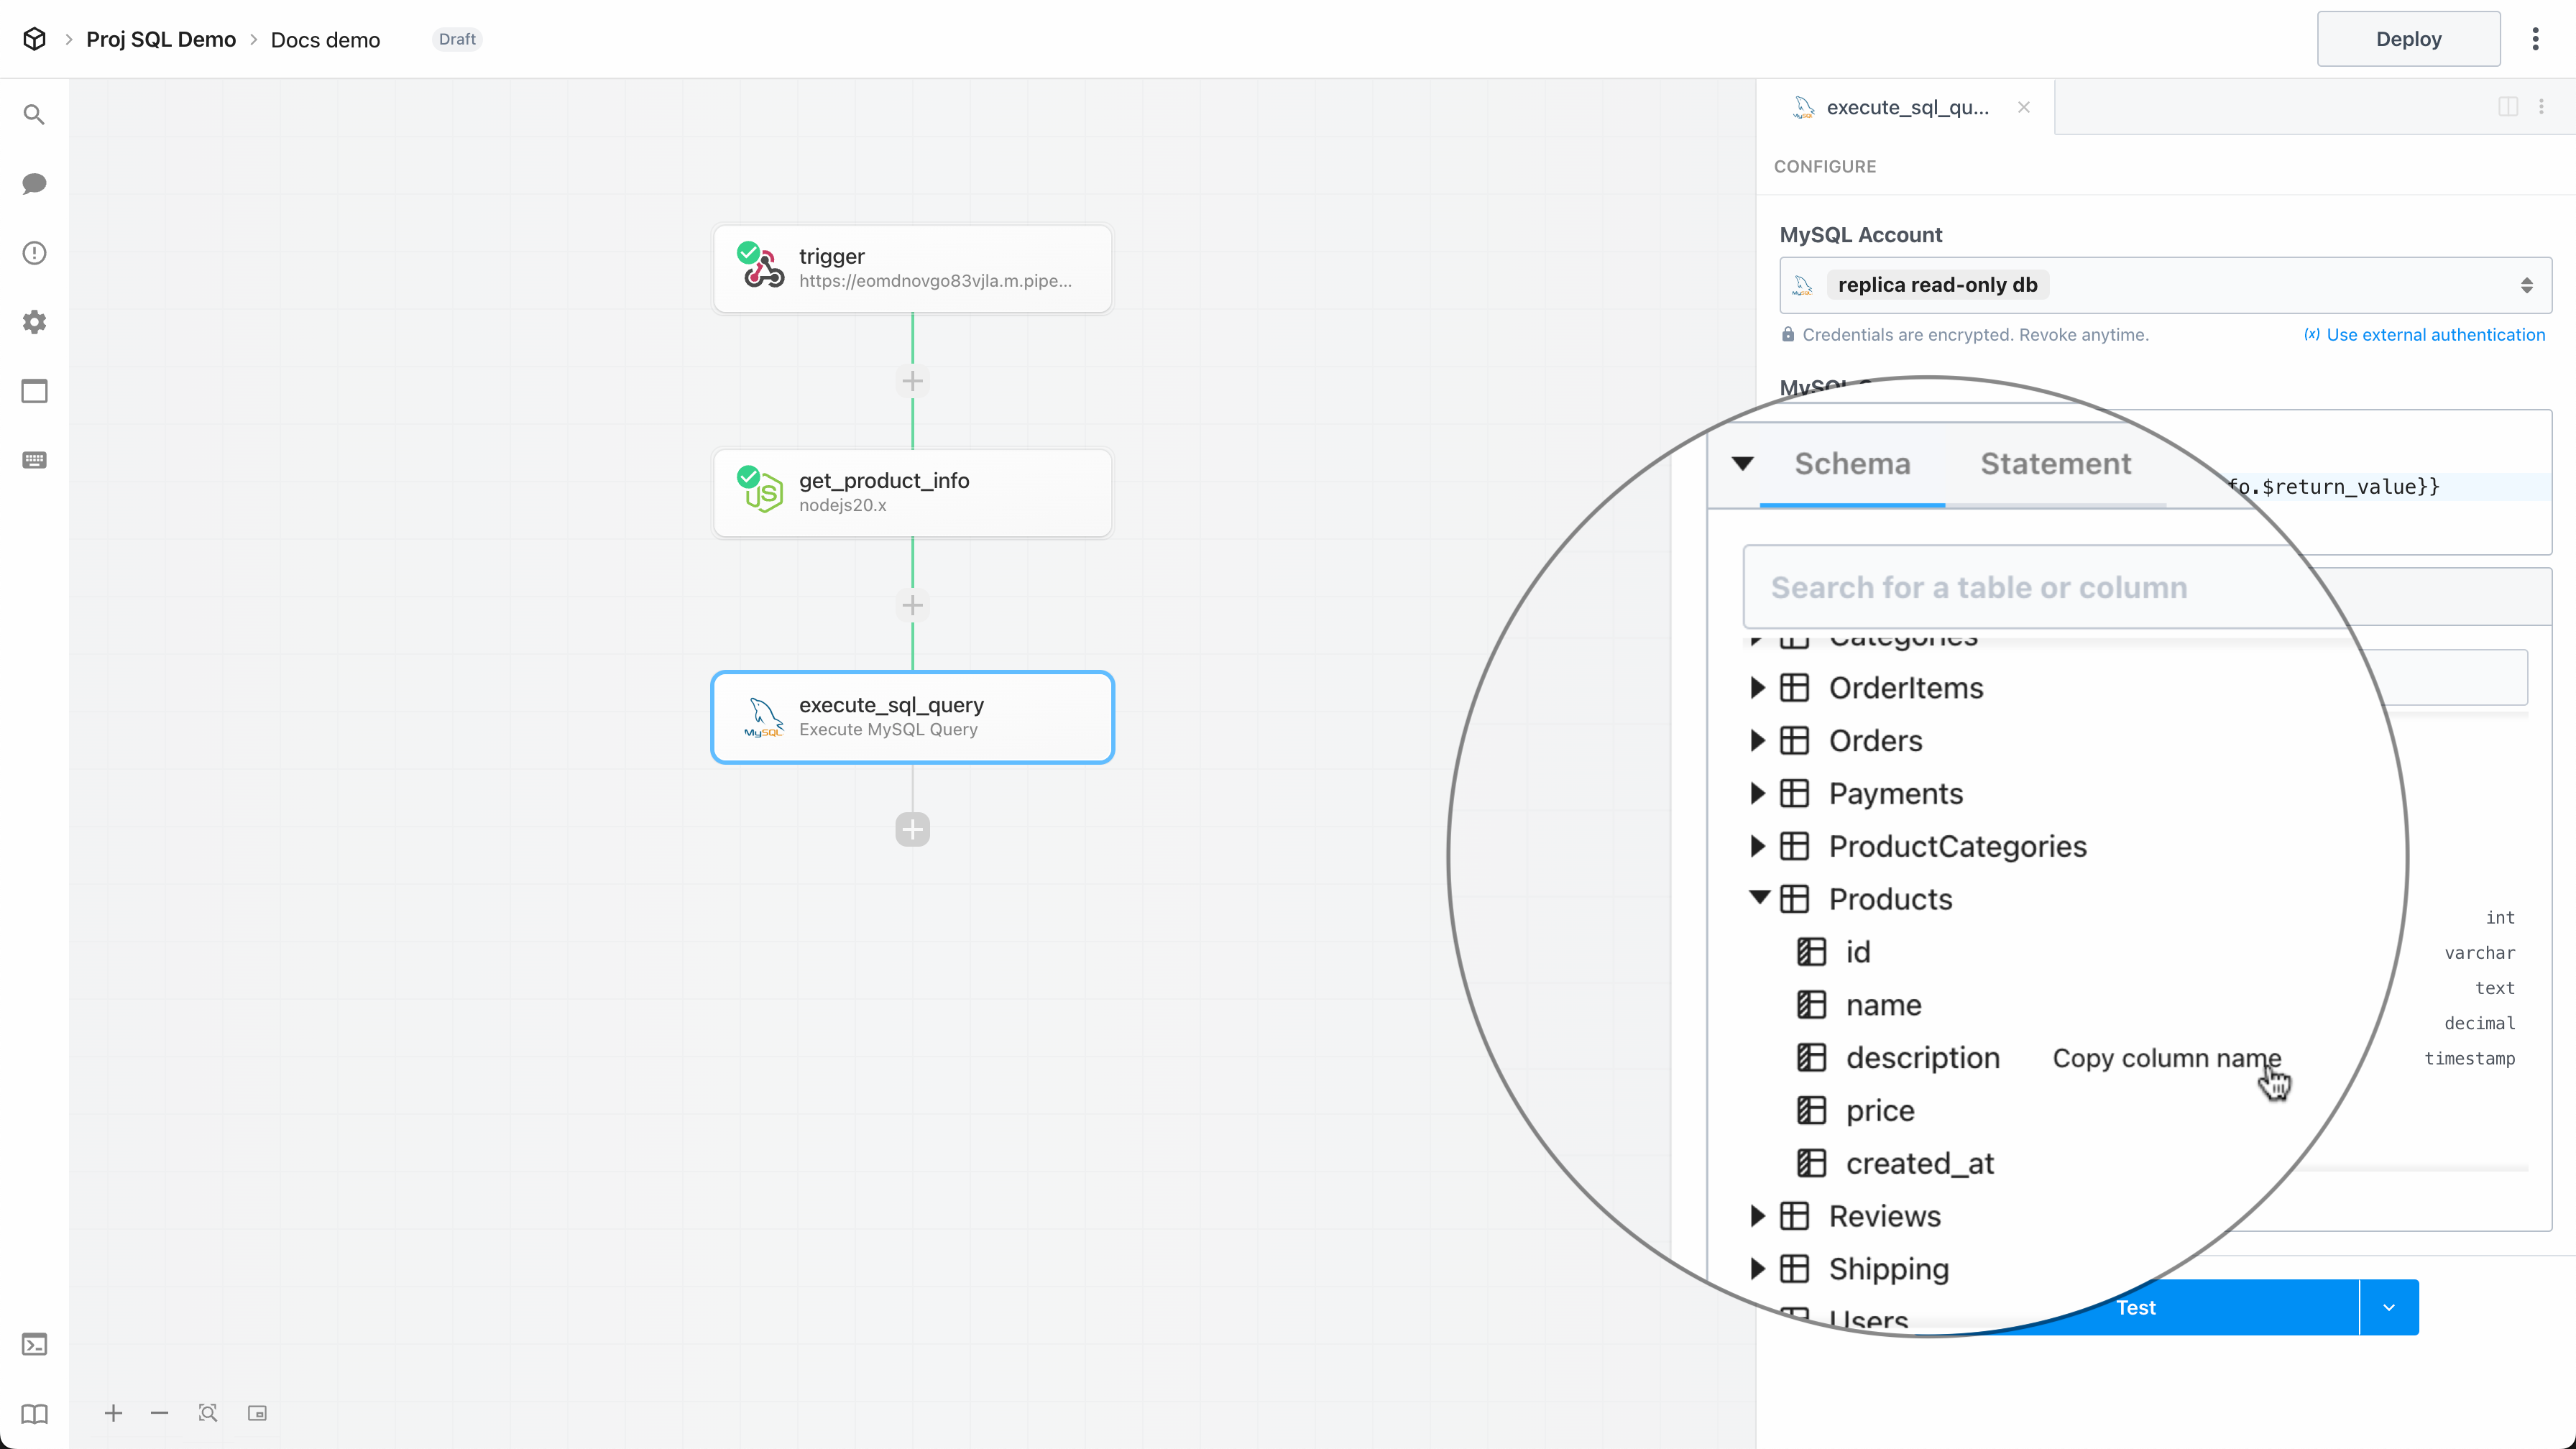 ## Prepared Statements
Prepared statements let you safely execute SQL queries with dynamic inputs that are automatically defined as parameters, in order to help prevent SQL injection attacks.
To reference dynamic data in a SQL query, simply use the standard `{{ }}` notation just like any other code step in Pipedream. For example,
```sql
select *
from products
where name = {{steps.get_product_info.$return_value.name}}
and created_at > {{steps.get_product_info.$return_value.created_at}}
```
**Prepared statement:**
## Prepared Statements
Prepared statements let you safely execute SQL queries with dynamic inputs that are automatically defined as parameters, in order to help prevent SQL injection attacks.
To reference dynamic data in a SQL query, simply use the standard `{{ }}` notation just like any other code step in Pipedream. For example,
```sql
select *
from products
where name = {{steps.get_product_info.$return_value.name}}
and created_at > {{steps.get_product_info.$return_value.created_at}}
```
**Prepared statement:**
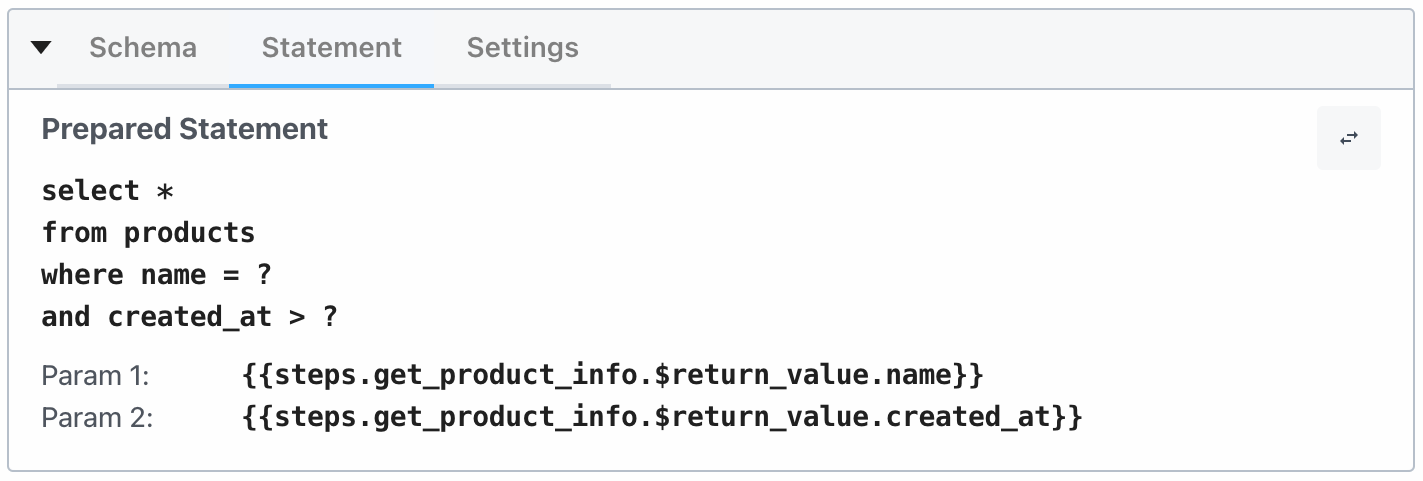 **Computed statement:**
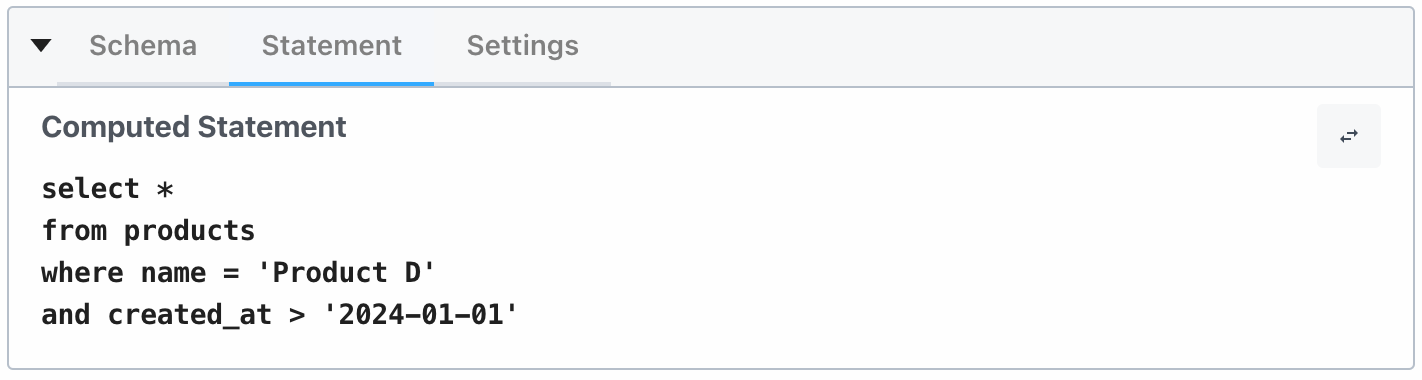
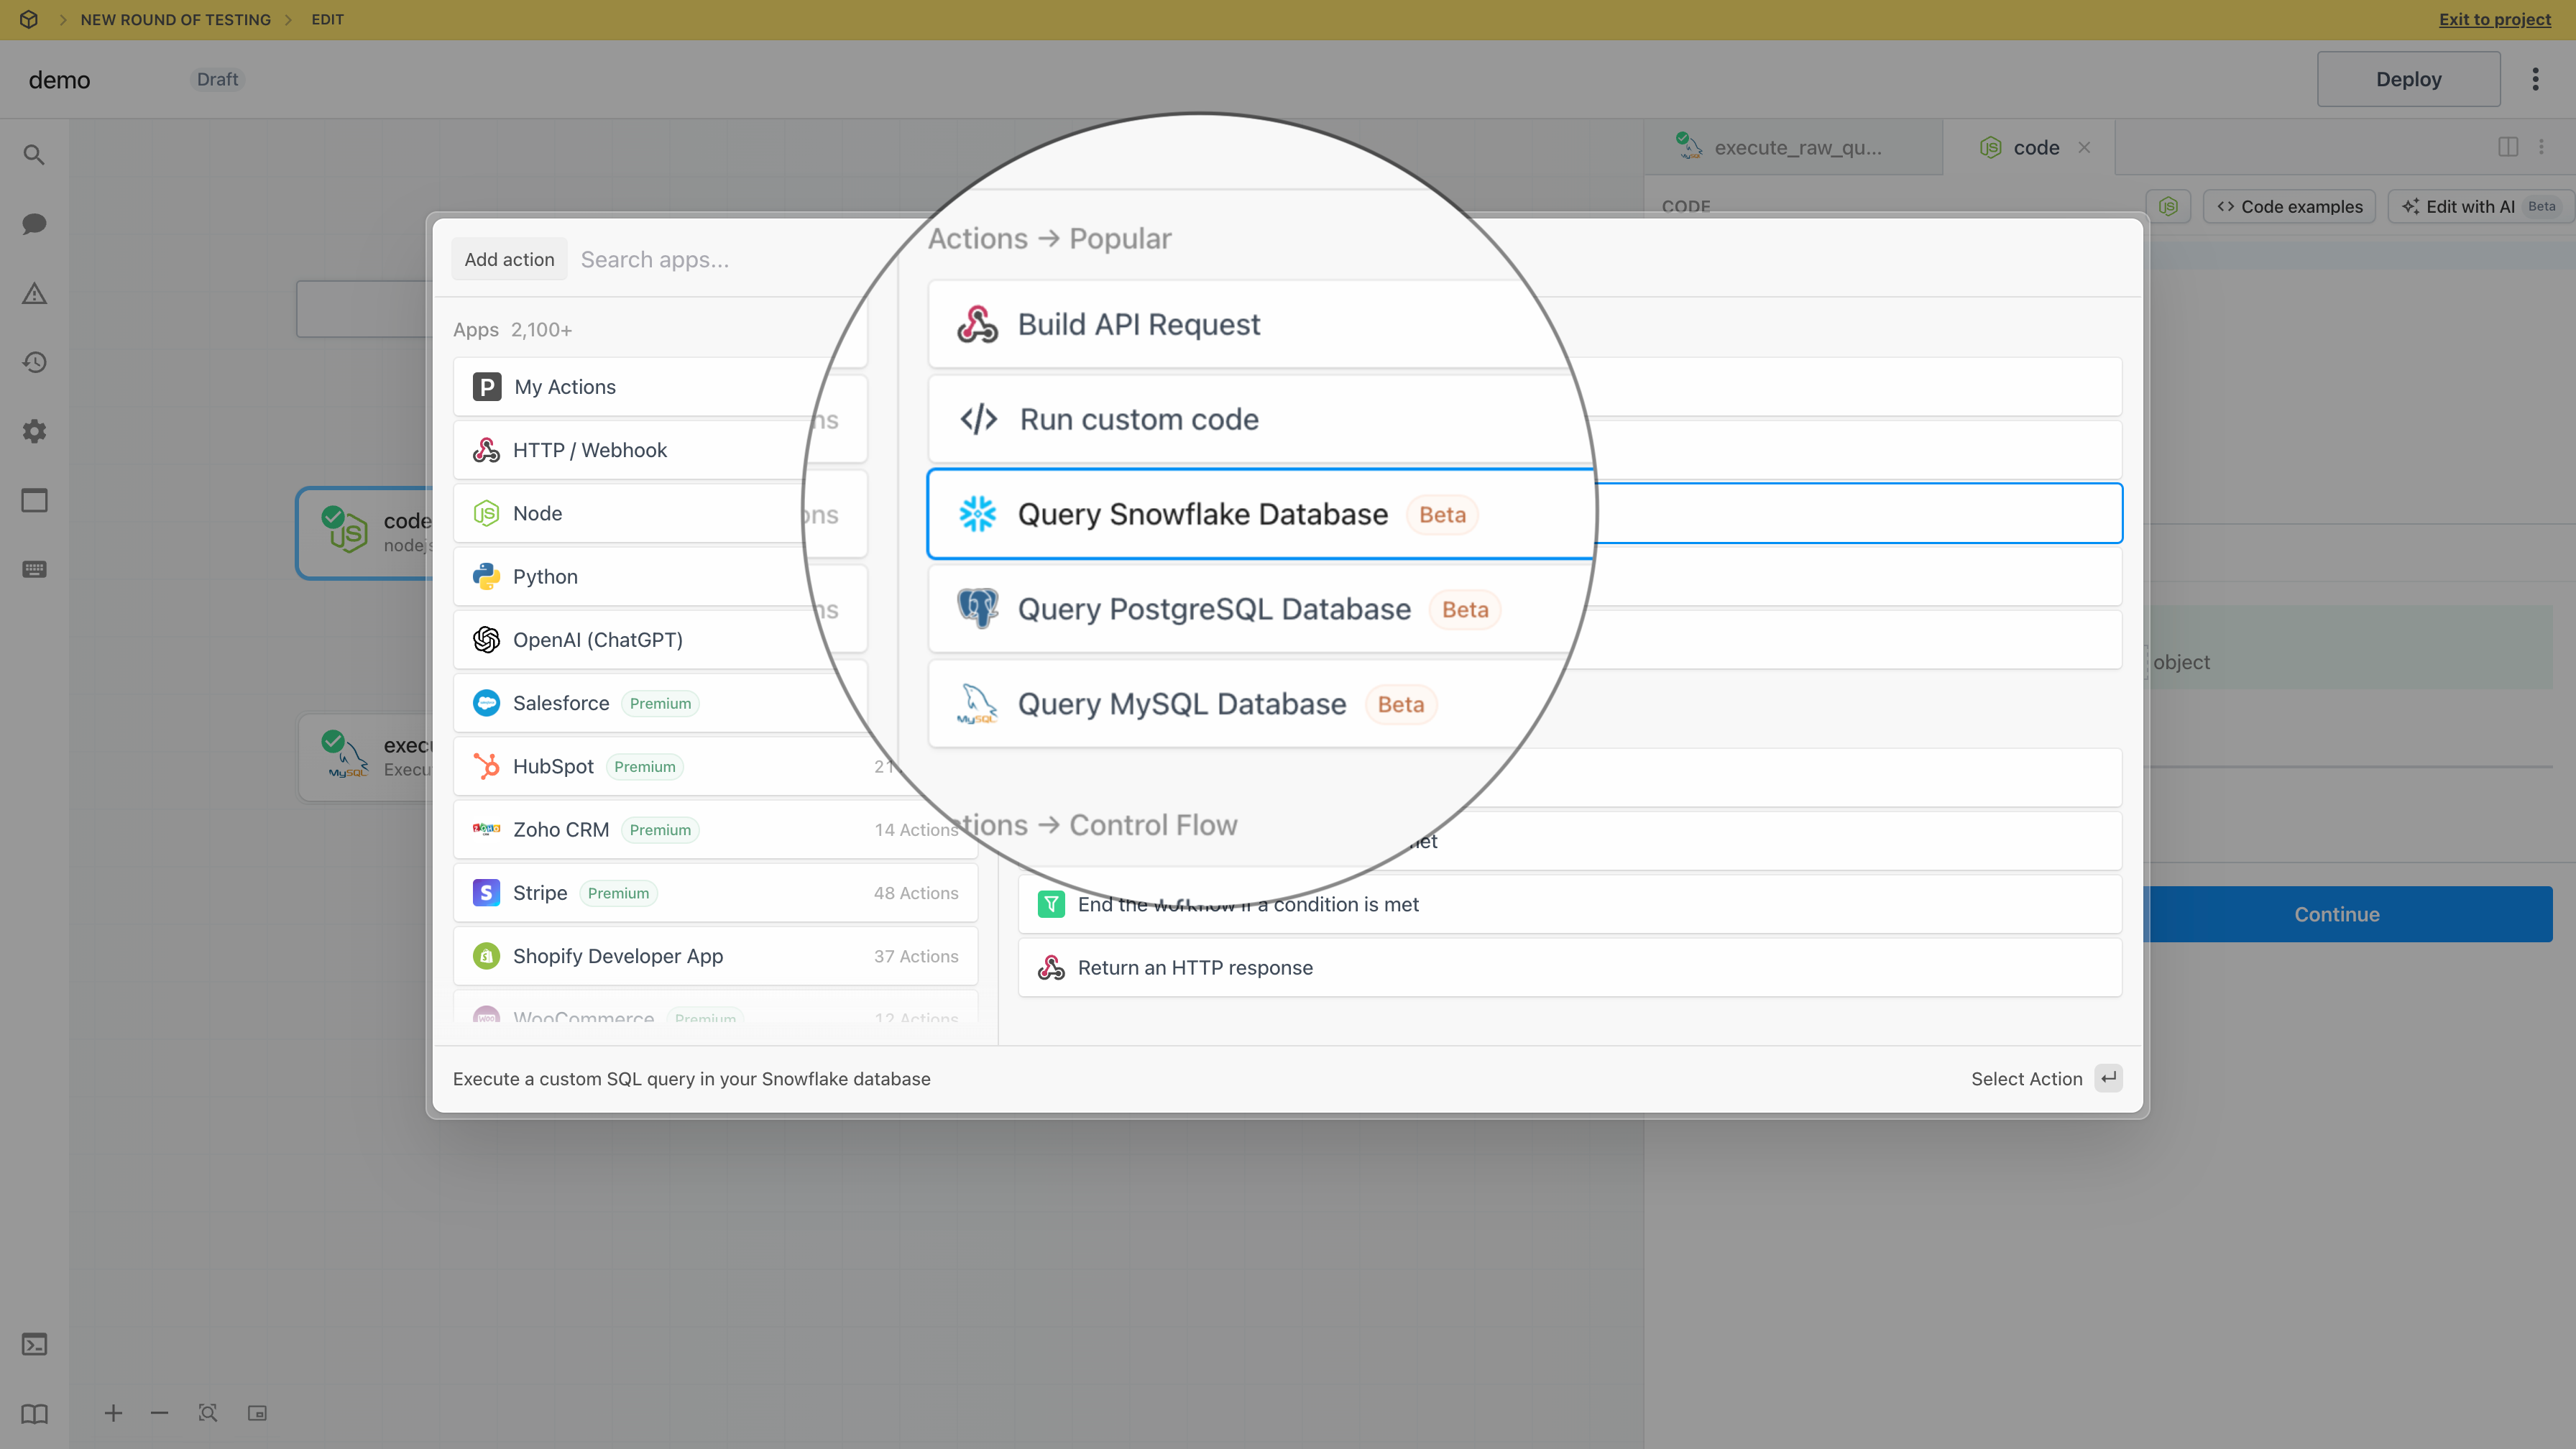
 **Note that the `p_` prefix is part of the workflow ID**.
Once you have the workflow ID, you can construct the event source URL for your SSE destination. That URL is of the following format:
```ruby
http://sdk.m.pipedream.net/pipelines/[YOUR WORKFLOW ID]/sse
```
In the example above, the URL of our event stream would be:
```ruby
http://sdk.m.pipedream.net/pipelines/p_aBcDeF/sse
```
You should be able to open that URL in your browser. Most modern browsers support connecting to an event stream directly, and will stream events without any work on your part to help you confirm that the stream is working.
If you’ve already sent events to your SSE destination, you should see those events here! We’ll return the most recent 100 events delivered to the corresponding SSE destination immediately. This allows your client to catch up with events previously sent to the destination. Then, any new events sent to the SSE destination while you’re connected will be delivered to the client.
### Sample code to connect to your event stream
It’s easy to setup a simple webpage to `console.log()` all events from an event stream. You can find a lot more examples of how to work with SSE on the web, but this should help you understand the basic concepts.
You’ll need to create two files in the same directory on your machine: an `index.html` file for the HTML.
**index.html**
```html
**Note that the `p_` prefix is part of the workflow ID**.
Once you have the workflow ID, you can construct the event source URL for your SSE destination. That URL is of the following format:
```ruby
http://sdk.m.pipedream.net/pipelines/[YOUR WORKFLOW ID]/sse
```
In the example above, the URL of our event stream would be:
```ruby
http://sdk.m.pipedream.net/pipelines/p_aBcDeF/sse
```
You should be able to open that URL in your browser. Most modern browsers support connecting to an event stream directly, and will stream events without any work on your part to help you confirm that the stream is working.
If you’ve already sent events to your SSE destination, you should see those events here! We’ll return the most recent 100 events delivered to the corresponding SSE destination immediately. This allows your client to catch up with events previously sent to the destination. Then, any new events sent to the SSE destination while you’re connected will be delivered to the client.
### Sample code to connect to your event stream
It’s easy to setup a simple webpage to `console.log()` all events from an event stream. You can find a lot more examples of how to work with SSE on the web, but this should help you understand the basic concepts.
You’ll need to create two files in the same directory on your machine: an `index.html` file for the HTML.
**index.html**
```html
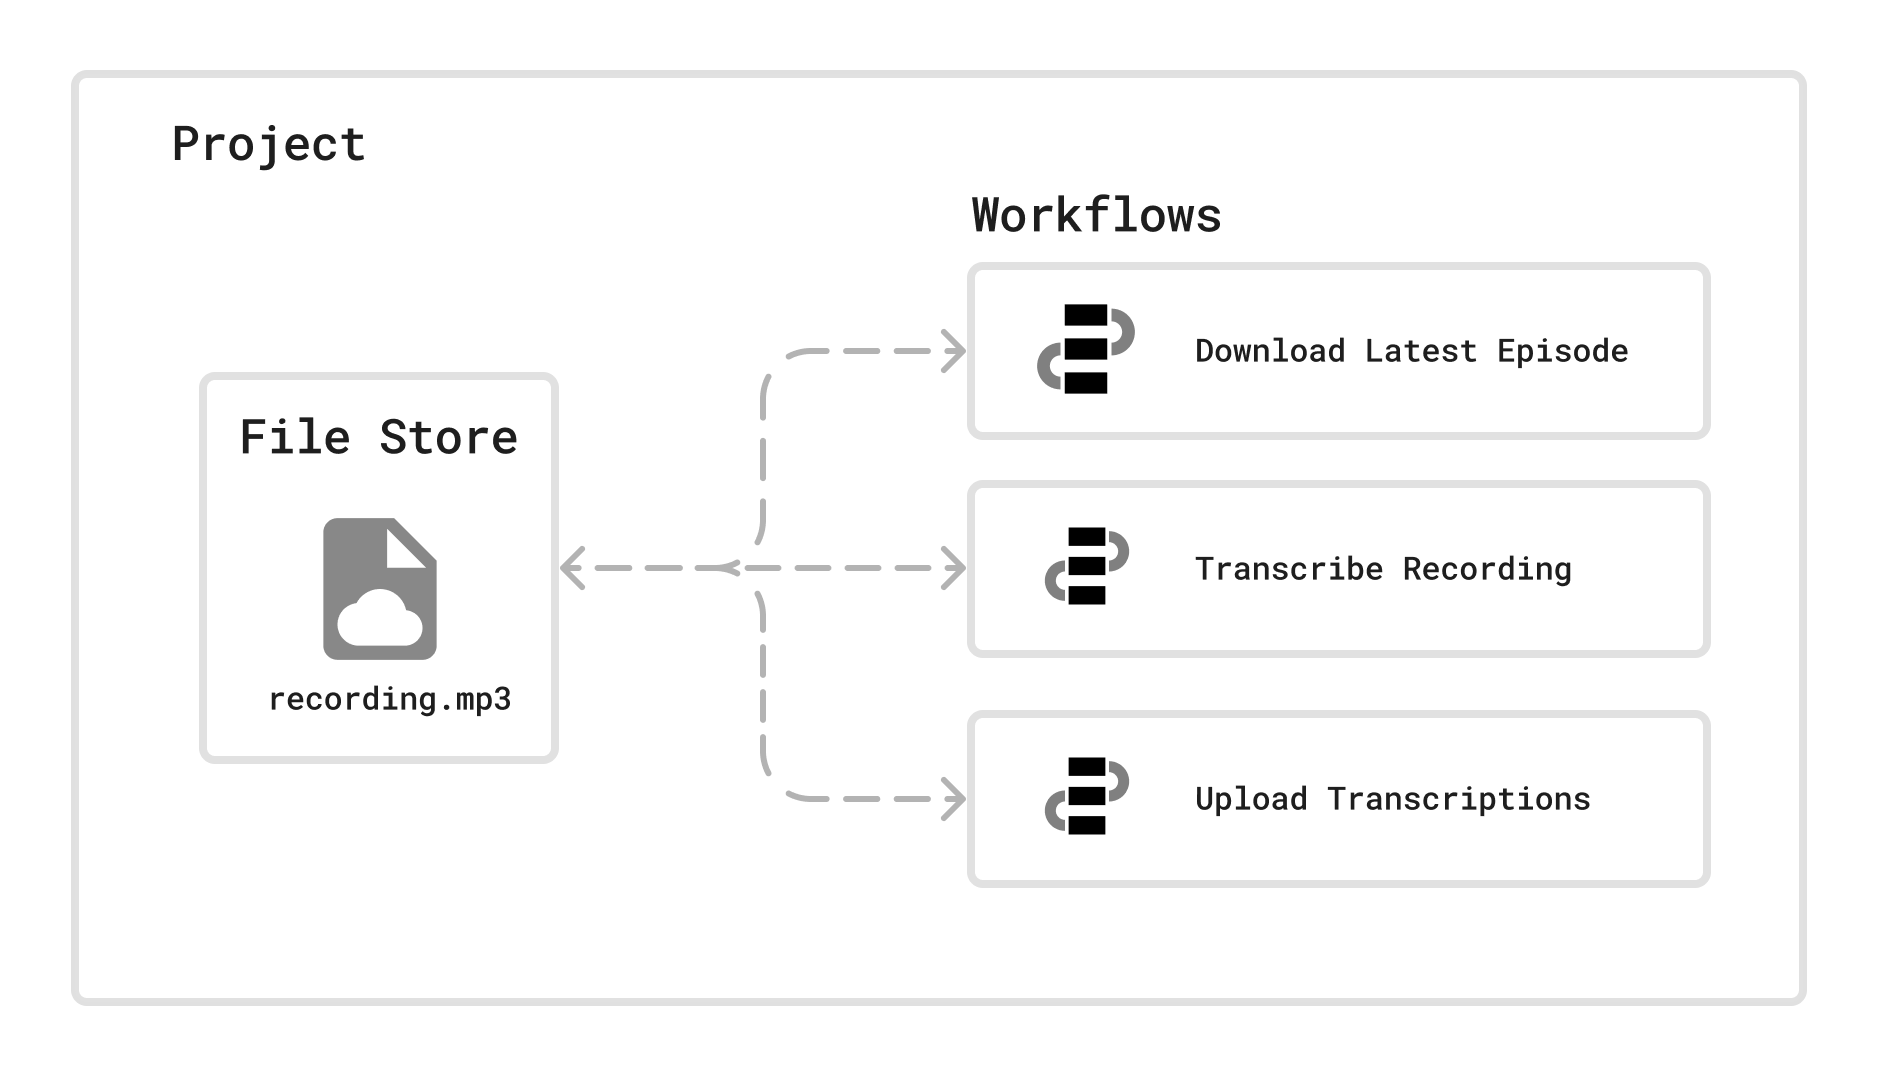 ## Managing File Stores from the Dashboard
You can access a File Store by opening the Project and selecting the *File Store* on the left hand navigation menu.
## Managing File Stores from the Dashboard
You can access a File Store by opening the Project and selecting the *File Store* on the left hand navigation menu.
 ### Uploading files to the File Store
To upload a file, select *New* then select *File*:
### Uploading files to the File Store
To upload a file, select *New* then select *File*:
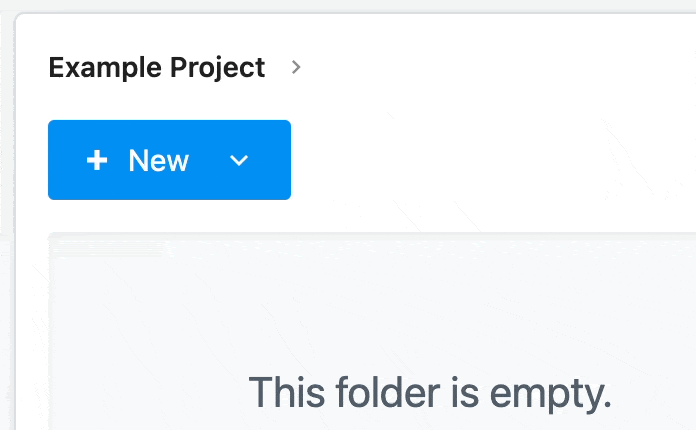 Then in the new pop-up, you can either drag and drop or browser your computer to stage a file for uploading:
 Now that the file(s) are staged for uploaded. Click *Upload* to upload them:
 Finally, click *Done* to close the upload pop-up:
 You should now see your file is uploaded and available for use within your Project:
 ### Deleting files from the File Store
You can delete individual files from a File Store by clicking the three dot menu on the far right of the file and selecting *Delete*.
### Deleting files from the File Store
You can delete individual files from a File Store by clicking the three dot menu on the far right of the file and selecting *Delete*.
 After confirming that you want to delete the file, it will be permanently deleted.
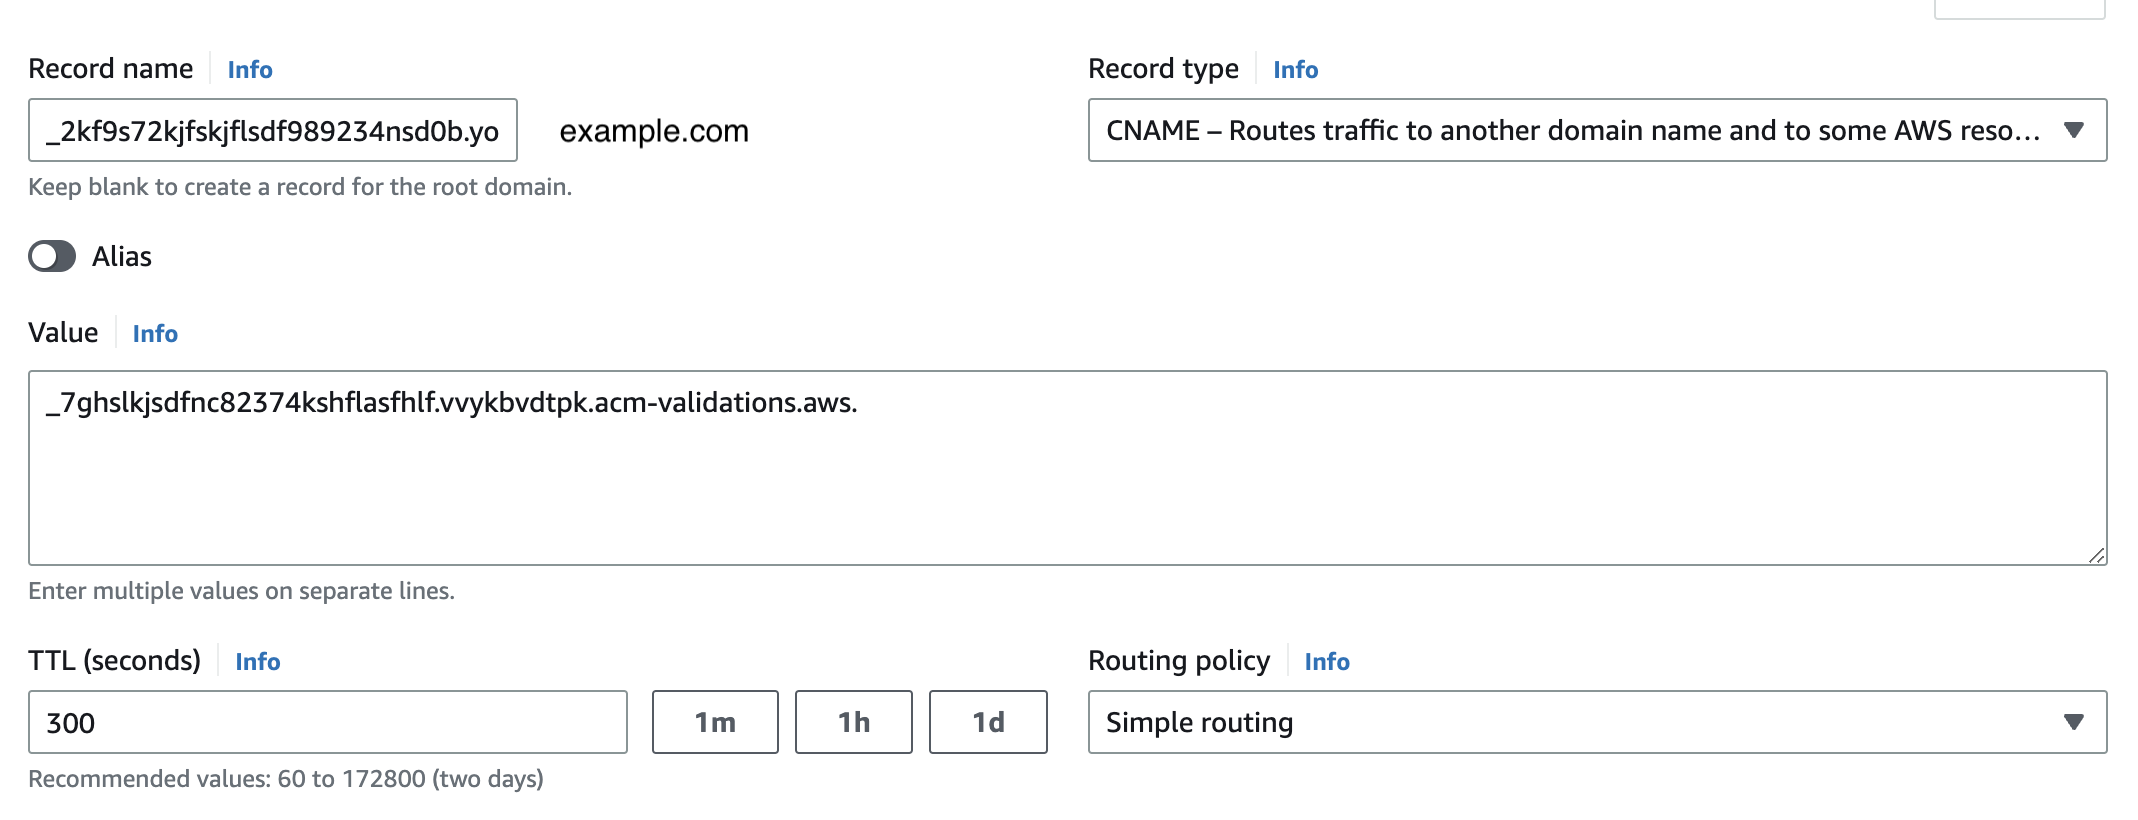 #### Add the DNS CNAME wildcard record
Now you’ll need to add the wildcard record that points all traffic for your domain to Pipedream. Pipedream will also provide the details of this record, like in this example:
* **Type**: `CNAME`
* **Name**: `*.eng.example.com`
* **Value**: `id123.cd.pdrm.net.`
* **TTL (seconds)**: 300
Once you’ve finished adding these DNS records, please **reach out to the Pipedream team**. We’ll validate the records and finalize the configuration for your domain.
### 4. Send a test request to your custom domain
Any traffic to existing **{ENDPOINT_BASE_URL}** endpoints will continue to work uninterrupted.
To confirm traffic to your new domain works, take any Pipedream endpoint URL and replace the **{ENDPOINT_BASE_URL}** with your custom domain. For example, if you configured a custom domain of `pipedream.example.com` and have an existing endpoint at
```javascript
https://[endpoint_id].m.pipedream.net
```
Try making a test request to
```javascript
https://[endpoint_id].eng.example.com
```
## Security
### How Pipedream manages the TLS/SSL certificate
See our [TLS/SSL security docs](/docs/privacy-and-security/#encryption-of-data-in-transit-tls-ssl-certificates) for more detail on how we create and manage the certificates for custom domains.
### Requests to custom domains are allowed only for your endpoints
Custom domains are mapped directly to customer endpoints. This means no other customer can send requests to their endpoints on *your* custom domain. Requests to `example.com` are restricted specifically to HTTP endpoints in your Pipedream workspace.
# Environment Variables
Source: https://pipedream.com/docs/workflows/environment-variables
Environment variables (env vars) enable you to separate secrets and other static configuration data from your code.
You shouldn’t include API keys or other sensitive data directly in your workflow’s code. By referencing the value of an environment variable instead, your workflow includes a reference to that variable — for example, `process.env.API_KEY` instead of the API key itself.
You can reference env vars and secrets in [workflow code](/docs/workflows/building-workflows/code/) or in the object explorer when passing data to steps, and you can define them either globally for the entire workspace, or scope them to individual projects.
| Scope | Description |
| ------------- | ------------------------------------------------------------------------------------------------------------------------------------------------------------------------------------------------------------------------------- |
| **Workspace** | All environment variables are available to all workflows within the workspace. All workspace members can manage workspace-wide variables [in the UI](https://pipedream.com/settings/env-vars). |
| **Project** | Environment variables defined within a project are only accessible to the workflows within that project. Only workspace members who have [access to the project](/docs/projects/access-controls/) can manage project variables. |
## Creating and updating environment variables
* To manage **global** environment variables for the workspace, navigate to **Settings**, then click **Environment Variables**: [https://pipedream.com/settings/env-vars](https://pipedream.com/settings/env-vars)
* To manage environment variables within a project, open the project, then click **Variables** from the project nav on the left
#### Add the DNS CNAME wildcard record
Now you’ll need to add the wildcard record that points all traffic for your domain to Pipedream. Pipedream will also provide the details of this record, like in this example:
* **Type**: `CNAME`
* **Name**: `*.eng.example.com`
* **Value**: `id123.cd.pdrm.net.`
* **TTL (seconds)**: 300
Once you’ve finished adding these DNS records, please **reach out to the Pipedream team**. We’ll validate the records and finalize the configuration for your domain.
### 4. Send a test request to your custom domain
Any traffic to existing **{ENDPOINT_BASE_URL}** endpoints will continue to work uninterrupted.
To confirm traffic to your new domain works, take any Pipedream endpoint URL and replace the **{ENDPOINT_BASE_URL}** with your custom domain. For example, if you configured a custom domain of `pipedream.example.com` and have an existing endpoint at
```javascript
https://[endpoint_id].m.pipedream.net
```
Try making a test request to
```javascript
https://[endpoint_id].eng.example.com
```
## Security
### How Pipedream manages the TLS/SSL certificate
See our [TLS/SSL security docs](/docs/privacy-and-security/#encryption-of-data-in-transit-tls-ssl-certificates) for more detail on how we create and manage the certificates for custom domains.
### Requests to custom domains are allowed only for your endpoints
Custom domains are mapped directly to customer endpoints. This means no other customer can send requests to their endpoints on *your* custom domain. Requests to `example.com` are restricted specifically to HTTP endpoints in your Pipedream workspace.
# Environment Variables
Source: https://pipedream.com/docs/workflows/environment-variables
Environment variables (env vars) enable you to separate secrets and other static configuration data from your code.
You shouldn’t include API keys or other sensitive data directly in your workflow’s code. By referencing the value of an environment variable instead, your workflow includes a reference to that variable — for example, `process.env.API_KEY` instead of the API key itself.
You can reference env vars and secrets in [workflow code](/docs/workflows/building-workflows/code/) or in the object explorer when passing data to steps, and you can define them either globally for the entire workspace, or scope them to individual projects.
| Scope | Description |
| ------------- | ------------------------------------------------------------------------------------------------------------------------------------------------------------------------------------------------------------------------------- |
| **Workspace** | All environment variables are available to all workflows within the workspace. All workspace members can manage workspace-wide variables [in the UI](https://pipedream.com/settings/env-vars). |
| **Project** | Environment variables defined within a project are only accessible to the workflows within that project. Only workspace members who have [access to the project](/docs/projects/access-controls/) can manage project variables. |
## Creating and updating environment variables
* To manage **global** environment variables for the workspace, navigate to **Settings**, then click **Environment Variables**: [https://pipedream.com/settings/env-vars](https://pipedream.com/settings/env-vars)
* To manage environment variables within a project, open the project, then click **Variables** from the project nav on the left
 Click **New Variable** to add a new environment variable or secret:
 **Configure the required fields**:
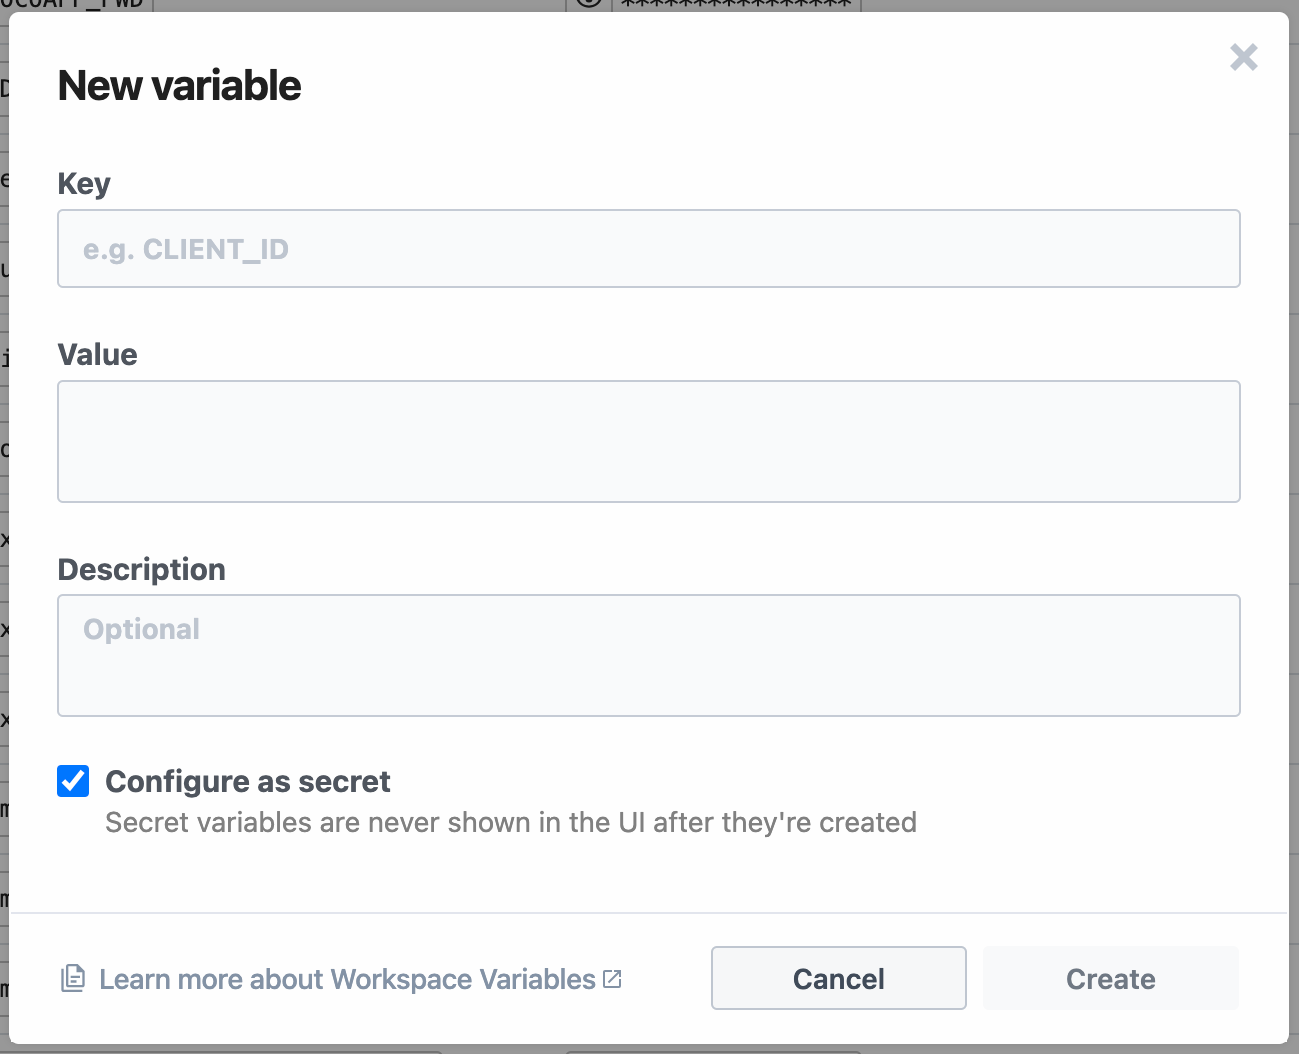 | Input field | Description |
| --------------- | ---------------------------------------------------------------------------------------------------------------------------- |
| **Key** | Name of the variable — for example, `CLIENT_ID` |
| **Value** | The value, which can contain any string with a max limit of 64KB |
| **Description** | Optionally add a description of the variable. This is only visible in the UI, and is not accessible within a workflow. |
| **Secret** | New variables default to **secret**. If configured as a secret, the value is never exposed in the UI and cannot be modified. |
To edit an environment variable, click the **Edit** button from the three dots to the right of a specific variable.
| Input field | Description |
| --------------- | ---------------------------------------------------------------------------------------------------------------------------- |
| **Key** | Name of the variable — for example, `CLIENT_ID` |
| **Value** | The value, which can contain any string with a max limit of 64KB |
| **Description** | Optionally add a description of the variable. This is only visible in the UI, and is not accessible within a workflow. |
| **Secret** | New variables default to **secret**. If configured as a secret, the value is never exposed in the UI and cannot be modified. |
To edit an environment variable, click the **Edit** button from the three dots to the right of a specific variable.
 * Updates to environment variables will be made available to your workflows as soon as the save operation is complete — typically a few seconds after you click **Save**.
* If you update the value of an environment variable in the UI, your workflow should automatically use that new value where it’s referenced.
* If you delete a variable in the UI, any deployed workflows that reference it will return `undefined`.
## Referencing environment variables in code
You can reference the value of any environment variable using the object [`process.env`](https://nodejs.org/dist/latest-v10.x/docs/api/process.html#process_process_env). This object contains environment variables as key-value pairs.
For example, let’s say you have an environment variable named `API_KEY`. You can reference its value in Node.js using `process.env.API_KEY`:
```javascript
const url = `http://yourapi.com/endpoint/?api_key=${process.env.API_KEY}`;
```
Reference the same environment variable in Python:
```python
import os
print(os.environ["API_KEY"])
```
Variable names are case-sensitive. Use the key name you defined when referencing your variable in `process.env`.
Referencing an environment variable that doesn’t exist returns the value `undefined` in Node.js. For example, if you try to reference `process.env.API_KEY` without first defining the `API_KEY` environment variable in the UI, it will return the value `undefined`.
### Using autocomplete to reference env vars
When referencing env vars directly in code within your Pipedream workflow, you can also take advantage of autocomplete:
* Updates to environment variables will be made available to your workflows as soon as the save operation is complete — typically a few seconds after you click **Save**.
* If you update the value of an environment variable in the UI, your workflow should automatically use that new value where it’s referenced.
* If you delete a variable in the UI, any deployed workflows that reference it will return `undefined`.
## Referencing environment variables in code
You can reference the value of any environment variable using the object [`process.env`](https://nodejs.org/dist/latest-v10.x/docs/api/process.html#process_process_env). This object contains environment variables as key-value pairs.
For example, let’s say you have an environment variable named `API_KEY`. You can reference its value in Node.js using `process.env.API_KEY`:
```javascript
const url = `http://yourapi.com/endpoint/?api_key=${process.env.API_KEY}`;
```
Reference the same environment variable in Python:
```python
import os
print(os.environ["API_KEY"])
```
Variable names are case-sensitive. Use the key name you defined when referencing your variable in `process.env`.
Referencing an environment variable that doesn’t exist returns the value `undefined` in Node.js. For example, if you try to reference `process.env.API_KEY` without first defining the `API_KEY` environment variable in the UI, it will return the value `undefined`.
### Using autocomplete to reference env vars
When referencing env vars directly in code within your Pipedream workflow, you can also take advantage of autocomplete:
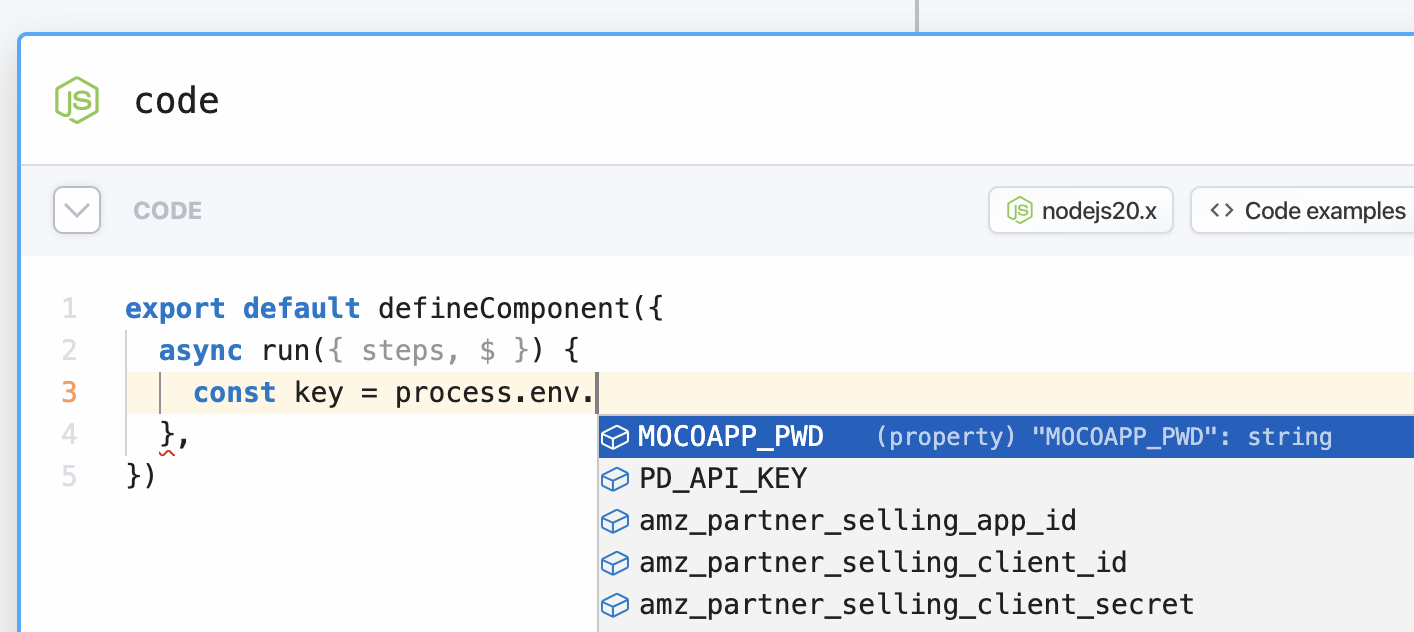
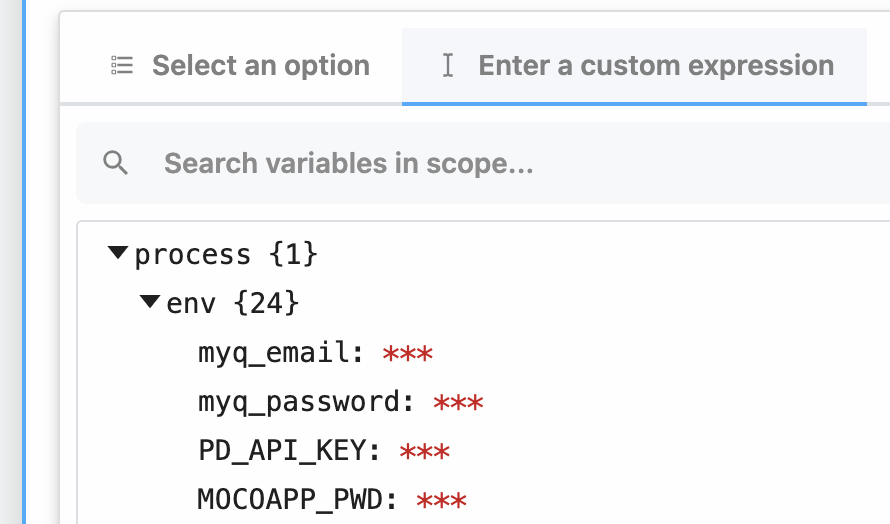
 #### All failed workflow executions
* You can view all failed workflow executions by applying the **Error** status filter
* This will only display the failed workflow executions in the selected time period
* This view in particular is helpful for identifying trends of errors, or workflows with persistent problems
#### All failed workflow executions
* You can view all failed workflow executions by applying the **Error** status filter
* This will only display the failed workflow executions in the selected time period
* This view in particular is helpful for identifying trends of errors, or workflows with persistent problems
 #### All paused workflow executions
* Workflow executions that are currently in a suspended state from `$.flow.delay` or `$.flow.suspend` will be shown when this filter is selected
#### All paused workflow executions
* Workflow executions that are currently in a suspended state from `$.flow.delay` or `$.flow.suspend` will be shown when this filter is selected
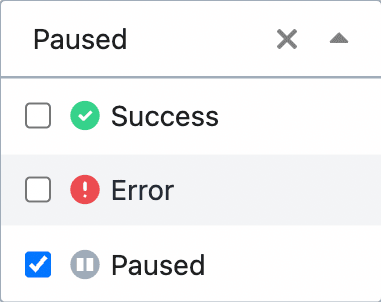
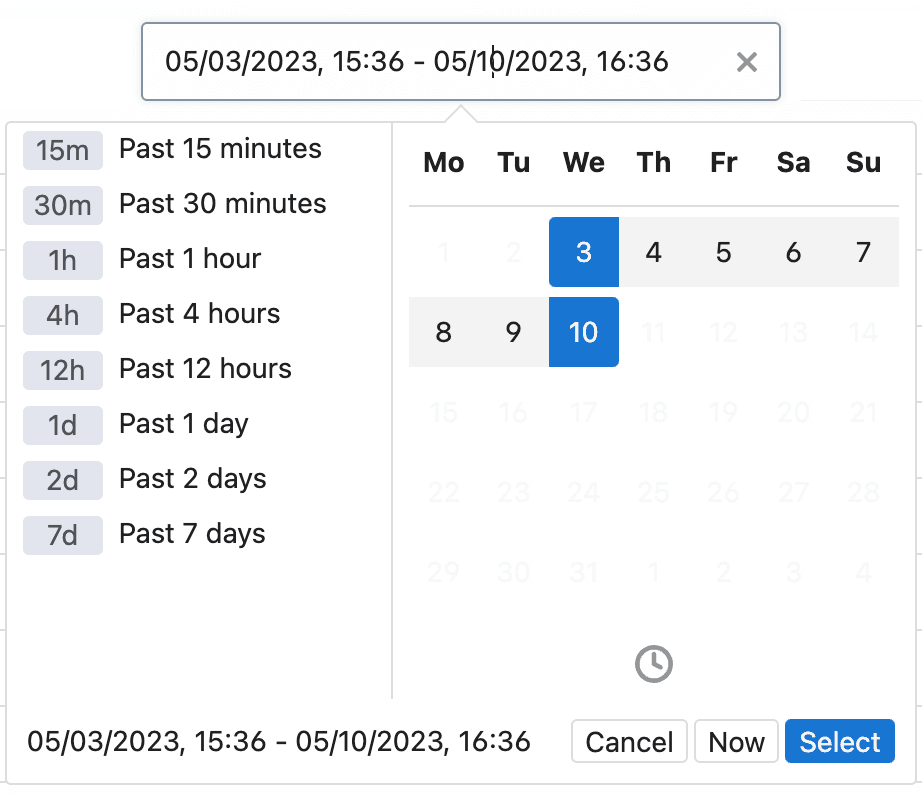 ### Filtering by workflow
You can also filter events by a specific workflow. You can search by the workflow’s name in the search bar in the top right.
### Filtering by workflow
You can also filter events by a specific workflow. You can search by the workflow’s name in the search bar in the top right.
 Alternatively, you can filter by workflow from a specific event. First, open the menu on the far right, then select **Filter By Workflow**. Then only events processed by that workflow will appear.
 ## Inspecting events
* Clicking on an individual event will open a panel that displays the steps executed, their individual configurations, as well as the overall performance and results of the entire workflow.
* The top of the event history details will display details including the overall status of that particular event execution and errors if any.
* If there is an error message, the link at the bottom of the error message will link to the corresponding workflow step that threw the error.
* From here you can easily **Build from event** or **Replay event**
## Inspecting events
* Clicking on an individual event will open a panel that displays the steps executed, their individual configurations, as well as the overall performance and results of the entire workflow.
* The top of the event history details will display details including the overall status of that particular event execution and errors if any.
* If there is an error message, the link at the bottom of the error message will link to the corresponding workflow step that threw the error.
* From here you can easily **Build from event** or **Replay event**
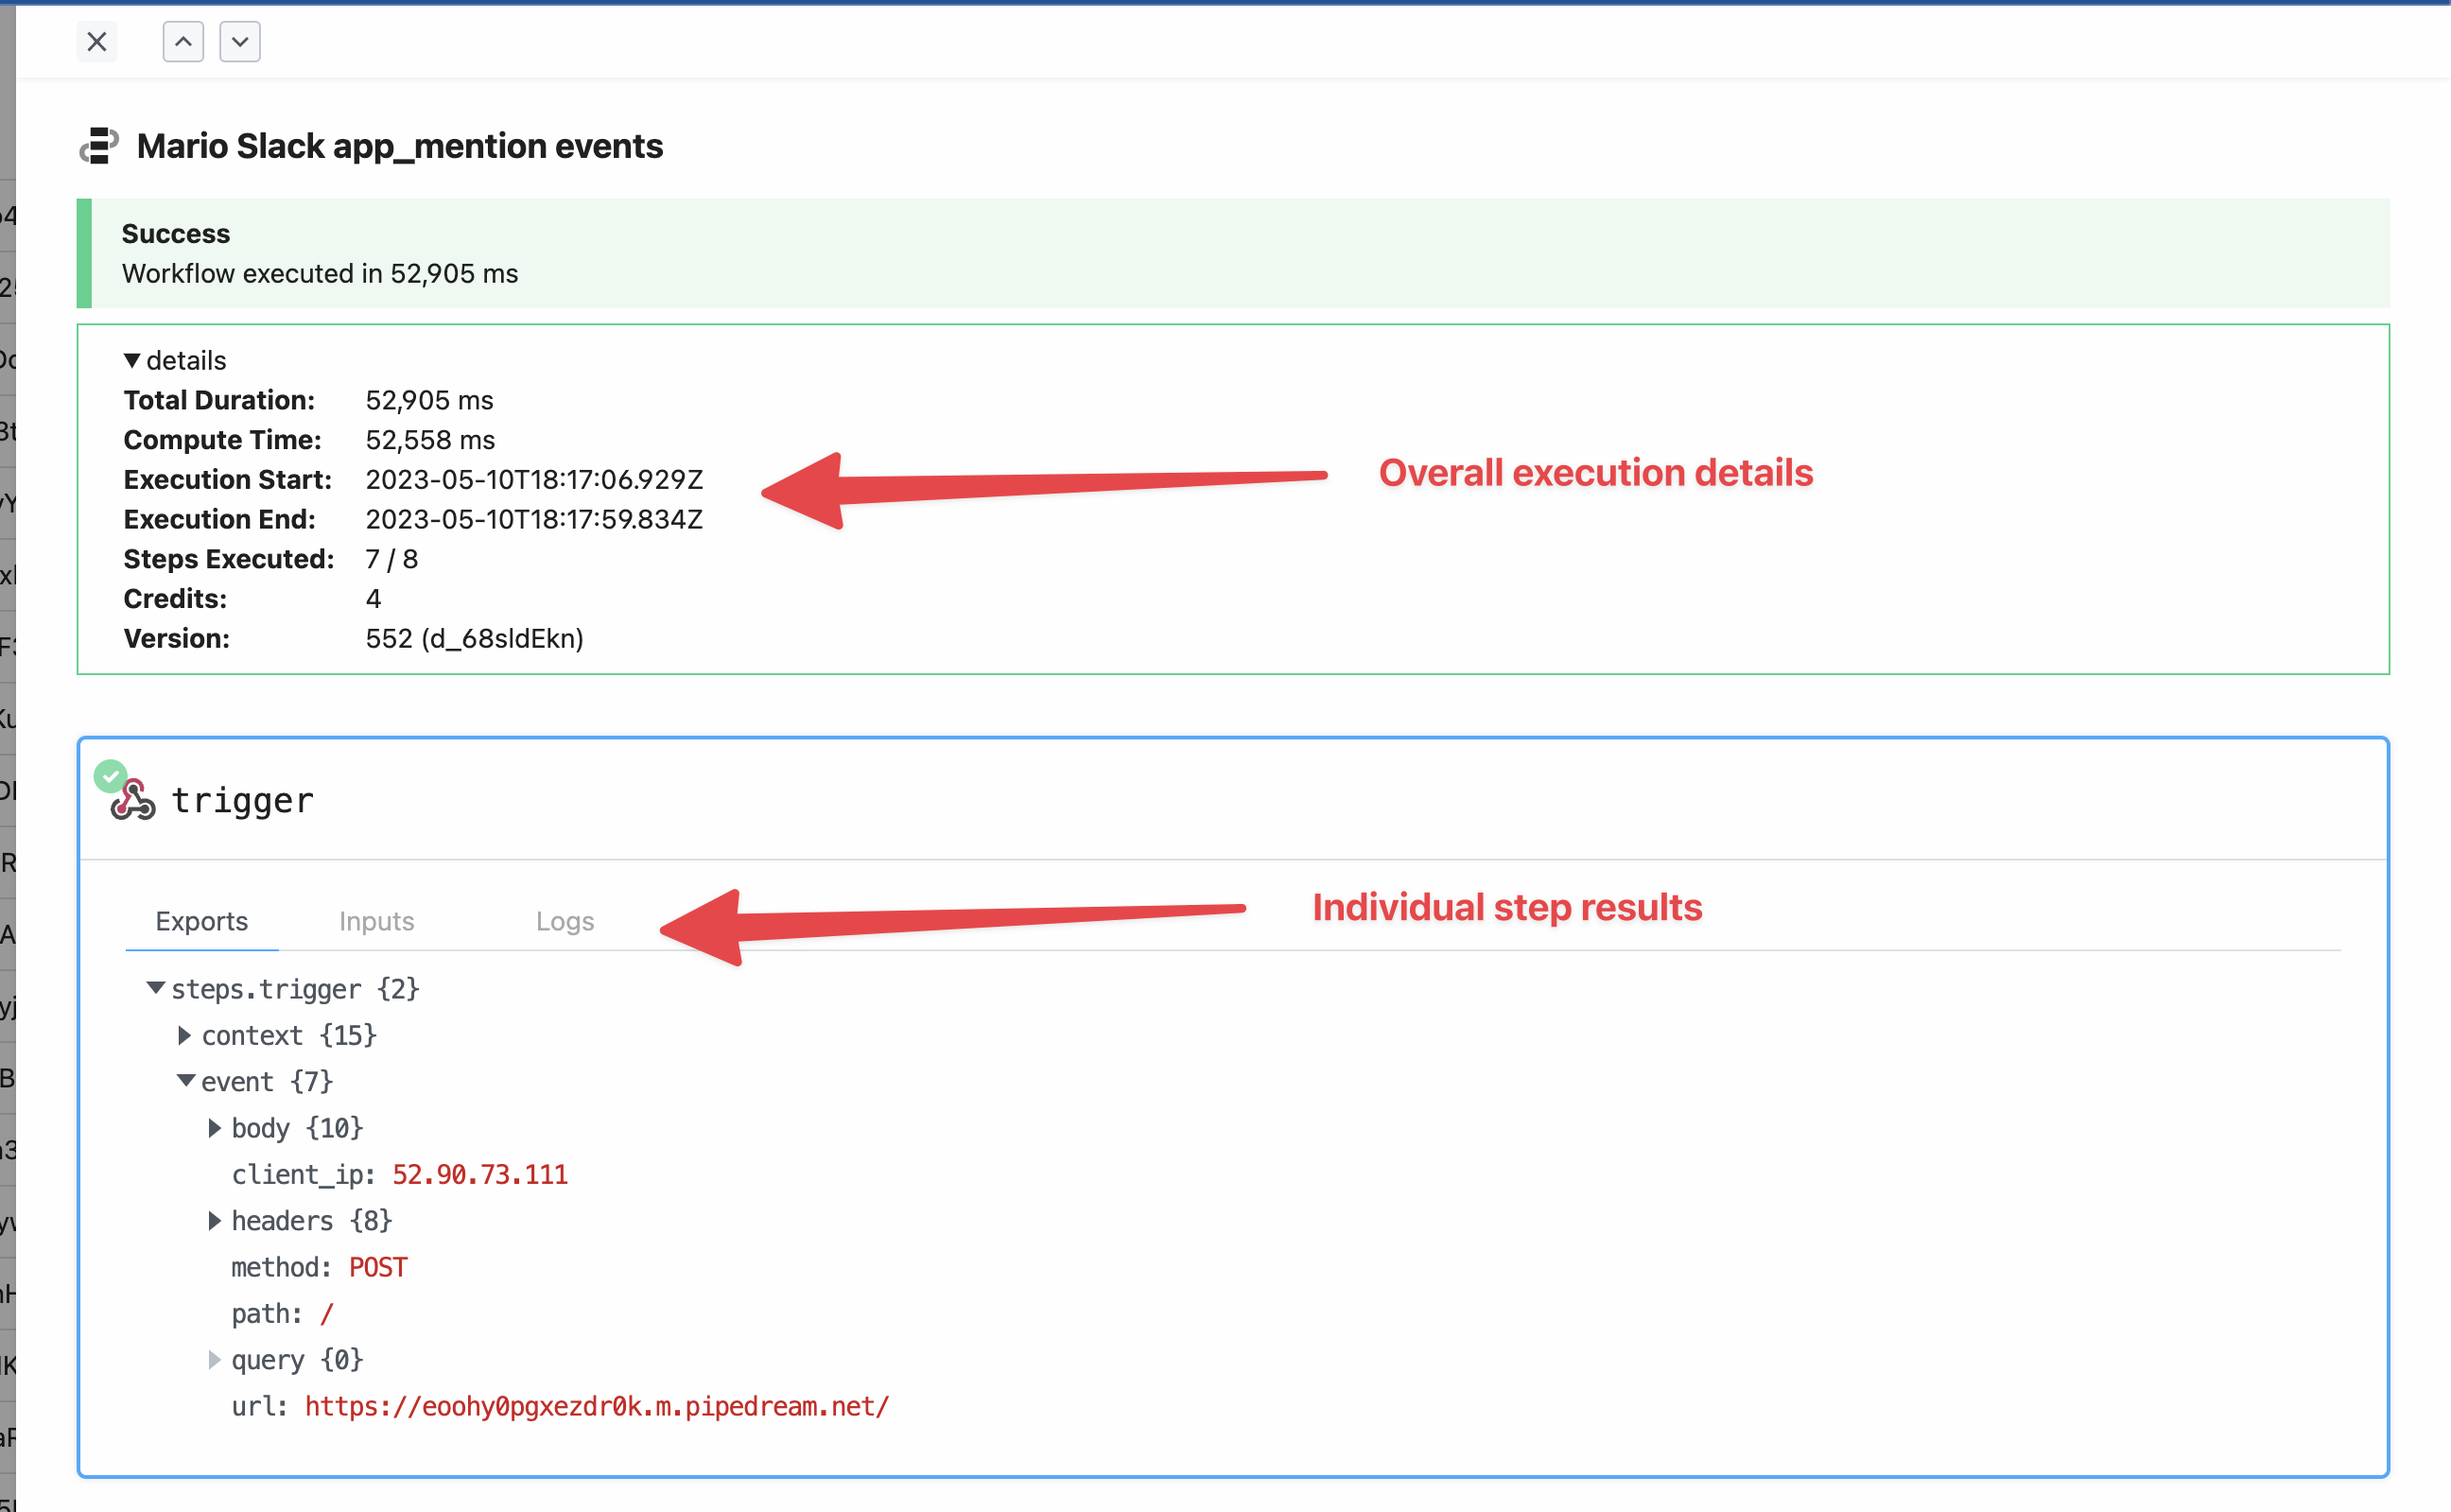 ## Bulk actions
You can select multiple events and perform bulk actions on them.
* **Replay**: Replays the selected events. This is useful for example when you have multiple errored events that you want to execute again after fixing a bug in your workflow.
* **Delete**: Deletes the selected events. This may be useful if you have certain events you want to scrub from the event history, or when you’ve successfully replayed events that had originally errored.
## Bulk actions
You can select multiple events and perform bulk actions on them.
* **Replay**: Replays the selected events. This is useful for example when you have multiple errored events that you want to execute again after fixing a bug in your workflow.
* **Delete**: Deletes the selected events. This may be useful if you have certain events you want to scrub from the event history, or when you’ve successfully replayed events that had originally errored.
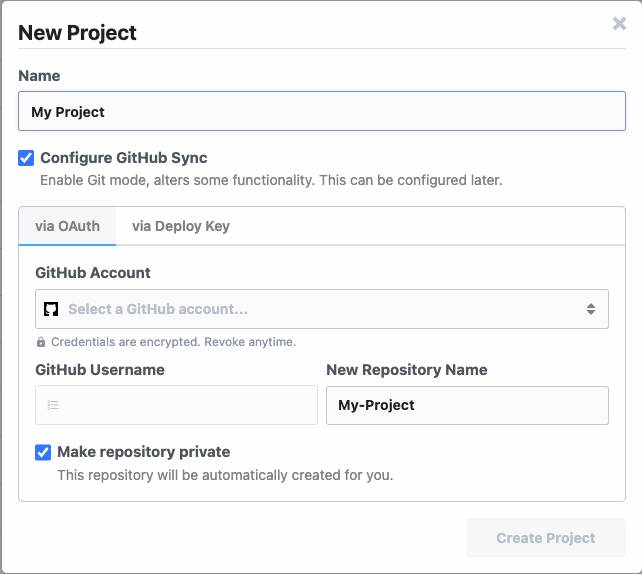 * To use **Deploy Keys**
* Create a new repo in GitHub
* Follow the instructions to configure the deploy key
* Test your setup and create a new project
*
* To use **Deploy Keys**
* Create a new repo in GitHub
* Follow the instructions to configure the deploy key
* Test your setup and create a new project
*
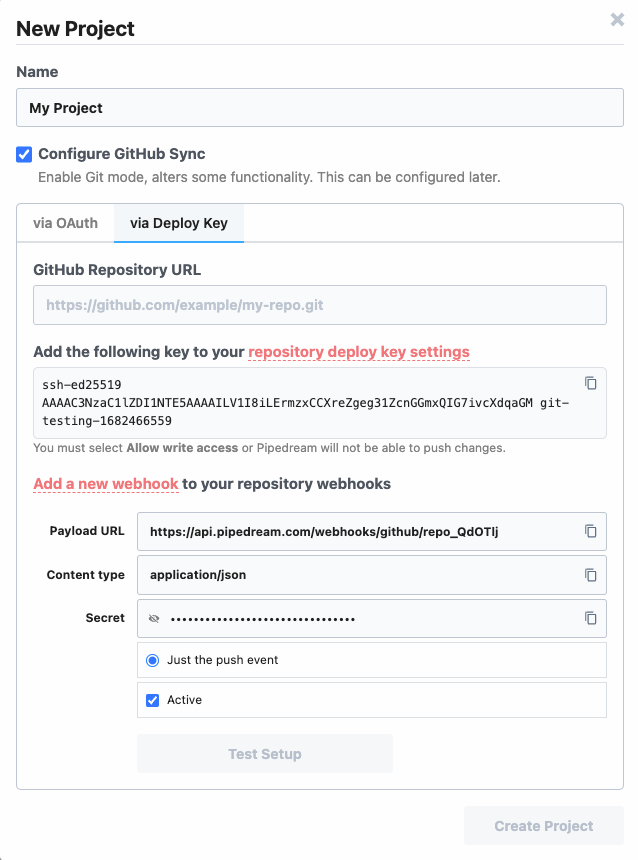 ### Create a branch to edit a project
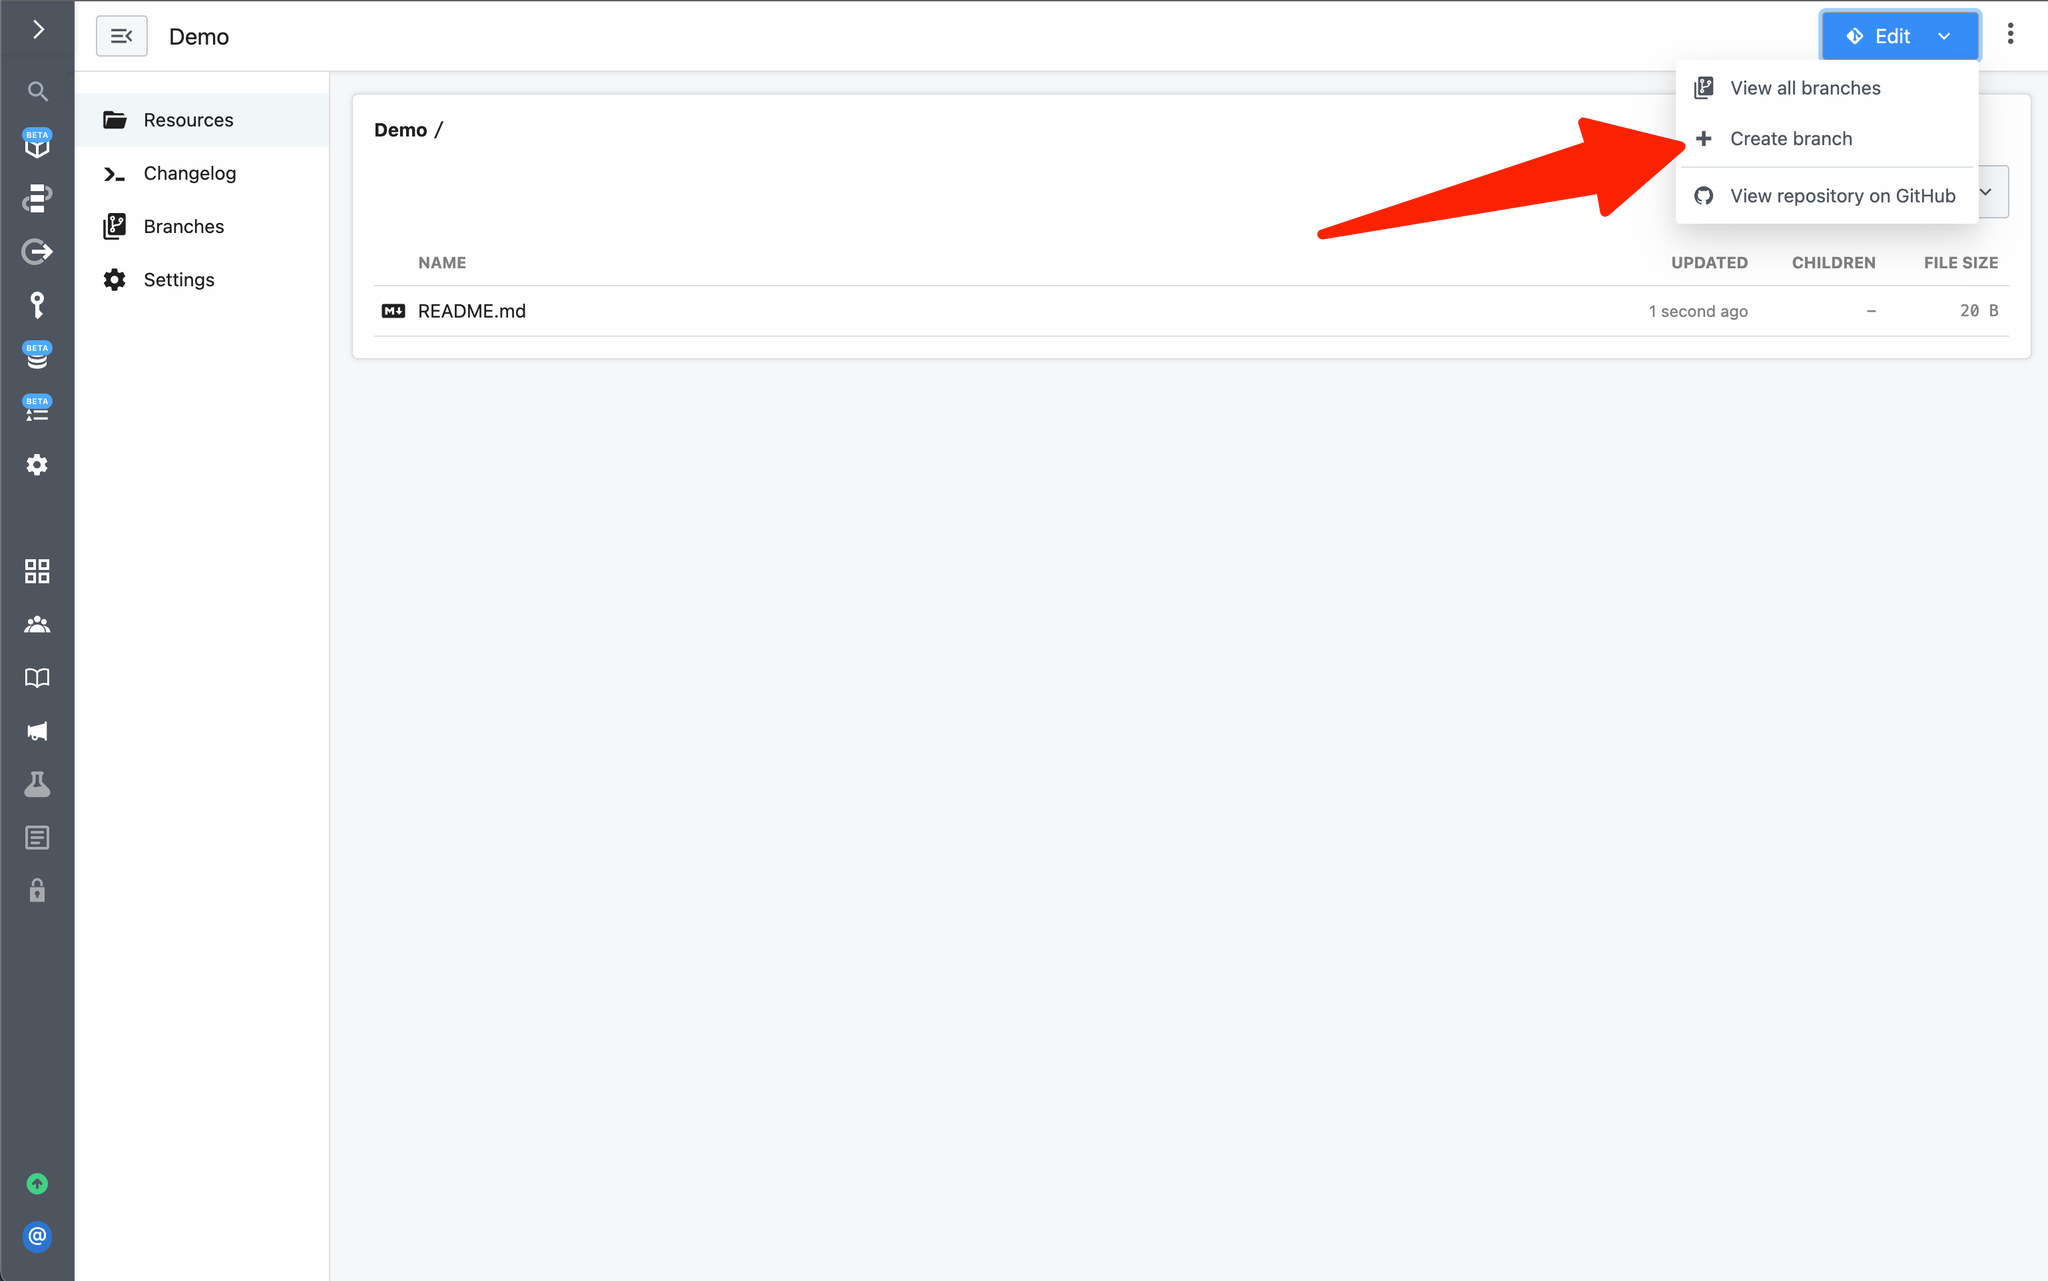 Next, name the branch and click **Create**:
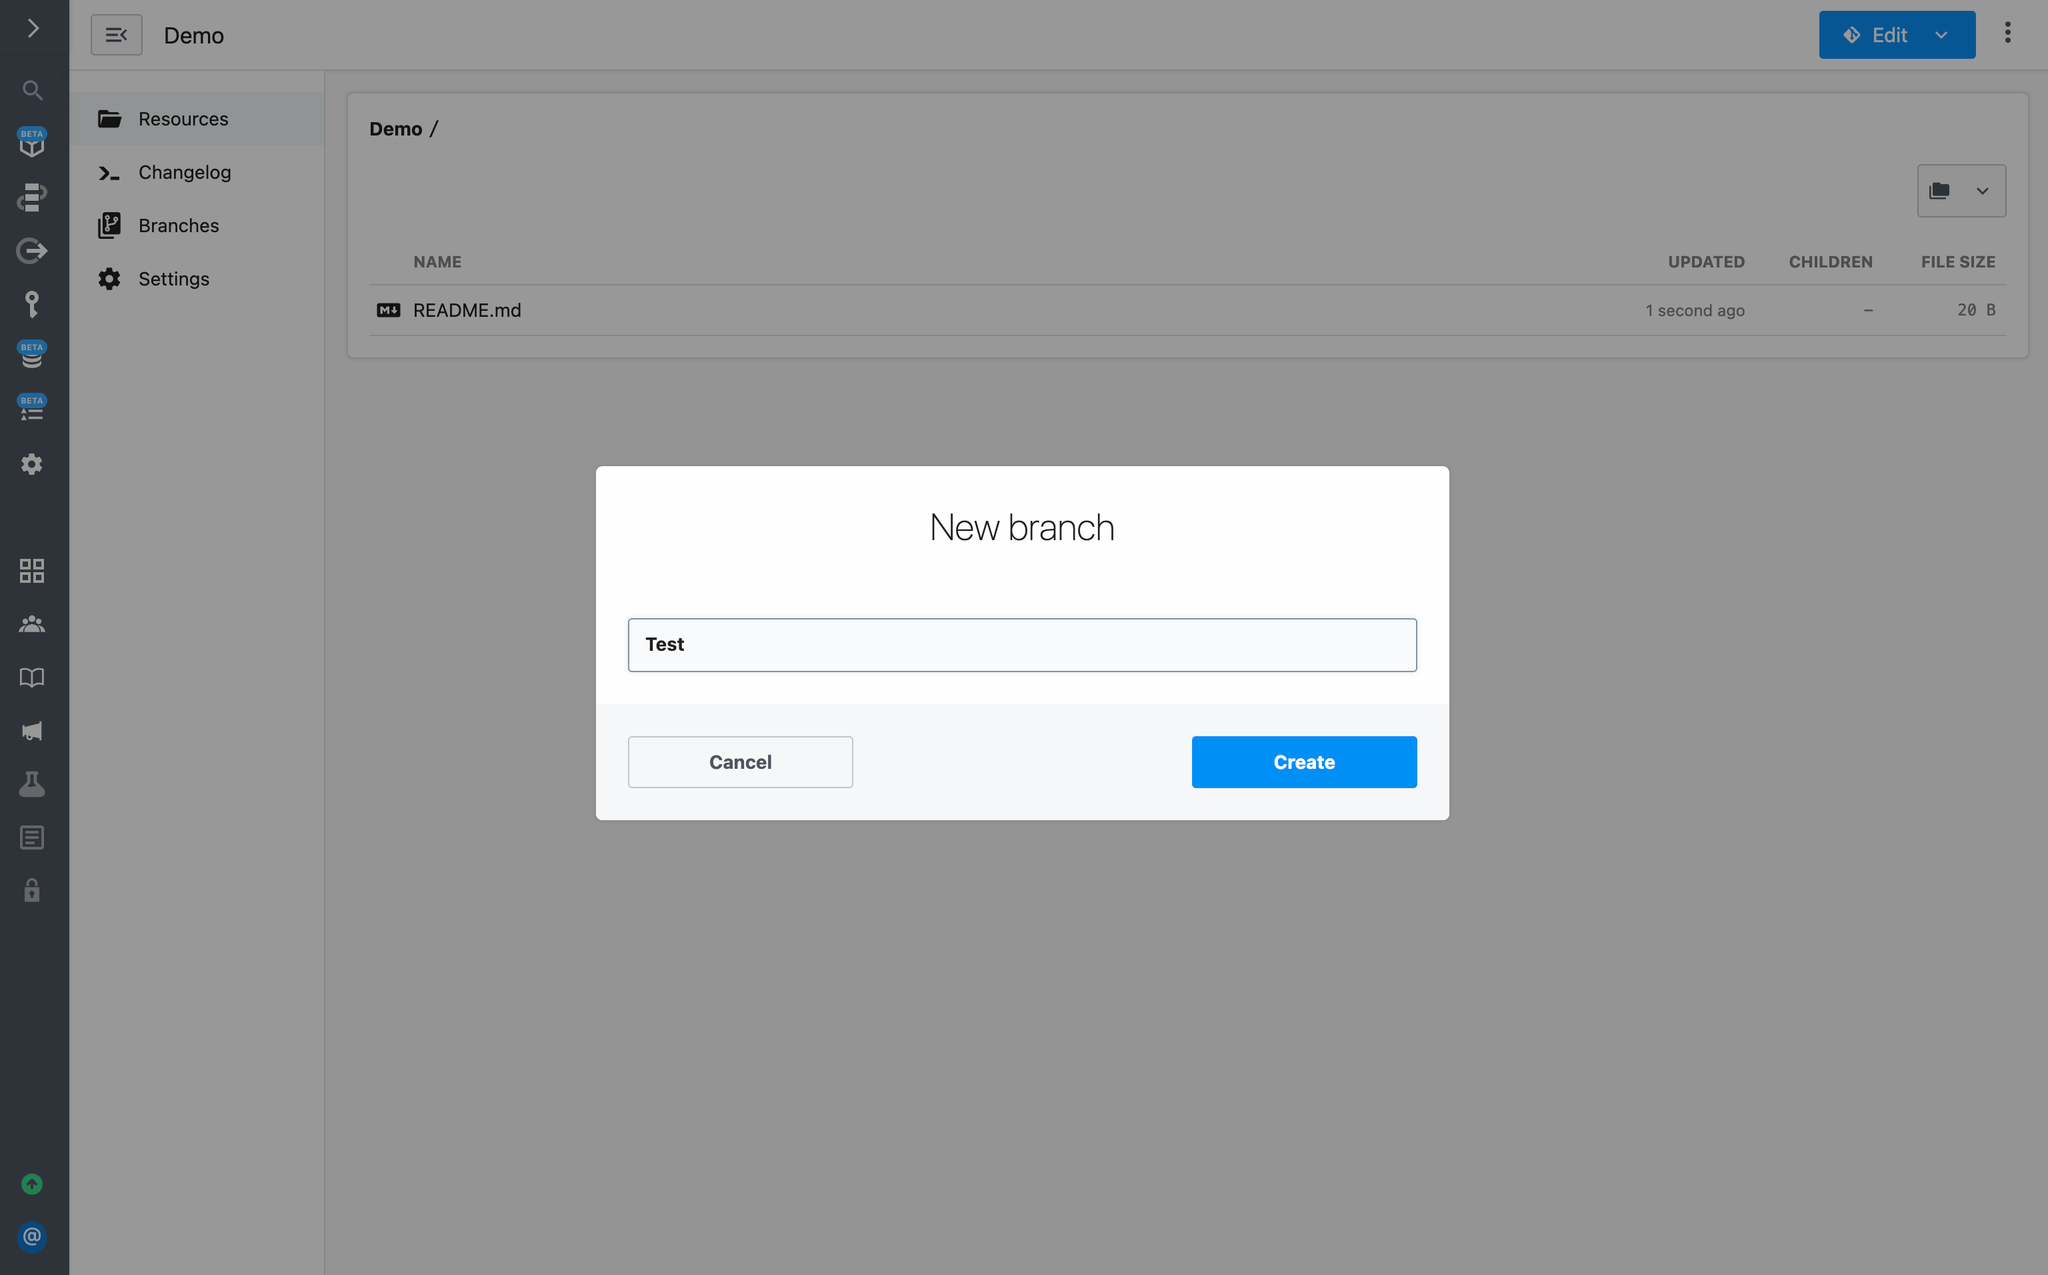 To exit development mode without merging to production, click **Exit Development Mode**:
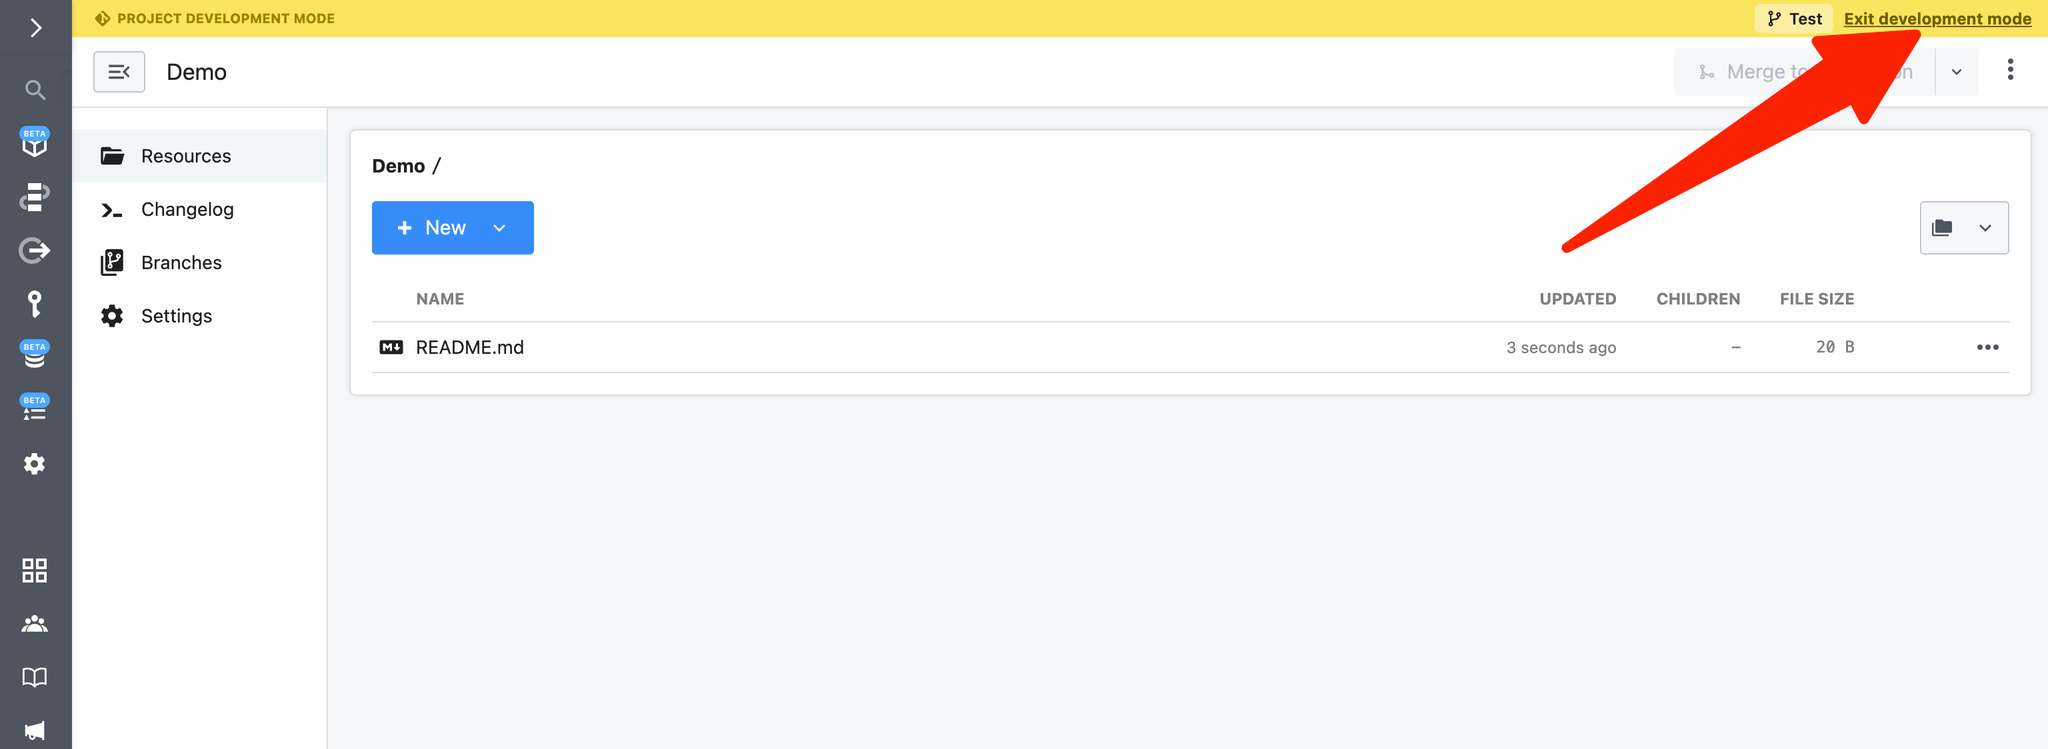 Your changes will be saved to the branch, if you choose to revisit them later.
### Merge changes to production
Once you’ve committed your changes, you can deploy your changes by merging them into the `production` branch through the Pipedream UI or GitHub.
When you merge a Git-backed project to production, all modified resources in the project will be deployed. Multiple workflows may be deployed, modified, or deleted in production through a single merge action.
#### Merge via the Pipedream UI
To merge changes to production, click on **Merge to production:**
Your changes will be saved to the branch, if you choose to revisit them later.
### Merge changes to production
Once you’ve committed your changes, you can deploy your changes by merging them into the `production` branch through the Pipedream UI or GitHub.
When you merge a Git-backed project to production, all modified resources in the project will be deployed. Multiple workflows may be deployed, modified, or deleted in production through a single merge action.
#### Merge via the Pipedream UI
To merge changes to production, click on **Merge to production:**
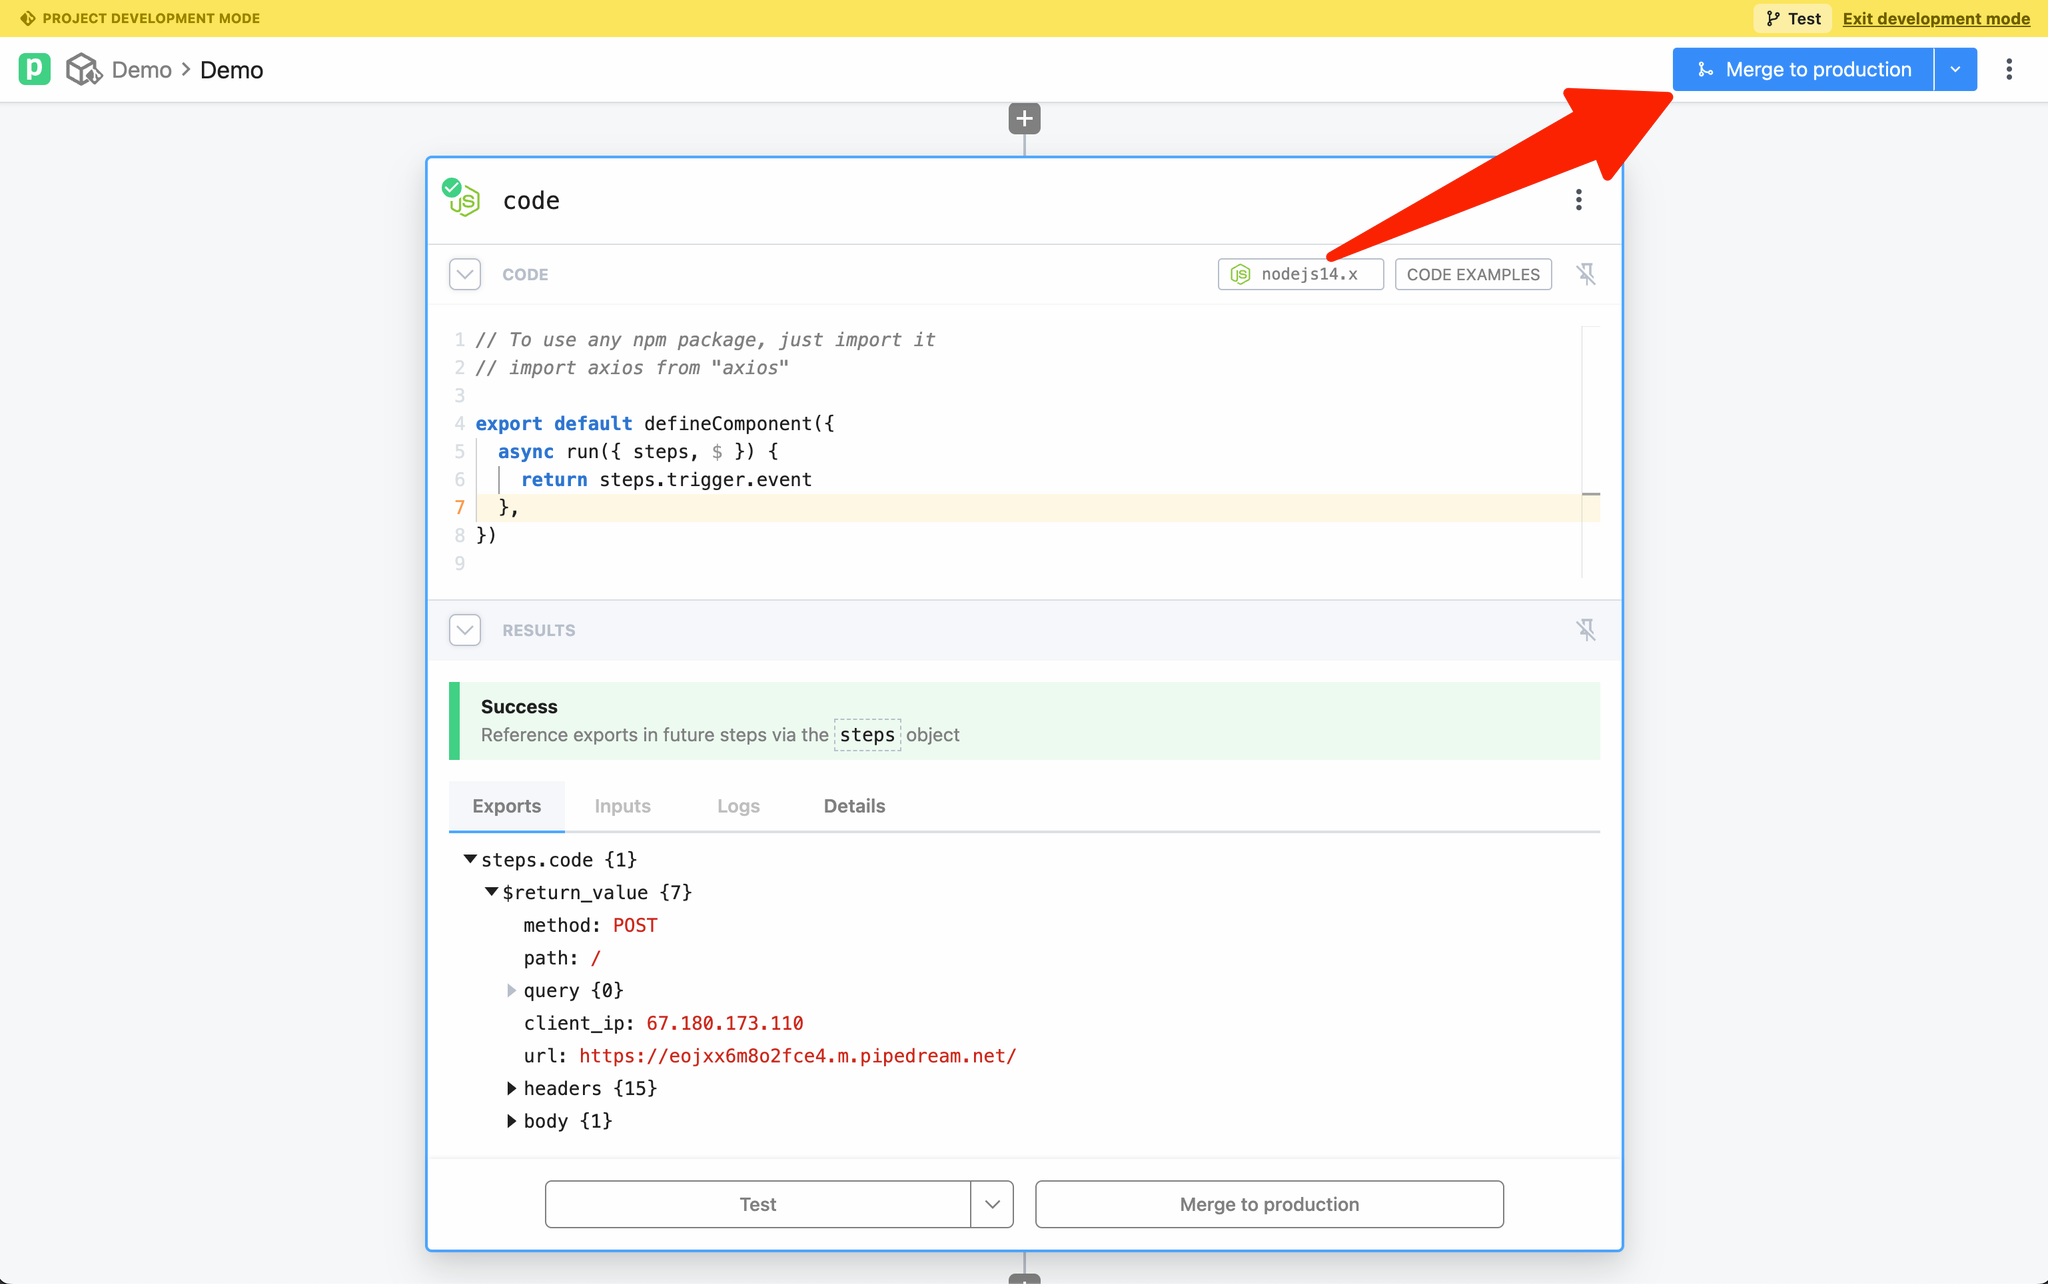 Pipedream will present a diff between the development branch and the `production`. Validate your changes and click **Merge to production** to complete the merge:
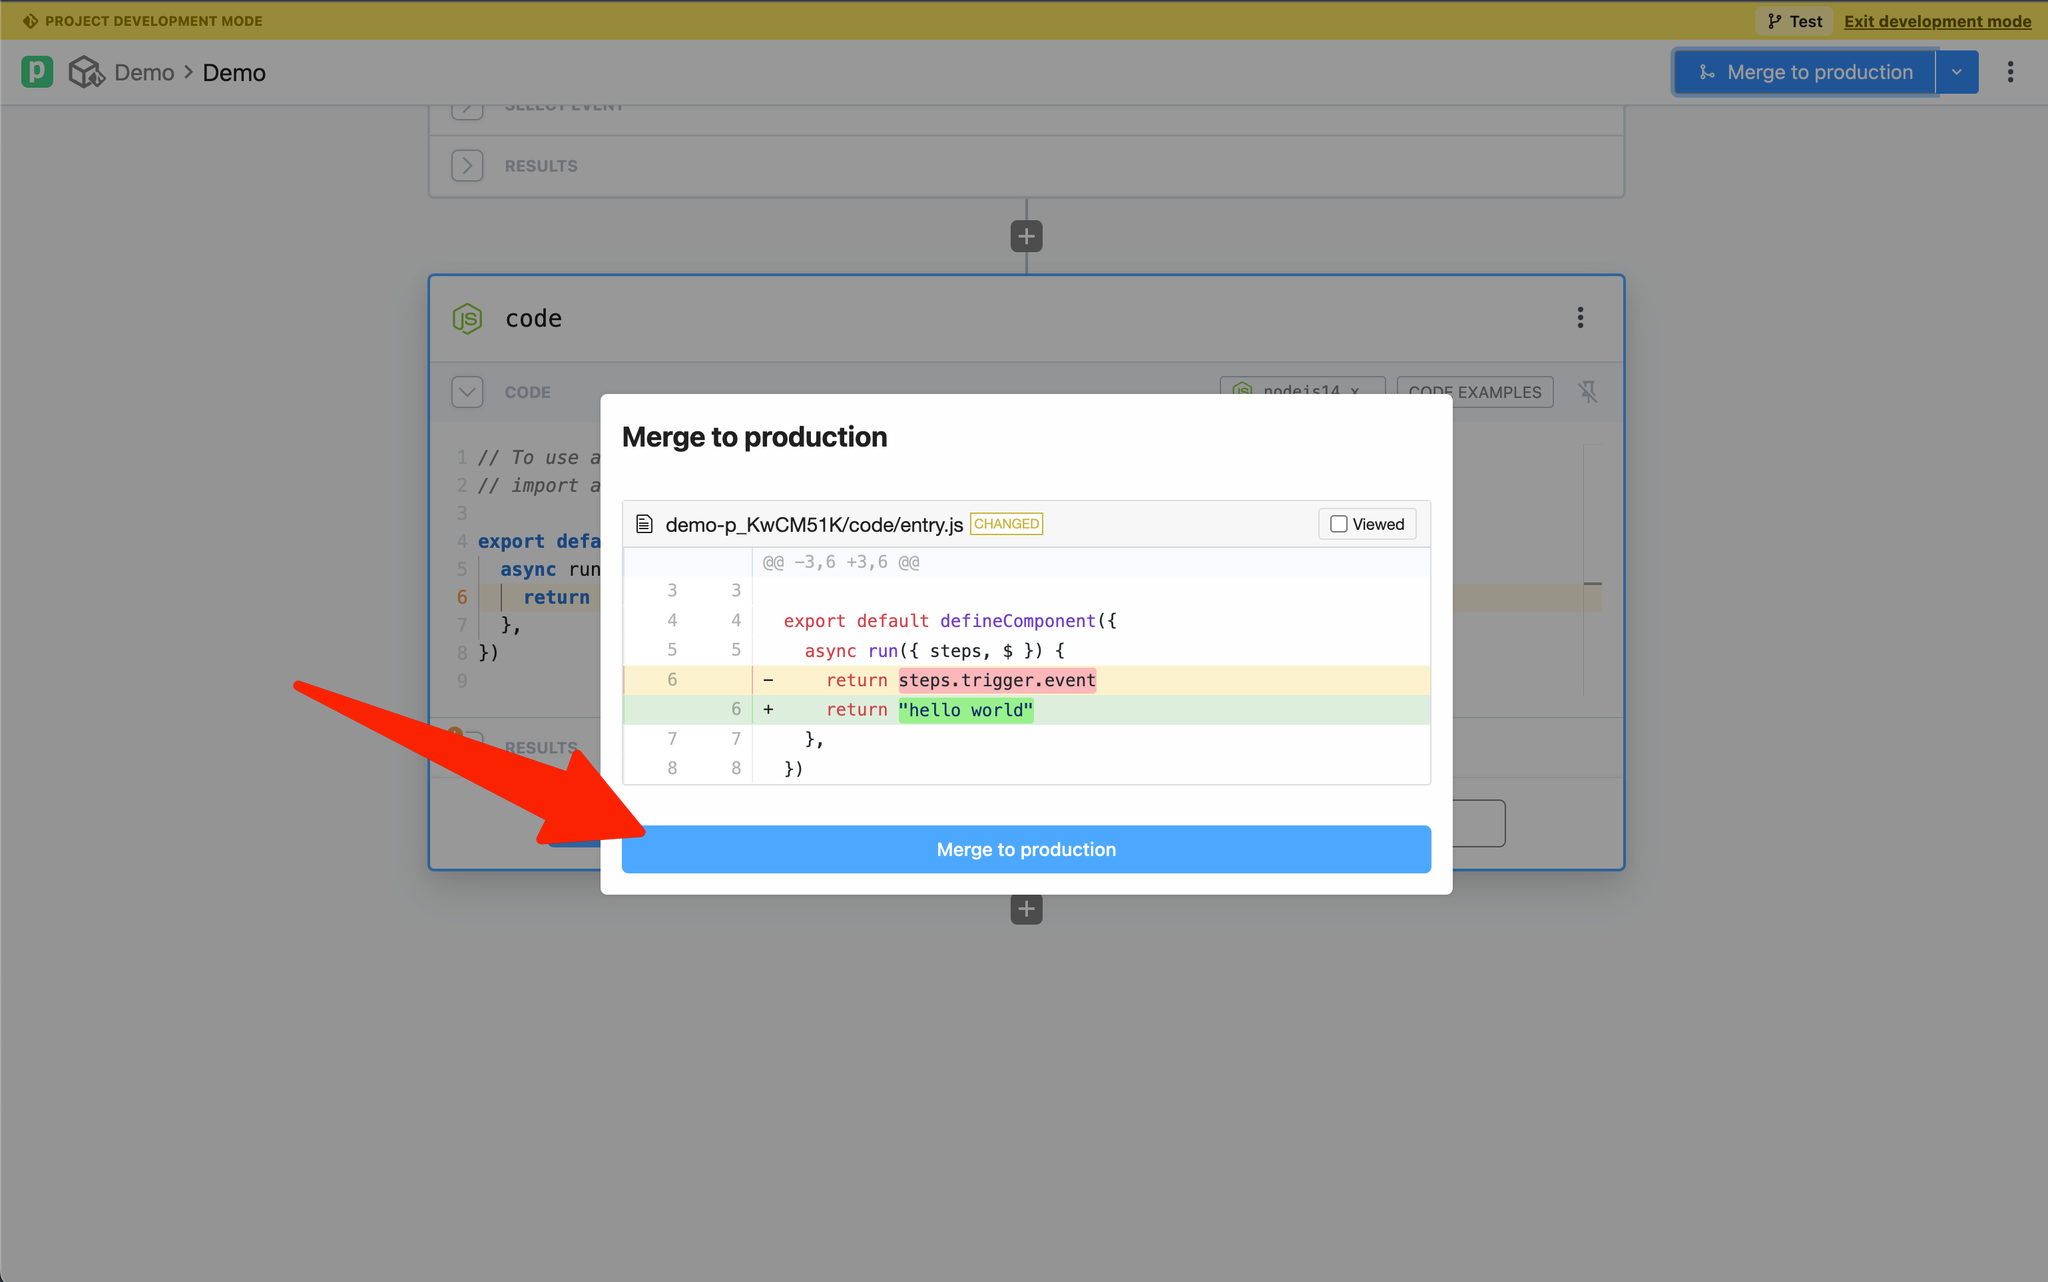 #### Create a Pull Request in GitHub
To create a pull request in GitHub, either choose Open GitHub pull request from the git-actions menu in Pipedream or in GitHub:
#### Create a Pull Request in GitHub
To create a pull request in GitHub, either choose Open GitHub pull request from the git-actions menu in Pipedream or in GitHub:
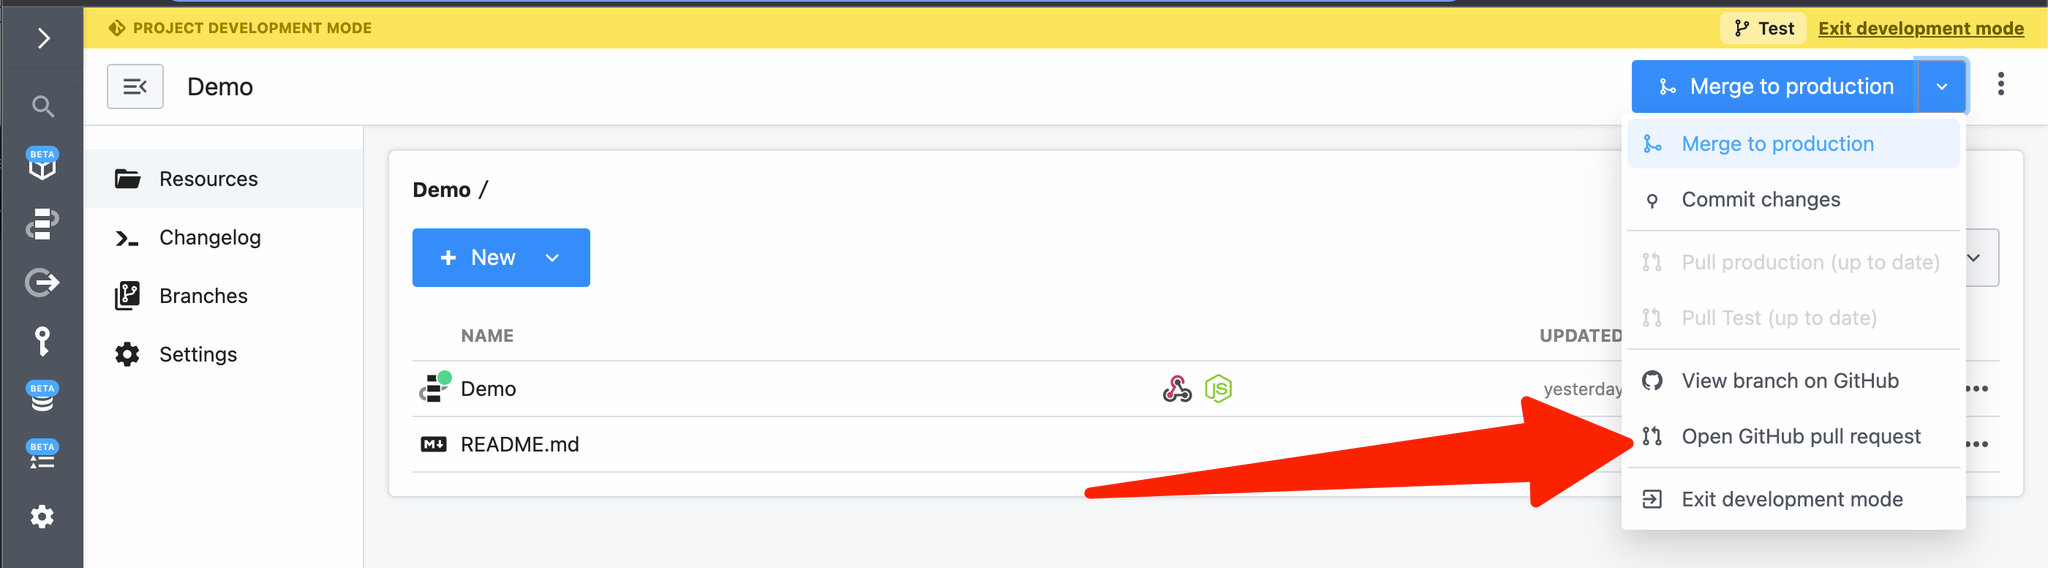 You can also review and merge changes directly from GitHub using the standard pull request process.
 You can review the diff and enter a commit message:
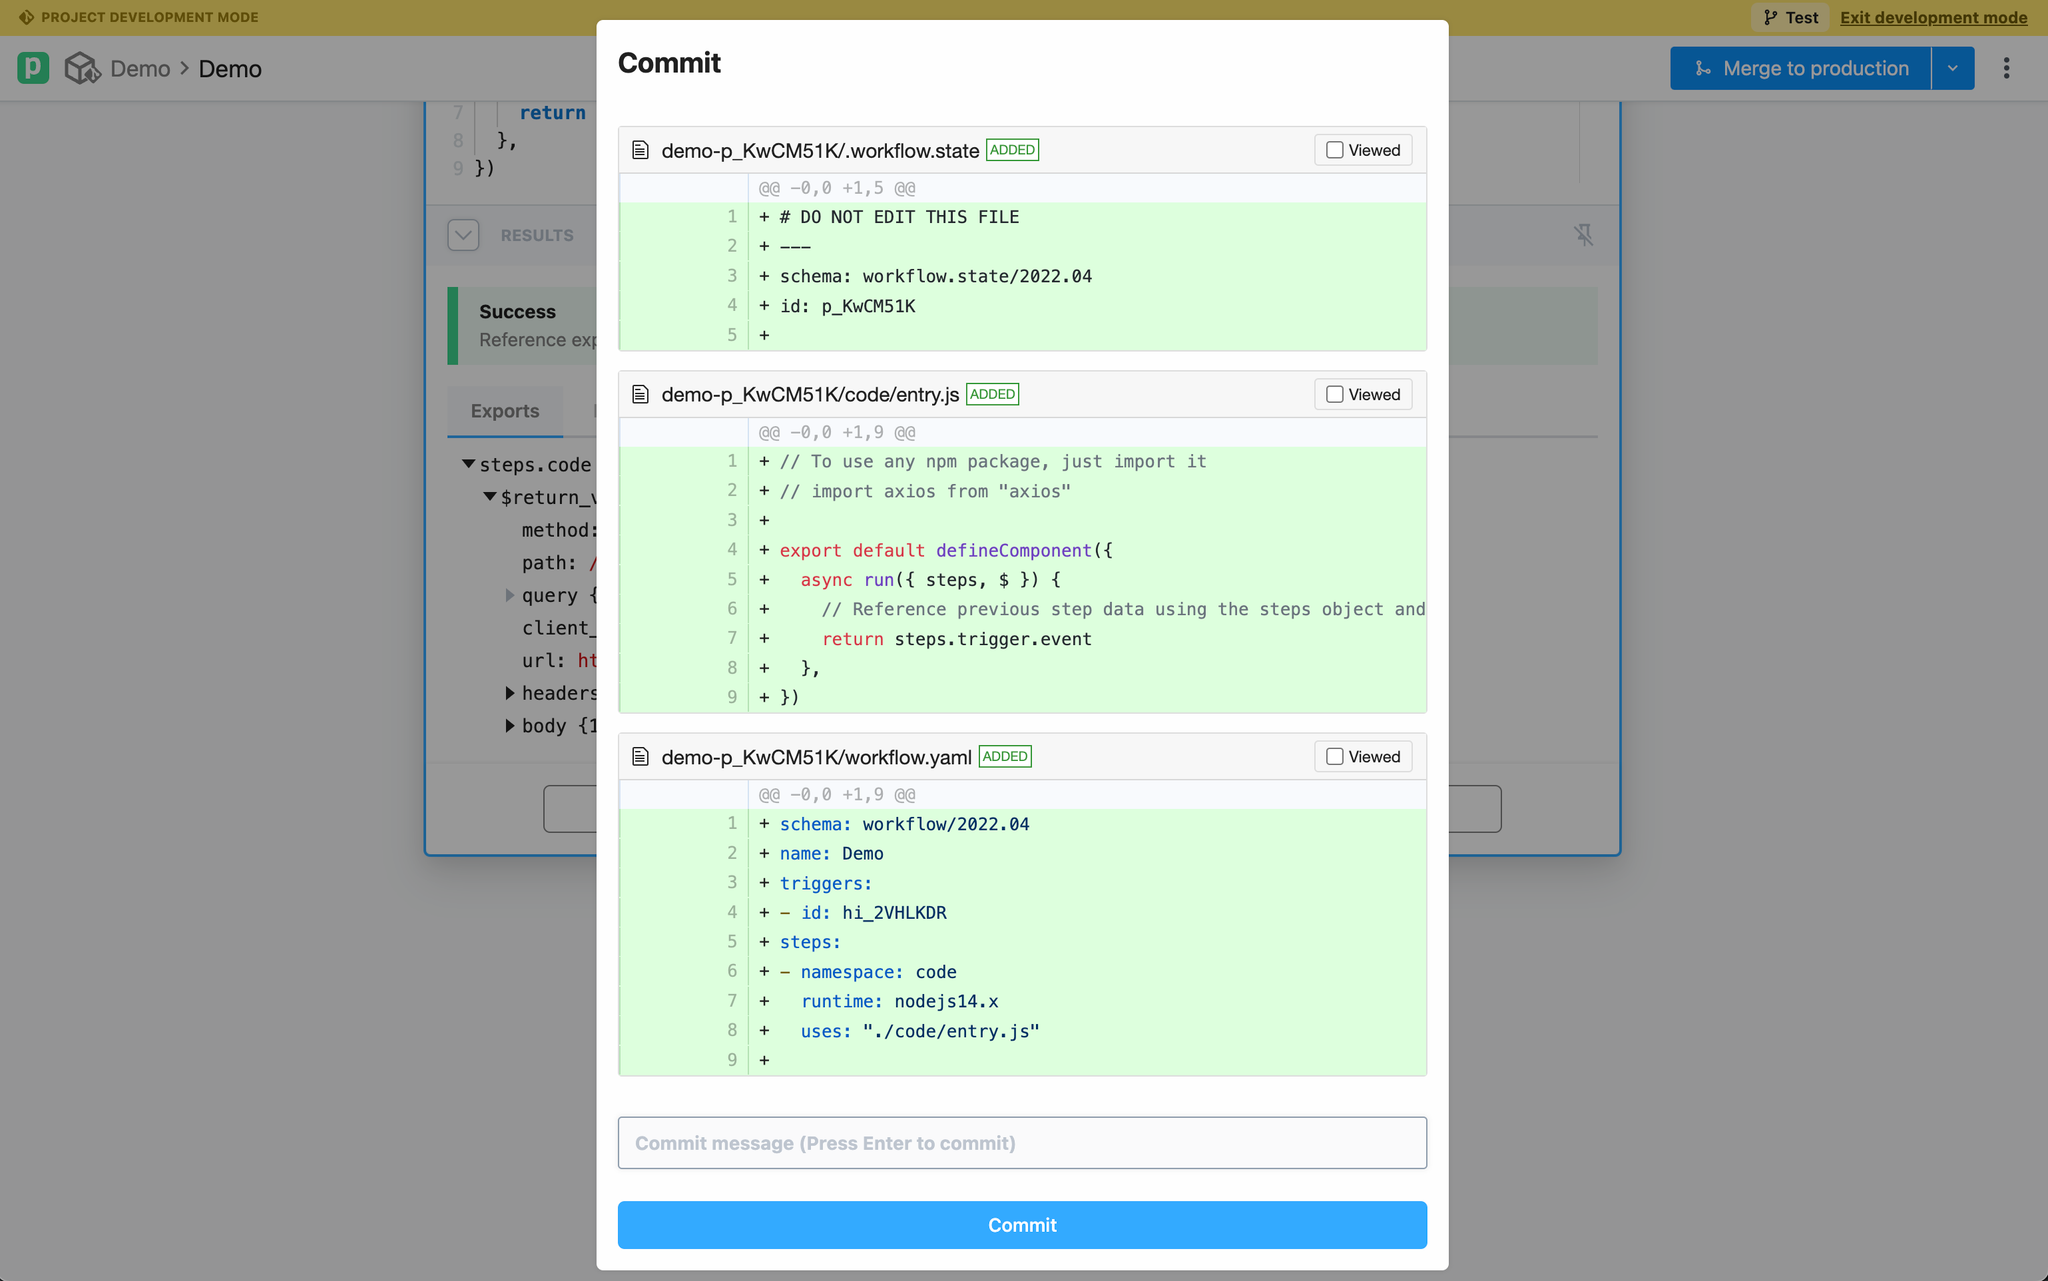 ### Pull changes and resolve conflicts
If remote changes are detected, you’ll be prompted to pull the changes:
### Pull changes and resolve conflicts
If remote changes are detected, you’ll be prompted to pull the changes:
 Pipedream will attempt to automatically merge changes. If there are conflicts, you will be prompted to manually resolve it:
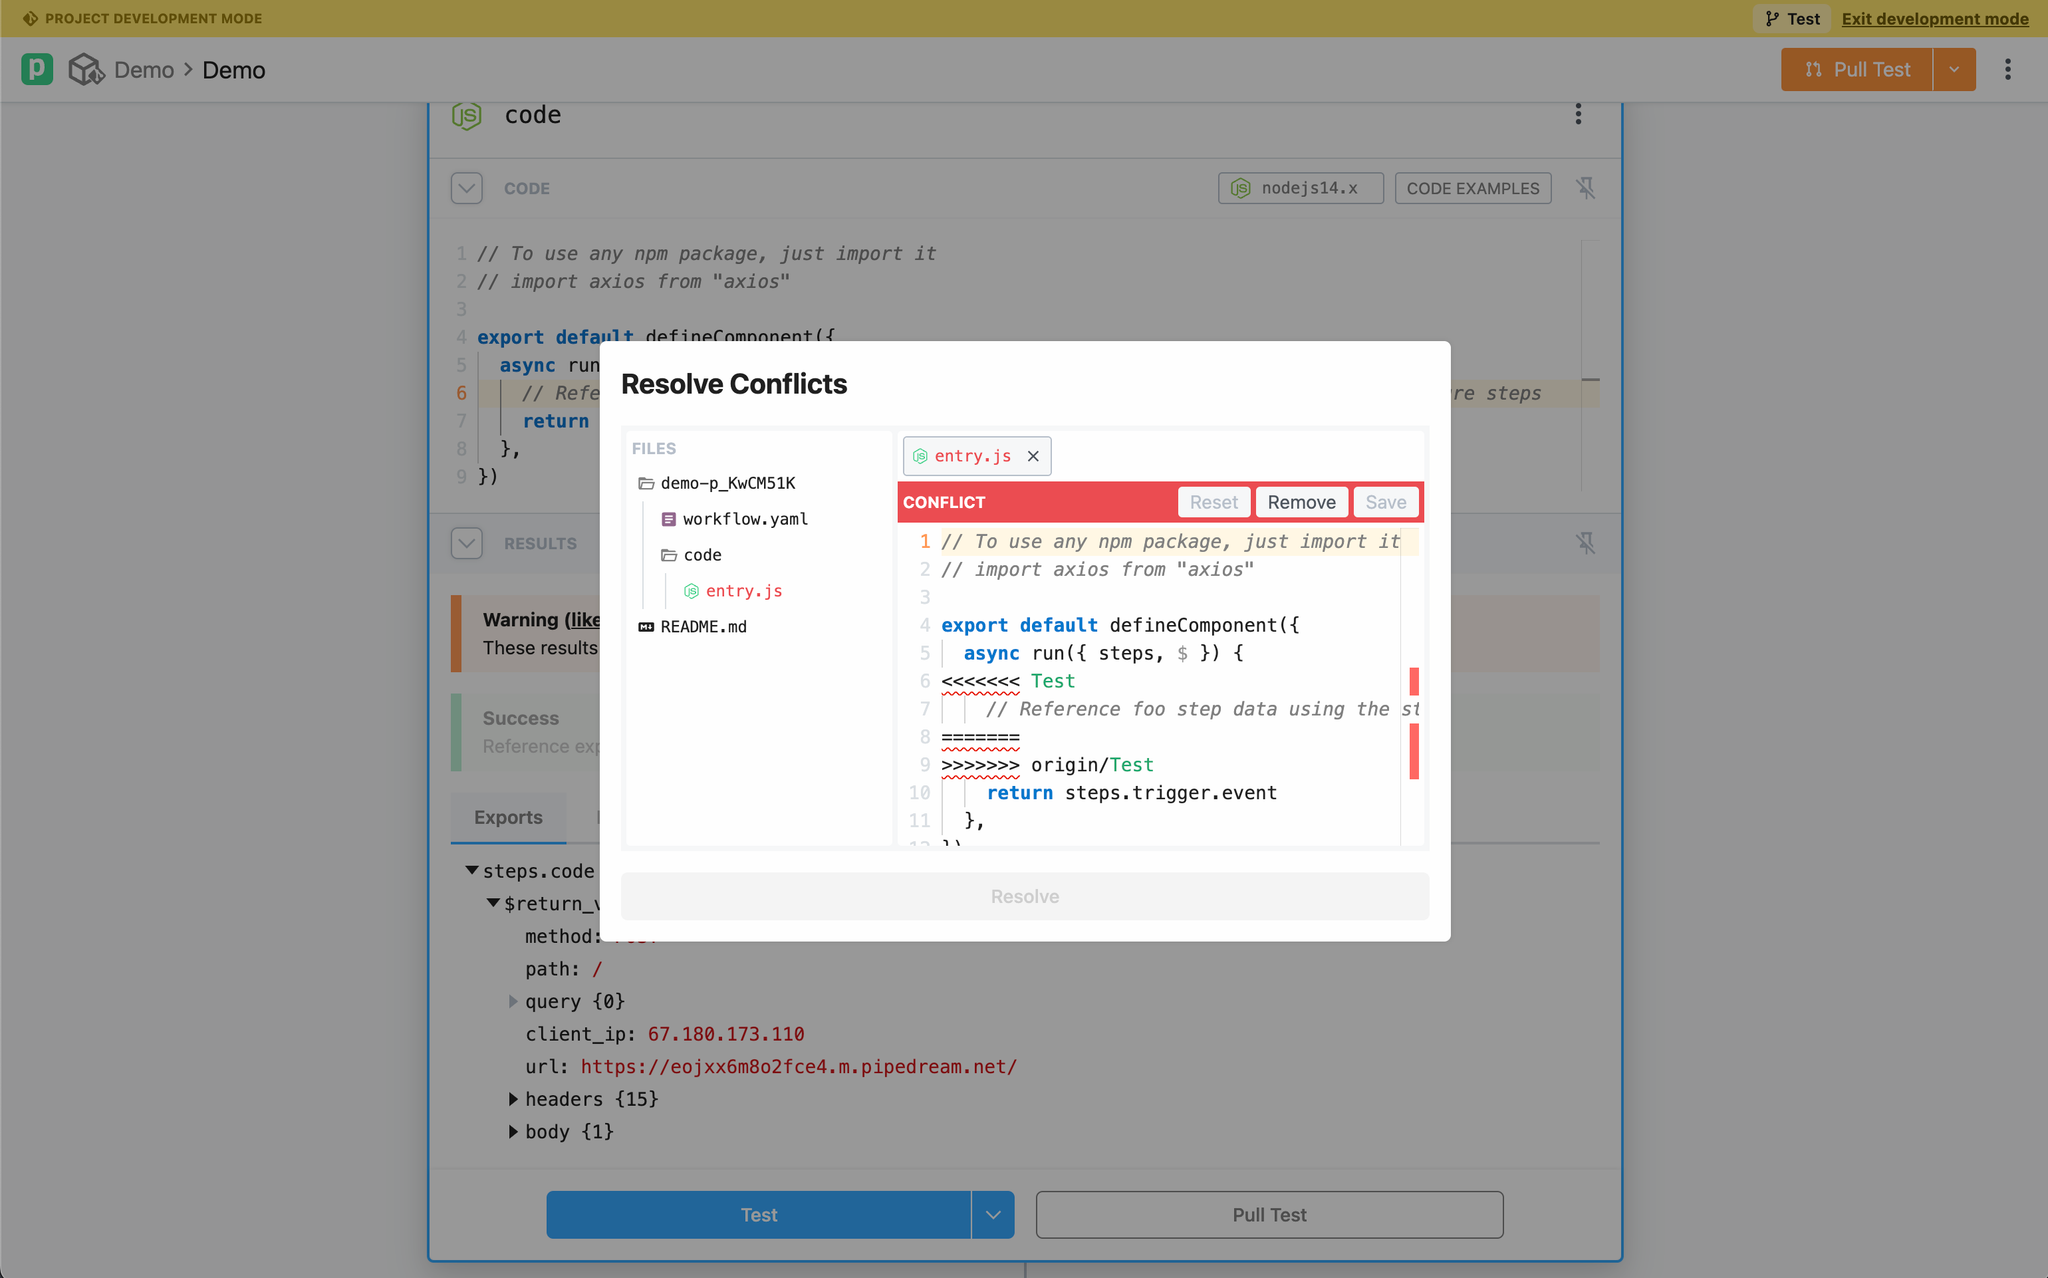 ### Move existing workflows to projects
 Then, select the project to move the selected workflows to:

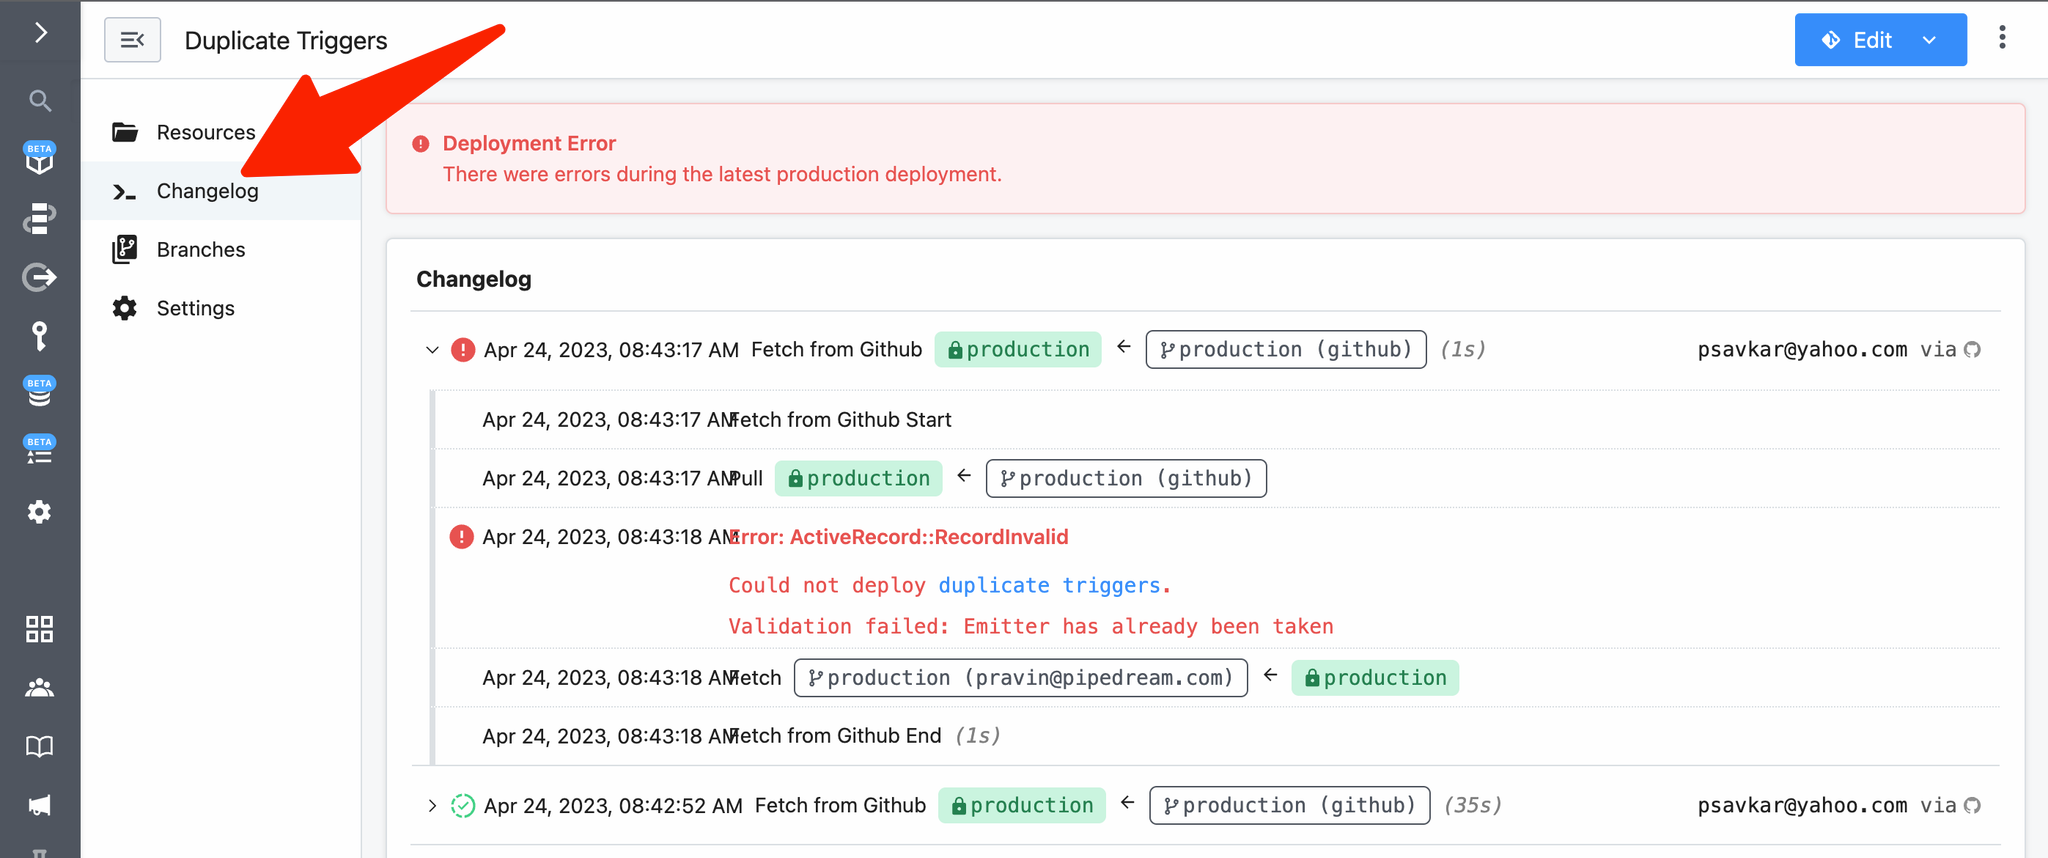 ### Local development
Projects that use GitHub sync may be edited outside of Pipedream. You can edit and commit directly via GitHub’s UI or clone the repo locally and use your preferred editor (e.g., VSCode).
To test external edits in Pipedream:
1. Commit and push local changes to your development branch in GitHub
2. Open the project in Pipedream’s UI and load your development branch
3. Use the Git Actions menu to pull changes from GitHub
## Known Issues
Below are a list of known issues that do not currently have solutions, but are in progress:
* Project branches on Pipedream cannot be deleted.
* If a workflow uses an action that has been deprecated, merging to production will fail.
* Legacy (v1) workflows are not supported in projects.
* Self-hosted GitHub Server instances are not yet supported. [Please contact us for help](https://pipedream.com/support).
* Workflow attachments are not supported
## GitHub Enterprise Cloud
If your repository is hosted on an GitHub Enterprise account, you can allow Pipedream’s address range to sync your project changes.
[Follow the directions here](https://docs.github.com/en/enterprise-cloud@latest/organizations/keeping-your-organization-secure/managing-security-settings-for-your-organization/managing-allowed-ip-addresses-for-your-organization) and add the following IP range:
{PD_EGRESS_IP_RANGE}
### Local development
Projects that use GitHub sync may be edited outside of Pipedream. You can edit and commit directly via GitHub’s UI or clone the repo locally and use your preferred editor (e.g., VSCode).
To test external edits in Pipedream:
1. Commit and push local changes to your development branch in GitHub
2. Open the project in Pipedream’s UI and load your development branch
3. Use the Git Actions menu to pull changes from GitHub
## Known Issues
Below are a list of known issues that do not currently have solutions, but are in progress:
* Project branches on Pipedream cannot be deleted.
* If a workflow uses an action that has been deprecated, merging to production will fail.
* Legacy (v1) workflows are not supported in projects.
* Self-hosted GitHub Server instances are not yet supported. [Please contact us for help](https://pipedream.com/support).
* Workflow attachments are not supported
## GitHub Enterprise Cloud
If your repository is hosted on an GitHub Enterprise account, you can allow Pipedream’s address range to sync your project changes.
[Follow the directions here](https://docs.github.com/en/enterprise-cloud@latest/organizations/keeping-your-organization-secure/managing-security-settings-for-your-organization/managing-allowed-ip-addresses-for-your-organization) and add the following IP range:
{PD_EGRESS_IP_RANGE}
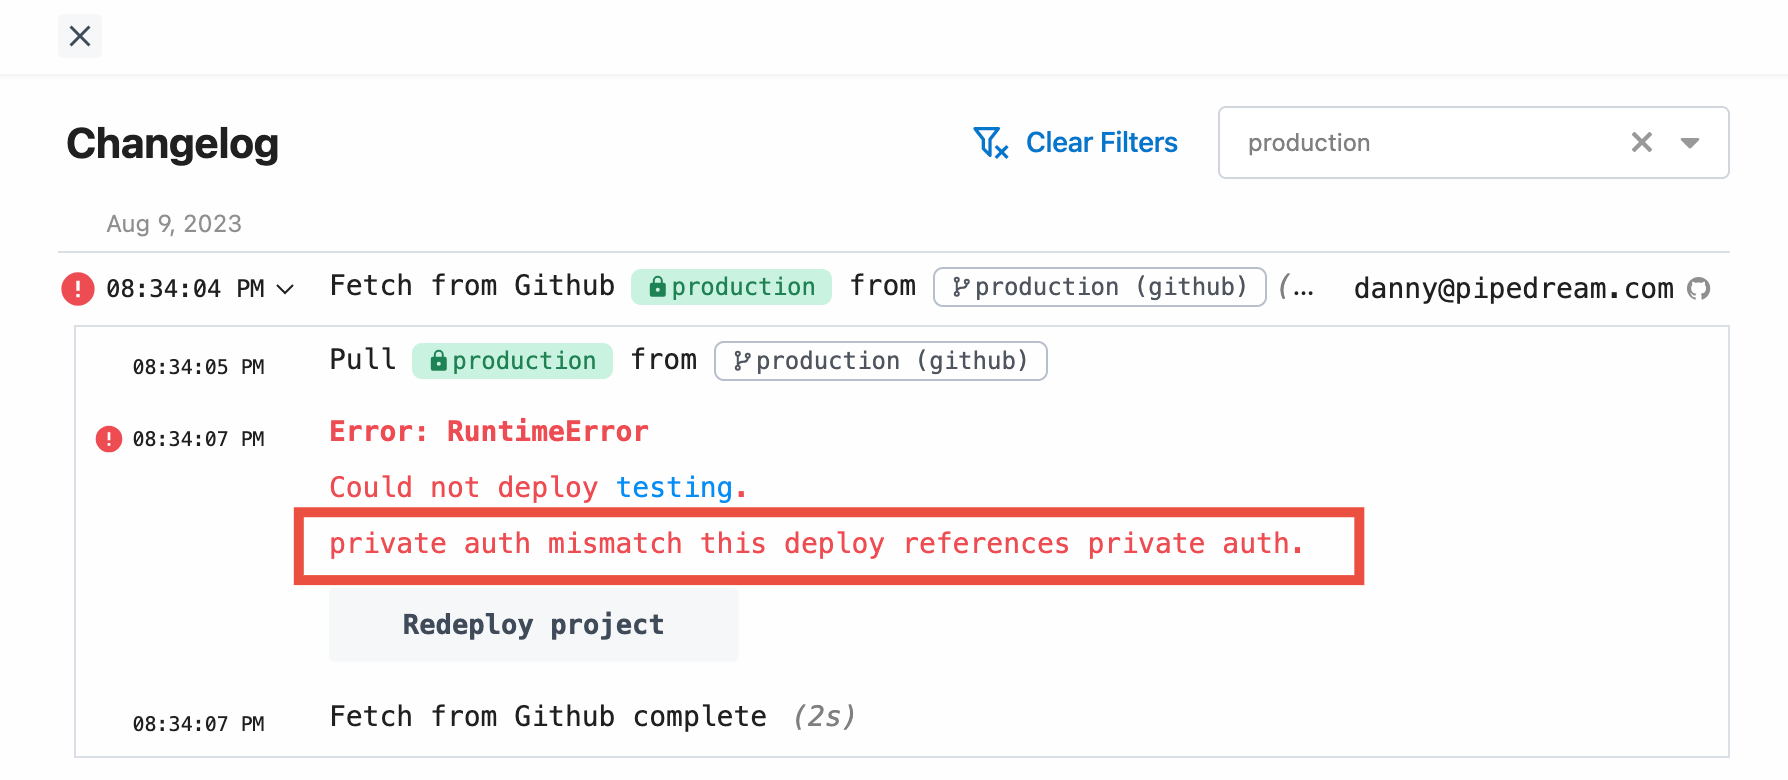 This error occurs when **both** of the below conditions are met:
1. The referenced workflow is using a connected account that’s not shared with the entire workspace
2. The change was merged from outside the Pipedream UI (via github.com or locally)
Since Pipedream can’t verify the person who merged that change should have access to use the connected account in a workflow in this case, we block these deploys.
To resolve this error:
1. Make sure all the connected accounts in the project’s workflows are [accessible to the entire workspace](/docs/apps/connected-accounts/#access-control)
2. Re-trigger a sync with Pipedream by making a nominal change to the workflow **from outside the Pipedream UI** (via github.com or locally), then merge that change to production
### Can I sync an existing GitHub Repository with workflows to a new Pipedream Project?
No, at this time it’s not possible because of how resources are connected during the bootstrapping process from the workflow YAML specification. However, this is on our roadmap, [please subscribe to this issue](https://github.com/PipedreamHQ/pipedream/issues/9255) for the latest details.
### Migrating Github Repositories
You can migrate Pipedream project’s Github repository to a new repository, while preserving history. You may want to do this when migrating a repository from a personal Github account to an organization account, without affecting the workflows within the Pipedream project.
#### Assumptions
* **Current GitHub Repository**: `previous_github_repo`
* **New GitHub Repository**: `new_github_repo`
* Basic familiarity with git and GitHub
* Access to a local terminal (e.g., Bash, Zsh, PowerShell)
* Necessary permissions to modify both the Pipedream project and associated GitHub repositories
#### Steps
1. **Access Project Settings in Pipedream:**
* Navigate to your Pipedream project.
* Use the dropdown menu on the “Edit” button in the top right corner to access `previous_github_repo` in GitHub.
This error occurs when **both** of the below conditions are met:
1. The referenced workflow is using a connected account that’s not shared with the entire workspace
2. The change was merged from outside the Pipedream UI (via github.com or locally)
Since Pipedream can’t verify the person who merged that change should have access to use the connected account in a workflow in this case, we block these deploys.
To resolve this error:
1. Make sure all the connected accounts in the project’s workflows are [accessible to the entire workspace](/docs/apps/connected-accounts/#access-control)
2. Re-trigger a sync with Pipedream by making a nominal change to the workflow **from outside the Pipedream UI** (via github.com or locally), then merge that change to production
### Can I sync an existing GitHub Repository with workflows to a new Pipedream Project?
No, at this time it’s not possible because of how resources are connected during the bootstrapping process from the workflow YAML specification. However, this is on our roadmap, [please subscribe to this issue](https://github.com/PipedreamHQ/pipedream/issues/9255) for the latest details.
### Migrating Github Repositories
You can migrate Pipedream project’s Github repository to a new repository, while preserving history. You may want to do this when migrating a repository from a personal Github account to an organization account, without affecting the workflows within the Pipedream project.
#### Assumptions
* **Current GitHub Repository**: `previous_github_repo`
* **New GitHub Repository**: `new_github_repo`
* Basic familiarity with git and GitHub
* Access to a local terminal (e.g., Bash, Zsh, PowerShell)
* Necessary permissions to modify both the Pipedream project and associated GitHub repositories
#### Steps
1. **Access Project Settings in Pipedream:**
* Navigate to your Pipedream project.
* Use the dropdown menu on the “Edit” button in the top right corner to access `previous_github_repo` in GitHub.
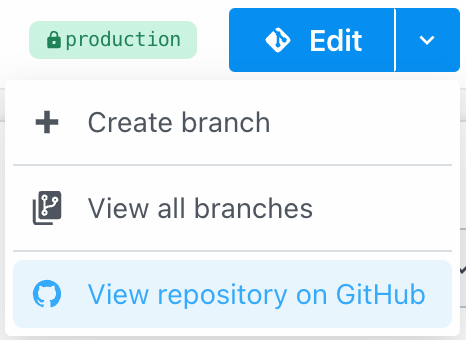 2. **Clone the Current Repository Locally:**
```php
git clone previous_github_repo_clone_url
```
3. Reset GitHub Sync in Pipedream:
* In Pipedream, go to your project settings.
* Click on “Reset GitHub Connection”.
2. **Clone the Current Repository Locally:**
```php
git clone previous_github_repo_clone_url
```
3. Reset GitHub Sync in Pipedream:
* In Pipedream, go to your project settings.
* Click on “Reset GitHub Connection”.
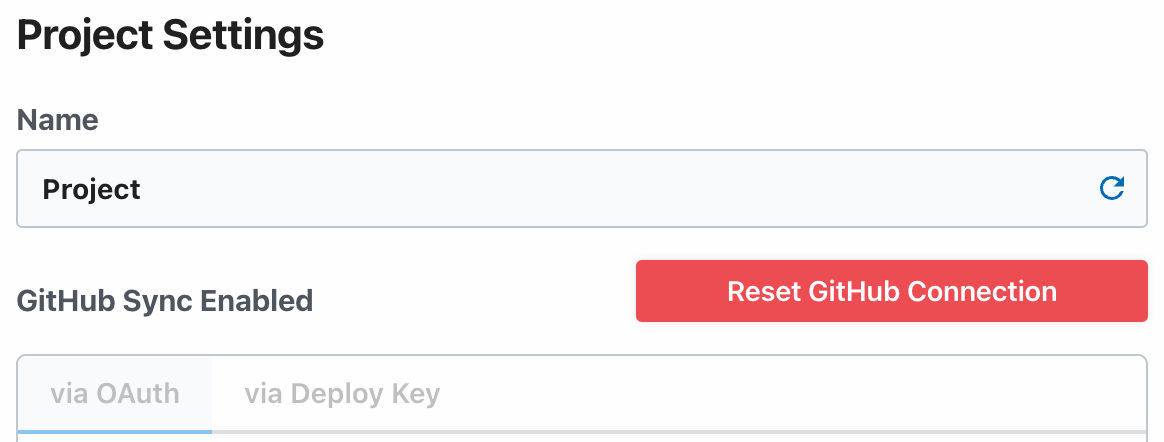 4. Set Up New repository connection:
* Configure the project’s GitHub repository to use `new_github_repo`.
5. Clone the new repository locally:
```bash
git clone new_github_repo_clone_url
cd new_github_repo
```
6. Link to the old repository:
```python
git remote add old_github_repo previous_github_repo_clone_url
git fetch --all
```
7. Prepare for migration:
* Create and switch to a new branch for migration:
```
git checkout -b migration
```
* Merge the main branch of `old_github_repo` into migration, allowing for unrelated histories:
```swift
git merge --allow-unrelated-histories old_github_repo/production
# Resolve any conflicts, such as in README.md
git commit
```
8. Finalize the migration:
* Optionally push the `migration` branch to the remote:
```python
git push --set-upstream origin migration
```
* Switch to the `production` branch and merge:
```
git checkout production
git merge --no-ff migration
git push
```
9. Cleanup:
* Remove the connection to the old repository:
```csharp
git remote remove old_github_repo
```
* Optionally, you may now safely delete `previous_github_repo` from GitHub.
### How does the `production` branch work?
Anything merged to the `production` branch will be deployed to your production workflows on Pipedream.
From a design perspective, we want to let you manage any branching strategy on your end, since you may be making commits to the repo outside of Pipedream. Once we support managing Pipedream workflows in a monorepo, where you may have other changes, we wanted to use a branch that didn’t conflict with a conventional main branch (like `main` or `master`).
In the future, we also plan to support you changing the default branch name.
# Limits
Source: https://pipedream.com/docs/workflows/limits
export const MAX_WORKFLOW_EXECUTION_LIMIT = '750';
export const FREE_INSPECTOR_EVENT_LIMIT = '7 days of events';
export const TMP_SIZE_LIMIT = '2GB';
export const FUNCTION_PAYLOAD_LIMIT = '6MB';
export const INSPECTOR_EVENT_EXPIRY_DAYS = '365';
export const DAILY_TESTING_LIMIT = '30 minutes';
export const EMAIL_PAYLOAD_SIZE_LIMIT = '30MB';
export const MEMORY_ABSOLUTE_LIMIT = '10GB';
export const MEMORY_LIMIT = '256MB';
export const PAYLOAD_SIZE_LIMIT = '512KB';
Pipedream imposes limits on source and workflow execution, the events you send to Pipedream, and other properties. You’ll receive an error if you encounter these limits. See our [troubleshooting guide](/docs/troubleshooting/) for more information on these specific errors.
Some of these limits apply only on the free tier. For example, Pipedream limits the number of credits and active workflows you can use on the free tier. **On paid tiers, you can run an unlimited number of credits for any amount of execution time (usage charges apply)**.
Other limits apply across the free and paid tiers. Please see the details on each limit below.
**These limits are subject to change at any time**.
## Number of Workflows
The limit of active workflows depends on your current plan. [See our pricing page](https://pipedream.com/pricing) for more details.
## Number of Event Sources
**You can run an unlimited number of event sources**, as long as each operates under the limits below.
## Execution Credits
Free Pipedream account have a limit on the number of execution credits. Paid plans are not capped but are subject to additional usage charges (you can manually set a usage cap if you want to manage costs).\
\
You can view your credits usage at the bottom-left of [the Pipedream UI](https://pipedream.com).
You can also see more detailed usage in [Billing and Usage Settings](https://pipedream.com/settings/billing). Here you’ll find your usage for the last 30 days, broken out by day, by resource (e.g. your source / workflow).
### Included Credits Usage Notifications
| Tier | Notifications |
| ---------- | ------------------------------------------------------------------------------------------------------------------------------------------------------------- |
| Free tiers | You’ll receive an email when you reach 100% of your usage. |
| Paid tiers | You’ll receive an email at 80% and 100% of your [included credits](/docs/pricing/#included-credits) for your [billing period](/docs/pricing/#billing-period). |
## Daily workflow testing limit
You **do not** use credits testing workflows, but workspaces on the **Free** plan are limited to {MAX_WORKFLOW_EXECUTION_LIMIT} of test runtime per day. If you exceed this limit when testing in the builder, you’ll see a **Runtime Quota Exceeded** error.
## Data stores
Depending on your plan, Pipedream sets limits on:
1. The total number of data stores
2. The total number of keys across all data stores
3. The total storage used across all data stores
You’ll find your workspace’s limits in the **Data Stores** section of usage dashboard in the bottom-left of [the Pipedream UI](https://pipedream.com).
## HTTP Triggers
The following limits apply to [HTTP triggers](/docs/workflows/building-workflows/triggers/#http).
### HTTP Request Body Size
By default, the body of HTTP requests sent to a source or workflow is limited to {PAYLOAD_SIZE_LIMIT}.
Your endpoint will issue a `413 Payload Too Large` status code when the body of your request exceeds {PAYLOAD_SIZE_LIMIT}.
**Pipedream supports two different ways to bypass this limit**. Both of these interfaces support uploading data up to `5TB`, though you may encounter other platform limits.
* You can send large HTTP payloads by passing the `pipedream_upload_body=1` query string or an `x-pd-upload-body: 1` HTTP header in your HTTP request. [Read more here](/docs/workflows/building-workflows/triggers/#sending-large-payloads).
* You can upload multiple large files, like images and videos, using the [large file upload interface](/docs/workflows/building-workflows/triggers/#large-file-support).
### QPS (Queries Per Second)
Generally the rate of HTTP requests sent to an endpoint is quantified by QPS, or *queries per second*. A query refers to an HTTP request.
**You can send an average of 10 requests per second to your HTTP trigger**. Any requests that exceed that threshold may trigger rate limiting. If you’re rate limited, we’ll return a `429 Too Many Requests` response. If you control the application sending requests, you should retry the request with [exponential backoff](https://cloud.google.com/storage/docs/exponential-backoff) or a similar technique.
We’ll also accept short bursts of traffic, as long as you remain close to an average of 10 QPS (e.g. sending a batch of 50 requests every 30 seconds should not trigger rate limiting).
**This limit can be raised for paying customers**. To request an increase, [reach out to our Support team](https://pipedream.com/support/) with the HTTP endpoint whose QPS you’d like to increase, with the new, desired limit.
## Email Triggers
Currently, most of the [limits that apply to HTTP triggers](/docs/workflows/limits/#http-triggers) also apply to [email triggers](/docs/workflows/building-workflows/triggers/#email).
The only limit that differs between email and HTTP triggers is the payload size: the total size of an email sent to a workflow - its body, headers, and attachments - is limited to {EMAIL_PAYLOAD_SIZE_LIMIT}.
## Memory
By default, workflows run with {MEMORY_LIMIT} of memory. You can modify a workflow’s memory [in your workflow’s Settings](/docs/workflows/building-workflows/settings/#memory), up to {MEMORY_ABSOLUTE_LIMIT}.
Increasing your workflow’s memory gives you a proportional increase in CPU. If your workflow is limited by memory or compute, increasing your workflow’s memory can reduce its overall runtime and make it more performant.
**Pipedream charges credits proportional to your memory configuration**. [Read more here](/docs/pricing/faq/#how-does-workflow-memory-affect-credits).
## Disk
Your code, or a third party library, may need access to disk during the execution of your workflow or event source. **You have access to {TMP_SIZE_LIMIT} of disk in the `/tmp` directory**.
This limit cannot be raised.
## Workflows
### Time per execution
Every event sent to a workflow triggers a new execution of that workflow. Workflows have a default execution limit that varies with the trigger type:
* HTTP and Email-triggered workflows default to **30 seconds** per execution.
* Cron-triggered workflows default to **60 seconds** per execution.
If your code exceeds your workflow-level limit, we’ll throw a **Timeout** error and stop your workflow. Any partial logs and observability associated with code cells that ran successfully before the timeout will be attached to the event in the UI, so you can examine the state of your workflow and troubleshoot where it may have failed.
You can increase the timeout limit, up to a max value set by your plan:
| Tier | Maximum time per execution |
| ---------- | -------------------------- |
| Free tiers | 300 seconds (5 min) |
| Paid tiers | 750 seconds (12.5 min) |
Events that trigger a **Timeout** error will appear in red in the [Inspector](/docs/workflows/building-workflows/inspect/). You’ll see the timeout error, also in red, in the cell at which the code timed out.
### Event History
The [Inspector](/docs/workflows/building-workflows/inspect/#the-inspector) shows the execution history for a given workflow. Events have a limited retention period, depending on your plan:
| Tier | Events retained per workflow |
| ---------- | -------------------------------------------------------------------------------- |
| Free tiers | {FREE_INSPECTOR_EVENT_LIMIT} |
| Paid tiers | [View breakdown of events history per paid plan](https://pipedream.com/pricing/) |
The execution details for a specific event also expires after {INSPECTOR_EVENT_EXPIRY_DAYS} days.
### Logs, Step Exports, and other observability
The total size of `console.log()` statements, [step exports](/docs/workflows/#step-exports), and the original event data sent to the workflow cannot exceed a combined size of {FUNCTION_PAYLOAD_LIMIT}. If you produce logs or step exports larger than this - for example, passing around large API responses, CSVs, or other data - you may encounter a **Function Payload Limit Exceeded** in your workflow.
This limit cannot be raised.
## Acceptable Use
We ask that you abide by our [Acceptable Use](https://pipedream.com/terms/#b-acceptable-use) policy. In short this means: don’t use Pipedream to break the law; don’t abuse the platform; and don’t use the platform to harm others.
# Workflow Development
Source: https://pipedream.com/docs/workflows/quickstart
Sign up for a [free Pipedream account](https://pipedream.com/auth/signup) (no credit card required) and complete this quickstart guide to learn the basic patterns for workflow development:
4. Set Up New repository connection:
* Configure the project’s GitHub repository to use `new_github_repo`.
5. Clone the new repository locally:
```bash
git clone new_github_repo_clone_url
cd new_github_repo
```
6. Link to the old repository:
```python
git remote add old_github_repo previous_github_repo_clone_url
git fetch --all
```
7. Prepare for migration:
* Create and switch to a new branch for migration:
```
git checkout -b migration
```
* Merge the main branch of `old_github_repo` into migration, allowing for unrelated histories:
```swift
git merge --allow-unrelated-histories old_github_repo/production
# Resolve any conflicts, such as in README.md
git commit
```
8. Finalize the migration:
* Optionally push the `migration` branch to the remote:
```python
git push --set-upstream origin migration
```
* Switch to the `production` branch and merge:
```
git checkout production
git merge --no-ff migration
git push
```
9. Cleanup:
* Remove the connection to the old repository:
```csharp
git remote remove old_github_repo
```
* Optionally, you may now safely delete `previous_github_repo` from GitHub.
### How does the `production` branch work?
Anything merged to the `production` branch will be deployed to your production workflows on Pipedream.
From a design perspective, we want to let you manage any branching strategy on your end, since you may be making commits to the repo outside of Pipedream. Once we support managing Pipedream workflows in a monorepo, where you may have other changes, we wanted to use a branch that didn’t conflict with a conventional main branch (like `main` or `master`).
In the future, we also plan to support you changing the default branch name.
# Limits
Source: https://pipedream.com/docs/workflows/limits
export const MAX_WORKFLOW_EXECUTION_LIMIT = '750';
export const FREE_INSPECTOR_EVENT_LIMIT = '7 days of events';
export const TMP_SIZE_LIMIT = '2GB';
export const FUNCTION_PAYLOAD_LIMIT = '6MB';
export const INSPECTOR_EVENT_EXPIRY_DAYS = '365';
export const DAILY_TESTING_LIMIT = '30 minutes';
export const EMAIL_PAYLOAD_SIZE_LIMIT = '30MB';
export const MEMORY_ABSOLUTE_LIMIT = '10GB';
export const MEMORY_LIMIT = '256MB';
export const PAYLOAD_SIZE_LIMIT = '512KB';
Pipedream imposes limits on source and workflow execution, the events you send to Pipedream, and other properties. You’ll receive an error if you encounter these limits. See our [troubleshooting guide](/docs/troubleshooting/) for more information on these specific errors.
Some of these limits apply only on the free tier. For example, Pipedream limits the number of credits and active workflows you can use on the free tier. **On paid tiers, you can run an unlimited number of credits for any amount of execution time (usage charges apply)**.
Other limits apply across the free and paid tiers. Please see the details on each limit below.
**These limits are subject to change at any time**.
## Number of Workflows
The limit of active workflows depends on your current plan. [See our pricing page](https://pipedream.com/pricing) for more details.
## Number of Event Sources
**You can run an unlimited number of event sources**, as long as each operates under the limits below.
## Execution Credits
Free Pipedream account have a limit on the number of execution credits. Paid plans are not capped but are subject to additional usage charges (you can manually set a usage cap if you want to manage costs).\
\
You can view your credits usage at the bottom-left of [the Pipedream UI](https://pipedream.com).
You can also see more detailed usage in [Billing and Usage Settings](https://pipedream.com/settings/billing). Here you’ll find your usage for the last 30 days, broken out by day, by resource (e.g. your source / workflow).
### Included Credits Usage Notifications
| Tier | Notifications |
| ---------- | ------------------------------------------------------------------------------------------------------------------------------------------------------------- |
| Free tiers | You’ll receive an email when you reach 100% of your usage. |
| Paid tiers | You’ll receive an email at 80% and 100% of your [included credits](/docs/pricing/#included-credits) for your [billing period](/docs/pricing/#billing-period). |
## Daily workflow testing limit
You **do not** use credits testing workflows, but workspaces on the **Free** plan are limited to {MAX_WORKFLOW_EXECUTION_LIMIT} of test runtime per day. If you exceed this limit when testing in the builder, you’ll see a **Runtime Quota Exceeded** error.
## Data stores
Depending on your plan, Pipedream sets limits on:
1. The total number of data stores
2. The total number of keys across all data stores
3. The total storage used across all data stores
You’ll find your workspace’s limits in the **Data Stores** section of usage dashboard in the bottom-left of [the Pipedream UI](https://pipedream.com).
## HTTP Triggers
The following limits apply to [HTTP triggers](/docs/workflows/building-workflows/triggers/#http).
### HTTP Request Body Size
By default, the body of HTTP requests sent to a source or workflow is limited to {PAYLOAD_SIZE_LIMIT}.
Your endpoint will issue a `413 Payload Too Large` status code when the body of your request exceeds {PAYLOAD_SIZE_LIMIT}.
**Pipedream supports two different ways to bypass this limit**. Both of these interfaces support uploading data up to `5TB`, though you may encounter other platform limits.
* You can send large HTTP payloads by passing the `pipedream_upload_body=1` query string or an `x-pd-upload-body: 1` HTTP header in your HTTP request. [Read more here](/docs/workflows/building-workflows/triggers/#sending-large-payloads).
* You can upload multiple large files, like images and videos, using the [large file upload interface](/docs/workflows/building-workflows/triggers/#large-file-support).
### QPS (Queries Per Second)
Generally the rate of HTTP requests sent to an endpoint is quantified by QPS, or *queries per second*. A query refers to an HTTP request.
**You can send an average of 10 requests per second to your HTTP trigger**. Any requests that exceed that threshold may trigger rate limiting. If you’re rate limited, we’ll return a `429 Too Many Requests` response. If you control the application sending requests, you should retry the request with [exponential backoff](https://cloud.google.com/storage/docs/exponential-backoff) or a similar technique.
We’ll also accept short bursts of traffic, as long as you remain close to an average of 10 QPS (e.g. sending a batch of 50 requests every 30 seconds should not trigger rate limiting).
**This limit can be raised for paying customers**. To request an increase, [reach out to our Support team](https://pipedream.com/support/) with the HTTP endpoint whose QPS you’d like to increase, with the new, desired limit.
## Email Triggers
Currently, most of the [limits that apply to HTTP triggers](/docs/workflows/limits/#http-triggers) also apply to [email triggers](/docs/workflows/building-workflows/triggers/#email).
The only limit that differs between email and HTTP triggers is the payload size: the total size of an email sent to a workflow - its body, headers, and attachments - is limited to {EMAIL_PAYLOAD_SIZE_LIMIT}.
## Memory
By default, workflows run with {MEMORY_LIMIT} of memory. You can modify a workflow’s memory [in your workflow’s Settings](/docs/workflows/building-workflows/settings/#memory), up to {MEMORY_ABSOLUTE_LIMIT}.
Increasing your workflow’s memory gives you a proportional increase in CPU. If your workflow is limited by memory or compute, increasing your workflow’s memory can reduce its overall runtime and make it more performant.
**Pipedream charges credits proportional to your memory configuration**. [Read more here](/docs/pricing/faq/#how-does-workflow-memory-affect-credits).
## Disk
Your code, or a third party library, may need access to disk during the execution of your workflow or event source. **You have access to {TMP_SIZE_LIMIT} of disk in the `/tmp` directory**.
This limit cannot be raised.
## Workflows
### Time per execution
Every event sent to a workflow triggers a new execution of that workflow. Workflows have a default execution limit that varies with the trigger type:
* HTTP and Email-triggered workflows default to **30 seconds** per execution.
* Cron-triggered workflows default to **60 seconds** per execution.
If your code exceeds your workflow-level limit, we’ll throw a **Timeout** error and stop your workflow. Any partial logs and observability associated with code cells that ran successfully before the timeout will be attached to the event in the UI, so you can examine the state of your workflow and troubleshoot where it may have failed.
You can increase the timeout limit, up to a max value set by your plan:
| Tier | Maximum time per execution |
| ---------- | -------------------------- |
| Free tiers | 300 seconds (5 min) |
| Paid tiers | 750 seconds (12.5 min) |
Events that trigger a **Timeout** error will appear in red in the [Inspector](/docs/workflows/building-workflows/inspect/). You’ll see the timeout error, also in red, in the cell at which the code timed out.
### Event History
The [Inspector](/docs/workflows/building-workflows/inspect/#the-inspector) shows the execution history for a given workflow. Events have a limited retention period, depending on your plan:
| Tier | Events retained per workflow |
| ---------- | -------------------------------------------------------------------------------- |
| Free tiers | {FREE_INSPECTOR_EVENT_LIMIT} |
| Paid tiers | [View breakdown of events history per paid plan](https://pipedream.com/pricing/) |
The execution details for a specific event also expires after {INSPECTOR_EVENT_EXPIRY_DAYS} days.
### Logs, Step Exports, and other observability
The total size of `console.log()` statements, [step exports](/docs/workflows/#step-exports), and the original event data sent to the workflow cannot exceed a combined size of {FUNCTION_PAYLOAD_LIMIT}. If you produce logs or step exports larger than this - for example, passing around large API responses, CSVs, or other data - you may encounter a **Function Payload Limit Exceeded** in your workflow.
This limit cannot be raised.
## Acceptable Use
We ask that you abide by our [Acceptable Use](https://pipedream.com/terms/#b-acceptable-use) policy. In short this means: don’t use Pipedream to break the law; don’t abuse the platform; and don’t use the platform to harm others.
# Workflow Development
Source: https://pipedream.com/docs/workflows/quickstart
Sign up for a [free Pipedream account](https://pipedream.com/auth/signup) (no credit card required) and complete this quickstart guide to learn the basic patterns for workflow development:
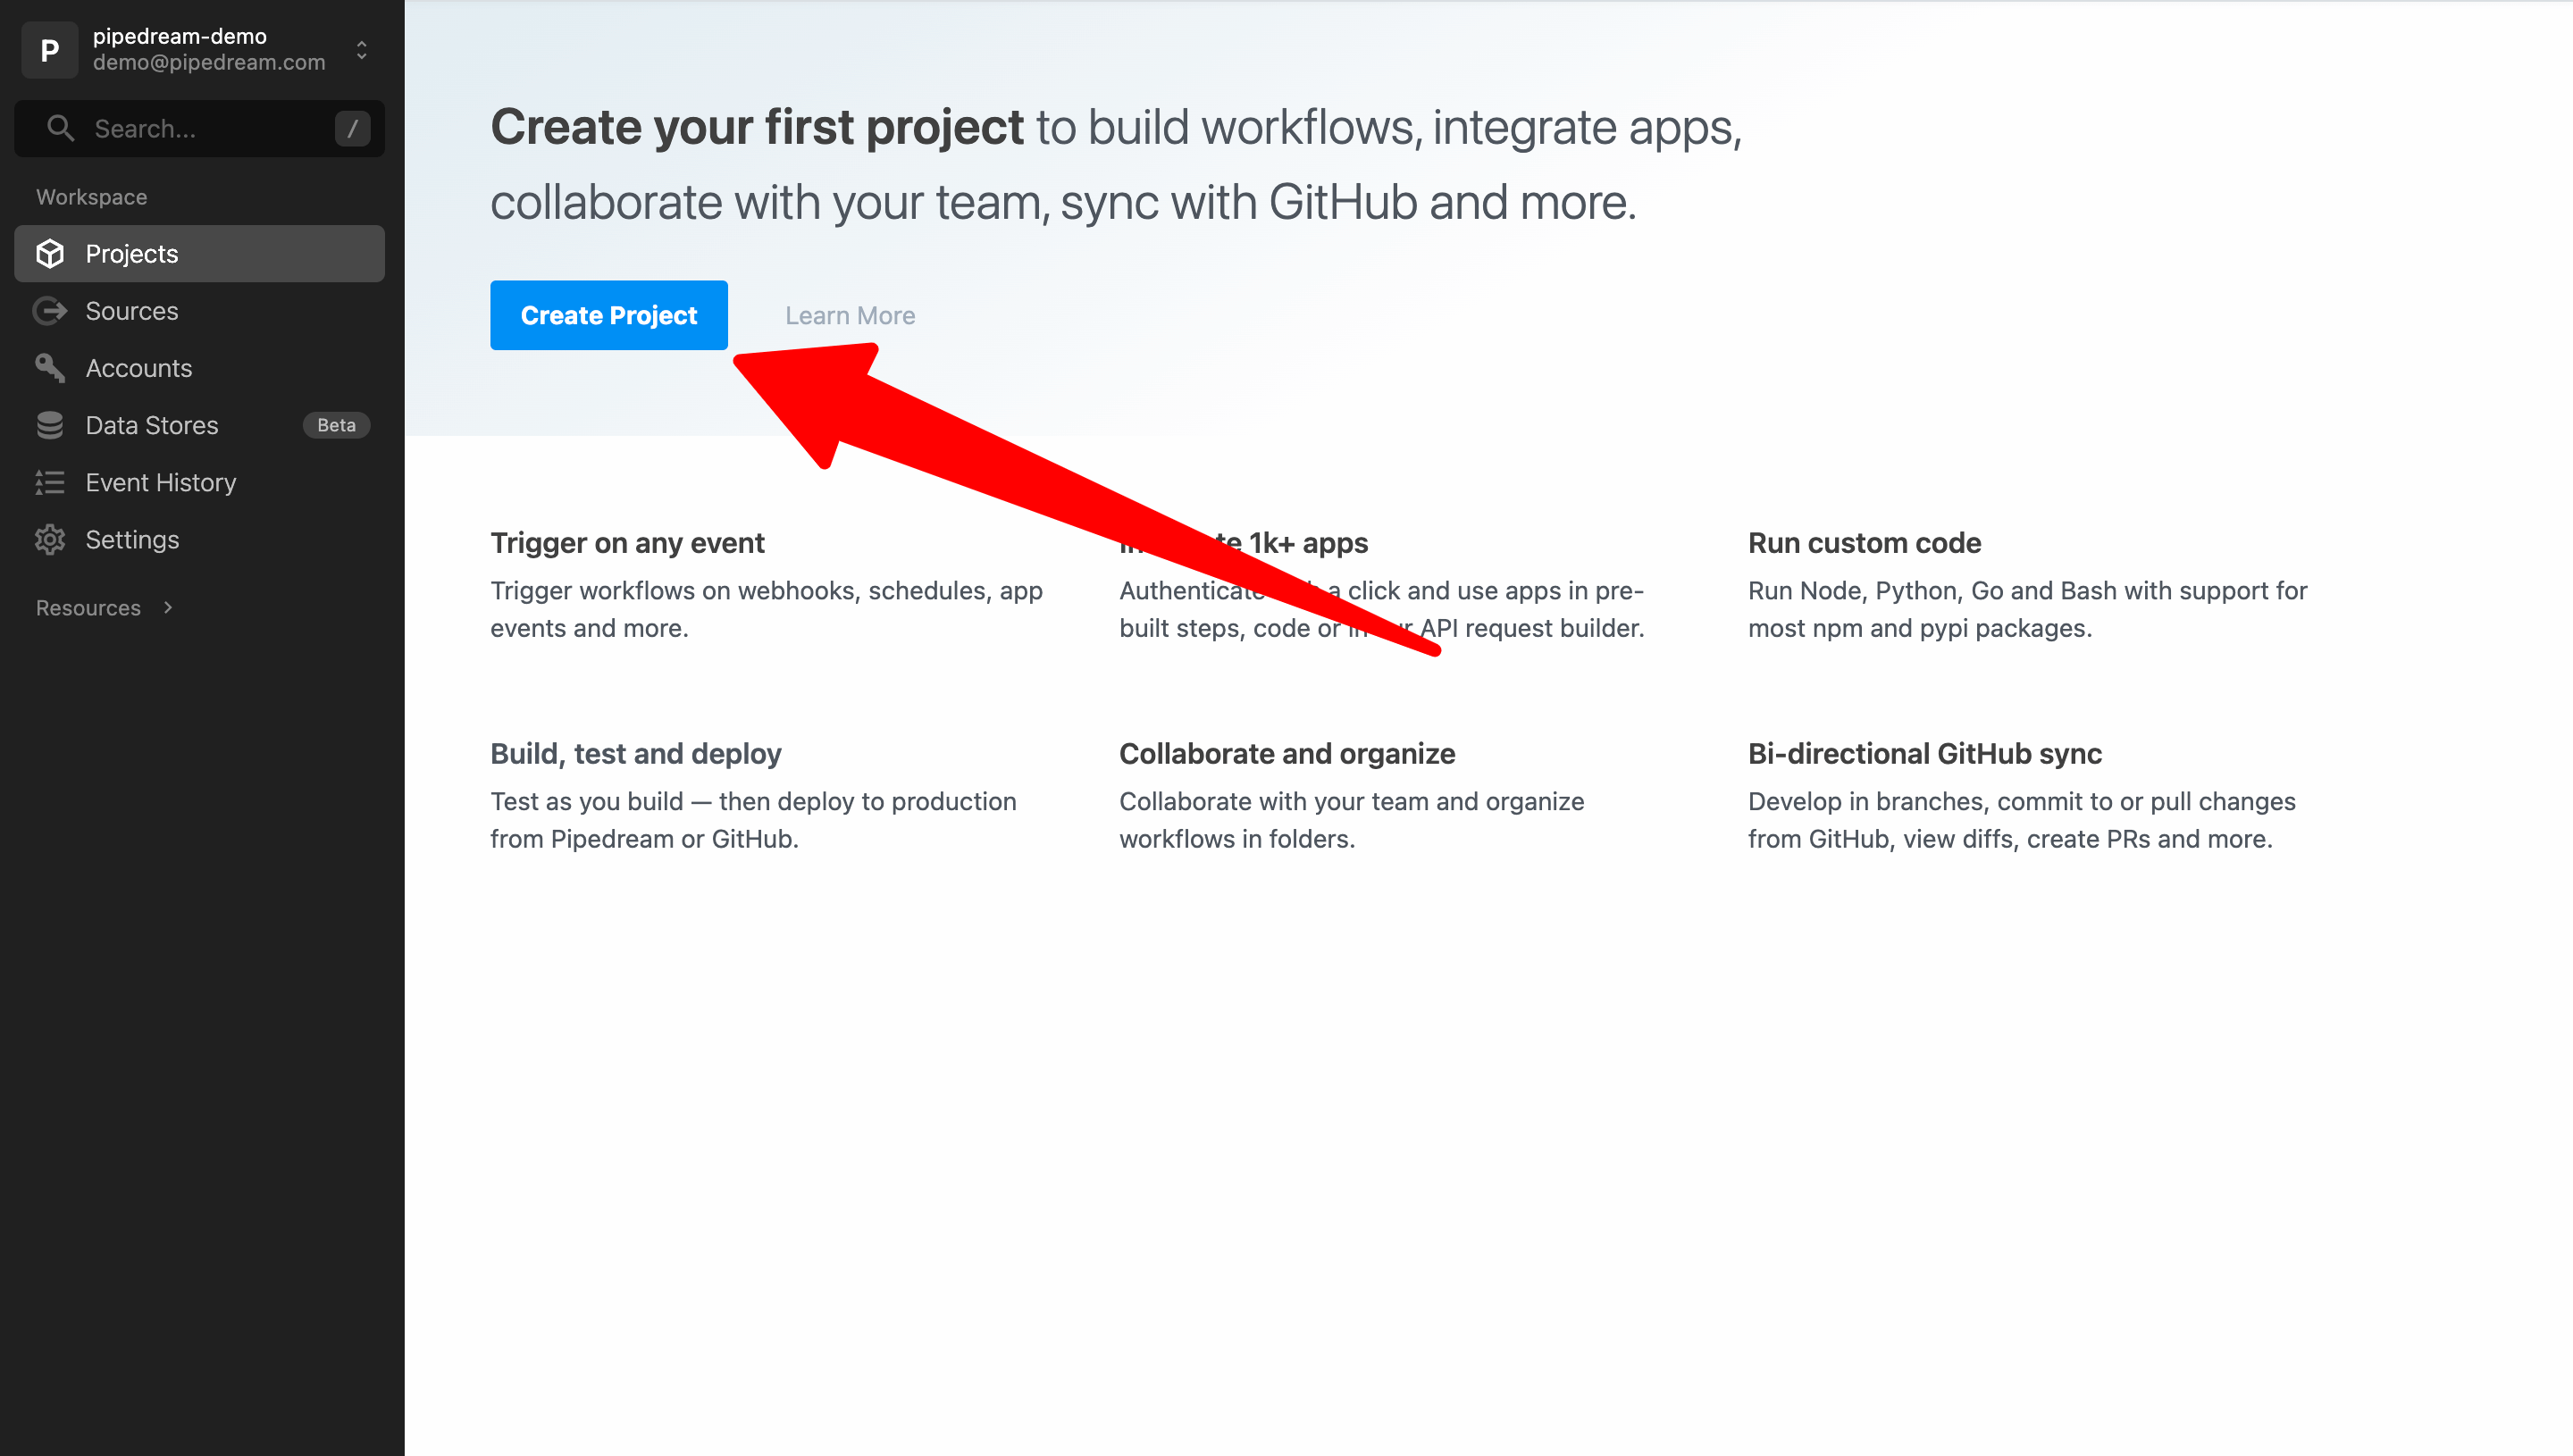 Next, enter a project name and click **Create Project**. For this example, we’ll name our project **Getting Started**. You may also click the icon to the right to generate a random project name.

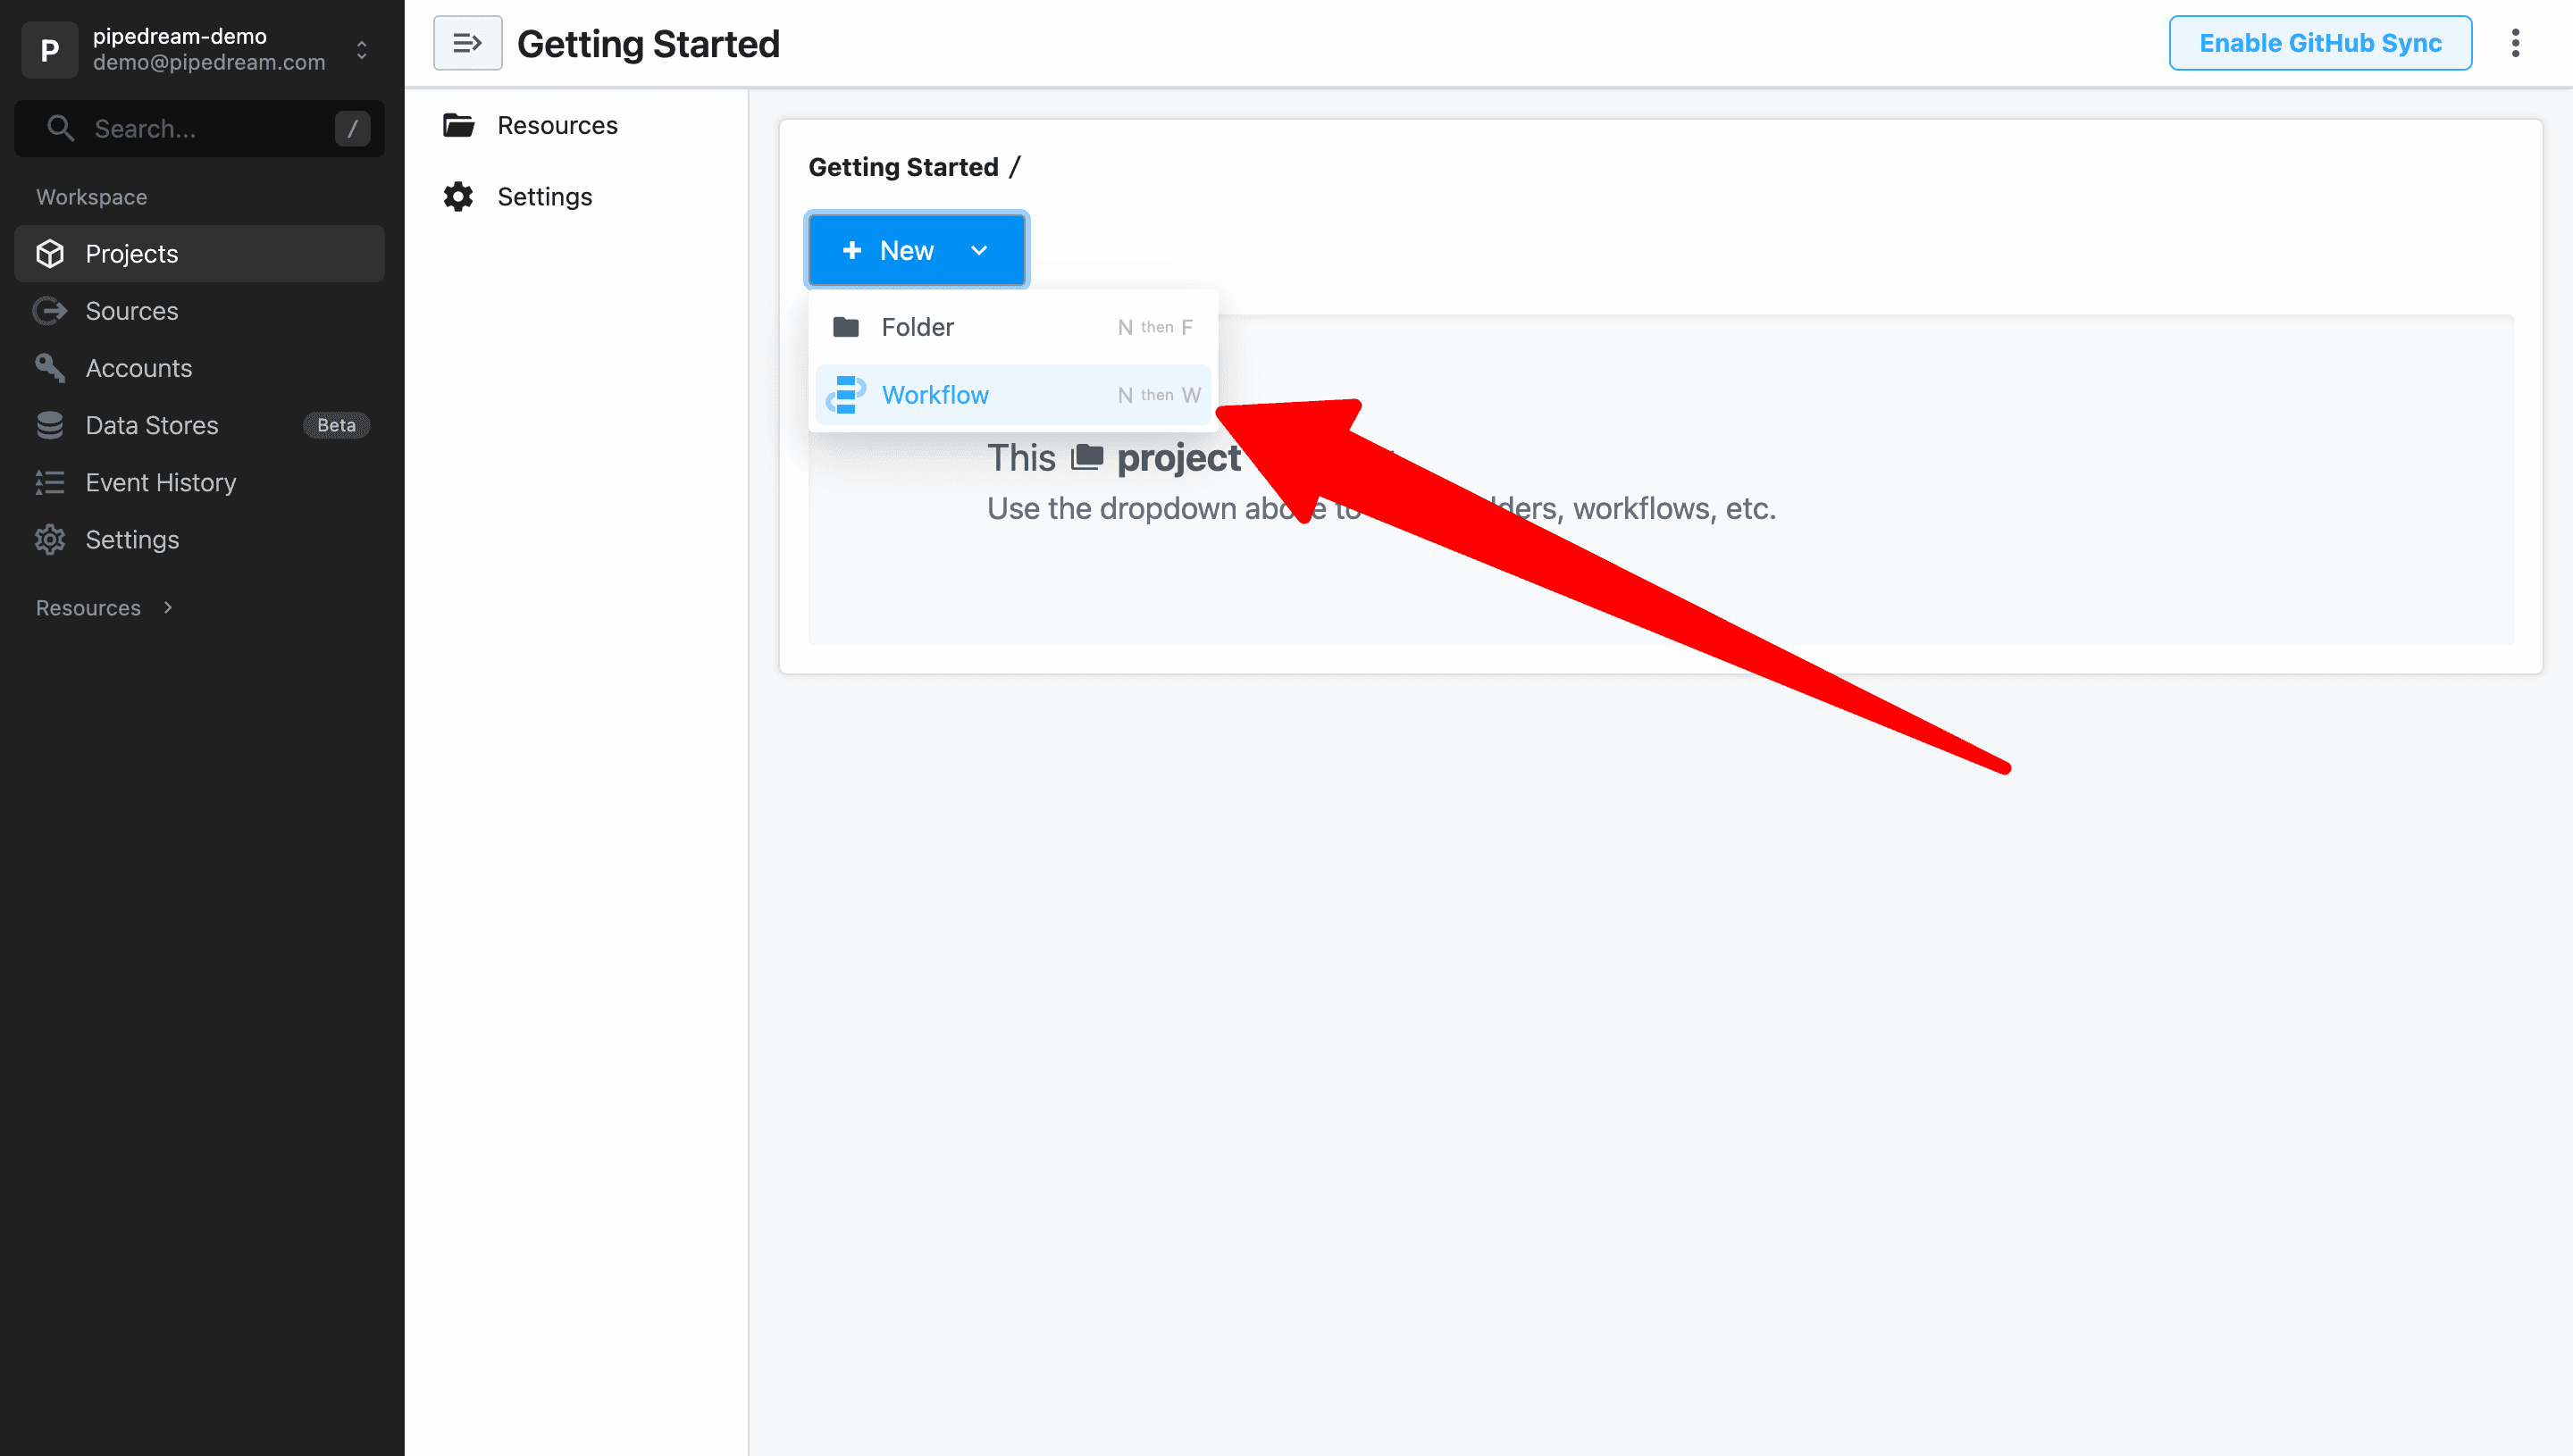 Name the workflow and click **Create Workflow** to use the default settings. For this example, we’ll name the workflow **Pipedream Quickstart**.
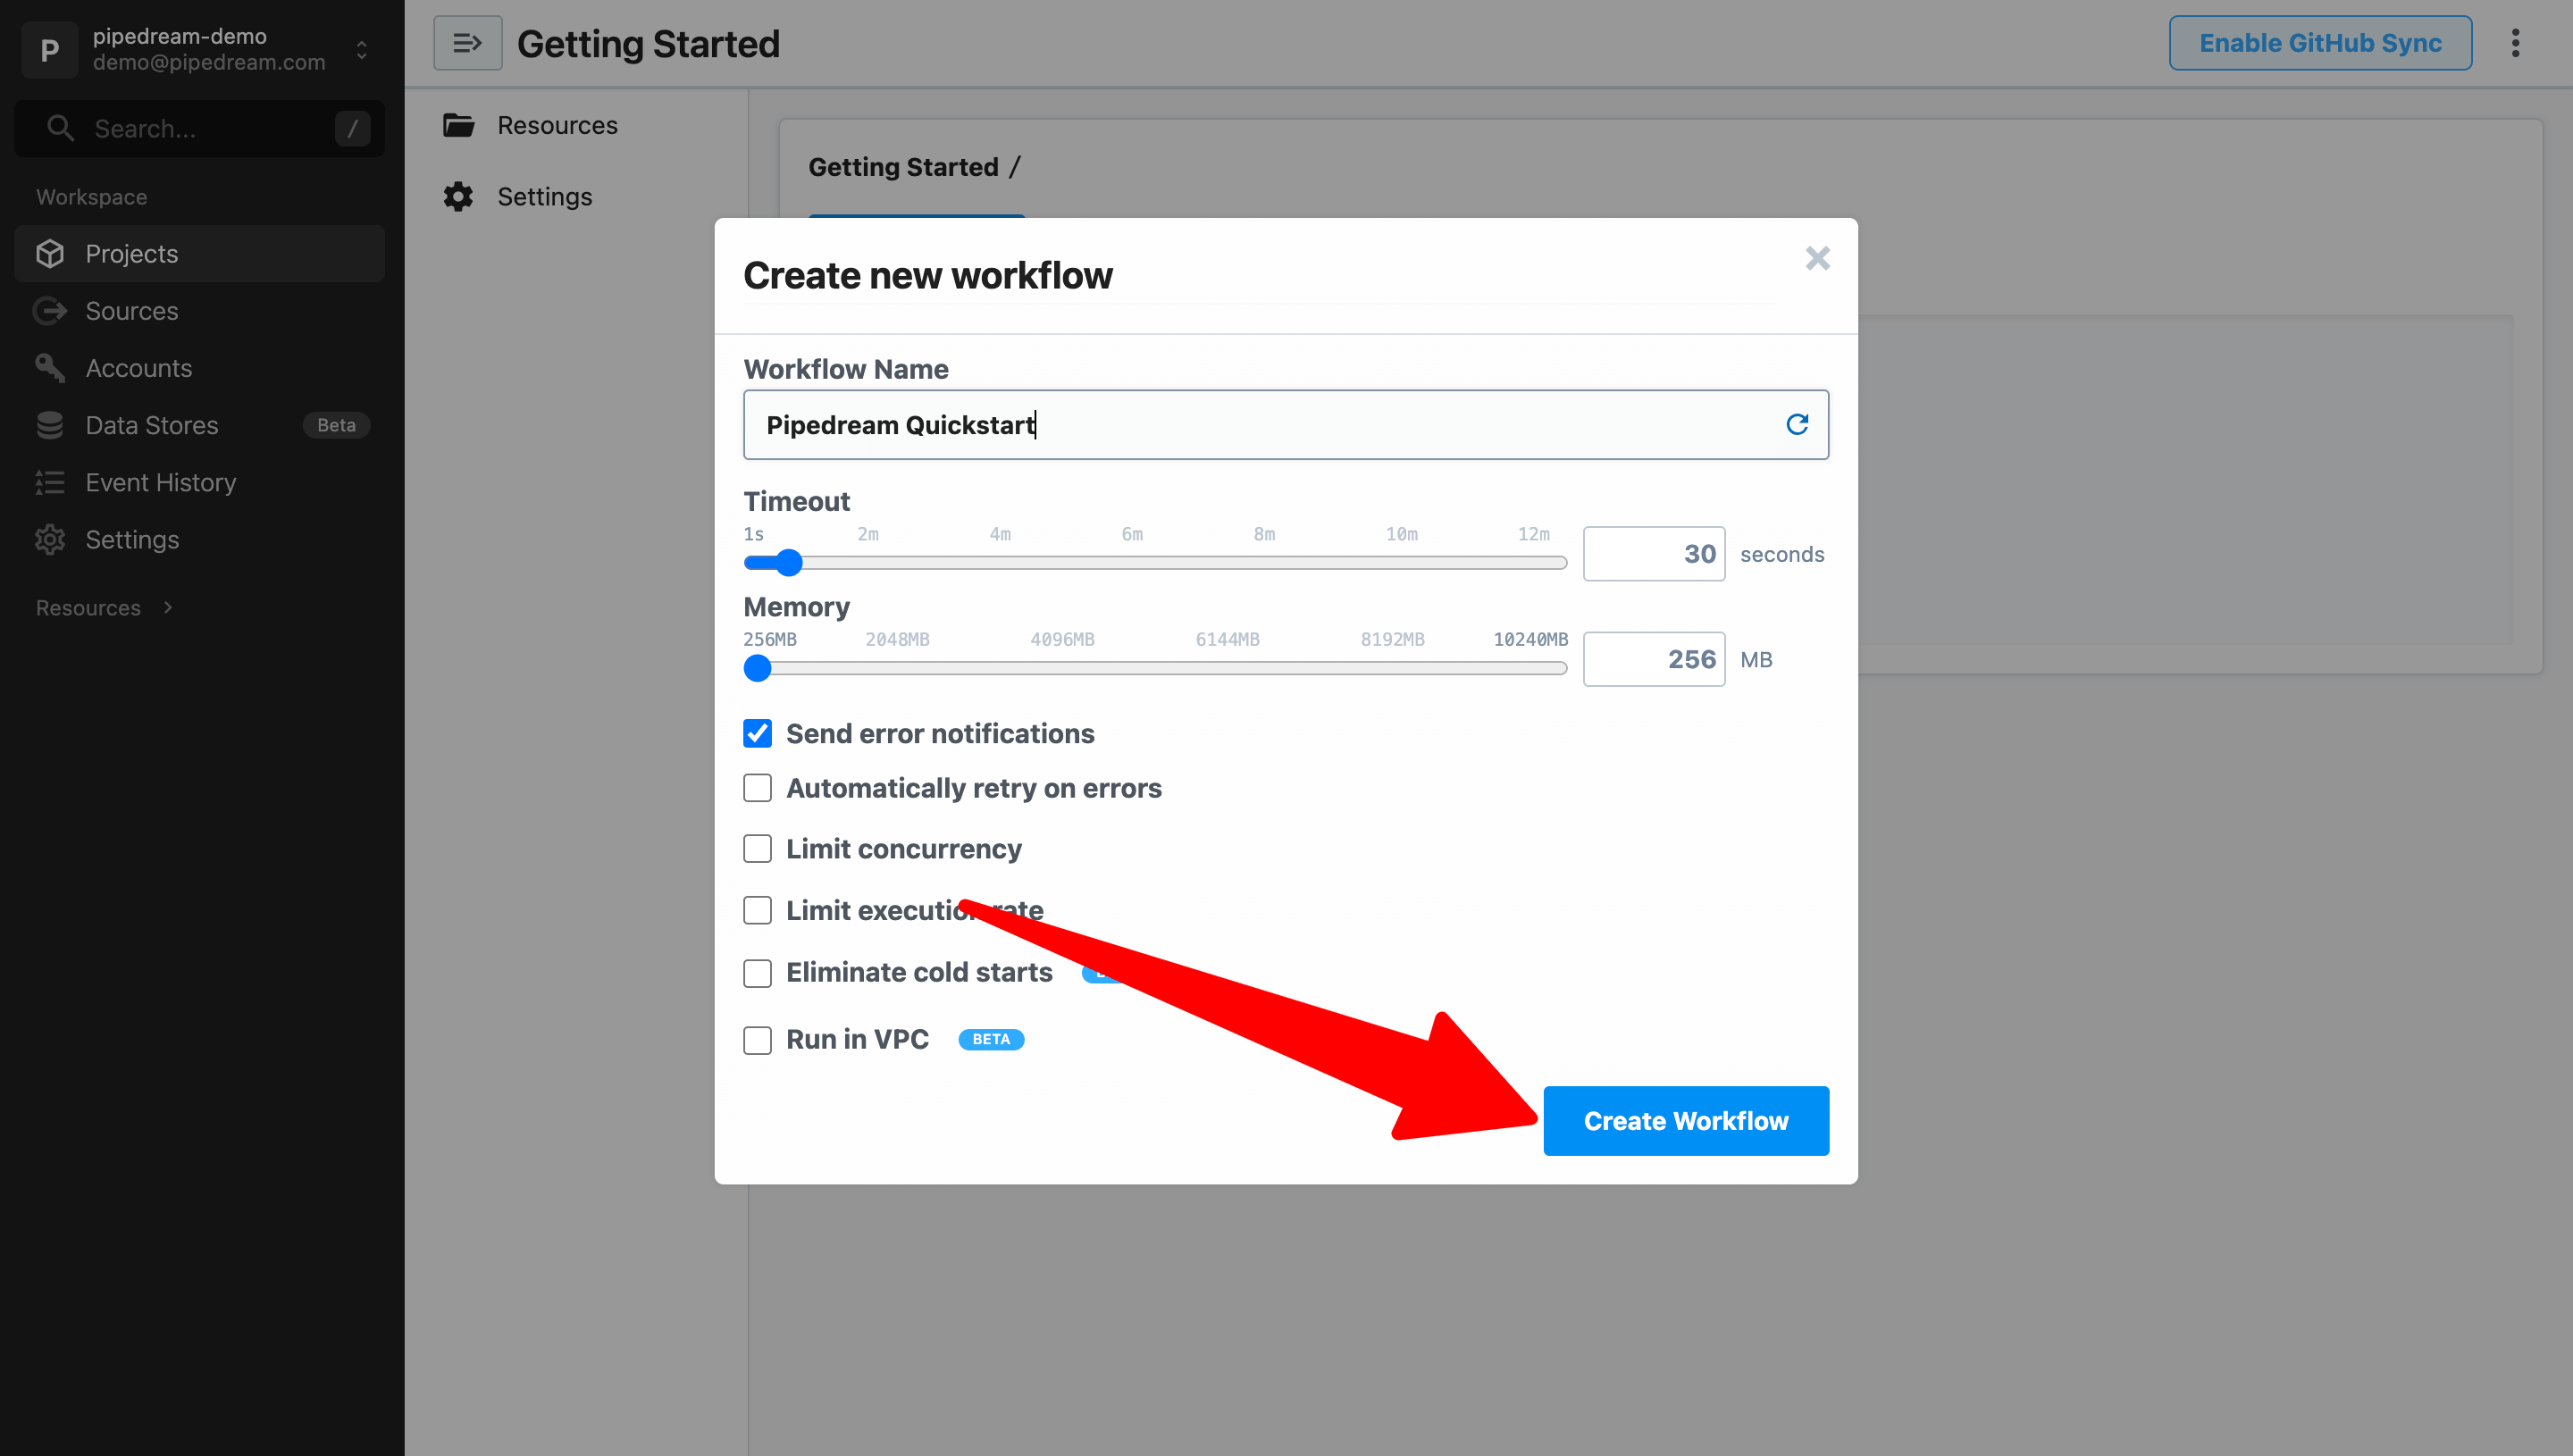
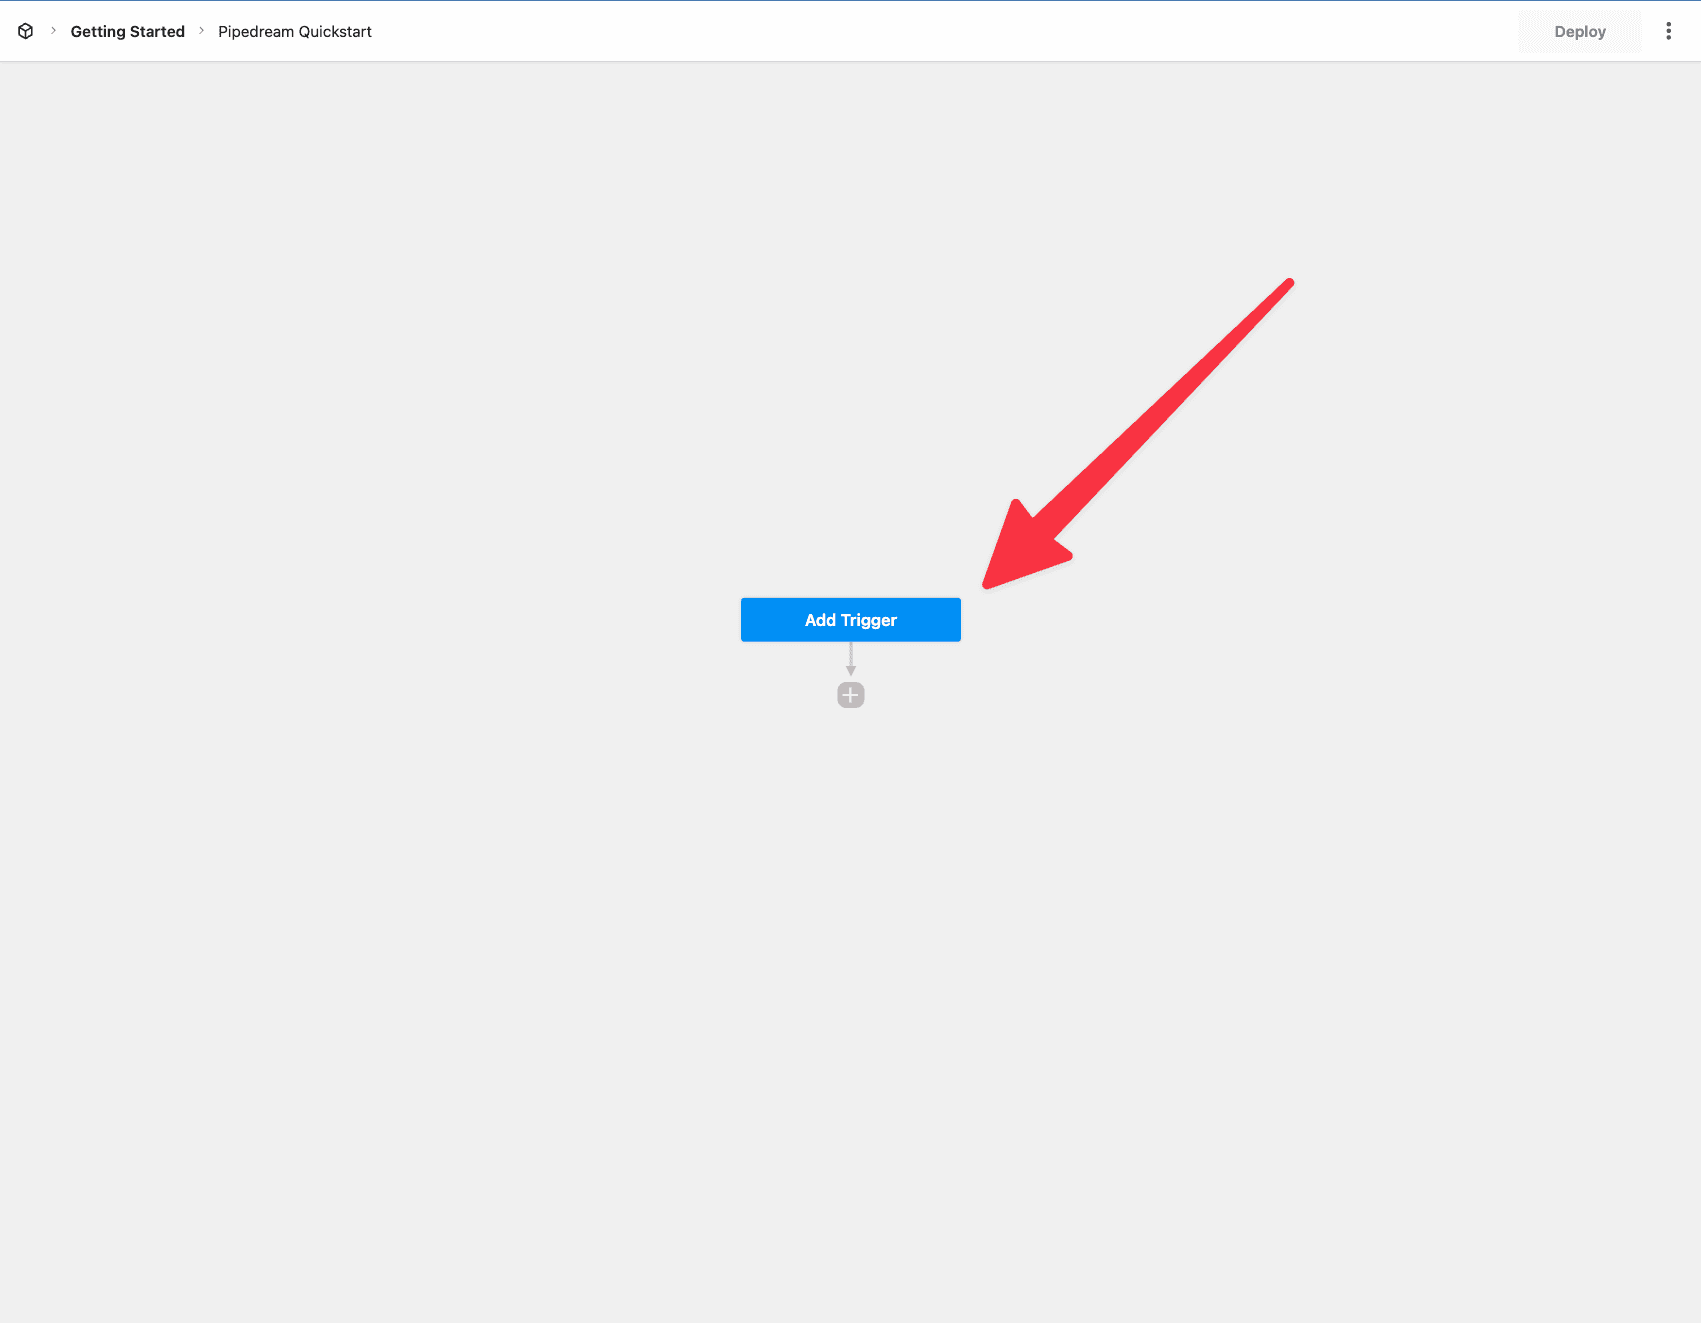 Clicking the trigger opens a new menu to select the trigger. For this example, select **New HTTP / Webhook Requests**.
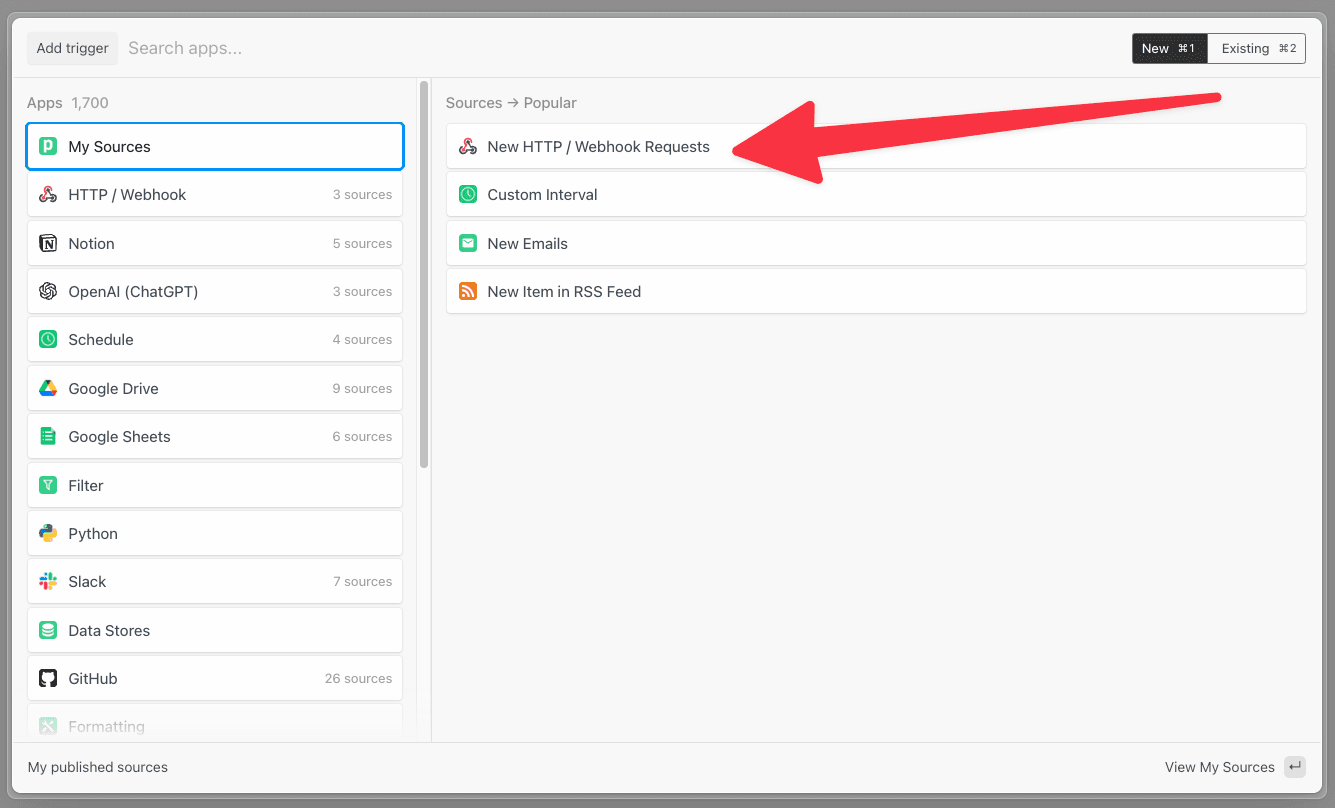 Click **Save and continue** in the step editor on the right to accept the default settings.
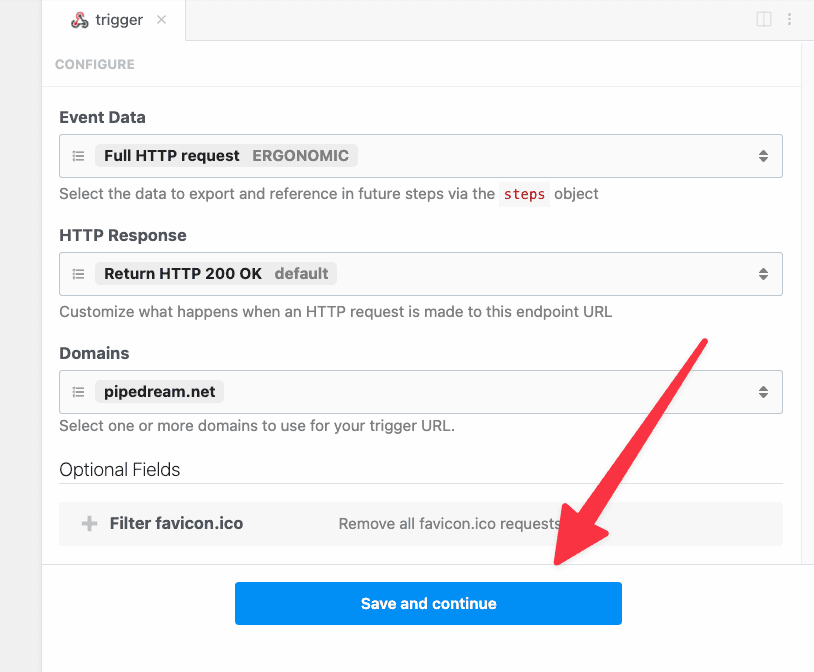 Pipedream will generate a unique URL to trigger this workflow. Once your workflow is deployed, your workflow will run on every request to this URL.
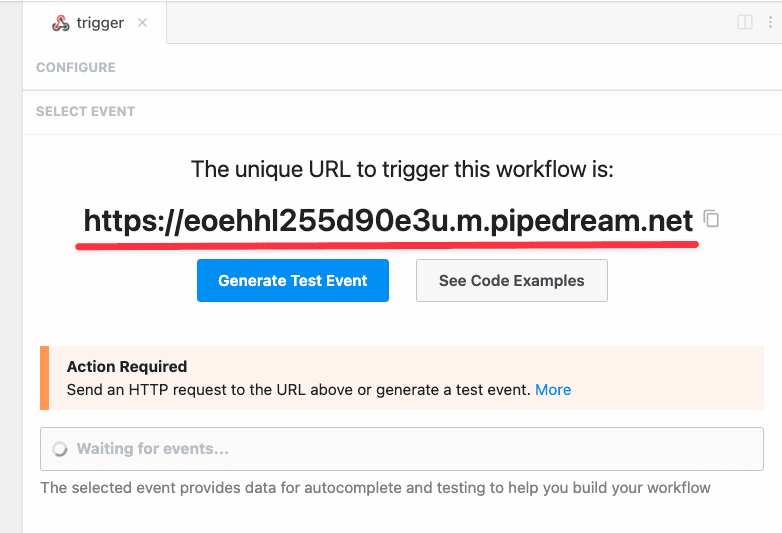
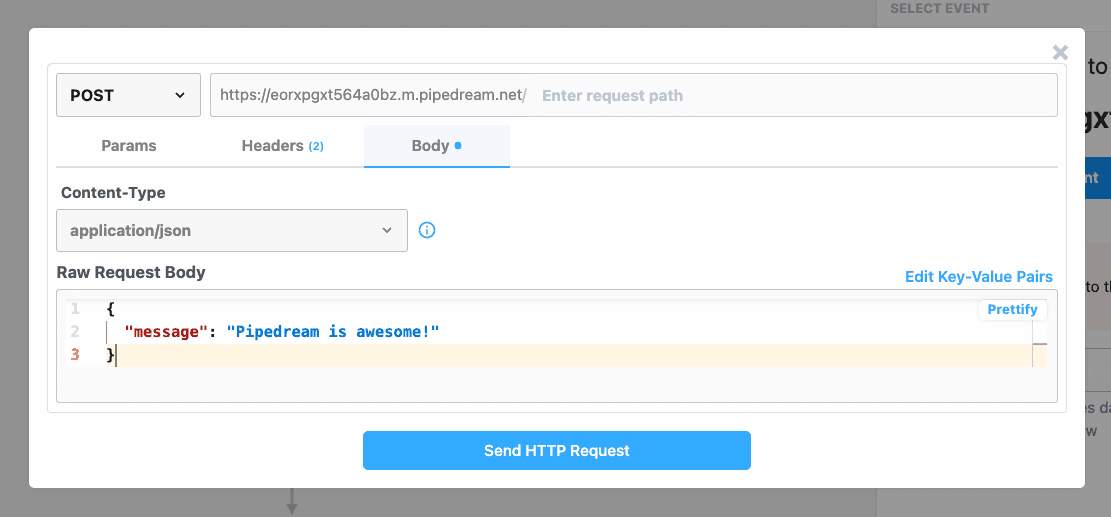 Pipedream will automatically select and display the contents of the selected event. Validate that the `message` was received as part the event `body`.
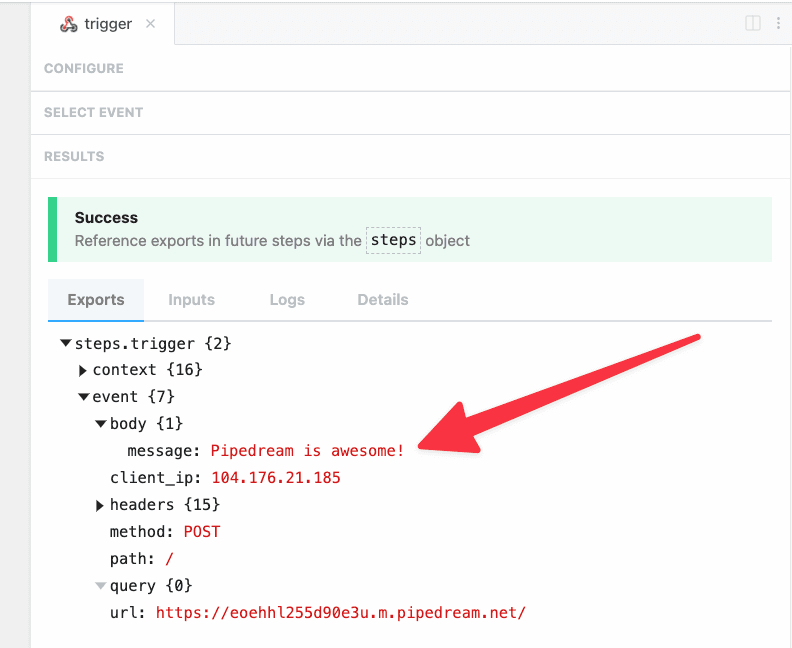
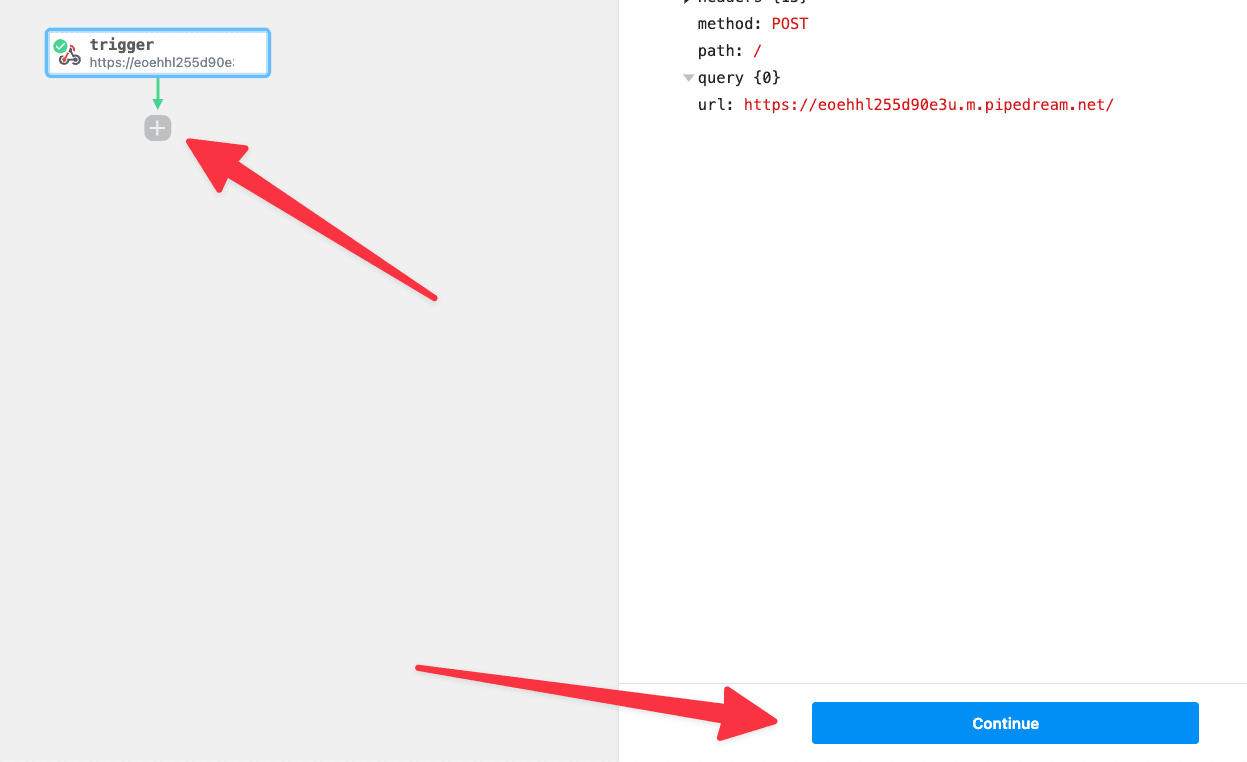 That will open the **Add a step** menu. Select **Run custom code**.
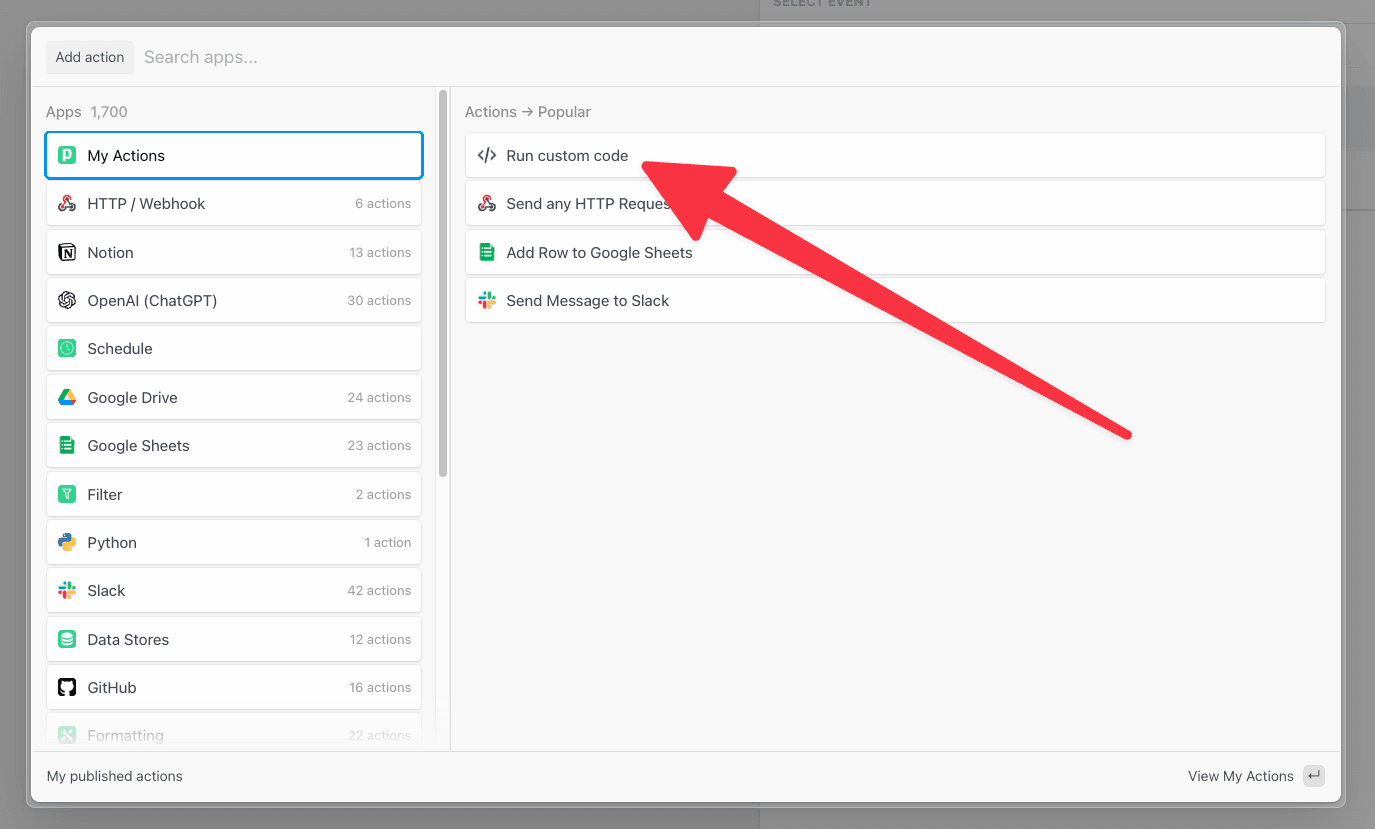 Pipedream will add a Node.js code step to the workflow.
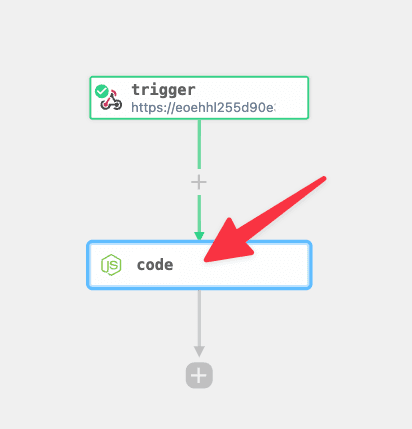 Rename the step to **sentiment**.
 Next, add the following code to the code step:
```javascript
import Sentiment from "sentiment"
export default defineComponent({
async run({ steps, $ }) {
let sentiment = new Sentiment()
return sentiment.analyze(steps.trigger.event.body.message)
},
})
```
This code imports the npm package, passes the message we sent to our trigger to the `analyze()` function by referencing `steps.trigger.event.body.message` and then returns the result.
Next, add the following code to the code step:
```javascript
import Sentiment from "sentiment"
export default defineComponent({
async run({ steps, $ }) {
let sentiment = new Sentiment()
return sentiment.analyze(steps.trigger.event.body.message)
},
})
```
This code imports the npm package, passes the message we sent to our trigger to the `analyze()` function by referencing `steps.trigger.event.body.message` and then returns the result.
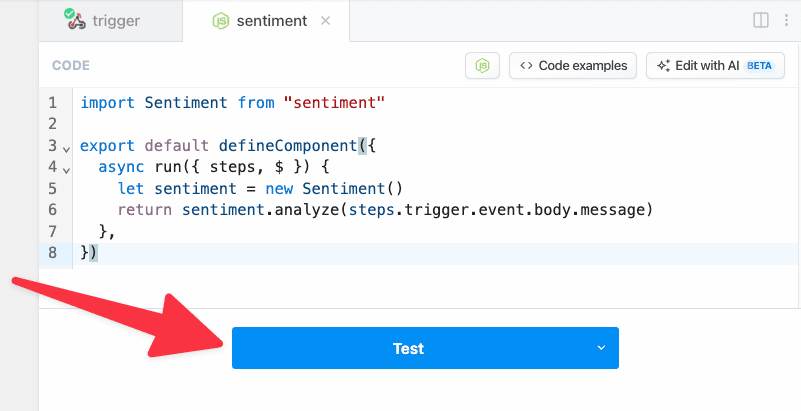 You should see the results of the sentiment analysis when the test is complete.
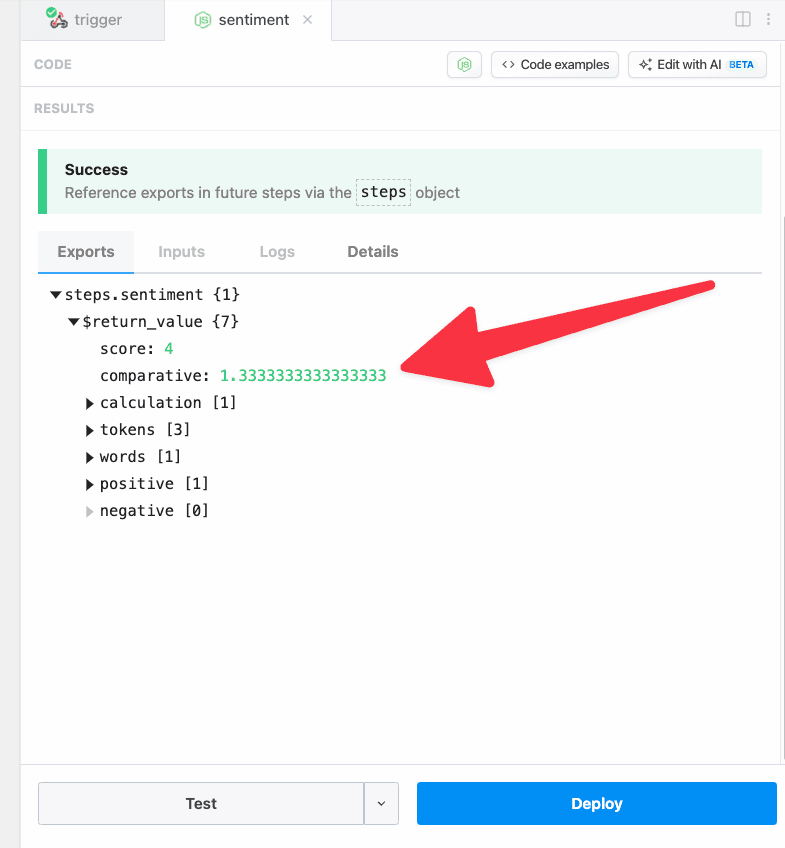
 Next, let’s add a step to the workflow to send the data to Google Sheets. First, click **+** after the `sentiment` code step and select the **Google Sheets** app.
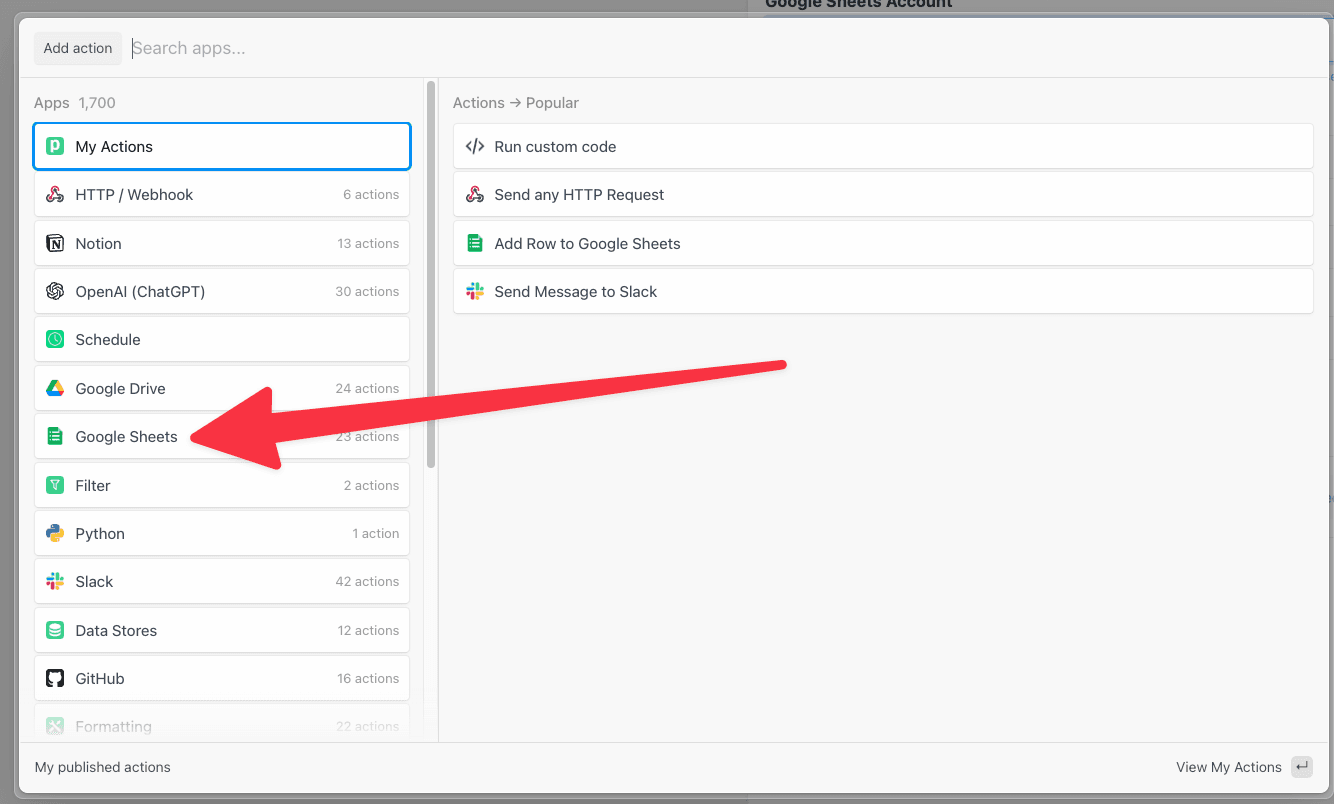 Then select the **Add Single Row** action.
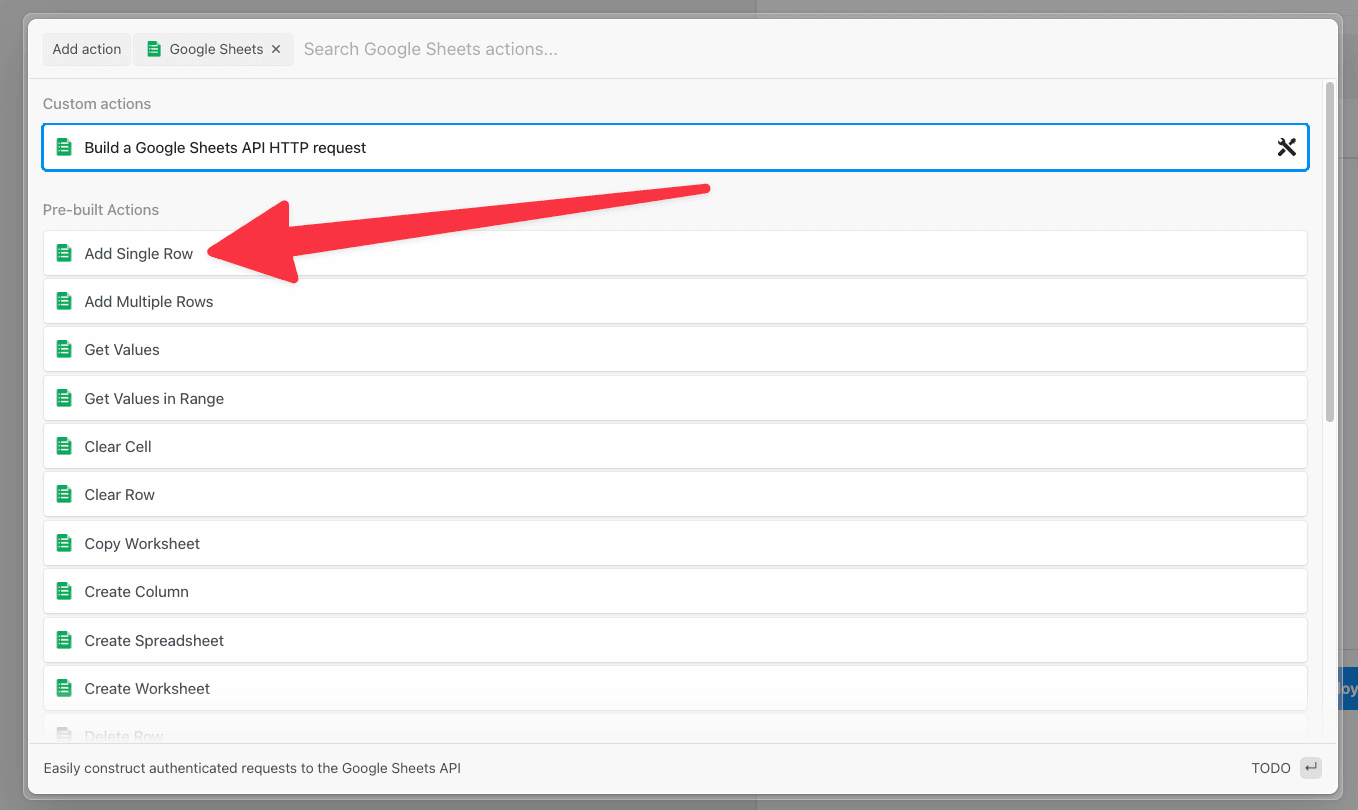 Click to connect you Google Sheets account to Pipedream (or select it from the dropdown if you previously connected an account).
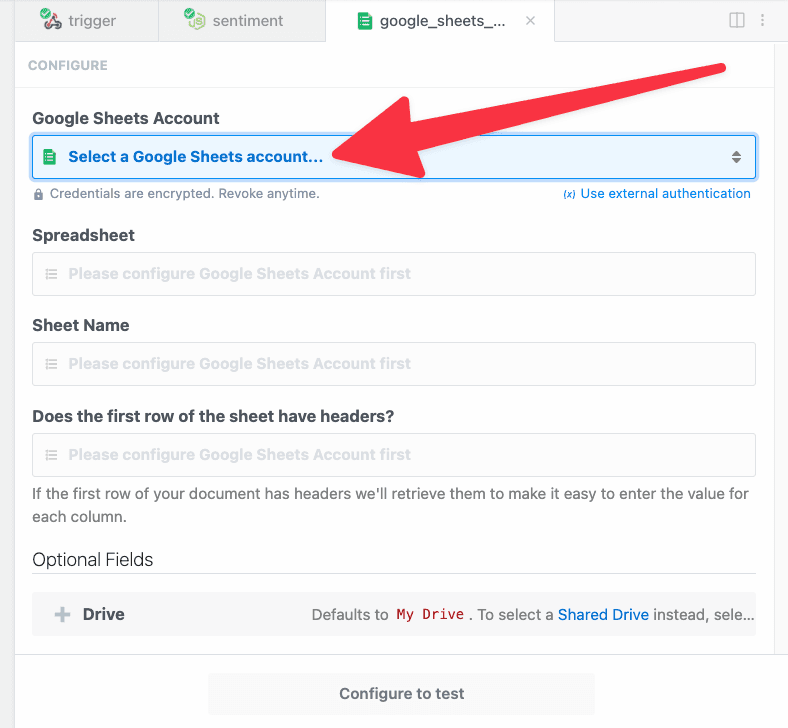 Pipedream will open Google’s sign in flow in a new window. Sign in with the account you want to connect.
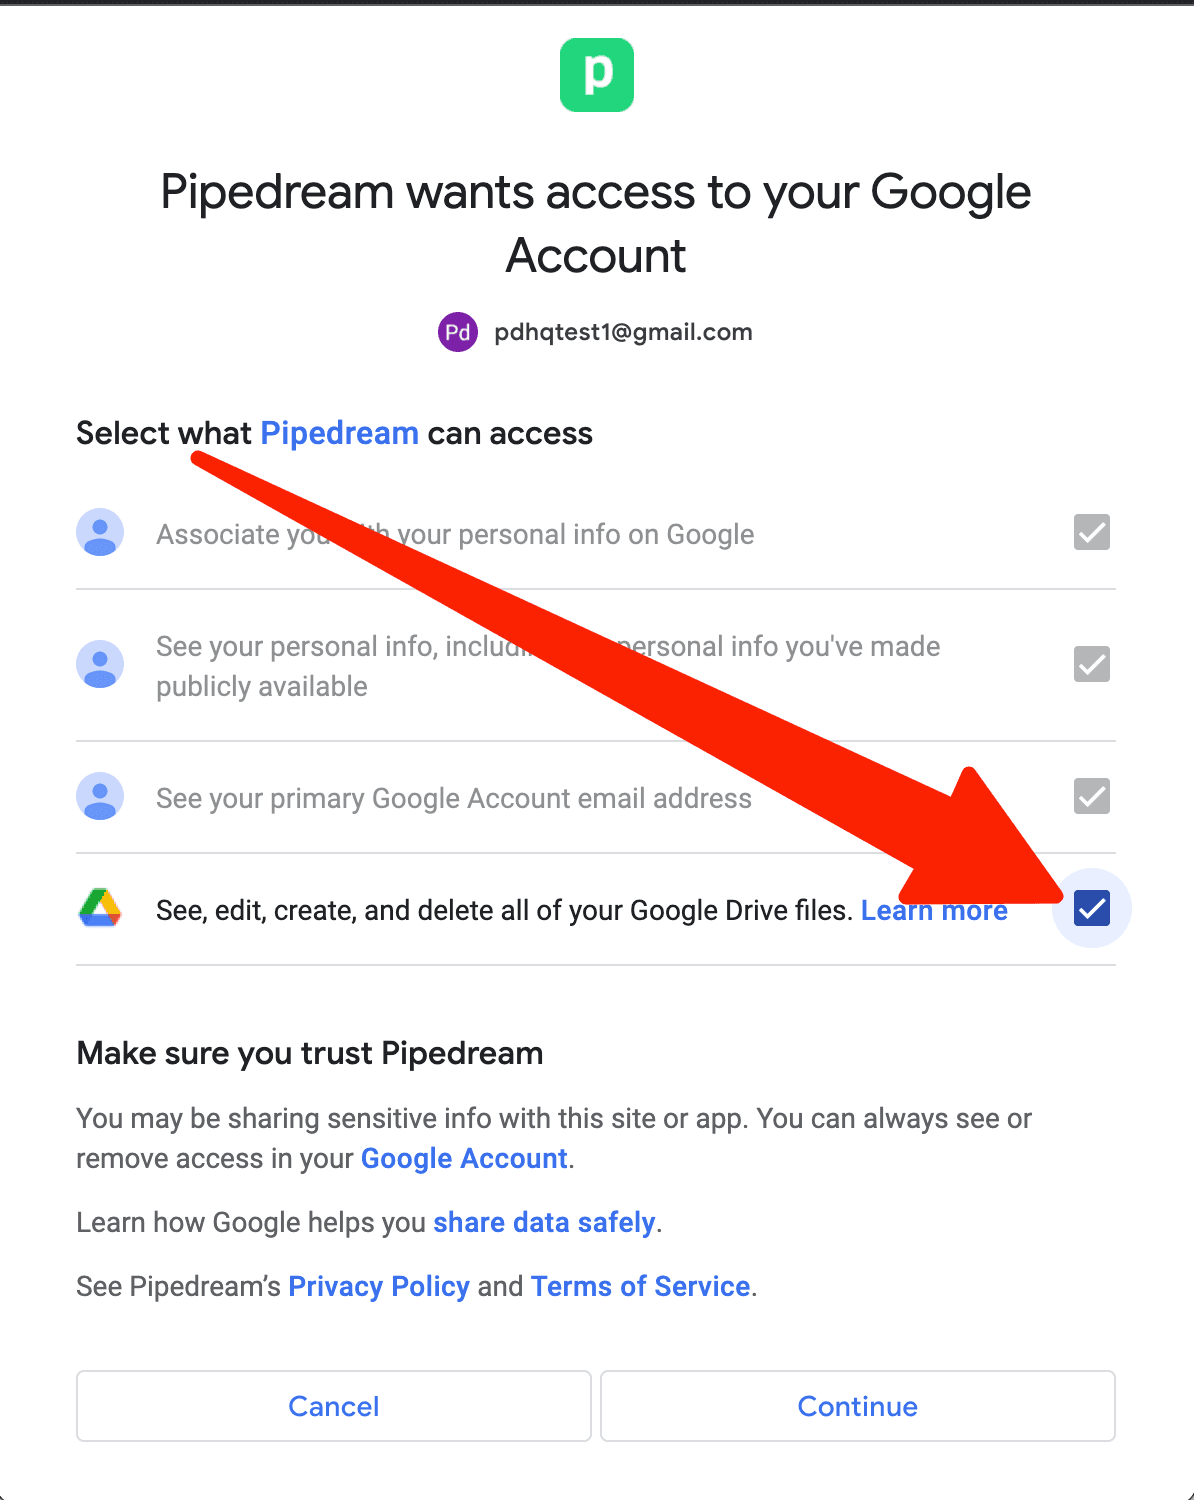 Learn more about Pipedream’s [privacy and security policy](/docs/privacy-and-security/).
When you complete connecting your Google account, the window should close and you should return to Pipedream. Your connected account should automatically be selected. Next, select your spreadsheet from the dropdown menu:
Learn more about Pipedream’s [privacy and security policy](/docs/privacy-and-security/).
When you complete connecting your Google account, the window should close and you should return to Pipedream. Your connected account should automatically be selected. Next, select your spreadsheet from the dropdown menu:
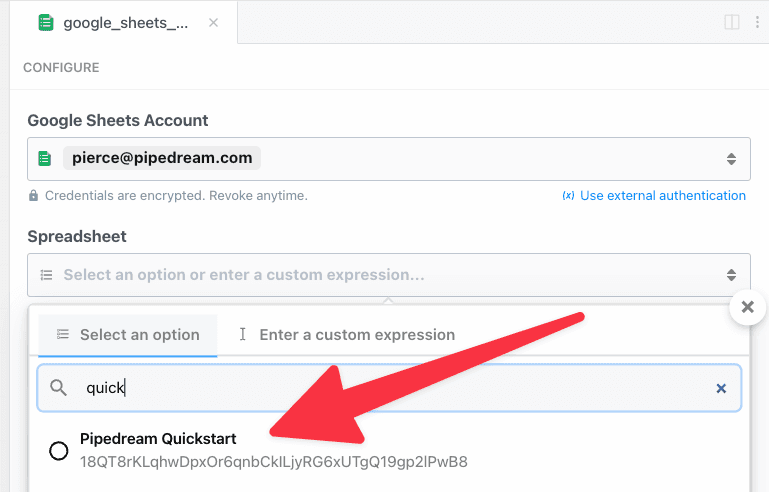 Then select the sheet name (the default sheet name in Google Sheets is **Sheet1**):
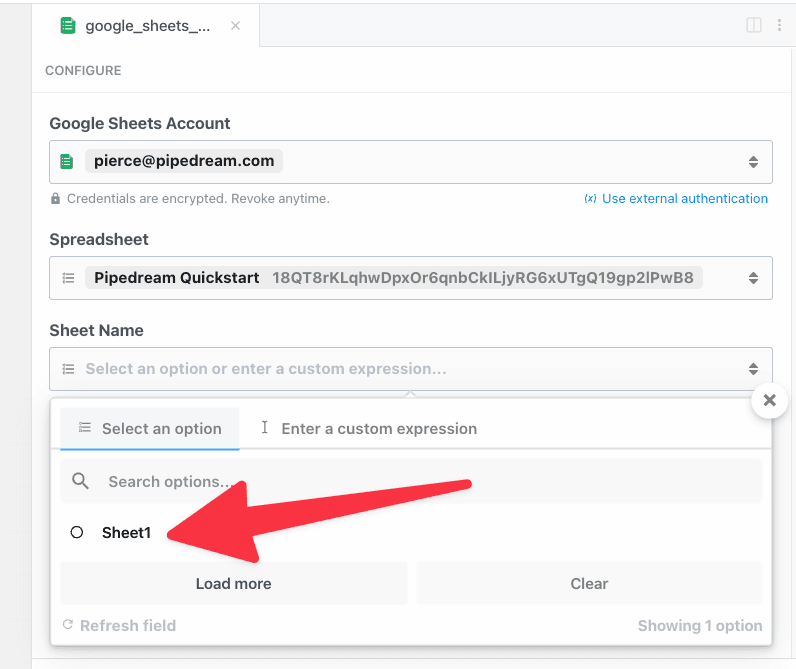 Next, select if the spreadsheet has headers in the first row. When a header row exists, Pipedream will automatically retrieve the header labels to make it easy to enter data (if not, you can manually construct an array of values). Since the sheet for this example contains headers, select **Yes**.
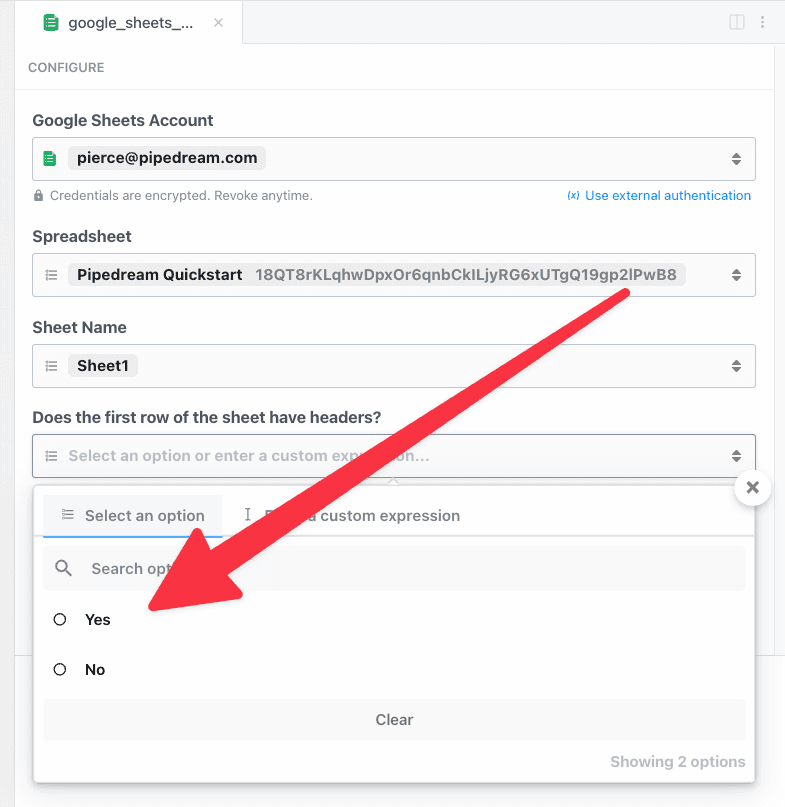 Pipedream will retrieve the headers and generate a form to enter data in your sheet:
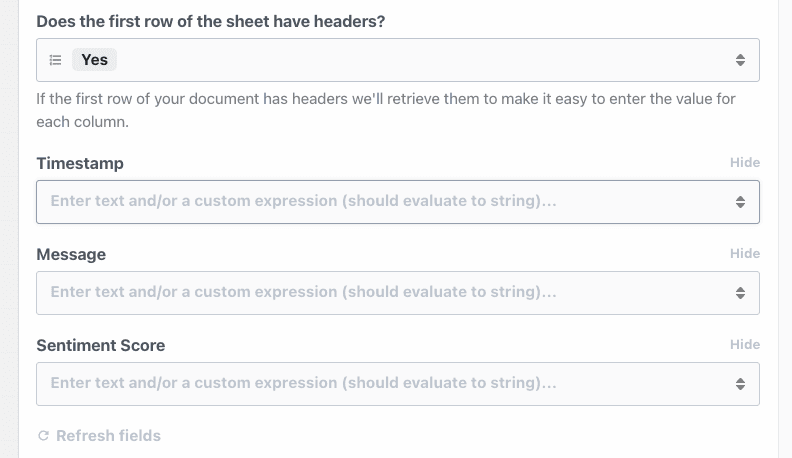 First, let’s use the object explorer to pass the timestamp for the workflow event as the value for the first column. This data can be found in the context object on the trigger.
When you click into the **Timestamp** field, Pipedream will display an object explorer to make it easy to find data. Scroll or search to find the `ts` key under `steps.trigger.context`.
First, let’s use the object explorer to pass the timestamp for the workflow event as the value for the first column. This data can be found in the context object on the trigger.
When you click into the **Timestamp** field, Pipedream will display an object explorer to make it easy to find data. Scroll or search to find the `ts` key under `steps.trigger.context`.
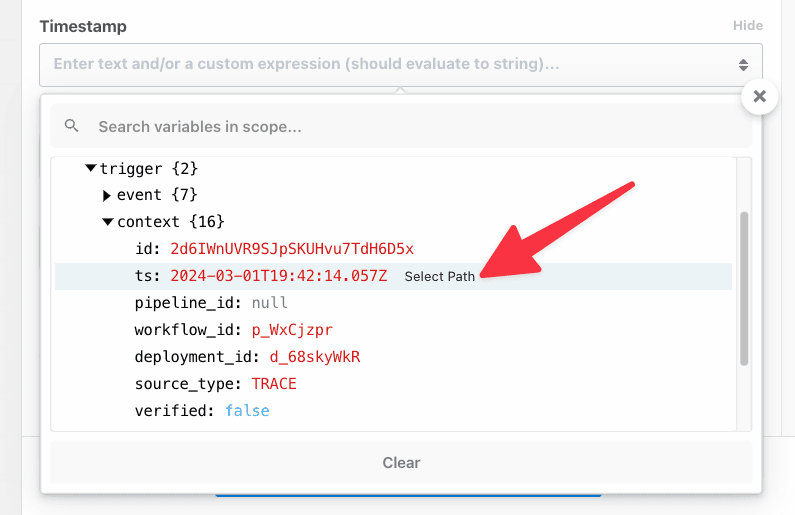 Click **select path** to insert a reference to `steps.trigger.context.ts`:
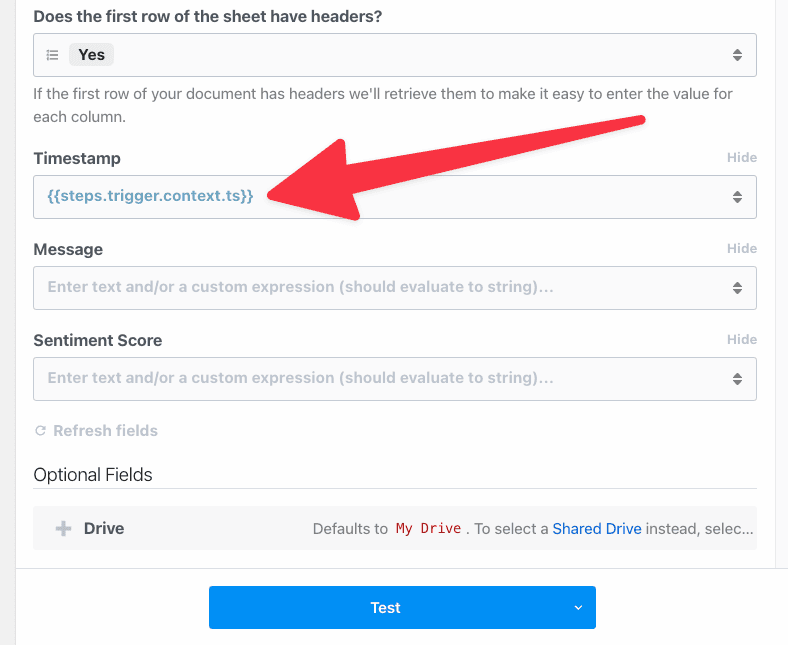 Next, let’s use autocomplete to enter a value for the **Message** column. First, add double braces `{{` — Pipedream will automatically add the closing braces `}}`.
Then, type `steps.trigger.event.body.message` between the pairs of braces. Pipedream will provide autocomplete suggestions as you type. Press **Tab** to use a suggestion and then click `.` to get suggestions for the next key. The final value in the **Message** field should be `steps.trigger.event.body.message`.
Next, let’s use autocomplete to enter a value for the **Message** column. First, add double braces `{{` — Pipedream will automatically add the closing braces `}}`.
Then, type `steps.trigger.event.body.message` between the pairs of braces. Pipedream will provide autocomplete suggestions as you type. Press **Tab** to use a suggestion and then click `.` to get suggestions for the next key. The final value in the **Message** field should be `steps.trigger.event.body.message`.
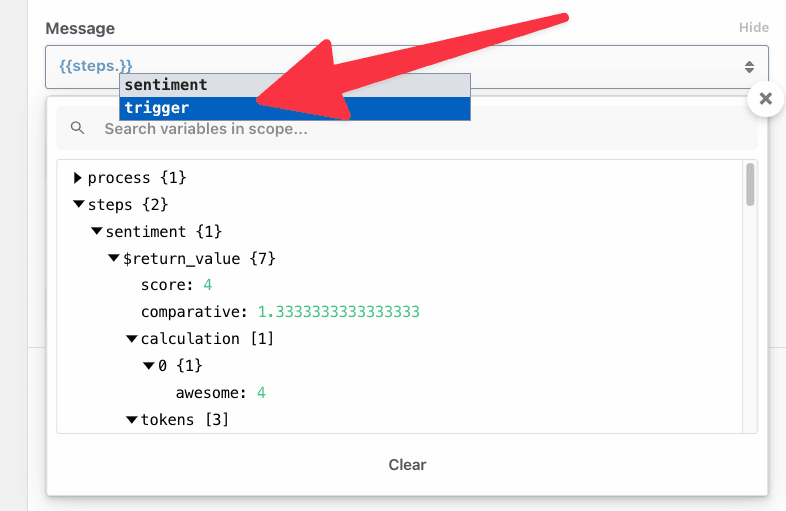 Finally, let’s copy a reference from a previous step. Click on the `sentiment` step to open the results in the editor:
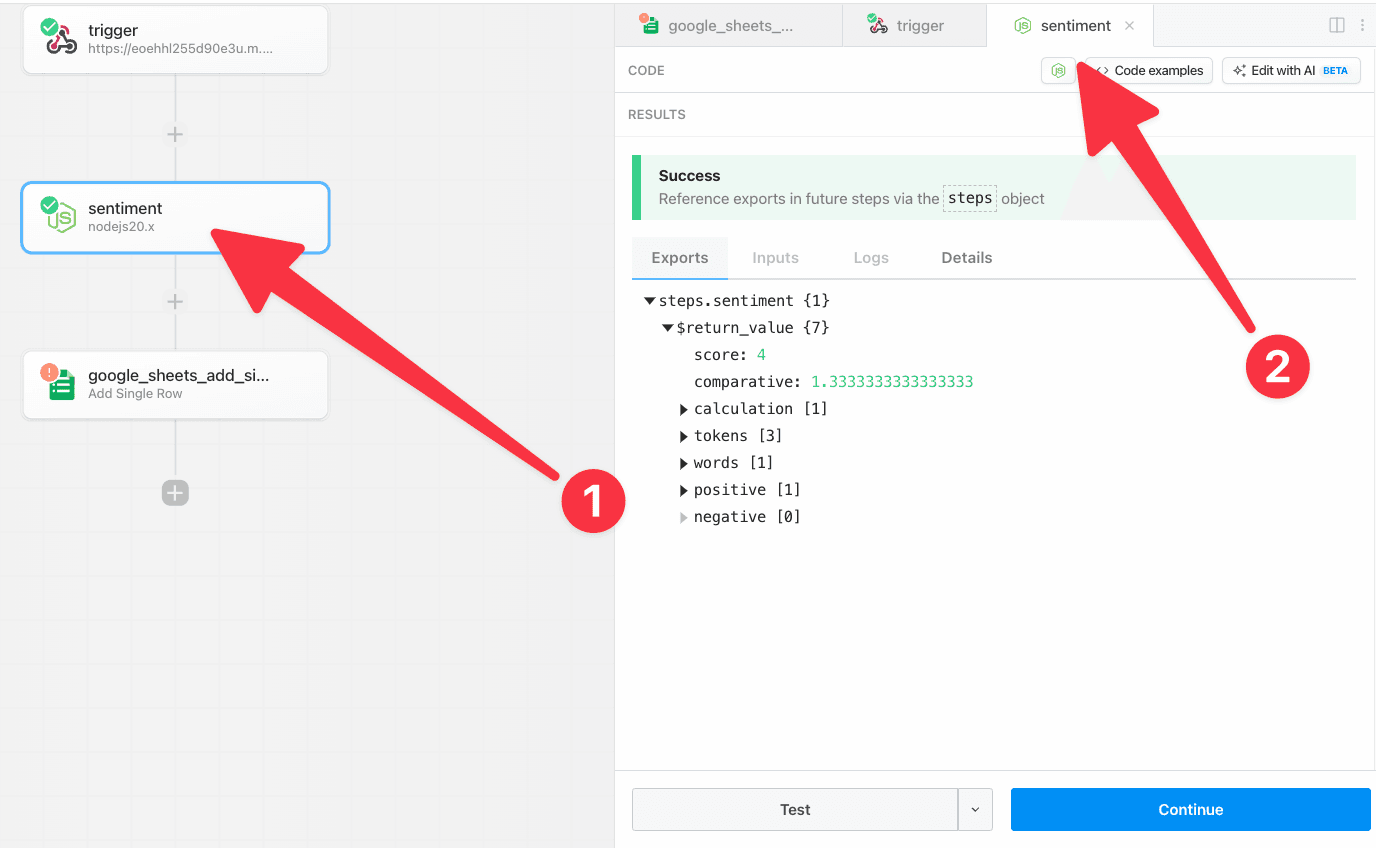 Next, click the **Copy Path** link next to the score.
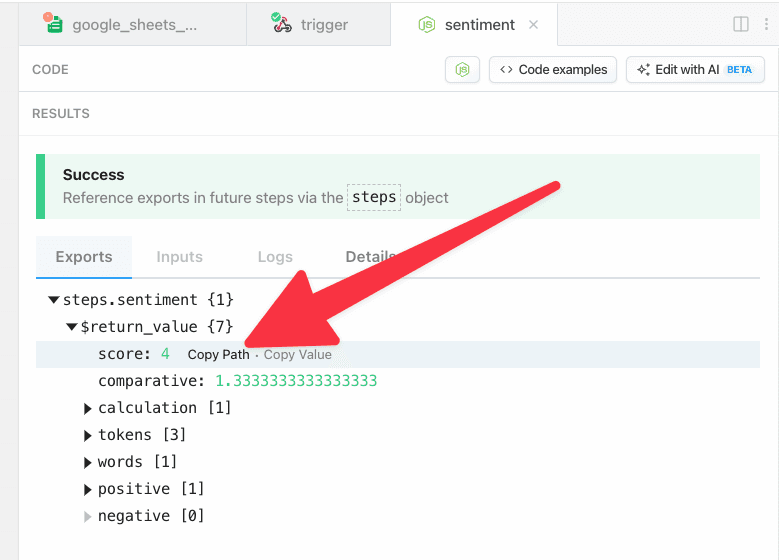 Click the Google Steps step or click the open tab in the editor. Then paste the value into the **Sentiment Score** field — Pipedream will automatically wrap the reference in double braces `{{ }}`.
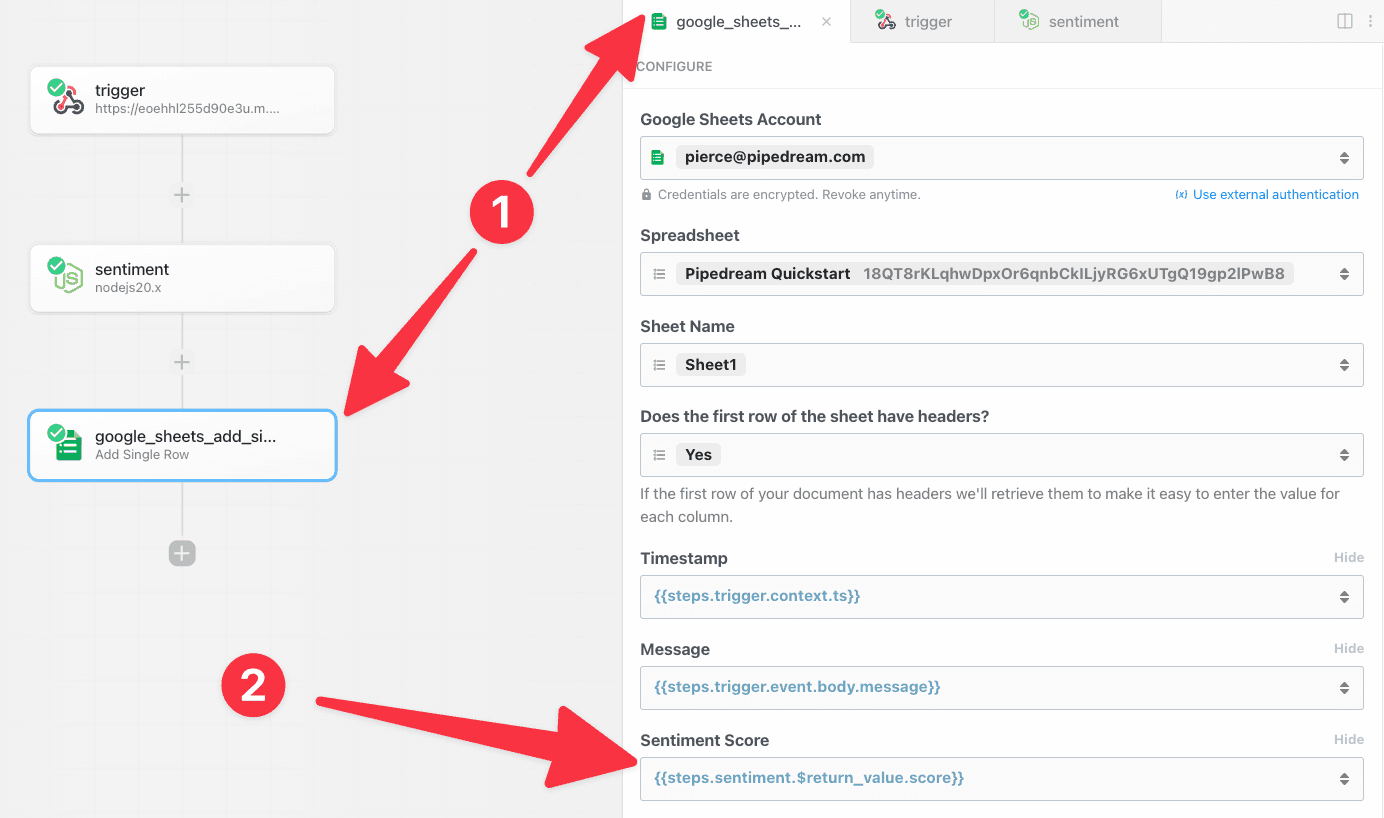 Now that the configuration is complete, click **Test** to validate the configuration for this step. When the test is complete, you will see a success message and a summary of the action performed:
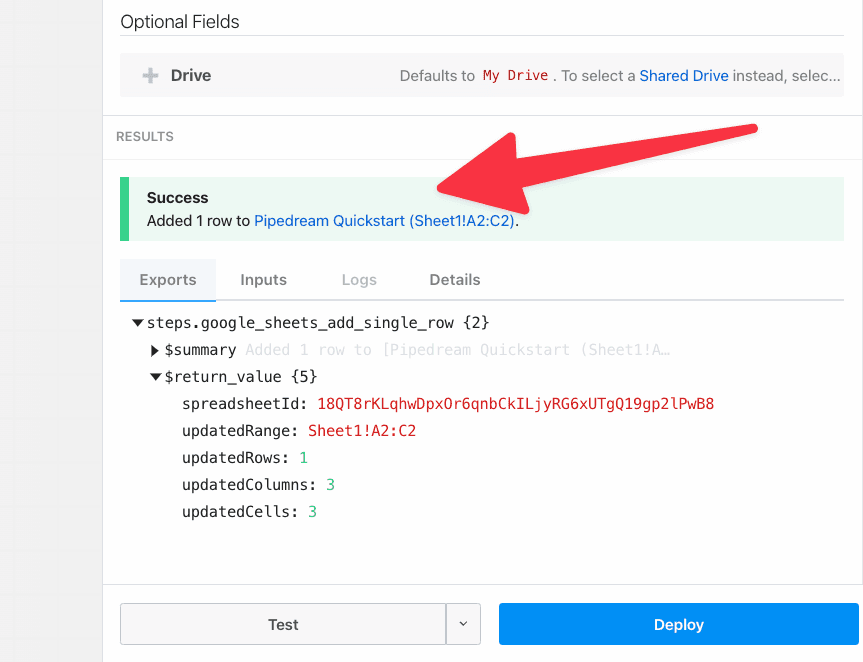 If you load your spreadsheet, you should see the data Pipedream inserted.
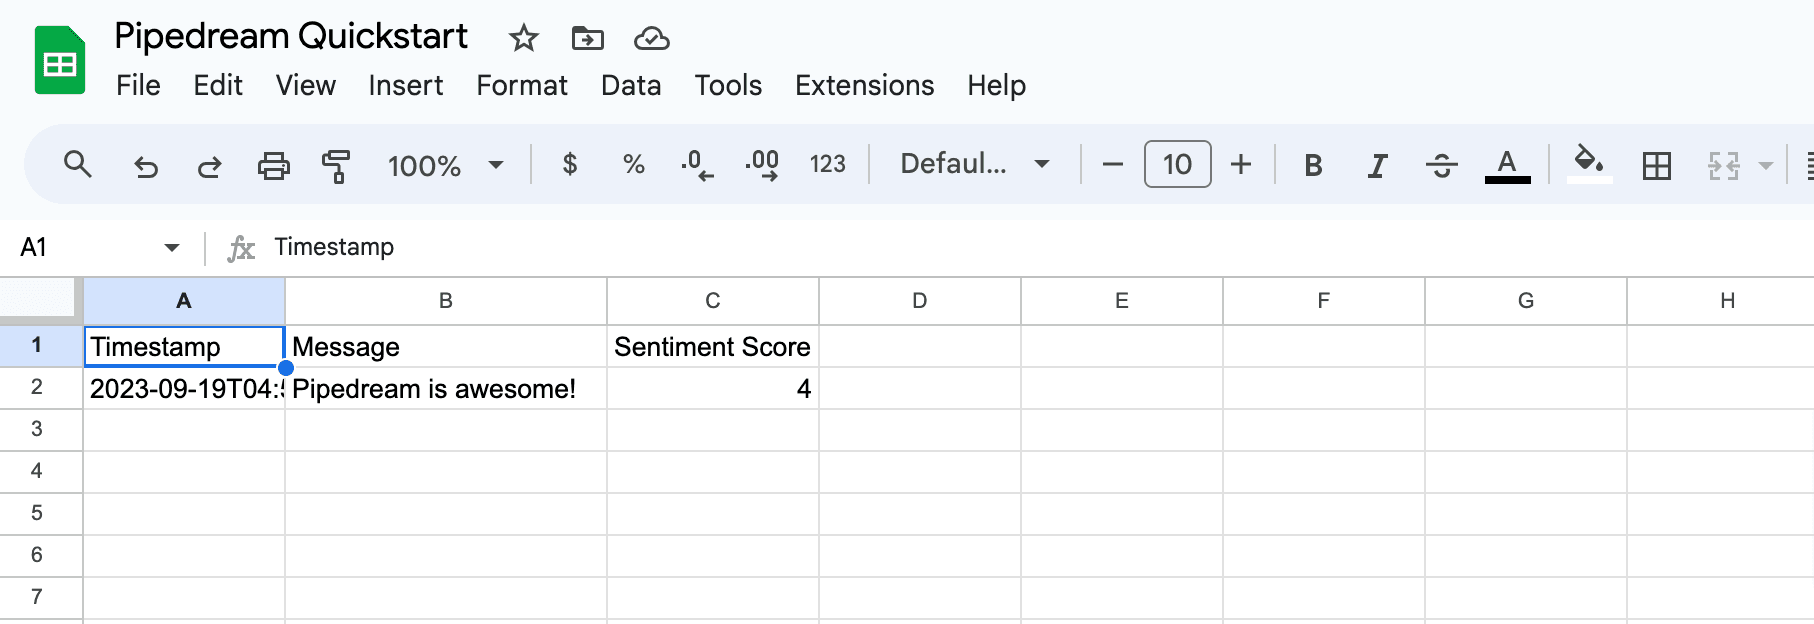 Next, return to your workflow and click **Deploy** to run your workflow on every trigger event.
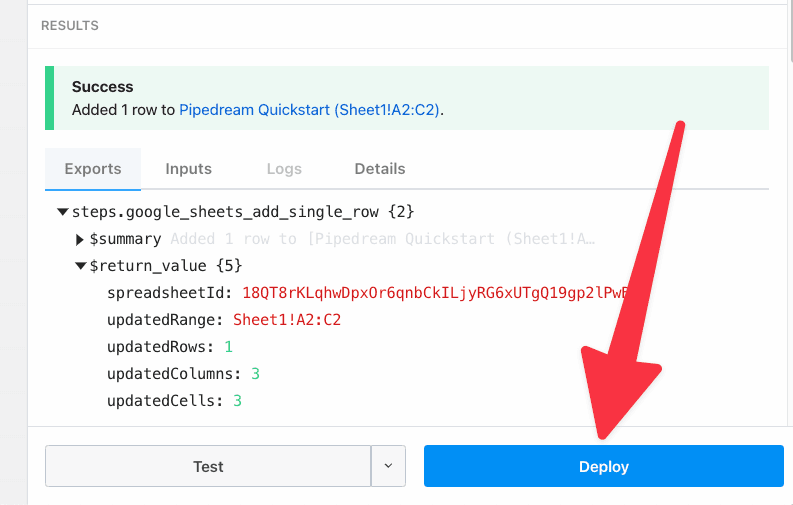 When your workflow deploys, you will be redirected to the **Inspector**. Your workflow is now live.
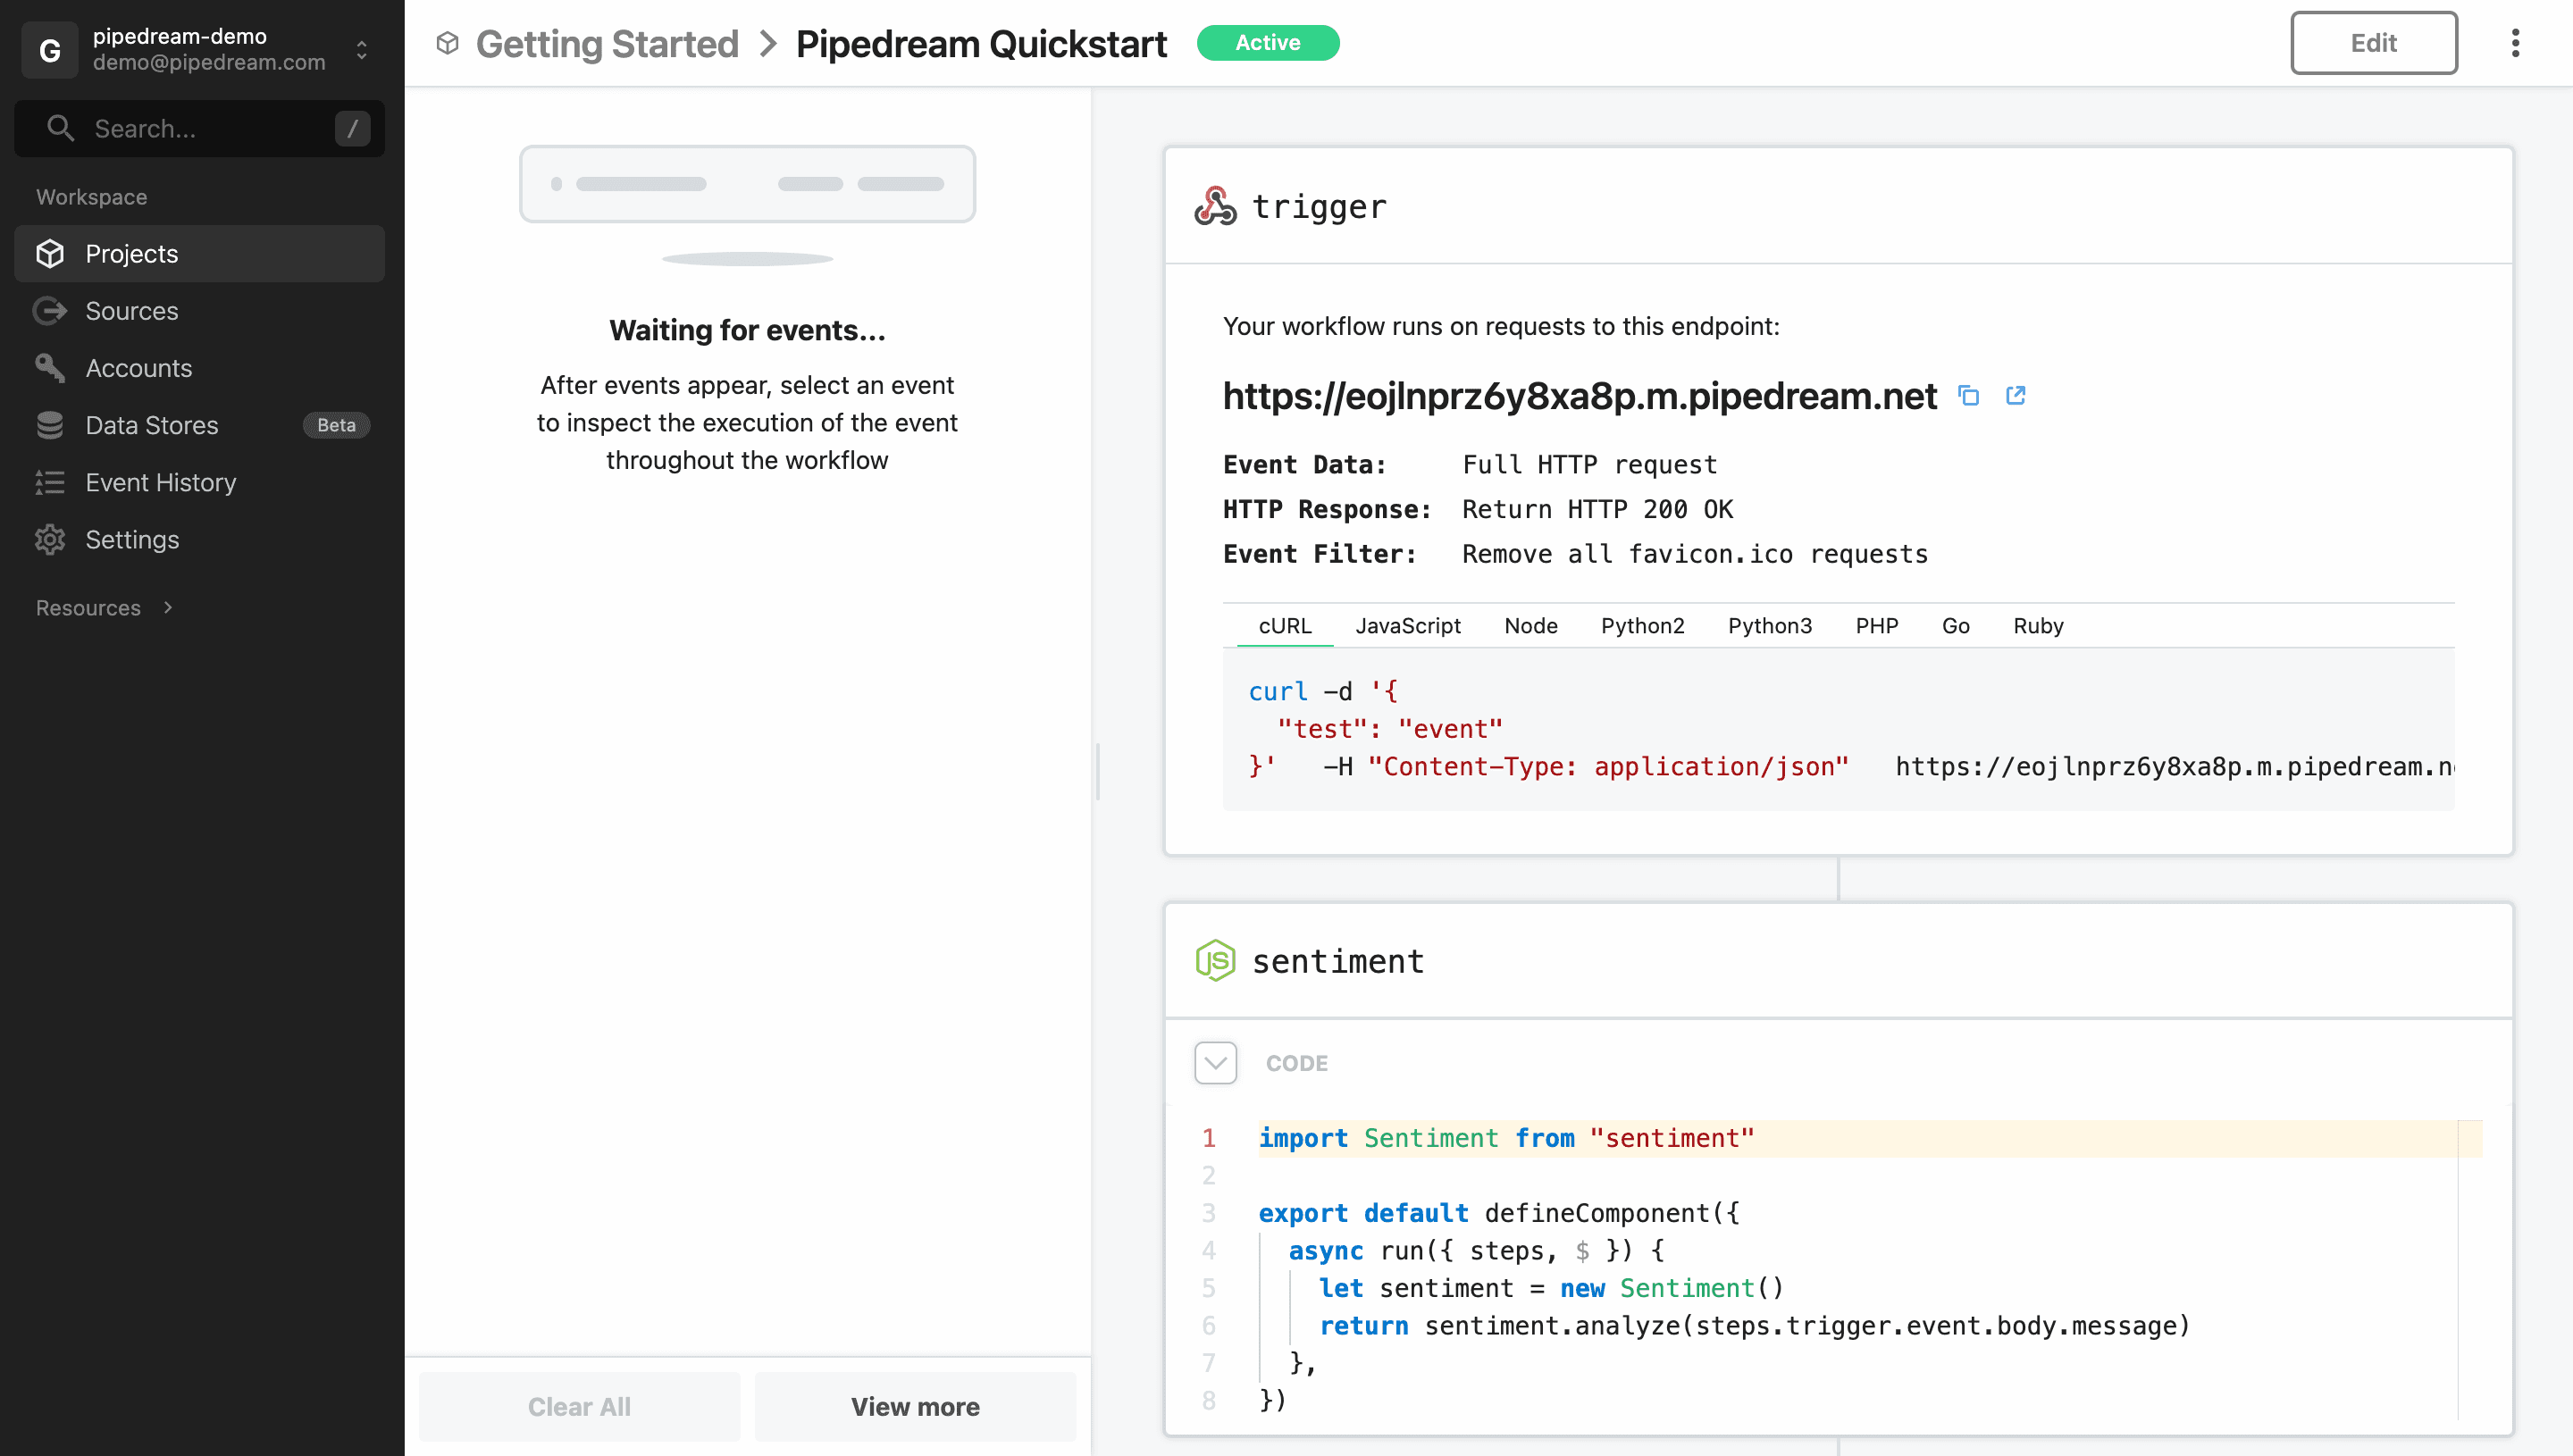 To validate your workflow is working as expected, send a new request to your workflow: You can edit and run the following `cURL` command:
```swift
curl -d '{ "message": "Pipedream is awesome!" }' \
-H "Content-Type: application/json" \
YOUR-TRIGGER-URL
```
The event will instantly appear in the event list. Select it to inspect the workflow execution.
To validate your workflow is working as expected, send a new request to your workflow: You can edit and run the following `cURL` command:
```swift
curl -d '{ "message": "Pipedream is awesome!" }' \
-H "Content-Type: application/json" \
YOUR-TRIGGER-URL
```
The event will instantly appear in the event list. Select it to inspect the workflow execution.
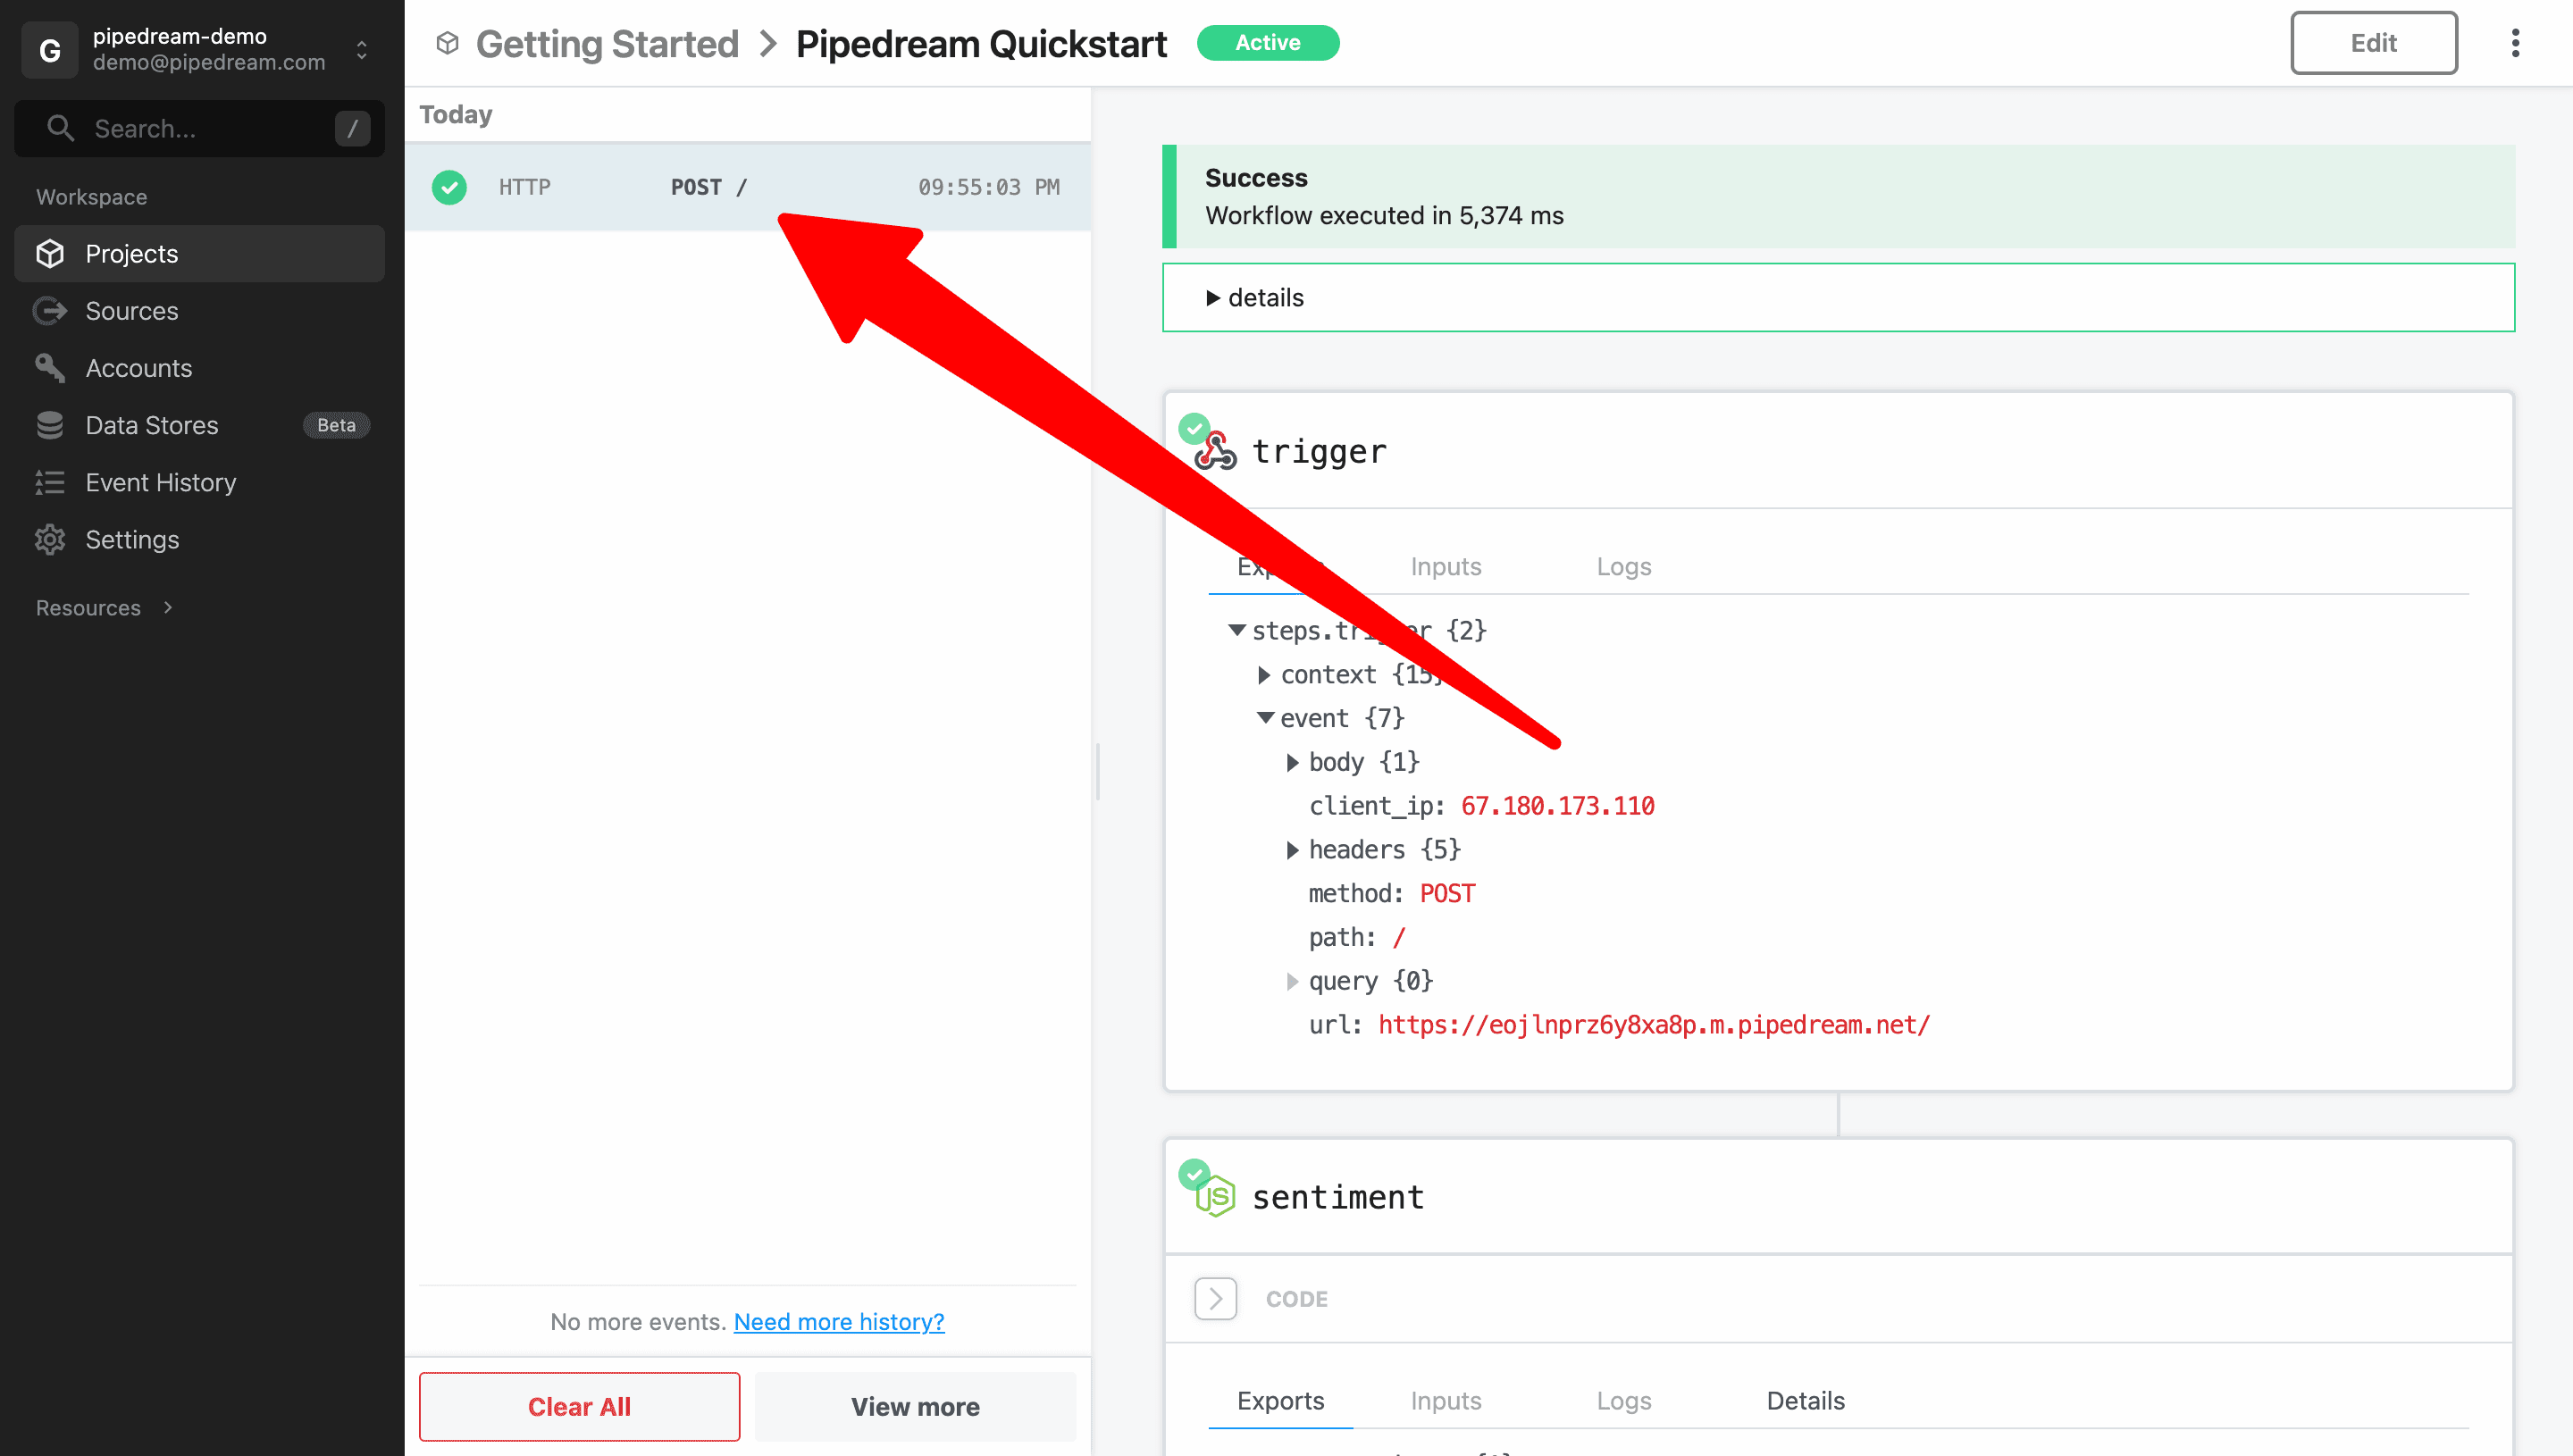 Finally, you can return to Google Sheets to validate that the new data was automatically inserted.
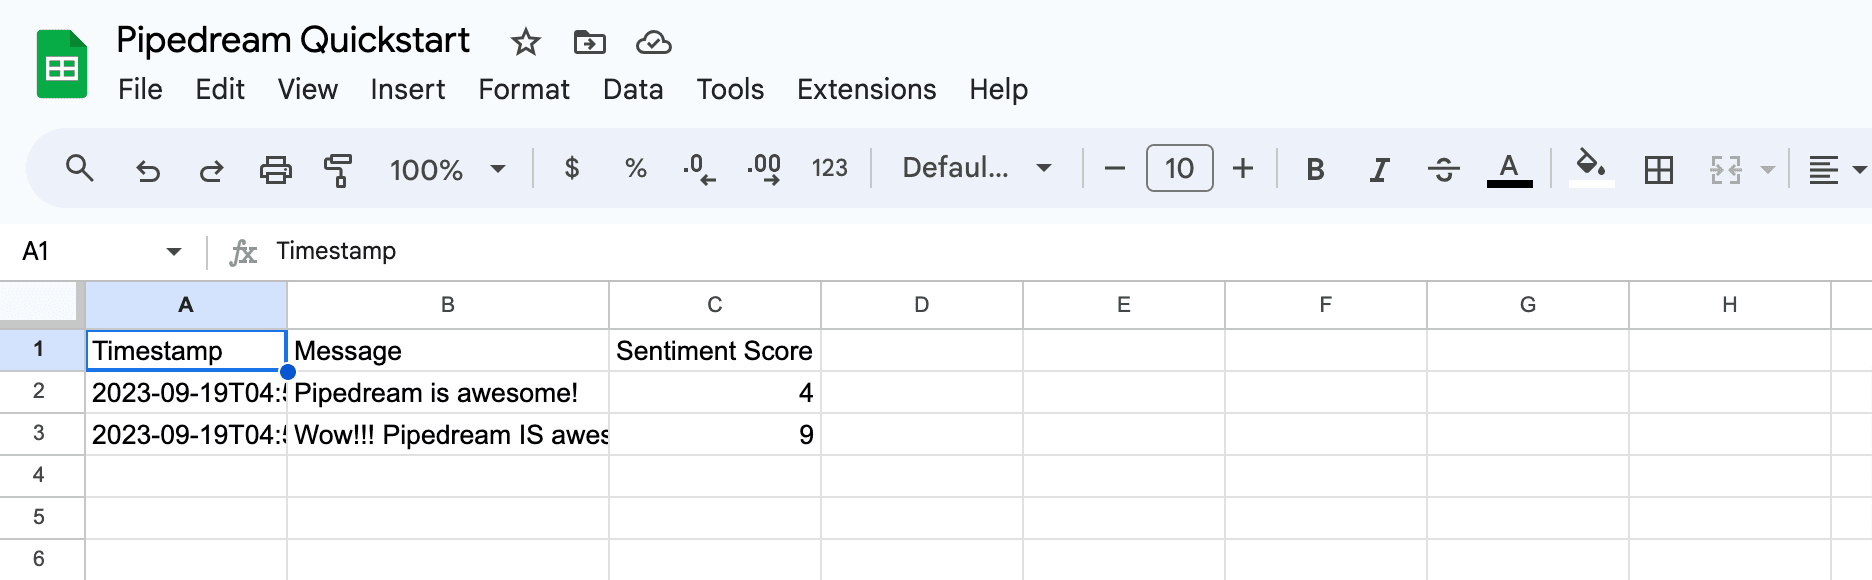
 1. Click on **New VPC** in the upper right of the page:
 2. Enter a network name and click **Create**:
 3. It may take 5-10 minutes to complete setting up your network. The status will change to **Available** when complete:
 ### Run workflows within a VPC
To run workflows in a VPC, check the **Run in Private Network** option in workflow settings and select the network you created. All outbound network requests for the workflow will originate from the static egress IP for the VPC (both when testing a workflow or when running the workflow in production).
### Run workflows within a VPC
To run workflows in a VPC, check the **Run in Private Network** option in workflow settings and select the network you created. All outbound network requests for the workflow will originate from the static egress IP for the VPC (both when testing a workflow or when running the workflow in production).
 If you don’t see the network listed, the network setup may still be in progress. If the issue persists longer than 10 minutes, please [contact support](https://pipedream.com/support).
### Find the static outbound IP address for a VPC
You can view and copy the static outbound IP address for each VPC in your workspace from the [Virtual Private Cloud settings](https://pipedream.com/settings/networks). If you need to restrict access to sensitive resources (e.g., a database) by IP address, copy this address and configure it in your application with the `/32` CIDR block. Network requests from workflows running in the VPC will originate from this address.
If you don’t see the network listed, the network setup may still be in progress. If the issue persists longer than 10 minutes, please [contact support](https://pipedream.com/support).
### Find the static outbound IP address for a VPC
You can view and copy the static outbound IP address for each VPC in your workspace from the [Virtual Private Cloud settings](https://pipedream.com/settings/networks). If you need to restrict access to sensitive resources (e.g., a database) by IP address, copy this address and configure it in your application with the `/32` CIDR block. Network requests from workflows running in the VPC will originate from this address.
 ## Managing a VPC
To rename or delete a VPC, navigate to the [Virtual Private Cloud settings](https://pipedream.com/settings/networks) for your workspace and select the option from the menu at the the right of the VPC you want to manage.
## Self-hosting and VPC peering
If you’re interested in running Pipedream workflows in your own infrastructure, or configure VPC peering to allow Pipedream to communicate to resources in a private network, please reach out to our [Sales team](mailto:sales@pipedream.com).
## Limitations
* Only workflows can run in VPCs (other resources like sources or data stores are not currently supported). For example, [sources](/docs/workflows/building-workflows/triggers/) cannot yet run in VPCs.
* Creating a new network can take up to 5 minutes. Deploying your first workflow into a new network and testing that workflow for the first time can take up to 1 min. Subsequent operations should be as fast as normal.
* VPCs only provide static IPs for outbound network requests. This feature does not provide a static IP for or otherwise restrict inbound requests.
* You can’t set a default network for all new workflows in a workspace or project (you must select the network every time you create a new workflow). Please [reach out](https://pipedream.com/support) if you’re interesting in imposing controls like this in your workspace.
* Workflows running in a VPC will still route specific requests routed through [the shared Pipedream network](/docs/workflows/data-management/destinations/http/#ip-addresses-for-pipedream-http-requests):
* [`$.send.http()`](/docs/workflows/data-management/destinations/http/) requests
* Async options requests (these are requests that are made to populate options in drop down menus for actions while a building a workflow — e.g., the option to “select a Google Sheet” when using the “add row to Google Sheets” action)
## FAQ
### Will HTTP requests sent from Node.js, Python and the HTTP request steps use the assigned static IP address?
Yes, all steps that send HTTP requests from a workflow assigned to a VPC will use that VPC’s IP address to send HTTP requests.
This will also include `axios`, `requests`, `fetch` or any HTTP client you prefer in your language of choice.
The only exception are requests sent by `$.send.http()` or the HTTP requests used to populate async options that power props like “Select a Google Sheet” or “Select a Slack channel”. These requests will route through the [standard set of Pipedream IP addresses.](/docs/privacy-and-security/#hosting-details)
### Can a single workflow live within multiple VPCs?
No, a VPC can contain many workflows, but a single workflow can only belong to one VPC.
### Can I modify my VPC’s IP address to another address?
No, IP addresses are assigned to VPCs for you, and they are not changeable.
### How much will VPCs cost?
VPCs are available on the **Business** plan. [Upgrade your plan here](https://pipedream.com/pricing).
# Managing workspaces
Source: https://pipedream.com/docs/workspaces
When you sign up for Pipedream, you’ll either create a new workspace or join an existing one if you signed up from an invitation.
You can create and join any number of workspaces. For example, you can create one to work alone and another to collaborate with your team. You can also start working alone, then easily add others into your existing workspace to work together on workflows you’ve already built out.
Once you’ve created a new workspace, you can invite your team to create and edit workflows together, and organize them within projects and folders.
## Creating a new workspace
To create a new workspace,
1. Open the dropdown menu in the top left of the Pipedream dashboard
2. Select **New workspace**
3. You’ll be prompted to name the workspace (you can [change the name later](/docs/workspaces/#renaming-a-workspace))
## Workspace settings
Find your current [workspace settings](https://pipedream.com/settings/account) like current members, under the **Settings** navigation menu item on the left hand side. This is where you can manage your workspace settings, including the workspace name, members, and member permissions.
### Inviting others to a join a workspace
After opening your workspace settings, open the [Membership](https://pipedream.com/settings/users) tab.
* Invite people to your workspace by entering their email address and then clicking **Send**
* Or create an invite link to more easily share with a larger group (you can limit access to only specific email domains)
## Managing a VPC
To rename or delete a VPC, navigate to the [Virtual Private Cloud settings](https://pipedream.com/settings/networks) for your workspace and select the option from the menu at the the right of the VPC you want to manage.
## Self-hosting and VPC peering
If you’re interested in running Pipedream workflows in your own infrastructure, or configure VPC peering to allow Pipedream to communicate to resources in a private network, please reach out to our [Sales team](mailto:sales@pipedream.com).
## Limitations
* Only workflows can run in VPCs (other resources like sources or data stores are not currently supported). For example, [sources](/docs/workflows/building-workflows/triggers/) cannot yet run in VPCs.
* Creating a new network can take up to 5 minutes. Deploying your first workflow into a new network and testing that workflow for the first time can take up to 1 min. Subsequent operations should be as fast as normal.
* VPCs only provide static IPs for outbound network requests. This feature does not provide a static IP for or otherwise restrict inbound requests.
* You can’t set a default network for all new workflows in a workspace or project (you must select the network every time you create a new workflow). Please [reach out](https://pipedream.com/support) if you’re interesting in imposing controls like this in your workspace.
* Workflows running in a VPC will still route specific requests routed through [the shared Pipedream network](/docs/workflows/data-management/destinations/http/#ip-addresses-for-pipedream-http-requests):
* [`$.send.http()`](/docs/workflows/data-management/destinations/http/) requests
* Async options requests (these are requests that are made to populate options in drop down menus for actions while a building a workflow — e.g., the option to “select a Google Sheet” when using the “add row to Google Sheets” action)
## FAQ
### Will HTTP requests sent from Node.js, Python and the HTTP request steps use the assigned static IP address?
Yes, all steps that send HTTP requests from a workflow assigned to a VPC will use that VPC’s IP address to send HTTP requests.
This will also include `axios`, `requests`, `fetch` or any HTTP client you prefer in your language of choice.
The only exception are requests sent by `$.send.http()` or the HTTP requests used to populate async options that power props like “Select a Google Sheet” or “Select a Slack channel”. These requests will route through the [standard set of Pipedream IP addresses.](/docs/privacy-and-security/#hosting-details)
### Can a single workflow live within multiple VPCs?
No, a VPC can contain many workflows, but a single workflow can only belong to one VPC.
### Can I modify my VPC’s IP address to another address?
No, IP addresses are assigned to VPCs for you, and they are not changeable.
### How much will VPCs cost?
VPCs are available on the **Business** plan. [Upgrade your plan here](https://pipedream.com/pricing).
# Managing workspaces
Source: https://pipedream.com/docs/workspaces
When you sign up for Pipedream, you’ll either create a new workspace or join an existing one if you signed up from an invitation.
You can create and join any number of workspaces. For example, you can create one to work alone and another to collaborate with your team. You can also start working alone, then easily add others into your existing workspace to work together on workflows you’ve already built out.
Once you’ve created a new workspace, you can invite your team to create and edit workflows together, and organize them within projects and folders.
## Creating a new workspace
To create a new workspace,
1. Open the dropdown menu in the top left of the Pipedream dashboard
2. Select **New workspace**
3. You’ll be prompted to name the workspace (you can [change the name later](/docs/workspaces/#renaming-a-workspace))
## Workspace settings
Find your current [workspace settings](https://pipedream.com/settings/account) like current members, under the **Settings** navigation menu item on the left hand side. This is where you can manage your workspace settings, including the workspace name, members, and member permissions.
### Inviting others to a join a workspace
After opening your workspace settings, open the [Membership](https://pipedream.com/settings/users) tab.
* Invite people to your workspace by entering their email address and then clicking **Send**
* Or create an invite link to more easily share with a larger group (you can limit access to only specific email domains)
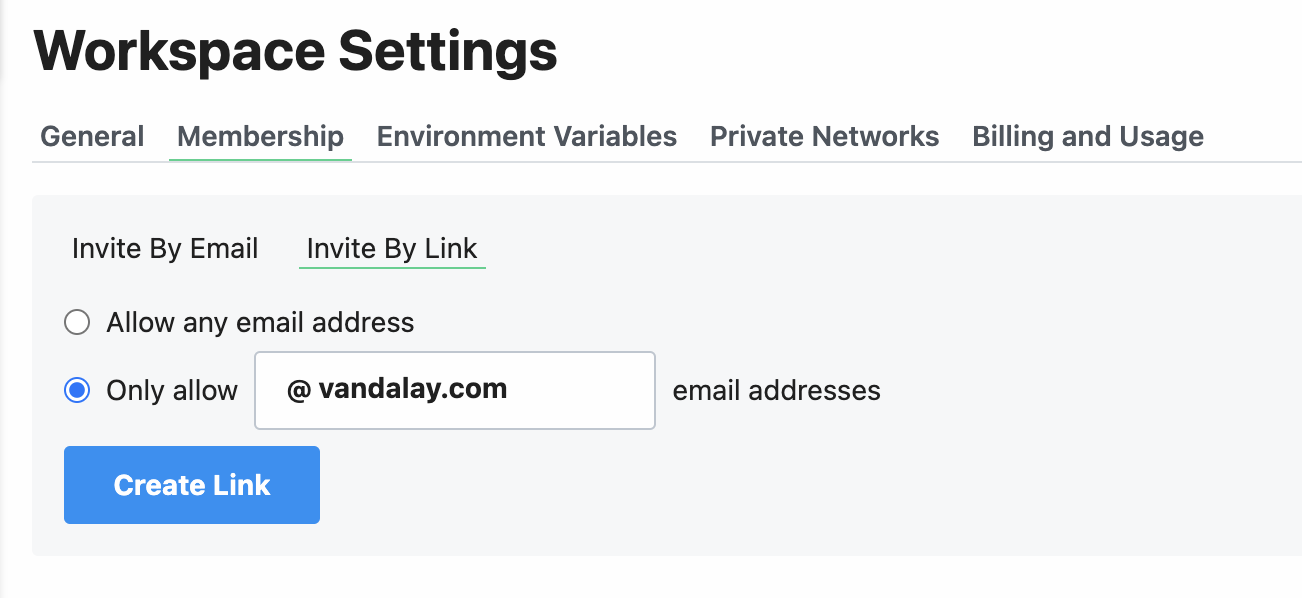 ### Managing member permissions
By default, new workspace members are assigned the **Member** level permission.
**Members** will be able to perform general tasks like viewing, developing, and deploying workflows.
However, only **Admins** will be able to manage workspace level settings, like changing member roles, renaming workspaces, and modifying Slack error notifications.
#### Promoting a member to admin
To promote a member to an admin level account in your workspace, click the 3 dots to the right of their email and select “Make Admin”.
### Managing member permissions
By default, new workspace members are assigned the **Member** level permission.
**Members** will be able to perform general tasks like viewing, developing, and deploying workflows.
However, only **Admins** will be able to manage workspace level settings, like changing member roles, renaming workspaces, and modifying Slack error notifications.
#### Promoting a member to admin
To promote a member to an admin level account in your workspace, click the 3 dots to the right of their email and select “Make Admin”.
 #### Demoting an admin to a member
To demote an admin back to a member, click the 3 dots to the right of their email address and select “Remove Admin”.
#### Demoting an admin to a member
To demote an admin back to a member, click the 3 dots to the right of their email address and select “Remove Admin”.
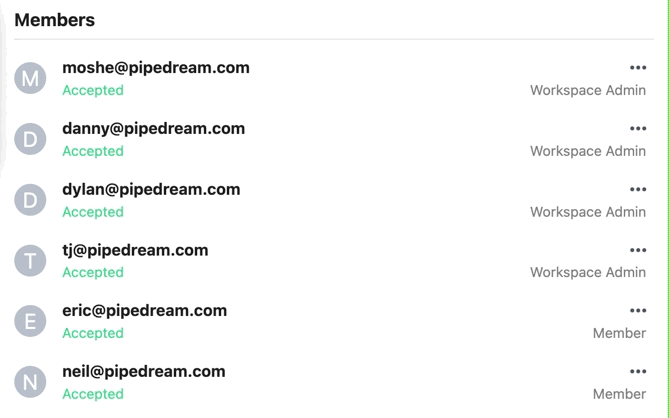 ### Finding your workspace’s ID
Visit your [workspace settings](https://pipedream.com/settings/account) and scroll down to the **API** section. You’ll see your workspace ID here.
### Requiring Two-Factor Authentication
As a workspace admin or owner on the [Business plan](https://pipedream.com/pricing), you’re able to **require** that all members in your workspace must enable 2FA on their account.
1. Open the Authentication tab in your [workspace settings](https://pipedream.com/settings/authentication) (you must be an admin or owner to make changes here)
2. Make sure you’re in the [correct workspace](/docs/workspaces/#switching-between-workspaces)
3. Click the toggle under **Require 2FA** — this will open a confirmation modal with some additional information
4. Once you enable the change in the modal, **all workspace members (including admins and owners) will immediately be required to configure 2FA on their account**. All new and existing workspace members will be required to set up 2FA the next time they sign in.
### Finding your workspace’s ID
Visit your [workspace settings](https://pipedream.com/settings/account) and scroll down to the **API** section. You’ll see your workspace ID here.
### Requiring Two-Factor Authentication
As a workspace admin or owner on the [Business plan](https://pipedream.com/pricing), you’re able to **require** that all members in your workspace must enable 2FA on their account.
1. Open the Authentication tab in your [workspace settings](https://pipedream.com/settings/authentication) (you must be an admin or owner to make changes here)
2. Make sure you’re in the [correct workspace](/docs/workspaces/#switching-between-workspaces)
3. Click the toggle under **Require 2FA** — this will open a confirmation modal with some additional information
4. Once you enable the change in the modal, **all workspace members (including admins and owners) will immediately be required to configure 2FA on their account**. All new and existing workspace members will be required to set up 2FA the next time they sign in.
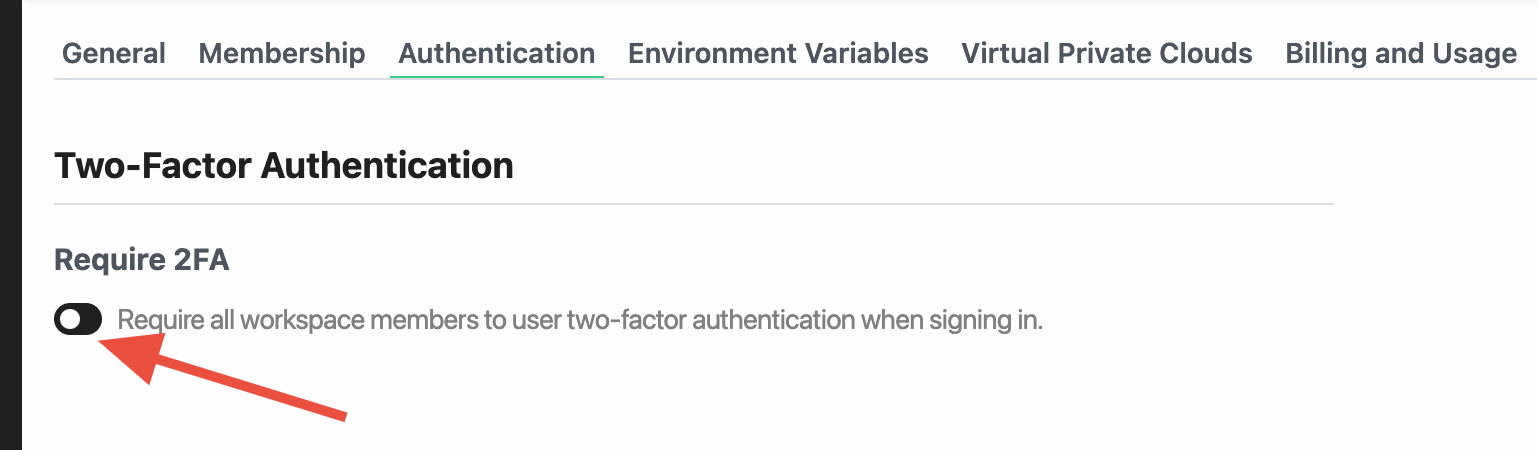
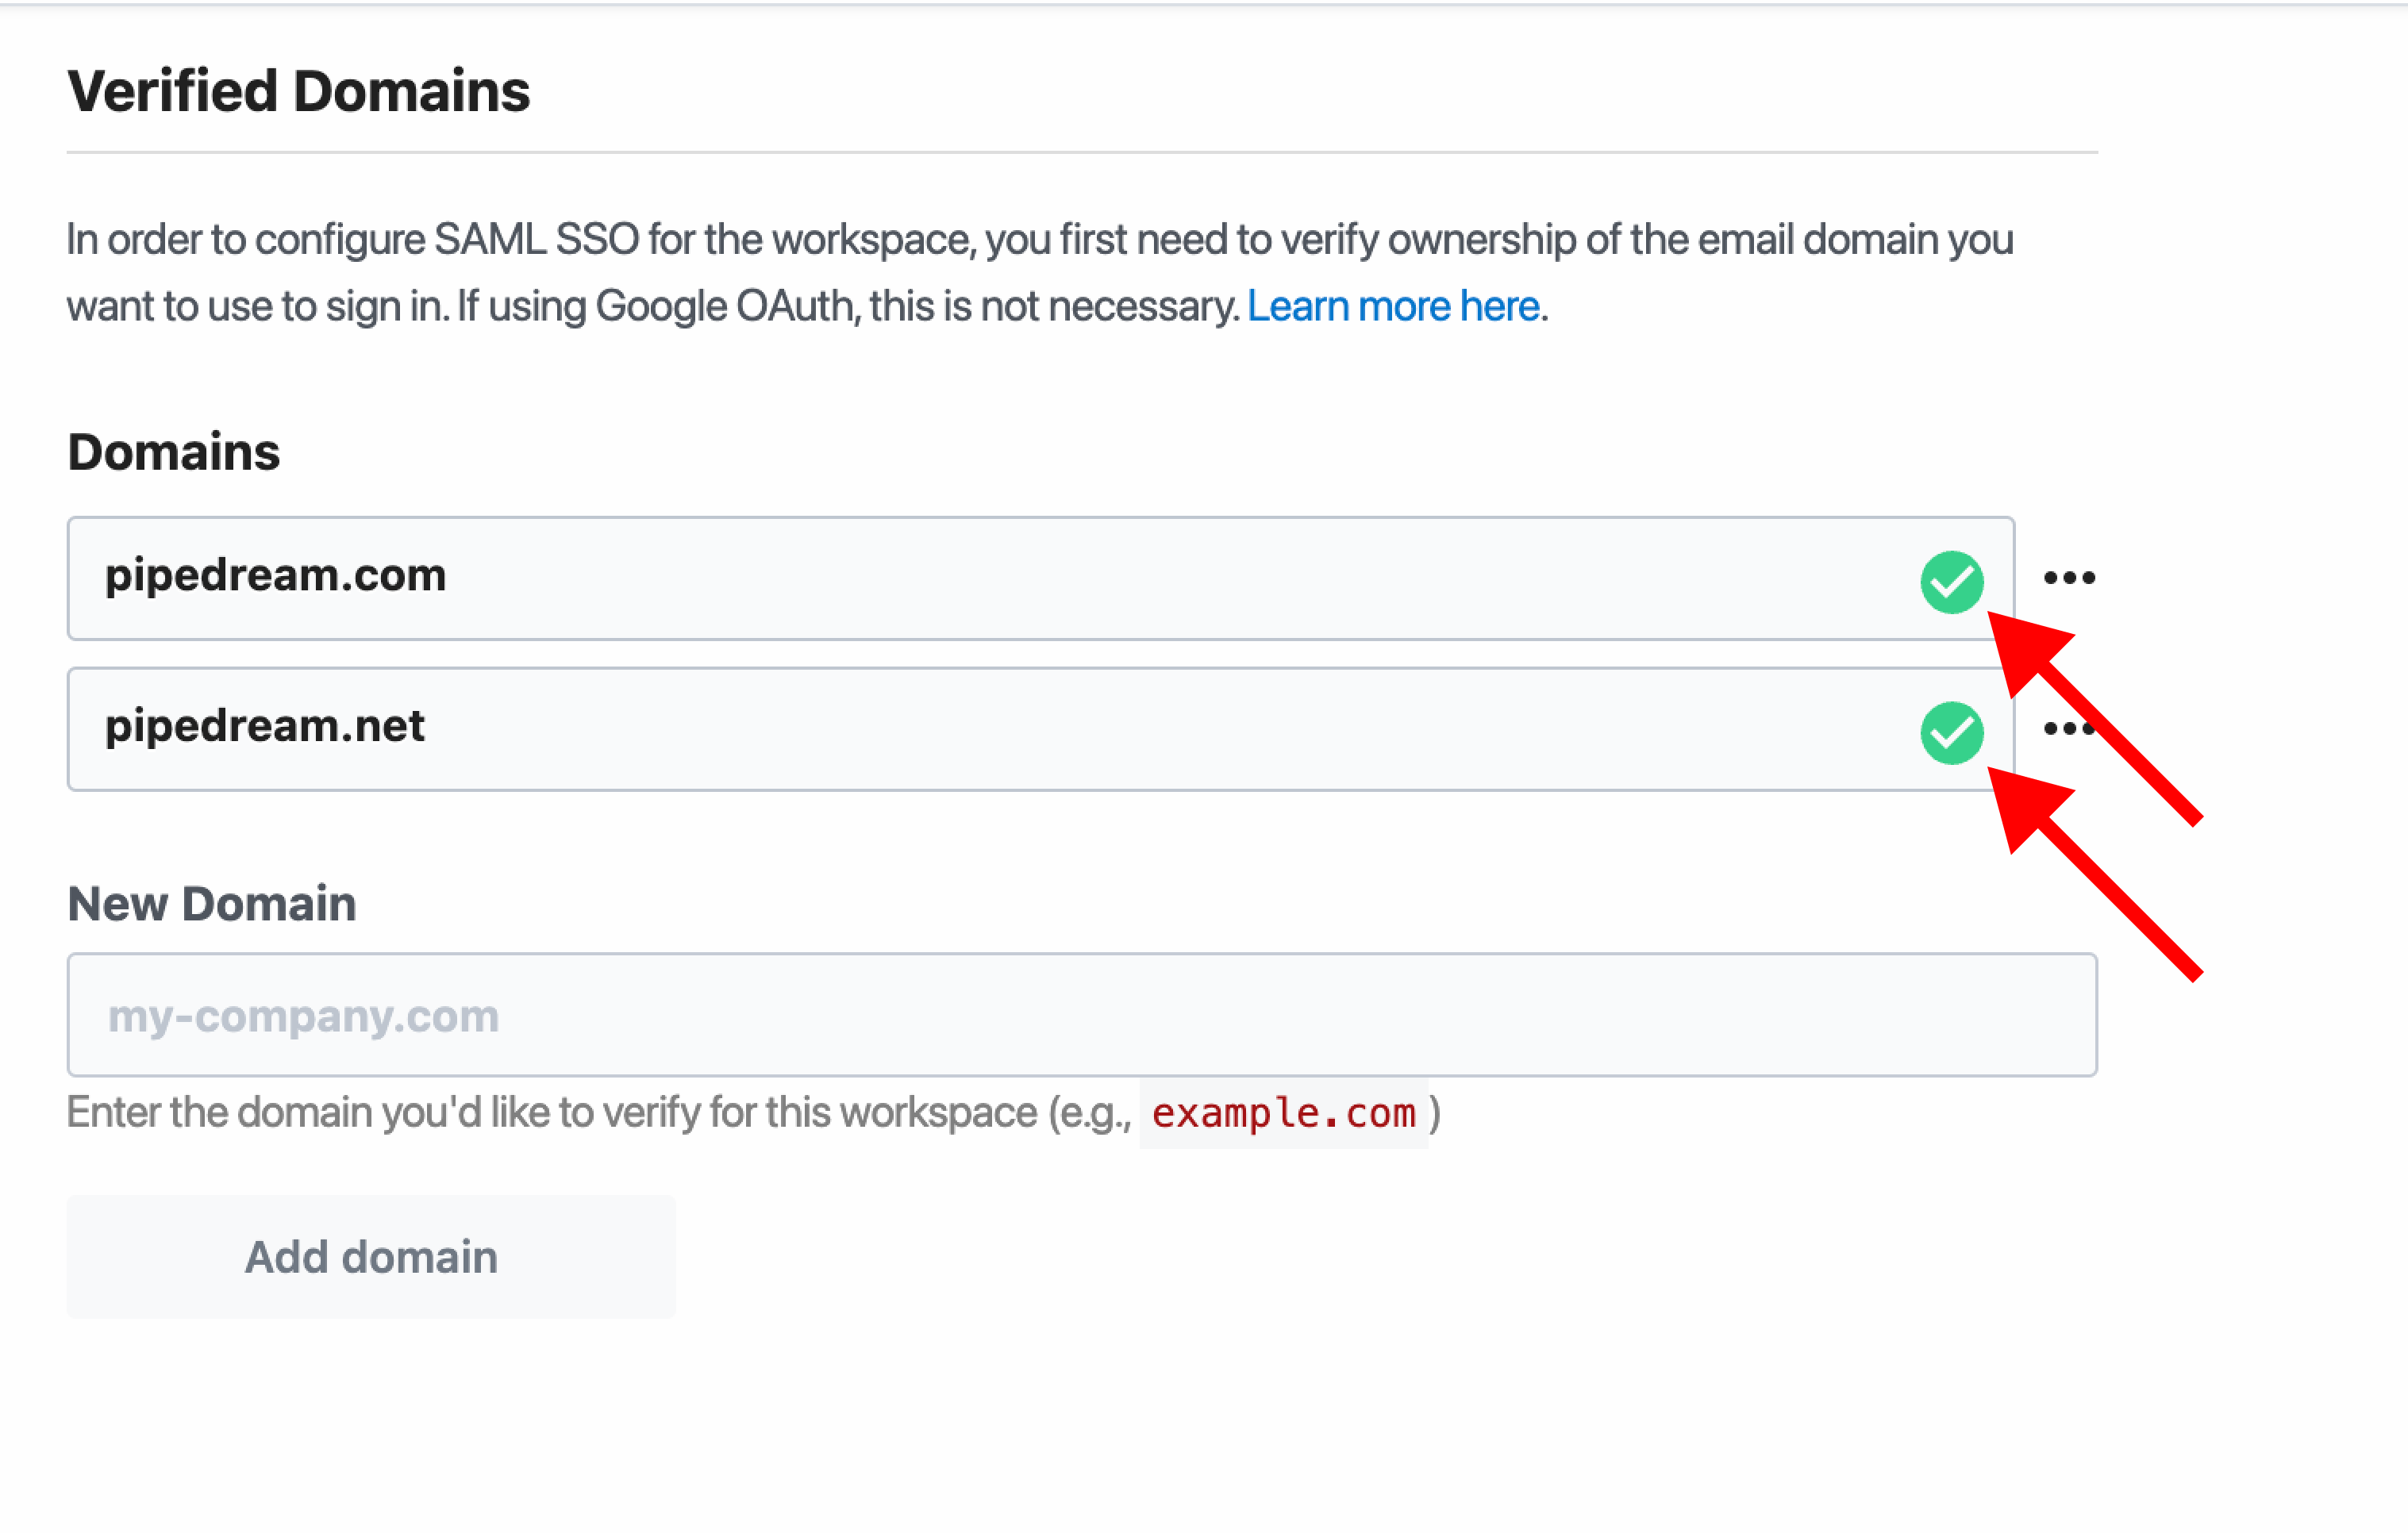 # Single Sign On Overview
Source: https://pipedream.com/docs/workspaces/sso
Pipedream supports Single Sign-On (SSO) with [Okta](/docs/workspaces/sso/okta/), [Google](/docs/workspaces/sso/google/), or [any provider](/docs/workspaces/sso/saml/) that supports SAML or Google OAuth, which allows IT and workspace administrators easier controls to manage access and security.
Using SSO with your Identity Provider (IdP) centralizes user login management and provides a single point of control for IT teams and employees.
## Requirements for SSO
* Your workspace must be on a [Business plan](https://pipedream.com/pricing)
* If using SAML, your Identity Provider must support SAML 2.0
* Only workspace admins and owners can configure SSO
* Your workspace admin or owner must [verify ownership](/docs/workspaces/sso/#verifying-your-email-domain) of the SSO email domain
# Single Sign On Overview
Source: https://pipedream.com/docs/workspaces/sso
Pipedream supports Single Sign-On (SSO) with [Okta](/docs/workspaces/sso/okta/), [Google](/docs/workspaces/sso/google/), or [any provider](/docs/workspaces/sso/saml/) that supports SAML or Google OAuth, which allows IT and workspace administrators easier controls to manage access and security.
Using SSO with your Identity Provider (IdP) centralizes user login management and provides a single point of control for IT teams and employees.
## Requirements for SSO
* Your workspace must be on a [Business plan](https://pipedream.com/pricing)
* If using SAML, your Identity Provider must support SAML 2.0
* Only workspace admins and owners can configure SSO
* Your workspace admin or owner must [verify ownership](/docs/workspaces/sso/#verifying-your-email-domain) of the SSO email domain
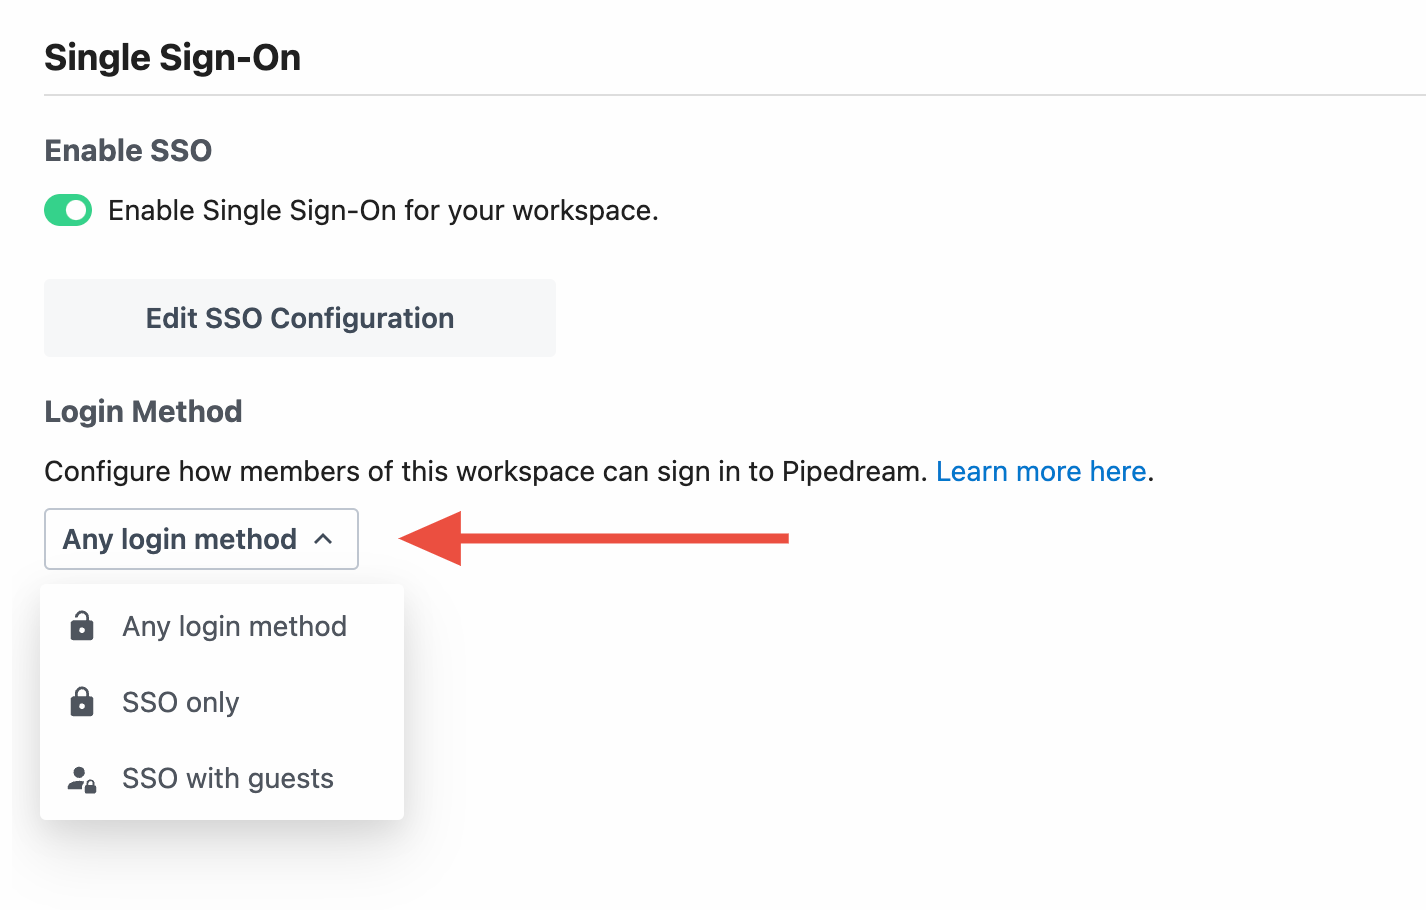 | Login Method | Description |
| -------------------- | ------------------------------------------------------------------------------------------------------------------------------------------------------------------------------------------------------------------------------------------------ |
| **Any login method** | Everyone in the workspace can sign in either using SSO or via the login method they used to create their account (email and password, Google OAuth, GitHub) |
| **SSO only** | Workspace members and admins must [sign in using SSO](https://pipedream.com/auth/sso) |
| **SSO with guests** | When siging in using a verified email domain, members and admins must [sign in using SSO](https://pipedream.com/auth/sso). If signing in with a different domain (`gmail.com` for example), members (guests) can sign in using any login method. |
### Workspace owners can always sign in using any login method
In order to ensure you don’t get locked out of your Pipedream workspace in the event of an outage with your identity provider, workspace owners can always sign in via the login method they used to create the account (email and password, Google, or GitHub).
### Login methods are enforced when signing in to pipedream.com
This means if you are a member of 2 workspaces and one of them allows **any login method** but the other **requires SSO**, you will be required to sign in to Pipedream using SSO every time, independent of the workspace you are trying to access.
# Configure SSO With Google Workspace
Source: https://pipedream.com/docs/workspaces/sso/google
Pipedream supports Single Sign-On (SSO) with Google Workspace. This guide shows you how to configure SSO in Pipedream to authenticate with your Google org.
## Requirements
* SSO is only supported for [workspaces](/docs/workspaces/) on the Business plan. Visit the [Pipedream pricing page](https://pipedream.com/pricing) to upgrade.
* You need an administrator of your Pipedream workspace and someone who can [create SAML apps in Google Workspace](https://apps.google.com/supportwidget/articlehome?hl=en\&article_url=https%3A%2F%2Fsupport.google.com%2Fa%2Fanswer%2F6087519%3Fhl%3Den\&assistant_id=generic-unu\&product_context=6087519\&product_name=UnuFlow\&trigger_context=a) to configure SSO.
## Configuration
To configure SSO in Pipedream, you need to set up a [SAML application](https://apps.google.com/supportwidget/articlehome?hl=en\&article_url=https%3A%2F%2Fsupport.google.com%2Fa%2Fanswer%2F6087519%3Fhl%3Den\&assistant_id=generic-unu\&product_context=6087519\&product_name=UnuFlow\&trigger_context=a) in Google Workspace. If you’re a Google Workspace admin, you’re all set. Otherwise, coordinate with a Google Workspace admin before you continue.
| Login Method | Description |
| -------------------- | ------------------------------------------------------------------------------------------------------------------------------------------------------------------------------------------------------------------------------------------------ |
| **Any login method** | Everyone in the workspace can sign in either using SSO or via the login method they used to create their account (email and password, Google OAuth, GitHub) |
| **SSO only** | Workspace members and admins must [sign in using SSO](https://pipedream.com/auth/sso) |
| **SSO with guests** | When siging in using a verified email domain, members and admins must [sign in using SSO](https://pipedream.com/auth/sso). If signing in with a different domain (`gmail.com` for example), members (guests) can sign in using any login method. |
### Workspace owners can always sign in using any login method
In order to ensure you don’t get locked out of your Pipedream workspace in the event of an outage with your identity provider, workspace owners can always sign in via the login method they used to create the account (email and password, Google, or GitHub).
### Login methods are enforced when signing in to pipedream.com
This means if you are a member of 2 workspaces and one of them allows **any login method** but the other **requires SSO**, you will be required to sign in to Pipedream using SSO every time, independent of the workspace you are trying to access.
# Configure SSO With Google Workspace
Source: https://pipedream.com/docs/workspaces/sso/google
Pipedream supports Single Sign-On (SSO) with Google Workspace. This guide shows you how to configure SSO in Pipedream to authenticate with your Google org.
## Requirements
* SSO is only supported for [workspaces](/docs/workspaces/) on the Business plan. Visit the [Pipedream pricing page](https://pipedream.com/pricing) to upgrade.
* You need an administrator of your Pipedream workspace and someone who can [create SAML apps in Google Workspace](https://apps.google.com/supportwidget/articlehome?hl=en\&article_url=https%3A%2F%2Fsupport.google.com%2Fa%2Fanswer%2F6087519%3Fhl%3Den\&assistant_id=generic-unu\&product_context=6087519\&product_name=UnuFlow\&trigger_context=a) to configure SSO.
## Configuration
To configure SSO in Pipedream, you need to set up a [SAML application](https://apps.google.com/supportwidget/articlehome?hl=en\&article_url=https%3A%2F%2Fsupport.google.com%2Fa%2Fanswer%2F6087519%3Fhl%3Den\&assistant_id=generic-unu\&product_context=6087519\&product_name=UnuFlow\&trigger_context=a) in Google Workspace. If you’re a Google Workspace admin, you’re all set. Otherwise, coordinate with a Google Workspace admin before you continue.
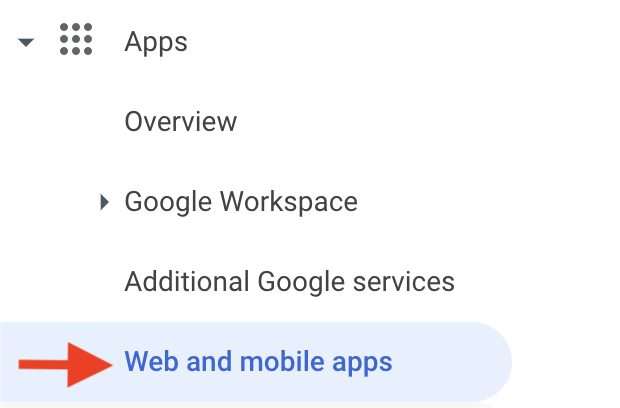

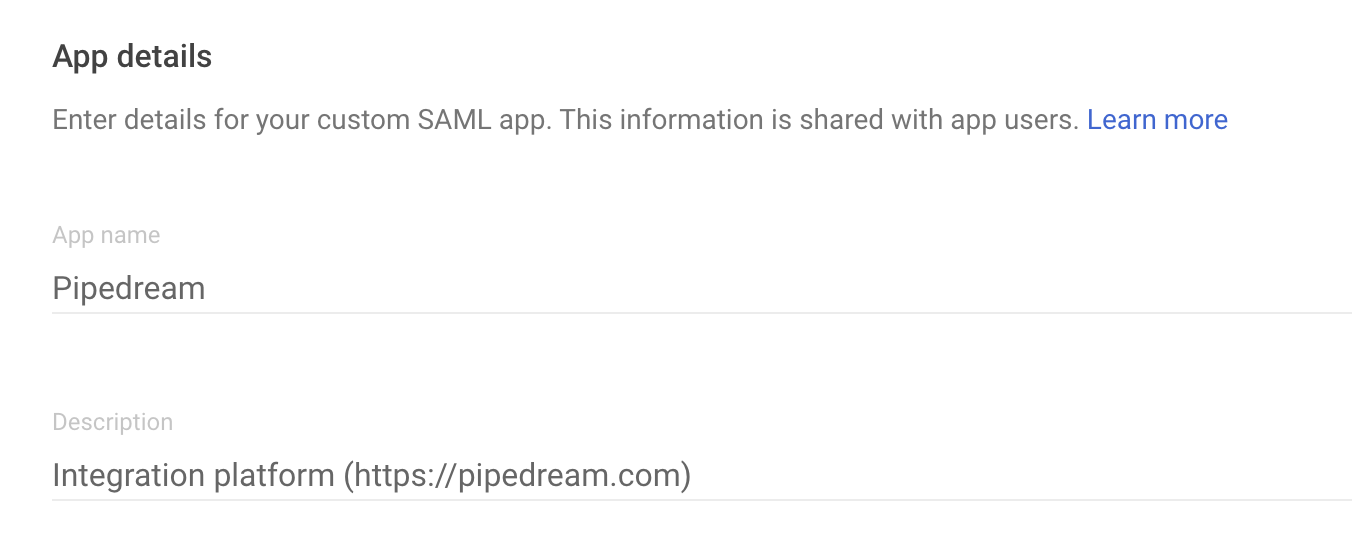
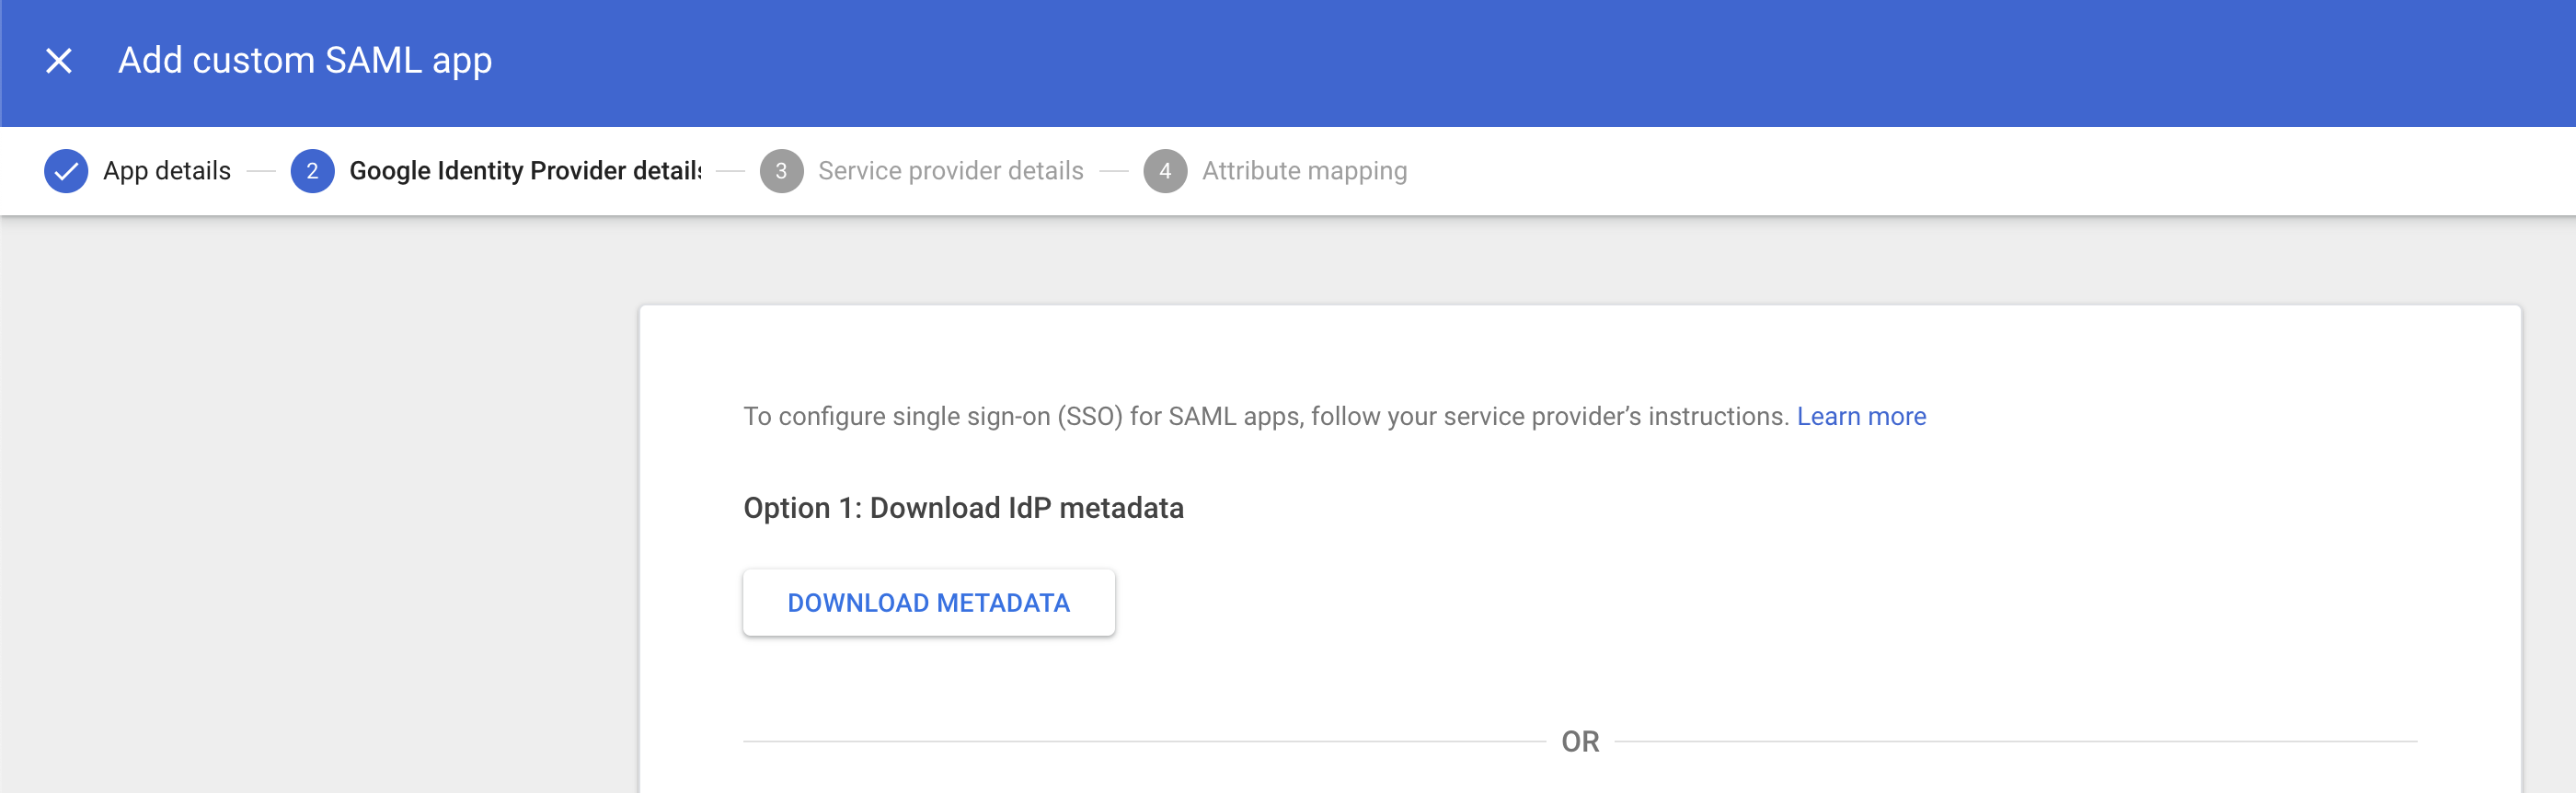
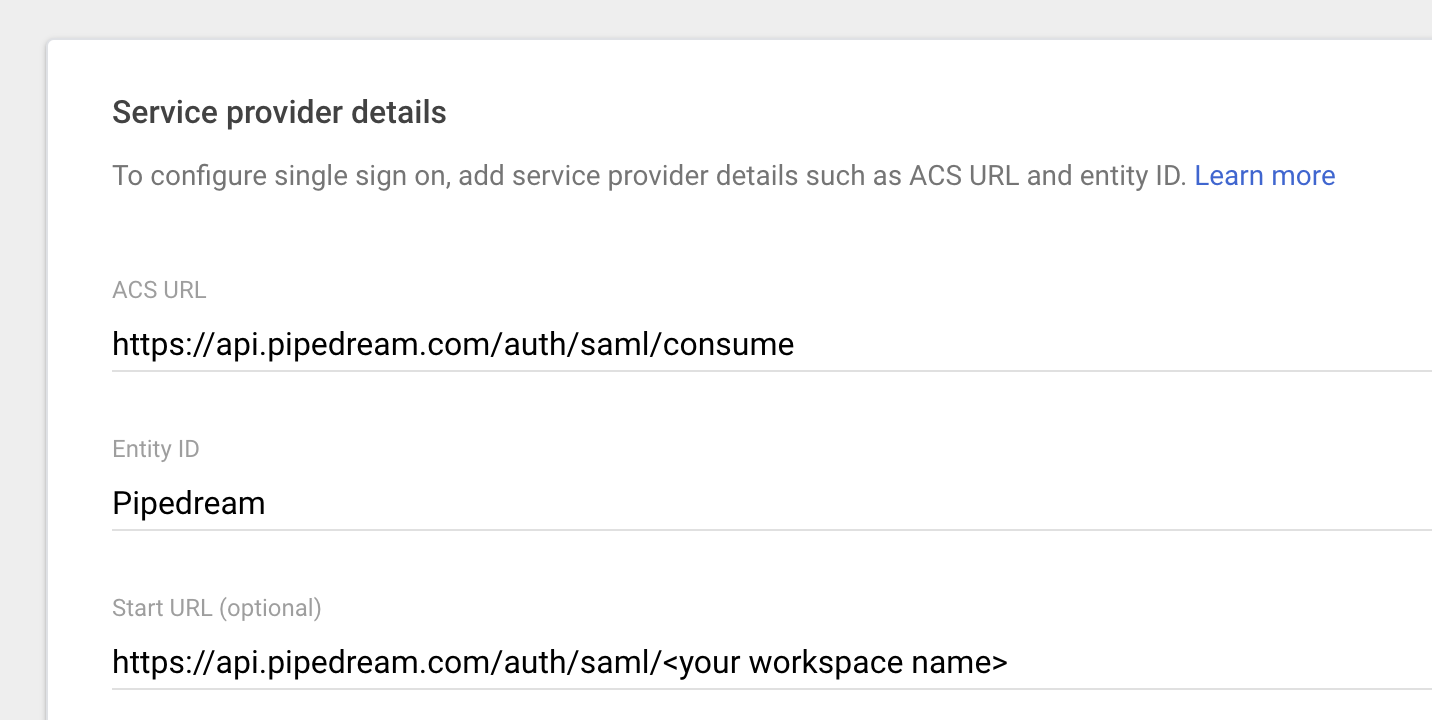 In the **Name ID** section, provide these values:
* **Name ID format** — `EMAIL`
* **Name ID** — Basic Information > Primary email
then press **Continue**.
In the **Name ID** section, provide these values:
* **Name ID format** — `EMAIL`
* **Name ID** — Basic Information > Primary email
then press **Continue**.

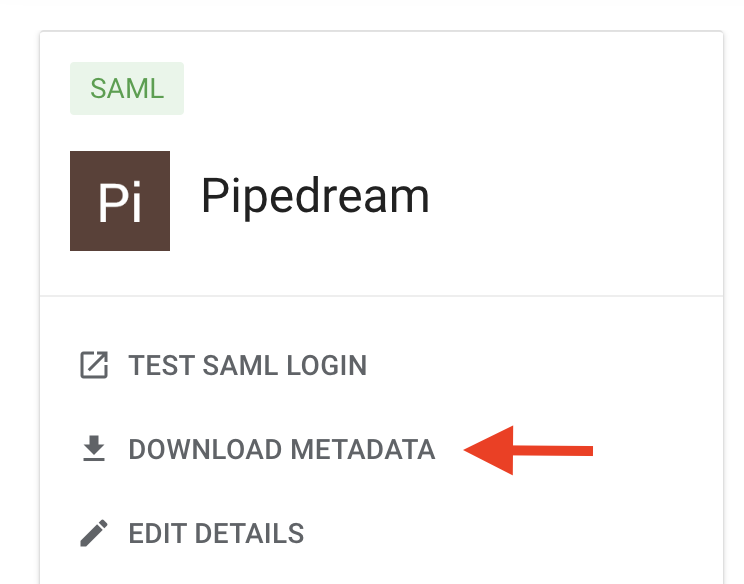 **Host this file on a public web server where Pipedream can access it via URL**, for example: `https://example.com/metadata.xml`. You’ll use that URL in the next step.
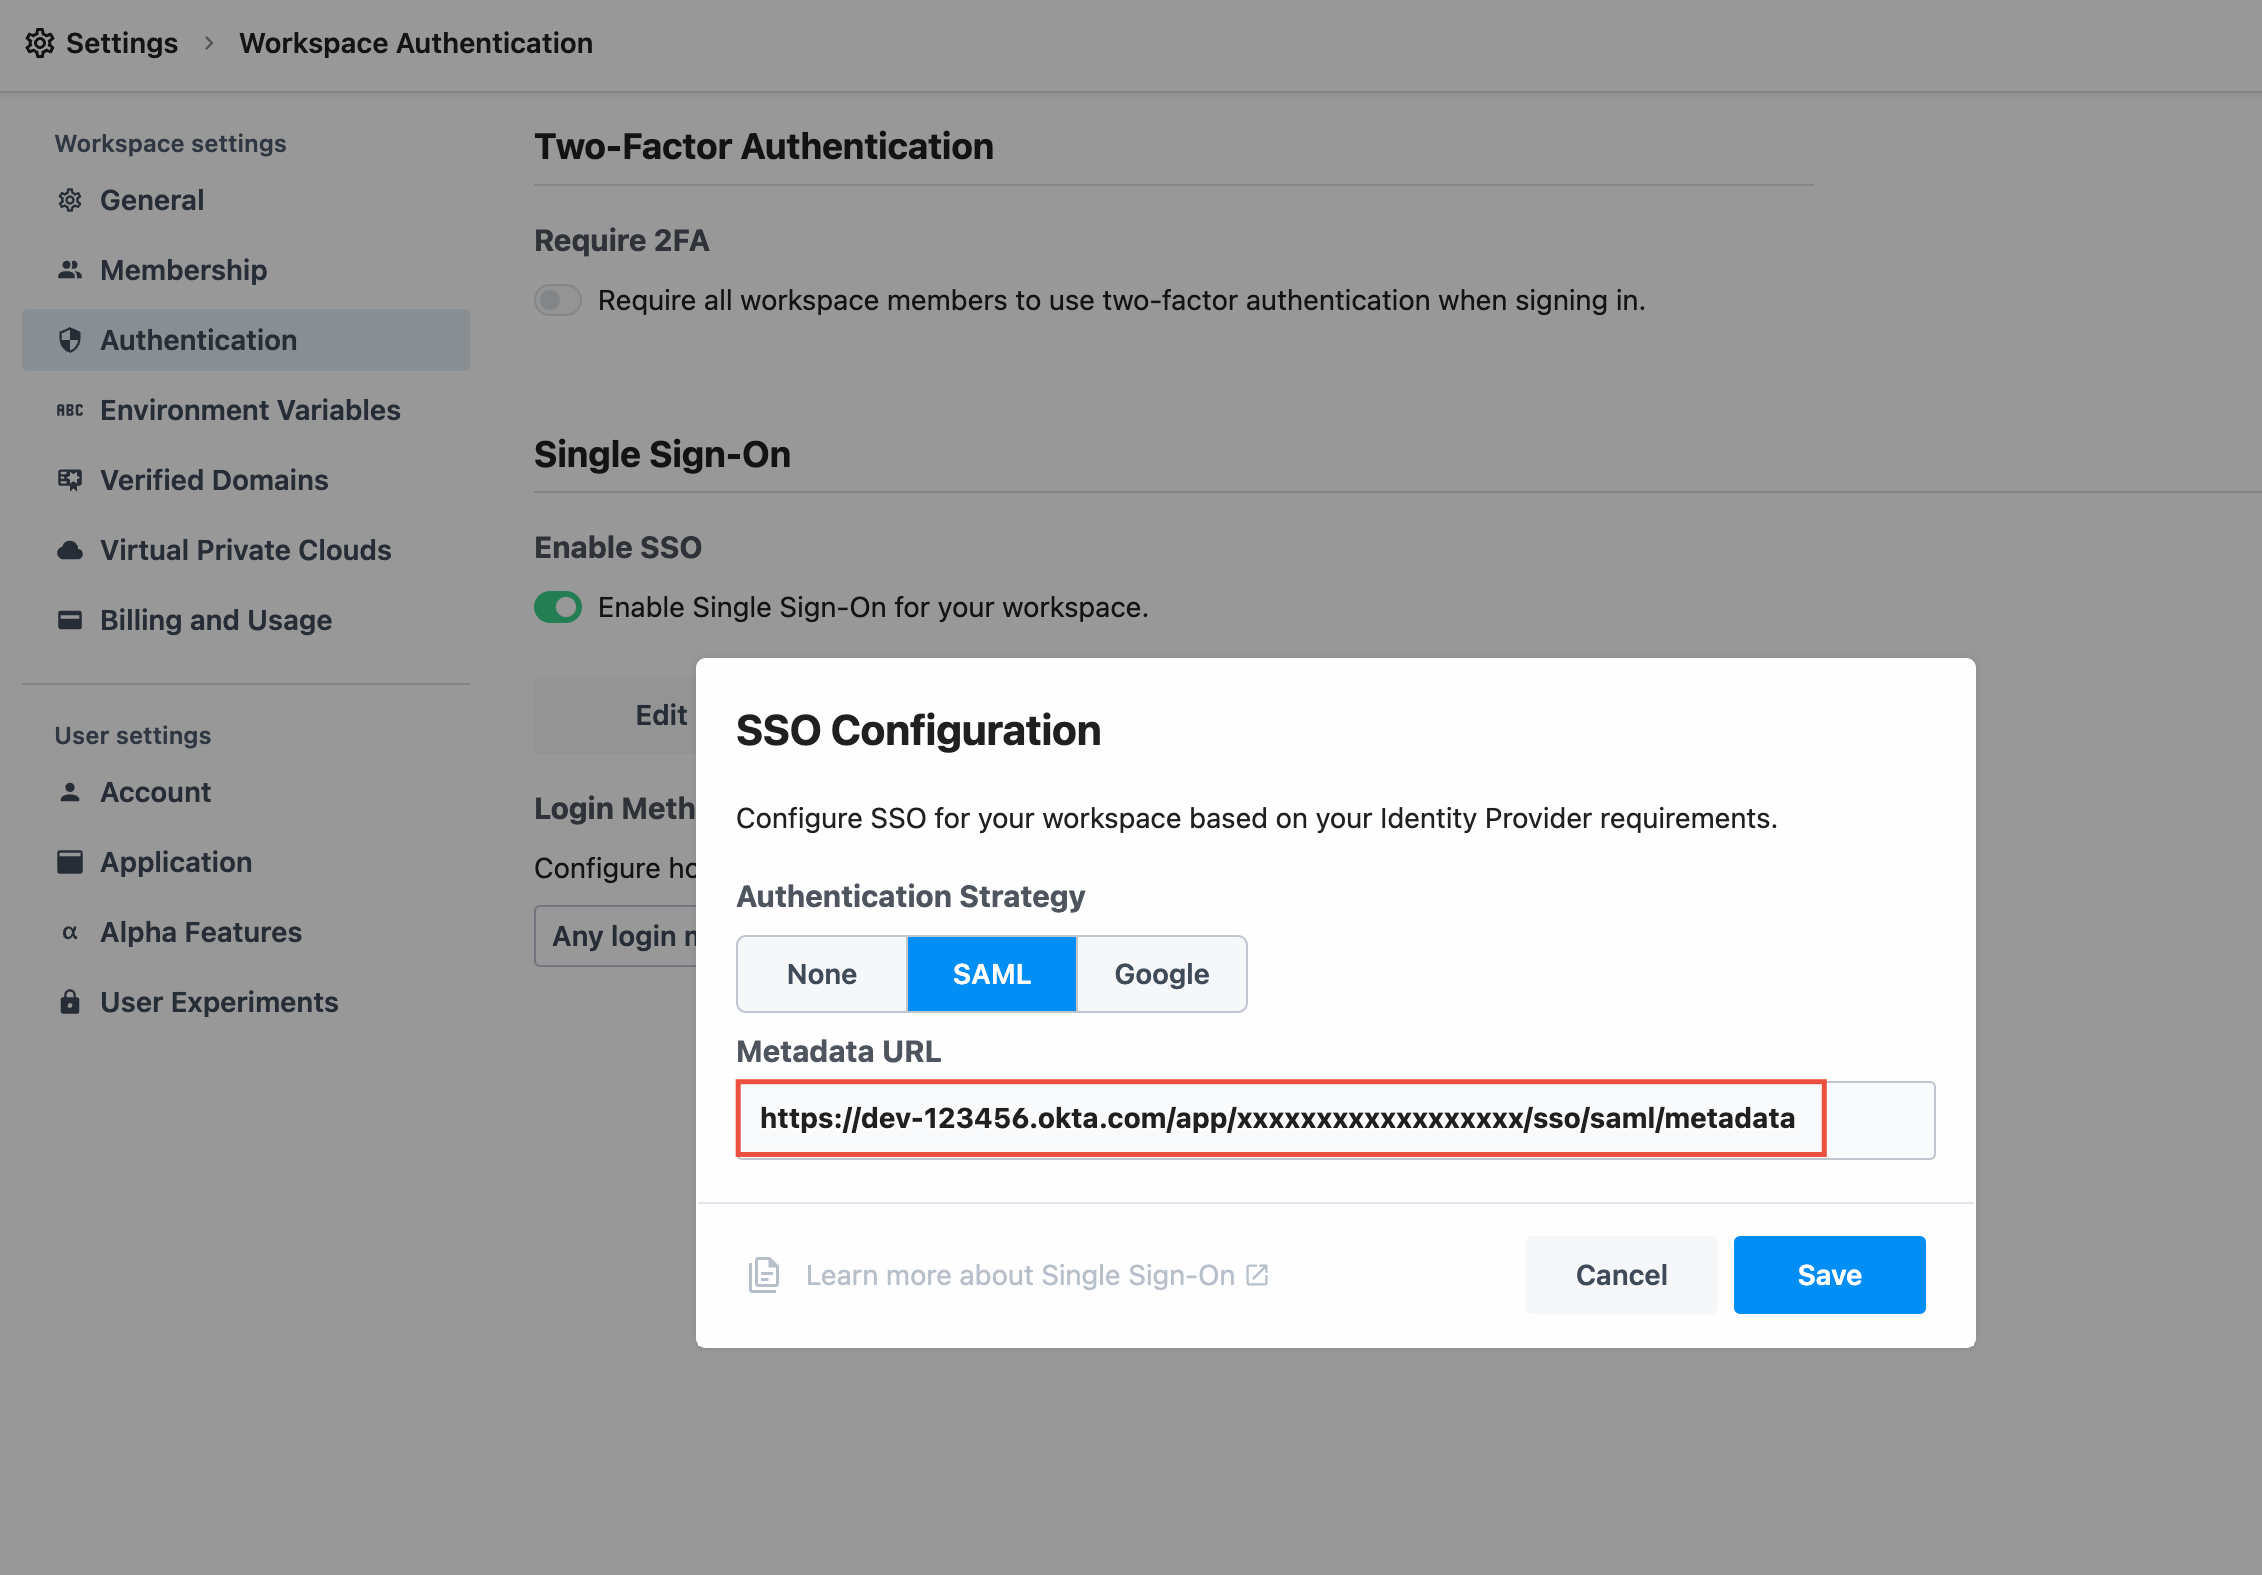
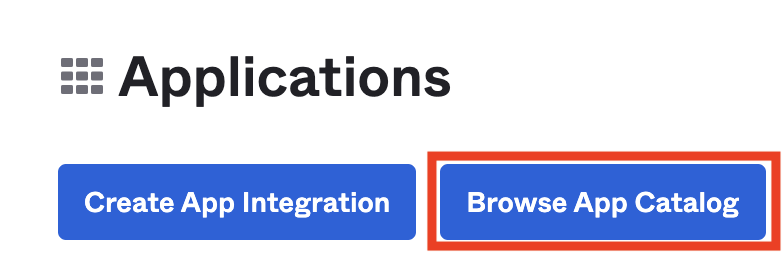
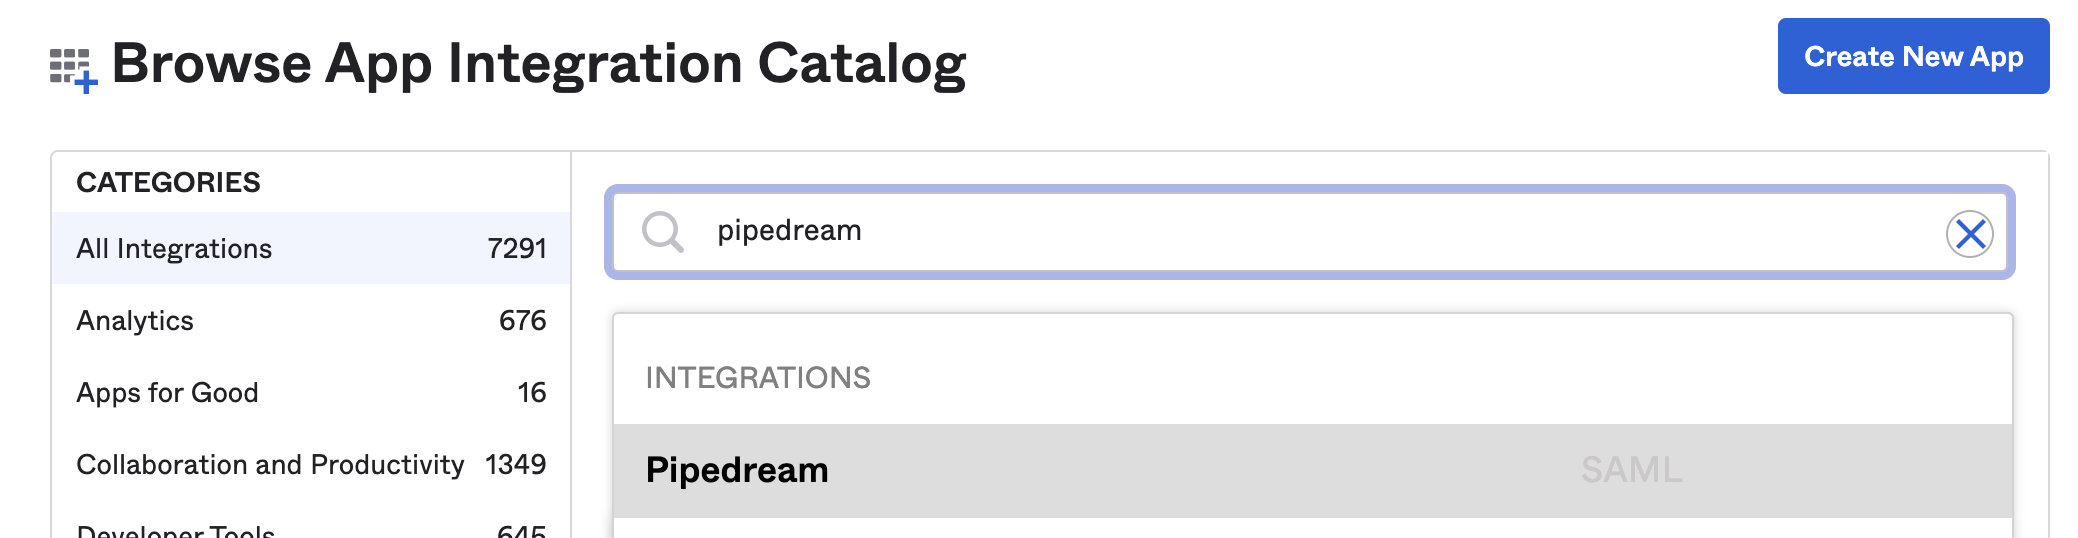
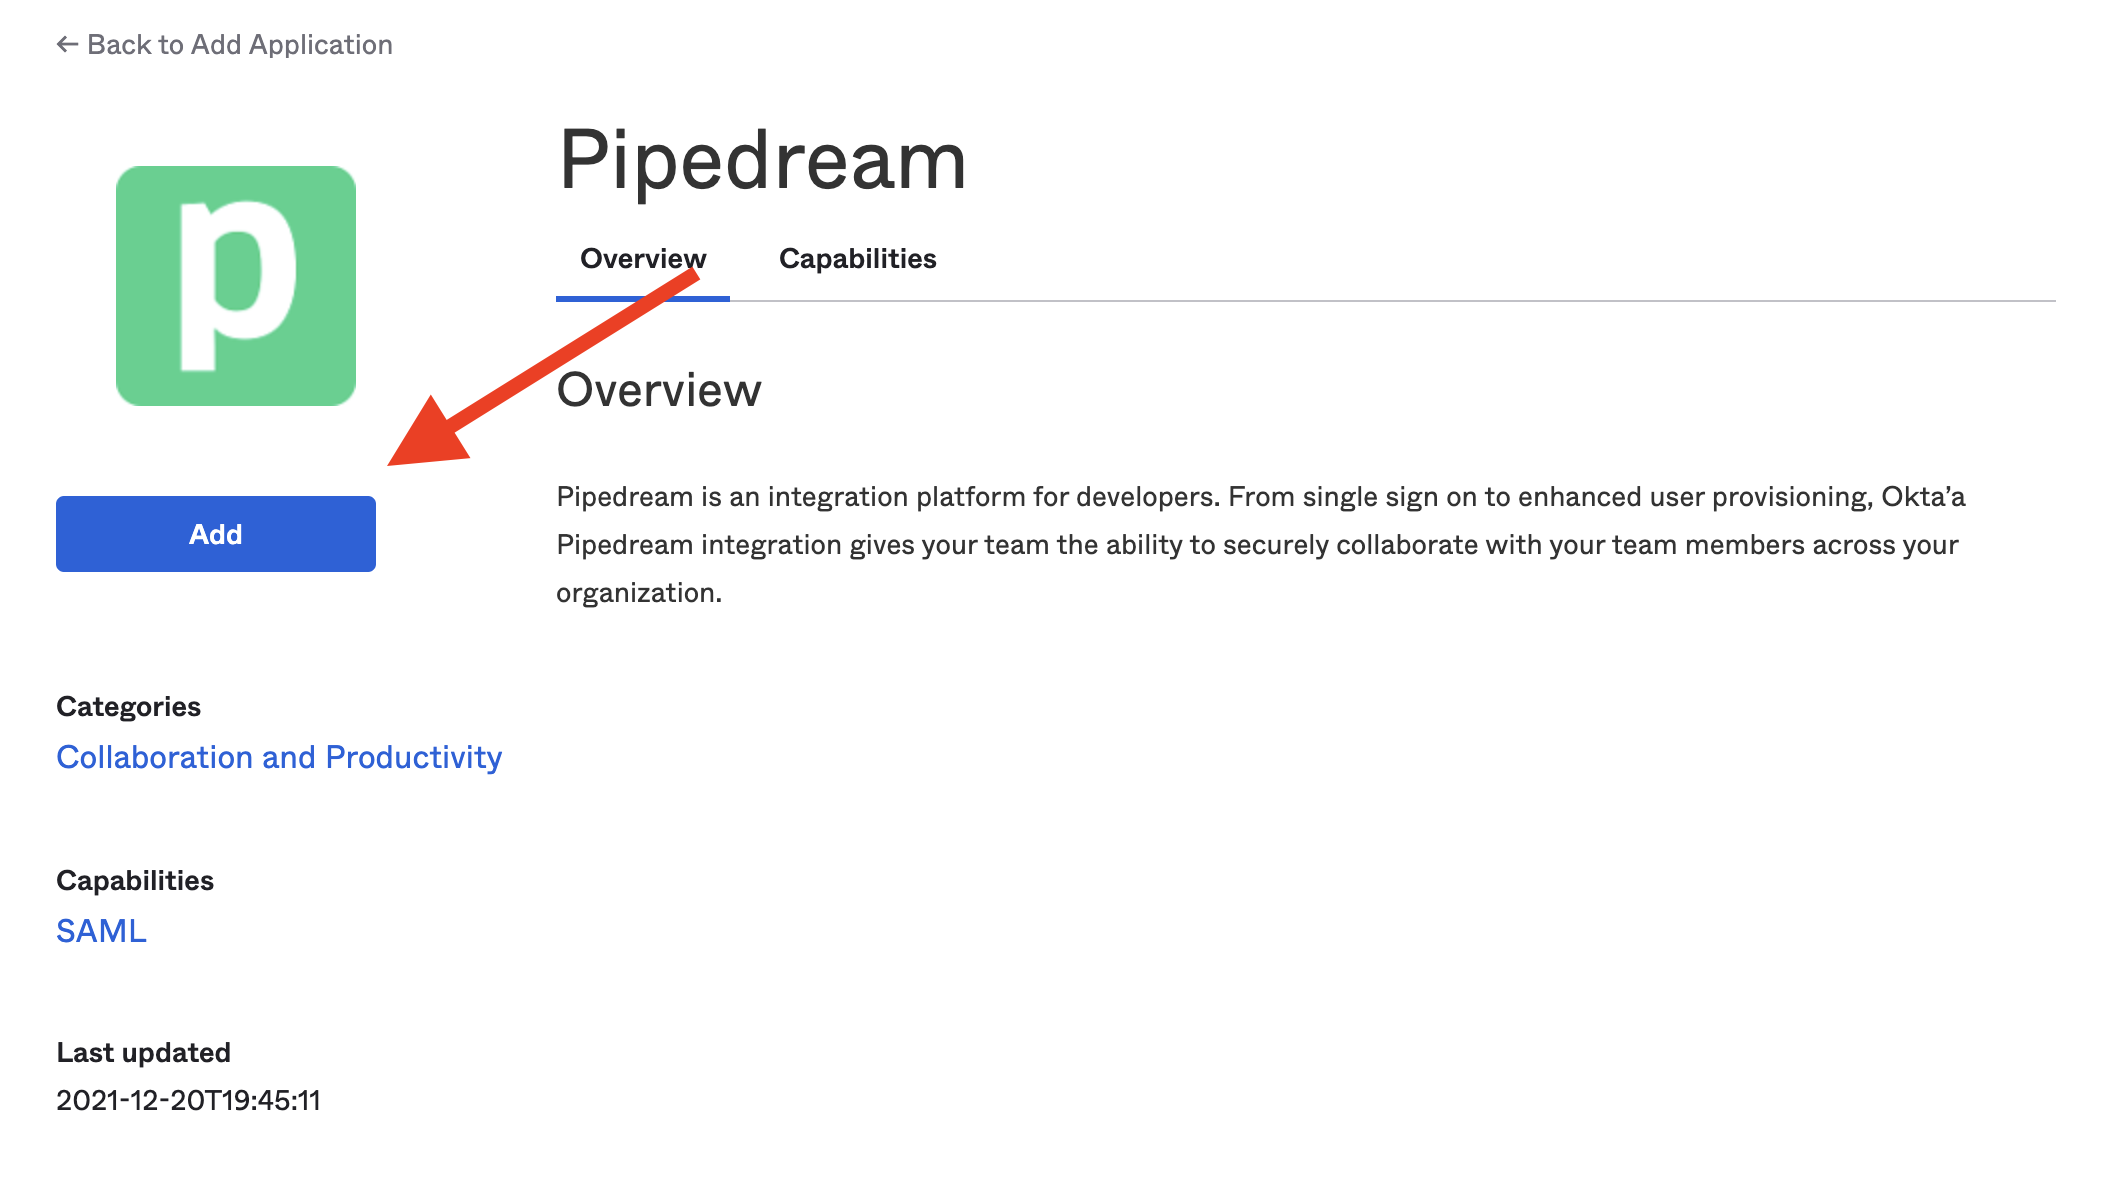
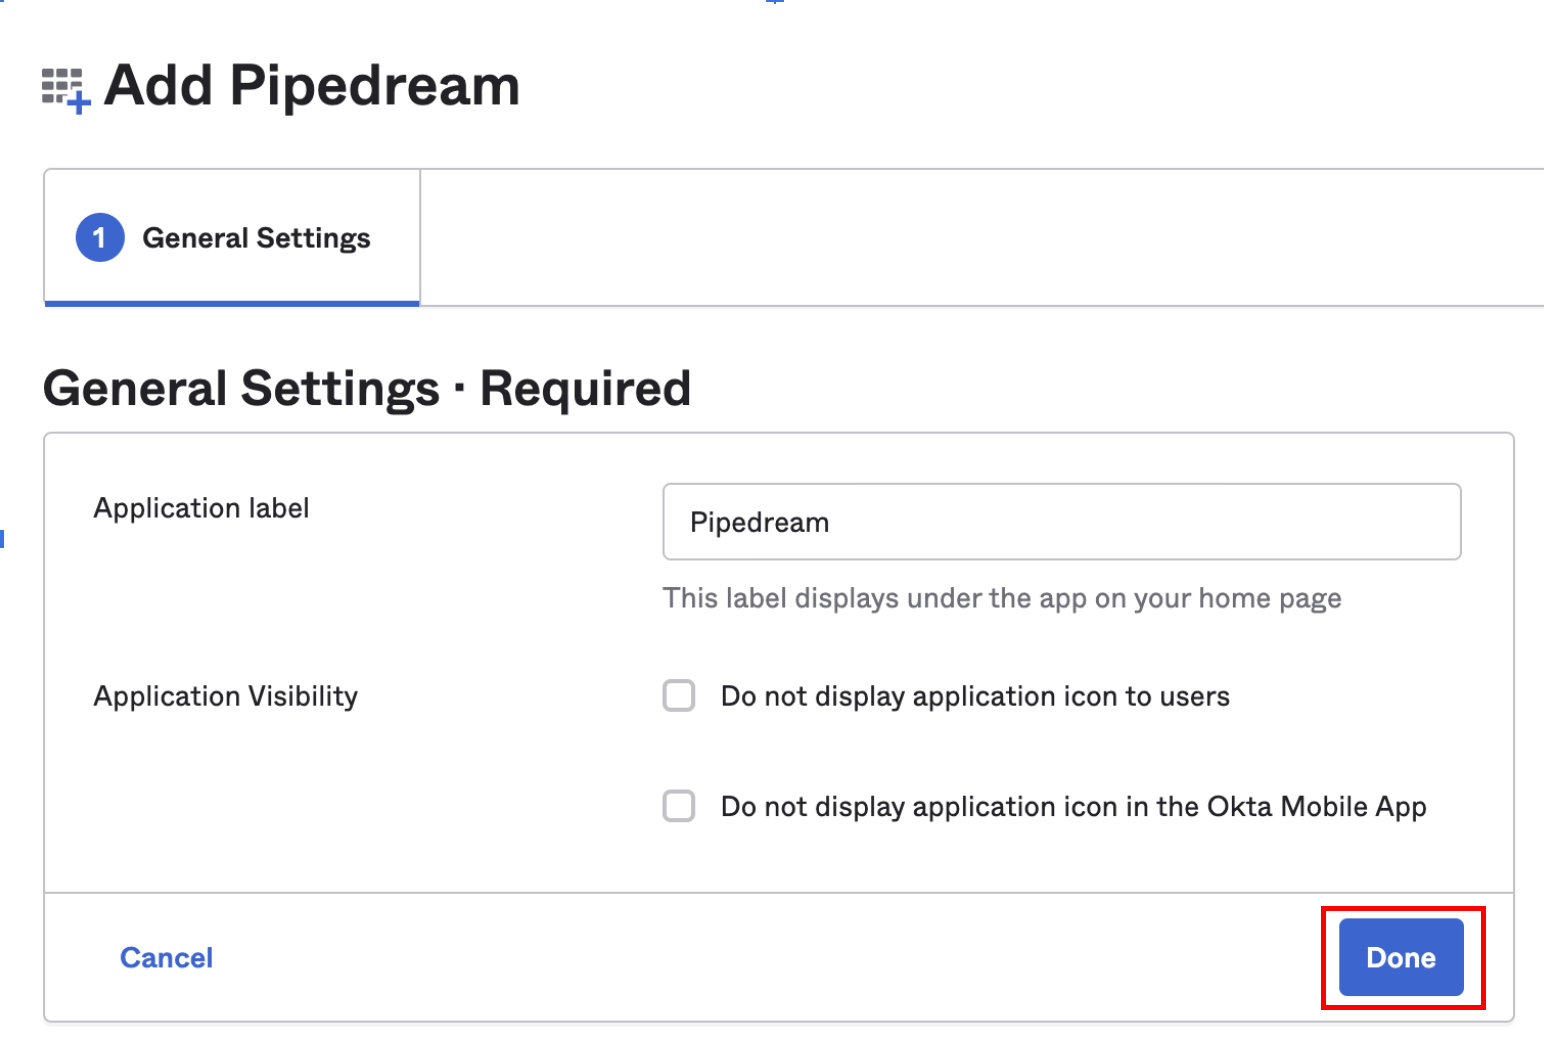
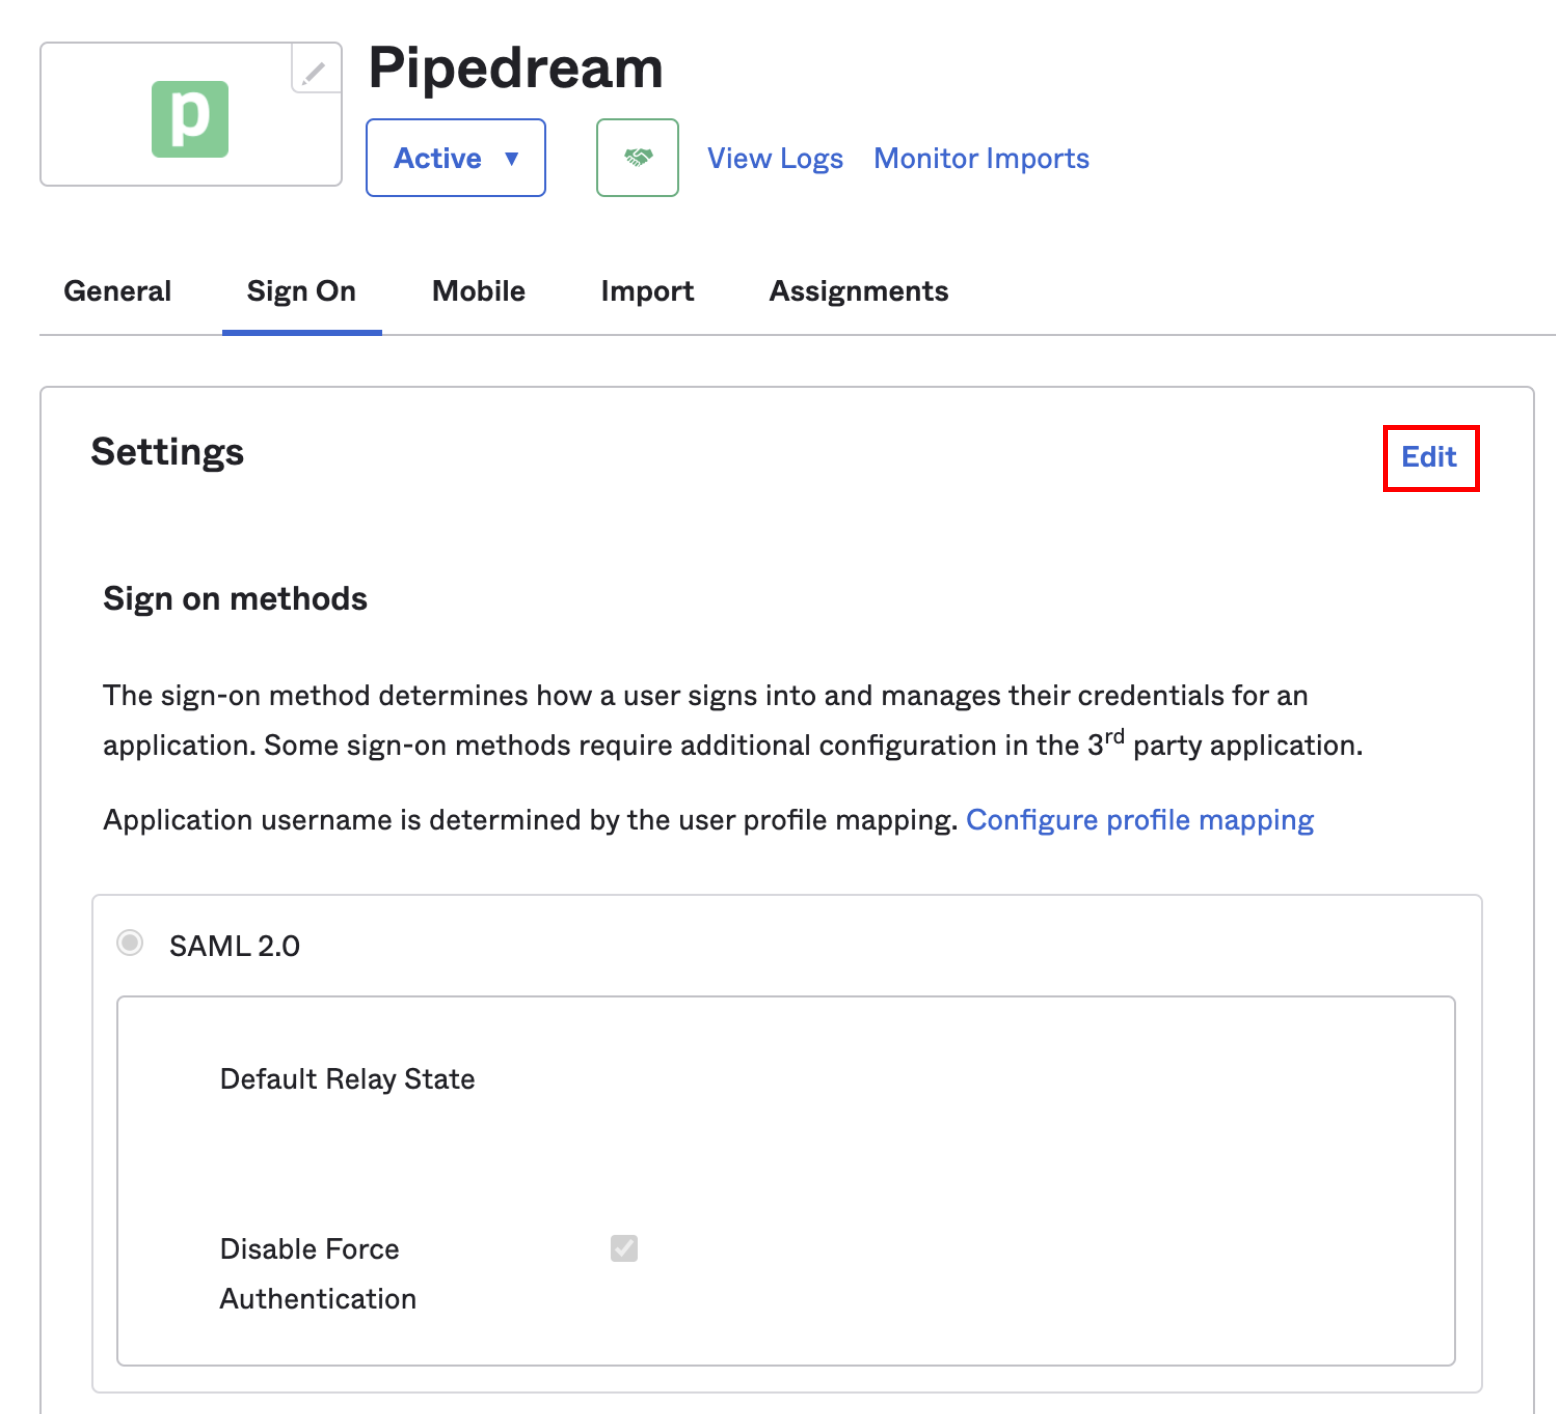

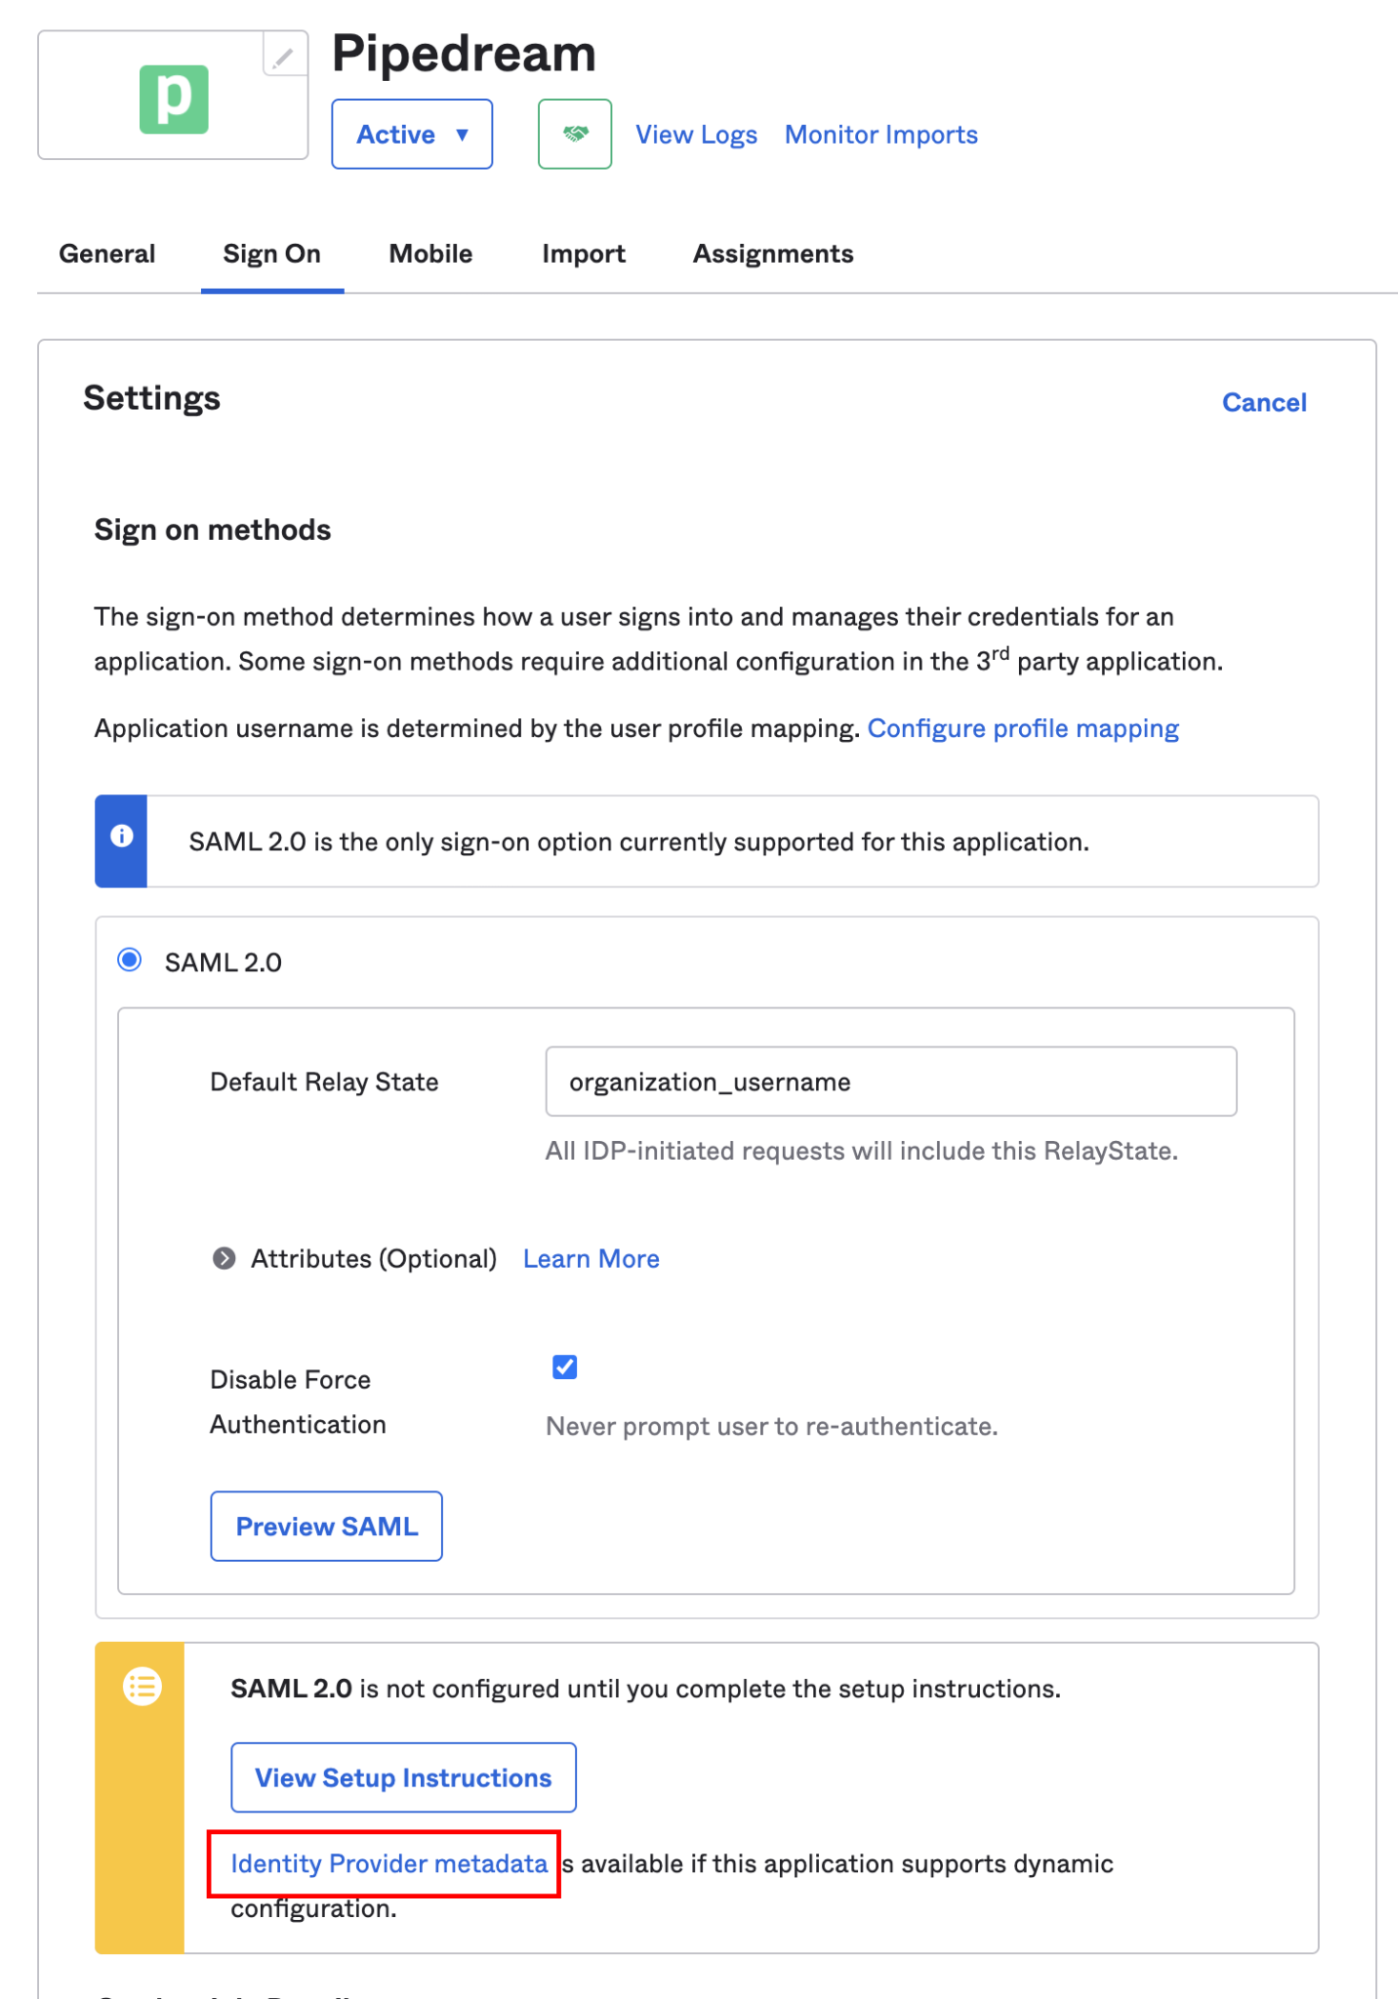 Click the **Identity Provider metadata** link and copy the URL from your browser’s address bar:
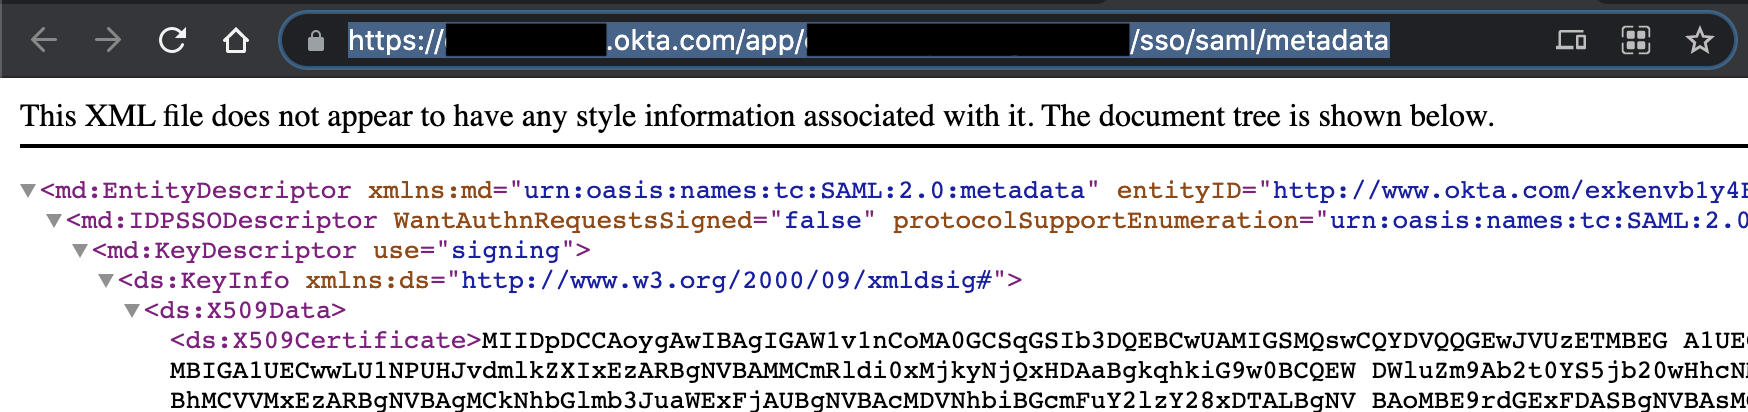
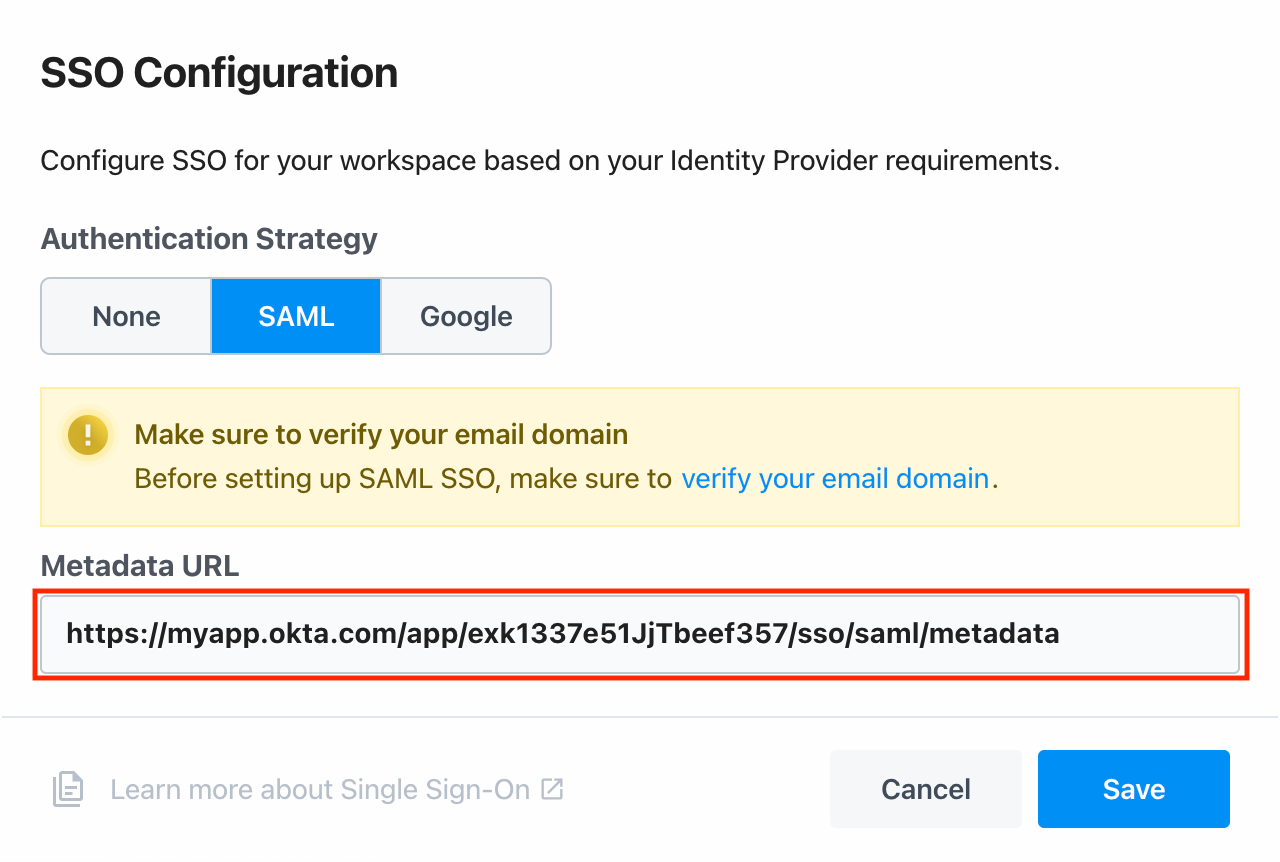
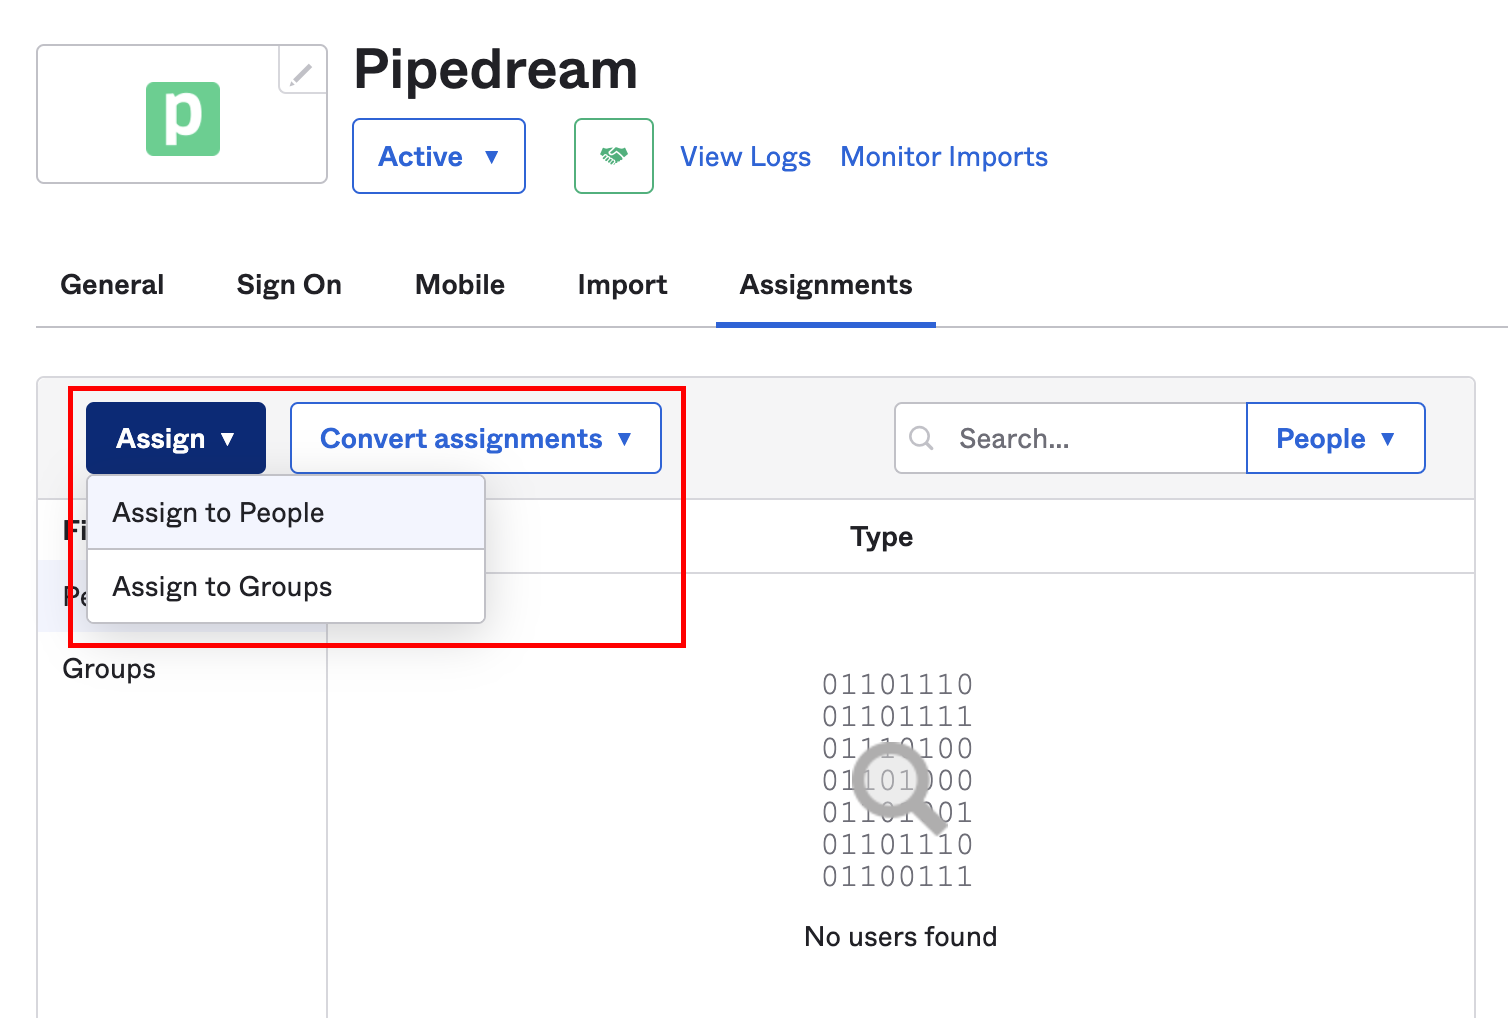 Assign the application to the relevant users in Okta, and Pipedream will configure the associated accounts on our end.
replacing `
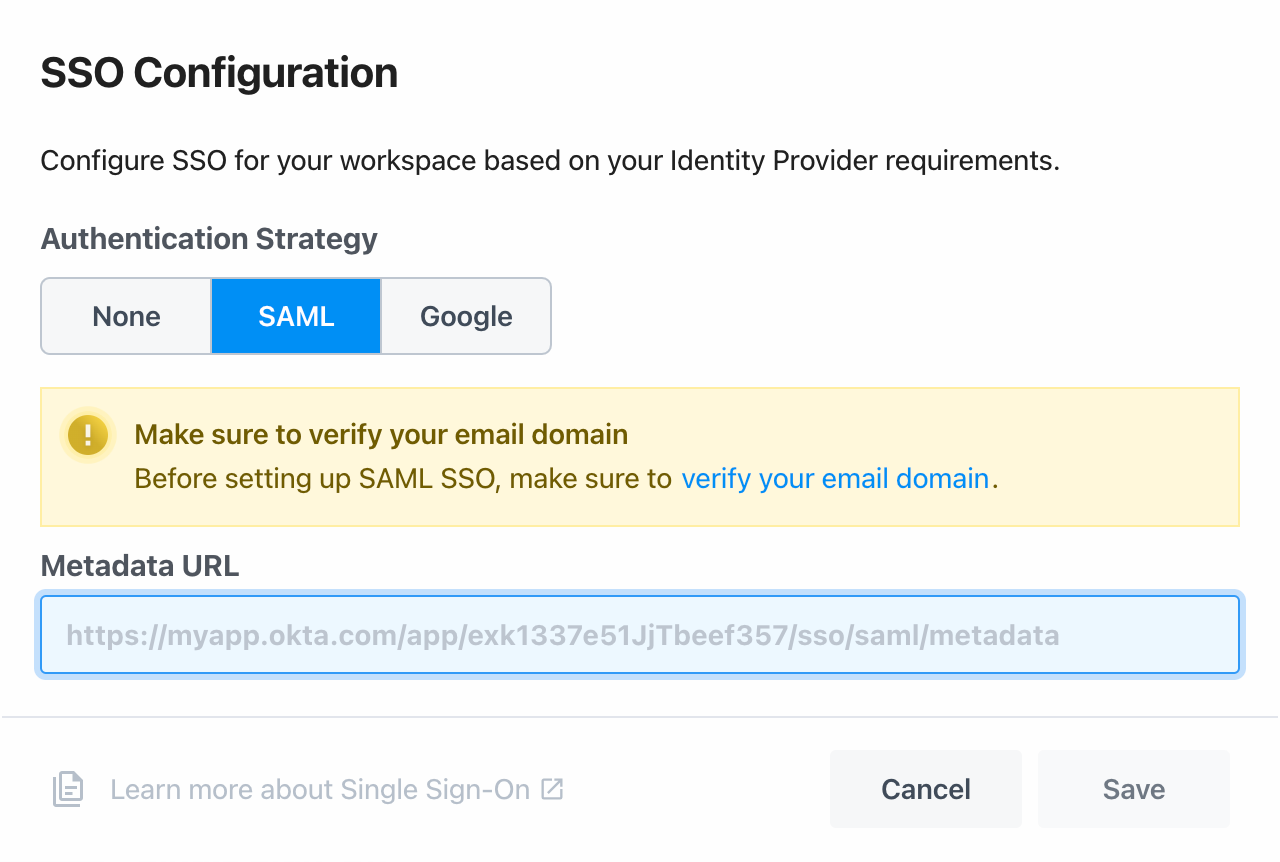 Any user in your workspace can now log into Pipedream at [https://pipedream.com/auth/sso](https://pipedream.com/auth/sso) by entering your workspaces’s name (found in your [Settings](https://pipedream.com/settings/account)). You can also access your SSO sign in URL directly by visiting [https://pipedream.com/auth/org/your-workspace-name](https://pipedream.com/auth/org), where `your-workspace-name` is the name of your workspace.
## Important details
Before you configure the application in your IdP, make sure all your users have matching email addresses for their Pipedream user profile and their IdP profile. Once SSO is enabled, they will not be able to change their Pipedream email address.
If a user’s Pipedream email does not match the email in their IdP profile, they will not be able to log in.
If existing users signed up for Pipedream using an email and password, they will no longer be able to do so. They will only be able to sign in using SSO.
Any user in your workspace can now log into Pipedream at [https://pipedream.com/auth/sso](https://pipedream.com/auth/sso) by entering your workspaces’s name (found in your [Settings](https://pipedream.com/settings/account)). You can also access your SSO sign in URL directly by visiting [https://pipedream.com/auth/org/your-workspace-name](https://pipedream.com/auth/org), where `your-workspace-name` is the name of your workspace.
## Important details
Before you configure the application in your IdP, make sure all your users have matching email addresses for their Pipedream user profile and their IdP profile. Once SSO is enabled, they will not be able to change their Pipedream email address.
If a user’s Pipedream email does not match the email in their IdP profile, they will not be able to log in.
If existing users signed up for Pipedream using an email and password, they will no longer be able to do so. They will only be able to sign in using SSO.