> ## Documentation Index
> Fetch the complete documentation index at: https://pipedream.com/docs/llms.txt
> Use this file to discover all available pages before exploring further.
# Quickstart: Action Development
## Overview
This document is intended for developers who want to author and edit [Pipedream Actions](/components/contributing/#actions). After completing this quickstart, you’ll understand how to:
* Develop Pipedream components
* Publish private actions and use them in workflows
* Use props to capture user input
* Update an action
* Use npm packages
* Use Pipedream managed auth for a 3rd party app
## Prerequisites
* Create a free account at [https://pipedream.com](https://pipedream.com)
* Download and install the [Pipedream CLI](/cli/install/)
* Once the CLI is installed, [link your Pipedream account](/cli/login/#existing-pipedream-account) to the CLI by running `pd login` in your terminal
> **NOTE:** See the [CLI reference](/cli/reference/) for detailed usage and examples beyond those covered below.
## Walkthrough
We recommend that you complete the examples below in order.
**hello world! (\~5 minutes)**
* Develop a `hello world!` action
* Publish it (private to your account) using the Pipedream CLI
* Add it to a workflow and run it
**hello \[name]! (\~5 minutes)**
* Capture user input using a `string` prop
* Publish a new version of your action
* Update the action in your workflow
**Use an npm Package (\~5 mins)**
* Require the `axios` npm package
* Make a simple API request
* Export data returned by the API from your action
**Use Managed Auth (\~10 mins)**
* Use Pipedream managed OAuth for GitHub with the `octokit` npm package
* Connect your GitHub account to the action in a Pipedream workflow
* Retrieve details for a repo and return them from the action
### hello world!
The following code represents a simple component that can be published as an action ([learn more](/components/contributing/api/) about the component structure). When used in a workflow, it will export `hello world!` as the return value for the step.
```javascript theme={null}
export default {
name: "Action Demo",
description: "This is a demo action",
key: "action_demo",
version: "0.0.1",
type: "action",
props: {},
async run() {
return `hello world!`;
},
};
```
To get started, save the code to a local `.js` file (e.g., `action.js`) and run the following CLI command:
```
pd publish action.js
```
The CLI will publish the component as an action in your account with the key `action_demo`. **The key must be unique across all components in your account (sources and actions). If it’s not unique, the existing component with the matching key will be updated.**
The CLI output should look similar to this:
```
sc_v4iaWB Action Demo 0.0.1 just now action_demo
```
To test the action:
1. Open Pipedream in your browser
2. Create a new workflow with a **Schedule** trigger
3. Click the **+** button to add a step to your workflow
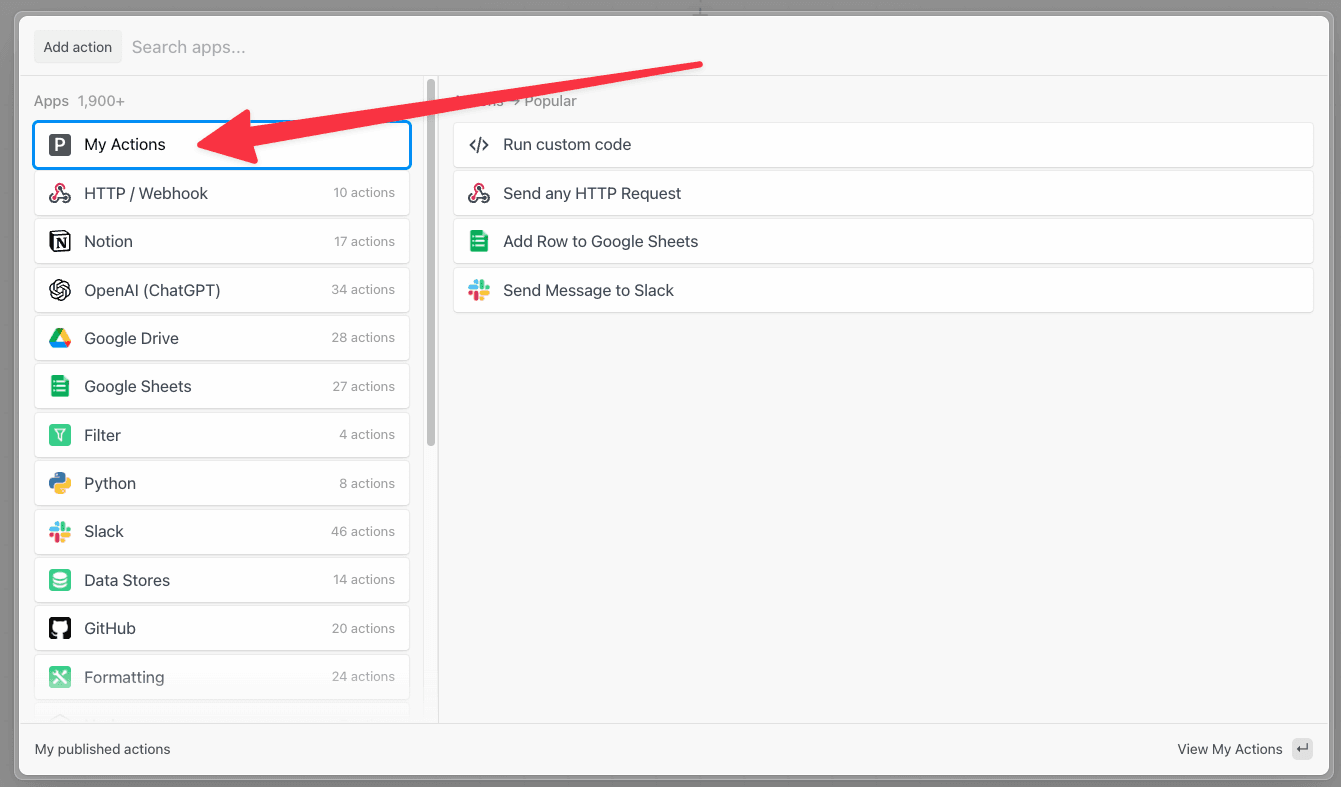
4. Click on **My Actions** and then select the **Action Demo** action to add it to your workflow.
 5. Deploy your workflow
6. Click **RUN NOW** to execute your workflow and action
You should see `hello world!` returned as the value for `steps.action_demo.$return_value`.
5. Deploy your workflow
6. Click **RUN NOW** to execute your workflow and action
You should see `hello world!` returned as the value for `steps.action_demo.$return_value`.
 Keep the browser tab open. We’ll return to this workflow in the rest of the examples as we update the action.
### hello \[name]!
Next, let’s update the component to capture some user input. First, add a `string` [prop](/components/contributing/api/#props) called `name` to the component.
```javascript theme={null}
export default {
name: "Action Demo",
description: "This is a demo action",
key: "action_demo",
version: "0.0.1",
type: "action",
props: {
name: {
type: "string",
label: "Name",
}
},
async run() {
return `hello world!`
},
}
```
Next, update the `run()` function to reference `this.name` in the return value.
```javascript theme={null}
export default {
name: "Action Demo",
description: "This is a demo action",
key: "action_demo",
version: "0.0.1",
type: "action",
props: {
name: {
type: "string",
label: "Name",
},
},
async run() {
return `hello ${this.name}!`;
},
};
```
Finally, update the component version to `0.0.2`. If you fail to update the version, the CLI will throw an error.
```javascript theme={null}
export default {
name: "Action Demo",
description: "This is a demo action",
key: "action_demo",
version: "0.0.2",
type: "action",
props: {
name: {
type: "string",
label: "Name",
},
},
async run() {
return `hello ${this.name}!`;
},
};
```
Save the file and run the `pd publish` command again to update the action in your account.
```
pd publish action.js
```
The CLI will update the component in your account with the key `action_demo`. You should see something like this:
```
sc_Egip04 Action Demo 0.0.2 just now action_demo
```
Next, let’s update the action in the workflow from the previous example and run it.
1. Hover over the action in your workflow —you should see an update icon at the top right. Click the icon to update the action to the latest version and then save the workflow. If you don’t see the icon, verify that the CLI successfully published the update or try refreshing the page.
Keep the browser tab open. We’ll return to this workflow in the rest of the examples as we update the action.
### hello \[name]!
Next, let’s update the component to capture some user input. First, add a `string` [prop](/components/contributing/api/#props) called `name` to the component.
```javascript theme={null}
export default {
name: "Action Demo",
description: "This is a demo action",
key: "action_demo",
version: "0.0.1",
type: "action",
props: {
name: {
type: "string",
label: "Name",
}
},
async run() {
return `hello world!`
},
}
```
Next, update the `run()` function to reference `this.name` in the return value.
```javascript theme={null}
export default {
name: "Action Demo",
description: "This is a demo action",
key: "action_demo",
version: "0.0.1",
type: "action",
props: {
name: {
type: "string",
label: "Name",
},
},
async run() {
return `hello ${this.name}!`;
},
};
```
Finally, update the component version to `0.0.2`. If you fail to update the version, the CLI will throw an error.
```javascript theme={null}
export default {
name: "Action Demo",
description: "This is a demo action",
key: "action_demo",
version: "0.0.2",
type: "action",
props: {
name: {
type: "string",
label: "Name",
},
},
async run() {
return `hello ${this.name}!`;
},
};
```
Save the file and run the `pd publish` command again to update the action in your account.
```
pd publish action.js
```
The CLI will update the component in your account with the key `action_demo`. You should see something like this:
```
sc_Egip04 Action Demo 0.0.2 just now action_demo
```
Next, let’s update the action in the workflow from the previous example and run it.
1. Hover over the action in your workflow —you should see an update icon at the top right. Click the icon to update the action to the latest version and then save the workflow. If you don’t see the icon, verify that the CLI successfully published the update or try refreshing the page.
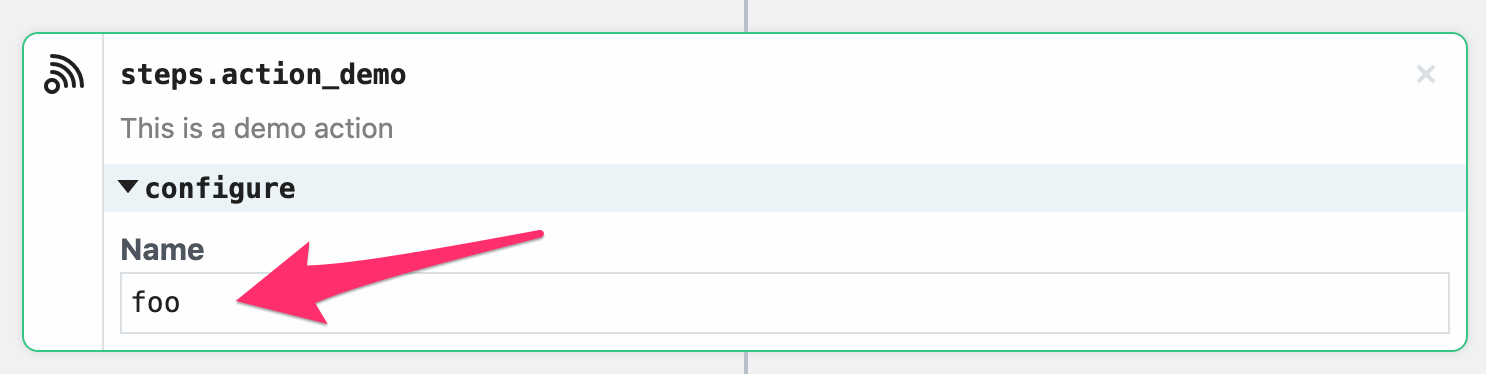
 2. After saving the workflow, you should see an input field appear. Enter a value for the `Name` input (e.g., `foo`).
 3. Deploy the workflow and click **RUN NOW**
You should see `hello foo!` (or the value you entered for `Name`) as the value returned by the step.
### Use an npm Package
Next, we’ll update the component to get data from the Star Wars API using the `axios` npm package. To use the `axios` package, just `import` it.
```javascript theme={null}
import { axios } from "@pipedream/platform";
export default {
name: "Action Demo",
description: "This is a demo action",
key: "action_demo",
version: "0.0.2",
type: "action",
props: {
name: {
type: "string",
label: "Name",
},
},
async run() {
return `hello ${this.name}!`;
},
};
```
To use most npm packages on Pipedream, just `import` or `require` them — there is no `package.json` or `npm install` required.
Then, update the `run()` method to:
* Make a request to the following endpoint for the Star Wars API: `https://swapi.dev/api/people/1/`
* Reference the `name` field of the payload returned by the API
```javascript theme={null}
import { axios } from "@pipedream/platform";
export default {
name: "Action Demo",
description: "This is a demo action",
key: "action_demo",
version: "0.0.2",
type: "action",
props: {
name: {
type: "string",
label: "Name",
},
},
async run({ $ }) {
const data = await axios($, {
url: "https://swapi.dev/api/people/1/",
});
return `hello ${data.name}!`;
},
};
```
Next, remove the `name` prop since we’re no longer using it.
```javascript theme={null}
import { axios } from "@pipedream/platform";
export default {
name: "Action Demo",
description: "This is a demo action",
key: "action_demo",
version: "0.0.2",
type: "action",
props: {},
async run({ $ }) {
const data = await axios($, {
url: "https://swapi.dev/api/people/1/",
});
return `hello ${data.name}!`;
},
};
```
Finally, update the version to `0.0.3`. If you fail to update the version, the CLI will throw an error.
```javascript theme={null}
import { axios } from "@pipedream/platform";
export default {
name: "Action Demo",
description: "This is a demo action",
key: "action_demo",
version: "0.0.3",
type: "action",
props: {},
async run({ $ }) {
const data = await axios($, {
url: "https://swapi.dev/api/people/1/",
});
return `hello ${data.name}!`;
},
};
```
Save the file and run the `pd publish` command again to update the action in your account.
```
pd publish action.js
```
The CLI will update the component in your account with the key `action_demo`. You should see something like this:
```
sc_ZriKEn Action Demo 0.0.3 1 second ago action_demo
```
Follow the steps in the previous example to update and run the action in your workflow. You should see `hello Luke Skywalker!` as the return value for the step.
### Use Managed Auth
For the last example, we’ll use Pipedream managed auth to retrieve and emit data from the GitHub API (which uses OAuth for authentication). First, remove the line that imports `axios` and clear the `run()` function from the last example. Your code should look like this:
```javascript theme={null}
export default {
name: "Action Demo",
description: "This is a demo action",
key: "action_demo",
version: "0.0.3",
type: "action",
async run() {},
};
```
Next, import GitHub’s `octokit` npm package
```javascript theme={null}
import { Octokit } from "@octokit/rest";
export default {
name: "Action Demo",
description: "This is a demo action",
key: "action_demo",
version: "0.0.3",
type: "action",
async run() {},
};
```
Then add an [app prop](/components/contributing/api/#app-props) to use Pipedream managed auth with this component. For this example, we’ll add an app prop for GitHub:
```javascript theme={null}
import { Octokit } from "@octokit/rest";
export default {
name: "Action Demo",
description: "This is a demo action",
key: "action_demo",
version: "0.0.3",
type: "action",
props: {
github: {
type: "app",
app: "github",
},
},
async run() {},
};
```
The value for the `app` property is the name slug for the app in Pipedream. This is not currently discoverable, but it will be in the near future on app pages in the [Pipedream Marketplace](https://pipedream.com/explore). For the time being, if you want to know how to reference an app, please [reach out](https://pipedream.com/community).
Next, update the `run()` method to get a repo from GitHub and return it. For this example, we’ll pass static values to get the `pipedreamhq/pipedream` repo. Notice that we’re passing the `oauth_access_token` in the authorization header by referencing the `$auth` property of the app prop — `this.github.$auth.oauth_access_token`. You can discover how to reference auth tokens in the **Authentication Strategy** section for each app in the [Pipedream Marketplace](https://pipedream.com/explore).
```javascript theme={null}
import { Octokit } from "@octokit/rest";
export default {
name: "Action Demo",
description: "This is a demo action",
key: "action_demo",
version: "0.0.3",
type: "action",
props: {
github: {
type: "app",
app: "github",
},
},
async run() {
const octokit = new Octokit({
auth: this.github.$auth.oauth_access_token,
});
return (
await octokit.rest.repos.get({
owner: `pipedreamhq`,
repo: `pipedream`,
})
).data;
},
};
```
In order to help users understand what’s happening with each action step, we recommend surfacing a brief summary with `$summary` ([read more](/components/contributing/api/#actions) about exporting data using `$.export`).
```javascript theme={null}
import { Octokit } from "@octokit/rest";
export default {
name: "Action Demo",
description: "This is a demo action",
key: "action_demo",
version: "0.0.3",
type: "action",
props: {
github: {
type: "app",
app: "github",
},
},
async run({ $ }) {
const octokit = new Octokit({
auth: this.github.$auth.oauth_access_token,
});
const { data } = await octokit.rest.repos.get({
owner: `pipedreamhq`,
repo: `pipedream`,
});
$.export("$summary", `Successfully fetched info for \`${data.full_name}\``);
return data;
},
};
```
Finally, update the version to `0.0.4`. If you fail to update the version, the CLI will throw an error.
```javascript theme={null}
import { Octokit } from "@octokit/rest";
export default {
name: "Action Demo",
description: "This is a demo action",
key: "action_demo",
version: "0.0.4",
type: "action",
props: {
github: {
type: "app",
app: "github",
},
},
async run({ $ }) {
const octokit = new Octokit({
auth: this.github.$auth.oauth_access_token,
});
const { data } = await octokit.rest.repos.get({
owner: `pipedreamhq`,
repo: `pipedream`,
});
$.export("$summary", `Successfully fetched info for \`${data.full_name}\``);
return data;
},
};
```
Save the file and run the `pd publish` command again to update the action in your account.
```
pd publish action.js
```
The CLI will update the component in your account with the key `action_demo`. You should see something like this:
```
sc_k3ia53 Action Demo 0.0.4 just now action_demo
```
Follow the steps in the earlier example to update the action in your workflow (you may need to save your workflow after refreshing the action). You should now see a prompt to connect your GitHub account to the step:
3. Deploy the workflow and click **RUN NOW**
You should see `hello foo!` (or the value you entered for `Name`) as the value returned by the step.
### Use an npm Package
Next, we’ll update the component to get data from the Star Wars API using the `axios` npm package. To use the `axios` package, just `import` it.
```javascript theme={null}
import { axios } from "@pipedream/platform";
export default {
name: "Action Demo",
description: "This is a demo action",
key: "action_demo",
version: "0.0.2",
type: "action",
props: {
name: {
type: "string",
label: "Name",
},
},
async run() {
return `hello ${this.name}!`;
},
};
```
To use most npm packages on Pipedream, just `import` or `require` them — there is no `package.json` or `npm install` required.
Then, update the `run()` method to:
* Make a request to the following endpoint for the Star Wars API: `https://swapi.dev/api/people/1/`
* Reference the `name` field of the payload returned by the API
```javascript theme={null}
import { axios } from "@pipedream/platform";
export default {
name: "Action Demo",
description: "This is a demo action",
key: "action_demo",
version: "0.0.2",
type: "action",
props: {
name: {
type: "string",
label: "Name",
},
},
async run({ $ }) {
const data = await axios($, {
url: "https://swapi.dev/api/people/1/",
});
return `hello ${data.name}!`;
},
};
```
Next, remove the `name` prop since we’re no longer using it.
```javascript theme={null}
import { axios } from "@pipedream/platform";
export default {
name: "Action Demo",
description: "This is a demo action",
key: "action_demo",
version: "0.0.2",
type: "action",
props: {},
async run({ $ }) {
const data = await axios($, {
url: "https://swapi.dev/api/people/1/",
});
return `hello ${data.name}!`;
},
};
```
Finally, update the version to `0.0.3`. If you fail to update the version, the CLI will throw an error.
```javascript theme={null}
import { axios } from "@pipedream/platform";
export default {
name: "Action Demo",
description: "This is a demo action",
key: "action_demo",
version: "0.0.3",
type: "action",
props: {},
async run({ $ }) {
const data = await axios($, {
url: "https://swapi.dev/api/people/1/",
});
return `hello ${data.name}!`;
},
};
```
Save the file and run the `pd publish` command again to update the action in your account.
```
pd publish action.js
```
The CLI will update the component in your account with the key `action_demo`. You should see something like this:
```
sc_ZriKEn Action Demo 0.0.3 1 second ago action_demo
```
Follow the steps in the previous example to update and run the action in your workflow. You should see `hello Luke Skywalker!` as the return value for the step.
### Use Managed Auth
For the last example, we’ll use Pipedream managed auth to retrieve and emit data from the GitHub API (which uses OAuth for authentication). First, remove the line that imports `axios` and clear the `run()` function from the last example. Your code should look like this:
```javascript theme={null}
export default {
name: "Action Demo",
description: "This is a demo action",
key: "action_demo",
version: "0.0.3",
type: "action",
async run() {},
};
```
Next, import GitHub’s `octokit` npm package
```javascript theme={null}
import { Octokit } from "@octokit/rest";
export default {
name: "Action Demo",
description: "This is a demo action",
key: "action_demo",
version: "0.0.3",
type: "action",
async run() {},
};
```
Then add an [app prop](/components/contributing/api/#app-props) to use Pipedream managed auth with this component. For this example, we’ll add an app prop for GitHub:
```javascript theme={null}
import { Octokit } from "@octokit/rest";
export default {
name: "Action Demo",
description: "This is a demo action",
key: "action_demo",
version: "0.0.3",
type: "action",
props: {
github: {
type: "app",
app: "github",
},
},
async run() {},
};
```
The value for the `app` property is the name slug for the app in Pipedream. This is not currently discoverable, but it will be in the near future on app pages in the [Pipedream Marketplace](https://pipedream.com/explore). For the time being, if you want to know how to reference an app, please [reach out](https://pipedream.com/community).
Next, update the `run()` method to get a repo from GitHub and return it. For this example, we’ll pass static values to get the `pipedreamhq/pipedream` repo. Notice that we’re passing the `oauth_access_token` in the authorization header by referencing the `$auth` property of the app prop — `this.github.$auth.oauth_access_token`. You can discover how to reference auth tokens in the **Authentication Strategy** section for each app in the [Pipedream Marketplace](https://pipedream.com/explore).
```javascript theme={null}
import { Octokit } from "@octokit/rest";
export default {
name: "Action Demo",
description: "This is a demo action",
key: "action_demo",
version: "0.0.3",
type: "action",
props: {
github: {
type: "app",
app: "github",
},
},
async run() {
const octokit = new Octokit({
auth: this.github.$auth.oauth_access_token,
});
return (
await octokit.rest.repos.get({
owner: `pipedreamhq`,
repo: `pipedream`,
})
).data;
},
};
```
In order to help users understand what’s happening with each action step, we recommend surfacing a brief summary with `$summary` ([read more](/components/contributing/api/#actions) about exporting data using `$.export`).
```javascript theme={null}
import { Octokit } from "@octokit/rest";
export default {
name: "Action Demo",
description: "This is a demo action",
key: "action_demo",
version: "0.0.3",
type: "action",
props: {
github: {
type: "app",
app: "github",
},
},
async run({ $ }) {
const octokit = new Octokit({
auth: this.github.$auth.oauth_access_token,
});
const { data } = await octokit.rest.repos.get({
owner: `pipedreamhq`,
repo: `pipedream`,
});
$.export("$summary", `Successfully fetched info for \`${data.full_name}\``);
return data;
},
};
```
Finally, update the version to `0.0.4`. If you fail to update the version, the CLI will throw an error.
```javascript theme={null}
import { Octokit } from "@octokit/rest";
export default {
name: "Action Demo",
description: "This is a demo action",
key: "action_demo",
version: "0.0.4",
type: "action",
props: {
github: {
type: "app",
app: "github",
},
},
async run({ $ }) {
const octokit = new Octokit({
auth: this.github.$auth.oauth_access_token,
});
const { data } = await octokit.rest.repos.get({
owner: `pipedreamhq`,
repo: `pipedream`,
});
$.export("$summary", `Successfully fetched info for \`${data.full_name}\``);
return data;
},
};
```
Save the file and run the `pd publish` command again to update the action in your account.
```
pd publish action.js
```
The CLI will update the component in your account with the key `action_demo`. You should see something like this:
```
sc_k3ia53 Action Demo 0.0.4 just now action_demo
```
Follow the steps in the earlier example to update the action in your workflow (you may need to save your workflow after refreshing the action). You should now see a prompt to connect your GitHub account to the step:
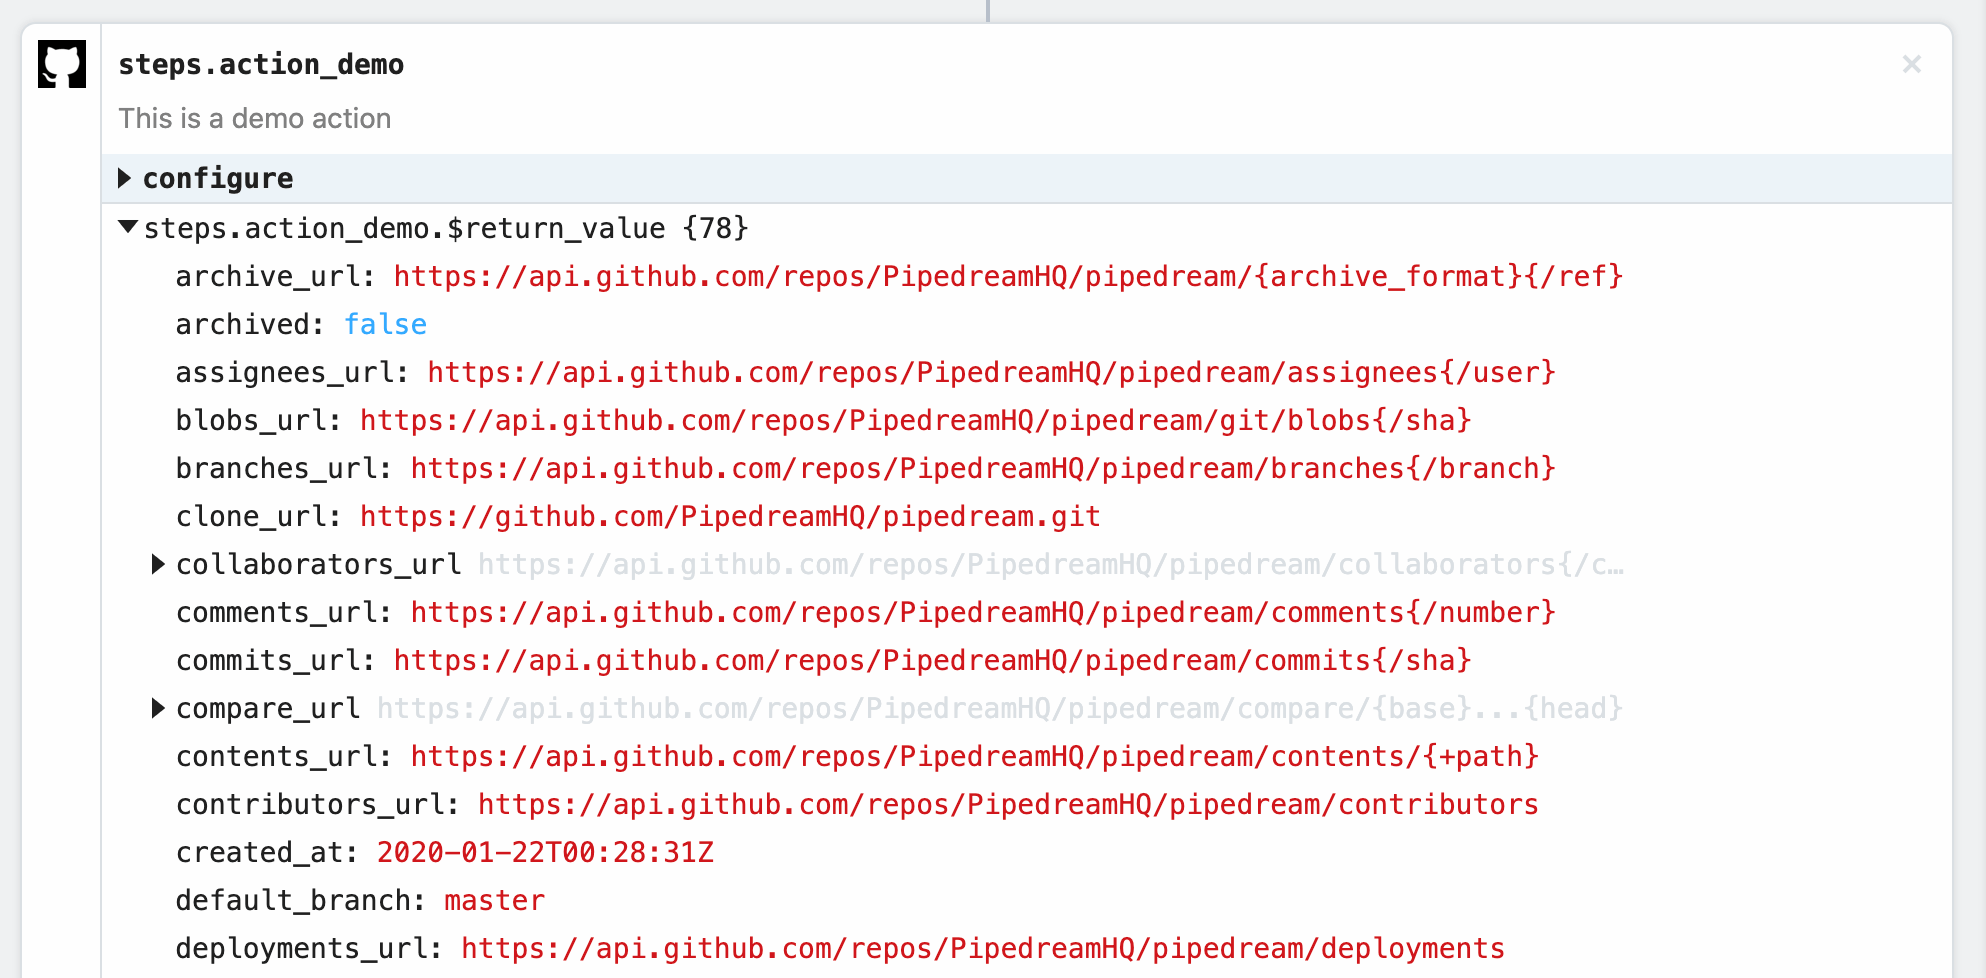
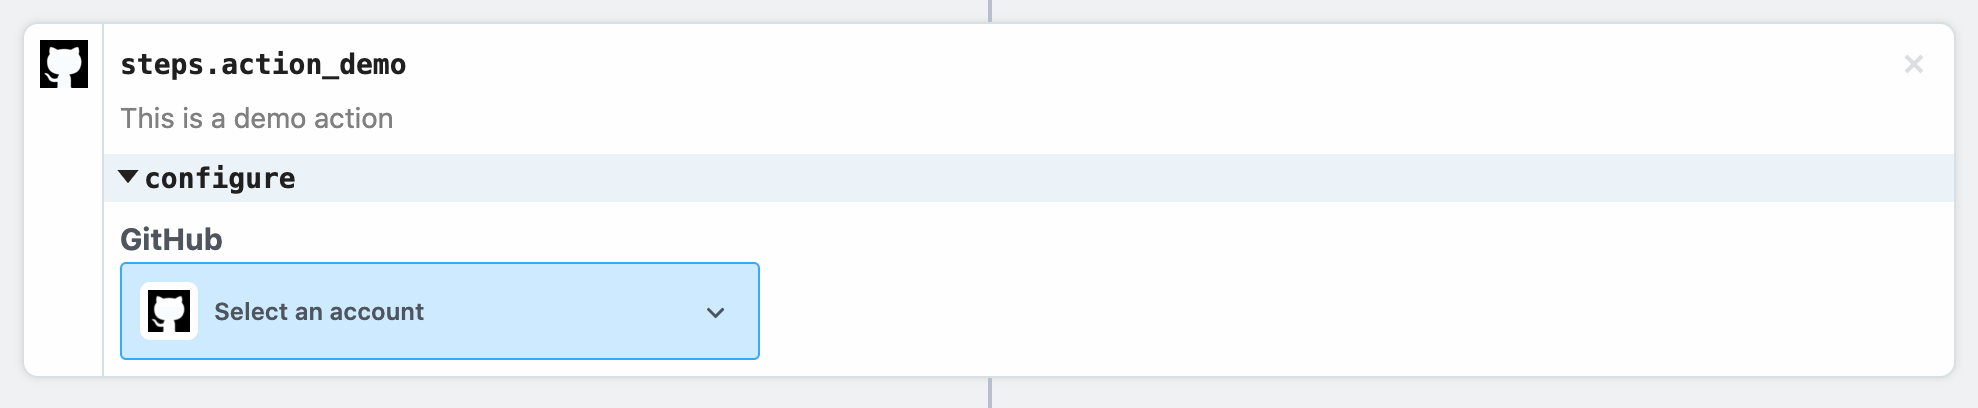 Select an existing account or connect a new one, and then deploy your workflow and click **RUN NOW**. You should see the results returned by the action:
 ## What’s Next?
You’re ready to start authoring and publishing actions on Pipedream! You can also check out the [detailed component reference](/components/contributing/api/#component-api) at any time!
If you have any questions or feedback, please [reach out](https://pipedream.com/community)!
## What’s Next?
You’re ready to start authoring and publishing actions on Pipedream! You can also check out the [detailed component reference](/components/contributing/api/#component-api) at any time!
If you have any questions or feedback, please [reach out](https://pipedream.com/community)!